

Prepare Pilot safely, validate its webhook listener, and publish only the required route for Linear
Pilot can turn tickets from systems such as Linear into development work that modifies repositories, runs quality gates, and opens pull requests. This guide separates Pilot installation, execution-backend authentication, Linear adapter configuration, local verification, Localtonet HTTP tunnel creation, public testing, and routine shutdown. It also identifies the release-specific values that must be confirmed before exposure because the reviewed Pilot v2.270.0 public evidence confirms Linear webhook support but does not expose the adapter’s exact route, configuration keys, or startup switch in the supplied material. That limitation matters: guessing any of those values would produce an unreliable or unsafe automation endpoint.
📋 What's in this guide
What you are building and what was verified
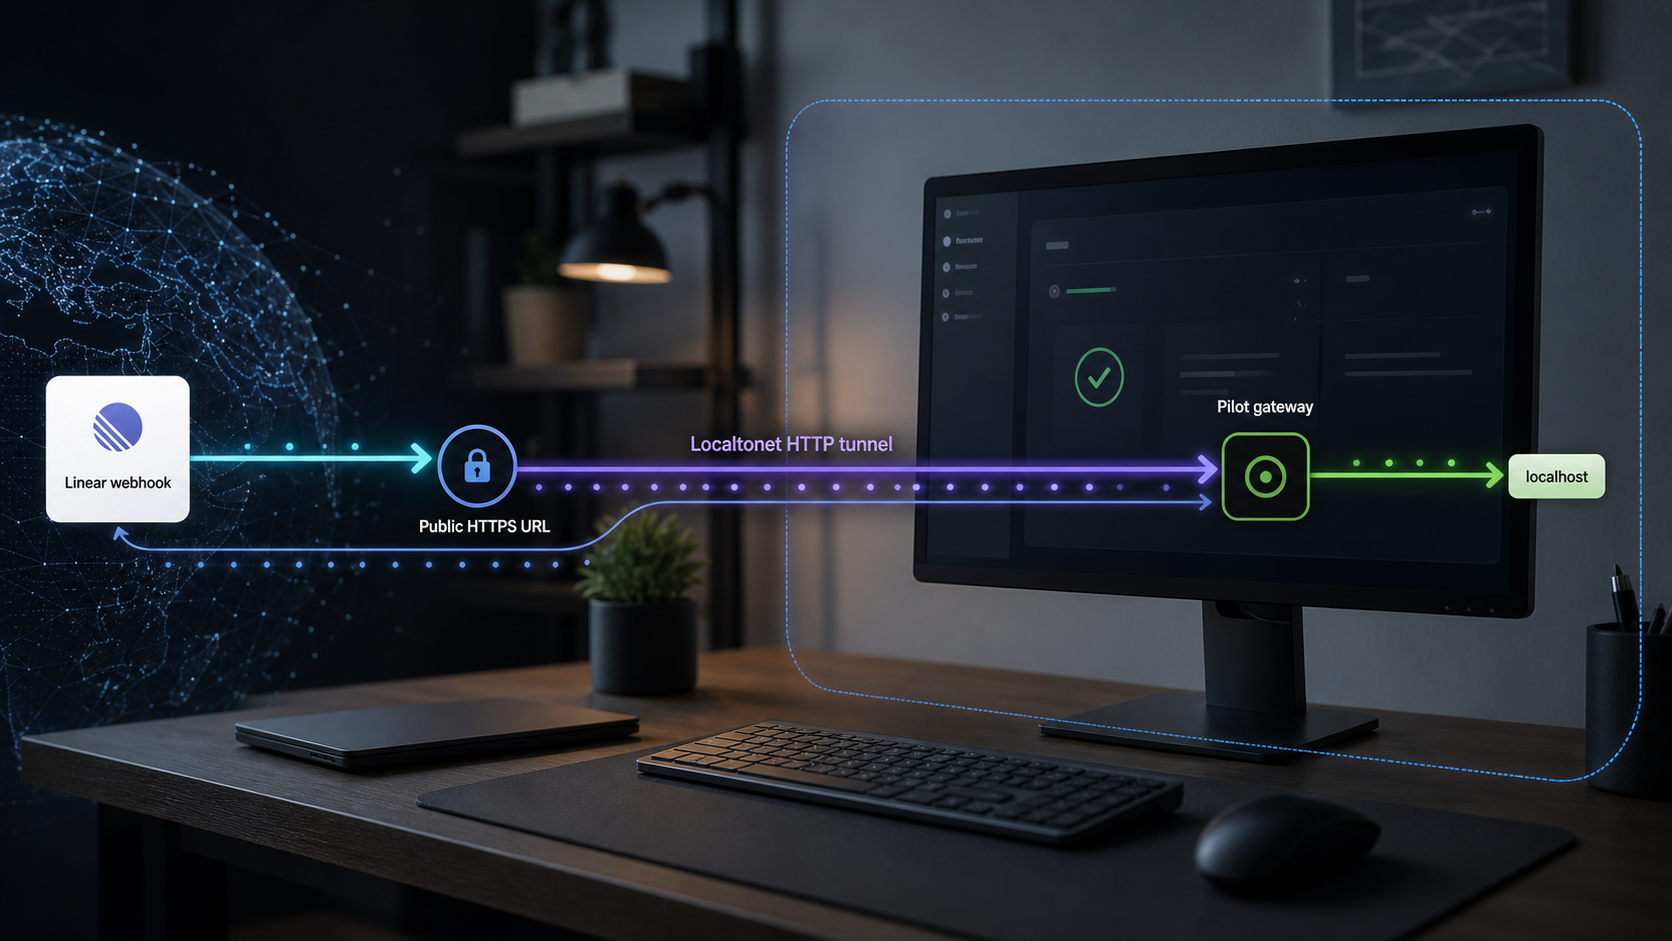
This workflow has three independent layers. Pilot is the automation application. Linear is the event source and ticket provider. Localtonet supplies public network reachability to an HTTP service running on or reachable from the connected client device.
The Localtonet client establishes an outbound connection to one of our relay servers. An HTTP tunnel then provides a public HTTPS address that forwards requests to the configured local IP address and port. This arrangement does not require inbound router port forwarding, firewall changes, a VPN, or a public IP address. The endpoint remains available only while Pilot is listening, the selected Localtonet client is connected, and the tunnel is running.
Network reachability is not webhook authorization. Localtonet routes an incoming HTTP request to the selected local target, but the receiving Pilot integration must still validate the exact path, signature, payload, event type, and any provider or repository permissions. A successful tunnel cannot correct an incorrect Pilot configuration, missing Linear credentials, an invalid signature, or insufficient repository access.
This revision uses Pilot release v2.270.0 as its documented version baseline and was reviewed against the supplied Pilot repository, release, and documentation evidence dated August 2026. The supplied evidence confirms Pilot installation methods, pilot setup, Claude Code requirements, dashboard startup for GitHub, and Linear webhook support. It does not contain the current Linear adapter page contents, exact Pilot webhook route, exact Linear configuration keys, or a confirmed Linear-specific startup command. Those values are therefore treated as release-specific gates rather than guessed here. No claim of a completed runtime test against v2.270.0 is made without test output.
This distinction also corrects older onboarding terminology. The repository README still shows pilot init in its quick start, while the current Pilot documentation homepage promotes pilot setup. For the v2.270.0 documentation workflow covered here, use pilot setup. Treat pilot init as an alternative or older repository workflow unless the documentation bundled with your installed build explicitly instructs you to use it.
Earlier material also described 127.0.0.1:9090 as a universal default and referred to a --no-gateway option. Neither claim is established by the supplied v2.270.0 evidence. This revision does not rely on either value. Use the listener address printed by your actual Pilot process or shown by its release-specific configuration, then enter that verified address in Localtonet.
Pilot, repository, and Linear prerequisites
Prepare the complete application chain before creating a public tunnel. Pilot requires Claude Code CLI 2.1.17 or later according to its repository. Pilot’s current documentation says it can use an existing Claude subscription when Claude Code is already authenticated, or an Anthropic API key through a supported configuration. An OpenAI API key is optional and is associated with voice transcription rather than the basic ticket workflow.
Go 1.22 or later is required only when installing with Go or building from source. It is not listed as a requirement for every packaged installation. You also need a Git repository host supported by the Pilot workflow, credentials with access to the intended repositories, and a Linear account authorized to configure the relevant workspace integration.
Application prerequisites
- A supported machine on which Pilot can remain running.
- Claude Code CLI 2.1.17 or later, installed and authenticated.
- A Pilot v2.270.0 installation or another explicitly identified version.
- Access to the repository and its required build, test, and lint tools.
- A clean local port on which the Pilot HTTP listener can start.
Provider and repository prerequisites
- A Linear workspace and permission to create or manage a webhook.
- The Linear API credential required by the Pilot adapter, if the installed adapter uses the API for task synchronization.
- The Linear webhook signing secret created or displayed during webhook configuration.
- A repository-provider token, such as the GitHub or GitLab token required by the selected repository workflow.
- Repository permissions limited to the projects Pilot is expected to modify.
Localtonet prerequisites
- A Localtonet account and a client installation for the relevant operating system.
- A connected device token for the machine that can reach Pilot.
- An available Localtonet relay server selected from the current dashboard.
- The verified local IP address and port on which Pilot is listening.
Pilot can modify source code and execute development workflows. Use a dedicated service identity where the providers support one, grant only the repositories and operations required for the intended project, and preserve protected-branch and pull-request review controls. Never put a Linear secret, repository token, Localtonet device token, or API key in a webhook URL.
Install and configure Pilot v2.270.0
Pilot currently presents more than one installation path. The documentation homepage promotes an installation script, while the repository continues to list Homebrew, Go, source, and desktop options. These are alternatives. Choose one path and avoid mixing binaries, configuration directories, or desktop and command-line processes unless Pilot’s version-specific instructions explicitly require that arrangement.
| Method | When it fits | Version or platform note |
|---|---|---|
| Current installation script | Current command-line onboarding promoted by the Pilot documentation homepage | Review the remote script before executing it and confirm the installed version afterward |
| Homebrew | macOS or another supported Homebrew environment | The repository describes this as its recommended package-manager route |
| Go install | Users who already manage Go-installed binaries | Requires Go 1.22 or later and a correct executable path |
| Build from source | Developers who need to inspect or compile the checked-out source | Requires Git, Go 1.22 or later, Make, and suitable installation permissions |
| Desktop package | Users who prefer Pilot’s packaged desktop application | Select the release asset that matches macOS, Windows, or Linux |
Current documentation installation path
The current Pilot documentation homepage promotes this Unix-like shell command:
curl -fsSL https://raw.githubusercontent.com/qf-studio/pilot/main/install.sh | bashPiping a remote script directly to a shell is convenient but grants that script the permissions of your current account. In a controlled environment, download and inspect it first or use one of the repository installation alternatives below. Windows users should use the supported Windows installer or desktop release rather than assuming a Bash command applies to PowerShell.
Homebrew alternative
brew tap qf-studio/pilot
brew install pilot
Go alternative
go install github.com/qf-studio/pilot/cmd/pilot@latest
If the shell cannot find pilot afterward, inspect your Go environment and add the actual Go binary directory to your shell’s executable path. Do not assume that every machine uses the same location.
Source-build alternative
git clone https://github.com/qf-studio/pilot
cd pilot
make build
sudo make install-global
Inspect the repository and the installation target before running the privileged final command. If you need an exact release rather than the repository’s current main branch, check out the intended release tag before building.
Run current setup
After installing the current documentation build, start its configuration flow:
pilot setupComplete the prompts shown by that installed release. Authenticate Claude Code before attempting an automated task. Configure the repository provider required by the destination repository, then configure Linear as the ticket provider using only the fields shown by the v2.270.0 setup flow or its Linear integration page.
The current documentation homepage demonstrates a GitHub repository token with the following environment variable:
export GITHUB_TOKEN="your-token"
Use GITLAB_TOKEN instead when following the corresponding GitLab workflow documented by Pilot. The token value above is intentionally a placeholder. Store real credentials in a protected secret store or process environment appropriate to your deployment rather than a shell-history entry, public repository, screenshot, or shared configuration file.
For version-specific details, use the Pilot installation documentation, the Pilot repository, and the Pilot v2.270.0 release page. Confirm the output of your installed binary before assuming that the latest documentation and an older package behave identically.
Configure Pilot’s Linear adapter and Linear webhook
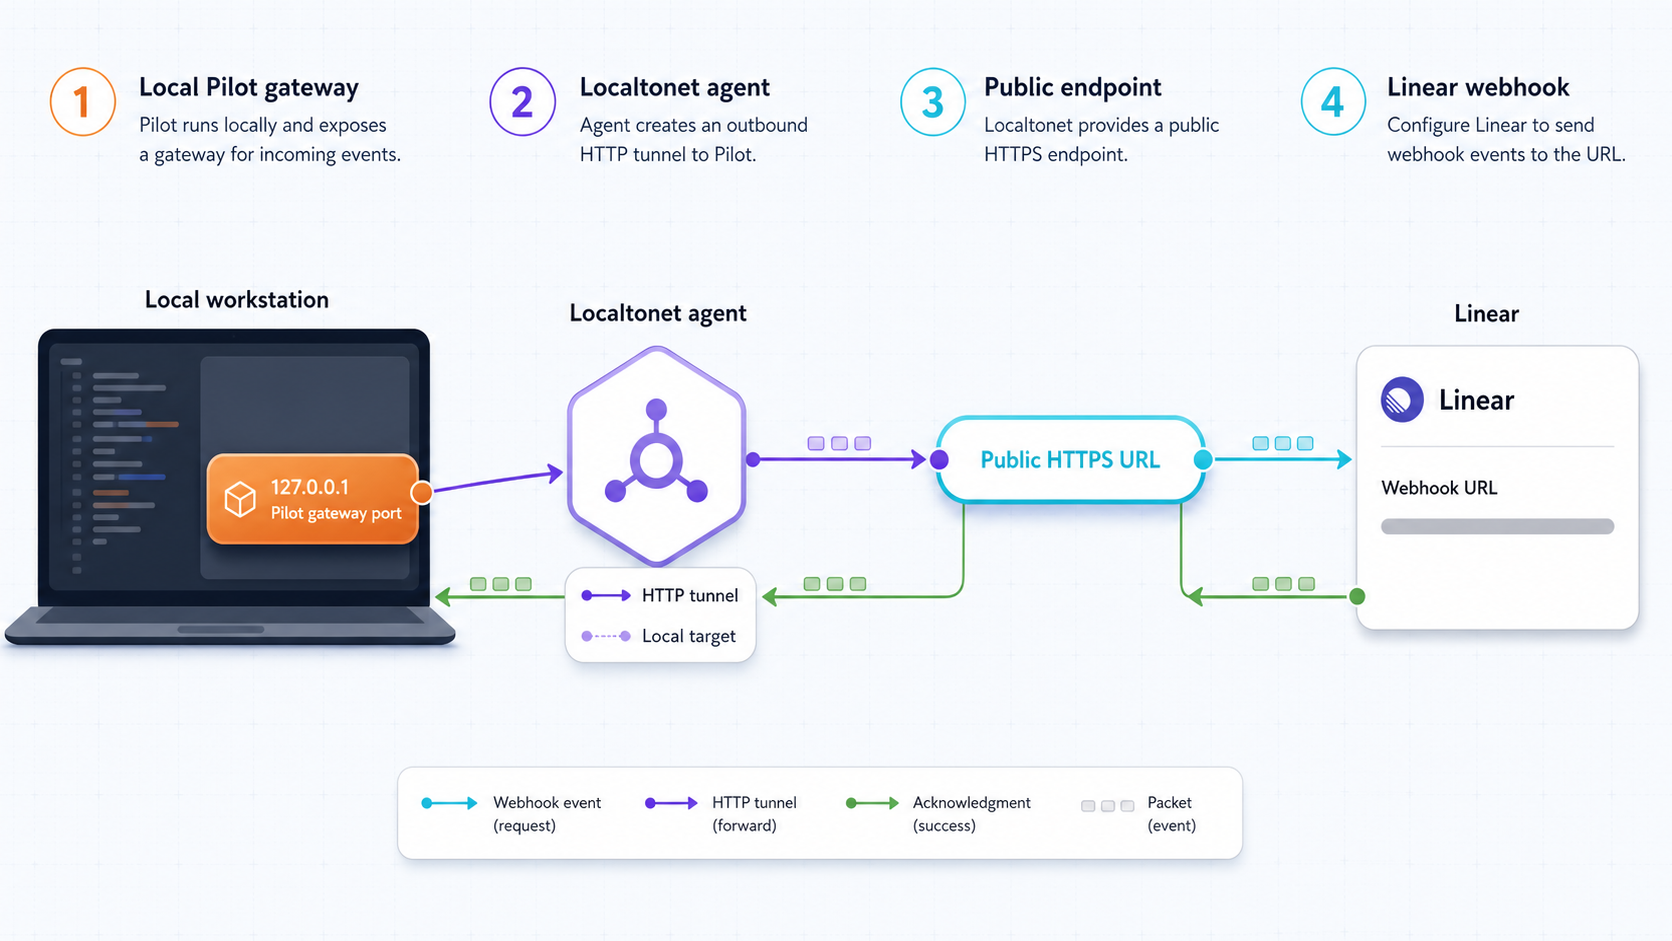
A complete Linear connection needs four application values: Pilot’s Linear API credential setting, Pilot’s webhook-secret setting, the exact Pilot webhook path, and the event types accepted by the adapter. It also needs a repository-provider credential because receiving a Linear ticket does not itself grant Pilot permission to clone, modify, or push a repository.
The supplied v2.270.0 primary evidence confirms “Linear/Jira/Asana Webhooks and task sync,” but it does not include the contents of Pilot’s Linear integration page or source definitions for the route, configuration keys, and startup activation mechanism. Consequently, this article does not invent names such as LINEAR_API_KEY, LINEAR_WEBHOOK_SECRET, /webhooks/linear, or --linear. Use a value only when it appears in pilot setup, the installed configuration schema, startup help for v2.270.0, or the Pilot Linear integration documentation. Do not start public exposure until all four values are confirmed.
Record the adapter contract before startup
Create a private deployment record containing the following values from the installed Pilot release. This record should contain secret references rather than secret values:
| Required value | Where it must come from | Why it matters |
|---|---|---|
| Linear API credential setting | Pilot v2.270.0 setup or configuration schema | Allows the adapter to perform documented Linear synchronization operations |
| Webhook signing-secret setting | Pilot v2.270.0 Linear adapter configuration | Lets Pilot verify that the raw request body was signed with the shared Linear secret |
| Exact webhook route | Pilot v2.270.0 Linear documentation or startup output | Determines the path appended to the Localtonet public HTTPS origin |
| Accepted Linear event scope | Pilot v2.270.0 Linear documentation | Prevents unrelated workspace events from reaching an automation handler unnecessarily |
| Repository mapping | Pilot configuration for the selected Linear team or project | Ensures an accepted ticket targets the intended repository rather than an unrelated project |
| Repository-provider token | The selected Git provider’s credential configuration | Controls Pilot’s ability to read code, create branches, push changes, and open pull requests |
Understand Linear signature verification
Linear signs webhook requests with HMAC-SHA256 using the webhook’s signing secret and sends the result in the Linear-Signature header. Verification must be calculated over the unmodified raw HTTP request body. Parsing and re-serializing JSON before computing the digest can change whitespace or field representation and cause a valid request to fail verification.
Pilot’s adapter should perform this verification when its documented signing-secret setting is configured. Confirm that behavior in the selected release before exposure. The verification process should compare the computed digest with the received signature safely, reject a missing or incorrect signature, and avoid starting repository work until validation succeeds. Localtonet forwards the request but does not replace Pilot’s signature check.
Linear includes a webhook timestamp that receivers can use to reject stale deliveries. Follow the current Linear and Pilot guidance for the accepted time window. Do not create a permissive fallback that accepts unsigned requests merely because a timestamp is present.
Create the Linear-side webhook
Perform these actions only after Pilot is configured locally and Localtonet has assigned the public origin:
- Open the webhook or API settings for the intended Linear workspace using an authorized account.
- Create a webhook with a descriptive name tied to this Pilot environment.
- Set its destination to the Localtonet public HTTPS origin followed by Pilot’s confirmed route.
- Select only the event categories required by the documented Pilot adapter, normally the issue-related scope when Pilot is consuming Linear tickets.
- Copy the generated signing secret into Pilot’s documented secret setting using protected credential storage.
- Save the webhook and retain access to Linear’s delivery status for controlled testing.
The destination has this conceptual form:
https://assigned-public-origin.example/PILOT_RELEASE_SPECIFIC_ROUTEThe example is deliberately not a deployable URL. Replace both parts with the actual Localtonet address and exact route reported by Pilot v2.270.0. Do not register only the public origin unless Pilot explicitly documents the root path as its Linear handler.
Consult the Linear webhook documentation for the current workspace configuration, signature, timestamp, event, and delivery behavior. Linear retries unsuccessful webhook deliveries, so the handler must tolerate duplicate delivery of the same logical event. A retry must not create a second branch, duplicate pull request, or repeated destructive action.
Start Pilot and verify the local listener
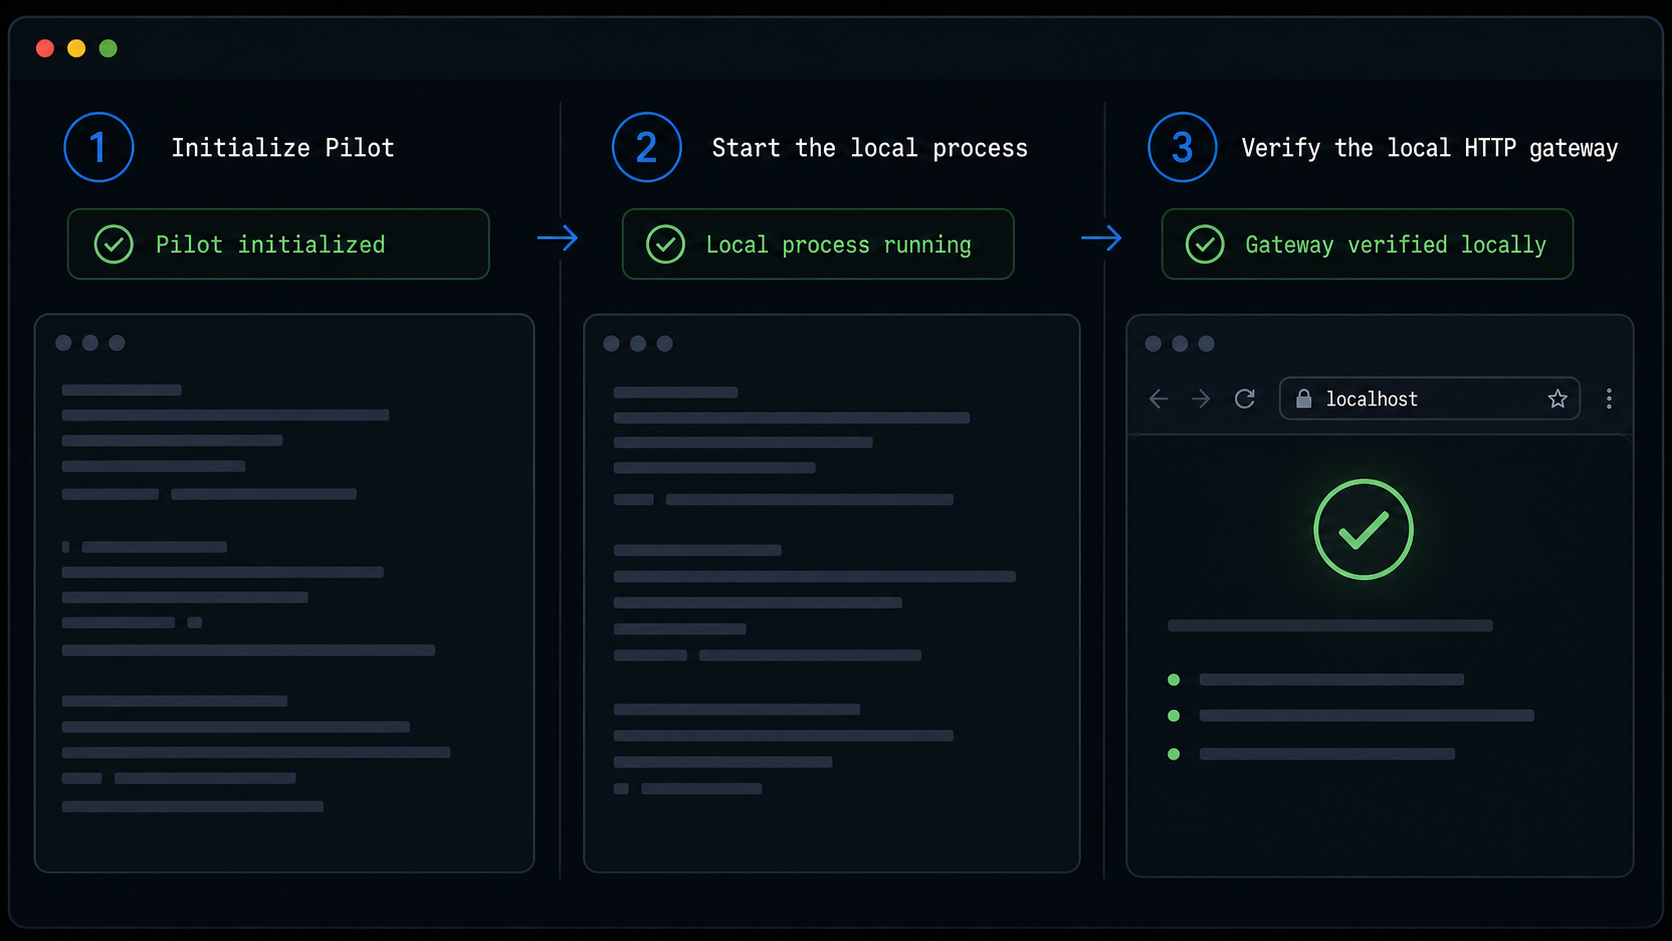
The current documentation homepage demonstrates startup with GitHub polling and the terminal dashboard:
pilot start --github --dashboard
This command confirms the current dashboard startup pattern, but it does not prove that GitHub polling activates the Linear adapter. Do not substitute it for a Linear-specific activation command unless the installed Pilot help or Linear documentation says both integrations should be started together. Likewise, do not use an unverified --linear flag.
Start Pilot using the exact command generated or documented by the v2.270.0 setup flow for Linear. Keep the foreground logs or dashboard visible during initial validation. The expected evidence at this stage is:
- Pilot starts without a configuration or credential error.
- Claude Code authentication is recognized.
- The selected repository provider is initialized successfully.
- The Linear adapter reports that it is enabled or ready.
- An HTTP listener starts on a specific IP address and port.
- No other process already owns that address.
If Pilot prints a listener such as 127.0.0.1 with a port, record exactly what it prints. A loopback listener can be targeted by Localtonet only when the Localtonet client runs on the same machine. If Pilot listens on another address, confirm that the client device can reach it and that doing so is consistent with your network policy.
First perform a harmless request against a health, status, or root endpoint explicitly documented by the installed release. Do not send a fabricated Linear payload to the webhook route as a health check because malformed or partially valid events can create confusing logs or unintended retries.
If Pilot does not document a harmless HTTP health endpoint, verify the listener with operating-system network tools and Pilot’s own startup status. A listening socket proves that a process owns the address, but it does not prove that the Linear route, signature validation, credentials, or repository mapping are correct.
Record the Pilot version, startup command, listener address, enabled adapter, and successful local status evidence before creating the tunnel. This baseline lets you determine whether a later failure belongs to Pilot, Localtonet, or Linear.
Protect the automation boundary
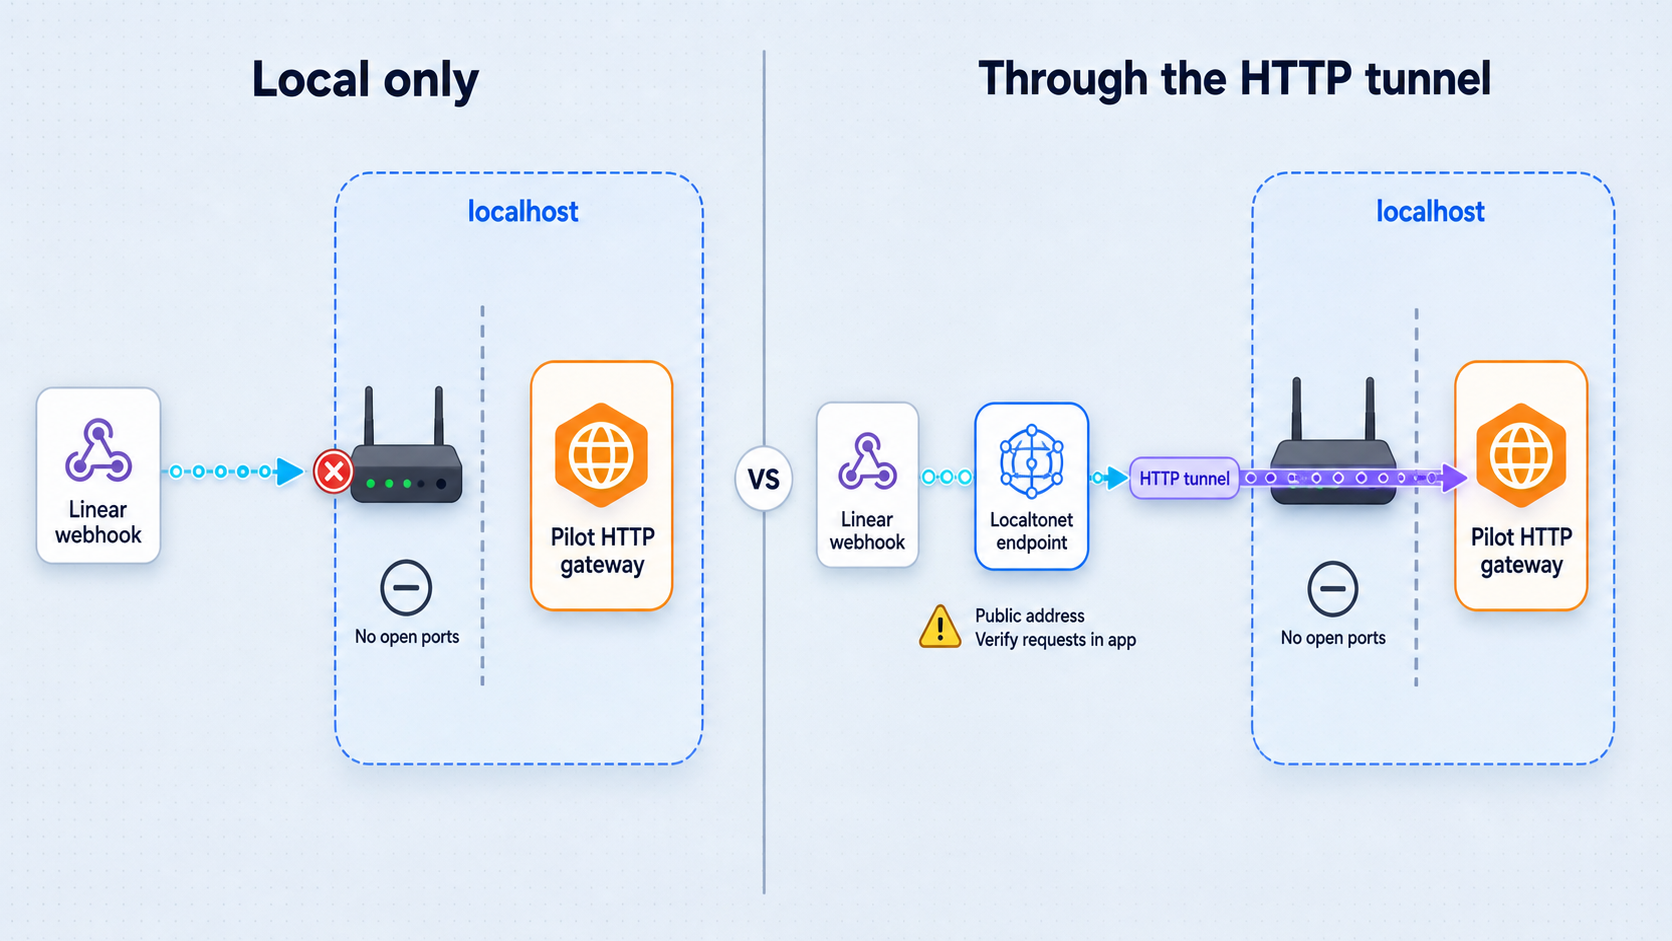
Pilot is not a passive website. Depending on its configuration, an accepted event can claim work, create a branch, modify files, run commands and tests, push changes, or open a pull request. Exposing its HTTP listener therefore creates an automation boundary with consequences beyond returning an HTTP response.
- Use a unique Linear webhook secret for this endpoint and environment.
- Store the secret in Pilot’s supported secret mechanism, not in source control.
- Verify signatures over the raw request body before parsing or acting on an event.
- Restrict Linear events to the minimum scope required by Pilot.
- Map only the intended Linear team or project to the intended repository.
- Use repository credentials with the least practical permissions.
- Keep branch protection, CI checks, and human pull-request review where appropriate.
- Design processing to be idempotent because retries and duplicate deliveries can occur.
Rotate a webhook secret safely
Treat rotation as a coordinated change. Stop or pause the public tunnel if the Pilot adapter cannot accept both the old and new secret during a transition. Create or retrieve the new Linear secret, update Pilot’s protected configuration, restart or reload Pilot as documented, and verify that the adapter is ready before resuming the tunnel. Send a controlled event and confirm that the new signature is accepted. Remove the old secret after the successful test.
If a secret may have been disclosed, stop the tunnel immediately, revoke or rotate the secret, inspect Linear delivery history and Pilot logs, and review repository activity for unexpected branches, commits, or pull requests. Rotating only the Localtonet address does not invalidate a compromised Linear signing secret.
Create and start the Localtonet HTTP tunnel
Create the tunnel only after Pilot is healthy locally. The Localtonet client must run on the Pilot machine or another device that can reach Pilot’s verified listener. If Pilot listens on 127.0.0.1, run both processes on the same machine because loopback always refers to the device making the connection.
Install and run the Localtonet client
Install the Localtonet application for the operating system on the device that can reach Pilot. Start the client and confirm that the device connects to our platform.
Select the device authentication token
Open the HTTP tunnel configuration and select the device-specific authentication token for the connected client. Keep this token private and never place it in Pilot, Linear, screenshots, or example URLs.
Select an available relay server
Choose a currently available Localtonet relay server or region from the dashboard. Do not copy a server code from an old tutorial because current availability can vary.
Enter the verified local target and HTTP process type
Set the target IP address and port to the listener verified during Pilot startup. Choose Random Sub Domain, Custom Sub Domain, or Custom Domain as appropriate. These process types serve the same local HTTP content at a public HTTPS address. Check current requirements before configuring custom-domain DNS.
Create and start the tunnel
Save the HTTP tunnel, then press Start. Creating a tunnel does not mean it is running. Wait until the dashboard shows the tunnel as running and record the assigned public HTTPS origin.
The current product workflow and available options are documented in the Localtonet HTTP tunnel documentation.
If Localtonet and Pilot run on different devices, do not enter 127.0.0.1 unless Pilot also runs on the Localtonet client device. On a separate client, that address targets the client itself rather than the Pilot host.
Verify the public route and run a controlled Linear delivery
Verification should progress from harmless network checks to one bounded application event. Do not begin with a production ticket that can modify a sensitive repository.
1. Check the public HTTP origin harmlessly
Request only the harmless health, status, or root endpoint already verified locally. Append the same documented path to the Localtonet public origin. Compare the public response with the local response. An HTTP response from Pilot, including a deliberate authorization or method response, demonstrates more than a DNS lookup because it confirms that the request traversed the tunnel to the application.
Do not treat an arbitrary 404 as proof that the Linear route is correct. It may prove that an HTTP server responded, but it can also indicate that the path was forwarded to the wrong application or that Pilot’s adapter is disabled.
2. Register the exact Linear destination
Combine the assigned public origin with Pilot’s confirmed v2.270.0 Linear route. Enter that full URL in Linear, select only the required issue-related event scope documented by Pilot, and configure the same signing secret on both sides.
3. Generate one bounded event
Use a dedicated test team, project, or repository where possible. Create or update one clearly labeled test issue in the exact way Pilot documents as its trigger. Avoid a broad project operation that emits many events. Keep Pilot’s dashboard, process logs, Linear delivery status, and repository activity visible.
4. Confirm every layer
- Linear shows a delivery attempt to the expected full URL.
- The delivery receives the success status expected by the Pilot adapter.
- Pilot logs show the expected route and event type.
- Pilot accepts the signature rather than bypassing validation.
- The event maps to the intended team, project, and repository.
- Exactly one task or work item is created or claimed.
- Repository activity is limited to the expected branch or pull-request workflow.
5. Test rejection safely
Where Pilot provides a documented diagnostic method, confirm that an invalid signature or unsupported event is rejected before any repository action occurs. Do not disable signature validation or send fabricated requests to a production automation endpoint. Linear’s own controlled delivery and Pilot’s documented diagnostics are safer than hand-built payloads whose schema may not match the installed release.
Duplicate delivery must not create duplicate work. If the same Linear event is retried, Pilot should use its documented event or task identity handling to recognize previously processed work. Confirm the actual behavior in a test environment before enabling broad event scope.
Routine operation, shutdown, and rollback
A webhook integration is a running service rather than a one-time configuration. Monitor all three components: Pilot, the connected Localtonet client, and the HTTP tunnel. Also watch Linear’s delivery status and repository activity for repeated failures or unexpected automation.
Normal operating checks
- Keep Pilot on an explicitly managed version and review release notes before upgrading.
- Confirm Claude Code and provider credentials remain valid.
- Keep the Localtonet client connected on the selected device.
- Confirm the tunnel is running after maintenance or a restart.
- Review rejected signatures and repeated deliveries without logging secret values.
- Watch for duplicate tasks, branches, or pull requests.
- Audit repository permissions when teams or projects change.
Planned shutdown
Disable or pause the Linear webhook first when the provider workflow permits it. Then stop the Localtonet tunnel so the public route is no longer available. Stop Pilot after active work has reached a safe state. Stopping the tunnel is operationally separate from creating it and does not delete the tunnel configuration.
Delete the Localtonet tunnel only when the endpoint is permanently retired. Revoke the Linear signing secret and unused provider credentials, then remove stale Pilot configuration according to the release documentation.
Emergency rollback
- Stop the Localtonet tunnel to remove public reachability.
- Disable the Linear webhook to stop new deliveries and retries where supported.
- Stop Pilot if it is processing an unsafe or incorrectly mapped task.
- Revoke or rotate exposed Linear and repository credentials.
- Inspect Pilot logs, Linear delivery history, and repository activity.
- Correct the route, event scope, signature configuration, or repository mapping locally.
- Repeat local and controlled public verification before restoring service.
Troubleshooting by layer
| Symptom | Likely layer | Safe checks |
|---|---|---|
pilot command not found |
Installation or PATH | Confirm which installation method was used, locate the installed binary, and inspect the actual shell PATH or Go binary directory |
| Pilot reports missing Claude authentication | Execution backend | Confirm Claude Code CLI 2.1.17 or later is installed and authenticated for the account running Pilot |
| Pilot cannot read or update Linear | Linear provider configuration | Verify the release-specific credential key, secret availability, workspace access, and token status without printing the token |
| Pilot cannot clone, push, or open a pull request | Repository provider | Check repository mapping, token permissions, organization restrictions, and branch policies |
| Pilot cannot start its listener | Local process or port conflict | Read startup output, identify the process already using the port, and use a documented Pilot configuration change rather than killing an unrelated service blindly |
| Local check reaches the wrong service | Listener address | Compare Pilot startup output with the tested IP and port and verify which process owns the socket |
| Local Pilot works but the public URL does not | Localtonet client or tunnel | Confirm the selected device is connected, the tunnel has been started, and its local target exactly matches Pilot |
| Tunnel targets loopback on another device | Incorrect network target | Run Localtonet on the Pilot machine or use a policy-approved address reachable from the client device |
| Public health check works but Linear receives 404 | Webhook path | Compare the full registered URL with the exact route documented for the installed Pilot release |
| Pilot reports an invalid signature | Webhook secret or raw-body validation | Confirm both sides use the same secret, the request body is not transformed before verification, and an old secret was not left active after rotation |
| Linear retries the same event | Response or processing behavior | Inspect Pilot’s response status and processing time, then confirm idempotent handling before allowing another delivery |
| One event produces duplicate branches or tasks | Deduplication or retry handling | Stop the tunnel, preserve event identifiers and logs, and verify Pilot’s release-specific duplicate-event behavior before resuming |
| Webhook reaches an unintended repository | Team or repository mapping | Stop the tunnel immediately, review mappings and permissions, remove unintended access, and inspect repository activity |
Installation and PATH problems
Do not repeatedly reinstall Pilot using several methods. First determine whether Homebrew, the installation script, Go, a source build, or the desktop package installed the active binary. Multiple copies can make setup appear inconsistent because one shell may run a different version from another. Confirm the binary resolved by your shell and compare its version with the intended release.
Disconnected Localtonet client or stopped tunnel
A saved tunnel is not necessarily running. Check both the selected client’s connection state and the tunnel state. If the client is disconnected, confirm that the Localtonet application is still running on the expected device. If the client is connected but the tunnel is stopped, start the tunnel separately.
Wrong route versus wrong target
Test the documented harmless public endpoint first. If it fails, investigate the tunnel target. If it succeeds but Linear’s route returns 404, investigate the appended Pilot path. If the path responds but Pilot rejects the request, investigate signature, timestamp, event scope, and adapter configuration.
Provider permissions
Separate Linear permissions from repository permissions. A valid Linear credential does not grant GitHub or GitLab access, and a repository token does not authorize Linear API operations. Check each provider independently and preserve least privilege while troubleshooting.
Frequently asked questions
Is Pilot’s gateway always available at 127.0.0.1:9090?
That address is not confirmed as a universal v2.270.0 default by the supplied current evidence. Use the listener shown by your installed Pilot configuration or startup output. Enter only that verified IP address and port in Localtonet.
Should I use pilot setup or pilot init?
The current Pilot documentation homepage promotes pilot setup, while the repository README still contains pilot init. This guide follows pilot setup for the current documentation workflow. Use pilot init only when the documentation for your installed release explicitly calls for it.
What exact Pilot route should I register in Linear?
Use the exact route shown by Pilot’s v2.270.0 Linear adapter documentation, installed configuration, or startup output. The supplied primary evidence confirms Linear webhook support but does not contain that route, so names such as /webhooks/linear must not be assumed.
Does Localtonet validate the Linear-Signature header?
Localtonet provides the public network route to the configured local HTTP service. Pilot’s Linear adapter must validate the Linear signature, raw request body, timestamp, event type, and application authorization according to its documented implementation.
Must Pilot and the Localtonet client run on the same machine?
Not always. The Localtonet client device must be able to reach Pilot’s listener. If Pilot listens only on 127.0.0.1, they must run on the same machine because loopback refers to the client device itself.
Why can one Linear event be delivered more than once?
Webhook providers retry unsuccessful deliveries, and distributed delivery can produce duplicates. Pilot’s processing must therefore be idempotent for the event or ticket identity so a retry does not create duplicate tasks, branches, or pull requests.
Does this setup require router port forwarding?
No. The Localtonet client establishes an outbound connection to our relay service, so the HTTP tunnel does not require inbound router port forwarding, firewall changes, VPN setup, or a public IP address.
What should I stop first during an incident?
Stop the Localtonet tunnel first to remove public reachability. Then disable the Linear webhook, stop unsafe Pilot processing, rotate affected secrets, and inspect delivery, application, and repository records before restoring service.
Expose a verified Pilot listener with Localtonet
After Pilot’s release-specific Linear route, credentials, signature validation, event scope, repository mapping, and local listener have all been verified, create a Localtonet HTTP tunnel and test one controlled delivery before enabling normal automation.
Get Started Free →

