

Build a working Medusa commerce environment, verify it locally, and publish only the services you intend to share
This guide provides a complete development workflow for creating a Medusa application with PostgreSQL, registering the first Admin user, confirming the local Admin endpoint, and exposing the application through a Localtonet HTTP tunnel. It also explains why temporary access to a development server is different from operating a persistent production deployment. The commands and runtime requirements are qualified for Medusa v2.19, whose release requirements include Node.js 20.19 or later in the Node 20 line, Node.js 22.12 or later in the Node 22 line, or a later supported LTS release.
📋 What's in this guide
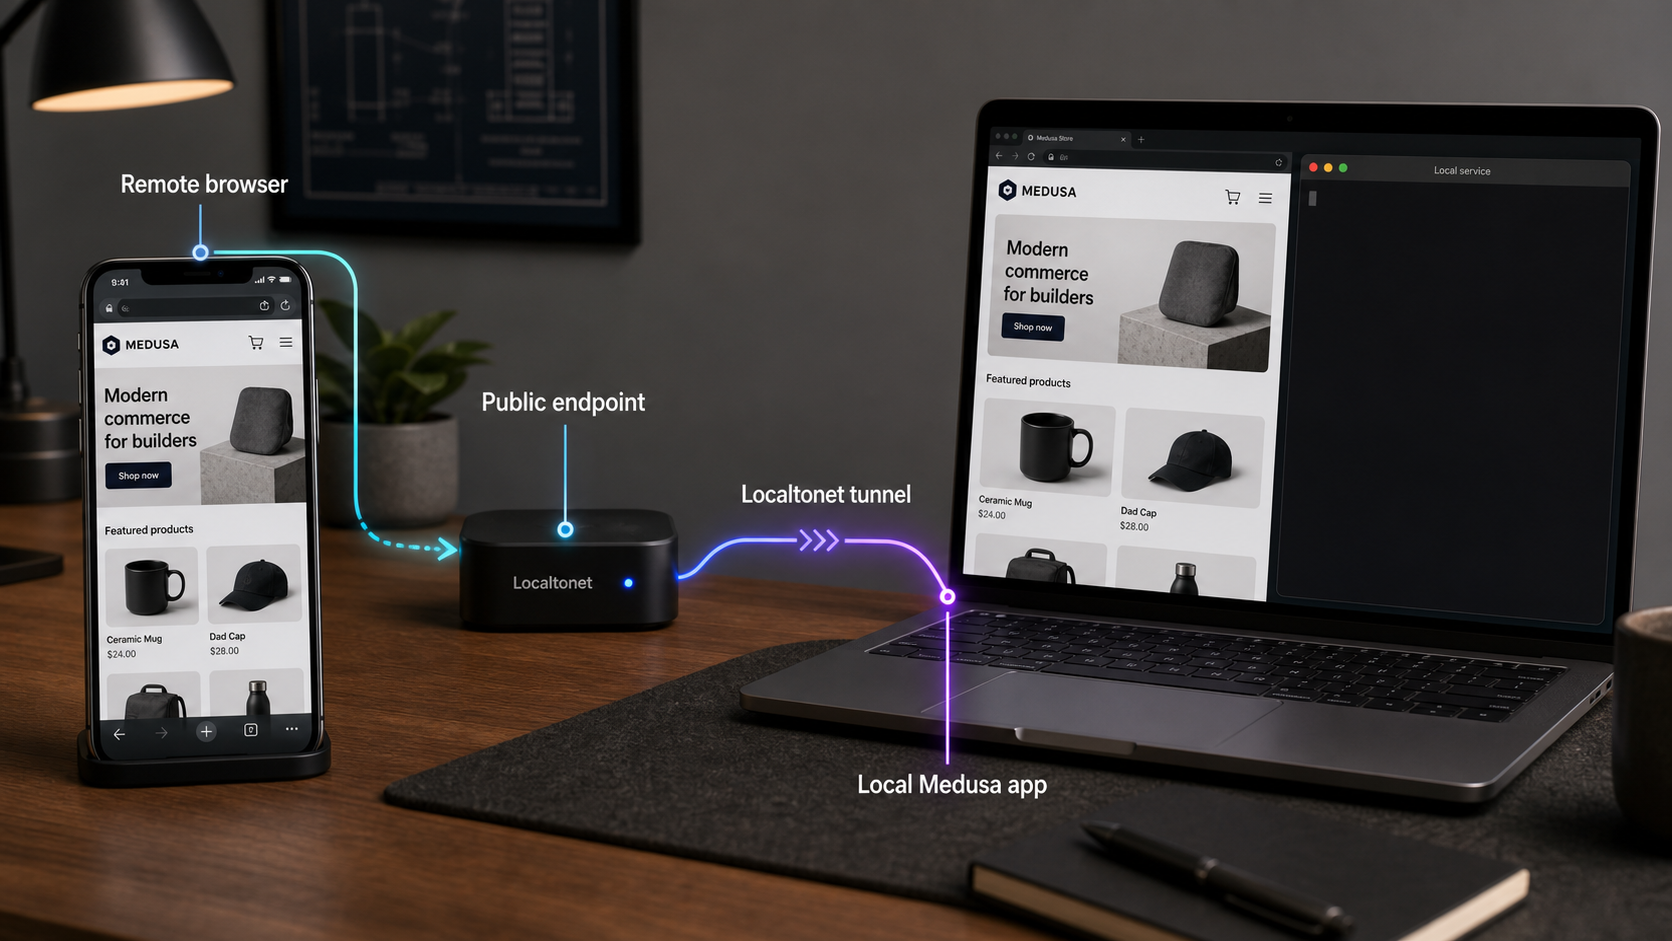
Understand what a Medusa project contains
Medusa is an open-source commerce platform with a framework for extending commerce behavior. Its core commerce modules are available under an open-source license, while separately identified Enterprise Edition materials require a commercial agreement. A project can support direct-to-consumer stores, business-to-business systems, marketplaces, distributor platforms, point-of-sale projects, service businesses, and other applications built around reusable commerce capabilities.
A standard Medusa project is not just one customer-facing website. The Medusa application contains the server and Admin dashboard. A storefront is a separate application that connects to the Medusa server. In production, the Medusa application also depends on PostgreSQL and Redis, and Medusa recommends separating the request-handling server from the background worker.
/app path. It requires an Admin account and must not be treated as a public storefront.
The first half of this tutorial creates a development installation and makes its server temporarily reachable. That is useful for remote testing, webhooks, demonstrations, and collaboration. It is not a complete production deployment. The later production section explains the additional architecture and operating controls required for persistent self-hosting.
Prerequisites for the Medusa v2.19 workflow
This installation path uses the current create-medusa-app workflow, npm, and an existing PostgreSQL database. Before starting, make sure the host has enough free disk space for dependencies and database data and that it can maintain outbound internet connections for package installation and Localtonet.
| Requirement | Development requirement | How to check |
|---|---|---|
| Node.js | For Medusa v2.19, use Node.js ^20.19.0, ^22.12.0, or a later supported LTS release. |
node --version |
| npm | Use the npm installation included with your supported Node.js environment. | npm --version |
| PostgreSQL | A reachable PostgreSQL server, database, and login role are required. | psql --version and a successful database login |
| Redis | Not part of the minimal development demonstration below, but required by Medusa’s production deployment architecture. | Use the health or connectivity tools supplied with your Redis deployment. |
| Localtonet client | Run it on the Medusa host or another device that can reach the Medusa HTTP listener. | Confirm that the selected device appears connected in our dashboard. |
Medusa v2.19 updated the Admin dashboard to Vite 7.3.6 and React Router 7.18.2. Node.js 20.0 through 20.18 and Node.js 22.0 through 22.11 are not supported by that release. If you use another Medusa version, check its release notes before choosing a runtime.
Confirm the installed versions before creating the project:
node --version
npm --version
psql --version
If you are upgrading rather than creating a new application, stop here and review the Medusa release notes. New-project instructions do not replace version-specific upgrade steps, dependency changes, or migration requirements.
Prepare a local PostgreSQL database
The PostgreSQL administrator can create a dedicated login role and database for Medusa. Run the following SQL through an administrator-controlled psql session. Replace the placeholder password with a strong, unique value before executing it:
CREATE ROLE medusa_user
  WITH LOGIN
  PASSWORD 'REPLACE_WITH_A_STRONG_UNIQUE_PASSWORD';

CREATE DATABASE medusa_db
  OWNER medusa_user;
Do not commit the resulting connection string to source control or paste it into screenshots. If the password contains characters with special meaning in a URL, encode those characters correctly when constructing a PostgreSQL connection URL. A local connection has this general form:
postgres://medusa_user:ENCODED_PASSWORD@127.0.0.1:5432/medusa_dbManaged PostgreSQL services may require TLS parameters or a provider-specific hostname. Use the connection string supplied by that database provider. The initial installation must use a connection that supports Medusa’s migrations. Keep the database private rather than exposing port 5432 through the HTTP tunnel.
Create, start, and verify Medusa locally
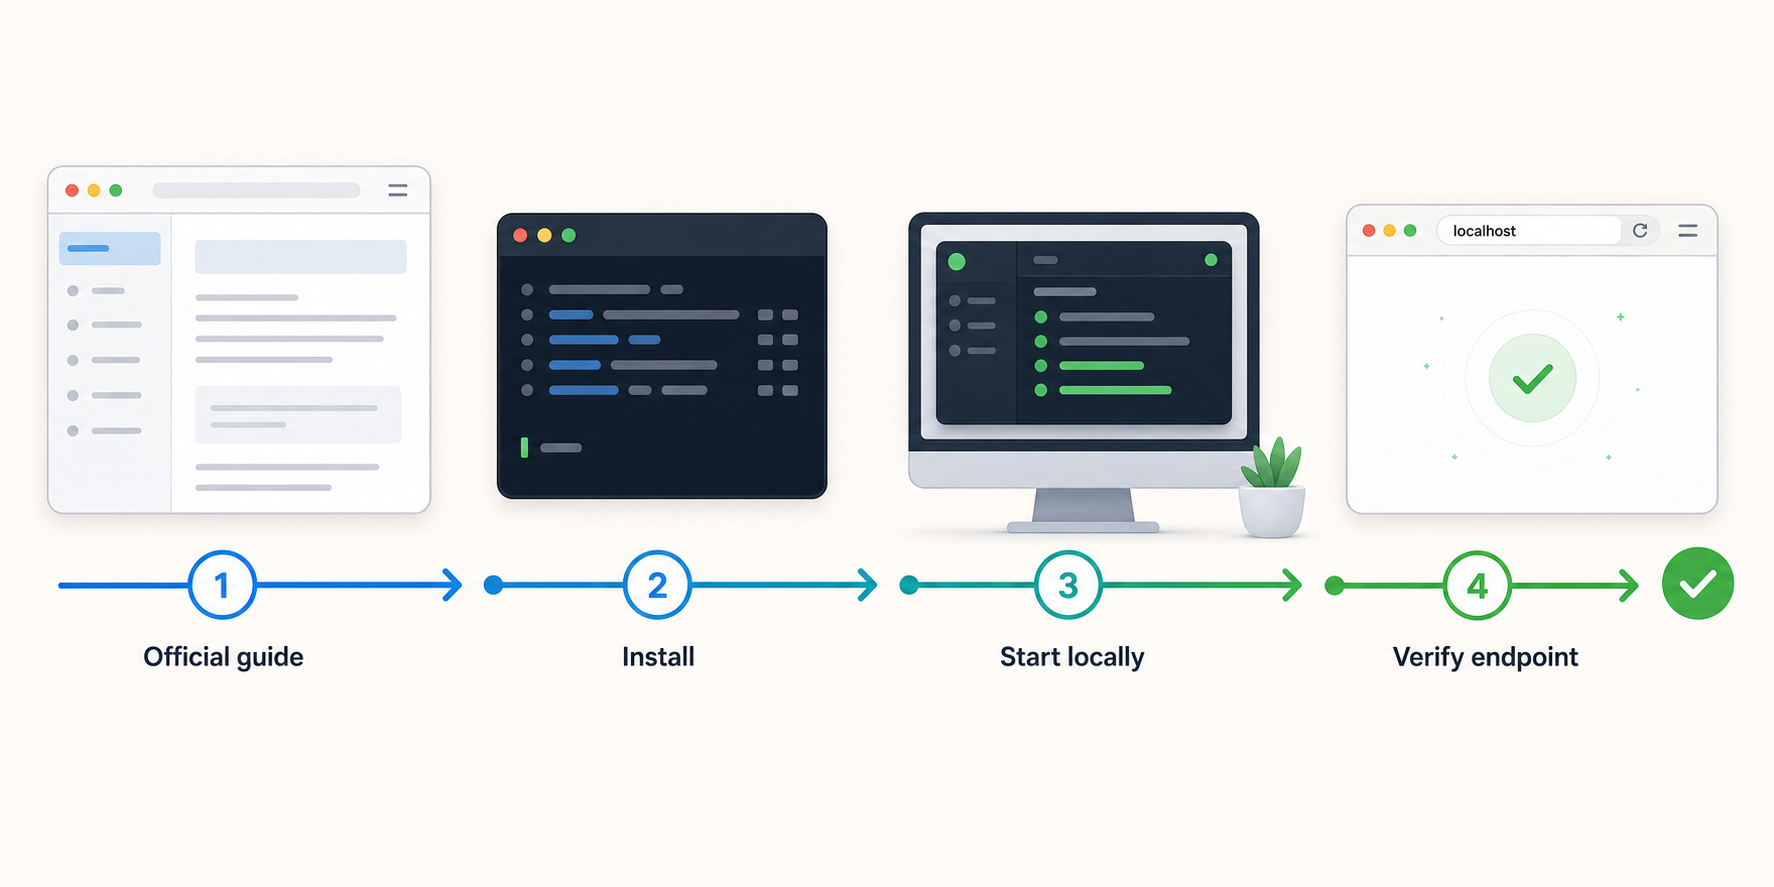
The workflow below is version-qualified for the current Medusa v2.19 documentation and the create-medusa-app project generator. The official
Medusa installation guide
remains the place to check for requirements introduced after this article’s review date.
Run the Medusa project generator
Pass the PostgreSQL connection URL to the current project generator. Replace the placeholder with your actual private connection string. Avoid saving the completed command in shared shell history.
npx create-medusa-app@latest --db-url "YOUR_POSTGRESQL_CONNECTION_STRING"Answer the project prompts
Enter a project name when prompted. The generator also asks whether to install the Next.js Starter Storefront. Choose the storefront only if you want to run and configure that separate application. The backend setup does not require a storefront.
Allow the generator to initialize the project
The generator creates the project, installs its dependencies, configures the database connection, runs the initial database migrations, and seeds initial data. Do not interrupt this stage. If migration or database authentication fails, correct the database connection before continuing.
Create the first Admin user
At the end of a successful setup, Medusa starts the development server and may open the Admin interface automatically. Complete the registration form to create the first Admin user. After successful registration, the browser redirects to the Admin dashboard.
Start Medusa again when needed
If the initial process has stopped, enter the generated backend project directory and start the npm development script. Replace the example directory with the project name selected during creation.
cd my-medusa-store
npm run devVerify the known local Admin endpoint
The generated development server reports that it is ready on port 9000. Open http://localhost:9000/app on the Medusa host and sign in with the Admin account you created. Resolve any application error before configuring Localtonet.
You can perform a basic HTTP check from the host without placing credentials in the command:
curl -I http://localhost:9000/appA browser test is still required because it confirms that the Admin application loads its scripts, completes authentication, and can make API requests. A successful response to one HTTP request does not prove that CORS, cookies, or frontend-to-server requests are configured correctly.
In this setup path, create-medusa-app runs the initial migrations and seeds the database. Do not run an unrelated migration sequence from an older Medusa release on top of the generated project. For later deployments and upgrades, use the migration procedure documented for the installed project version.
Configure public origins, APIs, and storefronts
Opening a tunnel introduces a new HTTPS origin. Medusa and any separately deployed storefront must be configured to recognize the real browser origins that will call them. An origin consists of the scheme, hostname, and optional port. It does not include a route such as /app.
Current Medusa projects use the following HTTP configuration properties in medusa-config.ts, commonly populated from environment variables:
| Configuration | Purpose | What to include |
|---|---|---|
projectConfig.http.adminCorsADMIN_CORS |
Controls browser origins allowed to call Admin routes. | The origins from which the Admin dashboard will access the Medusa server. |
projectConfig.http.storeCorsSTORE_CORS |
Controls browser origins allowed to call Store API routes. | Every legitimate storefront origin that makes browser requests to the Store API. |
projectConfig.http.authCorsAUTH_CORS |
Controls origins allowed to use authentication routes. | Authorized Admin and storefront origins that perform browser-based authentication. |
projectConfig.http.jwtSecretJWT_SECRET |
Protects JWT-based authentication material. | A strong secret supplied through the deployment environment, never frontend code. |
projectConfig.http.cookieSecretCOOKIE_SECRET |
Protects cookie-based session material. | A different strong secret supplied through the deployment environment. |
For example, if the Medusa application receives the temporary public origin https://medusa-example.example and you intend to load its Admin dashboard through that address, add that exact origin to ADMIN_CORS and AUTH_CORS. Preserve any local origins you still use during development. If a separate storefront at https://shop-example.example calls the server, add the storefront origin to STORE_CORS and, when it uses authentication routes, AUTH_CORS.
ADMIN_CORS=http://localhost:9000,https://medusa-example.example
STORE_CORS=http://localhost:8000,https://shop-example.example
AUTH_CORS=http://localhost:9000,http://localhost:8000,https://medusa-example.example,https://shop-example.example
JWT_SECRET=REPLACE_WITH_A_LONG_RANDOM_SECRET
COOKIE_SECRET=REPLACE_WITH_A_DIFFERENT_LONG_RANDOM_SECRET
The hostnames above are placeholders, not Localtonet addresses. Replace them with the exact assigned public origins. Do not include /app, /admin, or /store
Distinguish the dashboard from the APIs
- Admin dashboard: the browser interface served at
/app. It is intended for authorized administrators. - Admin API: administrative routes under
/admin. These must continue to enforce Medusa authentication and authorization. - Store API: storefront-oriented routes under
/store. Some calls require the appropriate publishable API key and application configuration. - Storefront: a separate frontend application. Publishing Medusa does not automatically publish or reconfigure the storefront.
Point a Next.js Starter Storefront to the public server
If the project generator created the Next.js Starter Storefront, configure its MEDUSA_BACKEND_URL with the Medusa server URL that the storefront environment can reach. A browser running on another network cannot use http://localhost:9000 to reach your computer because, from that browser’s perspective, localhost means the browser’s own device.
MEDUSA_BACKEND_URL=https://medusa-example.example
Restart or rebuild the storefront as required by its deployment mode after changing environment variables. Also ensure that the storefront’s own origin appears in Medusa’s STORE_CORS and relevant AUTH_CORS values.
Use the public HTTPS origin consistently and check Medusa’s current authentication documentation before changing cookie attributes or session behavior. CORS permission does not authenticate a user, and browser cookies do not make an unauthenticated API route public. Never place JWT_SECRET, COOKIE_SECRET, database credentials, or Admin credentials in storefront variables exposed to the browser.
Expose the Medusa HTTP service with Localtonet
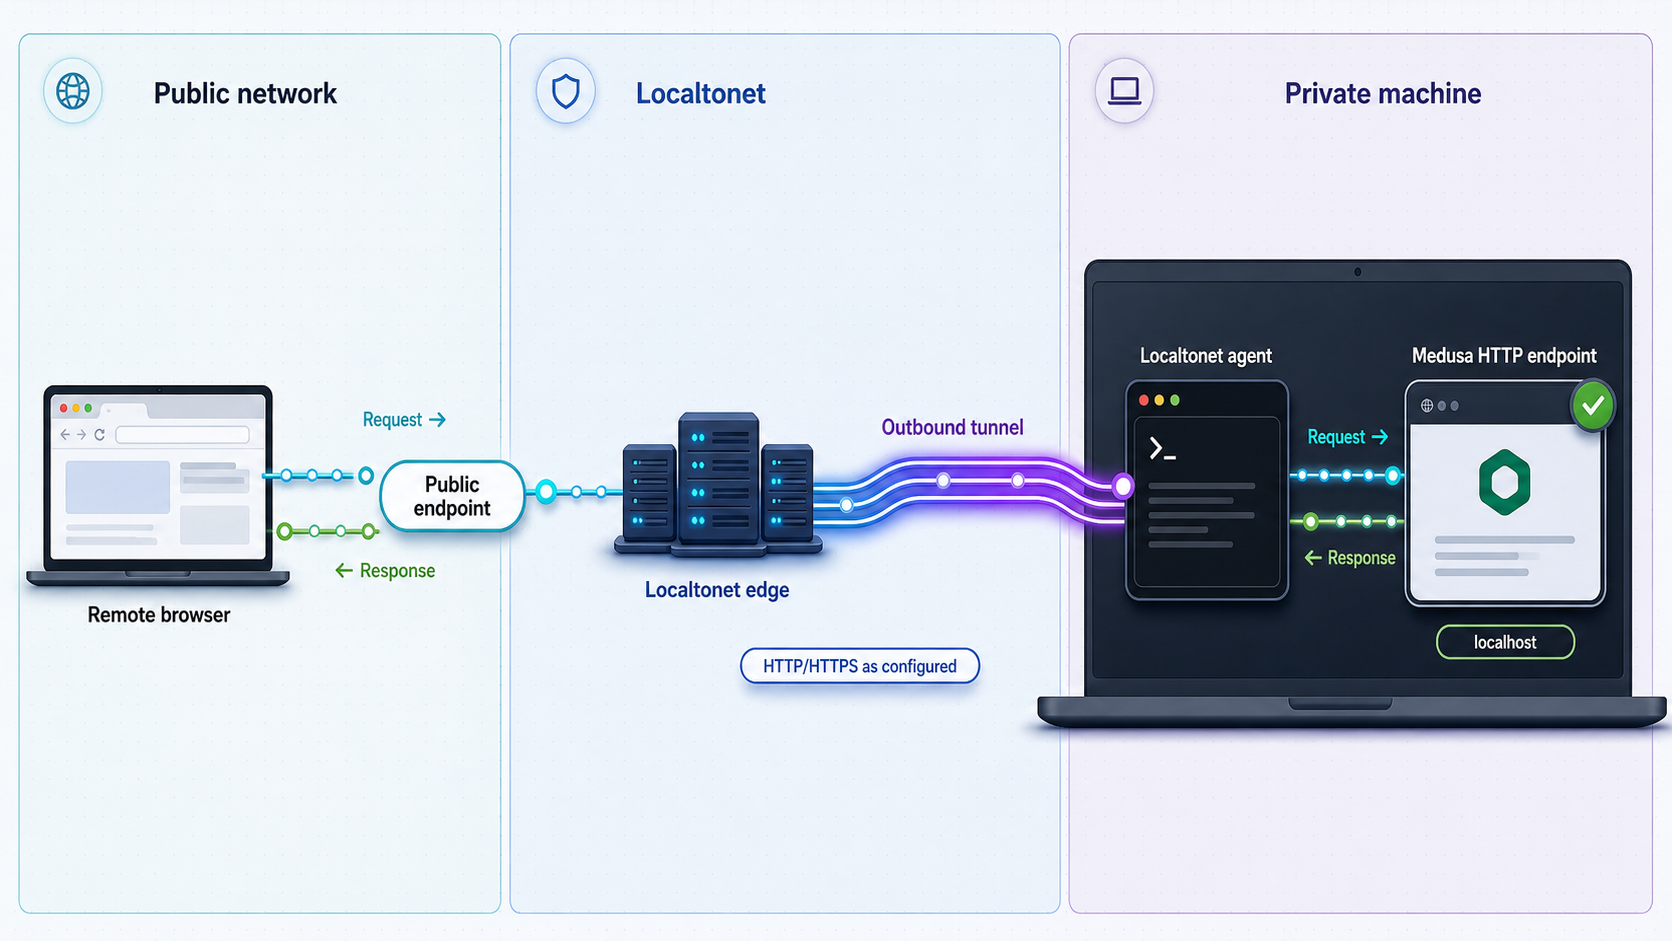
Our client establishes an outbound connection from the selected device to a Localtonet relay server. The resulting HTTP tunnel provides a public HTTPS URL without inbound router port forwarding, firewall changes, VPN setup, or a public IP address.
An HTTP tunnel points to an IP address and port on, or reachable from, the device running our client. Creating the tunnel does not start it. Medusa must remain available at the configured target, the selected Localtonet device must remain connected, and the tunnel must be running.
Install and run the Localtonet client
Run our client on the Medusa host whenever possible. It may instead run on another device that can reach the Medusa host over the local network. Confirm Medusa still responds before continuing.
Select the correct device
Select the device-specific authentication token associated with the client that will carry the tunnel. Treat the token as a credential. Never expose it in code, screenshots, logs, or shared instructions.
Select an available relay server
Choose an available relay server or region from the current dashboard. Do not copy a server code from an old tutorial because availability can vary by product configuration, plan, client version, or region.
Configure the HTTP local target
Create an HTTP tunnel and enter the Medusa server’s reachable local IP address and port. When our client runs on the Medusa machine and the standard development listener is available locally, the target is 127.0.0.1 on port 9000. If your project reports a different listener, use the value you verified.
Start the tunnel explicitly
Review the target and use the Start button. HTTP process types include Random Sub Domain, Custom Sub Domain, and Custom Domain where available. They serve the same target content at a public HTTPS address. Check current documentation before configuring custom-domain DNS.
Test remotely, then stop access when finished
Test the assigned URL from a separate network and confirm that it reaches Medusa. When temporary access is no longer required, stop the tunnel. Delete it if the configuration is no longer needed.
See our Localtonet HTTP tunnel documentation for the current dashboard workflow and available HTTP tunnel options.
Do not target 127.0.0.1 unless Medusa runs on that same device. Loopback always refers to the machine making the connection. Use the Medusa host’s reachable LAN address, confirm the server is listening on an interface reachable from the Localtonet device, and test that address directly from the client device before starting the tunnel.
Verify local, public, browser, and API behavior
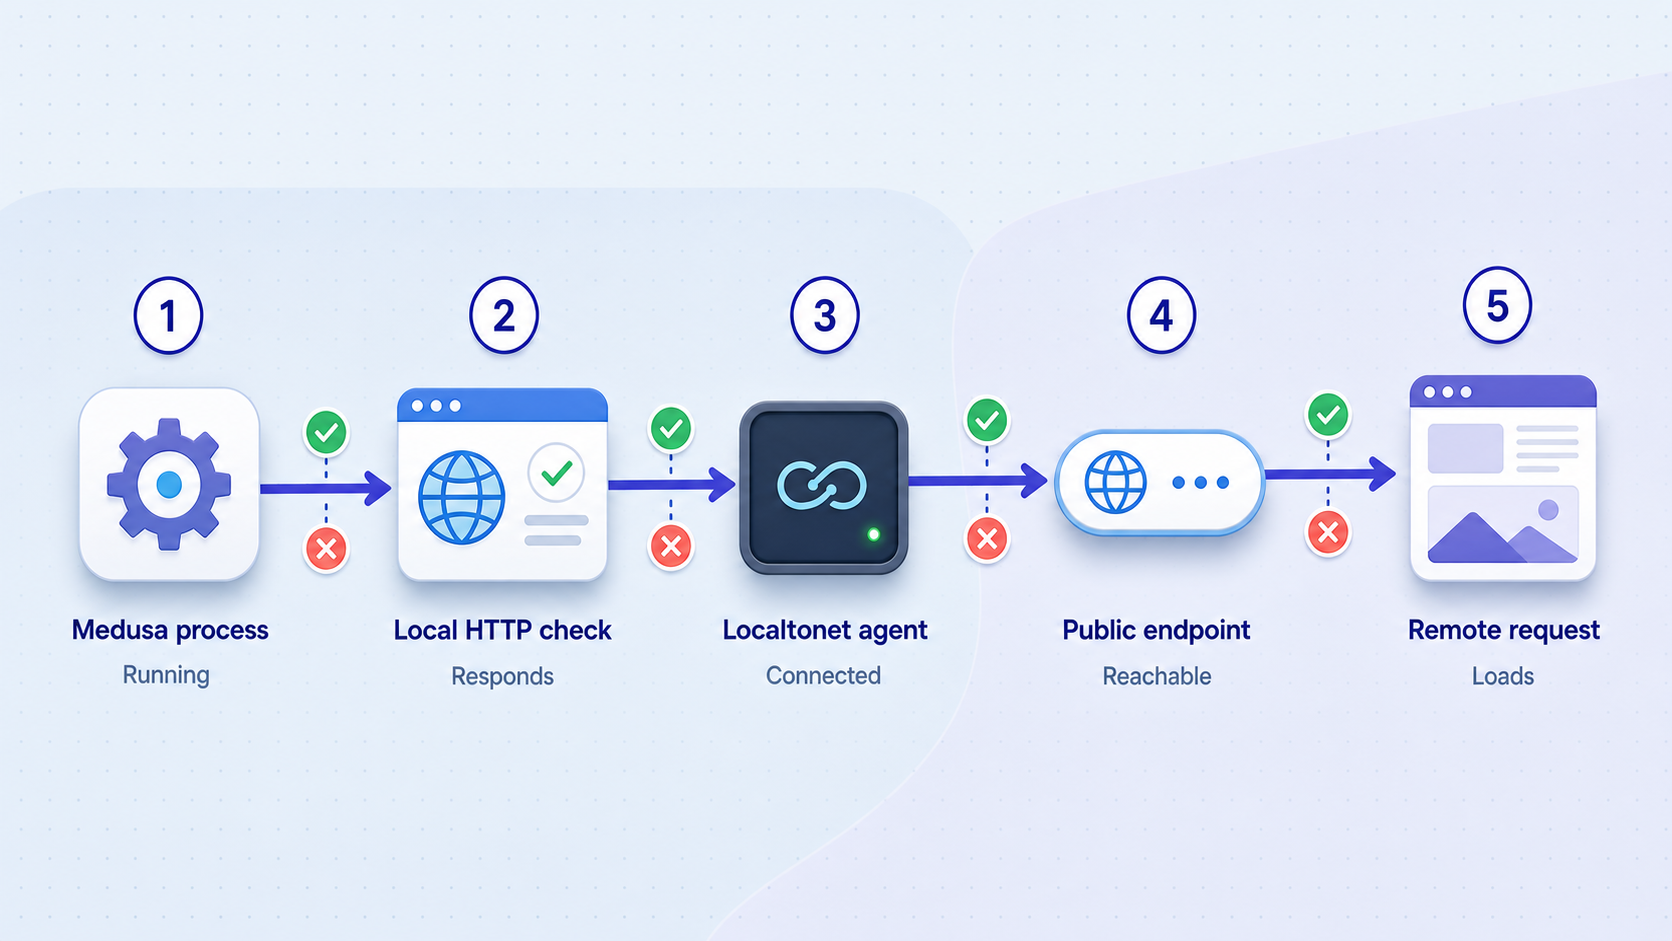
Verification should proceed from the innermost component outward. This makes it possible to tell whether a failure belongs to Medusa, PostgreSQL, the local network, the Localtonet target, browser-origin configuration, or authentication.
1. Check the local Admin interface
On the Medusa host, open:
http://localhost:9000/appConfirm that the page loads, the Admin user can sign in, and authenticated dashboard requests complete. Watch the Medusa terminal while doing this. Resolve database errors, migration failures, missing environment variables, and JavaScript errors locally.
2. Check from the Localtonet device
If our client runs on another device, request the Medusa host’s LAN address from that device:
curl -I http://MEDUSA_LAN_IP:9000/appFailure here is a local binding, host firewall, routing, or application-listener issue. A tunnel cannot forward successfully to a target that its client device cannot reach.
3. Check the public URL from a separate network
Use a phone with Wi-Fi disabled or another independent connection. This avoids a misleading test caused by local DNS, cached sessions, or access available only from the host network.
curl -I https://YOUR_ASSIGNED_PUBLIC_HOST/appThen load the same URL in a private browser window. The Admin interface should require authentication. A previously authenticated browser session is not sufficient evidence that access controls work.
4. Confirm Admin API authentication remains enforced
Make an unauthenticated request to an Admin API route and inspect the response:
curl -i https://YOUR_ASSIGNED_PUBLIC_HOST/admin/productsThe request must not return protected administrative data to an unauthenticated caller. Use the authentication flow supported by your Medusa version for authorized tests. Do not place a bearer token or session cookie in a shared command, issue report, or screenshot.
5. Test Store API and storefront behavior separately
A Store API request may require a publishable API key and other store configuration. Test it with the credentials and headers generated for your own project, without publishing those values. If a storefront is present, inspect its browser network panel and confirm requests go to the public Medusa server URL rather than localhost.
6. Compare logs on both sides
Keep the Medusa process output visible while testing and inspect the Localtonet client state. A public request that reaches Localtonet but produces no Medusa log entry usually indicates a wrong or unreachable local target. A request visible in Medusa that fails in the browser points more often to application routing, CORS, authentication, cookies, or storefront configuration.
Plan persistent production self-hosting separately
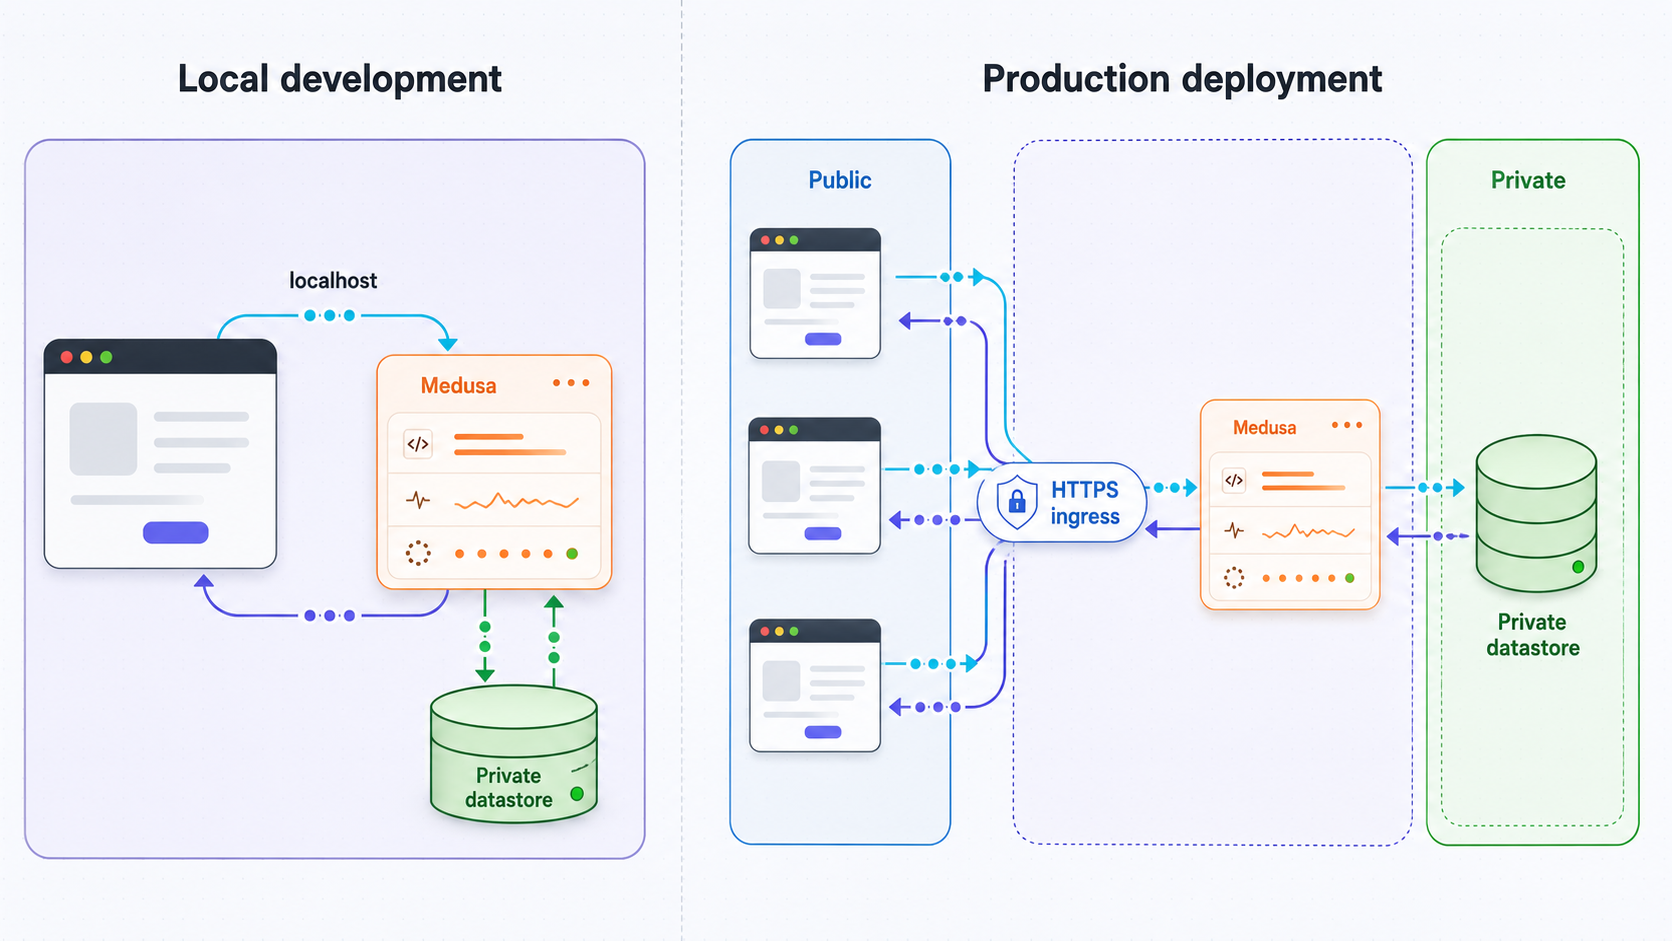
A development server exposed through a tunnel is appropriate for controlled testing, but public HTTPS reachability does not make the process durable or production-ready. Medusa’s deployment overview states that a standard project deploys the Medusa application separately from its storefront. The application connects to PostgreSQL, Redis, and other services required by the project.
For optimal experience, Medusa states that the hosting provider and plan should offer at least 2 GB of RAM. This is a recommended baseline from the deployment guidance, not a universal capacity guarantee. Actual memory and compute requirements depend on traffic, extensions, background jobs, integrations, and data volume.
| Component | Production role | Operating expectation |
|---|---|---|
| Server instance | Handles API requests and serves the Admin dashboard. | Run as a supervised service, expose only the intended HTTP listener, and restart it safely after failure. |
| Worker instance | Processes scheduled jobs, subscribers, and background tasks. | Run separately from the server so long-running background work does not compete with incoming requests. |
| PostgreSQL | Stores products, customers, orders, configuration, and other application data. | Use persistent storage, restricted credentials, tested backups, and monitored capacity. |
| Redis | Provides the Redis resource required by the deployed Medusa environment, including server session storage. | Keep it private, persist or replicate it according to the chosen service design, and monitor availability. |
| Storefront | Provides the customer-facing frontend. | Deploy separately and configure it with the reachable Medusa server URL and appropriate publishable key. |
| Localtonet client | Maintains the outbound connection for a Localtonet public endpoint. | Run it under reliable supervision if it is part of a persistent ingress design. The tunnel is unavailable when the device disconnects or the tunnel stops. |
Environment and secret management
Production environment configuration must include the real DATABASE_URL and REDIS_URL, strong JWT_SECRET and COOKIE_SECRET values, and the exact ADMIN_CORS, STORE_CORS, and AUTH_CORS origins. Medusa’s server and worker modes are selected through the environment configuration described in its worker-mode documentation.
Store secrets in the host or platform’s protected secret facility. Do not bake them into container images, commit them to a repository, place them in storefront variables, or reuse the same secret for unrelated purposes. Limit database permissions and network access to what the Medusa application requires.
Builds, migrations, and supervised processes
Production deployment should use the generated project’s production build and start scripts rather than npm run dev. Build the exact commit being released, run the migration procedure required by that Medusa version, and start the server and worker under a process manager or service supervisor that records logs and reports failures.
Deployment order matters. The Medusa application must be available before a storefront that depends on its server URL can function. Database migrations should be controlled so multiple instances do not race to apply them. Keep the previous deployable application version and a tested rollback procedure when an update includes breaking changes.
Persistence, backups, and recovery
Back up PostgreSQL on a documented schedule and retain enough recovery points for the business’s needs. A backup is not considered reliable until a restore has been tested in an isolated environment. Include uploaded assets and any external storage used by custom modules or integrations in the recovery plan.
Document how to recreate server and worker instances, restore the database, reconnect Redis, replace secrets, and recover Localtonet connectivity if it is used. Identify the acceptable recovery time and acceptable amount of data loss before an incident occurs.
Monitoring and updates
Monitor server and worker health, HTTP failures, response latency, database connectivity, Redis availability, disk usage, memory pressure, failed jobs, and tunnel status. Preserve enough structured logs to trace an order or API failure without logging passwords, session cookies, authorization headers, or complete payment data.
Review Medusa release notes before every upgrade. Medusa v2.19 demonstrates why this is necessary: it changed Node.js requirements and introduced breaking Vite and React Router updates. Test dependency updates, migrations, Admin behavior, Store API behavior, storefront checkout, background jobs, and rollback in a non-production environment before promoting a release.
Localtonet provides reachability to the configured service. It does not supervise Medusa, separate server and worker responsibilities, operate PostgreSQL or Redis, create backups, monitor commerce workflows, or make a development process suitable for real orders. Those remain responsibilities of the self-hosted architecture.
Secure each Medusa surface according to its audience
The Admin dashboard, Admin API, Store API, and storefront have different audiences. Avoid treating them as one undifferentiated website. A public storefront must be reachable by customers, but administrative operations must continue to require authorized Admin identities. Store API reachability must not imply access to Admin API data.
- Use strong, unique Admin credentials and remove accounts that are no longer needed.
- Do not depend on an obscure public hostname as an access control.
- Keep PostgreSQL and Redis private. Do not point an HTTP tunnel at either service.
- Use least-privilege database roles and rotate credentials through a controlled process.
- Keep secrets out of repositories, browser bundles, command output, screenshots, and support posts.
- Limit CORS values to known origins rather than using unrestricted wildcard values for administrative or authenticated requests.
- Test that unauthenticated Admin API requests are rejected after every routing or authentication change.
- Stop temporary tunnels when the demonstration, webhook test, or remote review has finished.
Localtonet’s public address uses HTTPS at the tunnel edge, but encrypted reachability does not replace application authorization, secure cookies, secret management, backups, or host maintenance. Continue to follow Medusa’s security and deployment guidance for the application itself.
Troubleshoot Medusa and Localtonet methodically
The generator or development server rejects the Node.js version
Run node --version. For Medusa v2.19, Node.js 20 must be at least 20.19 and Node.js 22 must be at least 22.12. Use a supported LTS release and reinstall project dependencies under that runtime if they were installed with an incompatible version.
PostgreSQL authentication or connection fails
Verify that PostgreSQL is running, the hostname and port are reachable, the database exists, and the role owns or can access it. Check for incorrectly URL-encoded password characters. For a managed database, confirm any required TLS parameters and network allow rules. Do not weaken database exposure by opening it publicly just to make the installation command succeed.
Migrations fail or tables are missing
Review the complete generator or server output rather than only its final line. Confirm that the database role can create and alter objects in the selected database and that the command points to the intended database. Do not manually mark a failed migration as complete. For an upgrade, use the migration sequence for the exact installed release.
Port 9000 is occupied
Identify the process already listening on the port before stopping anything. The correct solution may be to stop a stale Medusa process or configure a different listener using the project’s documented configuration. If Medusa starts on another port, update the Localtonet target and all dependent URLs to match the actual listener.
Medusa works on the host but not from the Localtonet device
If our client is on another machine, 127.0.0.1:9000 points to that other machine. Test the Medusa host’s LAN address directly from the Localtonet device. Confirm Medusa is bound to a reachable interface and that local network policy permits the connection. Do not change router-level exposure merely to solve an internal reachability problem.
The tunnel is configured but the URL is unavailable
Confirm that the intended Localtonet device is connected, the tunnel was started with the Start button, and Medusa is still running. Compare the configured local target with the verified IP address and port. Creating a tunnel configuration without starting it does not publish the service.
The public URL displays the wrong application
Another service is probably listening at the selected target. Stop the tunnel, identify the Medusa listener, correct the target, restart the tunnel, and test in a private browser window. Never assume that a successful HTTP response proves the correct application was reached.
The Admin page loads but sign-in or API calls fail
Inspect the browser network console for blocked CORS requests, cookie problems, redirects, and calls still pointing to localhost. Add the exact public Medusa origin to ADMIN_CORS and AUTH_CORS, then restart the server. Keep the public origin consistent and do not include /app in the CORS value.
The storefront loads but cannot retrieve products
Confirm that MEDUSA_BACKEND_URL points to the reachable Medusa server and that the storefront was restarted or rebuilt after the change. Add the storefront’s origin to STORE_CORS and, where authentication is used, AUTH_CORS. Confirm the storefront uses the correct publishable API key for the configured Medusa environment.
Production background work is unreliable
Confirm that both server and worker instances are running in their intended modes, can reach PostgreSQL and Redis, and use matching deployment configuration. Inspect worker logs for failed scheduled jobs or subscribers. Running only the request-handling server is not a substitute for the production worker architecture.
Frequently asked questions
Which Node.js versions can I use with Medusa v2.19?
Medusa v2.19 requires Node.js ^20.19.0, ^22.12.0, or a later supported LTS release. Node.js 20.0 through 20.18 and 22.0 through 22.11 are not supported by that release. Check newer release notes if you install a later Medusa version.
What command creates the Medusa project?
Use npx create-medusa-app@latest --db-url "YOUR_POSTGRESQL_CONNECTION_STRING". The generator prompts for the project name and optional Next.js Starter Storefront, installs dependencies, runs initial migrations, seeds data, and starts Medusa.
Where is the local Medusa Admin interface?
In the documented development workflow, the server starts on port 9000 and the Admin interface is available at http://localhost:9000/app. Use the registration form to create the first Admin user. If your server reports a different listener, use the actual address shown by your process.
Which address should I enter as the Localtonet target?
When the Localtonet client and Medusa run on the same machine, use the verified Medusa listener, normally 127.0.0.1 on port 9000 for this development workflow. If our client runs on another device, use a reachable LAN address and test it from that device first.
Do I need router port forwarding or a public IP address?
No. Our client establishes an outbound connection to a Localtonet relay server. This workflow does not require inbound router port forwarding, firewall changes, VPN setup, or a public IP address.
Does creating a tunnel start it automatically?
No. Use the Start button after creating and reviewing the tunnel. The URL works only while the selected Localtonet device is connected, the tunnel is running, and Medusa is reachable at the configured target.
Should I expose PostgreSQL, Redis, or the worker?
Not through the HTTP tunnel used here. Point it only to the intended Medusa HTTP server. PostgreSQL and Redis should remain private, and a background worker is not a browser-facing service.
Does a public HTTPS URL make the development server production-ready?
No. Production self-hosting additionally requires separate server and worker operation, PostgreSQL, Redis, production builds, controlled migrations, secret management, process supervision, persistent storage, backups, monitoring, updates, and a tested recovery plan.
Connect your verified Medusa application with Localtonet
Create the Medusa project, confirm the Admin interface and authentication locally, configure only the required public origins, and then use our HTTP tunnel to provide controlled remote reachability without inbound router port forwarding.
Get Started Free →

