

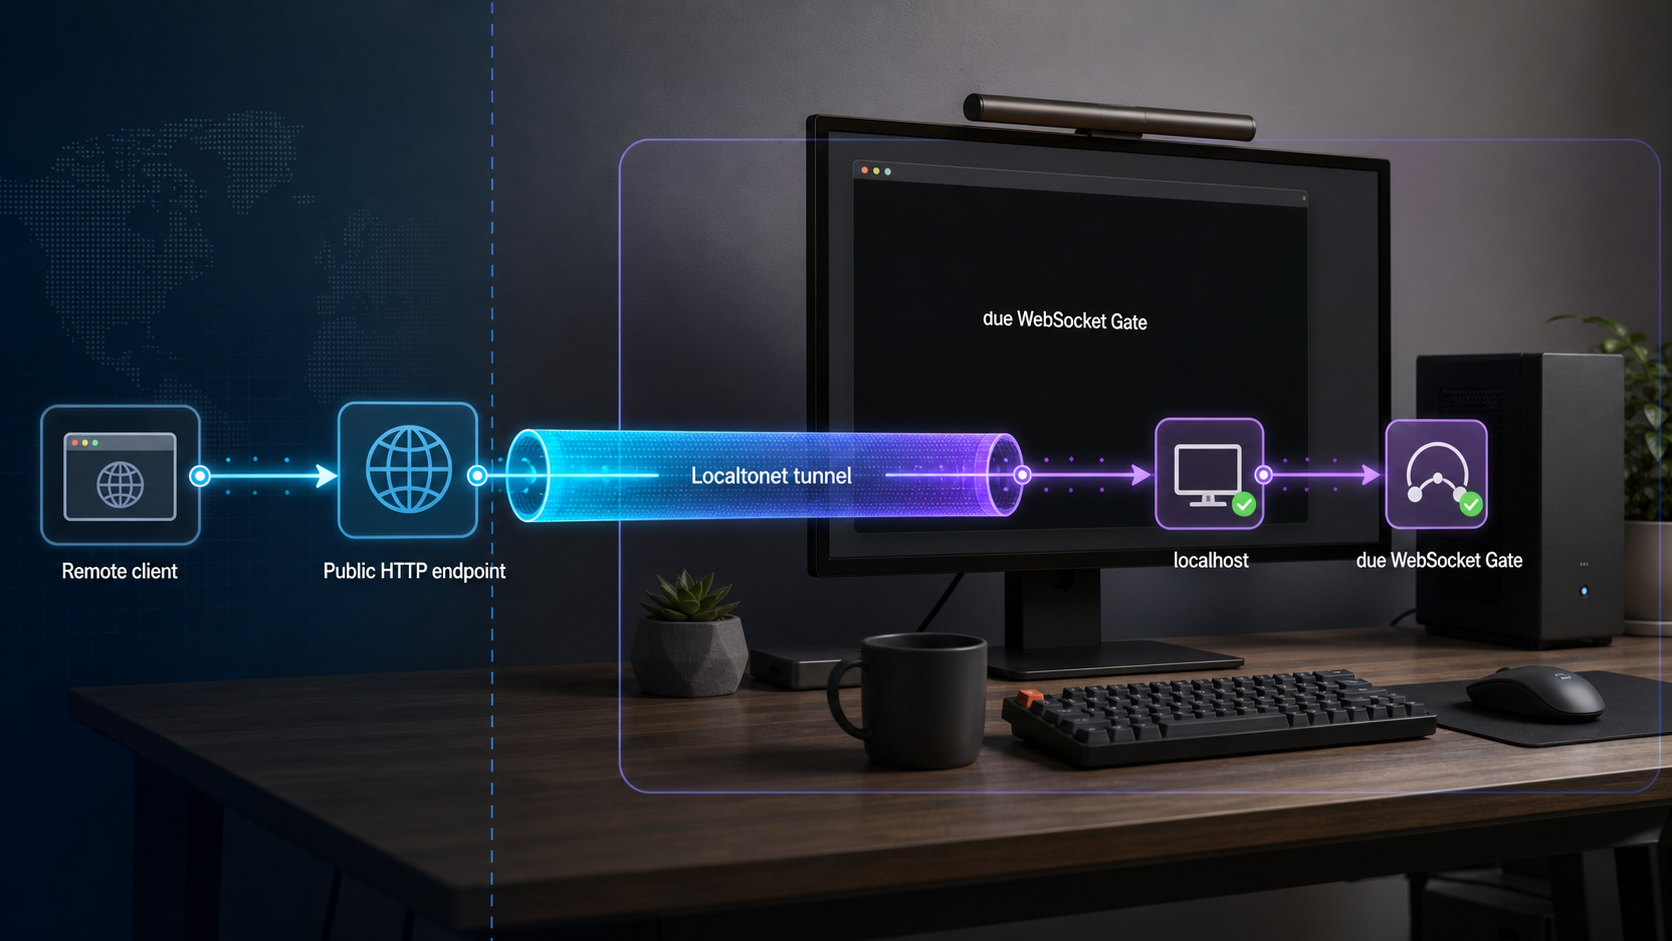
Build a working due Gate locally, verify its WebSocket listener, then make it reachable through an HTTP tunnel
due is an open-source Go framework for distributed game-server backends, with Gate components that accept client connections and route messages to application nodes. In this guide, we install the documented dependencies, start the repository’s supporting services, create the example WebSocket Gate, and confirm that it is listening locally on port 3553. After the local service works, we connect it to an HTTP tunnel with Localtonet so remote WebSocket clients can reach it without inbound router port forwarding, firewall changes, VPN setup, or a public IP address. We also cover lifecycle management, exposure safety, protocol limitations, and practical troubleshooting.
📋 What's in this guide
How the due WebSocket Gate fits into a game-server architecture
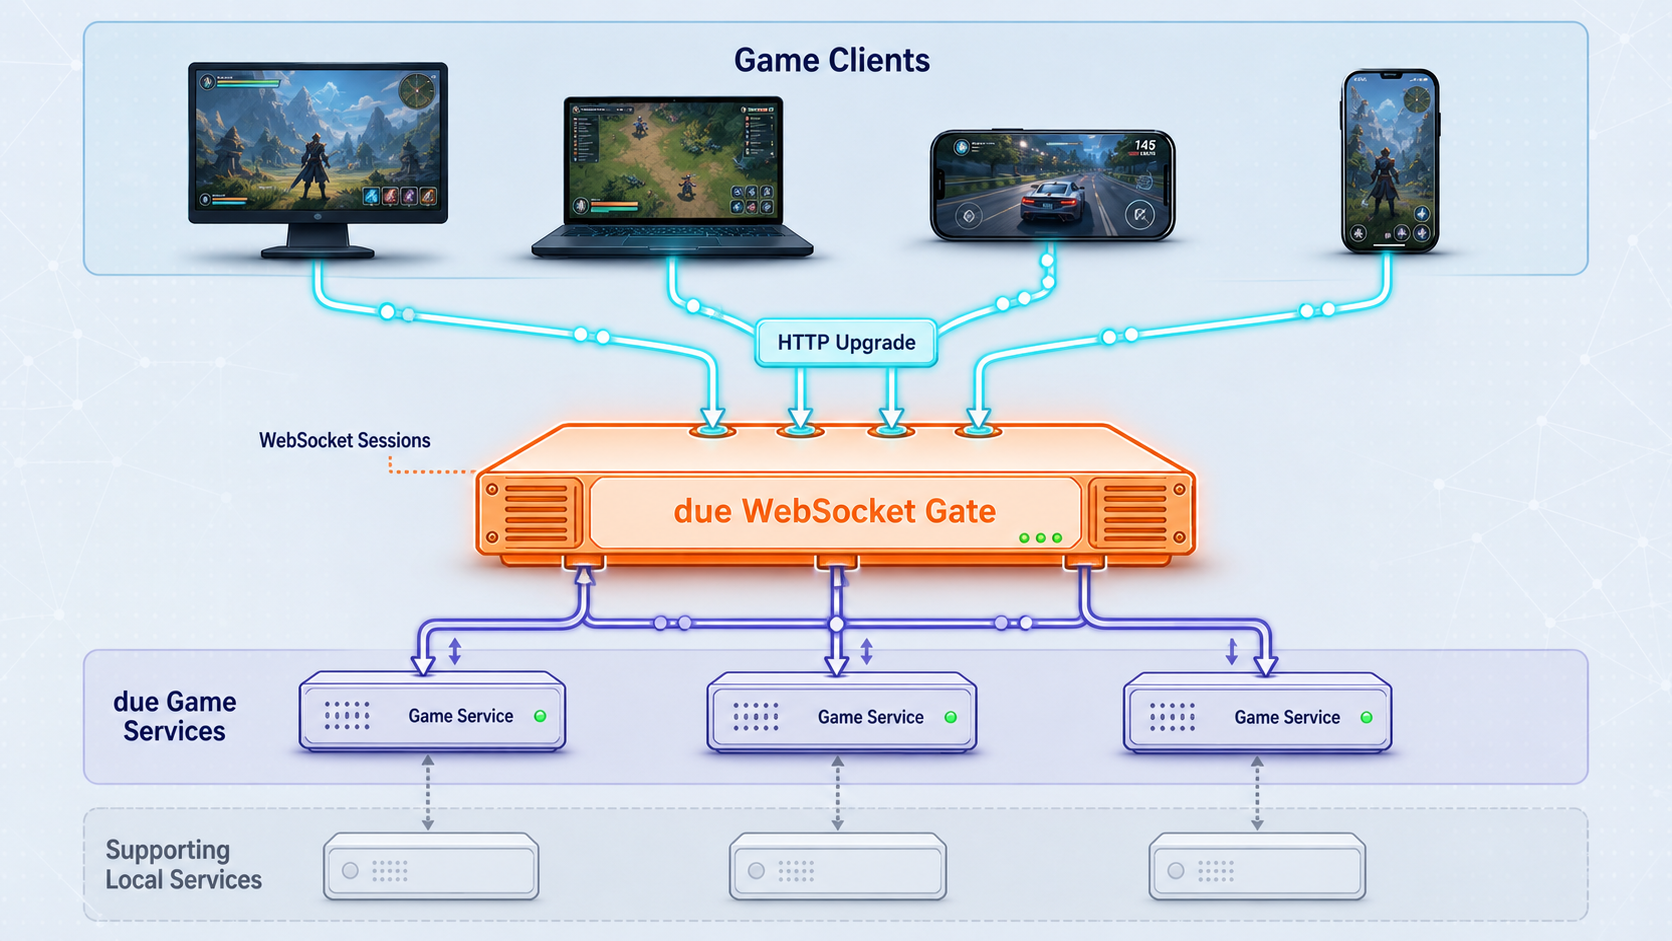
due is a Go framework designed for monolithic and distributed game-server architectures. Its modules cover gateways, service discovery, configuration, cluster communication, event buses, caching, distributed locks, logging, and several serialization and transport choices. The framework includes native network components for TCP, KCP, and WebSocket connections, while its broader service stack includes technologies such as gRPC and RPCX.
This tutorial focuses on the concrete WebSocket quick-start path documented by the due project. That distinction matters because the project supports more transports than the example actually configures. We should not assume that a WebSocket Gate automatically creates equivalent TCP or KCP listeners. Those transports require their own components and configuration.
Gate, Node, and Mesh responsibilities
In due terminology, the Gate is the client-facing gateway. It manages client connections, receives routed messages, and distributes those messages to the appropriate Node service. A Node contains core game logic and can be stateful or stateless, depending on the application. Mesh services are intended for stateless microservice logic. A Node can perform work that could otherwise live in a Mesh service, so the correct choice depends on the state and lifecycle requirements of the game.
The example in this guide creates only the Gate program because that is the complete listener example established by the supplied project evidence. A production game needs one or more Node services, business routes, message handlers, persistent data decisions, and an authentication model. Starting the Gate confirms that the network and cluster-facing gateway can run, but it does not create a complete game backend by itself.
Why an HTTP tunnel is appropriate for this example
A WebSocket connection begins with an HTTP request containing an upgrade negotiation. Once the server accepts that negotiation, the connection changes from ordinary HTTP request and response behavior to a persistent, bidirectional WebSocket stream. Because the due example exposes WebSocket rather than a raw TCP quick-start listener, an HTTP tunnel is the appropriate Localtonet family for this workflow.
This protocol choice does not mean that every due transport should use an HTTP tunnel. A future due configuration that exposes a raw TCP listener would normally require a TCP tunnel. KCP is UDP-based, so its transport requirements differ as well. Always match the tunnel to the listener that is actually running instead of selecting a tunnel from the framework’s general capability list.
| due capability | Role | Scope in this guide |
|---|---|---|
| WebSocket | Persistent browser-compatible client connection beginning with an HTTP upgrade | Configured and exposed through an HTTP tunnel |
| TCP | Raw stream transport for compatible game clients | Supported by due, but no equivalent listener is configured here |
| KCP | UDP-based reliable transport for compatible clients | Supported by due, but outside this evidenced quick-start workflow |
| gRPC and RPCX | Service-to-service communication options | RPCX is imported as a dependency in the quick start, but it is not the public client listener |
Prerequisites for the due quick start
Prepare a development machine with Go, Docker, and Docker Compose. You also need a copy of the due repository because its documented quick start uses a Compose configuration supplied in the repository’s docker directory. The evidence does not establish exact minimum versions of Go, Docker, or Docker Compose, so we will not invent version requirements. Use versions compatible with the current due source and its Compose file.
The Gate source imports Redis locator, Consul registry, WebSocket network, and RPCX transport modules. The repository’s supporting-service configuration should be started before the Gate. The supplied evidence does not enumerate every container, image, port, volume, or credential in that Compose configuration. Inspect the checked-out Compose file before using it, especially on a shared or production host.
What you need before continuing
- A working Go toolchain available in your terminal.
- Docker and the documented
docker-composecommand available on the machine. - A local copy of the due repository, including its
docker/docker-compose.yamlfile. - A writable Go module workspace for the Gate program.
- Local port 3553 available for the demonstrated WebSocket listener.
- Permission to start containers and bind a local network port.
- A Localtonet client installation for the later remote-access stage.
A Compose file can publish ports, create persistent volumes, and start infrastructure services. Read the repository’s current docker-compose.yaml before running it. Do not assume that a development configuration has production-safe credentials, network boundaries, storage, or backup behavior.
Use a module workspace
The project’s documented dependency commands use go get. With current Go workflows, run them inside an existing Go module. The module path is chosen by the developer or organization and is not specified by due’s quick-start excerpt, so this guide does not prescribe or fabricate one. If you are creating a fresh project, initialize it according to your organization’s Go module naming convention before running the dependency commands below.
Avoid placing the sample directly into an unrelated application module. A small dedicated workspace makes it easier to inspect dependency changes, remove the experiment, and distinguish framework setup failures from existing application conflicts.
Install due and start its supporting services
The official quick-start sequence begins by starting the supporting components, then retrieves due and the modules used by the example. Preserve that order so Consul and Redis-related dependencies can be available when the Gate starts.
Open the repository’s docker directory
Use a terminal to enter the docker directory from your local copy of the due repository. Confirm that docker-compose.yaml is present and review its current contents before running it. The absolute repository path depends on where you downloaded or cloned it.
Start the supplied supporting components
From the directory containing the Compose file, run the command documented by due:
docker-compose upKeep this process running while testing the Gate, unless your local Compose workflow deliberately starts it in another managed mode. Read the terminal output for failed image pulls, occupied ports, permission errors, or unhealthy services.
Move to your Go module workspace
Open a separate terminal and enter the Go module where the example Gate will live. Verify that you are not unintentionally changing another project’s dependency graph. The workspace path and module name are specific to your environment.
Retrieve due and the required modules
Run the dependency commands from the due quick start:
go get -u github.com/dobyte/due/v2@latest
go get -u github.com/dobyte/due/locate/redis/v2@latest
go get -u github.com/dobyte/due/network/ws/v2@latest
go get -u github.com/dobyte/due/registry/consul/v2@latest
go get -u github.com/dobyte/due/transport/rpcx/v2@latest
These commands intentionally use @latest because that is the documented quick-start form. The resolved versions can change over time. Record the resulting module files and review dependency updates before treating the experiment as a reproducible build.
The supplied release evidence identified due v2.5.8 as the latest release at the time it was captured, while the quick start uses @latest. A later run can resolve a newer version. For a maintained application, test an intentionally selected dependency set and commit the resulting go.mod and go.sum files. Do not copy an old startup banner’s version number and assume it describes the dependencies you installed.
Create and start the due WebSocket Gate
Create a main.go file in the Go module workspace. The example assembles a due container, a WebSocket server, a Redis locator, and a Consul registry. It then passes those dependencies to a Gate component, adds that component to the container, and starts the container.
package main

import (
	"github.com/dobyte/due/locate/redis/v2"
	"github.com/dobyte/due/network/ws/v2"
	"github.com/dobyte/due/registry/consul/v2"
	"github.com/dobyte/due/v2"
	"github.com/dobyte/due/v2/cluster/gate"
)

func main() {
	// Create the due container.
	container := due.NewContainer()

	// Create the WebSocket server.
	server := ws.NewServer()

	// Create the Redis-backed user locator.
	locator := redis.NewLocator()

	// Create the Consul service registry.
	registry := consul.NewRegistry()

	// Create the Gate component.
	component := gate.NewGate(
		gate.WithServer(server),
		gate.WithLocator(locator),
		gate.WithRegistry(registry),
	)

	// Add the Gate to the container.
	container.Add(component)

	// Start the container.
	container.Serve()
}
The comments above explain the same operations as the documented example without changing its component structure. No explicit listener address appears in this source because the WebSocket server is created with its defaults. In the documented demonstration, the local client endpoint is 0.0.0.0:3553. The wildcard address means the process accepts connections through available interfaces, subject to the host’s networking rules.
Binding to 0.0.0.0 can make the Gate reachable from other systems on the same network when host firewall and network policy permit it. For a local experiment, review who can reach port 3553. The supplied quick-start evidence does not establish a supported due configuration option for changing that bind address, so this article does not invent one.
Start the Gate from the directory containing main.go:
go run main.goLeave the process running. The due startup output should appear in the terminal. Focus on whether the process remains active and whether it reports dependency, registry, locator, or address-binding failures. Banner text and reported framework versions can differ between releases, so do not use an old sample banner as the verification criterion.
What this program does and does not do
This Gate accepts WebSocket connections and participates in the framework’s cluster arrangement through the selected locator and registry components. It does not define game routes, account login, authorization, matchmaking, player state, or message handlers. It also does not include the corresponding game client implementation.
due’s application protocol is more specific than ordinary text sent over a WebSocket. Its documented data packet includes a four-byte size field, a header containing a heartbeat marker and extension code, a route field, an optional sequence field, and message data. The route defaults to two bytes and the sequence defaults to two bytes, although those sizes can be changed by the application’s packer configuration. Heartbeat packets use a related format and can carry server time on downstream responses.
Consequently, a generic WebSocket tool can establish whether the network upgrade succeeds, but it cannot automatically prove that application-level due packets are encoded correctly. End-to-end game verification requires a due-compatible client and routes implemented by the game.
Verify the WebSocket Gate locally before tunneling it
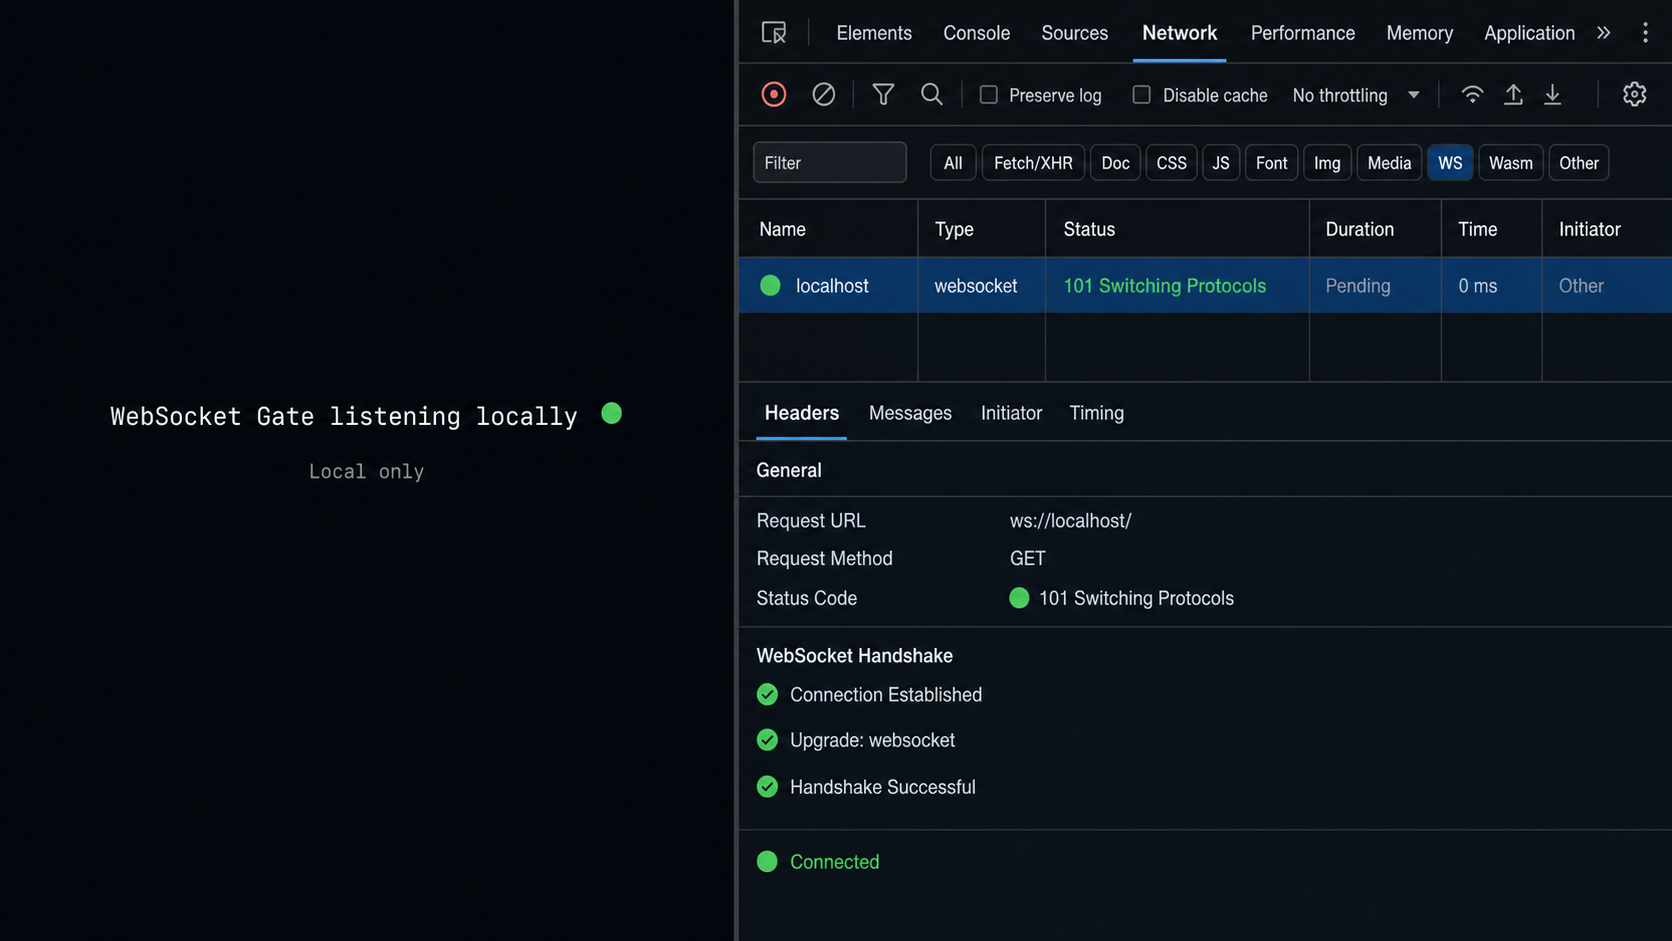
Local verification separates application problems from tunnel problems. If the Gate cannot accept a connection on the same machine, exposing it remotely will not fix its dependency, configuration, or protocol errors.
Confirm the supporting services remain available
Return to the Compose terminal and confirm that it has not exited with an error. Investigate failed containers or repeated connection messages before testing the Gate. The Gate depends on the locator and registry modules configured in the example.
Confirm the Gate process remains running
The go run main.go terminal should remain active. If it exits, read the first meaningful error rather than only the final exit status. Common categories include unavailable supporting services, a dependency mismatch, or another process already using port 3553.
Check that port 3553 is listening
Use your operating system’s socket inspection interface to verify that the due process is listening on TCP port 3553. Commands differ among Windows, macOS, and Linux, and no specific cross-platform inspection command is established by the supplied due evidence, so use the standard tool for your operating system.
Attempt a local WebSocket upgrade
Point a WebSocket-capable test client at ws://127.0.0.1:3553. Use the exact path required by your due application if you later configure one. A successful open event confirms the listener and WebSocket handshake, while an immediate error requires inspection of the Gate logs and client details.
Separate transport validation from game-protocol validation
Do not send arbitrary text and treat the resulting disconnect as proof that the tunnel or WebSocket server is broken. A complete functional test must encode the due packet header, route, sequence, payload, and heartbeat behavior expected by your application.
A minimal browser-side connection check
For a development-only handshake check, a browser page served from an appropriate development context can use the standard WebSocket API. The following snippet tests the documented local endpoint. It does not encode due application packets:
const socket = new WebSocket("ws://127.0.0.1:3553");

socket.addEventListener("open", () => {
  console.log("WebSocket transport opened");
});

socket.addEventListener("error", (event) => {
  console.error("WebSocket transport error", event);
});

socket.addEventListener("close", (event) => {
  console.log("WebSocket closed", event.code, event.reason);
});
Browser security policies can affect tests. In particular, a page loaded over HTTPS normally should not open an insecure ws:// connection. Test the local endpoint from a suitable local development context, or use a dedicated WebSocket client. Once the service is available through a public HTTPS address, the corresponding secure WebSocket scheme is wss://.
Use three distinct checks: confirm the process and listening socket, confirm the WebSocket upgrade, and then confirm due-formatted game messages with a compatible client. This separation makes it much easier to identify whether a failure belongs to the operating system, WebSocket transport, due packet format, or game logic.
Expose the working due WebSocket Gate with Localtonet
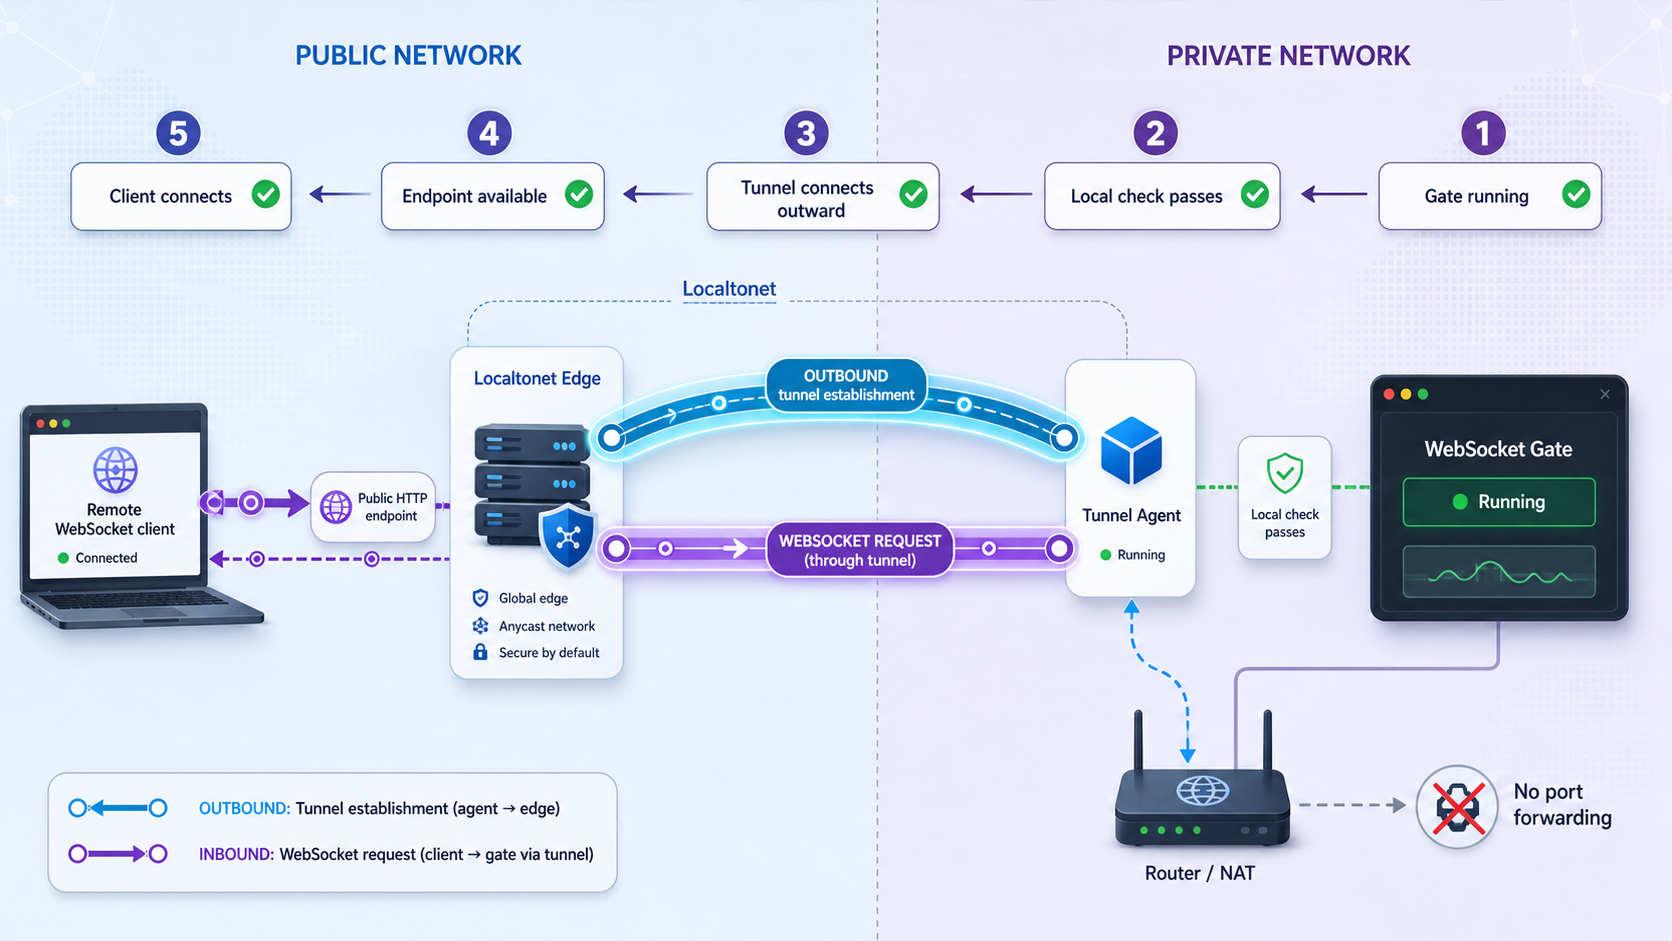
After local verification succeeds, use an HTTP tunnel to publish the Gate. Our client runs on the device that can reach 127.0.0.1:3553 and creates an outbound connection to a Localtonet relay server. The tunnel then provides a public address without requiring inbound router port forwarding, a public IP address, firewall changes, or VPN setup.
Creating a tunnel is not the same as running it. You must start the tunnel, and it remains available only while the selected Localtonet client is connected and the tunnel is running. If the Gate, our client, or the tunnel stops, remote WebSocket connections will fail or disconnect.
Install and run the Localtonet client
Install our client on the same machine as the due Gate, or on another device that can reach the Gate’s local address and port. Keep the client running for as long as remote access is required. Exact installation commands vary by operating system and client version, so obtain the current installer and instructions from our platform rather than using an unverified command.
Authenticate or select the client device
Use the device-specific authentication token assigned through Localtonet to identify the client that will run the tunnel. Treat the token as a secret. Never place it in source code, screenshots, logs, browser JavaScript, or a public repository.
Select an available relay server
Choose a currently available server or region from the Localtonet dashboard. Available server codes and regions can change and can vary by plan or deployment, so this guide does not hardcode a value.
Create an HTTP tunnel to the local Gate
Configure the tunnel’s local target as the IP address and port reachable from the selected client device. When our client runs on the due host, use 127.0.0.1 as the local IP and 3553 as the local port. Select the appropriate HTTP process type available for your account, such as a random subdomain, supported custom subdomain, or custom domain.
Start the tunnel
Use the Start button after reviewing the target. Creation alone does not make the tunnel active. Wait until the selected client and tunnel indicate that they are connected before testing the public address.
Connect with the public WebSocket URL
Take the public HTTPS address assigned to the HTTP tunnel and use its host with the secure WebSocket scheme, wss://. Preserve any application path and query string required by your final Gate implementation. Then repeat the transport and due-protocol tests performed locally.
For the current dashboard workflow, consult our Localtonet HTTP tunnel documentation. Exact custom-domain DNS records are intentionally not reproduced here because they must be checked against the current documentation and the configuration shown in your dashboard.
Translate the public HTTPS address to a WebSocket address
Suppose the dashboard assigns an HTTPS address represented here as https://assigned-public-host.example. A WebSocket client uses the same host with wss://:
const socket = new WebSocket("wss://assigned-public-host.example");The hostname above is deliberately illustrative and is not a real Localtonet endpoint. Always copy the address actually assigned to your tunnel. If your game client connects to a specific path, append that same path. Do not add a path merely because another WebSocket application uses one.
A public tunnel changes who can attempt to connect. Implement authentication, authorization, session validation, rate controls, input limits, and route-level permissions in the application before exposing sensitive game operations. A successful WebSocket connection must not automatically grant a user access to privileged routes.
Operate and maintain the due tunnel workflow
A development demo often runs three separate layers: the supporting containers, the due Gate process, and the Localtonet client with its active HTTP tunnel. Treat each as an independent lifecycle. Restarting one layer does not guarantee that the others reconnect cleanly or that existing WebSocket sessions survive.
| Layer | What it provides | Failure symptom | Operational check |
|---|---|---|---|
| Compose services | Infrastructure used by the Redis locator and Consul registry | Gate startup, registration, location, or cluster errors | Inspect container state and service logs |
| due Gate | WebSocket listener and client-facing gateway component | Local and remote connections fail | Confirm the process and port 3553 listener |
| Localtonet client | Outbound connection from the device to our relay | Tunnel reports disconnected or the public address is unavailable | Confirm the selected device is connected |
| HTTP tunnel | Public address forwarding to the local Gate target | Local WebSocket works but public WebSocket does not | Confirm the target, tunnel state, and assigned URL |
| Game client protocol | Authentication and correctly encoded due packets | WebSocket opens but requests fail or disconnect | Inspect packet encoding, route, sequence, and server logs |
Starting the stack
Start the repository’s supporting components first. Once they are ready, run the Gate and verify it locally. Then run the Localtonet client, confirm the correct device is connected, and start the HTTP tunnel. This order reduces misleading errors because each new layer is tested against a working lower layer.
Stopping the stack
Stop new remote access first by stopping the Localtonet tunnel. Then stop the Gate and supporting services using the normal controls for the processes you started. If the public endpoint is no longer needed, delete the tunnel rather than leaving an unused configuration available for accidental restart.
Stopping a tunnel interrupts active WebSocket sessions. Applications should handle disconnects explicitly and decide whether clients may reconnect, resume a session, or must authenticate again. Those policies belong to the game application and are not supplied by the basic Gate example.
Changing the local target
If the Gate moves to another machine, do not assume that 127.0.0.1 still points to it. Loopback always refers to the Localtonet client’s own machine. Either run our client on the Gate host or enter a local network address that the client device can actually reach. Verify that path locally from the client device before changing the tunnel.
Updating due
Test framework and module updates in a non-production environment. The supplied v2.5.8 release notes include fixes related to gateway network-event timeouts, registry watches, locator watches, and additional etcd registry and configuration credentials. That is a useful reminder that framework changes can affect connection and cluster behavior even when the Gate source code does not change.
Keep dependency changes reviewable. Record module file updates, run local transport checks, run due-protocol tests, and only then repeat remote tests. Avoid combining a due upgrade, infrastructure change, and tunnel target change in one unobserved deployment.
Troubleshoot due WebSocket and tunnel failures
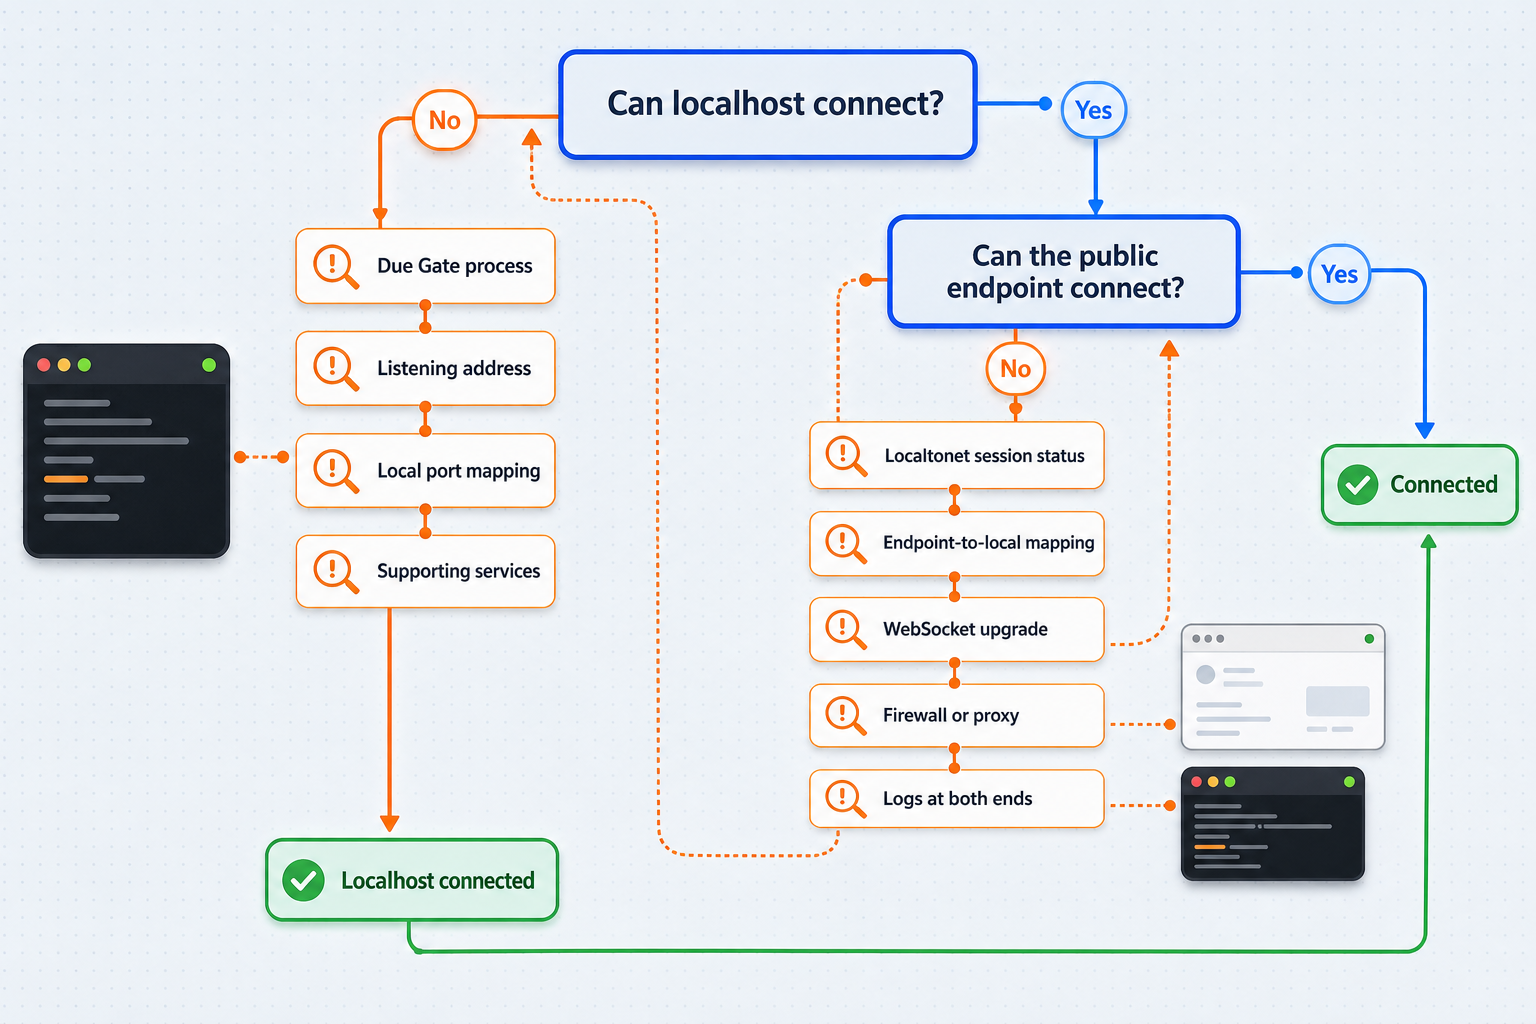
The Gate exits immediately
Start with the earliest meaningful error in the Gate terminal. Confirm that the Compose process is still running and that its services started successfully. Then verify that the Go module contains the dependencies imported by main.go. If the error reports that the address is already in use, identify the process occupying port 3553 or stop the duplicate Gate instance.
Do not solve a local startup failure by changing the tunnel. Localtonet forwards traffic to the target you configure, but it cannot make a stopped process begin listening.
Port 3553 is not listening
Verify that go run main.go remains active. Compilation success alone does not establish that the server completed startup. Review registry and locator connection errors, inspect supporting services, and check whether a security tool prevented the process from binding.
The documented demonstration uses 0.0.0.0:3553, but defaults can evolve. Trust the runtime configuration and current project version rather than assuming that every future version will preserve the same default. If your installed version behaves differently, consult its configuration and release documentation instead of guessing an unsupported option.
A normal HTTP request does not return a web page
The listener is a WebSocket gateway, not a conventional website. Typing its address into a browser navigation bar sends an ordinary page request, which is not equivalent to a WebSocket upgrade initiated by the WebSocket API. Use a WebSocket-capable client and inspect the upgrade result.
The local WebSocket works but the public connection fails
Confirm that the Localtonet client is connected, the HTTP tunnel is running, and its target is the correct IP and port. When the client runs on the Gate host, the expected target is 127.0.0.1:3553. If our client runs elsewhere, verify from that device that the Gate host is reachable.
Ensure that the client uses the public host assigned to the active tunnel, not a stale address from a deleted configuration. For an HTTPS public endpoint, use wss:// from browser and secure-page contexts. Preserve the correct application path.
The WebSocket opens and then closes
This can mean the transport works while the application protocol does not. due does not treat arbitrary WebSocket text as a valid routed game packet. Check the packet size, heartbeat marker, route width, sequence width, message encoding, and any authentication or handshake implemented by the game.
Also check whether the Gate depends on a Node that is absent or has no matching route handler. The minimal program in this guide creates the Gate only. A connection to the gateway does not guarantee that a complete backend exists for every client request.
The public endpoint works briefly and then becomes unavailable
Check all three long-running processes: supporting containers, Gate, and Localtonet client. Also confirm that the tunnel remains started. A tunnel is available only while its selected client is connected and the tunnel is running. Device sleep, process termination, network changes, and a manually stopped tunnel can interrupt access.
The browser reports mixed-content or security errors
A web page loaded over HTTPS should connect through wss://, not ws://. Use the secure WebSocket form of the public HTTPS host. The local ws://127.0.0.1:3553 endpoint is suitable for an appropriate local development test, but it should not be embedded into a secure public page.
Remote connections reach the wrong application
Verify the tunnel target and inspect which process owns port 3553. If another process acquired the port after the Gate stopped, the tunnel can forward to that process instead. Stop the tunnel while investigating unexpected target behavior, then restart it only after confirming the listener identity.
Verify supporting services, Gate process, listening port, local WebSocket upgrade, due packet exchange, Localtonet client connection, tunnel state, and finally the public WebSocket client. Testing in that order prevents a public connectivity symptom from hiding a local application failure.
Security considerations for a public game gateway
Remote reachability and application authorization are separate concerns. With Localtonet, our client establishes the outbound relay connection and publishes the configured local service. Your due application must still decide who may connect, which account a connection represents, which routes that account can call, and how malformed or excessive traffic is handled.
Protect credentials and device tokens
The Localtonet authentication token identifies the device that runs a tunnel. Keep it out of the Gate source, browser client, Compose file, committed environment files, build logs, issue reports, and screenshots. If a secret is accidentally disclosed, treat it as compromised and replace it through the appropriate account workflow.
Apply the same discipline to Redis, Consul, databases, signing keys, and game-service credentials. The due release evidence shows that credential support can differ by component and version. Confirm the exact configuration supported by the version you deploy rather than inventing environment variable names or configuration fields.
Authenticate before privileged routes
Design the initial connection as untrusted. Authenticate the player before accepting state-changing operations, bind the authenticated identity to the session, and authorize every route that accesses player or administrative state. Do not rely only on an identifier supplied by the client.
Validate due packets defensively
Enforce packet-size limits, accepted route ranges, sequence rules, payload schemas, and message-rate policies. Reject malformed frames without performing expensive work. Heartbeat behavior should have explicit timeout and replay expectations so abandoned sessions do not consume resources indefinitely.
Limit administrative exposure
Keep management endpoints separate from the public player gateway whenever possible. Apply least privilege, network restrictions, and strong authentication to operational interfaces. Expose only the local port required for the WebSocket Gate, and stop or delete its tunnel when remote access is no longer needed.
Plan for disconnects
Persistent WebSocket sessions can end because of client mobility, device sleep, application restarts, dependency failures, or tunnel lifecycle changes. Define safe reconnection and session-resumption behavior. A resumed connection should not inherit authorization merely because it presents a stale connection identifier.
Do not treat the quick start as a production deployment design
The quick start is useful for learning how due’s components fit together. It does not establish production credentials, data persistence, monitoring, backup, high availability, capacity planning, deployment topology, or abuse controls. Review each infrastructure service and framework module before using the stack for real players.
Frequently asked questions
Which local port does the due WebSocket Gate use in this example?
The documented demonstration exposes the WebSocket Gate at 0.0.0.0:3553. For a Localtonet client running on the same host, configure the HTTP tunnel target as 127.0.0.1 and port 3553. Confirm the actual runtime listener before creating the tunnel because framework defaults can change.
Why should I use a Localtonet HTTP tunnel for WebSocket?
WebSocket starts with an HTTP upgrade request, so the evidenced due WebSocket listener fits an HTTP tunnel. Use the public HTTPS host as a secure wss:// WebSocket address. A separate raw TCP or KCP listener would require a tunnel matched to that transport instead.
Does opening the WebSocket prove that the due game protocol works?
No. It proves only that the WebSocket transport and upgrade succeeded. due packets contain a specific size, header, route, optional sequence, and message layout. Full verification requires a compatible client, valid packet encoding, implemented routes, and the required Node-side game logic.
Does this quick start create a complete due game server?
No. It creates the Gate that manages client connections and routes messages. A complete backend also needs Node or Mesh services as appropriate, route handlers, game logic, authentication, authorization, persistence decisions, and a compatible client.
Can I expose due TCP or KCP through the same HTTP tunnel?
Do not assume so. due supports TCP, KCP, and WebSocket network components, but this guide configures only WebSocket. A raw TCP listener should use an appropriate TCP tunnel, while a UDP-based KCP listener has different transport requirements. Configure and verify the actual due listener first, then select the matching Localtonet tunnel family.
Must the Localtonet client run on the same machine as due?
No. It can run on another device that can reach the due host. In that arrangement, configure the tunnel with the Gate machine’s reachable local network address instead of 127.0.0.1. Loopback always refers to the machine running our client.
Is the public WebSocket available after I create the tunnel?
Not until you start it. Creating a Localtonet tunnel does not mean it is running. The selected client device must be connected, and the tunnel must be started. The endpoint remains available only while both conditions continue to be true.
Should I use ws:// or wss:// for the public endpoint?
Use wss:// with the host from the public HTTPS tunnel address, especially from pages loaded over HTTPS. The local development endpoint is represented as ws://127.0.0.1:3553, while the public secure endpoint uses the assigned host and the wss:// scheme.
Connect your verified due WebSocket Gate with Localtonet
Start the due supporting services, confirm the Gate on port 3553, and then create an HTTP tunnel from the Localtonet client that can reach it. Keep application authentication and due-protocol validation in place before sharing the public WebSocket address.
Get Started Free →

