

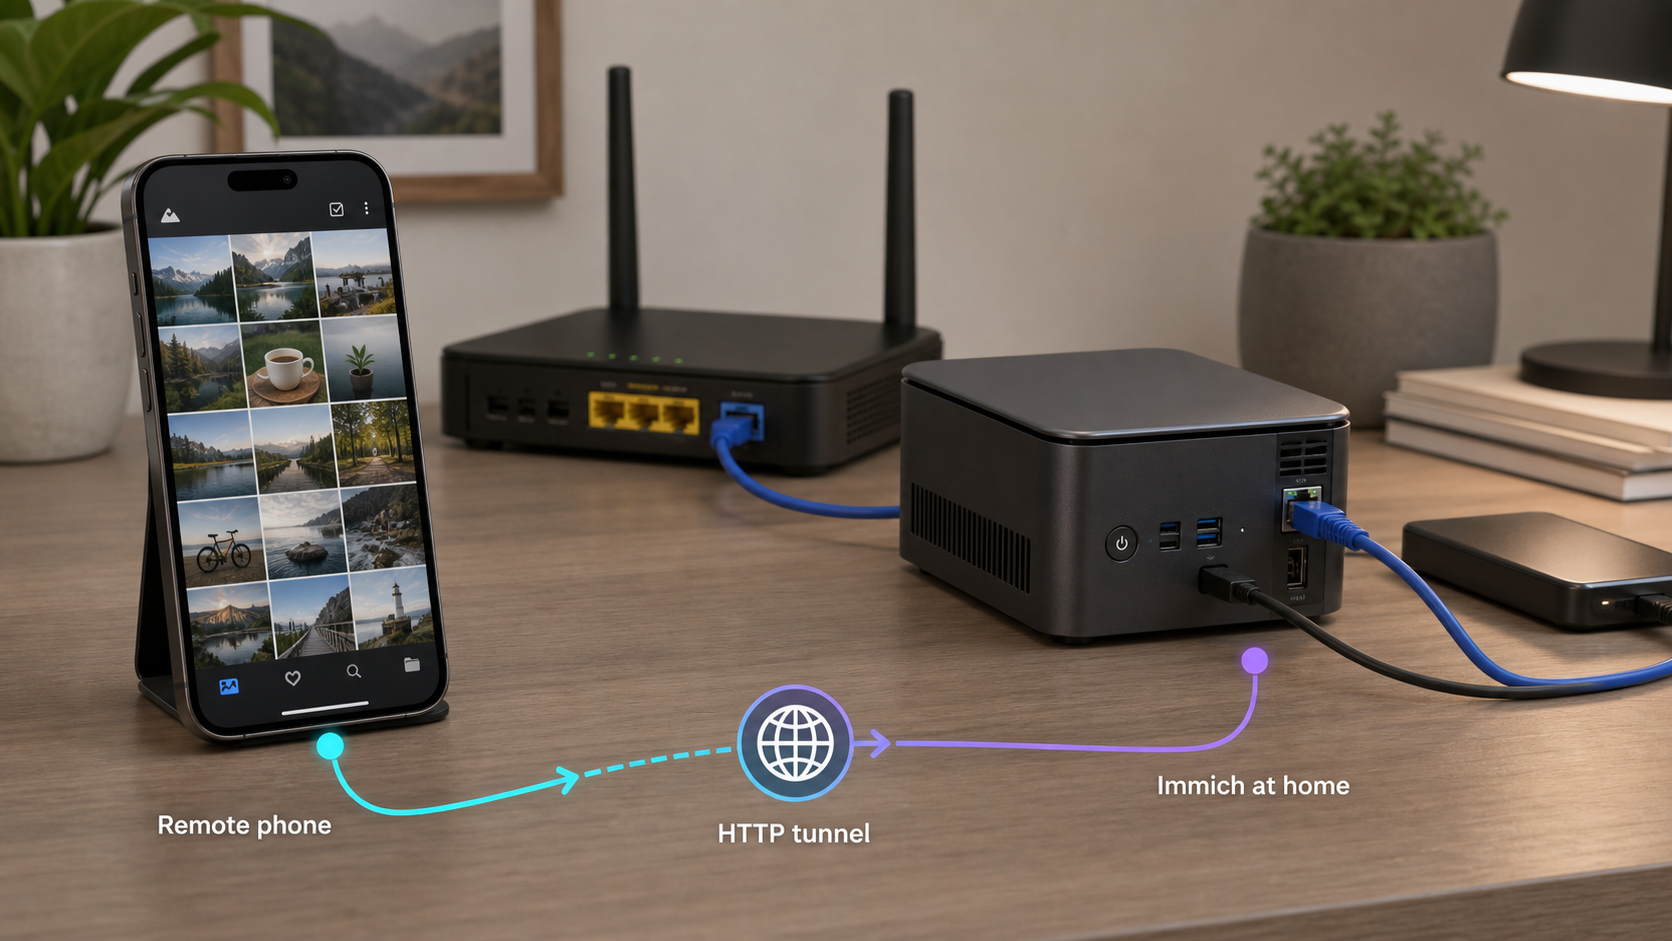
Build a private photo server, verify it locally, then publish only its web port
Immich can organize and back up a photo library on hardware you control. This guide scopes the server installation to Ubuntu and the official Docker Compose deployment path, then shows how to expose the Immich web service through Localtonet without inbound router port forwarding, firewall changes, a public IP address, or VPN setup. It also covers mobile backup validation, public-exposure security, backups, controlled updates, monitoring, and troubleshooting. Because Immich changes frequently, the installation uses files from the current Immich release instead of hardcoded image tags or version-specific settings.
📋 What's in this guide
Understand the deployment before installing it
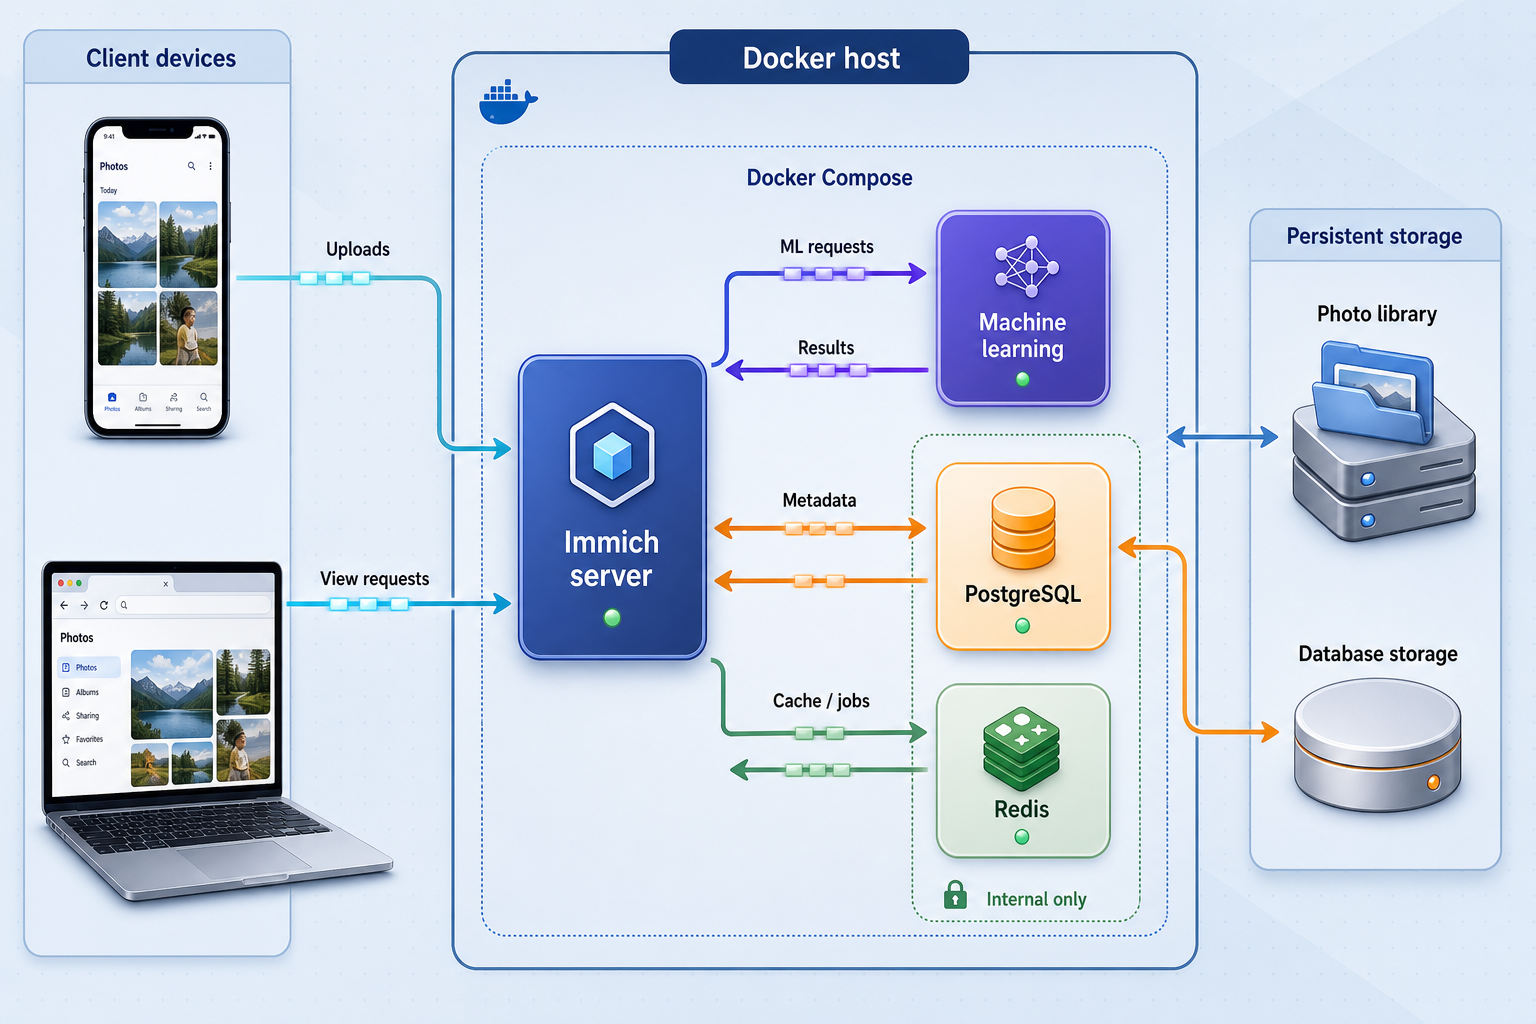
Immich is a self-hosted photo and video management application with web and mobile clients. The mobile applications can upload selected device albums to your server, while the web interface provides library browsing and administration. Features such as thumbnail generation, metadata extraction, search, face processing, and video processing are handled by services and background jobs within the deployment.
Self-hosting changes who operates the storage and application. It does not eliminate the need for security, backups, monitoring, or sufficient capacity. Your server remains responsible for storing the originals and application data, and publishing the login page creates an internet-reachable application that must be maintained accordingly.
The resulting request path is:
Phone or browser
        |
        v
Public Localtonet HTTPS address
        |
        v
Selected Localtonet relay
        |
        v
Outbound Localtonet client on the server
        |
        v
127.0.0.1:2283
        |
        v
Immich server
   |        |        |
   v        v        v
PostgreSQL  Job queue  Machine-learning service
        |
        v
Photo and video storageWhen you use this configuration, public traffic traverses the Localtonet relay server selected for the tunnel. The tunnel is available only while the selected device is connected to Localtonet and the tunnel is running. Keep this data path in mind when evaluating your own privacy, regulatory, and operational requirements.
Prerequisites and capacity planning
This tutorial uses a dedicated or always-on Ubuntu host. Other operating systems can run Docker, but their Docker installation and storage behavior differ. The Ubuntu-specific repository commands below must not be copied to Debian or another distribution. If you use a different operating system, install a currently supported Docker Engine and Docker Compose plugin using that operating system's official Docker instructions, then resume at the Immich installation section.
Immich updates its documented requirements as the application evolves. Before provisioning hardware, compare your system with the current Immich requirements documentation. Do not treat old blog estimates as permanent minimums. In particular, machine-learning jobs, video transcoding, large imports, and concurrent mobile uploads can require substantially more resources than an idle server.
| Resource | Planning requirement | Why it matters |
|---|---|---|
| CPU architecture | Use an architecture supported by the current Immich release and its container images. | Image availability and optional acceleration support are architecture-specific. |
| Memory | Meet the current documented minimum and leave headroom for model loading, imports, and transcoding. | An idle measurement does not represent peak processing demand. |
| Library storage | Provide space for the current library, new uploads, generated files, and operational free space. | There is no universal multiplier that accurately predicts every library's generated data. |
| Database storage | Use a filesystem and storage location supported by the current Immich documentation. | Database files have stricter consistency and locking requirements than ordinary media files. |
| Backup storage | Keep independent copies of both required filesystem data and a usable database backup. | A copy on the same disk does not protect against disk failure, theft, or destructive mistakes. |
| Network | Provide reliable outbound internet connectivity to the host. | Docker pulls, model downloads, Localtonet relay connectivity, and remote uploads depend on it. |
Do not create public tunnels to PostgreSQL, the job queue, the Docker socket, the machine-learning service, or a host administration interface. For this workflow, the Localtonet target is only 127.0.0.1:2283. Database passwords, Localtonet device tokens, API keys, and backup credentials must not be placed in screenshots, public repositories, chat messages, or shell history unnecessarily.
You will need an Ubuntu account with administrative access, a persistent directory for the deployment, a current Docker Engine with the Compose plugin, and a Localtonet device token for the machine that will run the tunnel. You should also decide where the media library and database will live before uploading a large collection.
Install Immich with the official Docker Compose release
Install Docker Engine on Ubuntu
The following commands intentionally configure Docker's Ubuntu repository. They are not Debian instructions. Review Docker's current Ubuntu installation documentation if your Ubuntu release, package state, or security policy requires a different installation path.
sudo apt-get update
sudo apt-get install -y ca-certificates curl
sudo install -m 0755 -d /etc/apt/keyrings

sudo curl -fsSL https://download.docker.com/linux/ubuntu/gpg \
  -o /etc/apt/keyrings/docker.asc
sudo chmod a+r /etc/apt/keyrings/docker.asc

echo \
  "deb [arch=$(dpkg --print-architecture) signed-by=/etc/apt/keyrings/docker.asc] https://download.docker.com/linux/ubuntu \
  $(. /etc/os-release && echo "${UBUNTU_CODENAME:-$VERSION_CODENAME}") stable" | \
  sudo tee /etc/apt/sources.list.d/docker.list > /dev/null

sudo apt-get update
sudo apt-get install -y docker-ce docker-ce-cli containerd.io \
  docker-buildx-plugin docker-compose-plugin
Confirm that Docker and the Compose plugin are available:
sudo docker version
sudo docker compose version
sudo docker run --rm hello-world
You can continue using sudo docker. If you add a user to the docker group, understand that membership grants privileges comparable to root access on the host. Make that change only for trusted administrative users.
Download the Compose and environment files from a release
Use the files attached to an Immich release rather than copying an old Compose definition from a tutorial. This avoids hardcoding container image tags and service definitions that may no longer match one another.
mkdir -p ~/immich-app
cd ~/immich-app

wget -O docker-compose.yml \
  https://github.com/immich-app/immich/releases/latest/download/docker-compose.yml

wget -O .env \
  https://github.com/immich-app/immich/releases/latest/download/example.env
The latest URL resolves to the current release when you download the files. It does not guarantee that a future release will be compatible with an old environment file or an old database state. Keep a copy of the exact Compose file used for each controlled deployment and read the release notes before updating.
Configure persistent locations and secrets
Open the downloaded environment file:
nano ~/immich-app/.envPreserve the variable names and comments supplied by the current release. Configure the upload location, database data location, timezone, database password, and version value according to that file and the current Immich environment-variable reference. Do not add variables copied from old tutorials unless they are present in the current reference.
This guide deliberately does not instruct you to add IMMICH_SERVER_URL. Its availability and effect must be established from the environment-variable reference for the release you deploy. A public tunnel URL does not, by itself, justify adding an undocumented environment variable.
| Configuration | Safe approach | Operational note |
|---|---|---|
UPLOAD_LOCATION |
Choose a persistent path with enough free space and reliable ownership. | This path contains essential filesystem data and must be included in your backup plan. |
DB_DATA_LOCATION |
Choose a persistent local path on a supported filesystem. | Do not assume a network share is suitable for live PostgreSQL data. |
DB_PASSWORD |
Generate a unique value compatible with the current example file's restrictions. | Do not reuse an Immich account password or commit the value to source control. |
TZ |
Use the timezone format requested by the current example file. | Confirm the value rather than copying a sample location. |
| Version setting | Use the release file's documented value or pin a reviewed release when controlled updates are required. | Never combine a new image set with an incompatible old Compose definition. |
Restrict casual access to the environment file and create the configured directories if the release instructions require host paths:
chmod 600 ~/immich-app/.envAbsolute host paths are easier to identify during recovery, but the right locations depend on your storage layout. If you use a mounted data disk, confirm that it is mounted before Docker starts. Otherwise, Docker may write into an empty mount-point directory on the root filesystem, causing unexpected disk exhaustion.
Start and inspect the deployment
cd ~/immich-app
sudo docker compose up -d
sudo docker compose ps
Do not rely on copied example output or a fixed startup delay. Container names, health states, and startup time can change by release and hardware. Wait for the services to become ready, then inspect logs if any service restarts, exits, or remains unhealthy:
sudo docker compose logs --tail=200
sudo docker compose ps
For a continuously updating view during initial startup, use:
sudo docker compose logs -fPress Ctrl+C to leave the log view. This does not stop containers started in detached mode.
Verify Immich on the local host
Test the published port from the server itself before introducing a public tunnel:
curl -I http://127.0.0.1:2283/An HTTP response confirms that something is listening and responding. It does not validate every background service, login flow, upload, or processing job. Open http://127.0.0.1:2283 in a browser on the host, or use the server's LAN address and port from a trusted device if the Docker port binding permits LAN access.
Complete Immich's current first-run flow and create the initial administrator account. Use a strong, unique password stored in a password manager. After signing in, inspect the administration interface, confirm that expected services and jobs are healthy, and upload a non-sensitive test image before importing an entire library.
The first account is security-sensitive. Finish initial setup on a trusted network before creating the Localtonet tunnel. Review the current Immich controls for user creation or registration, disable open registration where the deployed version supports that control and you do not need it, create only required accounts, and grant administrator privileges only where necessary.
Prepare Immich for safe public exposure
A tunnel removes the need to accept unsolicited inbound connections at your router, but it still creates a public route to the configured application. Anyone who discovers the public address can attempt to load the login page, test credentials, or probe the exposed web service. Treat this as internet exposure, not as a private LAN deployment.
127.0.0.1:2283. Do not expose the database, queue, machine-learning service, or Docker administration endpoints.
Protect the host as well as the application. Apply Ubuntu security updates, restrict SSH administration, remove unused services, keep Docker and its plugins current, and limit interactive access to trusted administrators. Avoid storing personal photos in world-readable directories. Confirm that backup destinations are protected from other users and that credentials are not included in diagnostic bundles.
If the deployment is used by a household or organization subject to contractual, legal, or regulatory obligations, review whether routing public photo traffic through a selected third-party relay is acceptable for that use case. This article does not claim that a standard tunnel configuration satisfies any particular compliance framework.
Expose Immich through a Localtonet HTTP tunnel
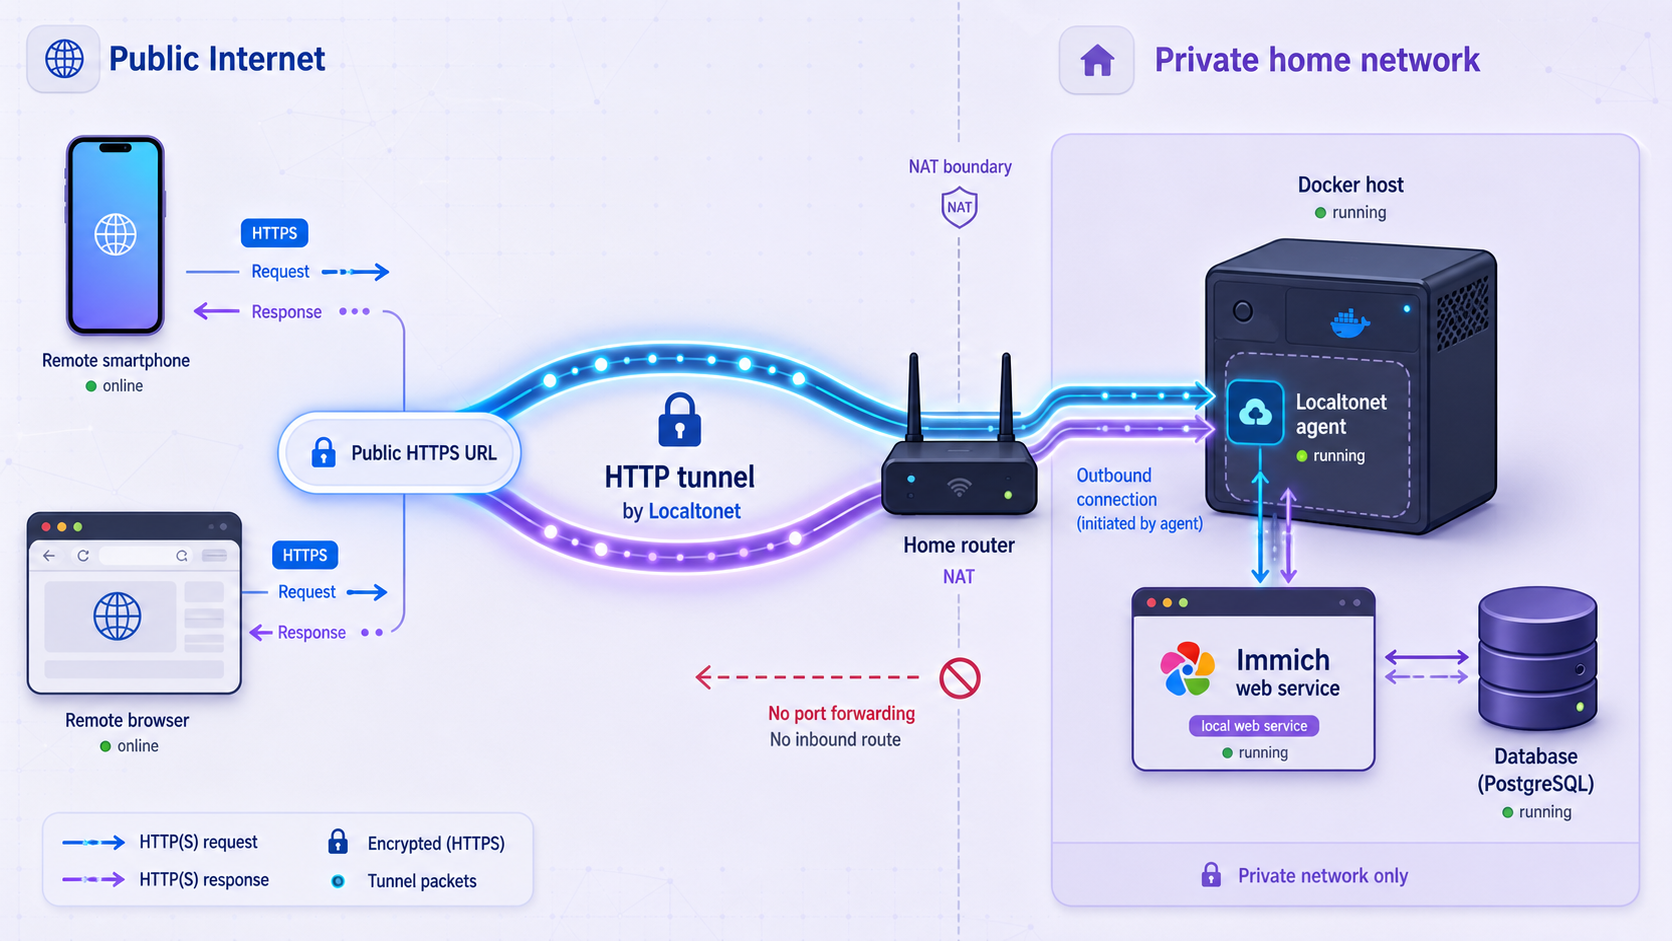
With Localtonet, the client on your Immich host establishes an outbound connection to one of our relay servers. You do not need inbound router port forwarding, firewall changes, VPN setup, or a public IP address. The tunnel provides a public HTTPS address that forwards to the local Immich server.
HTTP tunnel Process Type can be Random Sub Domain, Custom Sub Domain, or Custom Domain. All three serve the target at a public HTTPS address. Availability can vary by plan, client version, or current dashboard configuration, so do not assume that a specific subdomain, custom domain, or relay region will be available. Obtain current choices directly from the dashboard.
Install and run the Localtonet client
Install the Localtonet application on the Ubuntu host that runs Immich, or on another device that can reliably reach the Immich service. Keep the client running for as long as remote access is required.
Select the device-specific authentication token
Use the AuthToken associated with the client device that will run this tunnel. Treat the token as a secret. Do not copy a token into this article's commands, screenshots, source control, or support logs.
Choose an HTTP Process Type
Select Random Sub Domain, Custom Sub Domain, or Custom Domain according to the options currently available to your account. Do not depend on an example hostname being available.
Select a current relay server
Choose from the relay servers or regions currently presented by the dashboard. Server codes and availability can change, so this tutorial does not hardcode one.
Enter the local Immich target
Set the local IP address to 127.0.0.1 and the local port to 2283 when the Localtonet client runs on the same host as Immich. If the client runs elsewhere, use an address that the client device can reach and secure that LAN path appropriately.
Create the tunnel configuration
Save or create the HTTP tunnel after reviewing its token, Process Type, relay selection, local IP, and local port. Creating the tunnel does not mean it is running.
Press Start
Explicitly start the tunnel in the dashboard. The public address becomes usable only while the selected client is connected and the tunnel is running.
Verify from outside the LAN
Turn off Wi-Fi on a phone or use another external network, open the assigned HTTPS address, and confirm that the Immich login page loads. Sign in with a normal user account and test a non-sensitive upload.
The target configuration for a same-host deployment is concise:
| Field | Selection | Reason |
|---|---|---|
| Tunnel family | HTTP | Immich provides a web application and HTTP API. |
| Process Type | Choose an available HTTP option | Random Sub Domain, Custom Sub Domain, and Custom Domain all provide public HTTPS access. |
| AuthToken | The token for the intended client device | The tunnel must run through the correct connected device. |
| Relay server | A currently available dashboard option | Relay values and availability must not be hardcoded. |
| Local IP | 127.0.0.1 |
The Localtonet client and Immich run on the same host. |
| Local port | 2283 |
This is the Immich server target used by this deployment. |
Localtonet's Default File Server has separately documented file-upload behavior, but that does not establish the limits of an HTTP tunnel. This guide makes no blanket upload-size claim for Localtonet HTTP tunnels. Check the current terms and plan-specific product information before relying on the tunnel for unusually large videos or bulk imports.
Test the public address in a private browser window while signed out. The login page may be visible, but personal assets and administrative functions must not be available without authentication. Also confirm that the address stops forwarding when you intentionally stop the tunnel. This validates the expected lifecycle and helps you understand how to shut down access during maintenance.
Configure and verify mobile photo backup
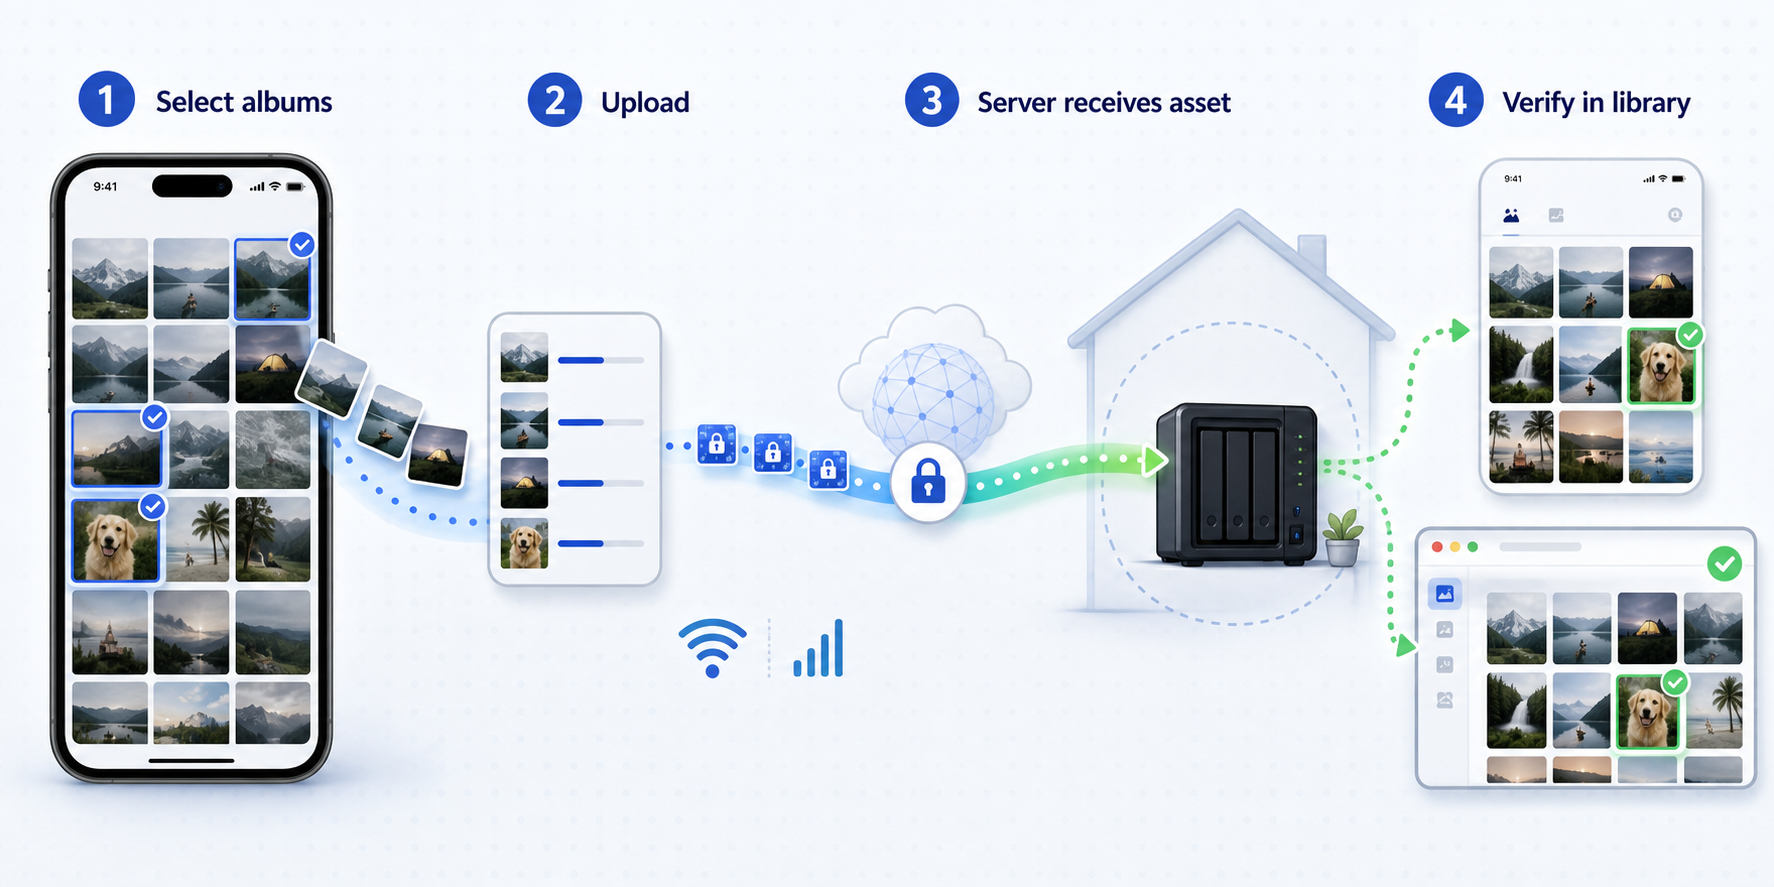
Install the current Immich mobile application through the official application store for your platform. Use your assigned Localtonet HTTPS address as the server address after the public tunnel has been verified. Sign in with a non-administrator Immich account for normal mobile use unless administration from the phone is specifically required.
The exact permission names and background-execution controls differ between iOS and Android releases. Grant Immich access only to the photo collections you intend to back up. If you select limited photo access, newly captured photos may not become available to the app automatically unless the operating system selection is updated.
Enter the public HTTPS server address
Use the exact URL assigned to the running Localtonet HTTP tunnel. Avoid trailing spaces and confirm that the address opens in the phone's browser first.
Sign in and select backup albums
Choose the camera roll or other device albums you want uploaded. Do not assume every local album is selected automatically.
Grant required operating-system permissions
Allow access to the selected photos and review background activity, battery optimization, and mobile-data permissions. Operating systems can pause or restrict background work to save power.
Complete the initial synchronization check
Keep the app open and the phone powered while the first small test set uploads. Confirm that the app reports completion rather than assuming background backup has finished.
Verify an off-network upload
Disable Wi-Fi, take or select a non-sensitive test photo, allow the upload, and confirm in the Immich web interface that the asset arrived and can be opened.
A successful foreground upload does not prove that overnight or background uploads will continue. Battery-saving modes, background restrictions, low-data settings, missing photo permissions, and force-closing the app can delay work. Review the operating system's settings and check Immich's backup status after the phone has been idle.
For the first import, use a small representative set that includes a photo and, if relevant, a video. Verify the resulting assets from another device. Large historical imports are easier to diagnose when the base connection, authentication, permissions, storage, and background jobs have already been tested.
Back up and restore Immich safely
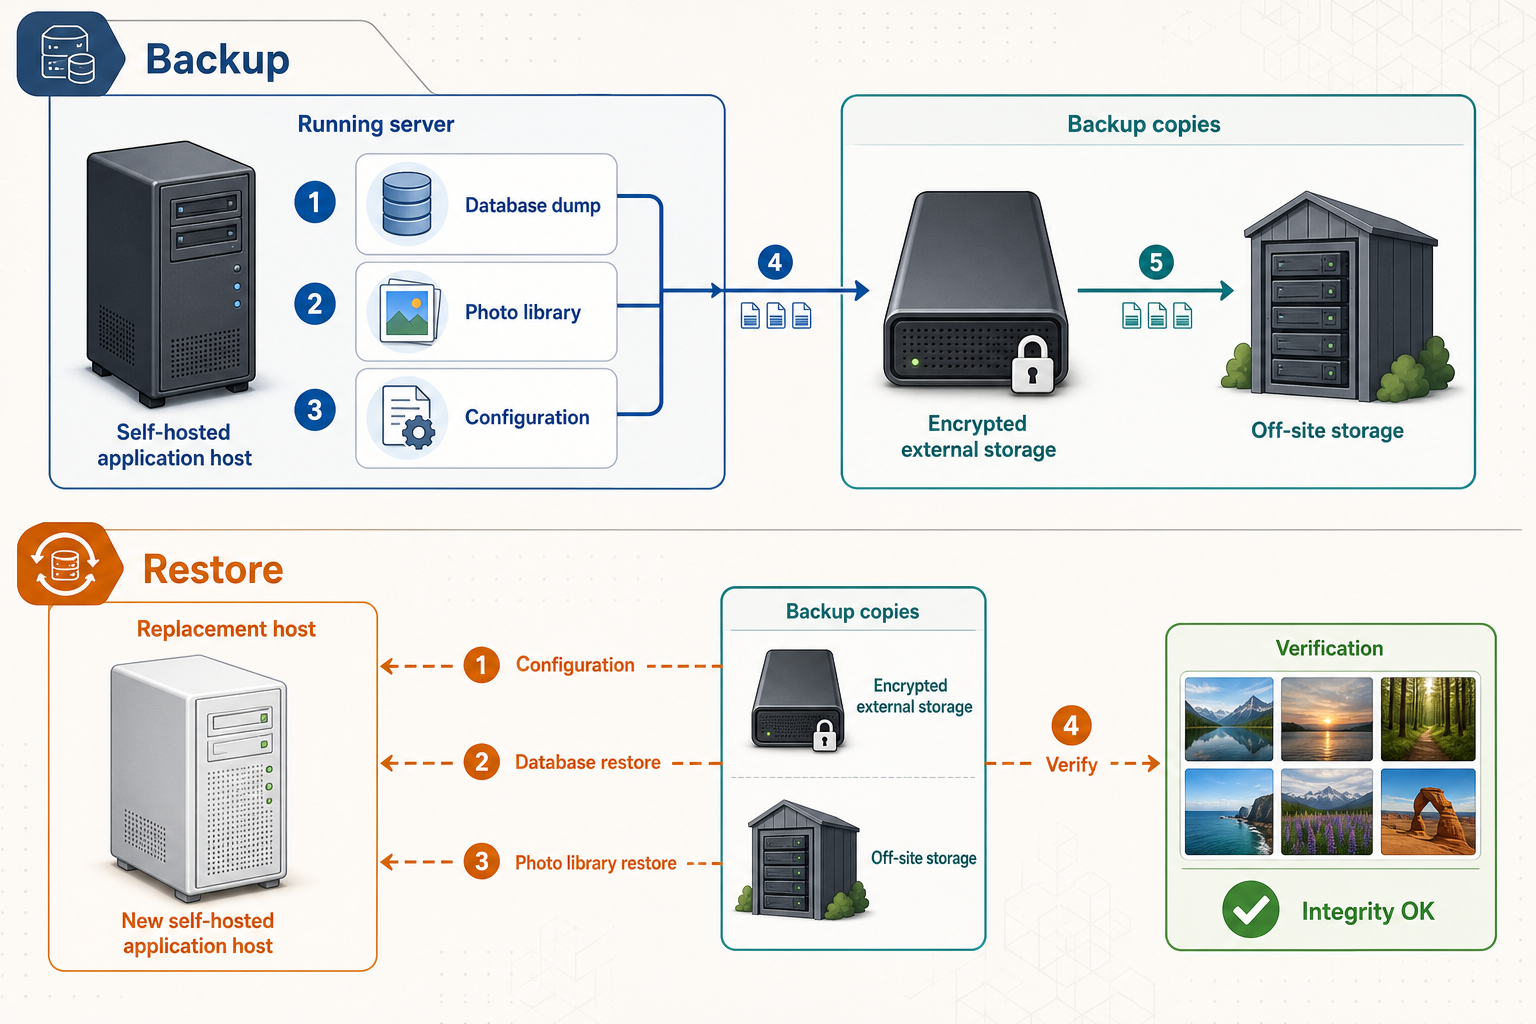
An Immich recovery requires more than a copy of the PostgreSQL data directory or a folder full of originals. Protect the database metadata and every filesystem location required by the deployed release. Database metadata connects users, albums, assets, generated files, and application state. Filesystem data contains the media and other files used by the application. A valid recovery needs a compatible set.
| Backup component | Protects | Key requirement |
|---|---|---|
| Database backup | Users, asset records, albums, settings, relationships, and other metadata | Use the procedure documented for the deployed Immich and PostgreSQL configuration. |
| Required filesystem data | Uploaded originals and other required library files | Preserve paths, contents, and ownership needed by the Compose deployment. |
| Deployment configuration | Compose definition and non-secret recovery information | Keep the exact release configuration while protecting secrets separately. |
| Off-host copy | Recovery from host or disk loss | Store at least one independent copy outside the live server. |
| Restore record | Evidence that the backup can actually be recovered | Document the date, release, test result, and problems found. |
Database restore syntax is sensitive to the PostgreSQL image, extensions, initialization state, and Immich release. Do not pipe a complete cluster dump into an already initialized production database and call that a fresh restore. Existing roles, schemas, extensions, and migrations can conflict, and a successful shell exit does not prove that the library is consistent.
Use the current Immich backup and restore procedure that corresponds to the release you actually run. The safe recovery sequence is:
Record the deployed release and configuration
Save the Compose file, relevant path configuration, and the version identifier needed to recreate a compatible environment. Store secrets securely rather than embedding them in documentation.
Create the documented database backup
Follow Immich's current command and backup format for the deployed database. Check the command exit status and verify that the resulting file is non-empty and readable.
Back up required filesystem data
Capture the required library paths as a consistent set. Preserve ownership and permissions where your backup tool supports them.
Prepare a clean recovery environment
Use a separate test host or isolated paths. Recreate the compatible Compose deployment without connecting it to the public tunnel.
Restore files and ownership
Restore the required filesystem data to the configured paths and confirm that the containers can read and write where expected.
Prepare and restore the database exactly as documented
Follow the current ordering for container creation, database preparation, extension availability, and dump import. Do not improvise against an active production database.
Start Immich and validate the recovery
Check logs, sign in, compare representative asset counts, open original files, inspect albums, and confirm that a new test upload and background processing succeed.
Schedule periodic restore tests on an isolated host. Confirm that representative originals, albums, users, metadata, thumbnails, and new uploads work after recovery. Do not connect the test restore to the production Localtonet tunnel, since that can expose stale data or create two servers behind the same expected workflow.
Routine operations, updates, acceleration, and troubleshooting
Monitor storage, service health, and logs
Photo servers tend to grow continuously. Monitor both the media filesystem and the filesystem containing Docker and PostgreSQL. Storage exhaustion can interrupt uploads, prevent database writes, break migrations, and leave background jobs failing.
df -h
df -i
cd ~/immich-app
sudo docker compose ps
sudo docker compose logs --tail=200
df -h checks byte capacity, while df -i checks inode consumption. Both can cause a filesystem to appear unusable. Review logs after updates, large imports, model changes, or repeated mobile failures. In the Immich administration interface, inspect background-job status and failed work rather than assuming that a visible upload has completed all processing.
Use controlled updates
Do not automatically pull a new release into an untested photo server. Read the current Immich release notes, identify breaking changes or migration requirements, verify a recent backup, and preserve the currently deployed Compose file and version information.
cd ~/immich-app

sudo docker compose pull
sudo docker compose up -d
sudo docker compose ps
sudo docker compose logs --tail=200
Run those commands only after reviewing the release and updating the release-provided files when required by Immich. Pulling images alone does not update a Compose definition that has changed. After the update, test local login, asset browsing, a small upload, background jobs, and the public tunnel.
If an update fails, stop and collect logs before making destructive changes. A rollback may require the previous Compose file, previous container images, and a database restore because database migrations are not necessarily reversible by selecting an older image. Do not assume that changing a version value alone safely reverses an update.
Keep the Localtonet client persistent
Remote access depends on three layers remaining available: Immich, Docker, and the Localtonet client with its tunnel started. Configure the Localtonet application to start according to the supported startup behavior of the installed client version, then verify that behavior after a controlled reboot. Do not invent a service unit or command from an unrelated client release.
After rebooting the host, check:
- the storage volumes are mounted before Immich starts;
- the Immich containers are running and healthy;
http://127.0.0.1:2283responds locally;- the correct Localtonet device is connected;
- the tunnel is running, not merely created;
- the public address works from outside the LAN;
- a test mobile upload completes.
Treat hardware acceleration as an optional, device-specific project
The base deployment uses the release's default processing path. Hardware acceleration requires more than adding a single Compose line. A supported configuration can require host GPU drivers, device permissions, container runtime support, release-matched auxiliary Compose files, a supported acceleration backend, and separate configuration for video transcoding and machine learning.
Do not assume that an auxiliary file was downloaded merely because you downloaded docker-compose.yml and example.env. Obtain any required acceleration files from the same Immich release and follow the current hardware transcoding documentation and machine-learning acceleration documentation. Support varies by operating system, processor, GPU, driver, architecture, and release.
This tutorial does not claim that Raspberry Pi 5, ARM NN, or any other accelerator is supported by the current Immich release. Confirm the exact host and backend in Immich's current compatibility documentation before changing Compose. A container that starts does not prove that workloads are using the accelerator.
Verify acceleration through service logs and a controlled processing job. Watch host CPU and accelerator utilization, inspect errors, and confirm that output files remain playable. Keep the prior working configuration so that you can return to CPU processing if the accelerated path fails.
Diagnose failures by layer
| Symptom | Layer to test | Diagnostic path |
|---|---|---|
| Local and public access both fail | Immich or Docker | Run docker compose ps, inspect logs, test 127.0.0.1:2283, and check disk capacity. |
| Local access works but the public URL fails | Localtonet client, tunnel, or public name | Confirm the selected device is connected, the tunnel is started, the relay selection is current, and the target is 127.0.0.1:2283. |
| The public login page loads but sign-in fails | Authentication | Test the same credentials locally, check account state and server logs, and avoid repeated guesses that may trigger protective controls. |
| Small files work but a particular upload fails | Client, storage, request path, or current plan behavior | Check app status, server logs, free space, file permissions, and current plan-specific tunnel information. Do not assume an unlimited HTTP request size. |
| Uploads arrive but thumbnails or search lag | Background jobs or machine learning | Inspect job status, queue and machine-learning logs, model downloads, memory pressure, and available disk space. |
| Models repeatedly download or fail to load | Machine-learning cache, connectivity, or permissions | Check service logs, outbound connectivity, persistent cache configuration, ownership, memory, and disk capacity. |
| The server fails after reboot | Mount and startup ordering | Confirm data disks mounted at the expected paths before Docker started, then inspect container logs and ownership. |
| The public address works only intermittently | Client lifecycle or host connectivity | Check whether the Localtonet client disconnects, the host sleeps, internet connectivity drops, or the tunnel was stopped. |
| An update leaves services unhealthy | Release compatibility or migration | Preserve logs, review release notes, avoid repeated destructive restarts, and use the documented recovery process if restoration is required. |
If you add another reverse proxy in front of Immich, test forwarded headers, request timeouts, connection upgrades, and upload behavior according to Immich's current reverse-proxy documentation. Do not copy configuration directives from a different proxy product. In the Localtonet workflow described here, point the HTTP tunnel directly at the Immich server unless your architecture has a specific, tested reason to add another local proxy.
Frequently asked questions
Do I need router port forwarding to access Immich through Localtonet?
No. The Localtonet client establishes an outbound connection to a relay server, so this workflow does not require inbound router port forwarding, firewall changes, VPN setup, or a public IP address.
Which Immich service should the HTTP tunnel expose?
For the deployment in this guide, expose only the Immich server at 127.0.0.1:2283. Do not expose PostgreSQL, the job queue, the machine-learning service, the Docker socket, or host administration services.
Does creating a Localtonet tunnel start it automatically?
No. Creating a tunnel and running it are separate lifecycle actions. After creating the configuration, press Start. The tunnel remains available only while the selected client device is connected and the tunnel is running.
Can I choose any Localtonet subdomain or relay region?
Do not assume so. HTTP Process Type can be Random Sub Domain, Custom Sub Domain, or Custom Domain, but available choices can vary. Relay servers and regions must also be selected from the current dashboard rather than copied from a tutorial.
Does a Localtonet HTTP tunnel have no upload-size limit?
This guide makes no such claim. The documented no-upload-size-limit statement for Localtonet's Default File Server does not establish HTTP tunnel behavior. Check current plan-specific product information before relying on an HTTP tunnel for very large uploads.
Why is a database backup not enough?
The database stores metadata and relationships, while required filesystem paths contain media and other application files. A usable recovery needs compatible database and filesystem backups, the relevant deployment configuration, correct ownership, and a tested restore process.
How do I know mobile backup works away from home?
Disable Wi-Fi, upload a non-sensitive test asset over mobile data, and verify from another device that it reached the server and can be opened. Also review photo permissions, background activity, battery optimization, and the app's backup status.
What should I do before updating Immich?
Read the release notes, identify Compose or migration changes, verify a recent database and filesystem backup, preserve the current configuration, and plan a local validation after the update. Do not assume that selecting an older image safely reverses a database migration.
Publish only your Immich web service
After Immich is healthy locally, create a Localtonet HTTP tunnel to 127.0.0.1:2283, start it, and verify authentication and mobile uploads from outside your home network.


