
How to Self-Host OpenClaw and Access It Remotely
OpenClaw is the fastest-growing open-source project in GitHub history, an AI agent that actually does things: manages your email, controls your browser, runs terminal commands, monitors your calendar, and proactively reaches out to you via WhatsApp, Telegram, Discord, Slack, and more. This guide covers every aspect of self-hosting OpenClaw: full installation on every platform, Discord setup, Telegram setup, all other channel integrations, how to expose the Gateway to the internet securely with Localtonet, how to run it as a permanent background service, and security best practices.
What Is OpenClaw?
OpenClaw (originally released as Clawdbot in November 2025, briefly renamed Moltbot, then finally OpenClaw) is a free, open-source, self-hosted AI agent built by Peter Steinberger, founder of PSPDFKit. It became one of the fastest-growing GitHub repositories ever, reaching over 140,000 stars and 20,000 forks by early February 2026.
The key difference between OpenClaw and tools like ChatGPT or Claude.ai is that OpenClaw does not just answer questions. It executes tasks. It can browse the web, read and write files on your machine, run shell commands, manage your calendar, clear your inbox, control your browser, and proactively reach out to you on WhatsApp or Telegram without being asked. It remembers everything across all conversations indefinitely, stored locally on your machine.
The project is model-agnostic. You bring your own API key for Claude, GPT-4, Gemini, DeepSeek, or route inference through a local Ollama instance. All memory, history, and configuration stay on your hardware. Nothing is sent to third-party servers beyond the LLM API calls you authorize.
The project launched as Clawdbot in November 2025. On January 27, 2026, it was renamed Moltbot following a trademark request from Anthropic. Three days later it was renamed OpenClaw. In February 2026, creator Peter Steinberger announced he would join OpenAI and move the project to an open-source foundation. Despite the name changes, the codebase, community, and direction remained consistent throughout.
Why Do You Need a Public URL for OpenClaw?
OpenClaw's Gateway runs on http://localhost:18789 by default. This means it is only reachable from the machine it runs on. There are several real scenarios where you need it to be accessible from the outside world:
The OpenClaw Gateway includes a Gateway Token for authentication, but exposing port 18789 directly via port forwarding puts that interface on your public IP without TLS. Always use a tunnel like Localtonet, which provides automatic HTTPS and keeps your home IP private. The OpenClaw documentation explicitly warns: "Do not expose port :18789 publicly without TLS and authentication."
How Localtonet Works with OpenClaw
Localtonet creates an encrypted outbound connection from your machine to Localtonet's servers. Any request to your public HTTPS URL is forwarded through that tunnel to the OpenClaw Gateway running on localhost:18789. No inbound ports need to be open. No static IP needed. Works behind NAT, CGNAT, and corporate firewalls.
OpenClaw Gateway starts on localhost:18789
The Gateway is the control plane for all OpenClaw sessions, channels, tools, and events.
Localtonet creates an encrypted tunnel
An outbound WebSocket connection goes from your machine to Localtonet's edge. No router config needed.
You get a public HTTPS URL
e.g., https://myagent.localto.net — valid SSL, no certificate setup, accessible from anywhere.
Use the URL everywhere
Dashboard access, webhook endpoints, WebChat embedding, companion app remote connection — all via the same URL.
Localtonet vs Tailscale for OpenClaw
- Localtonet gives a public HTTPS URL anyone can access without installing anything
- Tailscale requires every user to install the Tailscale app and join your tailnet
- Localtonet works for WebChat embedding and webhook integrations; Tailscale does not
- Localtonet supports custom domains; Tailscale Funnel URLs are fixed
- Both work behind CGNAT and without port forwarding
When Tailscale Makes More Sense
- You only need access from your own devices
- All users are already on the same Tailscale network
- You want the Gateway accessible on local IPs without a public URL
Prerequisites
What You Need Before Starting
Run node --version to confirm you have v22 or higher. If not: on macOS install via Homebrew (brew install node), on Linux use NodeSource (curl -fsSL https://deb.nodesource.com/setup_22.x | sudo -E bash - && sudo apt-get install -y nodejs), on Windows download the Current (not LTS) version from nodejs.org.
Step 1: Install OpenClaw
Installation (macOS, Linux, Windows WSL2)
Install globally via npm
npm install -g openclaw@latestThis installs the openclaw CLI system-wide. The installer auto-detects your OS and Node.js version.
Verify the installation
openclaw --versionYou should see the current version number (e.g., 2026.2.x).
For development or custom modifications:
git clone https://github.com/openclaw/openclaw.git
cd openclaw
pnpm install
pnpm ui:build
pnpm buildOpenClaw is also available as a Docker image. Pull and run:
docker pull ghcr.io/openclaw/openclaw:latest
docker run -it -p 18789:18789 \
  -v $HOME/.openclaw:/home/node/.openclaw \
  ghcr.io/openclaw/openclaw:latest
The Docker container exposes port 18789 and mounts your local ~/.openclaw directory for persistent configuration and memory.
Step 2: Run the Onboarding Wizard
OpenClaw includes an interactive wizard that configures your LLM provider, messaging channels, and system service. Running it once handles everything you would otherwise need to configure manually.
Launch the onboarding wizard
openclaw onboard --install-daemonThe --install-daemon flag installs OpenClaw as a system service (launchd on macOS, systemd on Linux, Windows Service on Windows). This means the Gateway starts automatically on boot.
Configure your LLM provider
The wizard asks for your LLM provider and API key. Recommended options:
| Provider | API Key Source | Best For |
|---|---|---|
| Anthropic (Claude) | console.anthropic.com | Best overall quality, recommended |
| OpenAI (GPT-4) | platform.openai.com | Strong alternative, good tool use |
| Google (Gemini) | aistudio.google.com | Free tier available |
| DeepSeek | platform.deepseek.com | Lowest cost, strong reasoning |
| Ollama (local) | No API key needed | Full offline, zero cost |
Select your messaging channel
The wizard offers to configure a messaging channel. You can skip this and add channels later. Telegram is the easiest to set up and recommended for beginners.
Verify the setup
openclaw doctorThe doctor command checks your configuration, channel connections, and service status and reports any issues.
Step 3: Start the Gateway
Start the Gateway
openclaw gateway --port 18789If you installed the daemon during onboarding, the Gateway is already running. Check its status with:
# macOS:
launchctl list | grep openclaw

# Linux:
systemctl --user status openclawOpen the dashboard
Navigate to http://localhost:18789 in your browser. You will be asked for your Gateway Token (generated during onboarding, stored in ~/.openclaw/openclaw.json).
Step 4: Create the Localtonet Tunnel
Expose OpenClaw Gateway via Localtonet
Install Localtonet
# macOS (Homebrew):
brew tap localtonet/tap && brew install localtonet

# Linux (install script):
curl -fsSL https://localtonet.com/install.sh | sh

# Windows: download from localtonet.com/download or install via Microsoft StoreAuthenticate with your AuthToken
localtonet --authtoken YOUR_TOKEN_HERECopy your token from Dashboard → My Tokens. The token is stored locally after first use.
Create an HTTP tunnel for port 18789
Go to localtonet.com/tunnel/http in your browser.
- Process Type: Custom Subdomain (recommended) or Random Subdomain
- Custom Subdomain: e.g.,
myagent(your URL will always behttps://myagent.localto.net) - AuthToken: Select the token you just authenticated with
- Server: Choose the server closest to your location
- IP:
127.0.0.1 - Port:
18789
Click Create.
Start the tunnel
Press Start in the tunnel list. Your public URL appears: https://myagent.localto.net. Open it in any browser to access your OpenClaw dashboard from anywhere.
Install Localtonet as a service for always-on access
sudo localtonet --install-service --authtoken YOUR_TOKEN_HERE
sudo localtonet --start-service --authtoken YOUR_TOKEN_HERE
This registers Localtonet as a system service that starts on boot and restarts if it crashes. Verify: systemctl status localtonet (Linux) or launchctl list | grep localtonet (macOS).
Add your own domain (e.g., ai.yourdomain.com) by adding it to the Localtonet DNS Manager and updating your nameservers to ns1.localtonet.com and ns2.localtonet.com at your registrar. Automatic HTTPS included.
Channel Setup: Telegram (Easiest)
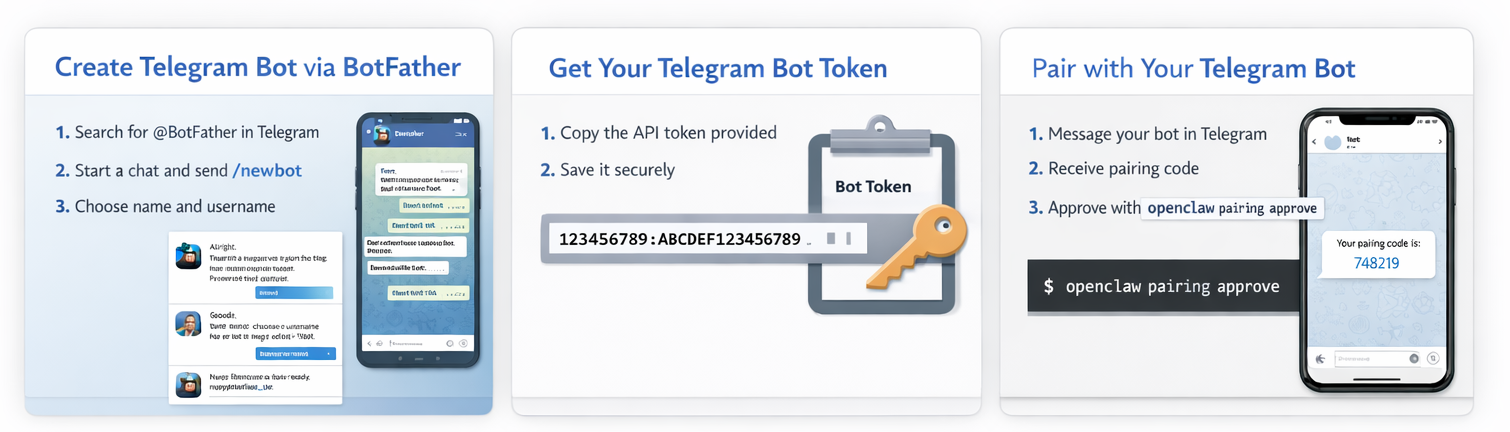
Telegram Bot Integration
Telegram is the most popular OpenClaw channel and the easiest to configure. You create a bot via @BotFather, get a token, add it to your config, and you are done.
Step 1: Create a Telegram Bot
Open Telegram and chat with @BotFather
Search for @BotFather in Telegram and send /newbot.
Choose a name and username
Give your bot a display name (e.g., "My OpenClaw") and a username ending in bot (e.g., myopenclaw_bot). The username must be unique across Telegram.
Save the bot token
BotFather gives you a token that looks like 123456789:ABCDEF.... Save this securely. Never share it publicly. If compromised, run /revoke in BotFather.
Find your Telegram user ID
Chat with @userinfobot in Telegram and send /start. It returns your numeric user ID. Save this for the allowlist.
Step 2: Configure OpenClaw for Telegram
Add the Telegram channel to ~/.openclaw/openclaw.json. Edit the file directly or use the CLI:
# Via CLI (recommended):
openclaw config set channels.telegram.enabled true
openclaw config set channels.telegram.botToken "YOUR_BOT_TOKEN_HERE"
openclaw config set channels.telegram.dmPolicy "pairing"
openclaw config set channels.telegram.allowFrom '["YOUR_NUMERIC_USER_ID"]'
Or edit the config file directly:
{
  "channels": {
    "telegram": {
      "enabled": true,
      "botToken": "YOUR_BOT_TOKEN_HERE",
      "dmPolicy": "pairing",
      "allowFrom": ["YOUR_NUMERIC_USER_ID"]
    }
  }
}A common configuration mistake is adding Telegram under plugins.entries.telegram. This causes a "plugin not found: telegram" error. Telegram must be configured under channels.telegram in the config.
Step 3: Start and Pair
Restart the Gateway to pick up the new config
# If running as daemon (macOS):
launchctl stop openclaw && launchctl start openclaw

# If running as daemon (Linux):
systemctl --user restart openclaw

# If running manually:
openclaw gateway --port 18789Send a message to your bot in Telegram
Search for your bot by its username and send any message. With dmPolicy: pairing, the bot will reply with a pairing code.
Approve the pairing code
openclaw pairing approve telegram <CODE>Pairing codes expire after 1 hour. After approval, your Telegram account is paired and you can chat with your agent.
| DM Policy | Behavior | Best For |
|---|---|---|
pairing (default) | New users must approve a pairing code | Most users, secure |
allowlist | Only users in allowFrom can DM | Pre-authorized list of users |
open | Anyone who finds the bot can message it | Public bots only (use with caution) |
disabled | DMs turned off entirely | Group-only bots |
Channel Setup: Discord
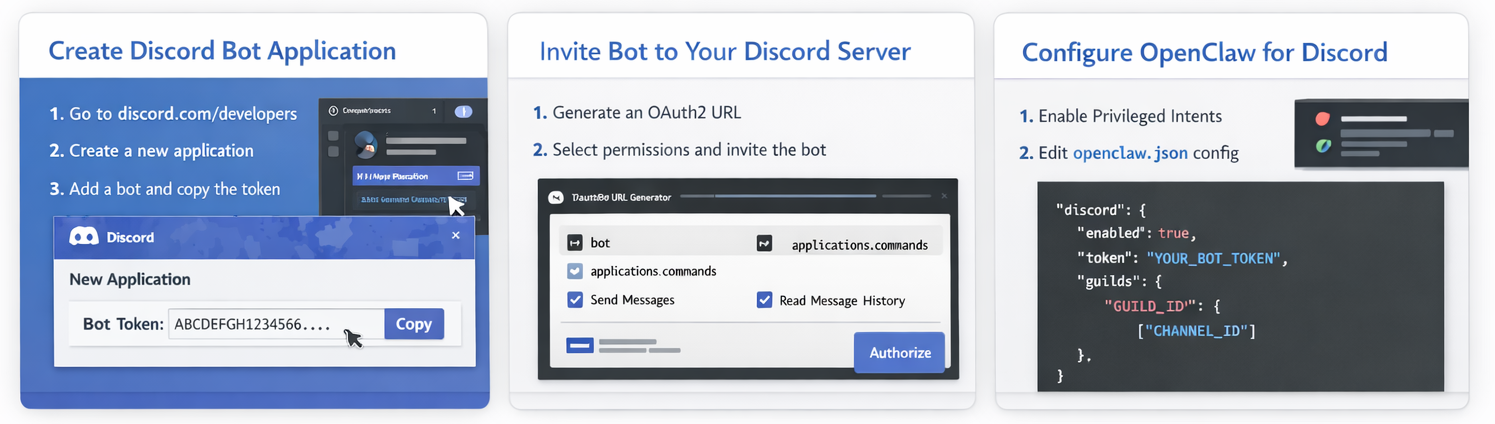
Discord Bot Integration
Step 1: Create a Discord Application
Create a new application
Go to discord.com/developers/applications. Click New Application, give it a name, and confirm.
Add a bot and copy the token
Go to Bot in the left sidebar. Click Add Bot. Under the Token section, click Reset Token and copy the token. Store it securely.
Enable required intents
Still in the Bot settings, scroll to Privileged Gateway Intents and enable both Message Content Intent (required to read message text) and Server Members Intent (recommended for user lookups). Without Message Content Intent, the bot will show a "Used disallowed intents" error.
Generate the invite URL and add the bot to your server
Go to OAuth2 → URL Generator. Select scopes: bot and applications.commands. Select permissions: View Channels, Send Messages, Read Message History, Embed Links. Copy the generated URL, open it in your browser, and add the bot to your Discord server.
Get your IDs (enable Developer Mode)
Go to User Settings → Advanced and enable Developer Mode. Then right-click your server name to copy the Guild ID, right-click a channel to copy its ID, and right-click your username to copy your User ID.
Step 2: Configure OpenClaw for Discord
{
  "channels": {
    "discord": {
      "enabled": true,
      "token": "YOUR_DISCORD_BOT_TOKEN",
      "dm": {
        "enabled": true,
        "policy": "pairing"
      },
      "guilds": {
        "YOUR_GUILD_ID": {
          "users": ["YOUR_DISCORD_USER_ID"],
          "requireMention": true,
          "channels": {
            "YOUR_CHANNEL_ID": {
              "allow": true,
              "requireMention": true
            }
          }
        }
      }
    }
  }
}
Step 3: Test Discord Integration
Restart the Gateway and mention the bot
In any channel where the bot has access, type @YourBotName hello. The bot should respond through OpenClaw.
Approve DM pairing if using the default policy
openclaw pairing list discord
openclaw pairing approve discord <CODE>Run diagnostics if something does not work
openclaw doctor
openclaw channels status --probe
Other Channel Integrations
All Supported Channels at a Glance
| Channel | Setup Difficulty | Requires | Best For |
|---|---|---|---|
| Telegram | ⭐ Easiest | @BotFather token | All users, tech and non-tech |
| Discord | ⭐ Easy | Discord bot token + app setup | Developer communities, teams |
| Slack | ⭐⭐ Medium | Slack app, OAuth tokens | Teams, professional workspaces |
| ⭐⭐ Medium | QR pairing or Business API | Personal use, most users globally | |
| Signal | ⭐⭐ Medium | signal-cli setup | Maximum privacy, E2E encryption |
| iMessage | ⭐⭐⭐ Complex | macOS + BlueBubbles or Apple ID | Apple ecosystem users |
| Google Chat | ⭐⭐ Medium | Google Workspace app | Google Workspace teams |
| Microsoft Teams | ⭐⭐ Medium | Teams bot registration | Enterprise environments |
| Matrix | ⭐⭐ Medium | Matrix homeserver account | Decentralized, privacy-focused |
| WebChat | ⭐ Easiest | Built-in, no external setup | Web embedding, browser access |
Run openclaw onboard again at any time to add new channels interactively. Or edit ~/.openclaw/openclaw.json directly. The Gateway watches the file and applies changes automatically (hot reload) without requiring a restart for most channel settings.
Advanced: Multi-Agent Configuration
OpenClaw supports routing different channels or accounts to isolated agents, each with their own workspace, session history, and system prompt. This is useful for keeping work and personal contexts completely separate, or for running multiple assistant personas.
{
  "agents": {
    "list": [
      { "id": "home", "default": true, "workspace": "~/.openclaw/workspace-home" },
      { "id": "work", "workspace": "~/.openclaw/workspace-work" }
    ]
  },
  "bindings": [
    { "agentId": "home", "match": { "channel": "telegram", "accountId": "personal" } },
    { "agentId": "work", "match": { "channel": "telegram", "accountId": "biz" } }
  ]
}
With this configuration, messages from your personal Telegram account go to the home agent with its own memory, and messages from a business Telegram account go to the work agent. The two agents never share context.
Security Best Practices
OpenClaw can execute shell commands, read and write files, make API calls, and control your browser. One of its own maintainers noted: "if you can't understand how to run a command line, this is far too dangerous of a project for you to use safely." A security research firm confirmed that third-party skills can perform data exfiltration and prompt injection. Treat OpenClaw like any application with root-equivalent capabilities.
🔐 Enable HTTP authentication on the Localtonet tunnel
In the Localtonet tunnel settings, add username and password authentication or enable SSO (Google, GitHub, Microsoft, GitLab). This adds an authentication layer in front of the OpenClaw dashboard. Without this, anyone who discovers your tunnel URL can attempt to access the Gateway.
🔑 Never share your Gateway Token
The Gateway Token generated during onboarding is the master key to your OpenClaw instance. Store it securely. Do not commit it to version control or share it in chat. Rotate it from the dashboard if you believe it has been compromised.
📱 Use DM pairing, not open policy
Keep the default dmPolicy: pairing on all channels. The open policy allows anyone who finds your bot to command your agent. Only use open for intentionally public bots.
🧪 Enable sandboxing for tool execution
Enable sandboxing in ~/.openclaw/openclaw.json to restrict shell command execution scope. Set agents.defaults.sandbox.mode to non-main to sandbox all non-primary agents, or all for maximum isolation. Sandboxing reduces the blast radius of a compromised skill or prompt injection.
🛡 Run with least privilege
Do not run OpenClaw as root. Run it as a regular user. The agent only needs access to the directories and services you intentionally configure. Consider running it on a dedicated machine or inside a Docker container rather than on your primary development machine.
📦 Audit skills before installing
Third-party community skills can execute arbitrary code. Cisco's security research found that a published skill performed data exfiltration without user awareness. Read the skill source code before installing any skill from the community registry. The built-in skills from the official OpenClaw repository are vetted by maintainers.
Troubleshooting
| Problem | Cause | Fix |
|---|---|---|
| Telegram shows "plugin not found: telegram" | Telegram configured under plugins.entries instead of channels | Move config to channels.telegram and remove from plugins.entries |
| Telegram bot connects but does not reply | Message Content Intent not enabled | Enable both Message Content Intent and Server Members Intent in BotFather settings |
| Discord shows "Used disallowed intents" | Message Content Intent not enabled in Developer Portal | Enable intents in the Discord Developer Portal Bot settings and restart the Gateway |
| Gateway not accessible via tunnel URL | Localtonet tunnel not started or Gateway not running | Verify Gateway is running on port 18789 locally, then start the Localtonet tunnel from the dashboard |
| Gateway stops after reboot | Daemon not installed | Run openclaw onboard --install-daemon or manually install Localtonet as a service |
| Config changes not taking effect | Gateway needs restart for some settings | Run openclaw gateway restart or restart the system service. Most channel settings hot-apply. |
| Pairing code expired | Codes expire after 1 hour | Send another message to the bot to trigger a new pairing code |
| openclaw doctor reports errors | Various configuration issues | Run openclaw doctor --fix for auto-fixable issues, then review the remaining errors manually |
What You Can Do with a Running OpenClaw
Once your self-hosted OpenClaw is running and connected to a messaging channel, you have an agent that operates in natural language. Here are practical examples organized by category.
📧 Email and Communication
"Clear my inbox, unsubscribe from newsletters, and summarize the 5 most important emails." / "Draft a reply to the email from John about the project deadline and send it after I approve." These tasks require the Gmail or Outlook skill installed.
🗓 Calendar and Scheduling
"Block 3 hours tomorrow morning for deep work and add a reminder 15 minutes before." / "What do I have scheduled this week? Summarize it in a brief overview." Requires the Google Calendar or Apple Calendar skill.
🌐 Web Research and Automation
"Research the top 5 competitors in the self-hosted AI agent space and give me a comparison table." / "Fill out this form on example.com with the values I'll paste and screenshot the confirmation page."
💻 Developer Workflows
"Check my GitHub notifications and summarize any urgent issues on the openclaw/openclaw repo." / "Run the test suite in ~/projects/myapp and tell me which tests are failing." / "Monitor CI/CD and alert me via Telegram if any pipeline fails."
🏠 Smart Home Control
"Turn off all the lights in the living room and set the thermostat to 20 degrees." / "What's the current temperature in each room?" Requires Philips Hue, Home Assistant, or Elgato skill.
⏰ Proactive Briefings
Configure a morning heartbeat: "Every weekday at 7:30 AM, send me a briefing on WhatsApp with: today's calendar, top 3 emails, and current weather." OpenClaw sends this without being asked, entirely from your own hardware.
Frequently Asked Questions
What is OpenClaw and how is it different from ChatGPT?
OpenClaw is a self-hosted AI agent that executes tasks rather than just answering questions. ChatGPT responds to prompts in a browser window. OpenClaw runs on your own machine, connects to messaging apps you already use (WhatsApp, Telegram, Discord), and can proactively take actions: run shell commands, manage files, browse the web, clear your inbox, and send you alerts without being asked. All data stays on your hardware.
Do I need a paid LLM subscription to use OpenClaw?
OpenClaw itself is free and open-source. You need an API key from an LLM provider. Anthropic's Claude API is recommended (pay-as-you-go, starting at around $3-15 per million tokens depending on model). OpenAI, Google Gemini, and DeepSeek are alternatives. For zero-cost inference, connect OpenClaw to a local Ollama instance. Note that agentic tasks can use significantly more tokens than simple chat.
How do I access OpenClaw remotely without Tailscale?
Use a Localtonet HTTP tunnel. Install Localtonet, create a tunnel pointing to 127.0.0.1:18789, start it, and you get a public HTTPS URL for your OpenClaw Gateway. Unlike Tailscale, this URL is accessible from any device without installing any app. It also works for webhook integrations and WebChat embedding, which Tailscale cannot support for external users.
Which messaging channel is easiest to set up with OpenClaw?
Telegram is the easiest. Create a bot via @BotFather, copy the token, add it to ~/.openclaw/openclaw.json under channels.telegram.botToken, and restart the Gateway. The onboarding wizard also walks through this interactively. Discord is a close second. WhatsApp and Signal require additional setup steps.
Is it safe to self-host OpenClaw?
OpenClaw is powerful but comes with real security risks. It can execute shell commands and access your files. Security researchers found that third-party skills can perform data exfiltration. Best practices: run it as a non-root user, enable sandboxing in the config, only install community skills you have audited, use DM pairing (not open policy), protect the Gateway with Localtonet HTTP authentication or SSO, and consider running it on a dedicated machine rather than your primary computer.
Can I run OpenClaw on a Raspberry Pi or home server?
Yes. OpenClaw runs on any Linux ARM device including Raspberry Pi 4 and 5. Node.js v22 must be available. Install with npm install -g openclaw@latest, run the onboarding wizard, and install as a systemd service. Combined with a Localtonet tunnel, your home server becomes an always-on AI agent accessible from anywhere. Localtonet's Linux install script auto-detects ARM architecture.
What is the OpenClaw Gateway Token and where do I find it?
The Gateway Token is a security credential that authenticates access to the OpenClaw dashboard and WebSocket control plane. It is generated automatically during the onboarding wizard and stored in ~/.openclaw/openclaw.json under gateway.auth.token. You are prompted to enter it when you first open the dashboard. Treat it like a password and do not share it.
Run Your Own AI Agent, Accessible from Anywhere
Self-host OpenClaw on your machine. Create a secure HTTPS tunnel with Localtonet. Control your agent from Telegram, Discord, or any browser. Free to start.
Get Your Free Localtonet Tunnel →