

Publish a verified dedicated server without changing your router
A home game server gives your group control over the world, rules, updates, and access, but internet players still need a route to the server. This guide explains how NAT, CGNAT, game ports, and Localtonet relays fit together. It includes a self-contained Minecraft Java Edition example with release-dependent Java guidance, EULA acceptance, server properties, online authentication, allowlist commands, local testing, public exposure, maintenance, and troubleshooting. You can adapt the networking workflow to another game after confirming that game's dedicated-server support, ports, and transport protocols in its current official documentation.
📋 What's in this guide
How a home game server becomes publicly reachable
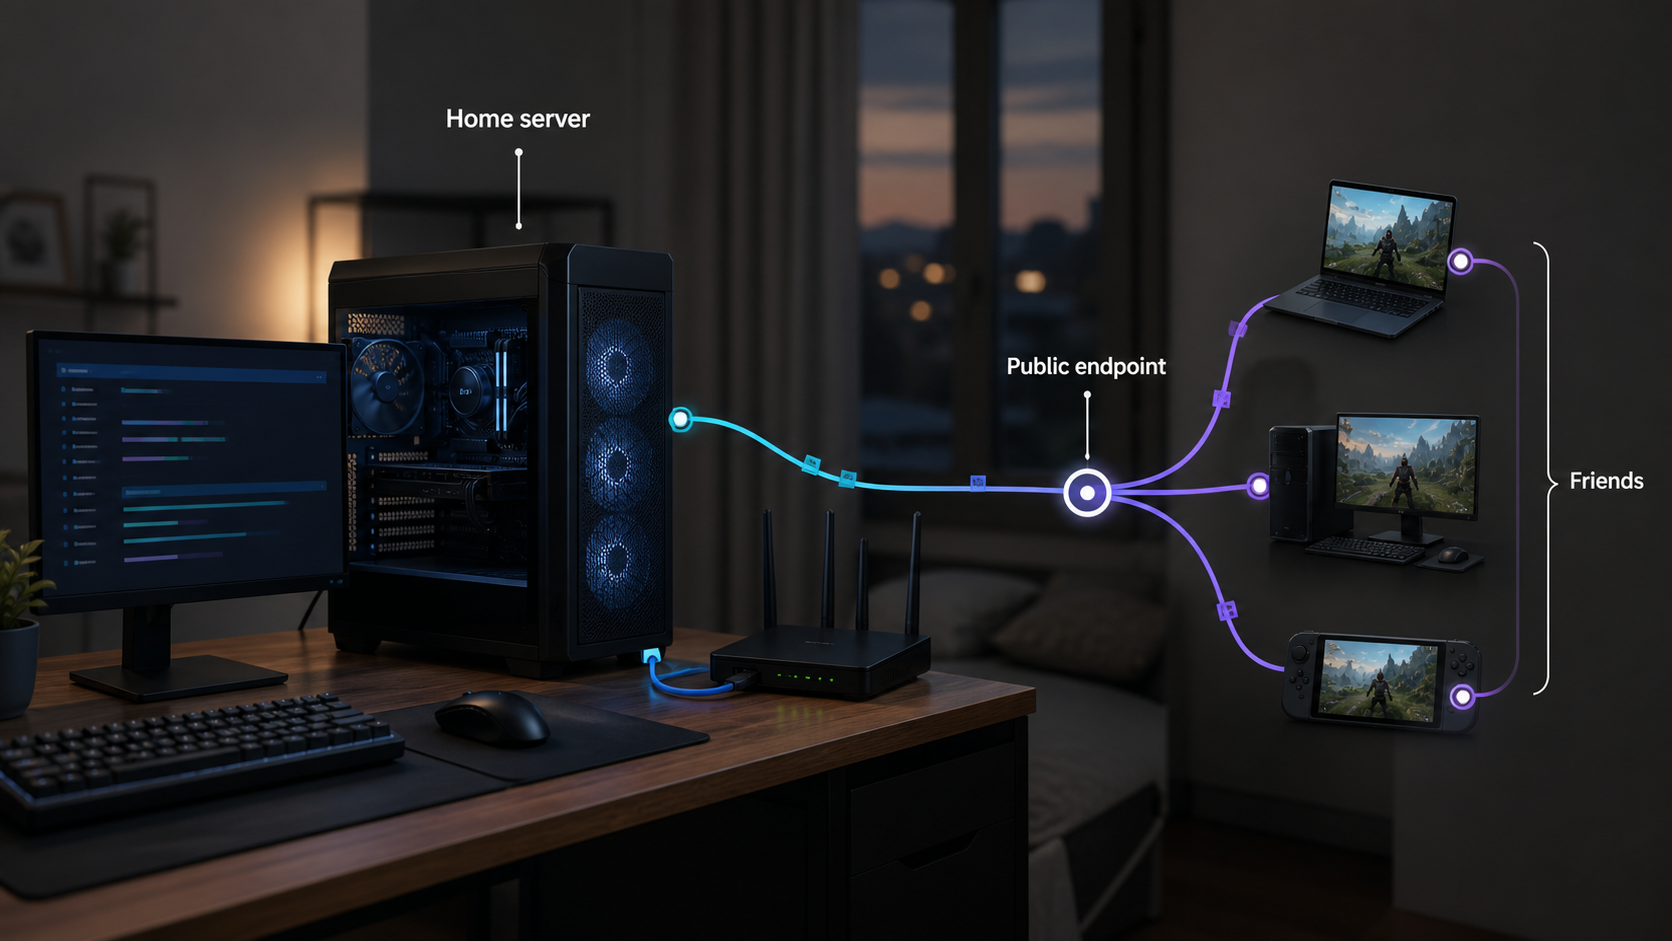
A dedicated game server is an application that listens for network traffic on one or more local ports. A player on the same computer or local network can often connect directly, but an internet player cannot use a private address such as 127.0.0.1, 192.168.x.x, or 10.x.x.x. Those addresses are intended for local networking and are not routed across the public internet.
Most home routers use Network Address Translation, or NAT, so several local devices can share one internet connection. Traditional self-hosting commonly requires an inbound router rule that maps a public port to the private address of the server. The host must control the router, keep the local address stable, configure the correct protocol, and permit the traffic through the computer's firewall.
Some internet providers add another translation layer called Carrier-Grade NAT, or CGNAT. In that arrangement, the router itself may not receive an independently reachable public IPv4 address. A port-forwarding rule on the home router cannot control the provider's upstream translation. Similar restrictions can arise on mobile, shared, apartment, campus, or managed networks where the host does not administer the internet gateway.
With Localtonet, our client application on the hosting device establishes an outbound connection to a Localtonet relay server. The resulting tunnel provides a public host and port. Friends connect to that endpoint, and compatible traffic is forwarded through the active tunnel to the local IP address and port configured by the host. No inbound router port-forwarding rule, public IP address, or VPN setup is required for this workflow.
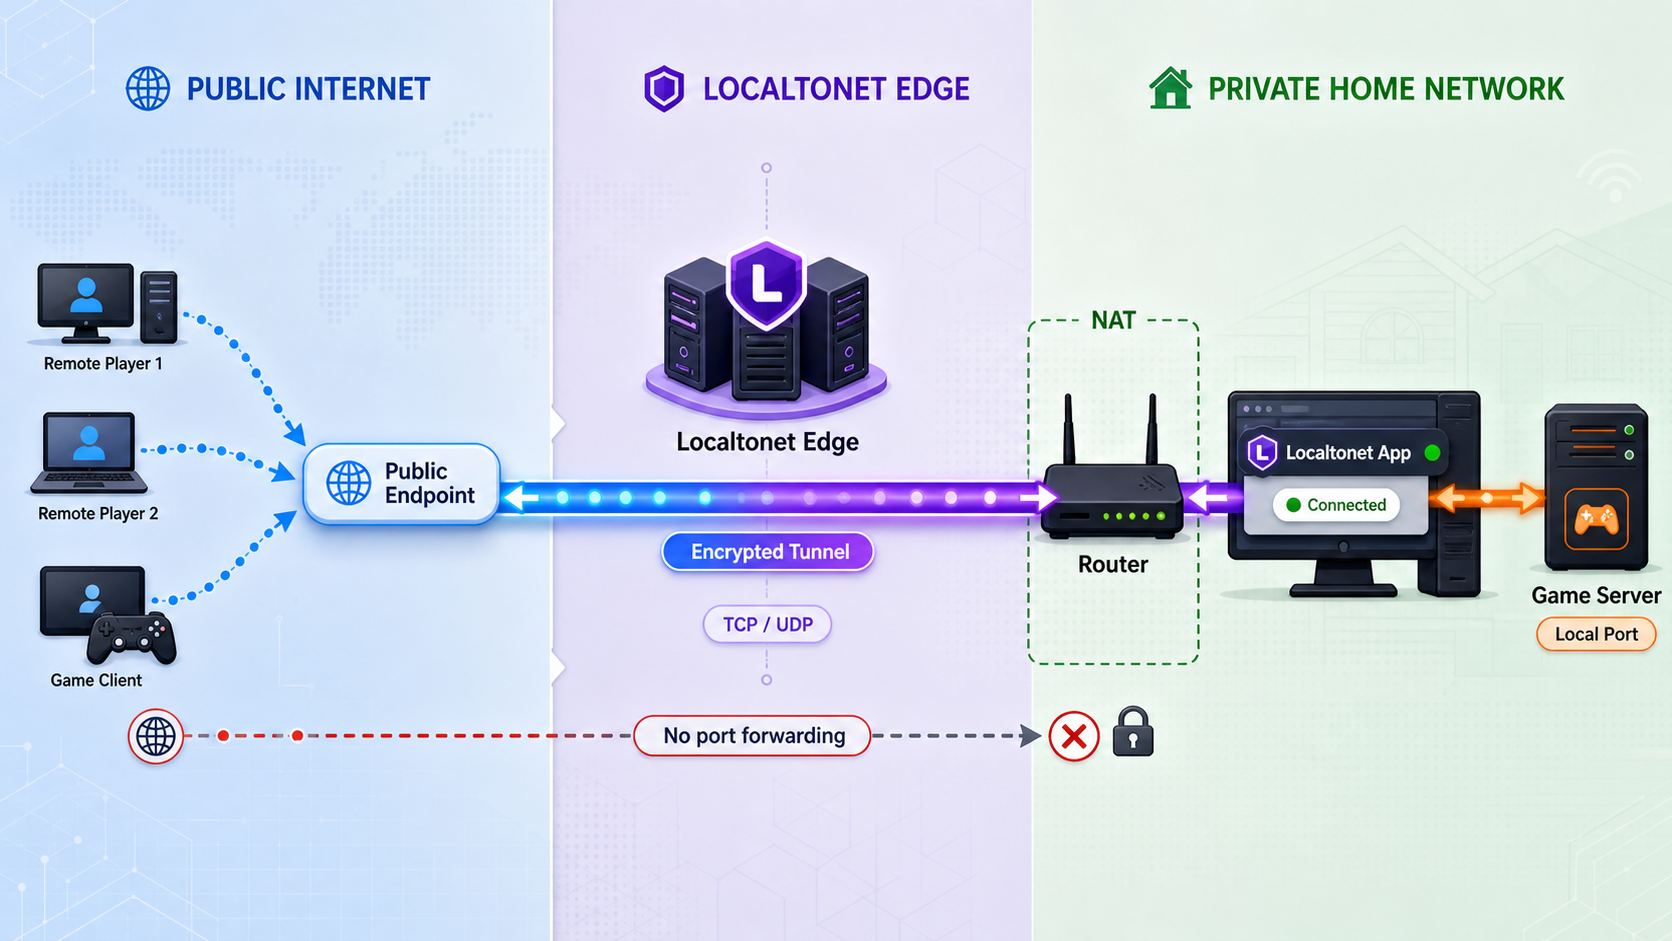
Endpoint protection, a local firewall, parental controls, organizational policy, or egress filtering can block the Localtonet client or the game server. Use Localtonet only on systems and networks where you have permission to run both applications. Do not use a tunnel to evade an administrator's access controls.
Creating a tunnel does not start it
Creating a Localtonet tunnel saves its configuration, but it does not by itself make the game server available. You must start the tunnel after creating it. The public endpoint remains usable only while the dedicated server is available, the selected Localtonet device is connected, and the tunnel is running.
If the game server stops, Localtonet has no active local service to receive forwarded traffic. If the Localtonet client disconnects or the tunnel is stopped, the relay cannot deliver traffic to the server. Treat these as separate lifecycle states when diagnosing a server that worked earlier but is no longer reachable.
Understand the latency path
A relayed connection adds a path between the player, the selected relay, and the host. Observed latency depends on physical distance, internet routing, congestion, packet loss, the host's connection, the player's connection, and the game server's own performance. TCP is not automatically unsuitable for games, and UDP is not automatically faster in every real-world situation. The server application selects a transport according to the behavior it needs.
When selecting a relay, consider the locations of the host and players. A nearby relay may be a sensible starting point, but measured results are more useful than assumptions based on a city name. Available relay servers and regions can change, so select from the current dashboard rather than copying a server code from an old tutorial.
Prerequisites for hosting safely
Confirm the complete server requirements before creating a tunnel. A tunnel can carry compatible network traffic, but it cannot add dedicated-server support to a game that does not provide it, correct an unsupported operating system, supply a missing runtime, or repair an invalid server configuration.
Do not estimate capacity from a generic player-count formula. CPU load, memory consumption, world size, simulation complexity, plugins, mods, save activity, and network behavior vary by game and version. Start with the publisher's current requirements, then monitor the actual server during realistic play.
Decide who will administer the host and game server. Use a dedicated non-administrative operating-system account where practical, keep credentials private, and avoid granting in-game operator access merely for convenience. The person operating the server should also know how to stop it cleanly, inspect logs, apply updates, and restore a backup.
Persistent worlds require a recovery plan before the first public session. Identify the directories containing configuration, access-control files, saves, worlds, plugins, and mods. Store backups separately from the live server folder and test restoration. A copy that has never been restored is not yet a proven backup.
Choose TCP, UDP, or combined UDP/TCP correctly
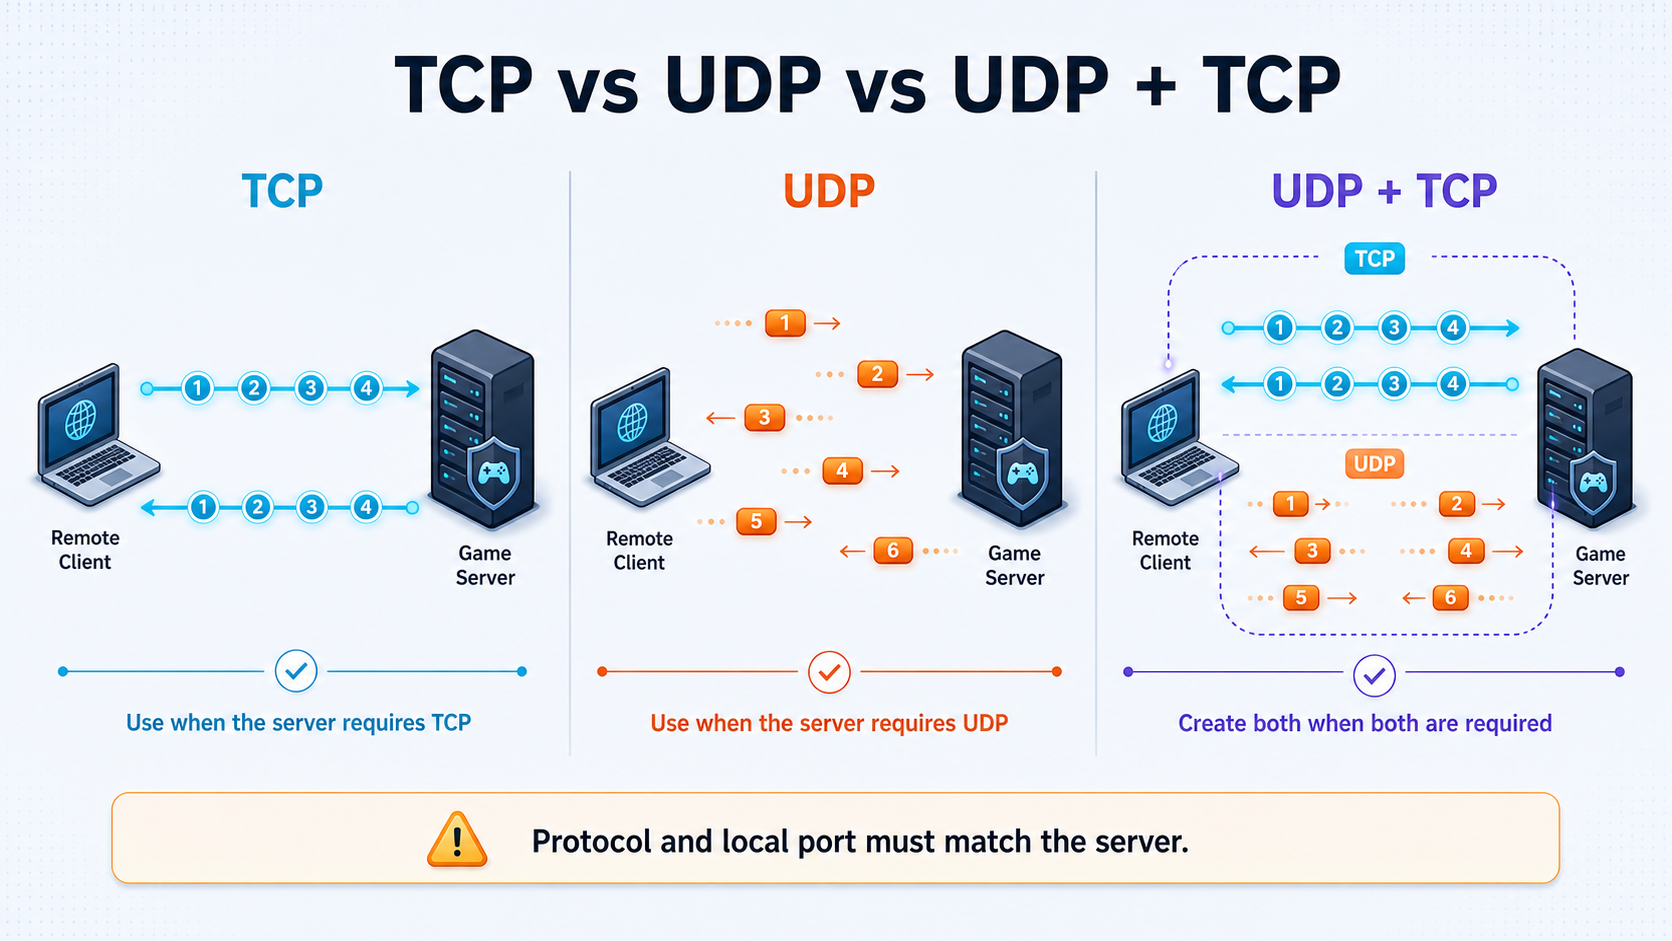
Select the tunnel type that matches the server application's listening protocol. Do not choose based only on the game's genre. A real-time game might use TCP, UDP, or several sockets with different responsibilities. The authoritative answer is the current documentation for the exact server version, supplemented by its startup logs and the listening sockets observed on the host.
| Tunnel type | Use it when | Important limitation |
|---|---|---|
| TCP | The required player-facing server socket listens on TCP. | A TCP tunnel cannot deliver UDP datagrams. |
| UDP | The required player-facing server socket listens on UDP. | A UDP tunnel cannot carry a separate TCP connection. |
| Combined UDP/TCP | The application needs both transports on the same local port number. | It does not combine several different local port numbers into one tunnel. |
Some servers use separate ports for gameplay, discovery, status queries, voice, or administration. A combined UDP/TCP tunnel for one local port does not expose a query or RCON listener running on another port. Review each required socket individually and expose only services that internet players genuinely need.
Build a port inventory
| Port role | Question to answer | Exposure decision |
|---|---|---|
| Gameplay | Which exact TCP or UDP socket accepts player sessions? | Expose the documented player-facing socket. |
| Query or discovery | Does direct connect work without it, or does a server browser require it? | Expose it only when the documented connection model needs it. |
| RCON or administration | Can the interface issue commands, change settings, or control players? | Keep it private unless remote access is necessary and strongly protected. |
| Voice or auxiliary service | Does it listen on a separate port or use another protocol? | Configure it separately according to the publisher's documentation. |
Verify the listener before exposing it
Server startup logs commonly report the listening address, port, and protocol. Operating-system networking tools can also display active listeners, although their commands and output differ by platform. Compare the observed listener with the server configuration. If the expected port does not appear, repair the local server before adding a tunnel.
The listening address matters. 127.0.0.1 is the loopback interface and can be reached only from the same device. A private LAN address can be reached by permitted devices on that network. Some applications use a blank setting to listen on available interfaces. Binding behavior belongs to the game server, not Localtonet, so follow that server's instructions instead of forcing an address without understanding the effect.
Minecraft Java Edition end-to-end example
Minecraft Java Edition provides an official dedicated-server download and is a useful single-port TCP example. This walkthrough applies to the official Java server, not Bedrock Dedicated Server, proxy networks, modded distributions, or third-party server software. Those alternatives may have different installation, runtime, protocol, port, and security requirements.
Download the server from the official Minecraft Java Edition server download page. That page publishes the current server JAR and its current launch guidance. Because the download changes with Minecraft releases, keep the downloaded filename, server release, and Java runtime requirement together in your maintenance notes.
Do not assume one Java major version works for every Minecraft server release. Use the Java requirement associated with the exact server JAR you download, then confirm the active runtime with java -version. The networking behavior described below is stable for the standard server, but runtime requirements can change as Minecraft releases change.
Install and configure the official server
Create a dedicated server folder
Create a folder owned by the account that will run the server. Keep the JAR, generated properties, logs, access-control files, and world data together. Do not run the server from a temporary download directory. Use a non-administrative account where practical.
Download the official server JAR
Open the canonical Minecraft Java server download page, review the current instructions, and download the JAR for the release you intend to host. Place it in the dedicated folder. Avoid unofficial mirrors. You may rename it to server.jar for simpler commands, or retain the original filename and use that exact name below.
Install and verify the required Java runtime
Install a Java runtime compatible with the downloaded server release. Open a terminal or command prompt and verify which runtime the command resolves to. If several Java installations exist, make sure the server starts with the intended one.
java -versionRun the server once to generate its files
From the dedicated folder, start the JAR using the official page's current launch syntax. The command below uses server.jar as the filename and disables the graphical interface. Adjust memory options only after reviewing the host's available memory and the guidance for the release you are running.
java -jar server.jar nogui
On an initial run, the official server generates files including eula.txt and then stops because the EULA has not been accepted.
Read and accept the EULA
Read the Minecraft End User License Agreement. If you agree, open the generated eula.txt, change eula=false to eula=true, and save it. This records acceptance for the server. Do not distribute a pre-edited file or automate acceptance without reviewing the agreement.
eula=trueStart once more to generate the world and properties
Run the same Java command again. Allow startup to finish and watch the console for errors. The official server creates or updates server.properties, world data, logs, and access-control files. Stop the server cleanly with the console command stop before editing properties.
Review the stable networking and authentication settings
Open server.properties while the server is stopped. The standard Java server uses TCP port 25565 unless server-port is changed. Keep server-ip blank for the normal all-interfaces configuration unless you have a deliberate local bind requirement. Keep online-mode=true for an ordinary internet-connected server so joining players are authenticated through Minecraft's account system.
server-ip=
server-port=25565
online-mode=true
white-list=true
enforce-whitelist=true
Property names and generated defaults can be inspected directly in the file produced by the exact server JAR. Do not put the Localtonet public hostname in server-ip. That setting controls the local interface on which Minecraft listens.
Enable and populate the allowlist
Start the server and wait for it to finish loading. In the server console, enable the allowlist, add each approved Java Edition player by account name, and inspect the resulting list. Replace the example names with the players you intend to admit.
whitelist on
whitelist add PlayerName
whitelist add AnotherPlayer
whitelist list
To revoke access, use whitelist remove PlayerName. If an administrator edits the allowlist file while the server is running, use whitelist reload afterward. Console commands are entered without a leading slash. In-game commands normally use a leading slash and require sufficient operator permission.
Grant operator access only when required
Being allowlisted permits a player to join; it does not need to make that player an operator. Grant administrative privileges only to trusted people who need to run server commands. Keep ordinary players allowlisted without operator status.
Verify the server locally
Start the server, wait for startup to complete, and connect from Minecraft Java Edition on the host using localhost:25565. If testing from another LAN computer, use the server host's private address and ensure the host firewall permits TCP traffic to the configured port. Do not publish the server until the appropriate local test succeeds.
Setting online-mode=false removes the normal account-authentication check and changes the server's identity assumptions. This guide does not recommend that configuration for a public server. An allowlist complements authenticated identities; it should not be treated as a substitute for them.
The Minecraft process listens on a local network interface. The Localtonet public hostname and port belong to the relay side of the connection and must not be entered in server-ip. Leave that property blank for the standard setup, or use a deliberate local bind only when you understand the routing effect.
Shut down and back up cleanly
Use the Minecraft server console's stop command before closing the terminal, restarting the host, updating the server, or taking an offline backup. The command allows the server to save the world and shut down normally. Do not rely on closing the terminal window or terminating the Java process.
stop
After the process exits, copy the world data, server.properties, allowlist, operator list, and any other files needed for recovery to storage separate from the live server folder. If you use plugins or mods in a different server distribution, include their configuration and data as directed by that project.
Test restoration before trusting the backup routine. When updating Minecraft or Java, stop the server, create a backup, read the new release requirements, update one component at a time, and test locally before restarting the public tunnel.
Configure the Localtonet TCP tunnel
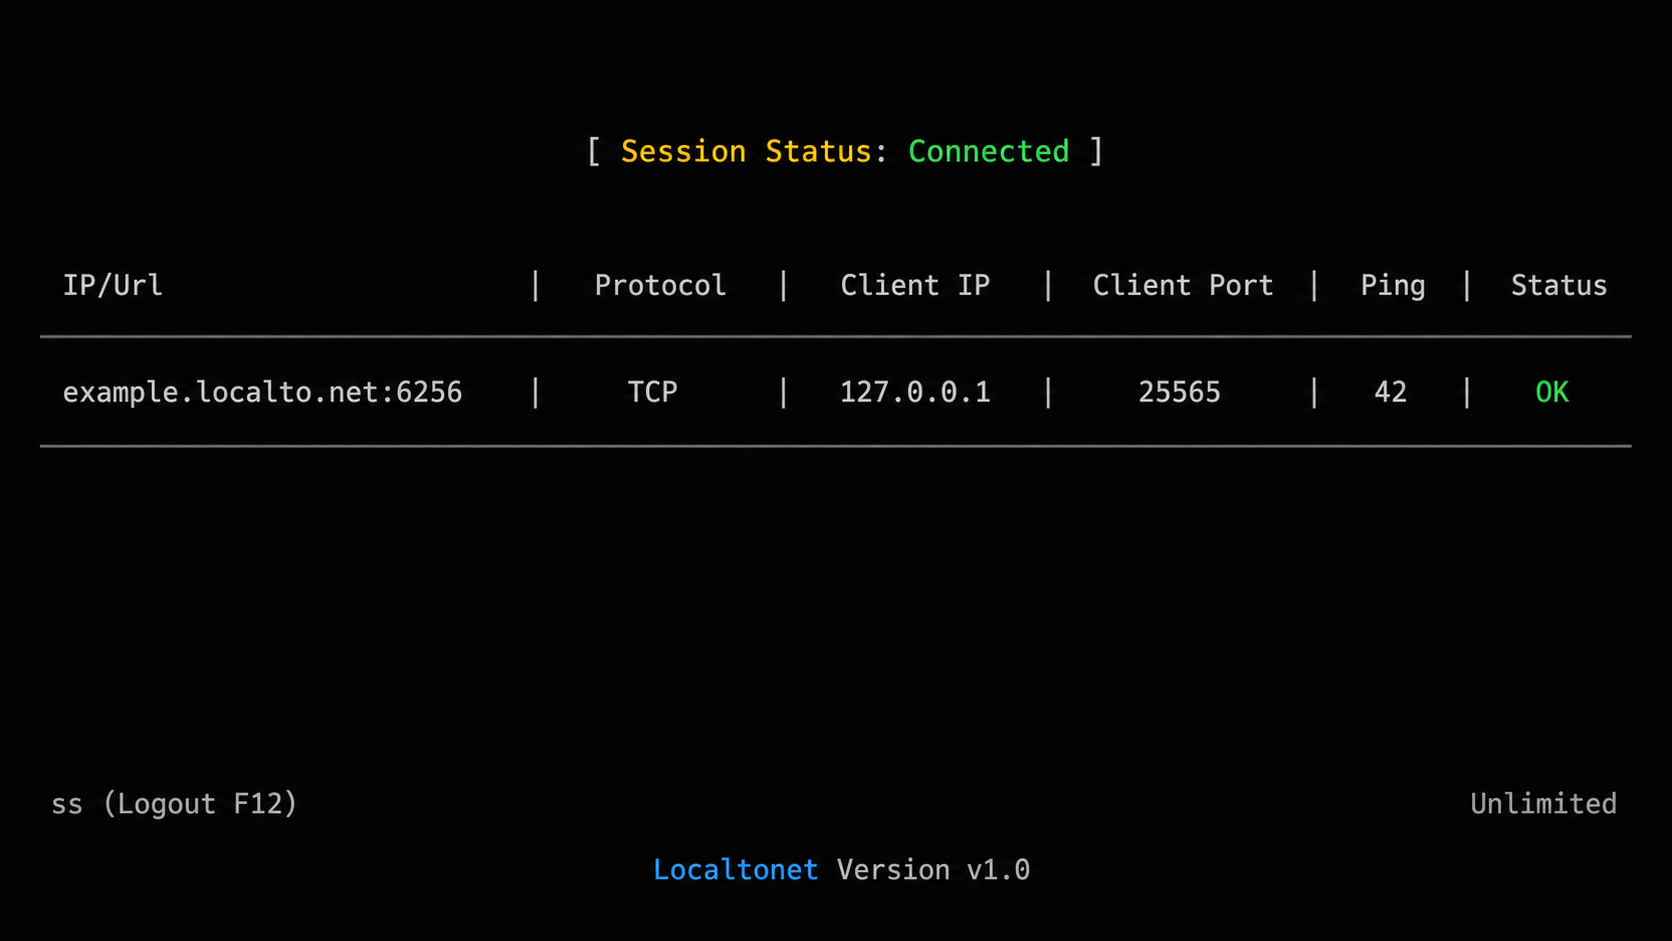
Complete the local Minecraft test first. For the standard Java configuration above, the target is TCP port 25565. If you changed server-port, use the configured value instead. For another game, select TCP, UDP, or combined UDP/TCP only after confirming the protocol in that game's current server documentation.
The sequence below follows the documented Localtonet lifecycle: install and authenticate the client, select the device and an available relay, provide the local target, create the configuration, and press Start. Dashboard presentation can change over time, so use the current Localtonet TCP tunnel documentation alongside the field descriptions below if the layout differs.
Install and run the Localtonet client
Download the appropriate client from the Localtonet download page. Choose the supported installation method for the device that can reach the game server. The current download page provides Windows, macOS, Linux, Android, Docker, OpenWrt, NAS or Home Assistant, and zero-install SSH paths. Availability and instructions can vary by platform.
Authenticate the intended device
Open the client and supply that device's AuthToken when prompted, or use a documented installation method that stores the token securely. The AuthToken identifies the device that will run the tunnel. Never place it in the Minecraft address field, a screenshot, public chat, source control, or an article. Confirm that the intended device is connected before creating the tunnel.
Open the TCP tunnel configuration
In the dashboard, choose the TCP tunnel workflow for this Minecraft Java example. For a different game, open the UDP or combined UDP/TCP workflow only when its documented listener requires that transport.
Select the AuthToken and relay server
Select the connected device's AuthToken and choose a currently available Localtonet server or region. Obtain available values from the current dashboard rather than hardcoding an old server code. Start with a location that is reasonable for the host and players, then evaluate it through real connection tests.
Enter the local IP address and port
Set the local target to the IP address and port reachable from the Localtonet client. Use 127.0.0.1 when Localtonet and Minecraft run on the same device and the server is reachable through loopback. If they run on different devices, use the Minecraft host's reachable private LAN address. Enter 25565 unless you deliberately changed Minecraft's server-port.
Create and start the tunnel
Save or create the configured TCP tunnel, then press Start. Creation and startup are separate lifecycle actions. Confirm that the tunnel is running and record the public host and port currently shown in the dashboard.
Test externally and close access when finished
Ask an allowlisted player to connect from a genuinely external internet connection using the exact assigned public host and port. When hosting is no longer needed, stop the tunnel while retaining its configuration, or delete it if the configuration is no longer required.
Loopback always refers to the device on which the connecting process runs. If the Localtonet client is on another computer, 127.0.0.1 points to that computer, not the Minecraft host. Use the server's reachable private address and confirm that the host firewall permits TCP connections from the Localtonet client device.
Optional automatic Localtonet startup
The current Localtonet download page documents automatic startup options for supported desktop systems. Windows can run Localtonet as a Windows Service, Linux systems using systemd can run it as a system service, and macOS provides a launchd service path. Use only the commands documented for your installed client version and platform.
Automatic Localtonet startup does not prove that Minecraft started, that the world loaded successfully, or that a saved tunnel is running. Verify all three components after a reboot. Protect the AuthToken used by a service and restrict administrative access to the host.
Verify the complete connection path
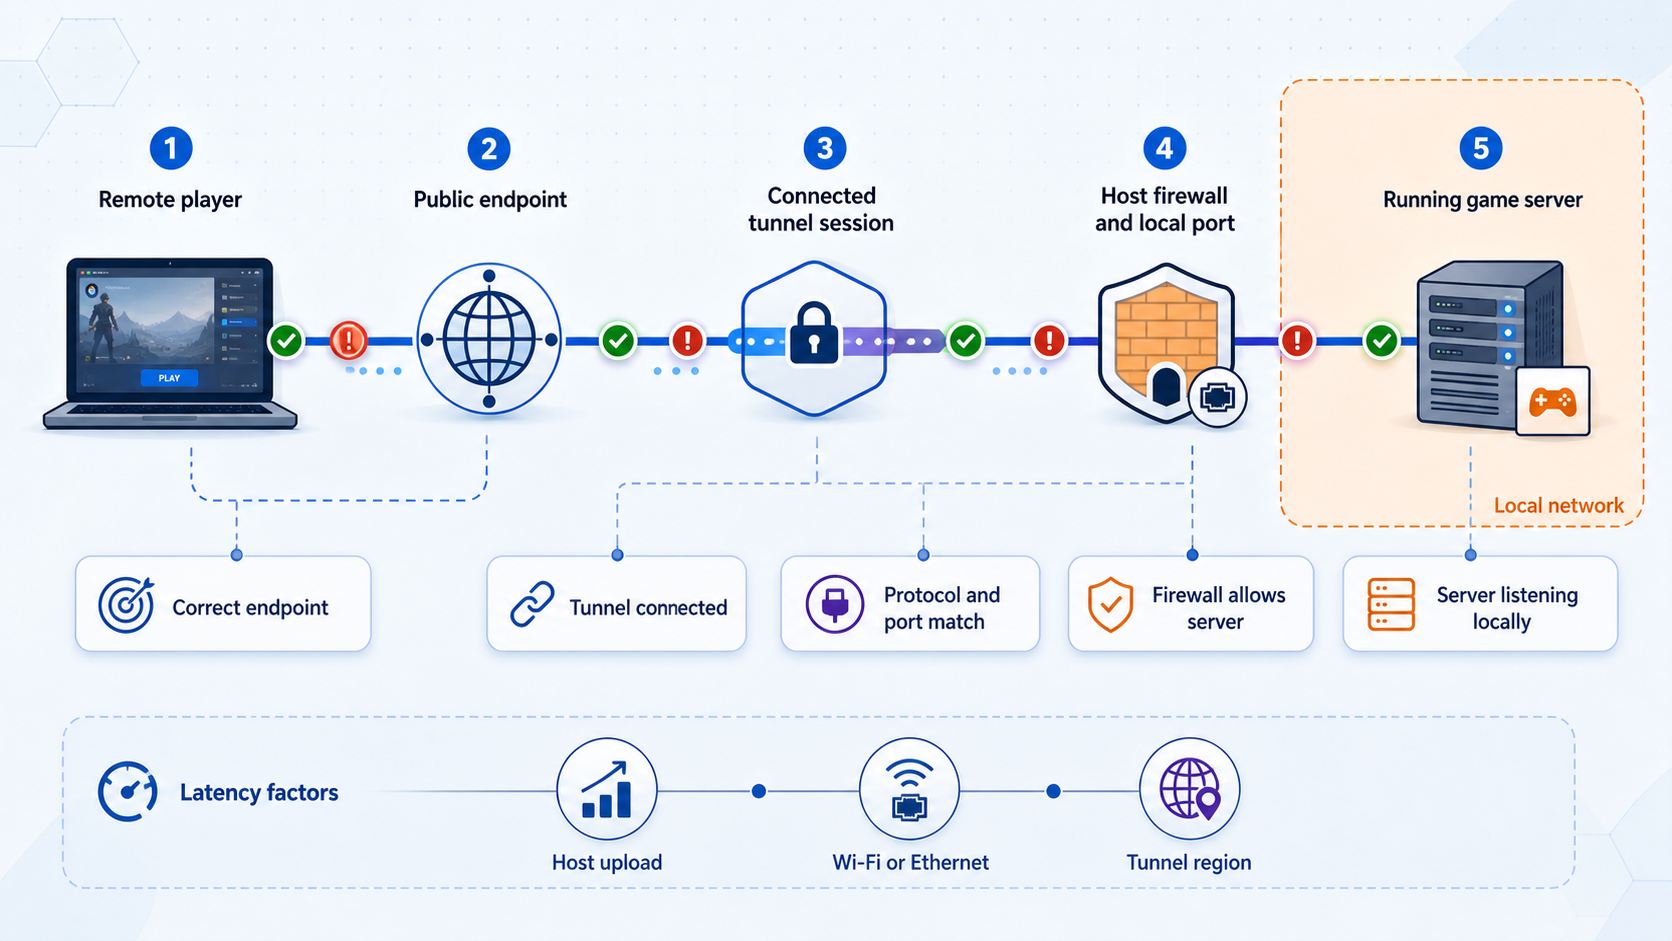
Test the deployment in layers. An external connection depends on several independent components, and jumping directly to an internet test makes failures harder to isolate.
Confirm server startup
Read the Minecraft console and logs. Confirm that startup completed without a Java compatibility error, rejected EULA, malformed property, inaccessible world, or port-binding failure.
Test on the server host
Connect through the local listener. For Minecraft on the same computer with the standard port, use localhost:25565. This proves the game process is available locally.
Test from the Localtonet client device
If Localtonet runs on another device, connect from that device to the Minecraft host's private IP and port. This identifies LAN routing, bind-address, and host-firewall problems before the relay is involved.
Confirm Localtonet device status
Verify that the intended AuthToken or device is connected. A tunnel associated with an offline device cannot reach the local server.
Confirm tunnel status and target
Verify that the TCP tunnel is running. Recheck its local IP, local port, selected relay, and assigned public endpoint. Make sure another saved tunnel was not started by mistake.
Test from outside the home network
Ask an allowlisted friend to connect through their own internet connection using the public host and port currently displayed. A test from inside the same home network may not reproduce an external player's route.
A successful host test proves that Minecraft is listening. A successful LAN test from a separate Localtonet device proves that the configured target is reachable. Connected device and running tunnel states prove that the relay path is active. A successful external player test validates the complete route. Record the first layer that fails before changing settings.
Secure and operate a public game server
Treat the assigned host and port as discoverable. Keeping the endpoint out of public posts reduces casual sharing, but it is not authentication. Protect the server at the game, operating-system, and network layers, and expose only the minimum services required for players.
Use IP restrictions as an additional layer
Localtonet's current paid feature list includes IP whitelisting. An IP restriction can reduce who reaches an endpoint, but it should complement Minecraft authentication and the game allowlist rather than replace them. Friends with dynamic public addresses may lose access when their provider changes their address. Shared connections, carrier networks, and VPNs can also affect the source address observed by the relay.
Keep firewall rules narrow
Localtonet does not require an inbound router port-forwarding rule. The operating-system firewall may still need to permit the game server locally, particularly when the Localtonet client runs on another LAN device. Scope any rule to the required application, protocol, port, network profile, and trusted local source where the operating system permits. Do not disable the firewall globally to make a test pass.
Follow a repeatable maintenance routine
- Warn players before maintenance and allow pending saves to finish.
- Use the Minecraft console's
stopcommand instead of terminating Java abruptly. - Back up worlds, properties, and access-control files before updates.
- Read the Java requirement for the new Minecraft release before changing runtimes.
- Verify the server on the host after every update.
- Repeat the LAN test if Localtonet runs on another device.
- Confirm that the Localtonet device is connected and the correct tunnel is running after reboot.
- Check the current public host and port before telling players to reconnect.
- Stop or delete tunnels that are no longer needed.
Troubleshooting connection failures and latency
The server does not start locally
Do not troubleshoot Localtonet yet. Read the server console for a Java compatibility error, unaccepted EULA, malformed configuration, inaccessible world, missing files, or a port already in use. Confirm that the downloaded server JAR matches the intended release and that java -version reports a compatible runtime.
Minecraft starts but does not listen on the expected port
Stop the server and inspect server.properties. Confirm that server-port contains the intended value. The standard value is 25565, but the tunnel must use the actual configured value. Check the startup log for a bind failure or another process already using the port.
Localhost works, but another LAN device cannot connect
Review the bind configuration and host firewall. For the standard Minecraft Java setup, leave server-ip blank unless you intentionally need a particular local interface. Confirm that the other device is using the Minecraft host's private address rather than 127.0.0.1. Loopback never refers to a different computer.
The tunnel exists, but nobody can connect
Check whether it was started. Then confirm that the associated Localtonet device is connected. Creating a tunnel is not the same as running it, and a running configuration cannot reach a disconnected client. Recheck the selected AuthToken, local target, TCP protocol, and current public endpoint.
The protocol or port is wrong
Minecraft Java's standard player connection uses TCP. A UDP tunnel will not carry that connection. For another game, compare the tunnel with the publisher's current documentation and the server's observed listening sockets. Make sure the target is the gameplay port rather than a client, query, discovery, or administrative port.
Direct connect works, but the server browser does not
Some games use a separate query or discovery socket. Review the game's port inventory. A combined UDP/TCP tunnel on one port does not expose a service listening on a different port number. Decide whether the auxiliary socket is necessary, then configure it separately only when the official server workflow requires it.
An allowlisted Minecraft player is rejected
Run whitelist list in the server console and confirm the player's account name is present. Add the correct name with whitelist add PlayerName. If the allowlist file was edited manually, run whitelist reload. Also confirm that the player uses the correct Minecraft release and that online-mode=true remains enabled.
The host firewall blocks the connection
Confirm that Java or the dedicated server process and the required TCP port are permitted for the appropriate network profile. If Localtonet runs on another device, test the private address from that device. Do not create broad allow-all rules or disable endpoint protection as a permanent workaround.
The server worked before a reboot
Verify three independent states: the Minecraft process, the Localtonet client device, and the tunnel. Automatic startup must be configured separately for the game server and Localtonet client. A saved tunnel may still need to be started. Review startup logs rather than assuming each component launched successfully.
Friends are using an old endpoint
Compare the address they entered with the host and port currently displayed in the dashboard. If the endpoint changed, distribute the current value through a trusted channel. Do not tell players to use the local port automatically. They must use the public port assigned or configured for the tunnel.
The connection works but latency is high
Measure before changing configuration. Test another currently available relay, check the host and players for congestion or packet loss, and monitor whether Minecraft is falling behind because of CPU, memory, storage, world simulation, plugins, or mods. A wired host connection can reduce Wi-Fi variability, but it cannot correct an overloaded server or poor internet routing.
Some players can connect and others cannot
Review the Minecraft allowlist, bans, game-version compatibility, account authentication, and any Localtonet IP restrictions. If an approved player's public address changed, an old IP rule may reject them. Ask affected players for the exact error text, but never ask them to share account credentials or your Localtonet AuthToken.
Check the path in this order: server process, local listener, host connection, connection from the Localtonet device, authenticated Localtonet client, started tunnel, current public endpoint, external player. Find the first failed checkpoint before making a change.
Current Localtonet pricing considerations
Self-hosting avoids renting a separate game-server machine, but it is not necessarily cost-free. The host still supplies the computer, electricity, internet connection, maintenance, and backup storage. Localtonet has free and paid tunnel options, and a game requiring several distinct public ports may need several tunnel configurations.
The terms below were verified against the Localtonet homepage on August 20, 2026. Pricing and included capabilities are time-sensitive, so review the current Localtonet pricing information before planning long-running hosting.
| Option | Published terms verified August 20, 2026 | Game-hosting consideration |
|---|---|---|
| Free | One HTTP, TCP, or UDP tunnel, 1 GB bandwidth per month, and a 30-minute tunnel timeout. | Useful for setup and short tests, but the timeout and allowance should not be treated as persistent hosting. |
| Pay-as-you-go | $2 per tunnel per month, unlimited tunnels, unlimited bandwidth, and no tunnel timeout. | Each required tunnel contributes to the total, which matters when a game needs several separate ports. |
| Paid endpoint and access options | The published feature list includes custom domains and ports, IP whitelisting, SSO, and team management. | Confirm the exact option available for the intended tunnel in the current dashboard before depending on it. |
Do not calculate cost from the gameplay port alone until you know whether the game also requires public query, discovery, voice, or other player-facing ports. Conversely, do not expose every port listed in a community guide. Build the inventory from current official server documentation and publish only what authorized players need.
Frequently asked questions
Can I host a game server without router port forwarding?
Yes, when the game provides a compatible direct-listening server. The Localtonet client establishes an outbound connection to our relay, which provides a public host and port. This removes the need for an inbound router port-forwarding rule, but local firewalls and organizational network policies still apply.
Do my friends need to install Localtonet?
Not for the public tunnel workflow described here. The host runs the Localtonet client. Authorized players use the game's normal direct-connect feature with the public host and port assigned to the tunnel.
Which Localtonet tunnel type does Minecraft Java Edition use?
The standard Minecraft Java player connection uses TCP. Its conventional server port is 25565, although the server administrator can change server-port. Configure the Localtonet TCP tunnel with the port the server actually uses.
What Java version does a Minecraft server require?
The requirement depends on the Minecraft server release. Check the official Java server download page and release guidance for the exact JAR, install a compatible runtime, and verify the active version with java -version. Do not apply an old tutorial's Java requirement to every release.
How do I enable the Minecraft allowlist?
Set white-list=true and, for enforcement behavior, enforce-whitelist=true in server.properties while the server is stopped. After starting it, run whitelist on, whitelist add PlayerName, and whitelist list in the server console. Remove access with whitelist remove PlayerName.
Should server-ip contain the Localtonet public hostname?
No. The public hostname belongs to the Localtonet relay. For the standard Minecraft Java setup, leave server-ip blank unless you deliberately need to bind Minecraft to a particular local interface. Localtonet separately targets an IP address reachable from its client device.
Does a combined UDP/TCP tunnel expose every port a game needs?
No. It supports both transports for the configured local port number. If gameplay, discovery, query, voice, or administration services use different port numbers, evaluate each socket separately and expose only the player-facing services that are required.
Why must I test locally before creating a tunnel?
A tunnel cannot repair a server that failed to start, uses an incompatible runtime, rejected the EULA, listens on the wrong port, or has invalid configuration. Local and LAN tests prove that the service is available to the Localtonet client before the relay is added.
Is the public endpoint private if I share it only with friends?
No. Treat a public host and port as discoverable. Keep Minecraft online authentication enabled, use the allowlist, restrict operator access, patch the server, maintain narrow firewall rules, and use Localtonet IP whitelisting as an additional layer where available.
What happens when the host or Localtonet client goes offline?
Players cannot reach the server. Availability requires the dedicated server, authenticated Localtonet device, and selected tunnel to remain active. After a reboot, verify all three before asking players to reconnect.
Is the free tier suitable for an always-on game server?
The terms verified on August 20, 2026 list one free HTTP, TCP, or UDP tunnel, 1 GB of bandwidth per month, and a 30-minute tunnel timeout. Those limits should not be described as persistent hosting. Pricing can change, so check the current Localtonet page before making a long-term plan.
Publish your verified game server with Localtonet
Start by confirming that the dedicated server works locally and documenting every required port and protocol. Then run Localtonet on a device that can reach it, create the matching tunnel, press Start, and test the assigned public endpoint from an external connection.
Get Started Free →

