

Deploy Muxarr safely, validate media processing, and provide controlled remote access
Muxarr is a self-hosted media-management application that removes unwanted audio and subtitle tracks, standardizes track metadata, and can automate processing alongside Sonarr and Radarr. This guide deploys Muxarr with Docker Run, plans persistent storage and permissions, verifies the container with Docker and HTTP checks, and completes a conservative first test. It also covers backups, updates, rollback planning, troubleshooting, and the network implications of publishing port 8183. After the local service is reliable, we connect it to an HTTP tunnel with Localtonet without requiring inbound router port forwarding or a public IP address.
📋 What's in this guide
What Muxarr does and how the deployment fits together
Muxarr helps administrators reduce unnecessary tracks in self-hosted media libraries. It can remove unwanted audio tracks such as commentary or unneeded dubs, remove subtitles that do not match a profile, and clean metadata attached to media tracks. It supports Matroska files such as .mkv and .webm, plus MP4-family files including .mp4 and .m4v.
For MKV files, Muxarr uses MKVToolNix tools including mkvmerge and mkvpropedit. For other supported containers, it uses FFmpeg and FFprobe. Its documented processing remuxes selected streams instead of performing a lossy video re-encode. Metadata-only MKV changes can be applied with mkvpropedit without a full remux. Muxarr validates a generated output file before replacing the original, and the original remains untouched if validation fails.
Safe output validation reduces processing risk, but it does not replace a backup. The application still needs permission to read and, when processing is enabled, modify files in your library. An administrator can also create a profile whose rules do not match the intended collection. Begin with copied or independently backed-up media in a limited test directory, inspect the preview, and play the processed result before widening the scope.
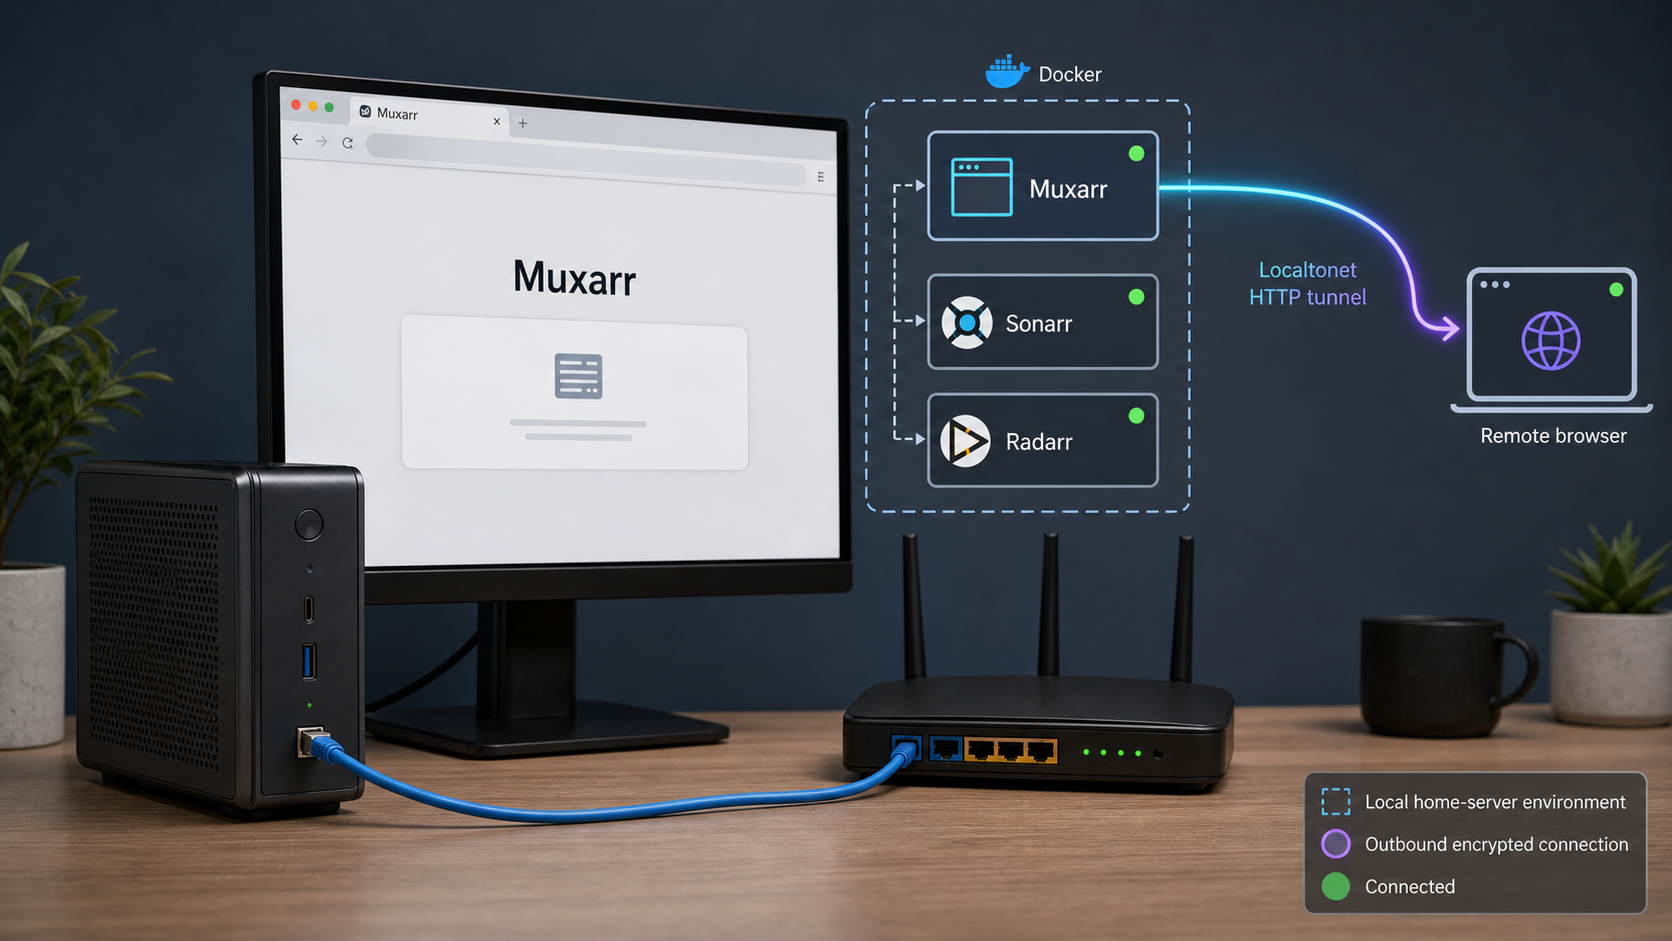
/config is fixed for current installations. Media may be mounted at /media, /movies, /tv, or other stable container paths.
Prerequisites and deployment decisions
The published Muxarr container image supports linux/amd64 and linux/arm64. Your host therefore needs one of those architectures, a working Docker Engine or Docker Desktop environment capable of running Linux containers, storage for persistent application data, and access to the media directories Muxarr will inspect. A NAS, Linux server, or another Docker-capable machine can be suitable when it meets these requirements.
Install Docker using the installation path supported for your host operating system. Docker installation differs among Linux distributions, Docker Desktop platforms, and NAS products, so this tutorial does not substitute a generic installation script for the instructions maintained by the host or Docker vendor. Do not proceed until the Docker client can communicate with the daemon.
Verify Docker and the host architecture
Run the following checks from the account that will administer Muxarr. docker version should show client and server information. docker info should return daemon details rather than a connection or permission error. The final command reports the host architecture on Linux and similar systems.
docker version
docker info
uname -m
Common architecture output includes x86_64 for AMD64 and aarch64 or arm64 for ARM64. If Docker commands require elevated privileges on your host, use the administration method prescribed for that system. Do not make the Docker socket broadly accessible as a shortcut because control of that socket normally grants extensive control over the host.
Plan persistent configuration and media storage
Muxarr stores its database and configuration at the fixed container path /config. Bind this path to a durable host directory that is included in your configuration backup. The media mount is separate. You may use /media inside the container or choose paths such as /movies and /tv. Add multiple mounts when the library spans different host directories.
Stable container paths matter. Profiles and Sonarr or Radarr path mappings can refer to the paths visible inside Muxarr. A host path may change after a storage migration if necessary, but preserving the corresponding container path avoids invalidating those references. For example, a new host storage location can still be mounted at the existing container path /media.
| Setting | Purpose | Planning guidance |
|---|---|---|
/config |
Muxarr database and configuration | Map a persistent host directory to this fixed path and back it up before updates or migration. |
| Media mount | Files Muxarr scans and processes | Use one or more stable container paths. Grant only the access required by the intended workflow. |
PUID and PGID |
Container process identity | Use numeric IDs whose host permissions match the configuration and media directories. |
UMASK |
Permissions on files Muxarr writes | The documented default is 022. The project gives 002 as an example for group-writable libraries. |
| Port publication | Access to the web interface | Choose all-interface, loopback-only, or a specific host-address binding based on where the browser and Localtonet client run. |
Discover the numeric user and group IDs
On a Linux host, run these commands as the account whose access should be represented inside the container:
id -u
id -g
id
Use the numeric results for PUID and PGID. Muxarr documents defaults of 888 for both variables, but relying on those defaults is appropriate only if those IDs have the required host permissions. The Docker command later in this guide uses 1000 merely as a replaceable example.
Choose how port 8183 should listen
Docker's short mapping -p 8183:8183 normally publishes port 8183 on all host interfaces. That can make Muxarr reachable from other devices on the local network independently of Localtonet, subject to host networking and firewall behavior. It is convenient when the Localtonet client or an administrator's browser runs on another device, but it creates a wider local exposure surface.
If the Localtonet client and your administrative browser run on the Docker host, a loopback-only mapping is usually the more limited choice:
-p 127.0.0.1:8183:8183
With that binding, the target is available at http://127.0.0.1:8183 from the host, but it is not intended to be reachable through the host's LAN address. Do not use loopback-only binding when the Localtonet client runs on a different machine because that client cannot use another host's 127.0.0.1. In that layout, publish the service on an address reachable from the client, then test the exact Docker host address from the client device before creating a tunnel.
Keep an independent media backup rather than treating Muxarr's output validation as a backup mechanism. Back up the persistent configuration directory as well. Start with a small test directory, use strong host filesystem permissions, and avoid granting access to unrelated directories.
Install Muxarr with Docker Run
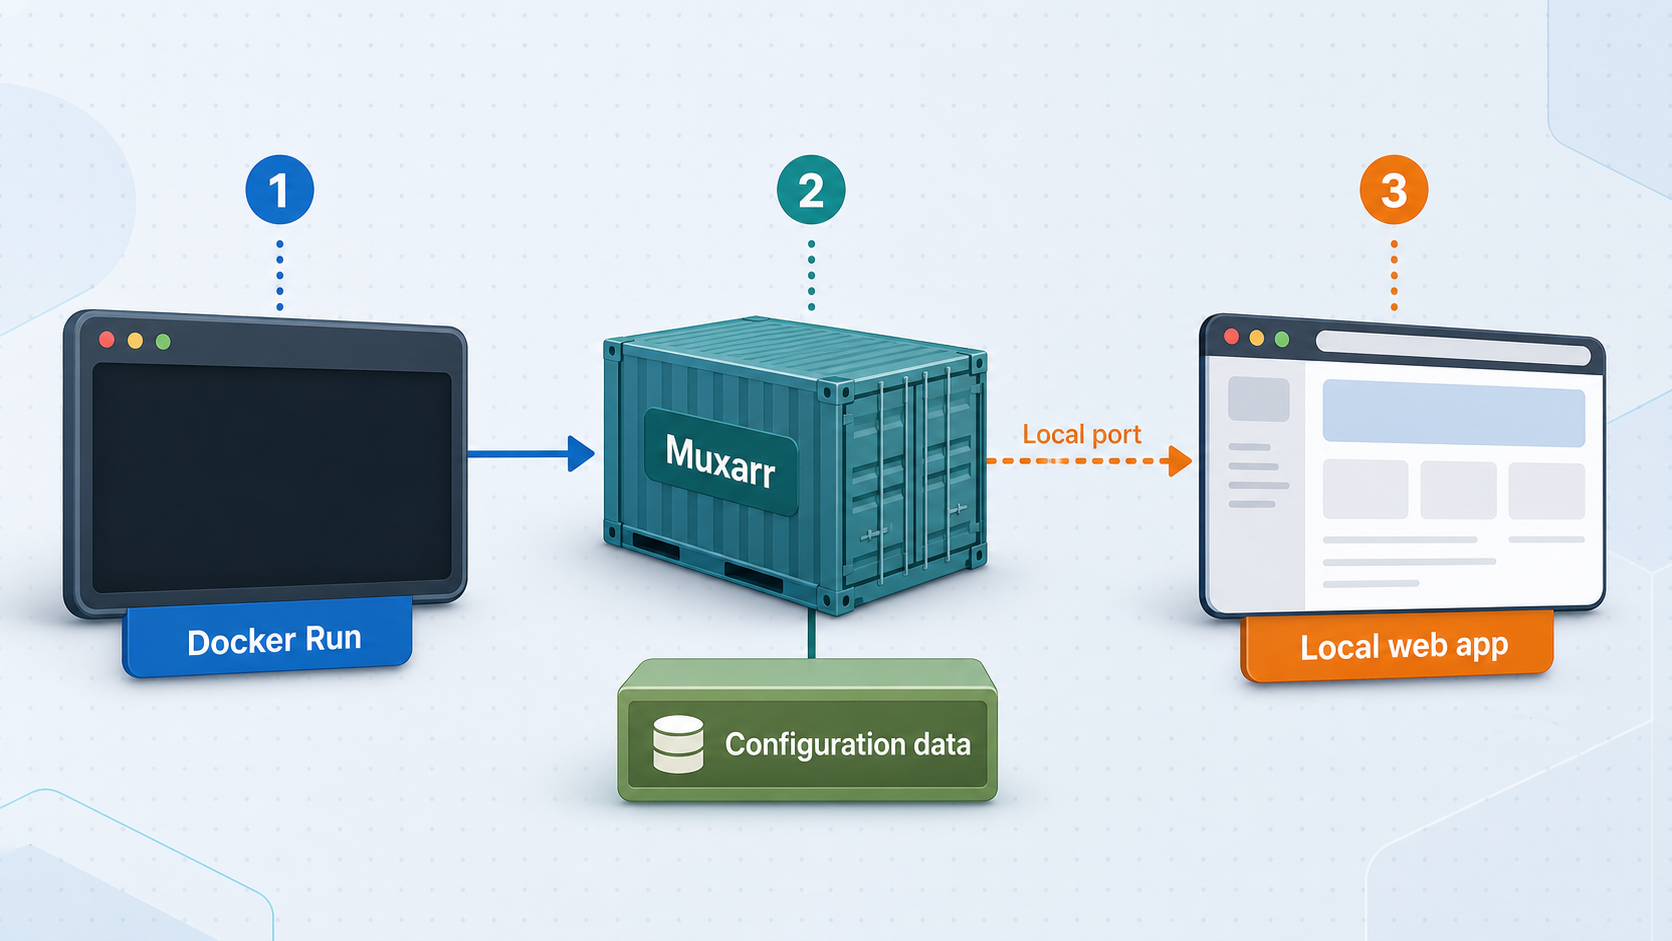
The following procedure follows Muxarr's documented Docker Run installation. Replace every example host path, timezone, PUID, and PGID. The command shown first uses the project's all-interface port publication. A loopback-only variation follows it.
Prepare persistent host directories
Create or select the Muxarr configuration directory and media directory. Confirm that you are not using an empty placeholder path by mistake and that the intended numeric identity can access them.
Start the Muxarr container
Run the documented image with your chosen environment values, port binding, configuration mount, and media mounts. Keep the container name stable so routine commands in this guide remain straightforward.
Open the local web application
Use http://127.0.0.1:8183 on the Docker host, or http://docker-host-address:8183 from an authorized LAN device when the selected binding permits it.
Complete the first-run wizard
Set optional application credentials, optionally connect Sonarr or Radarr, create a profile, scan a limited library, preview changes, and queue only validated test files at first.
Create the directories
This example uses generic Linux paths. Substitute paths appropriate to your host and avoid creating a second empty media directory when your real library is mounted elsewhere.
mkdir -p /path/to/muxarr/config
mkdir -p /path/to/your/media
ls -ld /path/to/muxarr/config /path/to/your/media
Review the owner, group, and permissions shown by ls. If the media is stored on network-attached storage, verify that it is actually mounted before starting Muxarr. Otherwise, Docker may bind an empty local directory at the expected path, causing the application to display an empty library.
Start with an all-interface port binding
docker run -d \
  --name=muxarr \
  -e TZ=Europe/Amsterdam \
  -e PUID=1000 \
  -e PGID=1000 \
  -p 8183:8183 \
  -v /path/to/muxarr/config:/config \
  -v /path/to/your/media:/media \
  --restart unless-stopped \
  ghcr.io/kirovair/muxarr:latest
Use this form only when Muxarr must be reachable through a non-loopback host address, such as when the Localtonet client is installed on another LAN device. Local network access should still be limited using the controls appropriate to your environment.
Use loopback when the Localtonet client runs on the same host
To limit the published port to the Docker host, use the same command with this port line:
-p 127.0.0.1:8183:8183Do not run both complete variants under the same container name. Choose the correct binding before deployment. If you need to change it later, back up the configuration, remove and recreate the container with the same volumes and new port mapping. Docker does not edit the published ports of an existing container in place.
ghcr.io/kirovair/muxarr:latest is the current documented quick-start image, but latest can point to a different image after a new publication. Re-running the same command at a later date may therefore deploy different software. Record the image identity before updates and review the project's current releases or registry tags when reproducibility matters. This guide does not invent a preferred release tag.
Verify the container and local HTTP service
Do not rely only on a browser page appearing. Check the container state, recent logs, effective mounts, port publication, and an HTTP response. These checks make it easier to distinguish a Docker problem from an application setup problem.
Check status and startup logs
docker ps --filter name=muxarr
docker inspect -f '{{.State.Status}}' muxarr
docker logs --tail 100 muxarr
The container should appear in docker ps, and the inspected state should report running. Review the logs for repeated restarts, permission errors, database problems, or port-related startup failures. To follow new log output while reproducing an issue, use:
docker logs --follow muxarrStop following logs with your terminal's normal interrupt sequence. Logs may contain local paths or other operational details, so inspect them before sharing.
Inspect mounts and port publication
docker inspect -f '{{json .Mounts}}' muxarr
docker port muxarr
docker inspect -f '{{.Config.Image}}' muxarr
Confirm that the host configuration directory maps to /config, that the intended media directory maps to the expected stable container path, and that container port 8183 has the host binding you selected. If a mount source points to a newly created empty directory instead of the real library, stop and correct it before creating profiles.
Perform a local HTTP check
From the Docker host, test the service with an HTTP client such as curl:
curl -I http://127.0.0.1:8183The exact response code can depend on the current application state and authentication behavior. The important initial result is that an HTTP response is returned rather than a connection refusal or timeout. If you published only on a specific non-loopback address, test that selected address instead.
When the Localtonet client will run on another device, repeat the reachability test from that device using the Docker host's reachable address:
curl -I http://docker-host-address:8183Replace the placeholder with the actual address. If this remote local-network check fails, a Localtonet tunnel on that device will also be unable to reach Muxarr. Correct the Docker binding, routing, host firewall policy, or address selection before continuing.
Complete first-run configuration and test a profile
Open the verified address in a browser. Muxarr's setup wizard guides you through optional credentials, optional Arr connections, profile creation, library scanning, preview, and processing. Keep the first run deliberately narrow so that profile behavior and filesystem permissions can be checked without affecting the full library.
Set application authentication
Muxarr allows a username and password to be configured during setup. Although the project describes this as optional, configure strong, unique credentials before making the interface publicly reachable. Do not reuse a Sonarr, Radarr, Localtonet, email, or administrator password.
Application authentication and tunnel transport solve different problems. The Localtonet HTTP tunnel provides a public HTTPS address and carries requests to the local target. Muxarr's credentials control access at the application layer. A public HTTPS address does not remove the need for application authorization, and an application password does not reduce filesystem permissions or limit what the container can modify.
Create a conservative profile
Point the first profile at a limited media directory visible inside the container. Configure language priorities and track limits for that collection, then scan it. Muxarr supports per-directory profiles, fallback languages, regional language distinctions, and choices related to track quality or size. Review each setting according to the language requirements of your library rather than copying a generic rule set.
Use the per-file track preview to confirm how audio, subtitles, language tags, and metadata have been interpreted. Pay particular attention to commentary, hearing-impaired subtitles, forced subtitles, undefined language tags, and regional variants. Metadata quality varies among media files, so a rule that works for one collection may need adjustment for another.
Validate processing and permissions
Queue a copied or backed-up test file. After processing, play the result in the media player used by your household or organization. Confirm that the expected primary audio remains, required subtitles remain available, playback can seek normally, and other library software can still read the file.
Inspect the processed file's host ownership and permissions. If another application must rename, move, or update the file, verify that the chosen PUID, PGID, and UMASK preserve that workflow. A UMASK of 002 is documented as an example for group-writable libraries, while the default is 022. Choose based on your permission model rather than changing it solely to suppress an error.
World-writable media permissions can hide an identity or group-design problem while expanding risk. Confirm the numeric IDs, directory ownership, group membership, mount mode, and network-storage behavior. Grant the container only the read and write access required for the directories it will process.
Optional Sonarr and Radarr integration
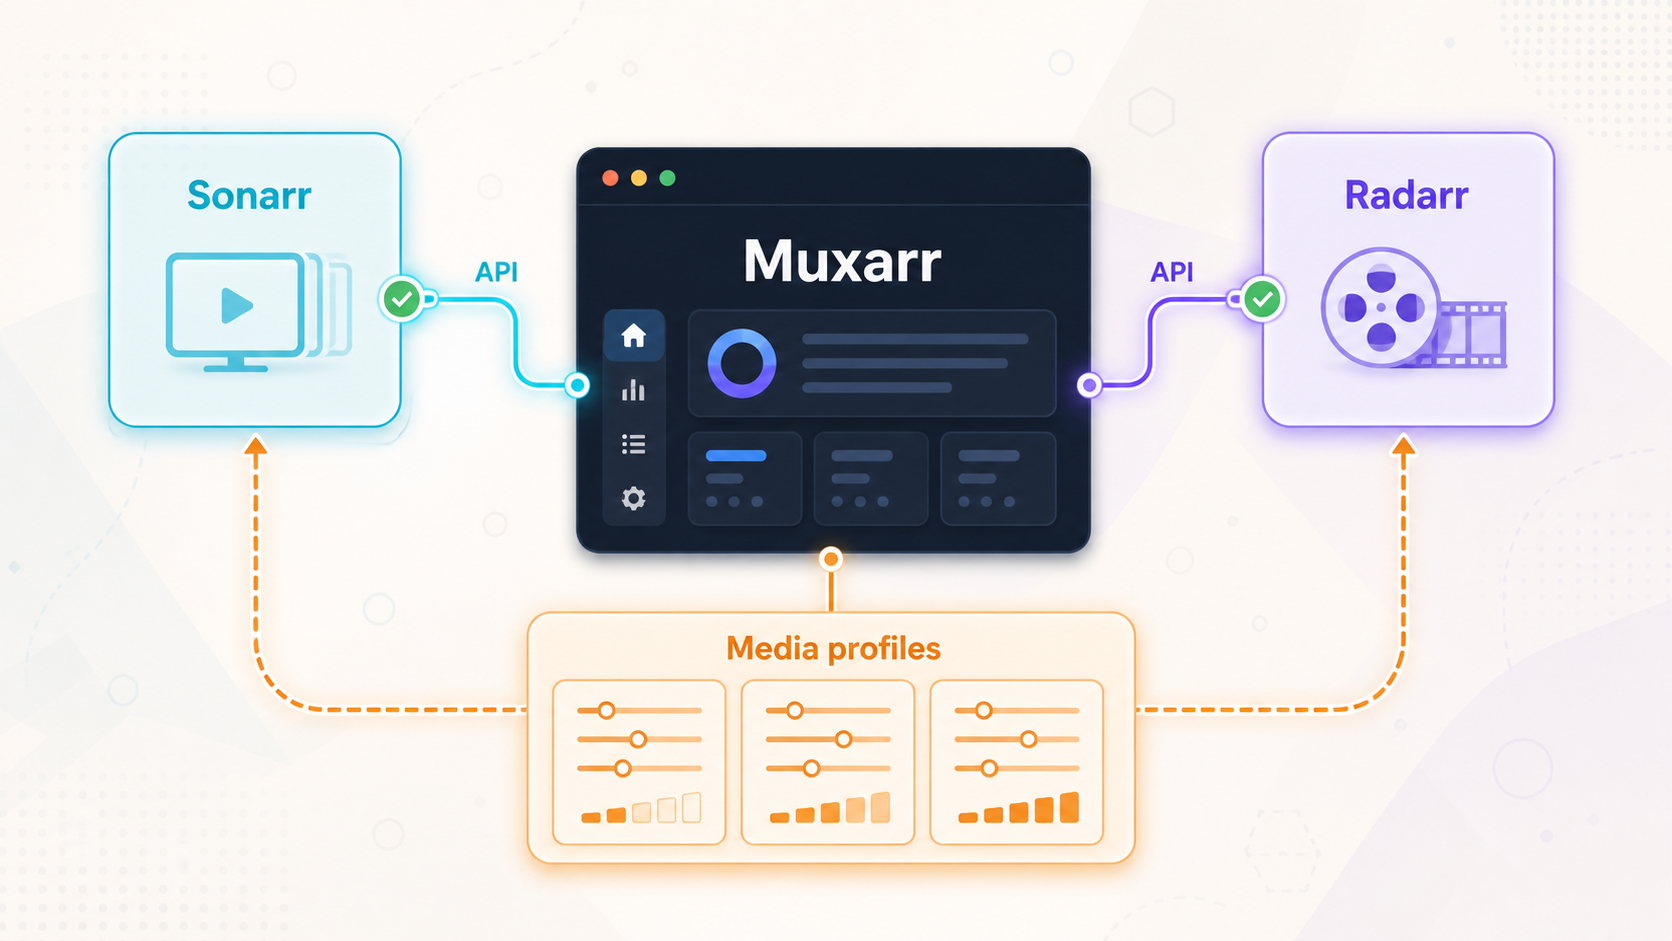
Sonarr and Radarr are optional. Muxarr can create profiles, scan media, preview changes, and queue files without them. When connected, the integrations support original-language detection and webhook-based automation for newly imported media. Muxarr also documents a configurable delay for automatic processing, allowing another tool such as Bazarr time to finish its work first.
Current public evidence does not provide a complete field-by-field integration form, webhook payload specification, or universal path-mapping recipe. Those values depend on application versions and how the containers are networked. This section therefore provides a validation framework rather than inventing URLs, fields, or webhook options that may not match the current Muxarr interface.
Protect connection details and API keys
Enter the service address and credentials requested by the current Muxarr setup interface. Use an address that is reachable from inside the Muxarr container, not merely one that works in the host browser. Do not publish Sonarr or Radarr API keys in screenshots, shell history, public URLs, client-side scripts, or support messages.
Muxarr also exposes a statistics endpoint at /api/stats, authenticated with an X-Api-Key header. Use the examples shown in the current Muxarr Settings and API interface when integrating a dashboard. Treat that key as a secret and rotate it if it is exposed.
Keep filesystem paths consistent
Separate containers can see the same host file under different internal paths. For example, Sonarr might report a file under one container path while Muxarr sees the corresponding storage under /media. A path mapping must translate the reported path to the path actually mounted inside Muxarr.
Validate the mapping with a real imported file. Take the path reported by Sonarr or Radarr, apply the configured mapping, and confirm that the resulting path exists within Muxarr's mounted library. An integration can successfully authenticate while automation still fails because the reported media path cannot be resolved.
Validate webhook automation cautiously
After the connection and path mapping work, use a test import rather than the full production queue. Confirm that the import event reaches the intended Muxarr workflow, that any configured delay behaves as expected, and that the correct profile is selected. Then inspect the preview or processing result and verify the output in your media player.
If manual scans work but new imports are not processed, separate the investigation into four parts: whether the Arr application sent the event, whether Muxarr received it, whether the path mapped to an existing file, and whether a matching profile permitted processing. This is more useful than repeatedly regenerating API keys without identifying which stage failed.
Backups, container operations, updates, and rollback
Routine operation includes checking status, reviewing logs, restarting after a temporary problem, stopping Muxarr before storage maintenance, protecting configuration, and testing every update. The container itself is replaceable. The persistent /config directory and your independently protected media are the state that must survive recreation.
Start, stop, and restart Muxarr
docker stop muxarr
docker start muxarr
docker restart muxarr
docker ps -a --filter name=muxarr
docker logs --tail 100 muxarr
The documented --restart unless-stopped policy allows Docker to restart the container after eligible daemon or host restarts, except when it has been explicitly stopped. It does not replace monitoring, backups, or post-restart verification.
Back up configuration
For a simple file-level backup, stop Muxarr so its database is not changing, then archive the host directory mapped to /config. The following is a generic Linux example:
docker stop muxarr
tar -czf muxarr-config-backup.tar.gz -C /path/to/muxarr/config .
docker start muxarr
Store the archive independently of the Docker host and protect it according to the credentials and integration data it contains. Test that the archive can be listed and that your restoration procedure preserves ownership and permissions. Media backup is a separate task and should follow a storage strategy suitable for the library's size and importance.
Record the running image before an update
docker inspect -f '{{.Image}}' muxarr
docker image inspect ghcr.io/kirovair/muxarr:latest --format '{{json .RepoDigests}}'
docker inspect muxarr > muxarr-container-inspect.json
The first command records the local image ID used by the container. Repository digest information, when available, helps identify image content more precisely than the mutable latest label. The full inspection output records mounts, environment configuration, restart policy, and port bindings, but may contain environment values or operational details. Keep it private and review it before sharing.
Update safely
Back up /config, record the current image identity and complete run configuration, then pull the current image:
docker pull ghcr.io/kirovair/muxarr:latestA running container does not automatically switch to the newly pulled image. Stop and remove the old container, then recreate it with the same configuration and media mount paths:
docker stop muxarr
docker rm muxarr
Run your reviewed Docker Run command again. Preserve the same host configuration directory, its destination at /config, and all established media container paths. After recreation, repeat the status, log, mount, port, HTTP, profile, and test-file checks. Do not remove the prior image or backup until the updated deployment has been accepted.
Pulling latest does not guarantee that the previous image remains addressable by that tag. Preserve the prior local image and record its ID or immutable registry digest before updating. If a release fails, stop and remove the new container, restore configuration only when migration changes require it, and recreate Muxarr from the known prior image with the original mounts and port binding.
Reconcile older /data installations
Current Muxarr sources describe the compatibility transition with slightly different emphasis. The project website says older /data mounts continue to work and that upgrading needs no immediate action. The current GitHub README says Muxarr can continue running from /data while presenting a reminder, but recommends changing the application-data destination to /config. Both agree that the host appdata folder remains the same and that media mount paths should not move.
A cautious migration is therefore:
- Record the current image, mounts, environment variables, and port binding.
- Stop the container and back up the existing appdata folder.
- Verify that the folder contains the expected database and configuration.
- Remove and recreate the container with the same host appdata path mapped to
/configinstead of/data. - Keep every media mount at its existing container path.
- Start Muxarr and verify credentials, profiles, Arr mappings, scans, and a limited processing test.
If the host appdata folder is empty because no persistent directory was mounted, or because an older release ignored a /config mount, the database may be inside the old container's storage. Stop the existing container and copy its /data contents before removing it:
docker stop muxarr
docker cp muxarr:/data/. /path/to/appdata/
Inspect the destination before proceeding. Recreate the container with /path/to/appdata:/config, then verify migration. Nothing should be deleted merely because a copy command completed.
If the migrated release fails and the older image is still available, the project documents that rollback can point the same host folder back to /data. Recreate the older container using the original media paths. If the new release changed stored data, use the pre-update backup rather than assuming every database change is backward-compatible.
Provide remote HTTP access with Localtonet
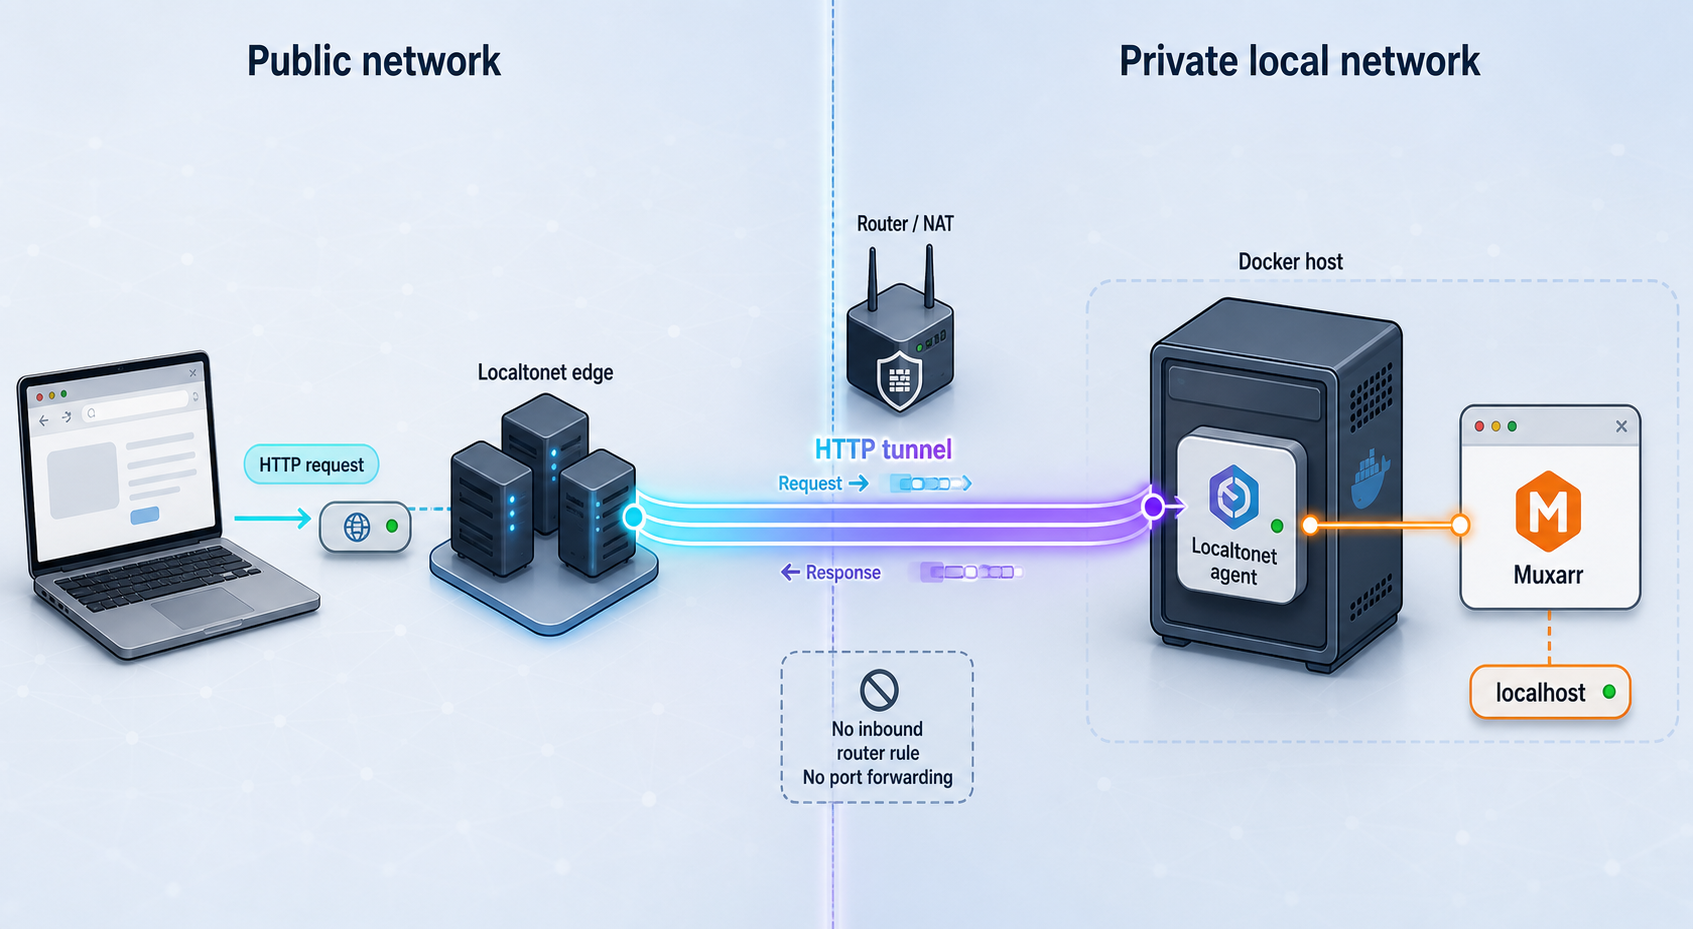
Once Muxarr works locally, we can expose its web interface through an HTTP tunnel with Localtonet. Our client application on the selected device establishes an outbound connection to a Localtonet relay server. This provides a public URL without inbound router port forwarding, firewall changes, VPN setup, or a public IP address.
Decide where the Localtonet client will run before finalizing the Docker port binding. If both applications run on the Docker host, use the loopback target 127.0.0.1:8183 after verifying it locally. If our client runs on another device, Muxarr must listen on an address reachable from that device, and the Localtonet target must use the Docker host's reachable address rather than 127.0.0.1.
Install and run the Localtonet client
Install our client on the Docker host or another device that can reach the verified Muxarr HTTP endpoint.
Authenticate or select the client device
Use the supported client workflow with its device-specific token, then select the connected device in the dashboard. Never place the token in this tutorial, a screenshot, or a public command.
Select an available relay server
Choose a currently available server or region from the dashboard. Obtain current values from the product rather than copying a hardcoded server code.
Create an HTTP tunnel for Muxarr
Set the local target to the address that the selected client uses to reach Muxarr and port 8183. Choose the applicable HTTP process type from the current dashboard.
Start the tunnel
Creating the tunnel does not start it. Press Start and wait until both the selected client and tunnel show that they are connected.
Test the public HTTPS address
Open the assigned URL from a genuinely external network, confirm that authentication is required, sign in, and perform a non-destructive navigation check. Stop or delete the tunnel when it is no longer needed.
Random Sub Domain, Custom Sub Domain, and Custom Domain HTTP process types serve the target at a public HTTPS address. Current availability and custom-domain requirements can vary, so select from the options presented by the dashboard. For the current interface sequence, see our HTTP tunnel documentation.
The public endpoint remains available only while the selected client device is connected and the tunnel is running. If either stops, the public URL cannot reach Muxarr even when the Docker container remains healthy.
Harden the public exposure
- Configure a strong, unique Muxarr username and password before starting the tunnel.
- Keep Sonarr, Radarr, Muxarr API keys, Localtonet device tokens, and backup archives private.
- Use the loopback Docker binding when our client runs on the same host and no LAN access is required.
- Mount only required media directories and apply the minimum useful read and write permissions.
- Use a small test library before granting write access to an entire collection.
- Test from a mobile connection or another external network rather than relying on a LAN browser.
- Confirm that unauthenticated visitors cannot reach administrative content.
- Stop or delete the tunnel when remote access is no longer required.
Muxarr's optional application password is an important control, but it is not sufficient by itself. Combine strong credentials with limited network exposure, protected API keys, least-privilege mounts, current software, independent backups, and external verification. Do not expose Sonarr or Radarr merely because Muxarr needs an internal connection to them.
Troubleshooting Muxarr and Localtonet
The container exits or repeatedly restarts
Run docker ps -a --filter name=muxarr and docker logs --tail 200 muxarr. Check for invalid volume paths, configuration permission errors, unsupported host architecture, or database startup failures. Confirm that docker info succeeds and inspect the container's mounts and environment configuration. If a new deployment fails immediately, compare the command with the documented structure and confirm that line continuation characters were copied correctly for your shell.
Docker reports that port 8183 is already allocated
Another container or host process is already using the selected host port. Run docker ps and docker port muxarr to inspect Docker publications, then use the port-inspection tool provided by your operating system to identify non-Docker listeners. Stop the conflicting service or select a different host port while leaving the Muxarr container port at 8183. If the host port changes, use that new host port in the browser and Localtonet target.
The browser reports connection refused
Confirm that the container is running, inspect logs, and run curl -I http://127.0.0.1:8183 on the Docker host. Check docker port muxarr to verify the binding. A loopback-only binding cannot be reached through the host's LAN address. Conversely, a Localtonet client on another device requires a reachable non-loopback binding and successful HTTP testing from that device.
Muxarr shows an empty media directory
Inspect the container mounts and verify that the host source is the real media location. Confirm that network storage was mounted before the container started. Check whether the profile points to the path visible inside Muxarr rather than the host path. For example, a host directory mounted at /media must be selected through /media inside the application.
Scanning works but processing fails with permissions errors
Reading a directory does not prove that Muxarr can create temporary output or replace a processed file. Verify the numeric PUID and PGID, host directory ownership, group permissions, mount mode, and network-storage rules. Inspect the logs while processing a copied test file. Do not use unrestricted permissions as a permanent workaround.
Processed files are inaccessible to another media application
Review the selected UMASK, file owner, and group after a test. Confirm that Muxarr and the other application share an intentional permission model. Muxarr documents 002 as an example for group-writable files, but both applications must use the relevant group and the directories must permit group access.
Sonarr or Radarr connects, but automation cannot find a file
This usually indicates a path-resolution problem rather than an API authentication problem. Compare the path reported by the Arr application with the path mounted inside Muxarr. Correct the path mapping while preserving stable media mounts. Validate with one known imported file before testing another webhook event.
New imports are not processed
Confirm that manual scanning and processing work first. Then verify that the Arr application emitted the event, Muxarr received it, the mapped file exists, the selected profile applies, and any configured automation delay has elapsed. Review both applications' current logs without exposing API keys or private library data.
The Localtonet client is connected, but the tunnel cannot reach Muxarr
Run an HTTP test from the actual Localtonet client device to the exact target address and port configured in the tunnel. If the client is on the Docker host, test 127.0.0.1:8183. If it is another device, test the Docker host's reachable address. A successful browser test from a third machine does not prove that the selected client has the same route.
The public URL stops working
Check each layer in order: Muxarr container status, local HTTP response, Localtonet client connectivity, tunnel status, and assigned public URL. Remember that a created tunnel must be started and remains available only while the selected client is connected and the tunnel is running. If local HTTP succeeds but the client is disconnected, restart or reconnect the supported Localtonet client workflow. If the client is connected but the tunnel is stopped, press Start.
The public page loads internally but not from the internet
Make sure you are testing the assigned Localtonet HTTPS URL rather than the private Docker host address. Test from a separate network, such as a mobile connection with Wi-Fi disabled. Confirm that the URL is current, the tunnel is running, and the target configured in the tunnel is reachable from the selected client. Do not add router port forwarding because it is not required for this Localtonet workflow.
Frequently asked questions
Which architectures does the Muxarr image support?
The current Muxarr site documents images for linux/amd64 and linux/arm64.
Which port does Muxarr use?
Muxarr listens on container TCP port 8183. The documented mapping 8183:8183 publishes it as host port 8183, while 127.0.0.1:8183:8183 limits the host listener to loopback.
Should I use a loopback-only Docker port binding?
It is appropriate when the browser and Localtonet client run on the Docker host and LAN access is unnecessary. Do not use it when the Localtonet client runs on another device because that device cannot reach the Docker host through its own loopback address.
Are Sonarr and Radarr required?
No. They are optional integrations for original-language detection and webhook automation. Muxarr can scan, preview, and process media without connecting either application.
Does Muxarr re-encode video?
Its documented workflow uses MKVToolNix for MKV files and FFmpeg stream copying for other supported containers. Streams are remuxed rather than subjected to lossy video re-encoding, and some MKV metadata-only changes use mkvpropedit without a full remux.
Is the latest image tag reproducible?
No. It is a mutable tag and can reference a different image after a new publication. Record the running image ID or digest before updating and preserve a known previous image for rollback.
Does an older /data mount have to be migrated immediately?
The current project site says older /data mounts continue to work, while the README recommends moving the same host appdata folder to the current /config destination and notes that Muxarr can continue from /data until then. Back up and inspect the installation before changing the destination, and keep media container paths unchanged.
Why verify Muxarr locally before creating a tunnel?
Local verification separates container, mount, permission, port, and application failures from Localtonet configuration. A tunnel cannot make a stopped or unreachable local service healthy.
Does creating a Localtonet tunnel make it active immediately?
No. You must press Start after creating it. The public endpoint is available only while the selected client is connected and the tunnel is running.
Do I need router port forwarding for Localtonet access?
No. Our client establishes an outbound connection to a Localtonet relay server, so this workflow does not require inbound router port forwarding, firewall changes, VPN setup, or a public IP address.
Connect your verified Muxarr service with Localtonet
After Docker, local HTTP access, application authentication, media permissions, and a limited processing test all succeed, create an HTTP tunnel that targets the working Muxarr endpoint on port 8183.
Get Started Free →

