

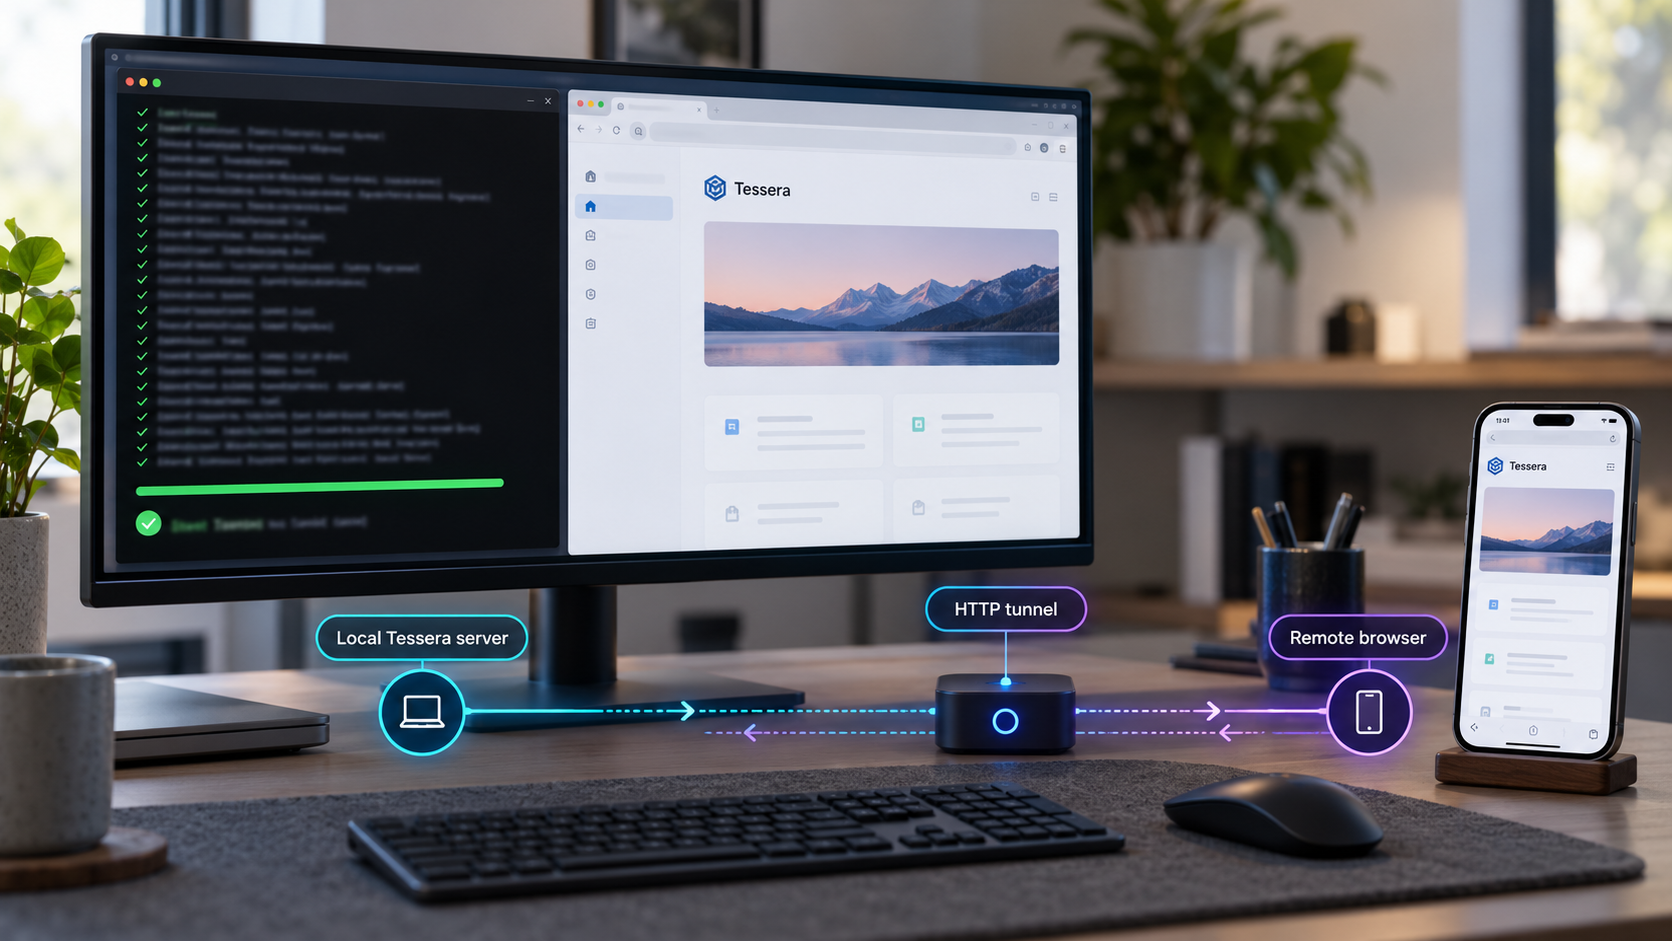
Build a local AI coding workspace, verify it on your machine, then publish its browser interface through a controlled HTTP tunnel
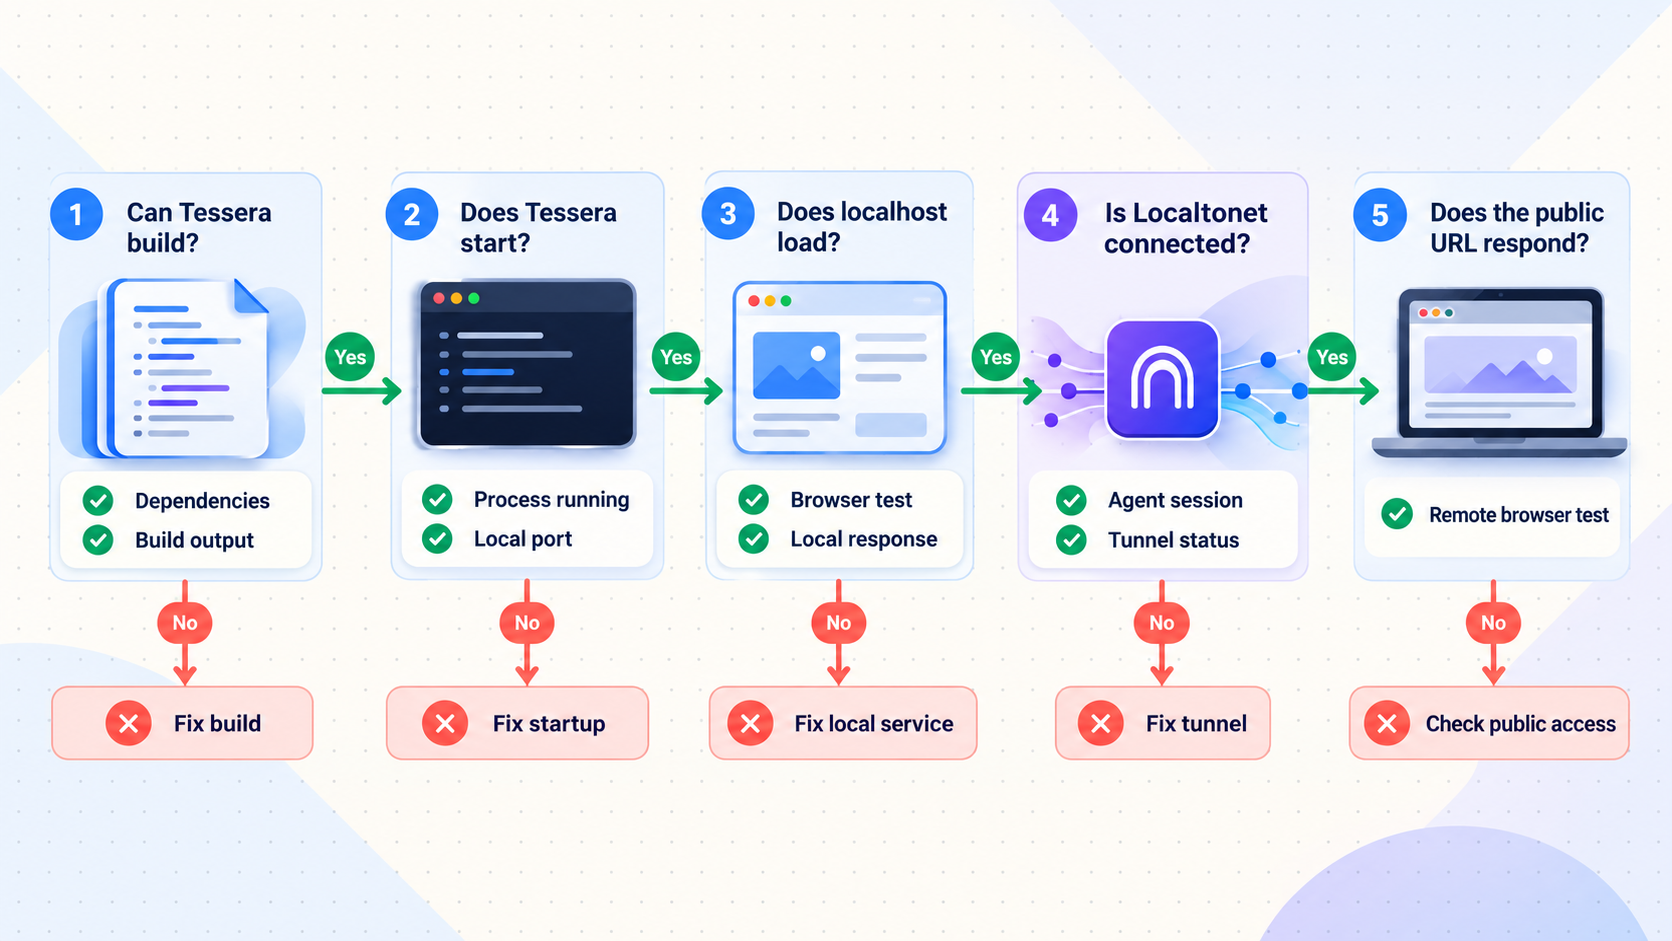
Tessera is a locally hosted workspace for organizing AI coding sessions, projects, Git worktrees, terminals, files, and related development workflows. In this guide, we build Tessera from source, configure its local server, complete the first-run setup, and verify the browser interface before introducing remote access. Once the application works locally, we connect it to a Localtonet HTTP tunnel without requiring inbound router port forwarding, firewall changes, VPN setup, or a public IP address. The result is a practical installation-first workflow that keeps application troubleshooting separate from tunnel troubleshooting.
📋 What's in this guide
How Tessera and Localtonet fit together
Tessera is a local control room for AI-assisted development. Its browser runtime organizes sessions across projects, collections, tabs, split panes, task boards, and Git worktrees. It can work with supported provider command-line tools such as Claude Code, Codex, and OpenCode, while keeping terminal sessions, files, diffs, branches, and task state visible in one workspace.
The important architectural detail is that Tessera runs locally and uses provider CLIs installed and authenticated on the same machine. Building the web application does not install, authenticate, or pay for those providers on your behalf. Before Tessera can launch a provider-backed session, the corresponding provider CLI must already be installed and authenticated according to that provider's requirements.
The source development server uses a custom Node.js server rather than only a basic static frontend process. That server handles the Next.js application, WebSocket transport, database initialization, provider bootstrapping, and background pollers. For a source checkout, the documented default HTTP port is 3000. The npm CLI uses 32123 by default, and the supplied Docker Compose workflow is documented at http://127.0.0.1:32123.
Localtonet enters the workflow only after that local HTTP service is healthy. Our client establishes an outbound connection from the device running Tessera to a Localtonet relay server. An HTTP tunnel then maps a public HTTPS address to the selected local IP address and port. This avoids opening an inbound router port, changing the firewall for unsolicited internet traffic, configuring a VPN, or obtaining a public IP address.
npm run dev. Its documented defaults are host 127.0.0.1 and port 3000.
Tessera documents device pairing under Settings and Remote access for mobile use. That application feature is distinct from exposing the local browser server through a Localtonet HTTP tunnel. This guide focuses on the latter because it provides a general public HTTP path to the locally verified interface.
Prerequisites for building Tessera from source
Complete the prerequisites before cloning the repository. Version mismatches and missing provider authentication are easier to resolve before they become mixed with application or tunnel errors.
Supported Node.js and npm versions
Tessera's source development workflow requires Node.js 20.9+ within the Node.js 20 line, or Node.js versions 22 through 26. It also requires npm 10 or later. Verify both tools in the terminal where you plan to install and run Tessera:
node --version
npm --version
Compare the reported versions with those requirements. If either tool is outside the documented range, install a supported version using the Node.js installation or version-management approach appropriate for your operating system. The exact operating-system package command is intentionally not prescribed here because package names, repositories, permissions, and version availability differ by platform.
Git and a suitable source directory
The documented source path uses Git to clone the Tessera repository. You therefore need a working git command and permission to create files in the directory where the repository will live. Check Git with:
git --versionChoose a source directory that is not itself an important production project. Tessera will have its own source tree, dependency directory, and runtime state. Keeping that checkout separate from the projects managed through Tessera makes permissions and cleanup easier to reason about.
At least one supported provider CLI
Tessera uses provider CLIs that are already installed and authenticated on the host. Its first-run process checks for a supported CLI. Install the provider tool you intend to use and complete its normal authentication before creating sessions in Tessera. The project documentation gives claude login and codex login as examples. OpenCode uses its configured provider credentials.
claude login

# Or, when using Codex:
codex login
Run only the command for a provider CLI that you have actually installed. Provider availability, account requirements, credentials, models, and usage terms are separate from Tessera and Localtonet.
A browser and a project folder
You need a browser on the local machine for the initial verification. You also need a project folder that Tessera is allowed to access. Because AI coding tools can inspect files, run processes, and change project content, start with a test repository or a project whose changes are safely tracked in Git.
Do not grant access to an unnecessarily broad home directory, a secrets directory, or a folder containing unrelated credentials. Use least privilege, keep important work under version control, review diffs before committing, and avoid exposing the browser interface until its local account and provider configuration are complete.
| Requirement | Documented expectation | Why it matters |
|---|---|---|
| Node.js | 20.9+ within 20.x, or versions 22 through 26 | Runs the custom server and the source development toolchain. |
| npm | Version 10 or later | Installs locked project dependencies and invokes the development script. |
| Git | A working Git installation | Clones the repository and supports the project and worktree workflows. |
| Provider CLI | At least one supported CLI installed and authenticated | Tessera launches and manages the locally available AI coding tools. |
| Browser | Access to the local Tessera URL | Completes account creation, project selection, and local verification. |
| Localtonet client | Needed only for the later remote-access stage | Establishes the outbound connection that carries the HTTP tunnel. |
Build and start Tessera from source
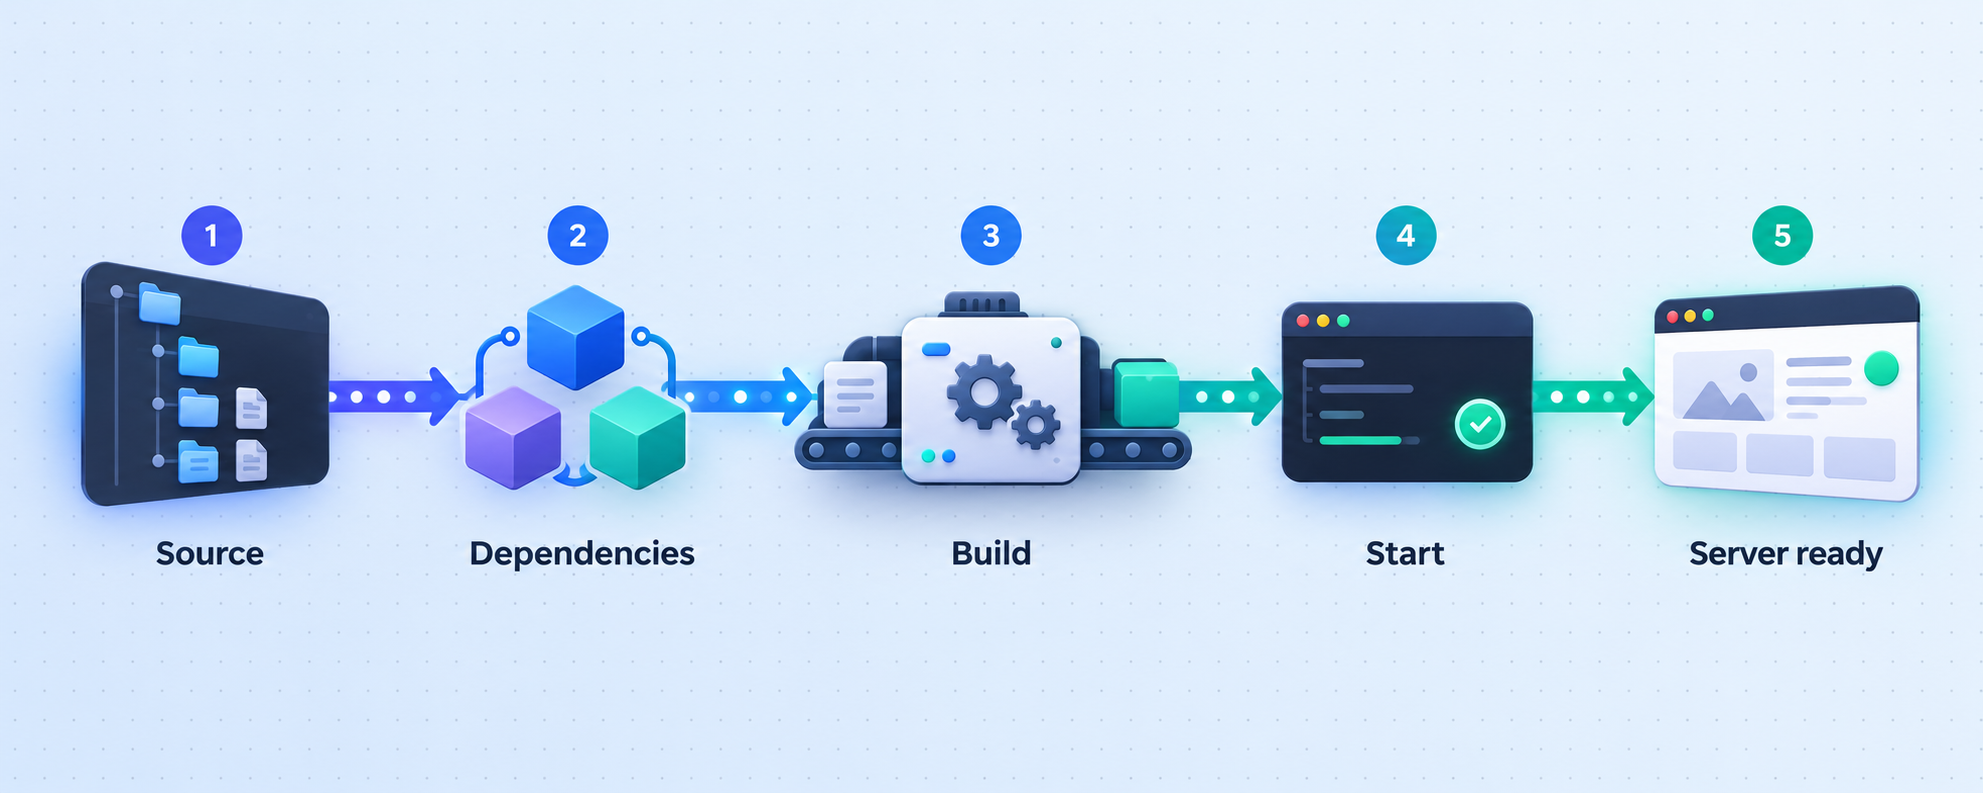
The source installation has four documented actions: clone the repository, enter the checkout, install its dependencies, and start the development server. Run the commands from a terminal under the operating-system account that should own the source and runtime files.
Clone the Tessera repository
Download the official source repository with Git. This creates a directory named tessera beneath the current directory.
git clone https://github.com/horang-labs/tessera.gitEnter the source directory
Change into the cloned repository before running npm commands so that npm reads Tessera's package metadata and lock file.
cd tesseraInstall the project dependencies
Use the documented installation command from the repository root. Let the command finish and review any reported failure rather than continuing with an incomplete dependency tree.
npm installStart the custom development server
Run the development script and keep this terminal open. Tessera starts its custom Node.js server, including the Next.js application, WebSocket transport, database initialization, provider bootstrapping, and background pollers.
npm run dev
Read the startup output before opening the browser. For an unchanged source configuration, the expected port is 3000 and the default host is 127.0.0.1. If the server prints a different URL because you deliberately supplied environment variables, use the printed address instead of assuming the default.
Resolve dependency errors, port conflicts, database initialization errors, and provider startup problems locally first. Adding a public tunnel to an unhealthy service creates a second diagnostic layer without fixing the application.
Alternative installation paths
Building from source is appropriate for development, inspection, and work on Tessera itself. The project also documents an npm package and a Docker Compose deployment. These alternatives use different default-port behavior, so record which path you actually selected before configuring a tunnel.
| Installation path | Startup command | Documented default endpoint |
|---|---|---|
| Source checkout | npm run dev |
127.0.0.1:3000 by default |
| Global npm package | tessera |
Printed local URL, with npm CLI port defaulting to 32123 |
| Docker Compose | docker compose up --build -d |
http://127.0.0.1:32123 |
For reference, the documented npm installation is:
npm install -g @horang-labs/tessera
tessera
The Docker Compose workflow first creates the required host directories and Git configuration file, then starts the supplied Compose deployment:
mkdir -p data/config data/local data/ssh data/codex data/tessera workspaces
touch data/gitconfig
docker compose up --build -d
Open http://127.0.0.1:32123 after that deployment starts. If the bind-mounted directories are not writable, the project documents this ownership correction:
sudo chown -R 1000:1000 data workspaces
That command changes ownership recursively, so inspect the target directories before running it and use it only for the documented Compose layout. The rest of this guide assumes the source build and its default port 3000, unless a section explicitly compares installation methods.
Configure the local Tessera server
Tessera exposes a small set of documented environment variables for its server and runtime data. The defaults are sufficient for a straightforward source installation, but understanding them prevents accidental data loss and incorrect tunnel targets.
| Variable | Default | Purpose |
|---|---|---|
TESSERA_DATA_DIR |
~/.tessera |
App data root for the database, local users, authentication keys, settings, worktrees, attachments, and session history. |
PORT |
3000 from source, 32123 from npm CLI |
Controls the local HTTP server port for source and npm runs. |
TESSERA_HOST |
127.0.0.1 |
Selects the host interface for source and npm runs. The source server also accepts HOST. |
LOG_LEVEL |
info |
Sets the backend log level to debug, info, warn, or error. |
CLAUDE_CONFIG_DIR |
~/.claude |
Overrides the Claude Code configuration directory used for skill discovery. |
Keep the default host when Localtonet runs on the same machine
The default 127.0.0.1 binding accepts connections only through the host's loopback interface. This is a useful default when the Localtonet client runs on the same machine as Tessera because our client can target that loopback address without making Tessera listen across the local network.
If the Localtonet client runs on another device, that device's 127.0.0.1 refers to itself, not to the Tessera host. Tessera would need to listen on an interface reachable from the client device, and the tunnel target would need to use the Tessera machine's reachable local address. The correct interface value depends on the host and network, so do not copy an arbitrary address. Changing the bind interface may also expose Tessera to other systems on that network.
Choose a port deliberately
Keep port 3000 for the simplest source workflow. If another application already uses it, select an unused local port through the documented PORT variable, restart Tessera, and use that same port in the browser and Localtonet tunnel. Environment-variable syntax differs among shells and operating systems, so configure it through your shell, process manager, or service definition rather than relying on an unverified platform-specific example.
Protect the data directory
The default ~/.tessera location contains much more than disposable cache data. It is the documented root for the database, local users, authentication keys, settings, worktrees, attachments, and session history. Back it up according to the importance of your sessions, and restrict filesystem access to the operating-system account that runs Tessera.
Moving TESSERA_DATA_DIR changes where future runs look for state. If Tessera appears fresh after a configuration change, check whether the process is pointing at a different data root before creating another account or assuming that the original state was deleted.
Use logging as a temporary diagnostic tool
The normal log level is info. When diagnosing startup, provider, WebSocket, or background-processing behavior, debug can expose more detail. Review logs before sharing them because development output can contain project paths, session context, command details, or other sensitive information. Return to an appropriate routine level after diagnosis.
Stop the existing source process, apply the environment through the same terminal or process manager that will launch Tessera, and run npm run dev again. Confirm the newly printed local address before changing a working tunnel.
Complete Tessera's first-run setup
With the server running, open the local interface in a browser. For the unchanged source defaults, use:
http://127.0.0.1:3000Tessera's first-run flow guides you through four application-level tasks. Complete these locally before creating public connectivity.
Create the local browser-runtime account
Create the account requested by Tessera and store its credentials securely. Do not use a disposable password merely because the server currently listens only on loopback. This account remains relevant when the interface becomes remotely reachable.
Let Tessera check the provider CLI
Confirm that at least one supported provider CLI is installed and authenticated. If the check fails, return to the host terminal and complete that provider's installation or login instead of trying to solve provider authentication through Localtonet.
Select a project folder
Choose a folder that the Tessera process can read and, where required by your workflow, modify. Begin with a controlled project under version control rather than granting broad access to unrelated files.
Start a chat or worktree-backed task
Create a small test session. A worktree-backed task is useful when you want changes isolated from the primary branch, while a direct chat can provide a simpler initial functional check.
A successful first run should leave you able to sign in, see the selected project, create a session, and observe activity from the configured provider. Do not use the appearance of the page alone as proof that the backend is fully working. Tessera's interface depends on server-side behavior and WebSocket communication, so exercise at least one real session before moving on.
Verify Tessera locally before creating a tunnel
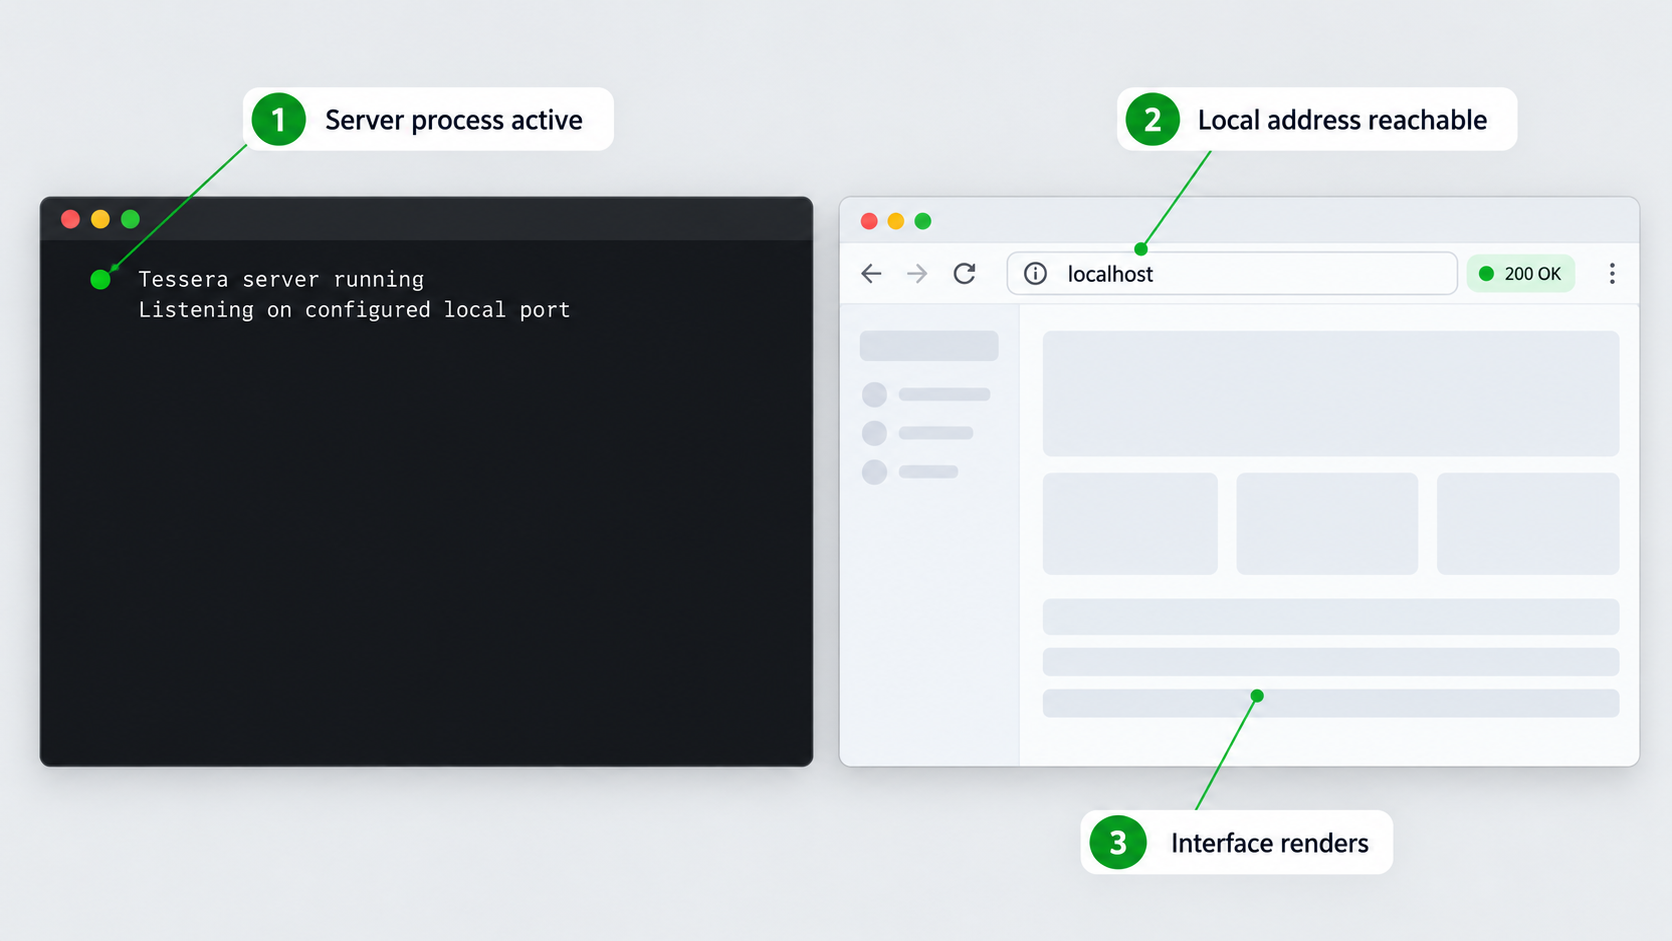
Local verification establishes a clean baseline. If every check below succeeds on the host but fails through the public endpoint, the problem is likely in the tunnel target, tunnel lifecycle, browser origin, or connectivity path. If it already fails locally, troubleshoot Tessera first.
Keep the server terminal running while testing. If you stop npm run dev, the browser may retain a rendered page temporarily, but requests and live session updates cannot continue. A Localtonet tunnel also cannot make a stopped local service available.
Record the exact working local target. For the default source setup, that target is IP address 127.0.0.1 and port 3000. For the global npm or documented Docker Compose paths, the default port is 32123. If you changed PORT, the configured value takes precedence.
Connect the working Tessera interface with Localtonet
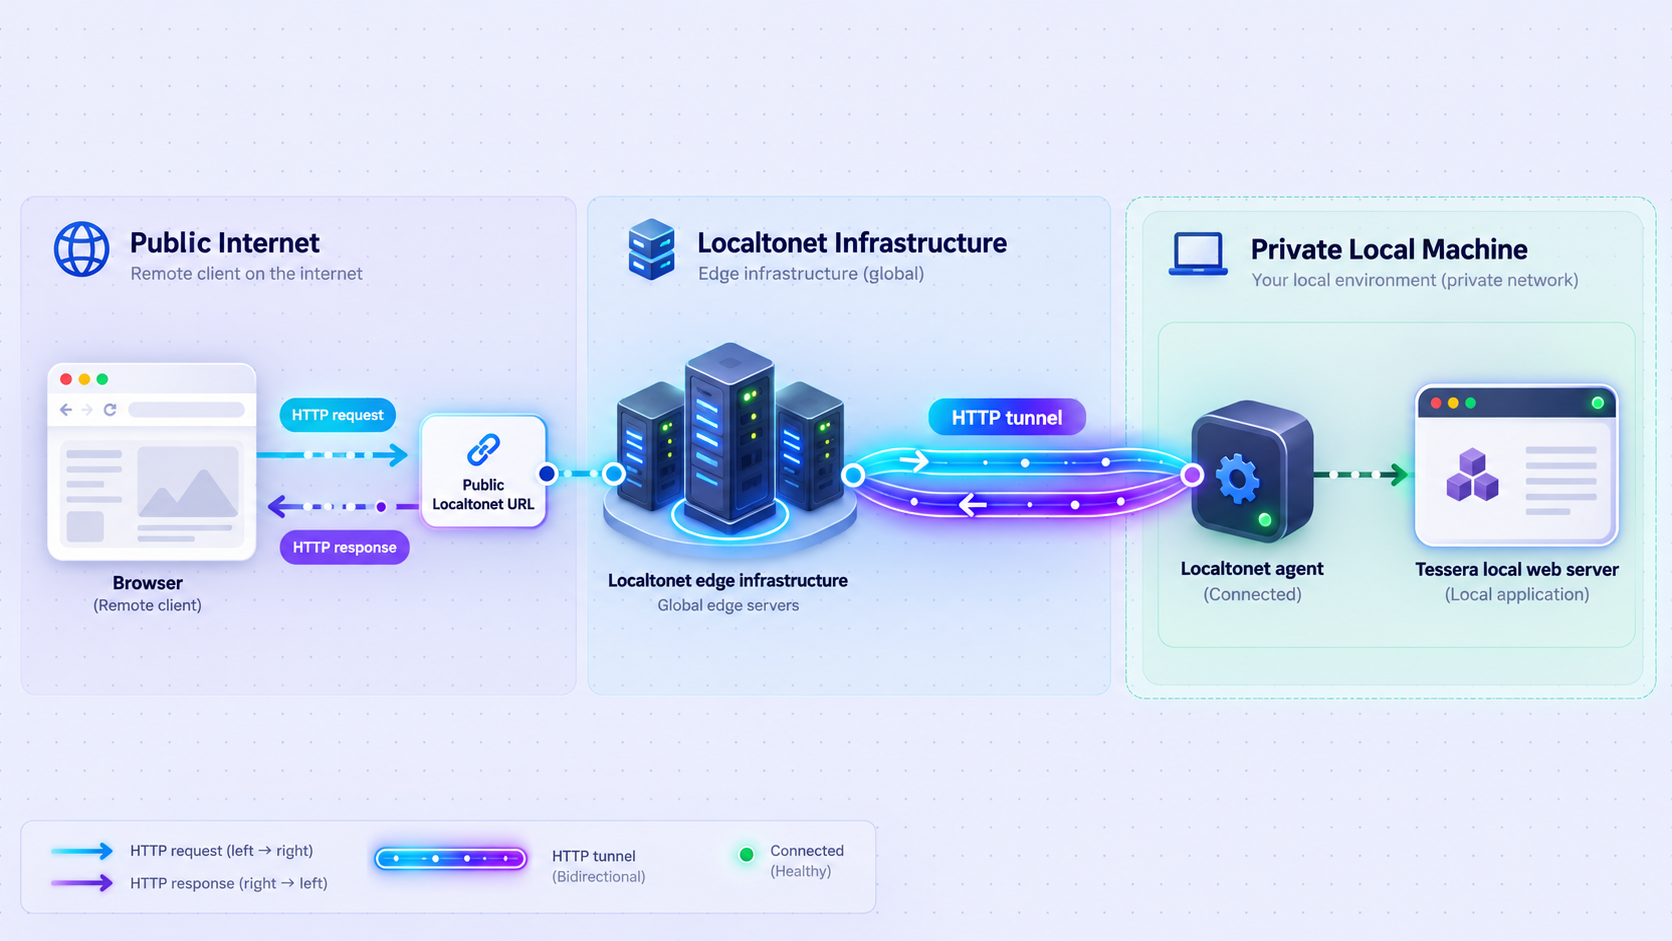
Use an HTTP tunnel because Tessera presents a browser-based HTTP application. The Localtonet client should run on the Tessera host whenever possible. That arrangement lets Tessera retain its loopback-only default while our client reaches 127.0.0.1:3000 locally.
Localtonet separates tunnel creation from tunnel operation. Creating a tunnel does not start it. The selected client device must be connected, and the tunnel must be started before the assigned public address works.
Install and run the Localtonet client on the Tessera host
Install the appropriate Localtonet application for the operating system, then run it on the device that can reach the verified Tessera endpoint. Keeping both processes on the same host permits a loopback target.
Authenticate or select the client device
Use the device-specific authentication token through the supported client and dashboard workflow. Never place the token in source code, screenshots, shell history shared with others, or this article's example commands.
Select an available relay server
Choose from the server or region values currently available in your Localtonet dashboard. Availability can vary, so use the current product list rather than copying a hardcoded server code from an old tutorial.
Create an HTTP tunnel to Tessera's local address
Select the HTTP tunnel family and enter the verified local IP address and port. For the unchanged source setup on the same device, use 127.0.0.1 and 3000. If you used npm, Docker Compose, or a custom PORT, use that installation's actual working port instead.
Start the tunnel
Use the Start button after saving the configuration. Wait for the selected device and tunnel to show a connected state. A saved but stopped tunnel does not forward traffic.
Open and verify the assigned public HTTPS address
Open the assigned URL in a separate browser context, sign in through Tessera's application interface, and repeat the meaningful local checks: project access, session loading, live updates, and a small provider interaction. Stop or delete the tunnel when remote access is no longer required.
HTTP and File Server tunnels can use a random subdomain, a custom subdomain, or a custom domain where supported. All three process types serve content through a public HTTPS address. Exact custom-domain DNS requirements should be checked against the current Localtonet documentation before changing DNS, because those details are not established in the supplied evidence for this tutorial.
For the current dashboard sequence and fields, consult our Localtonet HTTP tunnel documentation. Use that page to confirm any interface details that may have changed since this draft was reviewed.
Anyone who obtains the public address can attempt to reach the Tessera sign-in surface. Use a strong, unique local account password, expose only the intended port, avoid sharing the URL unnecessarily, review project permissions, and stop the tunnel when it is not needed. Localtonet supplies connectivity to the local service, but it does not replace Tessera's account security or your provider's authentication.
Choosing the correct target
| Tessera deployment | Typical local target | Verification rule |
|---|---|---|
| Source defaults | 127.0.0.1:3000 |
Use only after the browser interface works at that address on the client device. |
| Global npm defaults | 127.0.0.1:32123 |
Prefer the URL printed by the tessera command if it differs. |
| Docker Compose defaults | 127.0.0.1:32123 |
Confirm the documented Compose endpoint opens on the host first. |
| Custom port | The host plus configured PORT |
Use the actual address printed at startup and tested locally. |
| Client on another device | A network-reachable Tessera host address and port | Do not use 127.0.0.1; verify reachability and assess LAN exposure first. |
Operate, update, and secure the deployment
Understand the two-process lifecycle
Remote access depends on both Tessera and Localtonet. Tessera's source process must remain running, and the selected Localtonet client must remain connected with the tunnel started. Stopping either side interrupts access. A tunnel status alone does not prove that the upstream application is healthy.
During development, keep Tessera's terminal accessible so you can see restarts and errors. For unattended use, choose an operating-system process-management approach that fits your environment, but do not assume this guide has established a project-supported production service definition. The supplied evidence documents npm run dev for source development, not a specific system service, supervisor, or production deployment command.
Stop services cleanly
When the remote session is finished, stop the Localtonet tunnel in the dashboard. Stop or delete it depending on whether you expect to reuse the configuration. Then stop the source development process using the normal terminal interruption mechanism. Stopping the tunnel first immediately removes the public route while leaving you able to inspect the local application and logs.
Back up state, not only source code
A Git clone can be recreated, but Tessera's local users, authentication keys, settings, session history, attachments, database, and worktree state reside under TESSERA_DATA_DIR. Include that location in a backup policy appropriate for the sensitivity of your development environment. Protect backups at least as carefully as the live data because they may contain session and project information.
Review updates before applying them
A source checkout evolves independently from its local data. Before updating, preserve important work, review the repository's current release and migration guidance, and back up the data directory. The evidence used for this article identifies release v0.2.4 and a related desktop hotfix, but this tutorial does not assume that release remains current. Do not pin production decisions to that version without checking the project repository.
Avoid inventing an update procedure from generic Git habits. Local modifications, branch choice, dependency changes, and data migrations can affect the safe sequence. Use the project's current instructions for the exact version transition, then repeat local verification before reopening the Localtonet tunnel.
Protect provider credentials and project data
Provider authentication lives on the machine running Tessera. Never copy provider credentials into Localtonet tunnel fields. Never expose device authentication tokens in repository files, screenshots, support posts, or browser-visible configuration. Restrict operating-system access to both Tessera's data directory and each provider's configuration directory.
The browser interface can lead to actions with real consequences, including file edits, process execution, branch operations, commits, synchronization, and publishing branches. Use a dedicated test repository while evaluating remote access. Review agent output, diffs, and Git status before accepting or publishing changes.
The Localtonet HTTP tunnel makes the selected local endpoint reachable. Tessera's local account controls application sign-in, and the installed provider CLI controls provider access. Maintain all three layers instead of treating a difficult-to-guess URL as authentication.
Troubleshooting the source build and HTTP tunnel
npm install fails
Check node --version and npm --version first. Tessera requires Node.js 20.9+ within 20.x or Node.js 22 through 26, plus npm 10 or later. Also confirm that the current directory is the cloned tessera repository and that your user can write there. Read the first meaningful npm error rather than only the final summary, since later messages often result from the initial failure.
Do not proceed to npm run dev after an incomplete installation. Resolve network, filesystem, package, or runtime-version errors and rerun the documented install command.
The development server does not start
Look for a port conflict, invalid environment setting, inaccessible data directory, or dependency error in the terminal. Port 3000 is the source default, so another development application may already be using it. If you configure another port through PORT, restart Tessera and update both the local test URL and tunnel target.
If the failure follows a TESSERA_DATA_DIR change, verify that the target path exists where required and is writable by the process account. Avoid changing multiple variables at once because doing so makes it harder to identify the actual cause.
The local page does not open
Confirm that npm run dev is still running and inspect its printed URL. Test from the Tessera host. For the unchanged source setup, use http://127.0.0.1:3000, not port 32123. Port 32123 belongs to the documented npm CLI default and Docker Compose endpoint.
If the server is bound to 127.0.0.1, another computer cannot use the Tessera host's loopback address. Local verification should happen on the host or through a browser environment that can reach that host-local endpoint.
Tessera opens, but no provider is available
Confirm that the desired provider CLI is installed for the same operating-system user that runs Tessera. Authenticate it outside Tessera using the provider's supported process. For example, the project documentation lists claude login and codex login. Restart Tessera after changing provider configuration so its bootstrapping and discovery processes can see the updated environment.
If Claude Code is installed but skill discovery uses a nonstandard configuration location, review the documented CLAUDE_CONFIG_DIR variable. Do not point it at an unrelated directory or copy credentials into the Tessera repository.
The public URL reports an upstream or connection error
Reopen the local URL on the machine running the Localtonet client. If it fails there, restart or repair Tessera. If it works locally, compare the tunnel target character by character with the verified address. For a default source build on the same machine, it should target 127.0.0.1 and port 3000.
Next, verify that the correct Localtonet device is connected and that the tunnel was explicitly started. Remember that creating the tunnel does not start it. Also confirm that the selected client is running on the machine where 127.0.0.1 reaches Tessera.
The page loads remotely, but live sessions do not update
Test the same session locally and inspect Tessera's backend logs. The application uses WebSocket transport, so a rendered page does not by itself prove that live communication is healthy. Restarting the browser tab can distinguish stale client state from a continuing backend problem, but preserve any important unsent content first.
If local live updates work but remote updates consistently fail, record the browser error, server log timing, tunnel state, and installation method for review. Do not expose debug logs publicly without removing credentials, private URLs, project paths, and session content.
Authentication or settings appear to have disappeared
Check whether TESSERA_DATA_DIR changed between runs or whether Tessera started under a different operating-system account. The default ~/.tessera path is relative to that account's home directory. A fresh interface may indicate that Tessera is using another data root, not that the original database was erased.
Docker Compose reports permission errors
Confirm that you created the documented directories and data/gitconfig file before starting the deployment. For unwritable bind mounts, the project documents sudo chown -R 1000:1000 data workspaces. Because it recursively changes ownership, run it only from the intended Compose project directory after checking the paths.
Remote access stops unexpectedly
Check both lifecycles. Tessera may have stopped, the Localtonet client may have disconnected, or the tunnel may have been stopped. The public endpoint remains available only while the selected client is connected and the tunnel is running. Restart the failed component, verify locally again, and then recheck the public URL.
Frequently asked questions
What port does Tessera use when built from source?
The documented source default is port 3000, with host 127.0.0.1. The npm CLI defaults to port 32123, and the documented Docker Compose endpoint is http://127.0.0.1:32123. If you set PORT, use the configured and locally verified value instead.
Which Node.js versions can run Tessera from source?
Tessera documents Node.js 20.9 or later within the 20.x line, or Node.js versions 22 through 26. npm 10 or later is also required.
Does Tessera install and authenticate Claude Code, Codex, or OpenCode?
No. Tessera uses provider CLIs already installed and authenticated on the local machine. Complete provider installation and authentication separately before expecting Tessera to launch provider-backed sessions.
Must Tessera listen on the local network for Localtonet to reach it?
Not when the Localtonet client runs on the same machine. In that arrangement, our client can target Tessera at 127.0.0.1, allowing the application to retain its loopback-only default. A client on another device needs a network-reachable target instead.
Does creating a Localtonet tunnel immediately make Tessera public?
No. The selected Localtonet client must be connected, and the tunnel must be started. Creating or saving a tunnel configuration does not mean it is running.
Does the Localtonet HTTP tunnel replace Tessera's account security?
No. The tunnel provides connectivity to the selected HTTP service. Tessera's local account remains responsible for application sign-in, and provider CLIs retain their own authentication. Use strong credentials and stop the tunnel when remote access is unnecessary.
Where does Tessera store its local state?
The documented default data root is ~/.tessera. It contains the database, local users, authentication keys, settings, worktrees, attachments, and session history. The location can be changed with TESSERA_DATA_DIR.
Should I use the source, npm, or Docker Compose installation?
Use the source path when developing, inspecting, or modifying Tessera. The global npm package offers a direct browser-runtime command, while Docker Compose supplies a containerized deployment with documented host directories. Whichever path you choose, verify its local URL before configuring Localtonet and use the correct port for that path.
Connect your verified Tessera workspace with Localtonet
Once Tessera works locally and its account, project permissions, provider CLI, and live sessions have been tested, create an HTTP tunnel to the verified local address. Keep the Localtonet client on the Tessera host where possible, start the tunnel only when needed, and retain Tessera's application authentication.
Get Started Free →

