


Run your own reading list and book tracker, then reach it from anywhere over an HTTP tunnel
Jelu is a self-hosted tracker for books you have read and want to read. It runs as a Java application or as a Docker container and serves its web interface on port 11111. This guide covers both documented installation paths, the optional configuration file, local verification, routine operation and troubleshooting. It then adds remote access as a separate step with a Localtonet HTTP tunnel, so you can open your library from your phone or another network without port forwarding or a public IP address.
📋 What's in this guide
What Jelu is and why people self-host it
Jelu is an open-source, self-hosted application for keeping a list of books you have finished and books you intend to read. People often look at it as a Goodreads alternative, because the data lives in a database you own instead of on a commercial platform. The project is published on GitHub under the name bayang/jelu and has a healthy following. At the time of writing, the latest release we reviewed is v0.88.2, whose notes list fixes for a broken stylesheet on the add-book page, handling of inconsistent ISBN formats coming from Goodreads data, and updating events when reading progress is set.
From the project README, the features relevant to this guide are these: Jelu supports multiple users, can integrate with LDAP and with proxy authentication, exposes an API, and can use Calibre's fetch-ebook-metadata tool to look up book metadata if you point the configuration at it. The README also documents a CORS setting, which matters as soon as you put the application behind a public address. We cover that in the configuration and security sections.
fetch-ebook-metadata executable for metadata lookups.
We cover the two installation methods the Jelu README documents as primary: the Java JAR and the Docker image. There is also an unofficial Kubernetes Helm chart and a one-click RepoCloud deployment mentioned by the project, and a separate fork called jelu-lending that adds lending tracking. We do not walk through those, and we avoid inventing details about them.
Prerequisites and choosing an install method
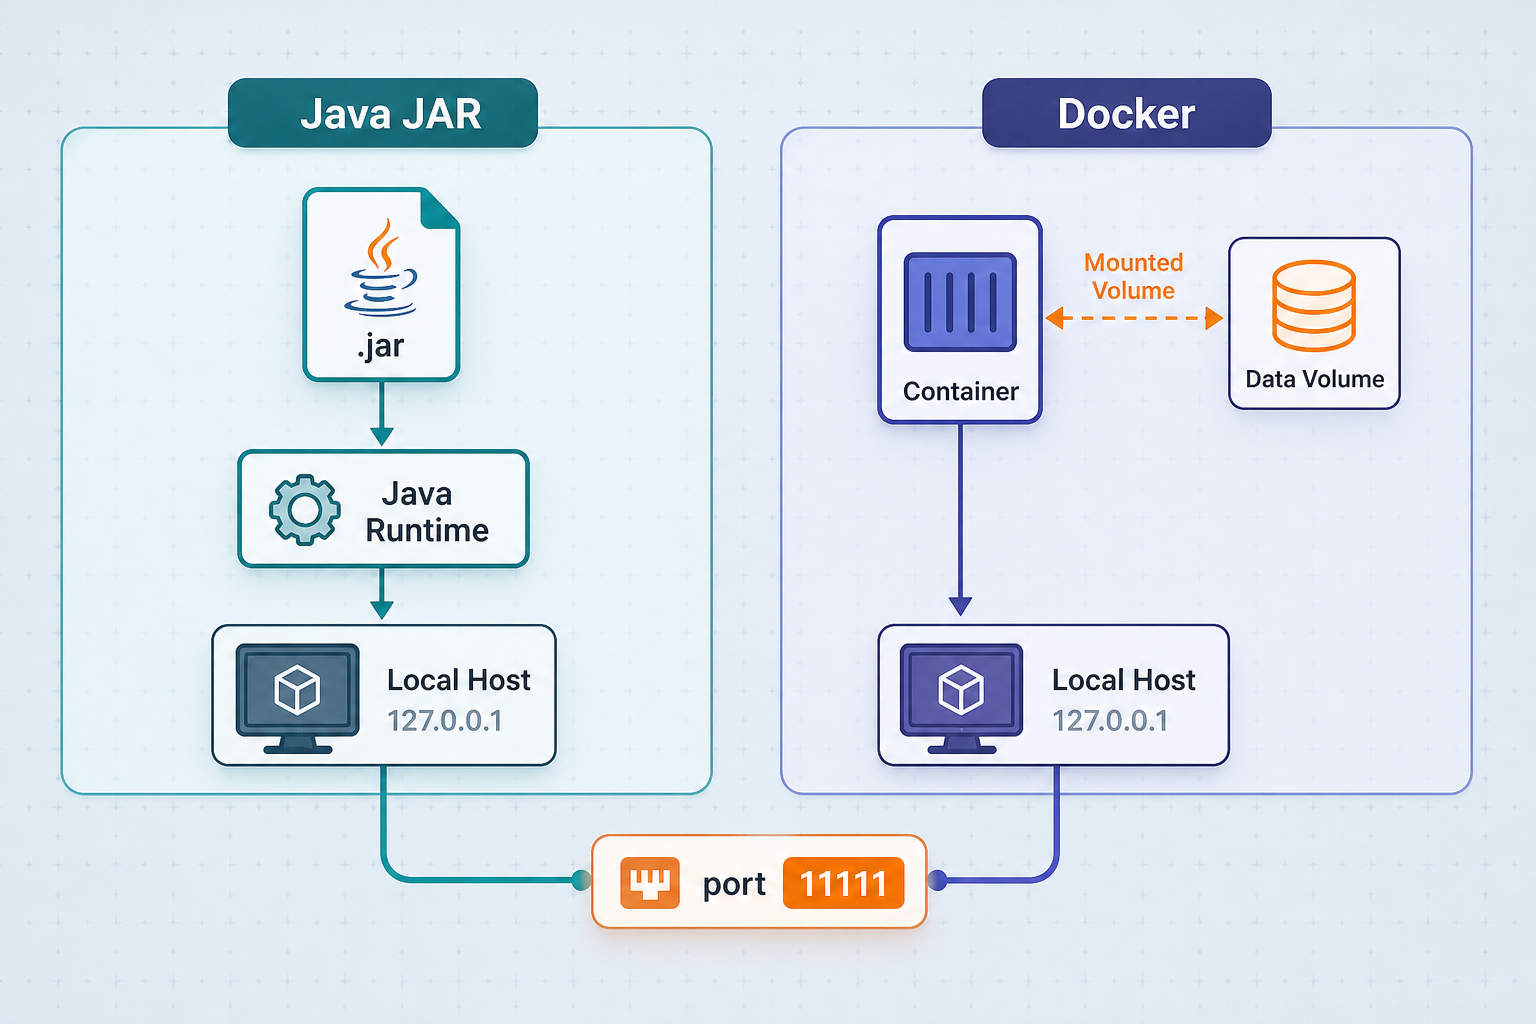
Jelu is a single web application, so the requirements are modest. You need a machine that stays on, since a tracker that is switched off cannot be reached locally or remotely. It could be a spare PC, a home server, a small single-board computer or a VPS. You also need either a Java runtime or Docker, depending on the method you choose.
One limitation to state plainly: the README text we reviewed does not specify a minimum Java version. Before running the JAR, check the official Jelu documentation or the release page for the Java version the current release expects, and confirm what your machine has installed with java -version. If you would rather not manage a Java runtime yourself, the Docker route sidesteps that question because the image brings its own runtime.
| Method | Best for | Notes |
|---|---|---|
| Java JAR | A machine where you already run Java apps, or a simple no-container setup | Documented in the README. Download the fat JAR from the releases section into its own folder and run it with java -jar. |
| Docker image (wabayang/jelu) | Servers that already run containers, easy upgrades and rollbacks | Documented in the README with a sample compose file that mounts config, database and files volumes and maps port 11111. |
| Kubernetes Helm chart | Clusters where you already deploy with Helm | Mentioned in the README as unofficial. Evaluate it on its own merits and check who maintains it. |
| RepoCloud one-click deploy | People who prefer a hosted deployment over running hardware | Listed by the project. This is a hosted route, so it is not the self-hosting-on-your-own-machine workflow this guide targets. |
Whichever you choose, install Jelu and confirm it works on the local machine before you involve any tunnel. Remote access should be a second step on a service you already know is healthy. It makes troubleshooting far easier because you can tell immediately whether a problem is in the app or in the path to it.
Install Jelu with the Java JAR
The Java installation is the simplest to understand. Jelu ships as a Spring fat JAR, which means the application and its dependencies are bundled in a single file. The README tells you to download that JAR from the releases section of the GitHub repository and to place it in a dedicated folder. The dedicated folder matters: Jelu will keep working files near where it runs, and a clean directory keeps them separate from everything else on the machine.
Create a dedicated folder
Make a new directory for Jelu, for example one named jelu in your home directory, and work from inside it.
Download the JAR from the releases section
Open the releases page of the bayang/jelu repository, choose the version you want (the release we reviewed is v0.88.2) and download the JAR asset into your folder. The file is named jelu-<version>.jar.
Optionally add an application.yml
If you need to change defaults such as the database location, the Calibre metadata tool path or CORS allowed origins, create an application.yml file. The next sections explain what this file is for. You can skip it for a first run.
Start the application
Run the JAR with Java from inside the folder, replacing the version with the one you downloaded.
java -jar jelu-<version>.jar
Leave that terminal open while you test. When the application finishes starting, move on to the verification section. Running it in a foreground terminal is fine for testing, but for a machine that should keep serving your library after you log out you will want a process manager or service definition. The README text we reviewed does not describe one, so choose a supervisor you already trust on your operating system, such as a systemd unit on Linux, and run the same java -jar command from the Jelu folder.
Install Jelu with Docker
The Docker route uses the wabayang/jelu image. The README includes a sample Docker Compose file that does three important things: it mounts volumes for configuration, the database and files, and it maps host port 11111 to container port 11111 (11111:11111). Mounting those volumes is what keeps your data safe when the container is recreated during an upgrade. Without persistent volumes, removing the container would also remove your library.
The README describes the compose file's config, database and files volumes, but the extracted material we worked from does not reproduce the container-side paths or any environment variables. We will not guess them. Copy the container paths from the sample compose file in the official Jelu README, and only change the host-side paths to match your server. Guessing a container path can leave your data inside the container's own filesystem, where it is lost on recreation.
The skeleton below shows only the parts we can state with confidence: the image name and the port mapping. Merge it with the official sample rather than using it alone.
services:
  jelu:
    image: wabayang/jelu
    ports:
      - "11111:11111"
    # Add the config, database and files volume mappings
    # exactly as shown in the official Jelu README sample.
    restart: unless-stopped
Two small additions there are general Docker practice rather than Jelu-specific claims. The restart: unless-stopped policy brings the container back after a reboot or crash, which suits a service you want always available. And for production-like use, pin the image to a specific release tag instead of relying on whatever the untagged image resolves to, so upgrades happen when you decide. Check the available tags on the image's registry page.
Prepare host folders for the volumes
Create the directories on the host that will hold configuration, the database and files, matching the volume lines in the official sample.
Save the compose file
Put your completed docker-compose.yml in a project folder. Keep the 11111:11111 mapping unless port 11111 is already used on the host.
Start the container
Run Compose in detached mode from the project folder, then check that the container is up.
docker compose up -d
docker compose ps
docker compose logs -f jelu
If your system uses the older standalone binary, the equivalent commands start with docker-compose instead. Watching the logs on first start is a good habit, because a database or permissions problem usually shows up there before it shows up anywhere else.
Configure Jelu with application.yml
Jelu works with defaults, and the README treats the configuration file as optional. When you do want to change behavior, the file is called application.yml. The settings the README calls out are these:
- Database path: where the application stores its database. This is the most important file to back up.
- Calibre metadata tool path: the location of Calibre's
fetch-ebook-metadataexecutable, if you have Calibre installed and want Jelu to use it for metadata. - CORS allowed origins: which web origins may call Jelu from a browser. The default allows all origins, and you can restrict it to a single origin.
The extracted evidence we reviewed does not include the exact YAML key names for these settings, and YAML is unforgiving about key names and indentation, so we are not going to print guessed keys. Open the configuration section of the official Jelu documentation, copy the key names from there, and put them in your file. For Docker installs, the file belongs in the host folder you mounted as the config volume. For Java installs, the README describes the file as the optional companion to the JAR, so keep it with the JAR in the same dedicated folder and consult the official docs if you need it in a different location.
Why the CORS setting matters for remote access
CORS is enforced by browsers. When a web page served from one origin tries to call an API on another origin, the browser checks whether the API allows it. Because Jelu defaults to allowing all origins, a fresh install is permissive. That is convenient on a home network, but once you publish Jelu on a public URL it is worth tightening. After you know your public tunnel address (covered below), restrict the allowed origin to exactly that address. If you later change the address, for example by moving from a random subdomain to a custom one, remember to update the setting, otherwise browser-based requests from the new address may be refused.
Authentication options
The README lists LDAP and proxy authentication among the supported authentication integrations. Treat these as advanced features and configure them deliberately. Proxy authentication in particular is the pattern where an upstream component asserts who the user is, so enabling it only makes sense if that upstream component is under your control and the application is not reachable by any other route. If you are just starting out, use Jelu's own user accounts and add integrations later. We do not describe initial account creation or default credentials here, because the evidence we reviewed does not state them. Follow the first-run instructions in the official documentation.
Verify Jelu locally before exposing it
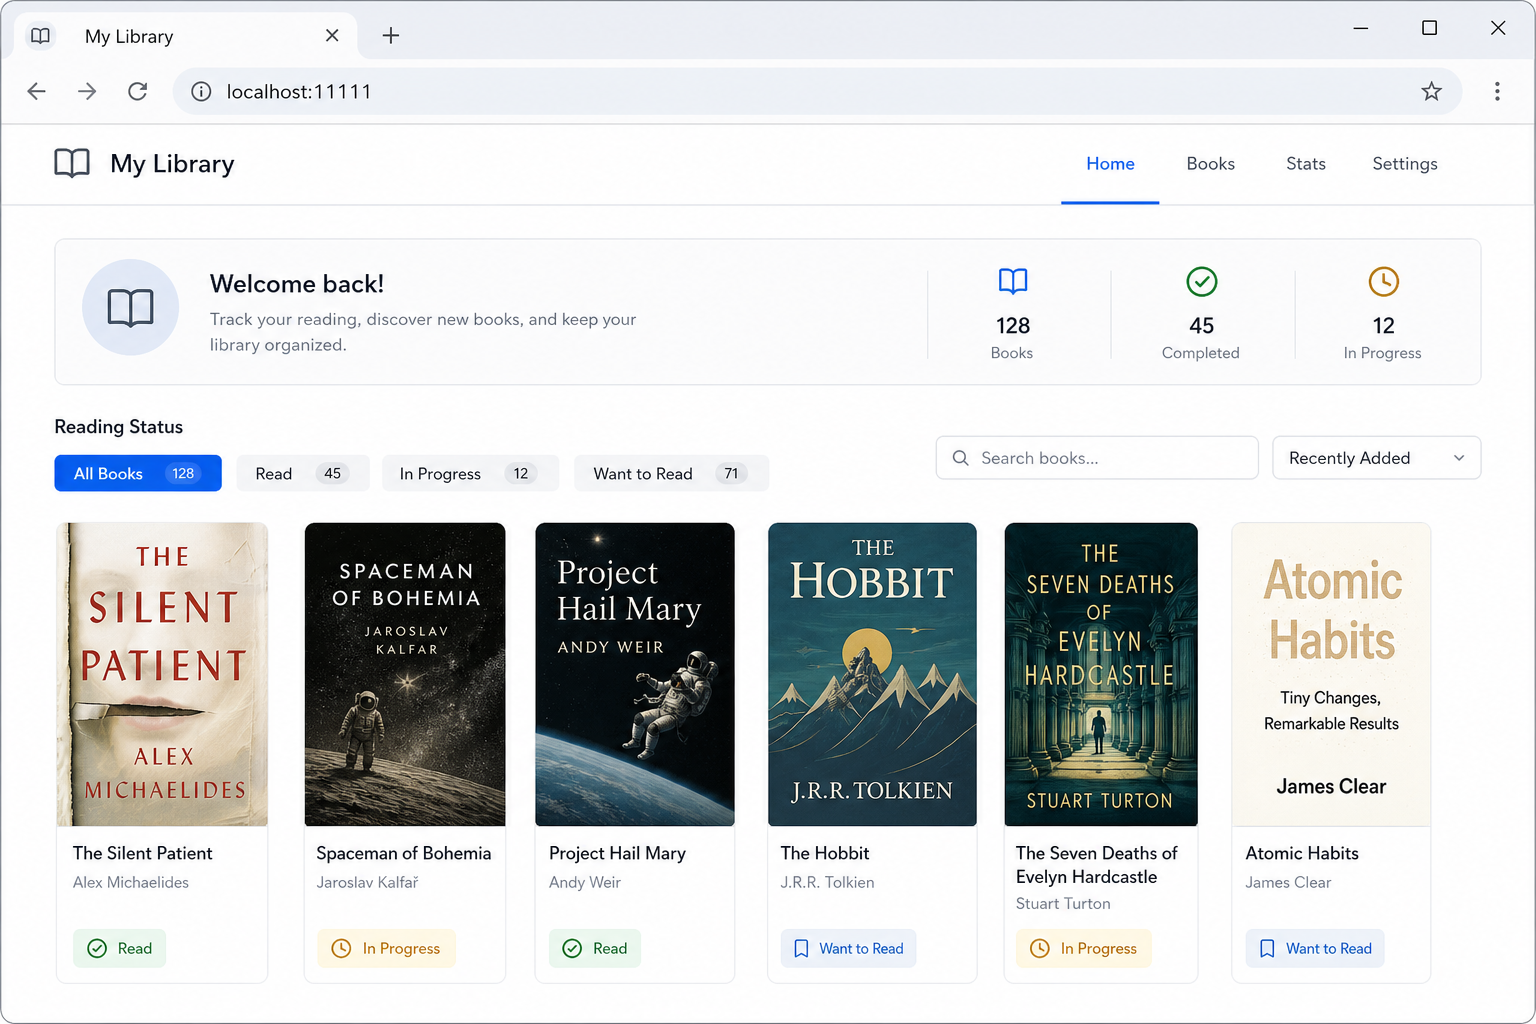
A short local test saves a lot of confusion later. The web interface is served on port 11111, so on the machine running Jelu you should be able to open http://localhost:11111 in a browser and see the application. If you are testing from another computer on your LAN, replace localhost with the server's LAN IP address, keeping in mind that a host firewall may need to allow that port for LAN access.
curl -I http://localhost:11111
The curl -I command asks only for response headers. Any HTTP response at all, such as a success or a redirect to a login page, proves that something is listening on the port and speaking HTTP. A "connection refused" result means nothing is listening, which points back to startup problems rather than networking.
Work through this short checklist before moving on:
- The page loads in a browser at the local address and port 11111.
- You can create or sign in to a user account following the official first-run instructions.
- You can add one test book and see it appear in your list.
- After restarting Jelu (stop and start the Java process, or
docker compose restart), the test book is still there. This confirms your data is persisted where you expect.
The last check is the one people skip, and it is the one that catches a missing Docker volume. If the book disappears after you recreate the container with docker compose down followed by docker compose up -d, your volumes are not mapped correctly. Fix that before you invest time in adding your library.
Daily operations: backups, upgrades and logs
Once Jelu runs, a few routine habits keep it healthy. The specifics of Jelu's internal file layout are not in the evidence we reviewed, so the advice here is deliberately general.
Back up the database and files
The README identifies the database location as configurable, and the Docker sample mounts separate volumes for the database and for files. Back up the host folders behind those volumes (and your application.yml). A simple copy of the folders while the application is stopped is the safest consistent snapshot, because it avoids copying a database file mid-write. Store at least one copy on a different disk or machine.
Upgrade deliberately
For the Java method, download the new JAR from the releases section into the same dedicated folder, stop the old process, and start the new JAR with java -jar. Keep the previous JAR until you have confirmed the new version works. For Docker, change the image tag (or pull the latest image), then recreate the container.
docker compose pull
docker compose up -d
Read the release notes before upgrading. Take a backup first, because we cannot make claims about how database migrations behave between versions from the evidence we have. The v0.88.2 notes, for instance, are small bug fixes, but a larger version jump can contain more.
Check logs when something looks wrong
With Docker, docker compose logs -f jelu streams the application output. With the Java method, the output appears in the terminal or wherever your service manager sends it. Logs are the first place to look for startup failures, configuration parse errors and permission problems.
Reach Jelu remotely with a Localtonet HTTP tunnel
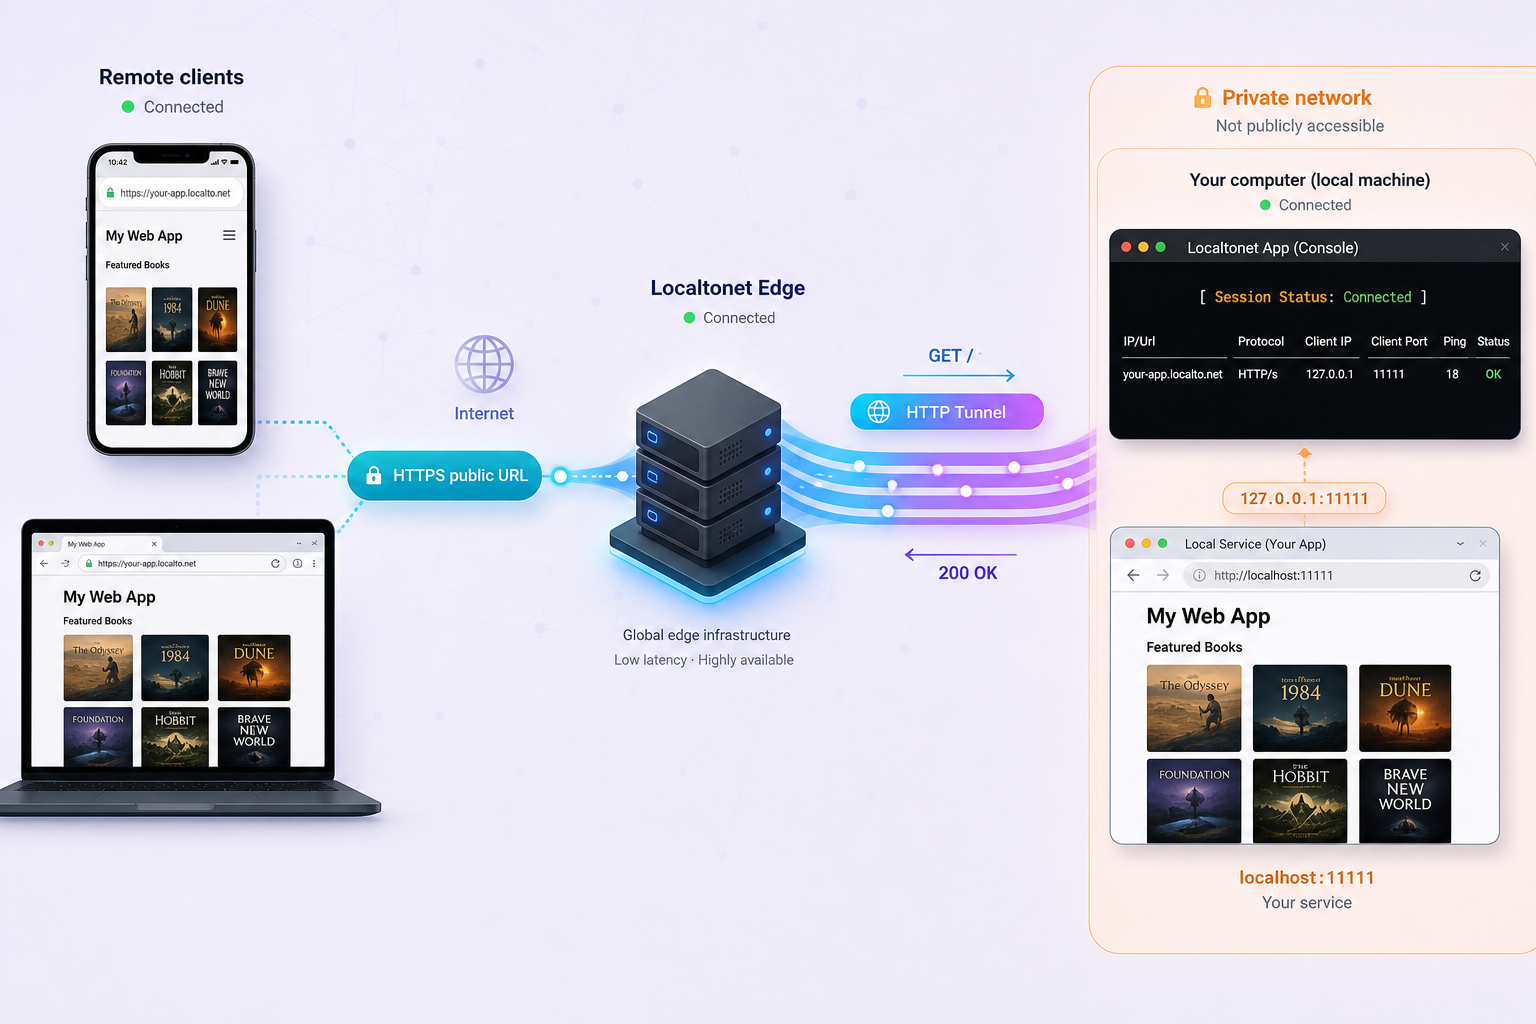
Now that Jelu works locally, the question is how to open it from outside your home or office network. The traditional route is a port-forward on your router plus a public IP address, dynamic DNS, and certificate handling. That route is often impossible (carrier-grade NAT, rented networks) and always widens the attack surface of your network. With Localtonet, the client application on the Jelu machine makes an outbound connection to a Localtonet relay server, and the resulting tunnel gives you a public HTTPS address that forwards to your local service. No inbound port forwarding, firewall rule changes, VPN setup or public IP address is required.
Jelu is a plain web application on one HTTP port, so the HTTP tunnel type is the natural fit. You do not need TCP, UDP or any other tunnel family for it. The README does not mention any non-HTTP requirement either.
Creating a tunnel does not start it. You must press Start. The tunnel is available only while the selected client or device is connected and the tunnel is running. If the machine hosting Jelu is off, or the Localtonet client is not connected, the public address will not reach your library.
Set up the tunnel
The sequence below follows our general Localtonet workflow. For the exact current fields and screens, see the Localtonet HTTP tunnel documentation, and follow it if anything on screen differs from this summary.
Install and run the Localtonet client on the Jelu machine
Install the Localtonet app on the device that can reach Jelu. The simplest choice is the same machine that runs Jelu, so the target can be 127.0.0.1 on port 11111. If you register first, use the Localtonet sign-up page.
Authenticate the device with its token
Each device has its own auth token in the dashboard. Use it to connect the client. Treat the token like a password: do not paste it into public issues, screenshots or shared notes.
Select a relay server
Choose one of the relay servers offered in the dashboard. Available servers and regions change over time, so pick from the current list rather than relying on an article.
Create an HTTP tunnel pointing at Jelu
Create a new HTTP tunnel, select your AuthToken and server, and set the local target to the Jelu address and port, for example 127.0.0.1 and 11111. Choose a Process Type: Random Sub Domain, Custom Sub Domain or Custom Domain. All three serve the same content at a public HTTPS address.
Press Start
Start the tunnel from the dashboard. Until you do, nothing is published.
Open the public address and test
Visit the assigned public URL from a device outside your LAN, such as a phone on mobile data. You should see the same Jelu interface you saw locally.
Choosing a Process Type
| Process Type | Good fit when | Consideration for Jelu |
|---|---|---|
| Random Sub Domain | You want to try remote access quickly | Easy to start. Because the address may differ if you recreate the tunnel, update your CORS origin and any saved bookmarks if it changes. |
| Custom Sub Domain | You want a name that is easier to remember | Gives a more stable address to bookmark and to use as the single allowed CORS origin. |
| Custom Domain | You want Jelu on a domain you own | DNS requirements must be checked against the current Localtonet documentation before you follow exact setup instructions. We do not list DNS records here. |
Update Jelu's CORS origin after the tunnel exists
Once you have a settled public address, return to application.yml and change the CORS allowed origins from the permissive default to that specific origin, using the exact key name from the official Jelu documentation. Include the scheme (https://) and host exactly as it appears in the browser address bar. Restart Jelu afterward, then reload the public address and confirm everything still works. If you also use the local address on your LAN with a browser-based client, think about whether you need that origin allowed as well, and consult the official docs on how multiple origins are expressed.
Keeping the tunnel running
A tunnel that stops when your terminal closes is not much use for a reading tracker you want available all the time. Make sure the Localtonet client itself starts when the machine boots, using your operating system's usual mechanism for background services. Our platform also offers platform-wide Token and Tunnel webhooks that notify you when a token or tunnel in a chosen Token Group changes to Connected or Disconnected, which can alert you if your Jelu host drops offline. See the Localtonet webhook documentation for the payload format.
Security checklist before sharing the address
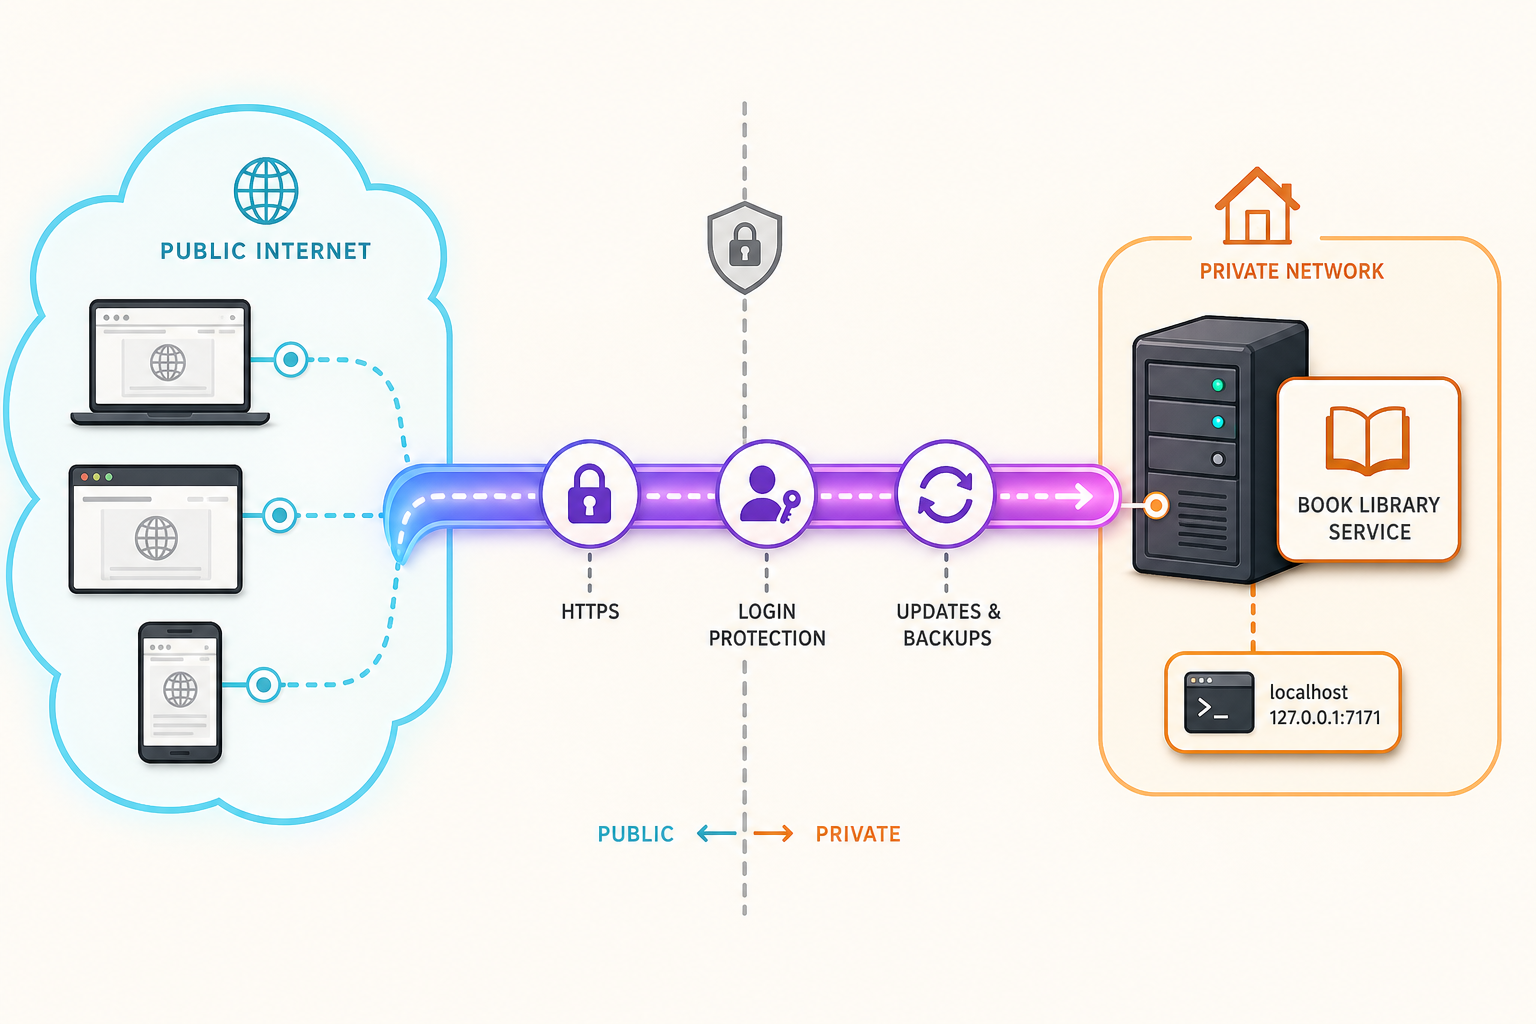
A tunnel makes your service reachable from the public internet. That is the entire point, and it is also the reason to be careful. A tunnel does not bypass or replace authorization on the application behind it. Whatever Jelu allows an unauthenticated visitor to see or do is exactly what the internet can see or do once the tunnel is started.
Before you start the tunnel, make sure every Jelu account has a strong, unique password and that you have removed any test accounts. Verify through the official documentation how first-run account creation and registration behave in your version, so a stranger cannot sign up on your public address. If you cannot confirm this, keep the tunnel stopped.
- Strong credentials: use long unique passwords for every user, and keep the Localtonet device token private.
- Restrict CORS: change the permissive default to your actual public origin, as described above.
- Be careful with proxy authentication: do not enable it unless you fully understand which component is vouching for users and that no other path reaches the app.
- Least exposure: expose only the Jelu port through the HTTP tunnel. Do not tunnel the whole machine or unrelated services.
- Use access controls available to you: check your Localtonet dashboard and plan for any additional access restrictions, since availability can vary by plan and we do not assume a specific one here.
- Stop when idle: if you only need remote access occasionally, stop the tunnel when you are done. A stopped tunnel publishes nothing.
- Keep Jelu updated: review release notes and upgrade periodically, since a public service should not sit on an old version indefinitely.
- Back up first: take a backup of the database and files before upgrades or configuration experiments.
If your library contains nothing sensitive, the risk is lower, but reading habits and notes can still be personal. Decide how public you want it to be, and consider whether limiting accounts to people you invite is enough.
Troubleshooting
Separate problems into two layers. First, does Jelu work on the machine itself? Second, does the tunnel carry traffic to it? Always settle the first layer before blaming the second.
| Symptom | Likely cause | What to check |
|---|---|---|
| Nothing loads at localhost:11111 | Jelu is not running or is still starting | Look at the terminal output (Java) or docker compose logs -f jelu. Confirm the process or container is up. |
| Docker refuses to start with a port error | Port 11111 is already in use on the host | Stop whatever else uses the port, or change the host side of the mapping (the left number) and point your tunnel at the new host port. |
| Data disappears after recreating the container | Volumes are not mapped to persistent host folders | Compare your compose file with the official sample and make sure config, database and files volumes use correct container paths. |
| Java reports an error on startup | Wrong or missing Java runtime, or wrong file name | Run java -version, check the required version in the official docs, and confirm the JAR file name matches your command. |
| Public address does not respond | Tunnel created but not started, or the client is disconnected | Open the dashboard, confirm the device is connected and the tunnel is running, and press Start if needed. |
| Public address shows an error from the tunnel | Wrong local target IP or port | Confirm the tunnel targets the address and port where Jelu answers locally, such as 127.0.0.1 and 11111. |
| Page loads but browser requests fail on the public address | CORS origin does not match the address you are using | Check the browser developer console for CORS messages, and make sure the allowed origin matches scheme and host exactly. Restart Jelu after editing. |
| Tunnel target is a different machine and fails | Jelu is bound to or firewalled from the LAN | Test from the Localtonet machine with curl -I http://<jelu-host>:11111. The simplest fix is to run the client on the same host as Jelu. |
A useful technique is to test each hop in order: from the Jelu machine with curl on localhost, then from another device on the LAN, then through the public tunnel address from outside. The first hop that fails tells you which layer to investigate. If you hit behavior that none of this explains, the Jelu GitHub issue tracker and the official documentation are the right places for application-specific questions, since we have not documented internals beyond what the project itself publishes.
Frequently asked questions
Which port does Jelu use?
The web interface is served on port 11111. The official Docker sample maps host port 11111 to container port 11111, and for the Java install you reach the interface at localhost:11111. That is the port you enter as the local target in a Localtonet HTTP tunnel.
Should I install Jelu with Java or Docker?
Both are documented in the README. Docker is convenient if you already run containers, because upgrades and rollbacks are simple and you do not manage a Java runtime. The Java JAR is a good fit if Java is already installed and you want the fewest moving parts. The README text we reviewed does not state a minimum Java version, so check the official documentation before choosing the Java route.
Do I need to open ports on my router to use Jelu remotely?
No. The Localtonet client on the Jelu machine makes an outbound connection to a Localtonet relay server, and the tunnel provides the public address. No inbound router port forwarding, firewall changes, VPN or public IP address is needed. The tunnel works only while the client is connected and the tunnel is running.
Why should I change the CORS setting after creating a tunnel?
The README states that Jelu's CORS configuration defaults to allowing all origins and can be restricted to a specific one, such as your public tunnel URL. Restricting it means browsers will only allow cross-origin requests from the address you actually use. Copy the exact key name for this setting from the official Jelu documentation, since we do not guess configuration keys.
Is a Localtonet tunnel a VPN for Jelu?
No. An HTTP tunnel publishes one web service at a public HTTPS address. It is not a VPN. If you want a private network where only your own devices can reach Jelu, Localtonet's VPN Manager is the separate product for private mesh networking. This guide uses the HTTP tunnel only.
Can I use my own domain for Jelu through Localtonet?
HTTP tunnels offer a Custom Domain Process Type alongside Random Sub Domain and Custom Sub Domain. The exact DNS requirements should be taken from the current Localtonet documentation rather than from an article, so check the HTTP tunnel documentation before configuring records. Remember to update Jelu's CORS origin if your public address changes.
Start with Localtonet
Get Jelu running locally on port 11111, confirm your data persists, then create a Localtonet HTTP tunnel to open your self-hosted book tracker from any network. Start the tunnel when you need it and stop it when you do not.
Get Started Free →