

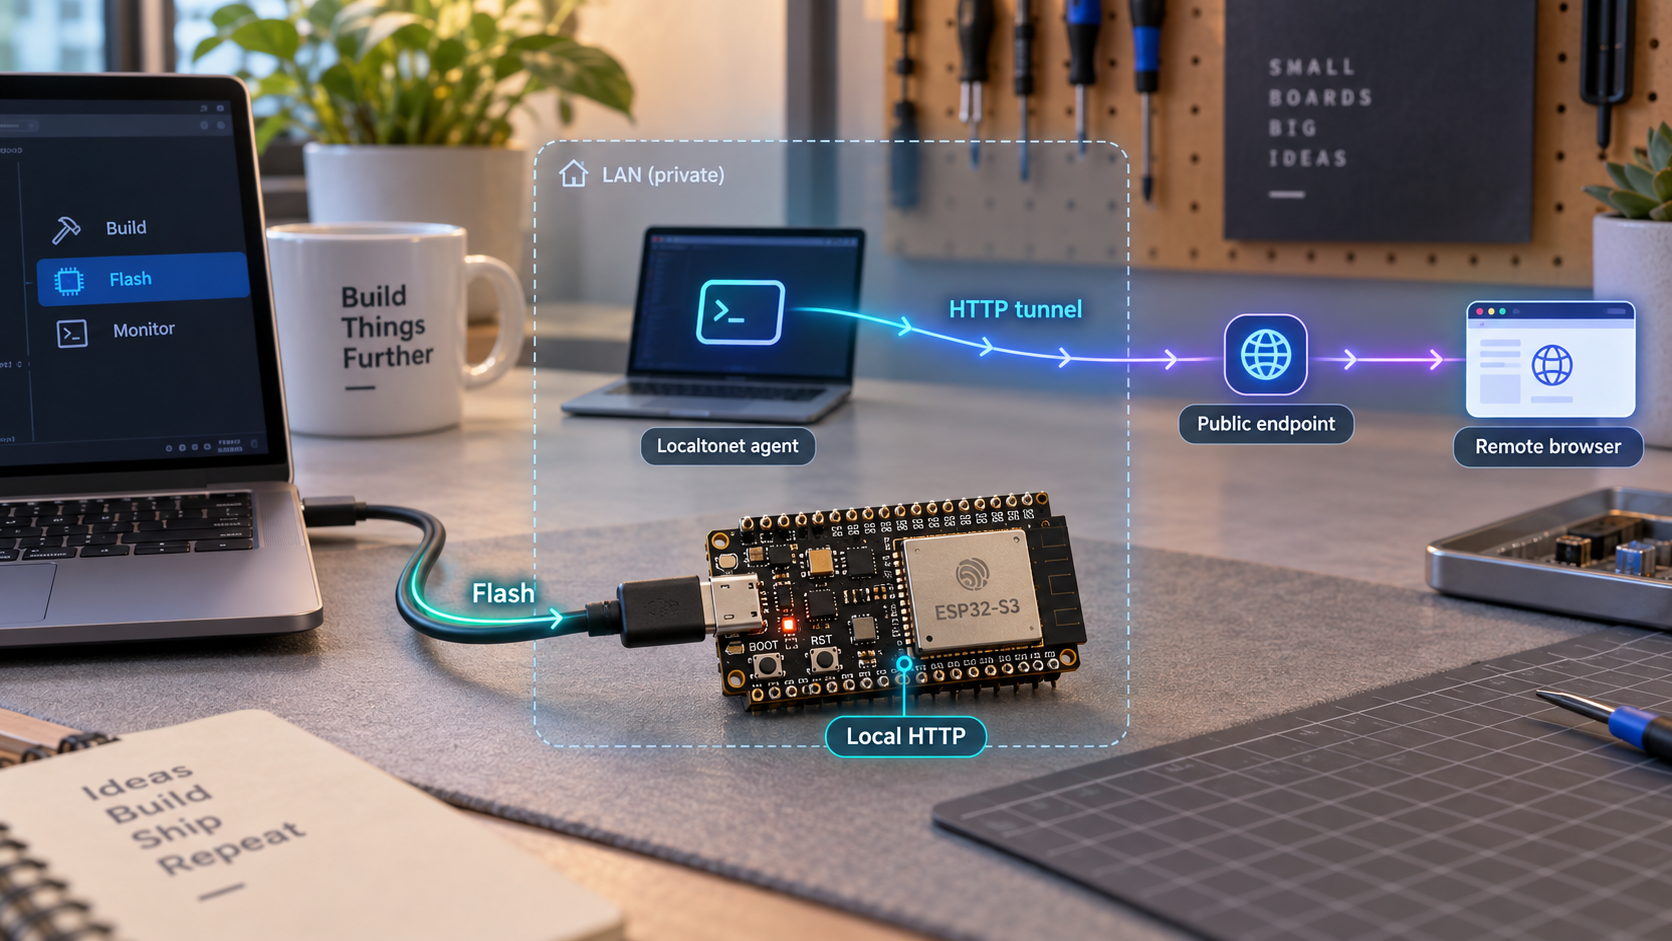
Prepare an ESP32-S3 OTGW build first, verify it on your LAN, then make a separate decision about remote access
OTGW-firmware 2.0.0 is an unreleased alpha development line for a specific ESP32-S3 arrangement: a traditional NodoShop OpenTherm Gateway with its PIC co-processor and a LOLIN S3 Mini. Firmware installation and Localtonet access are separate operations. Localtonet does not flash the ESP32-S3, and a tunnel should not be created until the gateway is working locally and every route intended for exposure has been checked for authentication. This revision is pinned to the repository's dev branch as reviewed on 20 August 2026 and deliberately stops where the available primary documentation does not define a safe, reproducible flashing or recovery procedure.
📋 What's in this guide
Revision pin, evidence boundary, and tutorial scope
The ESP32-S3 information in this guide is tied to the
OTGW-firmware repository
and its dev branch as reviewed on 20 August 2026. At that review point, the repository identified itself as OTGW-firmware v2.0.0 and described the code as unreleased, unsupported alpha software intended for alpha testers. A branch is a moving reference rather than an immutable release. Before building anything, record the exact commit shown by GitHub or by your local Git checkout so that your build, issue report, and any later recovery attempt refer to the same source.
The repository evidence supplied for this revision establishes the supported processor family, board arrangement, PlatformIO environment name, and build command. It also establishes that a root-level flash_esp.py file exists. It does not provide the script's current contents, supported Python version, Python package requirements, serial-port prompts, binary-selection rules, erase behavior, bootloader sequence, success transcript, post-write restart sequence, or rollback process. It likewise does not document an ESP32-S3 upload command in the extracted README content.
We will not guess at boot-button timing, serial-port flags, Python dependencies, partition files, upload commands, or script behavior for a heating controller. The verified source can be acquired and built using the documented command below, but the actual write should proceed only when the selected immutable revision supplies instructions for your board and its current flashing tool. If those instructions are absent, stop before erasing or writing the device.
This narrower scope is intentional. It gives you a reproducible way to identify the correct project line, reject an incompatible ESP8266 release, inspect the two installation mechanisms separately, establish a local verification checklist, and configure Localtonet after the gateway works. It does not turn undocumented behavior into instructions.
| Item | Verified for the reviewed dev branch | Not established by the supplied primary evidence |
|---|---|---|
| Processor target | ESP32-S3 using a LOLIN S3 Mini | Compatibility with arbitrary ESP32-S3 boards |
| Supported OTGW arrangement | Traditional NodoShop OTGW with PIC co-processor | A universal physical swap for every NodoShop revision |
| PlatformIO | Environment esp32; build with pio run -e esp32 |
A verified upload command, minimum PlatformIO version, or upload transcript |
| Python flasher | flash_esp.py exists in the repository root |
Dependencies, artifact selection, prompts, port handling, erase behavior, or success output |
| Network features | Web interface, REST API v2, MQTT, TCP bridge, Telnet log, and other listed features | Exact first-boot portal fields, stable API routes, or protection of every HTTP route |
Understand the firmware and remote-access architecture
An OpenTherm Gateway sits between a compatible thermostat and boiler and monitors or influences their OpenTherm communication. In the supported v2.0.0 arrangement described by the project, the existing PIC co-processor continues to handle the traditional OTGW side while a LOLIN S3 Mini runs the network-facing ESP32-S3 firmware.
The firmware lists a browser interface, REST API v2, MQTT integration with Home Assistant discovery, a TCP serial bridge on port 25238, a Telnet debug log on port 23, webhook callbacks, over-the-air firmware and filesystem updates, graphs, settings, and live OpenTherm logging. This guide considers only the HTTP service. It does not instruct you to publish the serial bridge, Telnet service, MQTT broker connection, or any direct OpenTherm control protocol.
Remote HTTP access uses three separate components:
Localtonet enters the workflow only after firmware installation, startup, Wi-Fi connectivity, and local HTTP verification. Our client runs on a separate supported host in this architecture. It establishes an outbound connection to our relay and forwards requests to the OTGW over the local network.
Confirm the exact hardware before replacing a module
The project distinguishes several hardware generations. Firmware v1.x ran on ESP8266 modules. NodoShop OTGW versions 1.x through 2.0 used a NodeMCU ESP8266, while version 2.3 and later used a Wemos D1 mini ESP8266. The reviewed v2.0.0 migration description specifically calls the LOLIN S3 Mini a replacement for the old Wemos D1 mini.
That wording does not establish a universal drop-in conversion for the earlier NodeMCU-based versions. If your OTGW is version 1.x through 2.0, do not assume that a LOLIN S3 Mini fits the socket, orientation, electrical connections, or enclosure used by the NodeMCU module. Obtain board-specific confirmation before purchasing, inserting, or powering the ESP32-S3 module.
For version 2.3 and later Wemos-based boards, the project describes the LOLIN S3 Mini as the migration replacement while retaining the same OTGW board and PIC co-processor. Even then, inspect the repository hardware support information and ESP8266 migration guidance for the exact revision you plan to use. Do not infer module orientation or boot controls from the fact that two modules have similar form factors.
| NodoShop or firmware line | Documented module | Decision for this guide |
|---|---|---|
| NodoShop OTGW 1.x through 2.0 | NodeMCU ESP8266 for v1.x firmware | Not covered by the documented Wemos-to-LOLIN replacement statement. Obtain board-specific confirmation. |
| NodoShop OTGW 2.3 and later | Wemos D1 mini ESP8266 for v1.x firmware | The migration text identifies the LOLIN S3 Mini as the replacement, with the OTGW board and PIC retained. |
| OTGW-firmware v1.7.4 | ESP8266 | Do not flash this release onto the ESP32-S3. |
| OTGW-firmware v2.0.0 dev line | LOLIN S3 Mini, ESP32-S3 | The relevant line for this article, but it is unreleased alpha software. |
| Direct-GPIO ESP32 OpenTherm board | Prototype ESP32 hardware without the PIC | Outside this guide and described by the project as a prototype. |
The published v1.7.4 release is a maintenance release for the ESP8266 1.x line. Its release status does not make it compatible with the LOLIN S3 Mini. Use only source or artifacts explicitly associated with the ESP32-S3 development line.
Also plan for heating-system continuity. Module replacement, erasure, failed startup, or a mismatched build can make the gateway unavailable. Before changing the hardware, establish how your thermostat and boiler behave when the OTGW or network module is offline. That behavior depends on the physical installation and is not controlled by Localtonet.
Acquire and pin the OTGW-firmware source
Start at the primary
OTGW-firmware repository.
The reviewed project uses the dev branch for the 2.0.0 alpha line. Do not select the latest stable release merely because GitHub gives it greater visual prominence, since v1.7.4 targets ESP8266.
Open the primary repository
Confirm that the README identifies the checkout as OTGW-firmware v2.0.0, labels it alpha software, and names the LOLIN S3 Mini in the traditional NodoShop OTGW with PIC as the supported arrangement.
Select the dev branch
Use the repository's dev branch rather than an ESP8266 release tag. Because this branch moves, record the full commit identifier displayed for the source you download.
Obtain one coherent source snapshot
Clone the selected branch with Git or download that revision's source archive from GitHub. Do not combine a flashing script, partition file, configuration, or compiled image taken from different commits.
Inspect the files that define the build
Review the checkout's README.md, platformio.ini, flash_esp.py, partition CSV files, and migration guidance before running a tool. These files are revision-specific and must remain aligned.
The repository exposes the relevant files directly: the dev README, the current PlatformIO configuration, and the current Python flashing script. Inspect these files at the same recorded commit. If GitHub shows that one changed after the others were reviewed, re-evaluate the procedure rather than assuming compatibility.
Prepare the workstation without inventing dependencies
The PlatformIO route requires a working PlatformIO installation. The Python route requires Python 3 because the previously published invocation uses python3. The evidence supplied for this article does not define a minimum PlatformIO version, supported Python minor versions, a requirements file to install, USB driver packages, or supported host operating systems.
Before connecting to a heating controller, verify that the chosen revision itself documents those requirements. If flash_esp.py imports packages that are not part of Python's standard library, install only the dependencies specified by that revision. Do not respond to a missing import by installing similarly named packages from an unverified source.
- Use a USB cable that supports data, not a charge-only cable.
- Confirm that the operating system detects a new USB or serial device when the board is attached.
- Record the detected device name before running any tool.
- Disconnect unrelated serial devices to reduce the risk of selecting the wrong target.
- Do not assume that automatic reset or bootloader entry works until the exact board instructions confirm it.
- Do not power the installed gateway simultaneously from conflicting sources.
Keep the Python and PlatformIO installation paths separate
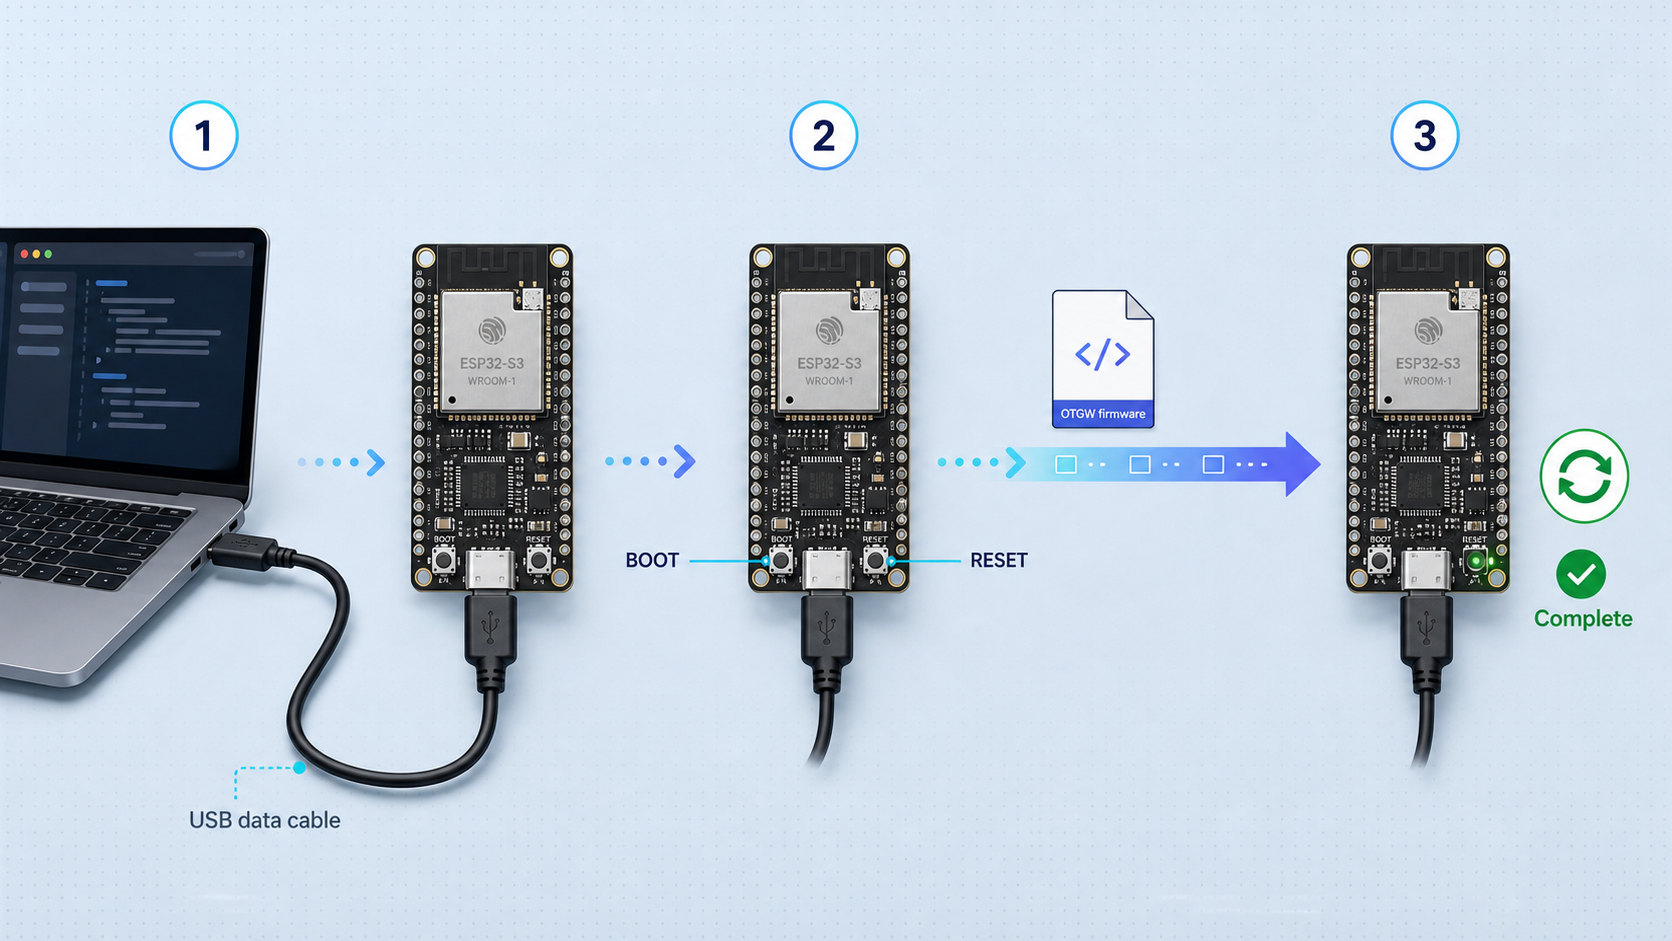
Earlier versions of this article combined the Python script and PlatformIO into one apparent six-step procedure. That was misleading because they are alternative paths, and the available primary evidence does not establish equivalent behavior. Review the path you intend to use independently.
Python script path
The repository contains flash_esp.py, but file presence alone does not prove that the script downloads a release, selects the correct artifact, prompts for a serial port, erases flash, writes every required partition, or restarts the device. Those behaviors must be verified from the script at your pinned commit.
Read the pinned script before executing it
Inspect its imports, accepted arguments, image paths, target checks, serial-port handling, partition addresses, erase actions, and exit behavior. Confirm that every referenced file exists in the same checkout.
Confirm explicit ESP32-S3 targeting
Do not run the script if it can select an ESP8266 release or if its target cannot be determined. The v1.7.4 artifacts belong to the ESP8266 line.
Resolve documented Python requirements
Use the Python version and dependencies declared by the selected source revision. If the revision does not declare them, the Python path is not self-contained enough for this guide to recommend execution.
Require an unambiguous device and completion report
Proceed only if the tool identifies the intended serial device and reports each required write as successful. The supplied evidence contains no authoritative success transcript, so this article does not fabricate one.
A previously cited invocation was:
python3 flash_esp.pyDo not treat that single command as sufficient authorization to run the current script. Confirm its current interface and dependencies from the pinned file first. In particular, this guide does not describe it as a release installer because the supplied primary evidence does not verify that characterization.
PlatformIO source-build path
The reviewed README explicitly documents the PlatformIO environment name and build command:
pio run -e esp32
The environment is named esp32 even though the supported module uses an ESP32-S3. Run the command from the root of the matching source checkout, where its platformio.ini is present. A successful build establishes that PlatformIO compiled the selected environment. It does not establish that any bytes were written to the board.
Open the pinned source root
Confirm that the working directory contains the reviewed platformio.ini, source tree, and partition files from one commit.
Build the documented environment
Run pio run -e esp32. Do not substitute an ESP8266 environment or rename the environment to match the processor marketing name.
Stop on the first build error
Resolve the first meaningful dependency, configuration, or compiler error against the pinned revision. Do not change board definitions or partition layouts at random.
Obtain the upload procedure from the same revision
The supplied README evidence verifies the build command but not an upload command, serial-port option, bootloader sequence, or expected upload output. Do not append a generic PlatformIO upload target and assume it matches this project.
A safe write procedure needs a supported board connection, bootloader-entry sequence, serial-port selection method, required images and addresses, successful output criteria, restart instructions, and a recovery path. Those details are not available in the supplied repository extract. Continue only when the primary project instructions for your exact commit provide them or a project maintainer confirms them.
After any documented write completes, follow that revision's restart procedure. Do not disconnect during a write, and do not assume a successful tool exit proves that the firmware boots, communicates with the PIC, joins Wi-Fi, starts HTTP, or observes the OpenTherm bus. Each of those is a separate checkpoint.
Verify startup and HTTP locally before considering a tunnel
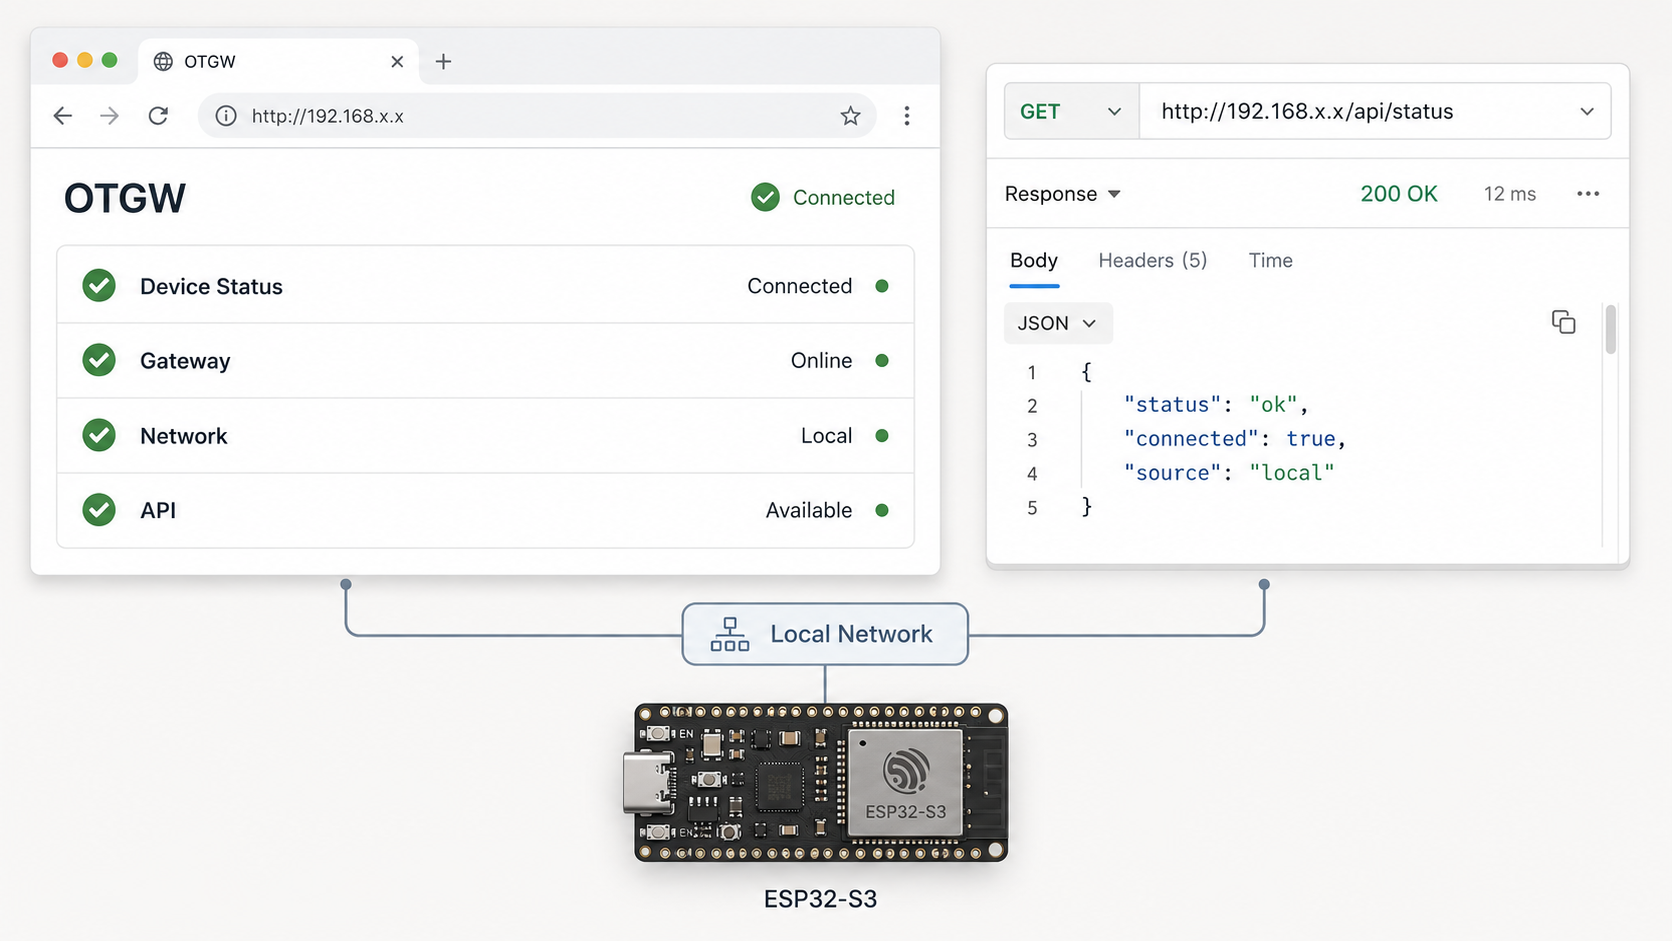
The reviewed dev README lists Wi-Fi, a web interface, REST API v2, AP fallback mode in beta, and triple-reset Wi-Fi credential recovery. It does not provide the exact first-boot access-point name, captive-portal address, credentials, field labels, LED sequence, or timing in the supplied extract. For that reason, this guide does not present a speculative captive-portal walkthrough.
Likewise, the supplied evidence does not establish otgw.local as a guaranteed hostname for this alpha revision. Discover the gateway through the router or DHCP server and use its assigned LAN IP address unless the exact revision explicitly documents and successfully advertises a local hostname.
Local verification sequence
- Follow the pinned revision's documented restart and Wi-Fi provisioning procedure.
- Confirm that the device appears in the intended network's DHCP or client list.
- Record the assigned LAN IP address.
- From a computer on the same network, open the documented HTTP address at that IP.
- Confirm that the web interface loads consistently after a refresh.
- Inspect the live OT log or status views and confirm that the values are plausible for the installation.
- Use only a REST API v2 route documented by the pinned revision and confirm its method, response, and authentication behavior locally.
- Repeat the HTTP test from the separate computer that will run our Localtonet client.
If the HTTP service uses the standard HTTP port, a local test has the following form:
http://<otgw-lan-ip>/If the selected revision or configuration uses another port, include that actual port and use the same value later as the Localtonet target. Do not infer a port from another firmware generation.
| Check | What it proves | What remains unproven |
|---|---|---|
| Device appears in DHCP | The gateway joined the LAN and received an address | HTTP, API, PIC, and OpenTherm operation |
| Local web interface loads | The selected IP, port, and HTTP service work locally | Protection of every route and correct heating data |
| Live OpenTherm data appears | The application is receiving meaningful gateway or bus information | Support for every boiler-specific message or control |
| A documented API route returns JSON | That route and method work on the LAN | That other routes are authenticated or safe to publish |
| Localtonet host opens the same URL | The future tunnel host has a route to the OTGW | That the public endpoint is running or authorized |
Consider assigning a predictable address through a DHCP reservation in your normal network administration system. Localtonet cannot reach an old IP address after the OTGW receives a different lease. The reservation procedure depends on your router or DHCP server.
The reviewed README mentions beta AP fallback and triple-reset Wi-Fi credential recovery. It does not provide the exact timing or resulting state in the supplied evidence. Check the instructions for the recorded commit before intentionally resetting the controller. Do not repeatedly cycle power in an attempt to discover the sequence.
Configure Localtonet only after local verification
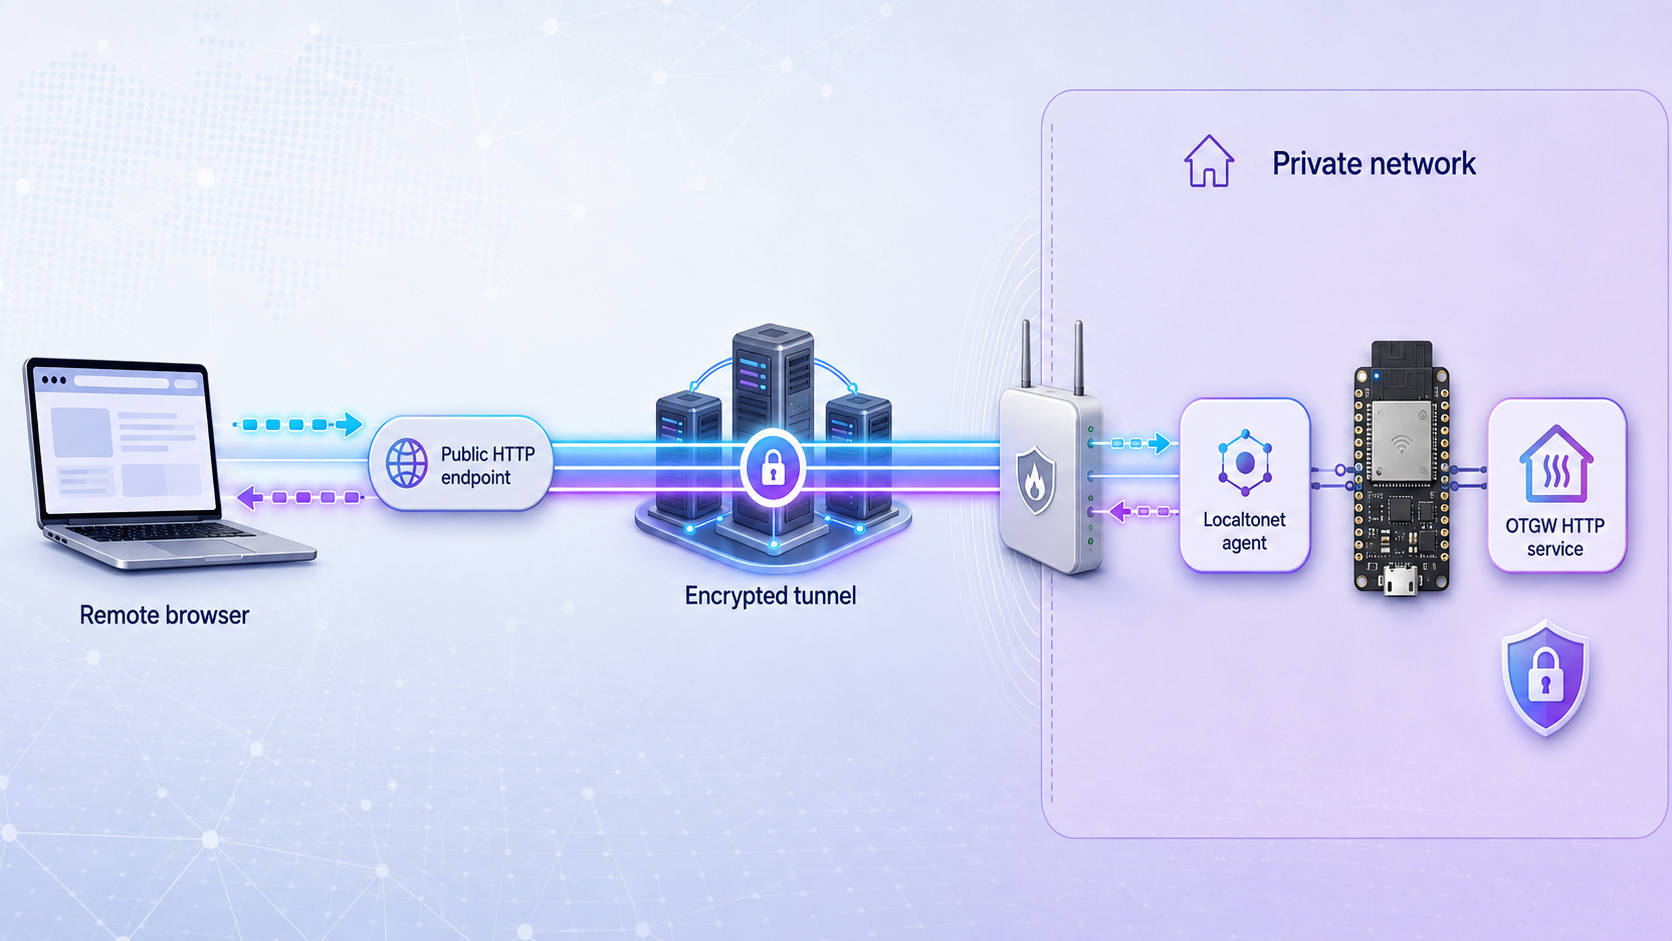
With Localtonet, the client on your LAN establishes an outbound connection to one of our relay servers. The resulting HTTP tunnel provides a public URL without inbound router port forwarding, inbound firewall changes, VPN setup, or a public IP address. The tunnel is available only while the selected client is connected and the tunnel is running.
Before creating it, complete the route-by-route security review in the next section. If status pages, APIs, streams, settings, maintenance actions, or write-capable routes remain publicly usable without suitable authentication, keep the OTGW LAN-only rather than proceeding.
Install and run our client on a separate LAN host
Use a supported computer or device that can reach the OTGW's verified LAN IP and HTTP port. Open the OTGW URL from that host before creating the tunnel.
Authenticate or select that Localtonet device
Use the device-specific authentication token associated with the host. Never include the token in screenshots, source files, shell examples, issue reports, or public logs.
Select an available relay server
Choose from the server or region values currently shown in our dashboard. Available values can vary, so do not copy a hardcoded server code from an old tutorial.
Create an HTTP tunnel to the OTGW
Enter the gateway's verified LAN IP address and HTTP port as the local target. Use the address that works from the Localtonet host. Do not enter 127.0.0.1 unless the OTGW service or a deliberate reverse proxy actually runs on that same host.
Start and verify the tunnel
Creating or saving a tunnel does not start it. Press Start, then test the assigned public HTTPS address from a separate network. Begin with a read-only view whose authentication behavior you already verified locally.
Stop or delete the tunnel when finished
Stop the tunnel at the end of a temporary support session. Delete it when the configuration is no longer needed. Stopping exposure does not change the OTGW's local configuration.
See our HTTP tunnel documentation for the current dashboard workflow. HTTP tunnels can use a generated subdomain, a selected subdomain where supported, or a custom domain. Check the current documentation before configuring custom-domain DNS.
In this architecture, localhost on the Localtonet host refers to the helper computer, not the OTGW. Use the gateway's reachable LAN IP and service port unless you intentionally operate a reverse proxy on the helper computer.
Decide whether the OTGW is safe to make public
A heating controller is a sensitive administrative service. Its pages may disclose temperatures, schedules, equipment state, network configuration, and operational history. An API or settings route may also allow changes with physical consequences. A public URL changes the threat model even when it is intended for short-term maintenance.
The reviewed OTGW project description states that HTTP Basic Authentication is optional for settings and maintenance endpoints. That is a limited claim. It does not establish that the main status interface, REST API, live log, real-time streams, every write route, or every static resource requires authentication.
Test the exact alpha revision route by route. If status, API, streaming, maintenance, or write-capable routes remain unauthenticated, do not expose the OTGW directly through a public tunnel. Keep it LAN-only or place it behind an independently reviewed authentication layer that protects every request. A temporary tunnel and an unguessable hostname are not substitutes for authorization.
Minimum pre-exposure review
- Enable the firmware's supported authentication for settings and maintenance endpoints.
- Use a strong, unique password that is not reused elsewhere.
- Open the root page in a private browser session and record whether it requires credentials.
- Test each API route you intend to use without credentials, then with invalid and valid credentials.
- Check live logs, graphs, event streams, downloads, upload functions, settings, maintenance, OTA, and restart actions separately.
- Verify both read and write methods. A protected settings page does not prove that its underlying API is protected.
- Do not publish Telnet on port 23 or the TCP serial bridge on port 25238 as part of this HTTP workflow.
- Stop the tunnel immediately if a route exposes sensitive data or accepts an unauthorized change.
The public browser-facing connection uses the tunnel's HTTPS address. The local target described here remains the OTGW's HTTP service on the LAN. Keep the helper host and OTGW on a trusted or appropriately segmented network. Do not claim that the local HTTP hop becomes encrypted merely because the public address uses HTTPS.
Define recovery and rollback before writing firmware
The supplied project evidence does not establish a complete ESP32-S3 rollback procedure. It does not say whether settings survive every flashing method, which partitions must be preserved, whether the Python script performs an erase, how to recover a board that no longer enumerates normally, or how to return safely from v2.0.0 to an older module.
Therefore, a responsible installation plan needs explicit answers before the first write:
- What exact commit or artifact is being installed?
- Which board revision and module are present?
- How does that board enter its ROM bootloader?
- Which serial device belongs to the board?
- Which images and partition addresses will be written?
- What output proves that every required write completed?
- How is the board restarted after writing?
- How are Wi-Fi and application settings backed up or recreated?
- How is a failed board returned to a flashable state?
- How will heating continue while the gateway is unavailable?
If the pinned revision, board documentation, and maintainer guidance do not answer these questions, do not perform the upgrade on a production heating controller. Test on spare supported hardware or wait for a documented release. Reinstalling an older module may appear possible for a Wemos-based board, but the supplied evidence does not define that as a complete or safe rollback procedure.
Network recovery should also be planned separately. The dev README mentions triple-reset Wi-Fi credential recovery and beta AP fallback, but the exact trigger timing and resulting configuration are not established here. Preserve local network access to the Localtonet host so that you can stop the tunnel even if the OTGW becomes unresponsive.
Troubleshoot hardware, firmware, LAN, and tunnel layers separately
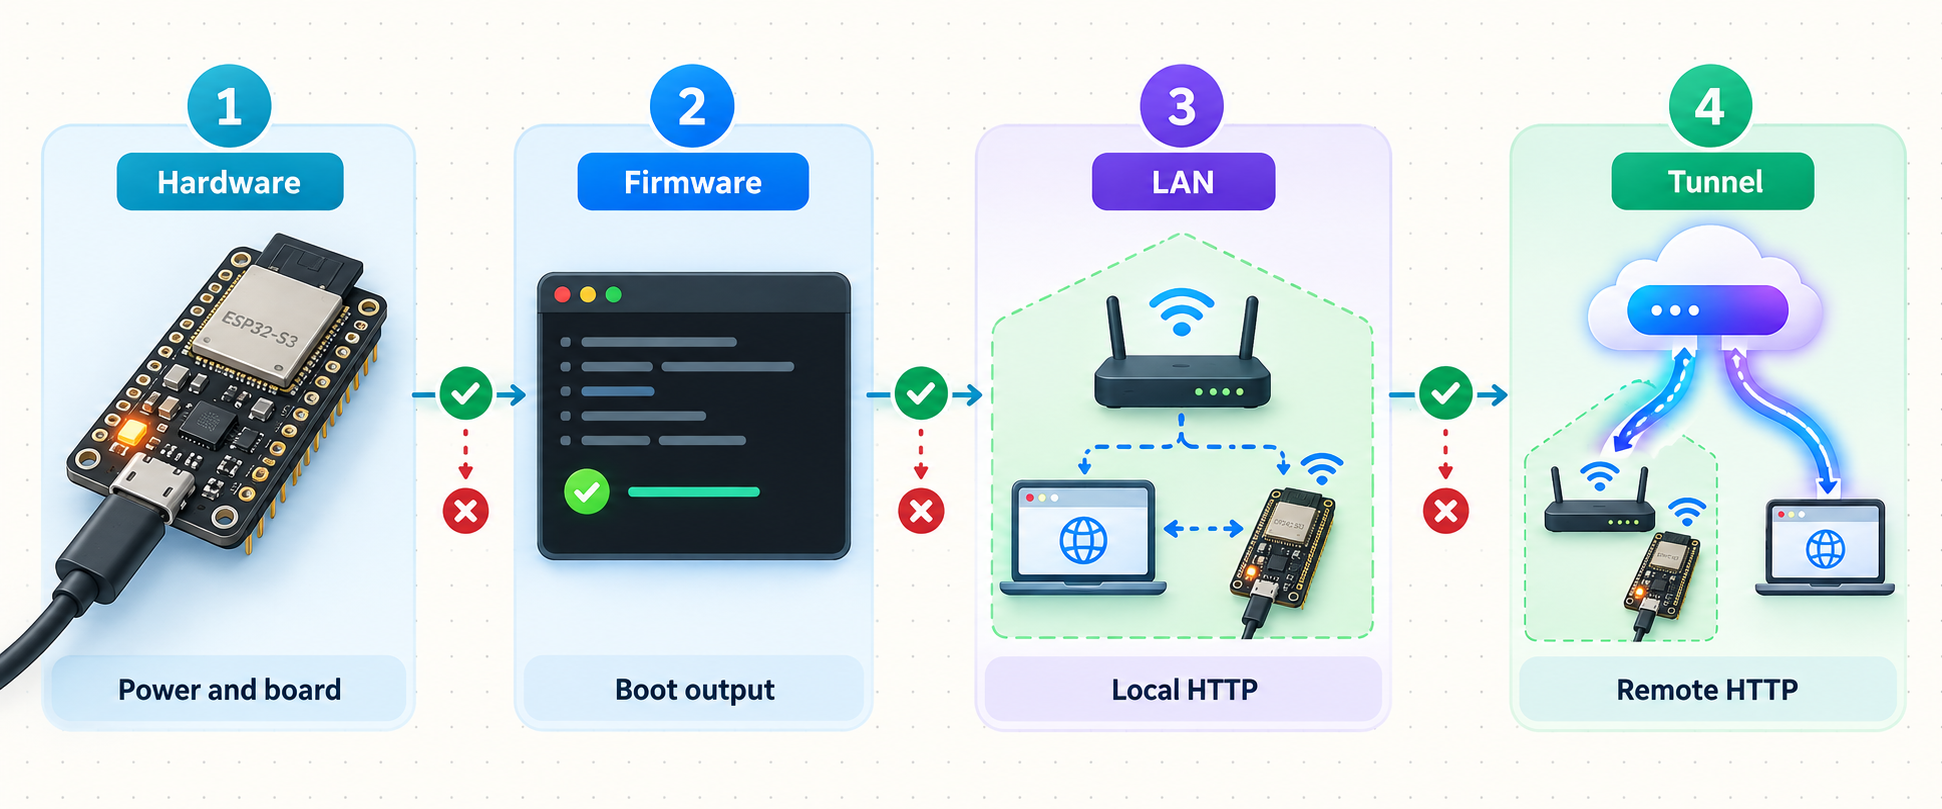
Work from the device outward. A public tunnel cannot fix a wrong module, failed write, missing Wi-Fi configuration, broken PIC communication, or unreachable LAN service.
| Symptom | Likely layer | Recommended action |
|---|---|---|
| The computer does not detect the board | USB cable, driver, power, or boot state | Use a data-capable cable, inspect OS device discovery, and follow only the exact board's documented bootloader procedure. |
| More than one serial port is available | Host device selection | Disconnect unrelated serial devices and compare the device list before and after connecting the board. |
flash_esp.py reports a missing module |
Python dependency | Install only dependencies declared by the pinned revision. Do not guess package names. |
| PlatformIO cannot find the environment | Wrong directory or source revision | Run from the repository root and confirm that its platformio.ini defines esp32. |
| The build fails | Dependency, compiler, configuration, or source issue | Capture the first meaningful error and resolve it against the recorded commit. Do not switch to an ESP8266 target. |
| The tool writes but the device does not start | Target, partition, write, restart, or hardware mismatch | Do not keep erasing or rewriting. Recheck the exact target and use the documented recovery path for that board and commit. |
| No expected Wi-Fi behavior appears | Boot, stored credentials, or revision-specific setup | Check the DHCP server and pinned instructions before using AP fallback or triple-reset recovery. |
| The device has an IP but HTTP does not load | HTTP service, port, isolation, or incomplete boot | Confirm the documented port, subnet, client-isolation policy, and device startup state. |
| The interface loads but OT data is absent | PIC, wiring, thermostat, boiler, or OpenTherm bus | Treat this as a gateway-side problem and do not add remote access yet. |
| The OTGW works from one computer but not the Localtonet host | VLAN, routing, client isolation, or host firewall | Open the same LAN IP and port from the Localtonet host and permit only the required path. |
| The tunnel is saved but its URL is unavailable | Localtonet lifecycle | Confirm that the intended client is connected and press Start for the tunnel. |
| The tunnel returns an upstream error | Wrong LAN IP, port, or local reachability | Repeat the local test from the Localtonet host. Do not target localhost for a service on the ESP32-S3. |
| The public page loads but an API request fails | Route, method, payload, or authentication | Repeat the identical request locally and compare it with the API documentation for the recorded commit. |
| Remote access stops later | Helper host, client, tunnel state, or changed OTGW address | Confirm that the host and our client are online, the tunnel is running, and the target IP is still current. |
When local HTTP works but public HTTP does not
Start on the helper computer. If it cannot open the OTGW's LAN URL, our relay cannot forward to it. If that local request succeeds, confirm the device token selection, client connection, relay selection, exact target IP and port, and tunnel running state. Saving the configuration is not the same as starting it.
When authentication differs between routes
Treat each route as a separate security finding. A login prompt on the settings page does not prove that REST, live streams, OTA handlers, or write operations are protected. Stop the tunnel while investigating. If comprehensive authorization cannot be established, keep the interface private.
When the OTGW address changes
Update the target or create a DHCP reservation through your router. Local hostname discovery can vary between computers, containers, and VLANs, so a predictable LAN IP is generally easier to validate from the Localtonet host.
Frequently asked questions
Does Localtonet flash OTGW-firmware onto the ESP32-S3?
No. Firmware installation is an independent project procedure. Localtonet is used later, on a separate LAN host, to forward the already working OTGW HTTP service.
Can I flash the v1.7.4 release onto a LOLIN S3 Mini?
No. Version v1.7.4 is a maintenance release for the ESP8266 1.x line. The reviewed ESP32-S3 work is in the unreleased v2.0.0 development line.
Is the LOLIN S3 Mini a universal replacement for every NodoShop OTGW module?
No universal replacement is established. The repository distinguishes NodeMCU-based NodoShop versions 1.x through 2.0 from Wemos D1 mini-based versions 2.3 and later. Its migration wording specifically describes replacing the Wemos D1 mini with a LOLIN S3 Mini while retaining the OTGW board and PIC.
What PlatformIO command is verified by the reviewed README?
The reviewed README documents pio run -e esp32 as the build command. The supplied evidence does not establish an upload command, serial-port option, bootloader sequence, or successful upload transcript, so this article does not invent them.
Does this guide verify what flash_esp.py downloads or writes?
No. The available evidence confirms that the file exists but does not include its current implementation. Inspect the script at the pinned commit for dependencies, arguments, image selection, partition addresses, serial handling, and erase behavior before deciding whether to execute it.
Can I rely on otgw.local after first boot?
The supplied evidence does not establish that hostname for the reviewed alpha revision. Find the assigned LAN IP through your router or DHCP server and use the address that works from the future Localtonet host.
Does OTGW Basic Authentication protect the entire web service?
That is not established. The project description identifies optional Basic Authentication for settings and maintenance endpoints. Verify status pages, API routes, streams, maintenance functions, and write operations separately. Do not publish the service if required routes remain unauthenticated.
Can Localtonet run directly on the ESP32-S3?
This workflow does not assume Localtonet client support on the ESP32-S3. Run our client on a separate supported host that can reach the OTGW over the LAN.
Do I need router port forwarding or a public IP address?
No. Our client establishes an outbound connection to a Localtonet relay. This workflow does not require inbound router port forwarding, inbound firewall changes, VPN setup, or a public IP address. The client must remain connected and the tunnel must be running.
Should I expose the Telnet or TCP serial bridge too?
Not as part of this workflow. The project lists Telnet on port 23 and a TCP serial bridge on port 25238, but those services have different security characteristics. Keep them private unless you perform a separate protocol-specific security review.
Connect a locally verified OTGW with Localtonet
After the correct ESP32-S3 revision has been installed through a project-verified procedure, the gateway works reliably on the LAN, and every intended HTTP route has suitable authorization, use a separate Localtonet host to create the tunnel. Start with a read-only test, keep the exposure limited to the required service, and stop the tunnel when remote access is no longer needed.
Get Started Free →

