

Run a browser-based Docker control plane locally, then expose it only when remote administration is required
Portainer provides a web interface for administering a Docker environment, but that convenience also creates a sensitive control surface. In this tutorial, you will deploy Portainer Community Edition on a supported Docker host, keep its HTTPS listener bound to loopback, complete the initial configuration locally, verify its health, and connect it through a Localtonet TCP tunnel. You will also prepare backups, use a controlled update process, troubleshoot common failures, and understand why access to Portainer can become access to the underlying host.
📋 What's in this guide
Understand the architecture and security boundary
Portainer is a container-management application with a browser interface. Depending on the environment and enabled features, it can display containers, inspect logs, manage images, networks and volumes, and deploy workloads. This guide uses Portainer Community Edition with a local Docker Engine. Portainer Business Edition has a different feature and licensing model, so authentication, authorization, identity integration and environment-management capabilities should be checked against the current Portainer edition documentation before you rely on them.
The deployment mounts /var/run/docker.sock into the Portainer container. That socket is the Docker Engine API endpoint on a typical Linux host. It is not an ordinary application data volume. A process that can issue sufficiently privileged Docker API requests can generally create privileged containers, mount host filesystems, access secrets available to Docker, modify workloads and obtain host-level control.
Compromise of an administrator account, the Portainer application or a browser session can lead to compromise of the Docker host when Portainer has unrestricted Docker socket access. Do not treat the dashboard as a low-risk monitoring page. Restrict who can reach it, use strong unique credentials, patch promptly, preserve tested backups and keep a recovery path that does not depend on Portainer itself.
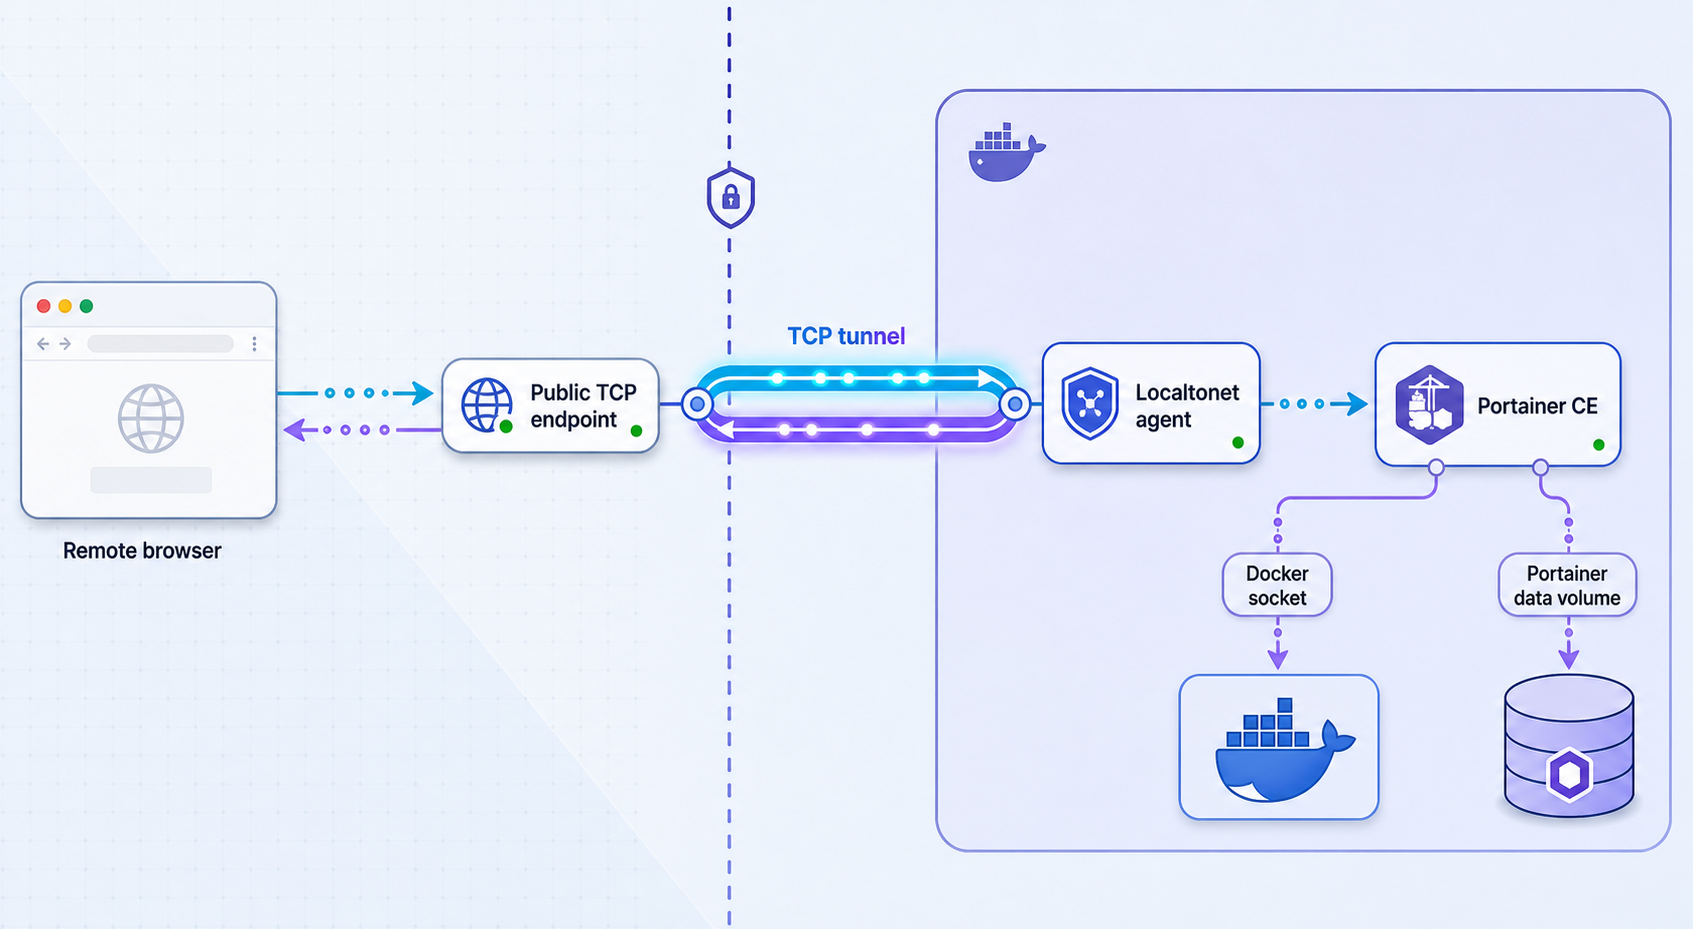
This tutorial limits the host-published Portainer port to 127.0.0.1:9443. Devices on the LAN cannot connect directly to that binding. A Localtonet client running on the same host can reach it through loopback and establish an outbound connection to a Localtonet relay. A remote browser then connects to the public host and port assigned to the TCP tunnel.
Remote browser
      |
      | Public TCP connection carrying Portainer HTTPS
      v
Localtonet relay host and port
      ^
      | Outbound tunnel connection
      |
Localtonet client on Docker host
      |
      | 127.0.0.1:9443
      v
Portainer container
      |
      | /var/run/docker.sock
      v
Docker Engine and host workloads
With a raw TCP tunnel, the relay forwards the TCP stream and Portainer remains the HTTPS server. The browser therefore evaluates the certificate presented by Portainer, not a certificate for an HTTP endpoint terminated at the relay. Portainer commonly begins with a certificate that is not trusted for the public relay hostname, so a browser warning is expected until you deliberately configure a certificate and hostname that match.
Prerequisites and compatibility checks
Use a host you administer and can recover without the Portainer interface. The commands in this guide target a Linux Docker host with a POSIX-compatible shell. Docker Desktop and other platforms have different socket paths, networking behavior and filesystem permissions, so do not copy the Linux socket mount unchanged onto another platform without checking Portainer's current installation instructions for that platform.
Host requirements
- A supported 64-bit host operating system and CPU architecture for the Portainer image you plan to deploy.
- A currently supported Docker Engine installation.
- Docker Compose v2, invoked as
docker compose. - Permission to run Docker commands and read the Docker socket.
- Local access to a browser, or an SSH port-forwarding method, for completing the initial setup before public exposure.
- Enough persistent storage for the Portainer data volume and its backups.
- A Localtonet account and a device that will run the current Localtonet client.
Portainer's supported Docker versions, host operating systems and architectures can change between releases. Check the compatibility matrix for the exact Portainer release before installation or upgrade. This is especially important on Raspberry Pi systems. Do not assume that every 32-bit ARM image, Raspberry Pi generation or operating-system release is supported. Confirm the machine reports a currently supported architecture, commonly aarch64 for a 64-bit ARM installation, and confirm that the selected Portainer release publishes an image for it.
Check the host architecture, Docker Engine and Compose installation:
uname -m
docker version
docker compose version
docker info
These commands should complete without connection errors. Review the server section of docker version, not just the client section. If only the Docker client is installed or the daemon is stopped, Portainer will not be able to manage an environment.
Confirm that the expected Linux Docker socket exists:
ls -l /var/run/docker.sockAdding a user to the Docker group is commonly equivalent to granting that user root-level control through the Docker API. Do not change socket permissions to make an error disappear, and never make the socket world-writable. Use an account and privilege model appropriate for host administration.
Choose an image channel deliberately
The previous version of this tutorial used portainer/portainer-ce:sts. STS is a short-term support channel and should not be selected silently for a long-lived management service. This guide starts with Portainer's LTS channel:
portainer/portainer-ce:ltsA moving channel tag is convenient for an initial controlled deployment, but it is not a complete production update policy. Before routine operation, record the exact version and image digest you tested. Use that tested release in the Compose file so an unrelated image pull cannot silently move the management plane to a newer build. Before changing versions, check Portainer's release notes, supported upgrade path, Docker compatibility and architecture support.
| Decision | Use | Operational implication |
|---|---|---|
| LTS channel | Standard long-lived installation starting point | Still moves when the channel tag is updated, so test and pin a specific approved release for controlled operations. |
| STS channel | Short-term release testing where its lifecycle is understood | May require more frequent upgrades and compatibility validation. It is not used in this tutorial. |
| Specific version or digest | Repeatable deployment and rollback preparation | You must deliberately review and change the reference when applying an upgrade. |
Install Portainer CE with Docker Compose
The following sequence creates one Compose project, exposes only Portainer's HTTPS interface on loopback and stores Portainer data in a named volume. Port 8000 is not published because this tutorial does not configure Edge Agent features. Do not publish extra ports unless a documented feature requires them and you have reviewed the resulting network exposure.
Create a restricted project directory
Choose a stable directory for the Compose file. Keep it readable only by administrators because future configuration may contain operational details.
mkdir -p "$HOME/portainer"
cd "$HOME/portainer"
chmod 700 "$HOME/portainer"Create the Compose definition
Save the following content as compose.yaml. The LTS channel replaces the previous STS image, and only port 9443 is bound to the host loopback interface.
services:
  portainer:
    image: portainer/portainer-ce:lts
    container_name: portainer
    restart: unless-stopped
    ports:
      - "127.0.0.1:9443:9443"
    volumes:
      - /var/run/docker.sock:/var/run/docker.sock
      - portainer_data:/data

volumes:
  portainer_data:
name: portainer_dataValidate the Compose file
Ask Compose to render the effective configuration before creating anything. Correct YAML errors, unexpected variable substitutions or invalid options first.
docker compose configPull the selected image
Pull the image explicitly so download or architecture errors are visible before startup.
docker compose pullStart Portainer
Create the named data volume and launch the container in detached mode.
docker compose up -dConfirm that the container remains running
Check the Compose state and inspect recent logs. A container that repeatedly restarts is not ready for initial configuration.
docker compose ps
docker compose logs --tail=100 portainerComplete the initial setup locally
Open https://127.0.0.1:9443 from the host. Create the initial administrator account immediately with a long, unique password. Confirm that Portainer displays the local Docker environment made available by the socket mount. Interface labels can differ by Portainer release, so verify that the selected environment is the intended local engine before making changes.
Portainer can initially present a certificate that your browser does not trust or that does not match 127.0.0.1. Confirm that you are connecting directly to the intended host before proceeding. Do not teach users to ignore certificate warnings on arbitrary remote addresses.
Portainer can restrict or reset an incomplete initial setup session. If the setup page reports that initialization timed out, leave port 9443 bound to loopback, restart the Portainer container, reopen the local page and complete account creation promptly:
docker compose restart portainer
docker compose logs --tail=100 portainer
Verify Portainer locally before creating a tunnel
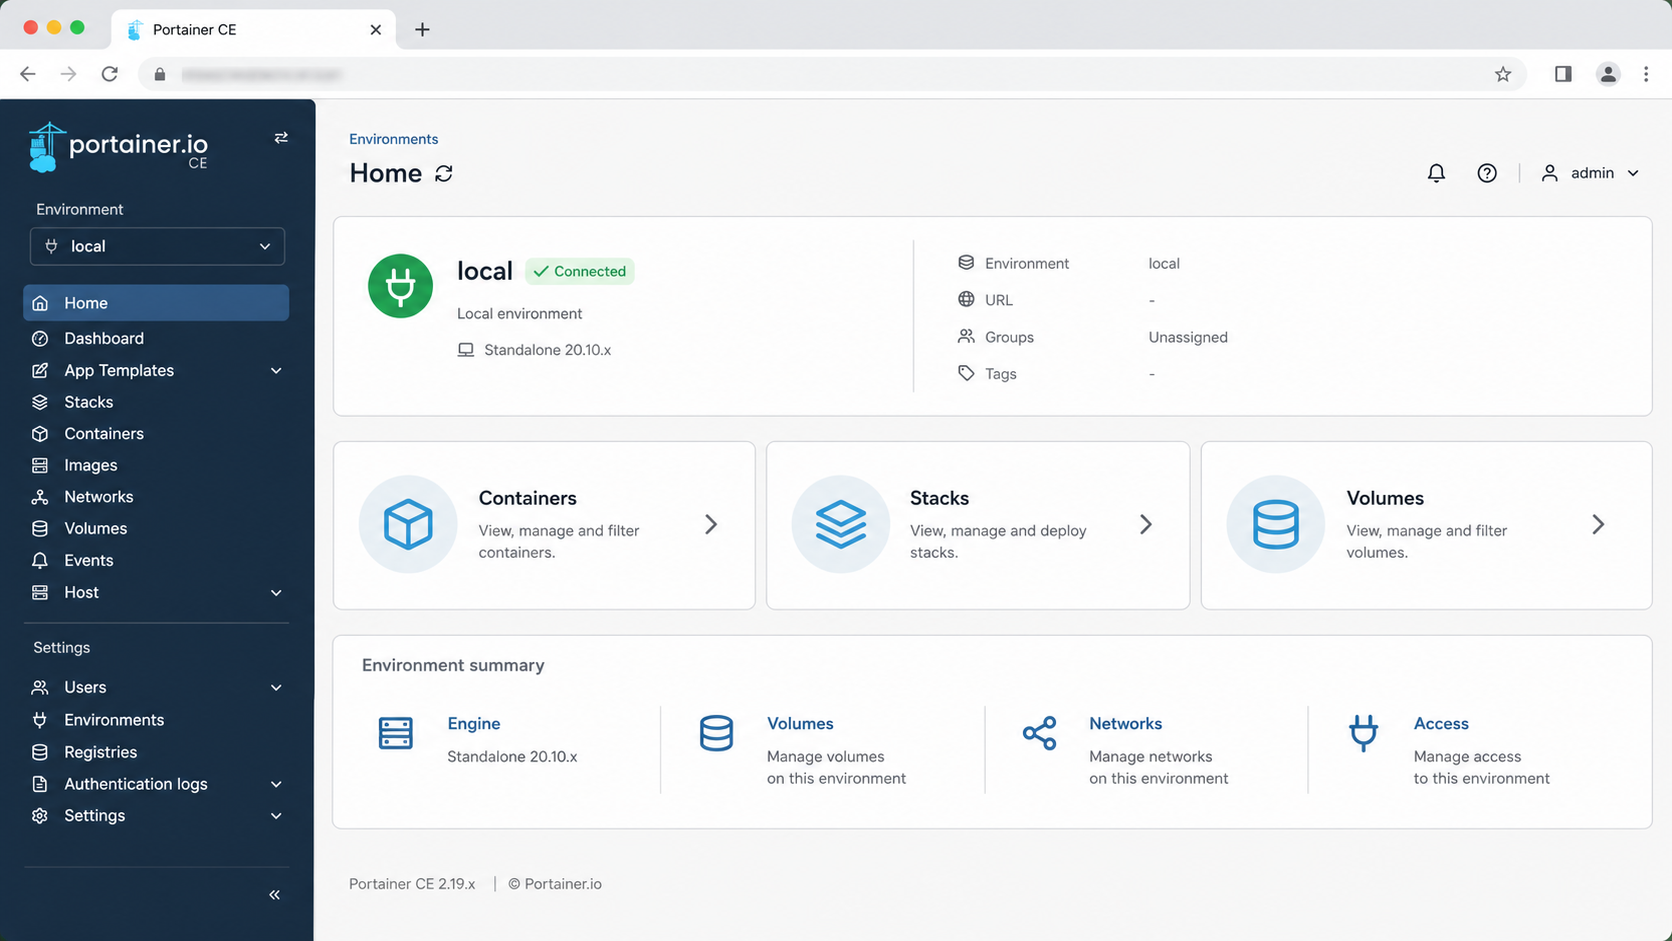
Remote exposure should be the last installation step, not the first. Verify the container, listener, HTTPS response, authentication and Docker environment while the service is reachable only from the host.
Check container state and logs
cd "$HOME/portainer"
docker compose ps
docker inspect portainer --format '{{.State.Status}} {{.State.Restarting}}'
docker compose logs --tail=100 portainer
The state should remain running, and the log should not show a repeated startup failure. A normal start followed by repeated exits usually points to storage permissions, incompatible image architecture, corrupted application data, a port conflict or an unsupported upgrade path.
Check the loopback listener
ss -lnt | grep 9443
Confirm the host listener is associated with 127.0.0.1:9443, not 0.0.0.0:9443 or a LAN address. Docker's implementation can affect how listener information is displayed, so also test from another LAN device if you need to prove that the port is not directly reachable.
Check the local HTTPS response
curl -k -sS -o /dev/null -w '%{http_code}\n' https://127.0.0.1:9443/
The -k option is used only for this local diagnostic because the initial certificate may not be trusted. A returned HTTP status confirms that an HTTPS service responded. It does not prove that authentication, certificate validation or every Portainer operation works.
Verify application behavior
- Sign out and confirm that protected pages require authentication.
- Sign back in using the intended administrator account.
- Confirm that the displayed Docker endpoint is the correct host.
- Compare the containers shown in Portainer with
docker ps. - Open logs for a non-sensitive test container and confirm the expected output appears.
- Avoid testing destructive actions against production workloads.
An uninitialized management interface can allow the first visitor to establish administrative control. Complete setup locally, test sign-out behavior and confirm the account works before making the TCP endpoint reachable.
Create and verify a Localtonet TCP tunnel
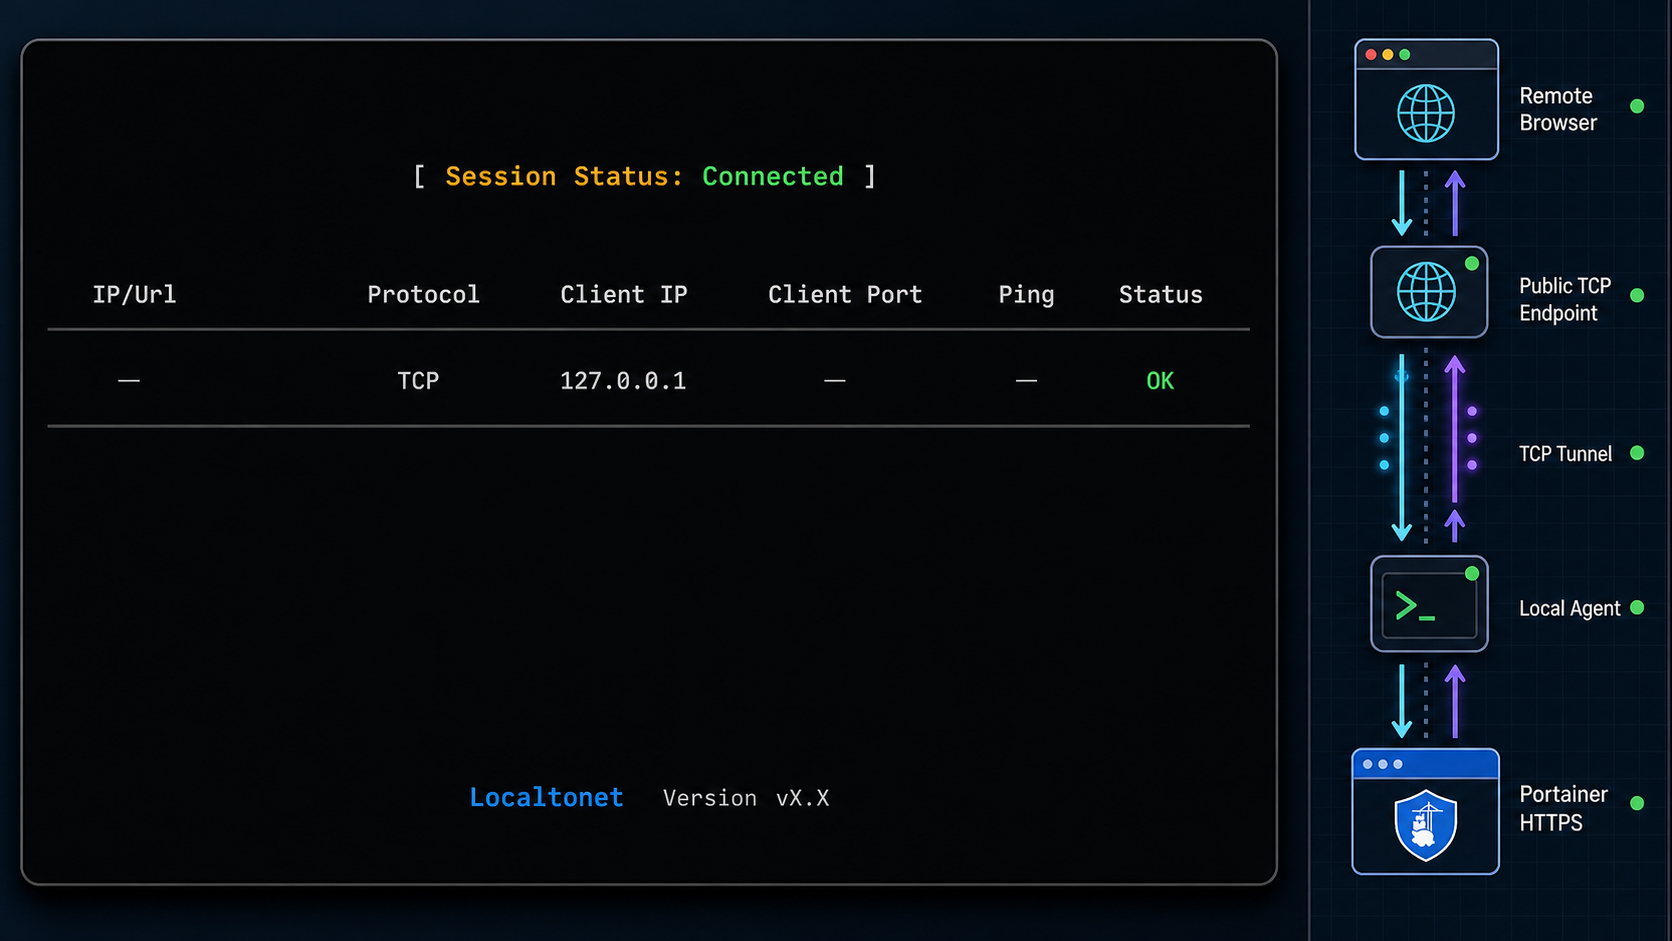
With Localtonet, the client on your host establishes an outbound connection to our relay server. You do not need to open an inbound router port, change the host firewall for public ingress or obtain a public IP address. The tunnel is available only while the selected client is connected and the tunnel is running.
This tutorial uses a raw TCP tunnel targeting 127.0.0.1:9443. TCP forwarding is appropriate when you want Portainer itself to remain the HTTPS server. That choice does not automatically produce a publicly trusted certificate. It forwards the TLS stream, including Portainer's certificate, to the remote browser.
A TCP tunnel forwards bytes to Portainer's HTTPS listener, so Portainer terminates TLS. An HTTP tunnel normally provides an HTTP-facing public address where TLS can terminate at the tunnel edge. Safely targeting an HTTPS upstream requires verified support for the upstream protocol, certificate validation and hostname behavior. Because those details are not established for this configuration, this guide does not point an HTTP tunnel at Portainer's self-signed HTTPS port.
Install the current Localtonet client
Install the current Localtonet application for the host operating system using the instructions available in the Localtonet documentation. This article intentionally does not include an unverified shell installer or service command. Run the client on the Docker host so it can reach the loopback-only Portainer listener.
Select the correct device AuthToken
In the Localtonet dashboard, select the device-specific AuthToken associated with the client running on this host. Treat the token as a secret. Do not paste it into a Compose file, screenshot, support post or article.
Select an available relay server
Choose a server or region currently offered in your dashboard. Available values can vary, so do not copy a hardcoded server code from another deployment.
Configure the TCP target
Create a TCP tunnel whose local target is IP address 127.0.0.1 and port 9443. This works when the Localtonet client runs directly on the Docker host. If the client runs in another container, its own loopback address is not the Docker host, so use a deliberately designed container network or host-reachable address instead.
Create the tunnel
Save or create the tunnel configuration. Creation stores the configuration but does not make the tunnel run.
Press Start
Start the tunnel from the dashboard and confirm that both the selected device and tunnel show a connected state. Record the assigned public host and port displayed for this running tunnel.
Verify the assigned endpoint
From a separate network, open the assigned host and port using HTTPS. Verify that the certificate presented is the one you expect Portainer to serve, then confirm that the login screen loads and authentication succeeds. Do not assume a sample hostname or port from another tunnel will apply to yours.
Stop or delete the tunnel when it is not needed
Press Stop to make a retained tunnel configuration unavailable. Delete the tunnel when you no longer need the configuration. Also confirm that the public endpoint no longer connects.
Do not assume that an assigned relay address will remain unchanged across a stop, restart, device reboot or plan change. Address persistence depends on the tunnel configuration and current product behavior. Always read the endpoint shown for the running tunnel, and verify any stability requirement before distributing the address.
Custom domains and certificates
Localtonet supports custom-domain workflows for tunnel types described in our current product guidance. However, a custom domain does not by itself change which component terminates TLS in a raw TCP design. If TCP forwarding reaches Portainer's HTTPS listener, the browser still evaluates Portainer's certificate. A trusted result therefore requires Portainer to present a certificate valid for the hostname the browser uses, together with a safe certificate-renewal process.
An HTTP custom-domain tunnel is a different architecture because TLS can terminate at the tunnel edge. Do not simply redirect that tunnel to Portainer's self-signed HTTPS listener unless the current HTTP tunnel configuration explicitly supports HTTPS upstreams and you have verified certificate validation, upstream hostname and TLS termination behavior. The Localtonet custom-domain guide explains the current domain onboarding workflow, but application-specific upstream security still needs a deliberate design.
Harden Portainer and remote access
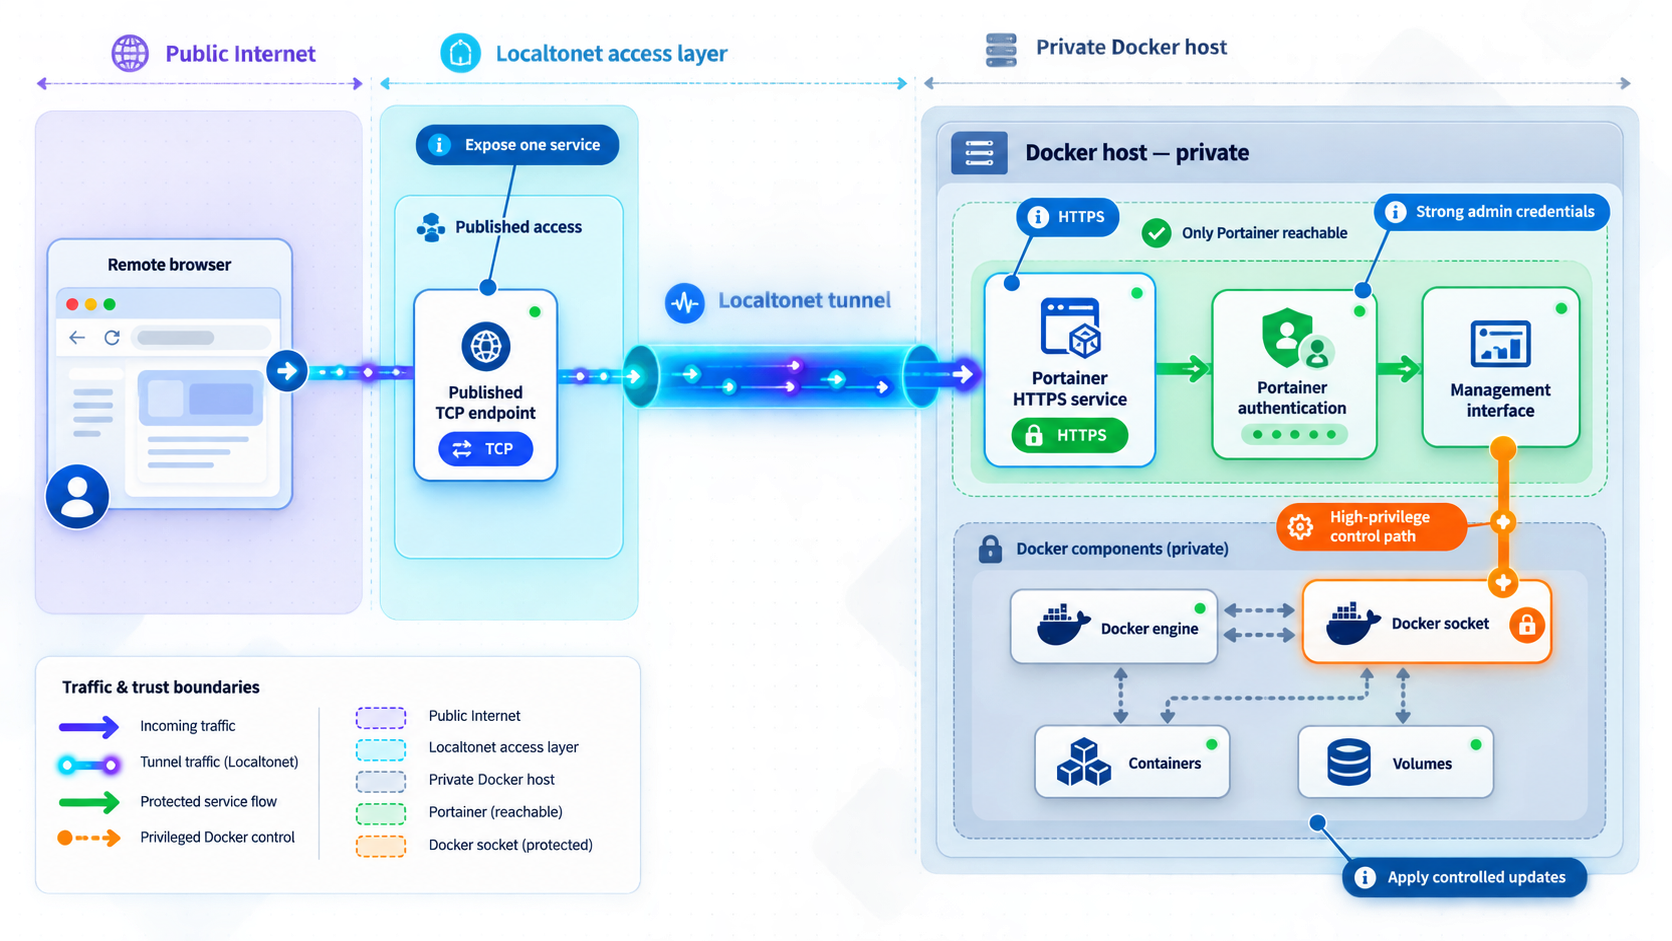
A tunnel solves reachability. It does not replace authentication, authorization, patch management or incident response. The safest deployment is one in which Portainer is reachable by as few people as possible, for as little time as practical, and where compromise does not destroy the only available recovery path.
Access-control checklist
- Do not share administrator credentials.
- Use individual accounts and least privilege only where the current Portainer edition supports the controls you require.
- Enable supported multi-factor or external authentication options only after checking their availability and recovery behavior for your edition.
- Keep the host clock accurate because authentication, certificates and logs depend on correct time.
- Do not expose browser sessions on shared or unmanaged devices.
- Sign out after administration and revoke accounts promptly when access is no longer required.
- Keep the Localtonet device token secret and rotate it through supported account controls if exposure is suspected.
- Use additional network or identity restrictions where they are available and verified for your current configuration.
Portainer Agent considerations
Portainer can manage additional environments through supported connection methods, including agent-based designs. Do not expose an agent listener casually or assume that a port number and deployment copied from an old tutorial remain correct. Agent and server versions, network reachability, trust relationships and firewall rules must follow the current Portainer documentation.
Connecting another Docker host expands the impact of a compromised Portainer account. Review whether the central instance needs administrative control of that environment, isolate management traffic, keep server and agent versions compatible, and preserve an independent recovery path on every managed host.
Routine operation, shutdown and controlled updates
Daily health checks
Use Docker directly when checking whether the management plane itself is healthy:
cd "$HOME/portainer"
docker compose ps
docker compose logs --since=30m portainer
curl -k -sS -o /dev/null -w '%{http_code}\n' https://127.0.0.1:9443/
Also verify that the Localtonet client is connected, the intended device token is selected and the tunnel is running only when needed. Creating a tunnel is not proof that it is active. Test the public endpoint from outside the host network, then stop the tunnel after the maintenance session.
Stop and start Portainer
cd "$HOME/portainer"
docker compose stop
docker compose start
Because the Compose file uses restart: unless-stopped, Docker can restart Portainer after an unexpected process exit or daemon restart, while preserving an intentional stopped state according to Docker's restart-policy behavior. This setting does not guarantee that Docker itself starts at boot, that the Localtonet client starts, or that the public endpoint remains unchanged.
To remove the container and network while retaining the named data volume:
docker compose down
Commands that remove Compose volumes can delete the portainer_data volume. That volume contains Portainer's persistent application data. Confirm that a tested backup exists before any destructive cleanup.
Use a controlled update process
- Identify the exact currently running Portainer version and image reference.
- Read the target release notes and supported upgrade path.
- Confirm Docker version, host architecture and agent compatibility.
- Back up the Portainer data volume and record the current Compose file.
- Test the target release against a restored copy in a non-production environment where practical.
- Change the Compose image reference to the exact approved version or digest.
- Pull the approved image and recreate only the Portainer service.
- Inspect logs, sign in, verify environments and test a non-destructive operation.
- Keep the previous image and backup until the validation period is complete.
After updating the pinned image reference in compose.yaml, apply it with:
docker compose config
docker compose pull portainer
docker compose up -d portainer
docker compose ps
docker compose logs --tail=100 portainer
Do not use an unattended pull-and-recreate job for this management service unless you have separately designed compatibility testing, monitoring and rollback. A newer application version may migrate stored data. Replacing the image with an older one after such a migration may not be a valid rollback.
Backup, restore and rollback preparation
The named portainer_data volume persists Portainer configuration independently of the container. Persistent storage reduces accidental data loss during container recreation, but it is not a backup. Deletion, filesystem corruption, a failed migration or hostile administrative activity can affect the volume.
Prepare a consistent backup
- Record the Portainer image version or digest, Compose file, Docker version and host architecture.
- Stop remote access by stopping the Localtonet tunnel.
- Stop the Portainer container to avoid copying application data while it is changing.
- Back up the entire
portainer_datavolume using your approved Docker-volume, filesystem snapshot or infrastructure backup procedure. - Encrypt and restrict the backup because it can contain sensitive management configuration.
- Start Portainer, inspect logs and verify local login.
- Test restoration on an isolated host before treating the backup as usable.
Confirm the volume name and inspect its metadata:
docker volume ls
docker volume inspect portainer_data
Avoid editing files inside the volume manually. A backup should preserve ownership, permissions, timestamps and all application data. If your backup platform snapshots the Docker data directory, use its documented consistency process rather than copying a live database file ad hoc.
Restore safely
Restoration should use a Portainer release compatible with the backed-up data. Start with an isolated host or isolated Docker environment, create an empty destination volume, restore the complete backup while Portainer is stopped, then launch the recorded image version. Review logs before exposing the restored interface.
Validate the administrator login, connected environments, endpoint identities and expected configuration. Do not assume that credentials, agent connections, certificates or external identity integrations will work merely because the container starts. After validation, rotate sensitive credentials if the restoration was prompted by a security incident.
Plan rollback before upgrading
A useful rollback plan includes the previous Compose file, previous image reference, a pre-upgrade volume backup and written restoration steps. Keeping the old image alone is insufficient because the new release may alter persistent data. If validation fails, stop the tunnel first, collect logs, stop Portainer and follow the documented restoration process for the backup rather than repeatedly switching image tags against an already migrated volume.
Keep direct shell, console or infrastructure-provider access to the Docker host. If Portainer cannot start, its web terminal and controls cannot repair it. Test that independent access before an upgrade or remote maintenance window.
Troubleshooting common failures
The initial setup page timed out
Keep the Localtonet tunnel stopped and confirm port 9443 is still loopback-only. Restart Portainer, watch the logs and complete initial account setup immediately:
docker compose restart portainer
docker compose logs -f portainer
If previously initialized data exists but the page behaves like a fresh installation, stop and investigate before creating another administrator. Confirm the intended portainer_data volume is mounted and that you did not launch a second Compose project with a different volume.
The browser displays a certificate warning
On local access, the initial Portainer certificate may be self-signed or may not match 127.0.0.1. Through a TCP tunnel, the browser still receives the certificate served by Portainer. A warning is therefore not fixed merely by forwarding the connection through a public host.
Confirm the hostname, certificate fingerprint and expected endpoint before proceeding. For recurring remote use, configure a trusted certificate and hostname using Portainer's current documented certificate process, or choose a separately verified HTTP termination design. Do not normalize bypassing warnings on an administrative endpoint.
Localtonet cannot reach 127.0.0.1:9443
- Run the local
curltest on the same host and execution context as the Localtonet client. - Confirm Portainer is running and the loopback listener exists.
- Confirm the tunnel target is TCP, IP
127.0.0.1and port9443. - If Localtonet runs in a container or virtual machine, remember that its
127.0.0.1refers to that container or virtual machine, not automatically to the Docker host. - Check host security controls and local firewall rules without disabling them broadly.
The tunnel was created but the endpoint does not connect
A created tunnel is not automatically running. Confirm that the selected Localtonet device is connected, the correct device-specific AuthToken is selected, an available server is configured and the tunnel has been started. Read the assigned host and port from the currently running tunnel rather than using a remembered address.
If the tunnel will not start, verify that the Localtonet client remains online and that the device can make outbound connections. Stop and start the tunnel after correcting the local target. If you recreate it, expect that the assigned endpoint may differ.
Portainer cannot access the Docker socket
Inspect the mount and socket without weakening permissions:
docker inspect portainer --format '{{json .Mounts}}'
ls -l /var/run/docker.sock
docker info
docker compose logs --tail=200 portainer
Confirm the host actually uses the socket path in the Compose file. Rootless Docker, Docker Desktop and alternative runtimes can use different endpoints and require a different supported installation method. Do not solve the problem with chmod 666 /var/run/docker.sock.
The Portainer container is restarting repeatedly
docker compose ps
docker inspect portainer --format '{{.State.ExitCode}} {{.State.Error}}'
docker compose logs --tail=300 portainer
Check for a port conflict, unsupported CPU architecture, incompatible Docker release, failed data migration, read-only storage, full disk or damaged application data. Do not delete the volume as a first troubleshooting step. Stop the tunnel, preserve logs and volume backups, then compare the running and target versions with the supported upgrade path.
Port 9443 is already in use
ss -lntp | grep 9443
docker ps --format 'table {{.Names}}\t{{.Ports}}'
Identify the existing service before changing anything. You can choose another loopback host port while retaining Portainer's internal port:
ports:
  - "127.0.0.1:19443:9443"
If you make that change, update the local verification URL and Localtonet target port to 19443. Portainer still listens on port 9443 inside its container.
Frequently asked questions
Is mounting the Docker socket into Portainer safe?
It is powerful rather than inherently low-risk. The socket allows extensive Docker Engine control, which can generally be used to obtain host-level control. Protect Portainer as a host administration service, restrict access, patch it promptly and maintain recovery access outside Portainer.
Why does this guide use the LTS image instead of STS?
STS is a short-term support channel and should be chosen only when its lifecycle and compatibility implications fit your update policy. The LTS channel is the standard long-lived starting point. For repeatable operations, test and pin the exact approved Portainer version or digest rather than relying indefinitely on a moving channel tag.
Does a Localtonet TCP tunnel remove Portainer's certificate warning?
No. A raw TCP tunnel forwards Portainer's TLS connection, so the browser evaluates the certificate presented by Portainer. To avoid warnings, Portainer must present a trusted certificate valid for the hostname in use, or you must deploy a separately verified TLS-termination architecture.
Will the Localtonet endpoint remain the same after a reboot?
Do not assume that it will. Endpoint persistence can vary by tunnel configuration, lifecycle and plan. Confirm the address displayed for the running tunnel and verify current persistence behavior before sharing it as a permanent administration address.
Can Portainer CE provide read-only users, SSO or advanced RBAC?
Authentication and authorization features differ by Portainer edition and release. Do not assume a particular read-only, SSO, LDAP, RBAC or audit capability is included in CE. Review the current Portainer edition and licensing documentation against your access-control requirements.
Can I run this deployment on a Raspberry Pi?
Only if the exact Portainer release supports the Pi's operating system and CPU architecture. Check uname -m and Portainer's current platform matrix. Do not assume that 32-bit ARM, every Pi generation or every Raspberry Pi OS release is supported. A supported 64-bit ARM environment must still meet Docker and Portainer compatibility requirements.
Will deleting and recreating the Portainer container erase its configuration?
Recreating the container normally preserves data when the same named portainer_data volume is retained and mounted. Removing or replacing the volume can erase that data. A persistent volume is not a backup, so create and test an independent backup before upgrades or destructive maintenance.
Do I need to leave the Portainer tunnel running continuously?
No. Portainer can continue managing the local Docker environment while its public tunnel is stopped. For occasional administration, start the Localtonet tunnel when needed, verify the endpoint, complete the maintenance session and stop the tunnel afterward.
Connect your loopback-only Portainer service with Localtonet
After installing Portainer from the command line, completing local setup and preparing a recovery path, create a Localtonet TCP tunnel for the host's loopback listener. Start it only when remote administration is required, verify the assigned endpoint and stop or delete it when the session is complete.
Get Started with Localtonet →

