

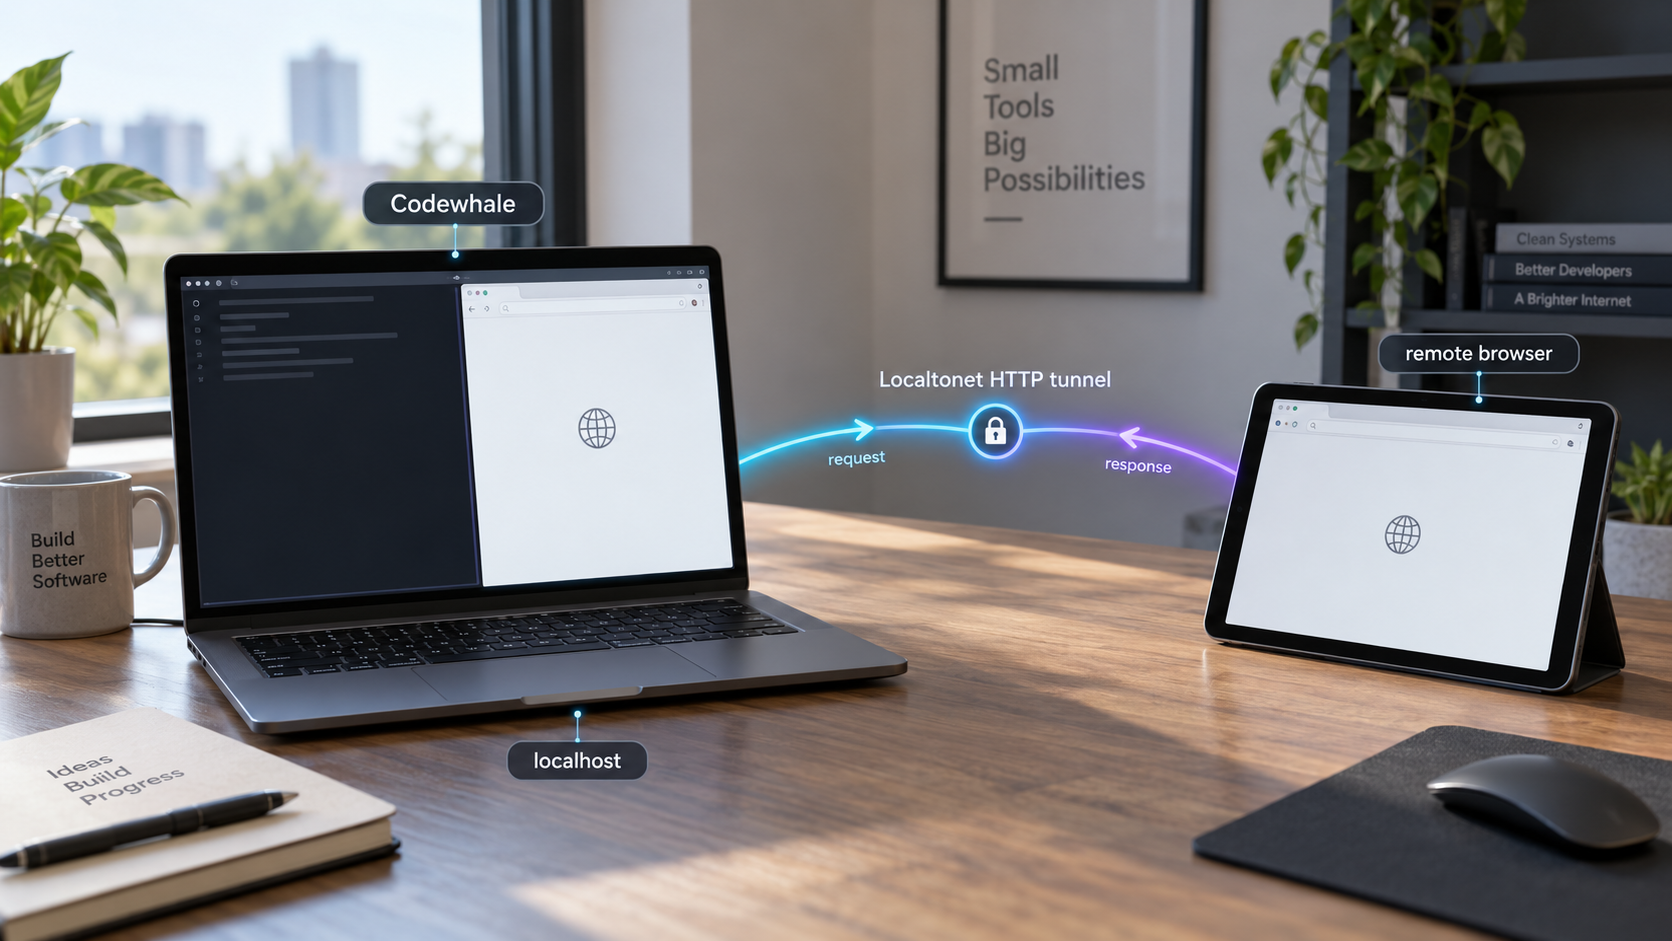
Run Codewhale’s browser client locally, verify it, and expose only the endpoint you intend to use
Codewhale is an open-source coding agent that can inspect projects, edit files, run commands, and verify its work using a model provider or local inference runtime. This guide installs the official npm package, checks the command-line client, configures a model connection, starts the bundled browser client, and verifies the service locally before introducing remote access. Once the local client is working, we explain how to connect its loopback HTTP endpoint to a Localtonet HTTP tunnel without guessing Codewhale’s dynamically reported port. Because a coding agent can hold powerful access to your workstation and source tree, the guide also treats authentication, permissions, process lifetime, and exposure risk as essential parts of the setup.
📋 What's in this guide
What this Codewhale and Localtonet workflow does
Codewhale is primarily a local developer tool rather than a conventional public web application. Its interactive terminal interface runs with the codewhale command, while codewhale web starts a bundled browser client bound to 127.0.0.1. The project also documents a local HTTP Runtime API for threads, events, and approvals, but the available evidence does not establish an exact Runtime API port or a separate command for starting that API independently.
Binding the browser client to 127.0.0.1 limits direct network access to processes on the same computer. Another device on the LAN normally cannot connect to that loopback address. This is a useful local default, but it means remote access requires a carefully controlled bridge between the local listener and the user who needs it.
With Localtonet, the client application on the Codewhale computer creates an outbound connection to one of our relay servers. An HTTP tunnel can then forward its assigned public HTTPS address to the local IP address and port used by the Codewhale browser client. This does not require inbound router port forwarding, a public IP address, VPN setup, or an inbound firewall change. The public endpoint remains available only while the selected Localtonet device is connected and the tunnel is running.
codewhale npm package wraps the project’s release binaries. It is one of several supported installation methods, alongside the shell installer, winget, Cargo, archives, and other documented routes.
codewhale web starts Codewhale’s bundled browser client on the loopback interface. The exact port must be taken from the running installation rather than assumed.
Keep the two setup phases separate
The safest and easiest-to-debug sequence is to complete the Codewhale setup first. Confirm that the executable works, connect an appropriate model, open a non-sensitive test project, start the browser client, and verify it from the same machine. Only after that local workflow succeeds should you create a Localtonet tunnel.
This separation matters because a tunnel cannot repair an application that failed to install, cannot determine an undocumented application port, and cannot correct a provider or permission problem inside Codewhale. Local verification gives you a known-good target before public connectivity is introduced.
Codewhale can work with files and execute commands using the access granted to its process. Do not treat its browser client like a harmless static website. Before exposing it, confirm what authentication and authorization protections are active in your installed version, restrict the working directory, select a conservative approval posture, and avoid placing secrets or unrelated projects within the agent’s reach. The available project evidence does not establish a built-in authentication control that is safe to assume for arbitrary public exposure.
Prerequisites and decisions to make first
The npm route requires a working Node.js and npm installation. The supplied project evidence does not specify a minimum supported Node.js or npm version, so this guide does not invent one. Use a currently maintained Node.js release that is appropriate for your operating system, then confirm that both executables are available in the terminal where you plan to install Codewhale.
node --version
npm --version
Both commands should return version information rather than a command-not-found error. If either command is missing, install Node.js and npm through the supported method for your operating system before continuing. If your organization manages developer runtimes centrally, follow its approved version and package-management policy.
Choose only one Codewhale installation route
Codewhale supports several installation methods, but its documentation recommends choosing one route per machine. Installing the npm wrapper alongside a shell-installed, Cargo-built, winget-installed, or manually extracted copy can put multiple codewhale executables on the system. Your shell may then run a different executable than the one you intended to update.
This article uses npm throughout. If Codewhale is already installed by another method, identify and remove or deliberately retain that installation before adding the npm package. Do not assume that running the npm install automatically replaces a binary supplied by another package manager.
Prepare a low-risk test project
Codewhale uses the folder from which it is started as the project workspace. For the first run, use a disposable or version-controlled test project without production credentials, private keys, customer data, deployment tokens, or unrelated repositories. This makes it possible to learn the approval and tool behavior without placing valuable data at unnecessary risk.
Decide how Codewhale will reach a model
Codewhale can connect to hosted model providers, OpenAI-compatible endpoints, and local or self-hosted inference systems such as Ollama, vLLM, or SGLang. Provider-specific accounts, keys, model availability, usage charges, and server setup remain the responsibility of the corresponding provider or inference environment.
An account is not required for the terminal and local browser client. Codewhale also documents an account-based route for managing provider keys, but signing in does not upload existing local keys, and local use remains available without an account. If Ollama is already running with a compatible chat model, Codewhale may select it automatically. Otherwise, you can choose a provider interactively after installation.
| Requirement | Why it matters | How to confirm it |
|---|---|---|
| Node.js and npm | The selected installation route uses npm to install the global Codewhale wrapper. | Run node --version and npm --version. |
| A model connection | Codewhale needs a hosted, compatible, local, or self-hosted model to perform agent tasks. | Use the interactive provider and model controls after starting Codewhale. |
| A controlled project folder | The agent’s file and command access affects the workspace from which it is launched. | Start with a disposable or version-controlled test repository. |
| A local browser | The bundled web client must be tested locally before tunneling. | Open the address reported by the running web client on the same computer. |
| Localtonet client access | The client must run on the device that can reach the loopback-bound Codewhale service. | Install and connect our client on the same computer as Codewhale. |
Install Codewhale globally with npm
The npm package is a wrapper around the corresponding Codewhale release binaries. The documented installation command is:
npm install -g codewhale
A global installation makes the codewhale command available outside a specific Node.js project. Wait for npm to finish and review any actual errors it reports. Warnings are not automatically installation failures, but they should still be read rather than ignored.
Confirm Node.js and npm are available
Run node --version and npm --version. Resolve missing-command or runtime-management issues before installing Codewhale.
Install the official npm package globally
Run npm install -g codewhale in your terminal. Avoid installing through several channels on the same machine because competing executables can produce confusing PATH behavior.
Verify the installed executable
Run codewhale --version. A reported Codewhale version confirms that the shell can find and execute the installed command.
Open a controlled project directory
Change into the test project you prepared. Codewhale should be started from the folder you want it to work on, so check the current directory before launching the agent.
Start the terminal client for the first configuration
Run codewhale. Connect a model, review the active mode and approval posture, and use a low-risk task to confirm the local engine works before starting the browser client.
Verify the executable explicitly
codewhale --versionIf the command prints a version, the npm-installed executable is available to the current shell. If it is not found, close and reopen the terminal in case the global binary directory was added to the environment during installation. You should also inspect your npm global configuration and shell PATH instead of repeatedly reinstalling the package.
Avoid immediately using an elevated shell merely to overcome a global npm permission error. The appropriate fix depends on how Node.js was installed and how your operating system manages global package directories. A user-scoped Node.js version manager or correctly configured npm prefix is often safer than changing ownership broadly or installing developer tooling as an administrator, but follow the policy for your system.
The npm package and primary executable use the lowercase identifier codewhale. An older package named deepseek-tui is deprecated and no longer receives releases. Do not install that legacy package for this workflow.
Configure a model and test the terminal workflow
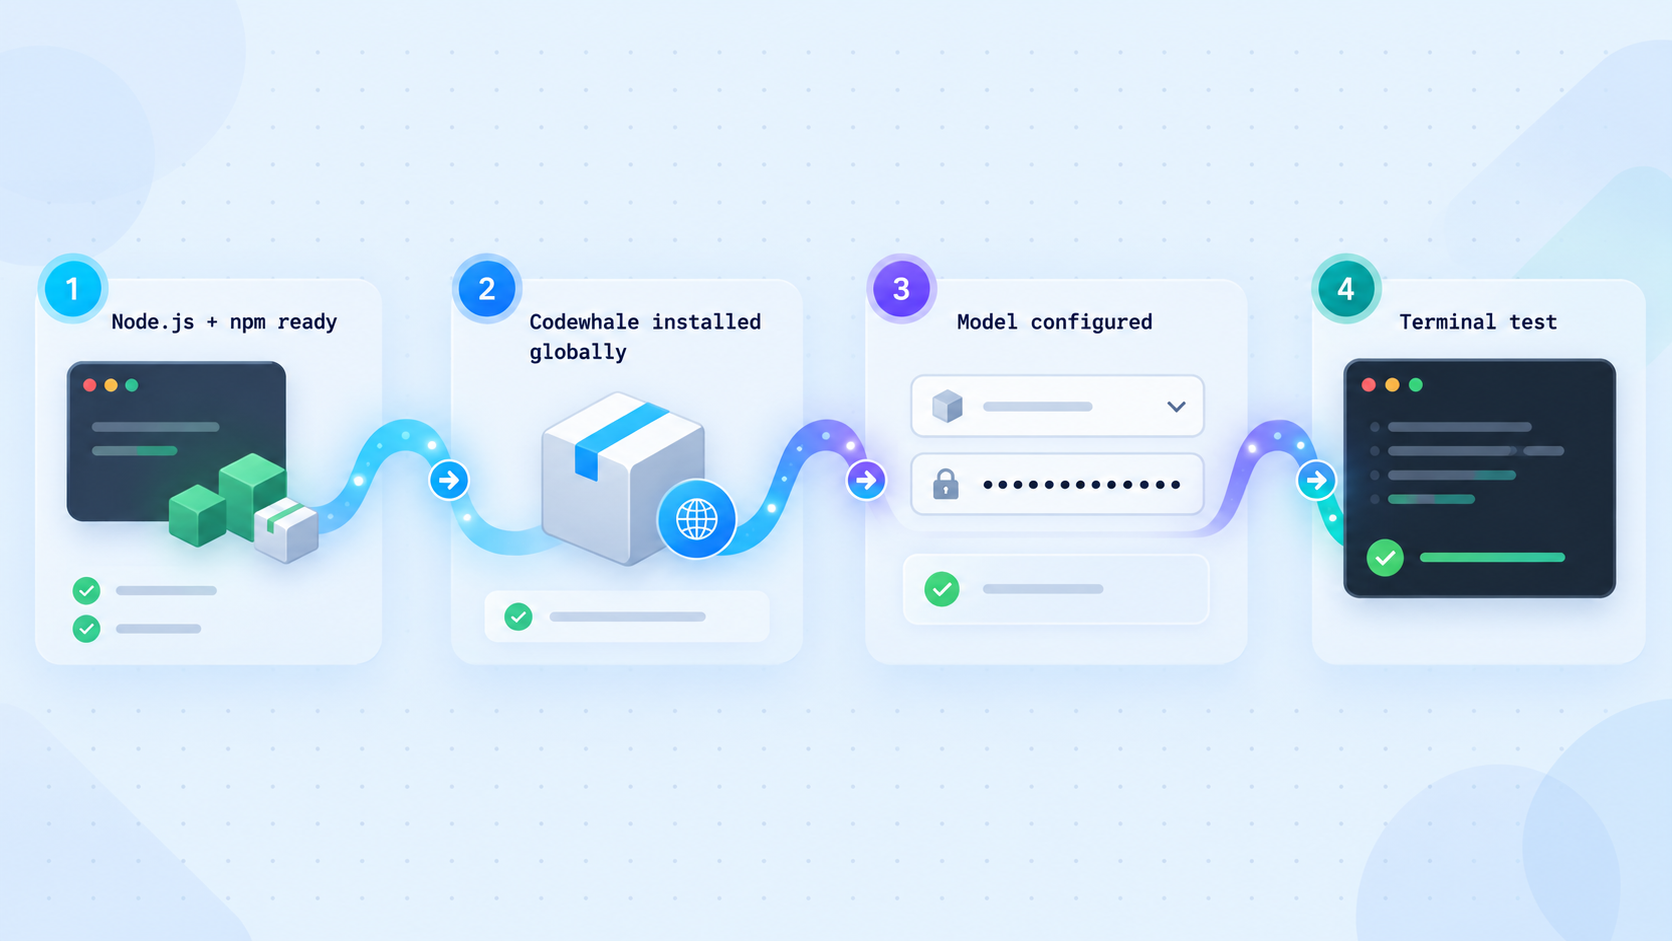
A successful installation only confirms that the executable runs. Codewhale still needs access to a model before it can perform useful work. Start it from the directory that should become the workspace:
codewhale
Inside the interactive terminal interface, run /provider, or use the documented F3 shortcut, to add a hosted provider key or select a local runtime. Use /model when you need to change models. Run /help to view the commands and keyboard shortcuts available in the installed version.
Treat model credentials as secrets. Enter them only through the project’s documented configuration flow, do not put them into the tunnel URL, and do not paste them into screenshots, logs, shell history, source files, or support messages. If you use an OpenAI-compatible or self-hosted endpoint, verify its address and authentication independently.
Understand modes and approval posture
Codewhale documents three modes: Plan, Work, and Operate. Plan is intended for exploration without changes. Work can edit files and run commands. Operate can drive a goal through planned and verified steps. Approval postures determine when the agent asks before using tools, with documented options including Ask, Auto-Review, and Full Access.
For initial testing and especially before remote access, prefer a mode and posture that require meaningful review. Full Access still observes Codewhale’s hard policy boundaries, but it can permit much more autonomous activity than an unfamiliar remote workflow should normally receive. The operating-system sandbox is also platform-dependent: the project documents Seatbelt on macOS and bubblewrap on Linux when bubblewrap is installed and working. A sandbox should be treated as one control, not as a substitute for careful workspace and credential isolation.
Run a harmless first task
Ask Codewhale to inspect the test project or explain a file before requesting changes. Review the proposed actions, approvals, command output, and resulting files. Codewhale provides receipts that record file operations, commands, and approvals, and it includes workspace recovery controls such as /undo and /restore. Learn those controls while the project is still disposable.
This local terminal test confirms several dependencies at once: the selected model is reachable, credentials are accepted, the project directory is correct, tool approvals are visible, and the engine can complete a basic turn. If this phase fails, troubleshoot it before adding the browser client or tunnel.
Start and verify the local Codewhale web client
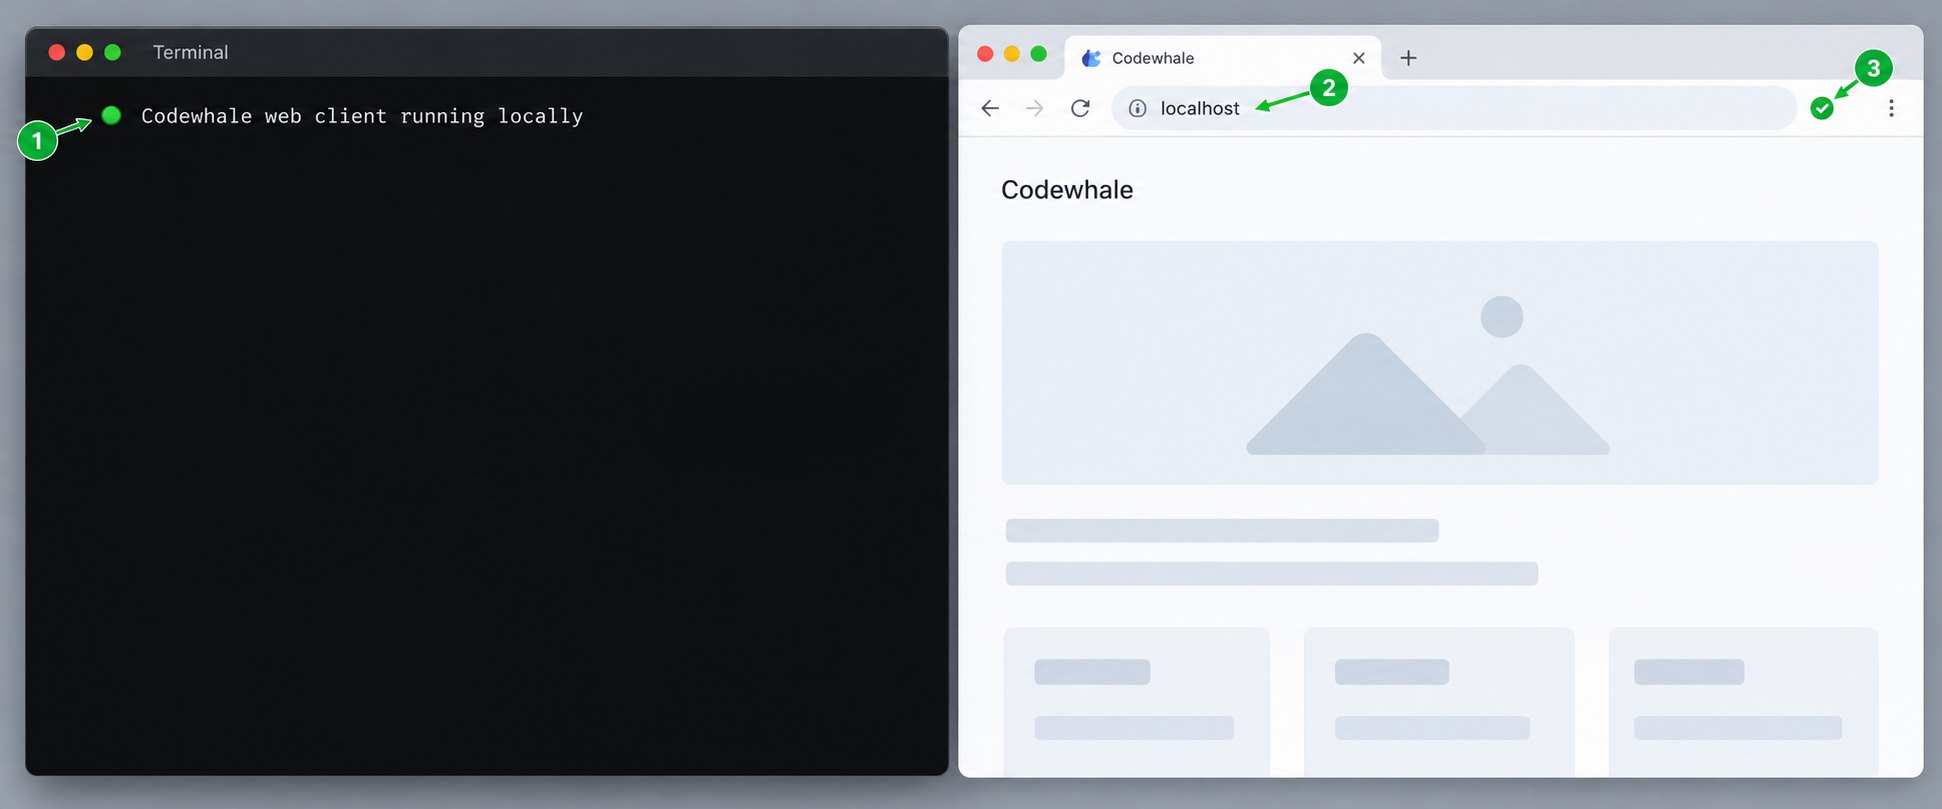
Once the terminal workflow works, start the bundled browser client from the intended project directory:
codewhale web
Codewhale documents this client as listening on 127.0.0.1. Keep the terminal process running while using the browser interface. Closing the process or terminating its terminal session stops the local service, which also leaves a tunnel without a working target.
The verified project material identifies the loopback address but does not establish a fixed port for the browser client. Use the address and port shown by your installed Codewhale process or otherwise confirmed on your machine. Do not copy an arbitrary port from an unofficial tutorial, and do not assume the Runtime API uses the same endpoint.
Perform the local browser check
Open the exact local address associated with the running browser client from a browser on the same computer. The hostname may be represented as 127.0.0.1 or an equivalent loopback form, but the port must match the active process. Confirm that the interface loads and that it connects to the expected project and session.
A complete local verification should cover more than the first page load:
- Confirm the browser client displays the intended workspace rather than another Codewhale session.
- Submit a harmless prompt that does not modify important files.
- Verify that approval requests appear when expected.
- Check that provider or local-model communication still works through the web interface.
- Confirm that stopping
codewhale webmakes the local endpoint unavailable. - Restart the command and verify whether the reported port remains the same before relying on a saved tunnel target.
The last check is important because the evidence does not promise a fixed port across launches. If the port changes, update the Localtonet tunnel’s local target before restarting remote access.
Browser client versus Runtime API
| Interface | Documented purpose | Remote-access guidance |
|---|---|---|
| Terminal client | Interactive use through the codewhale command. |
It is not an HTTP target and should not be entered as one in an HTTP tunnel. |
| Bundled browser client | Local browser access started with codewhale web and bound to 127.0.0.1. |
Use its verified local port as the target when the goal is browser access. |
| Runtime API | Local HTTP API for threads, events, and approvals. | Do not assume its startup command, port, route structure, or authentication. Those details are not established by the supplied evidence. |
This guide tunnels the browser client. If your actual integration requires the Runtime API, obtain its current endpoint and security requirements from the installed Codewhale version’s official documentation before creating a separate tunnel. Never probe or expose unknown agent-control routes merely because they appear to be HTTP services.
Connect the verified web client through Localtonet
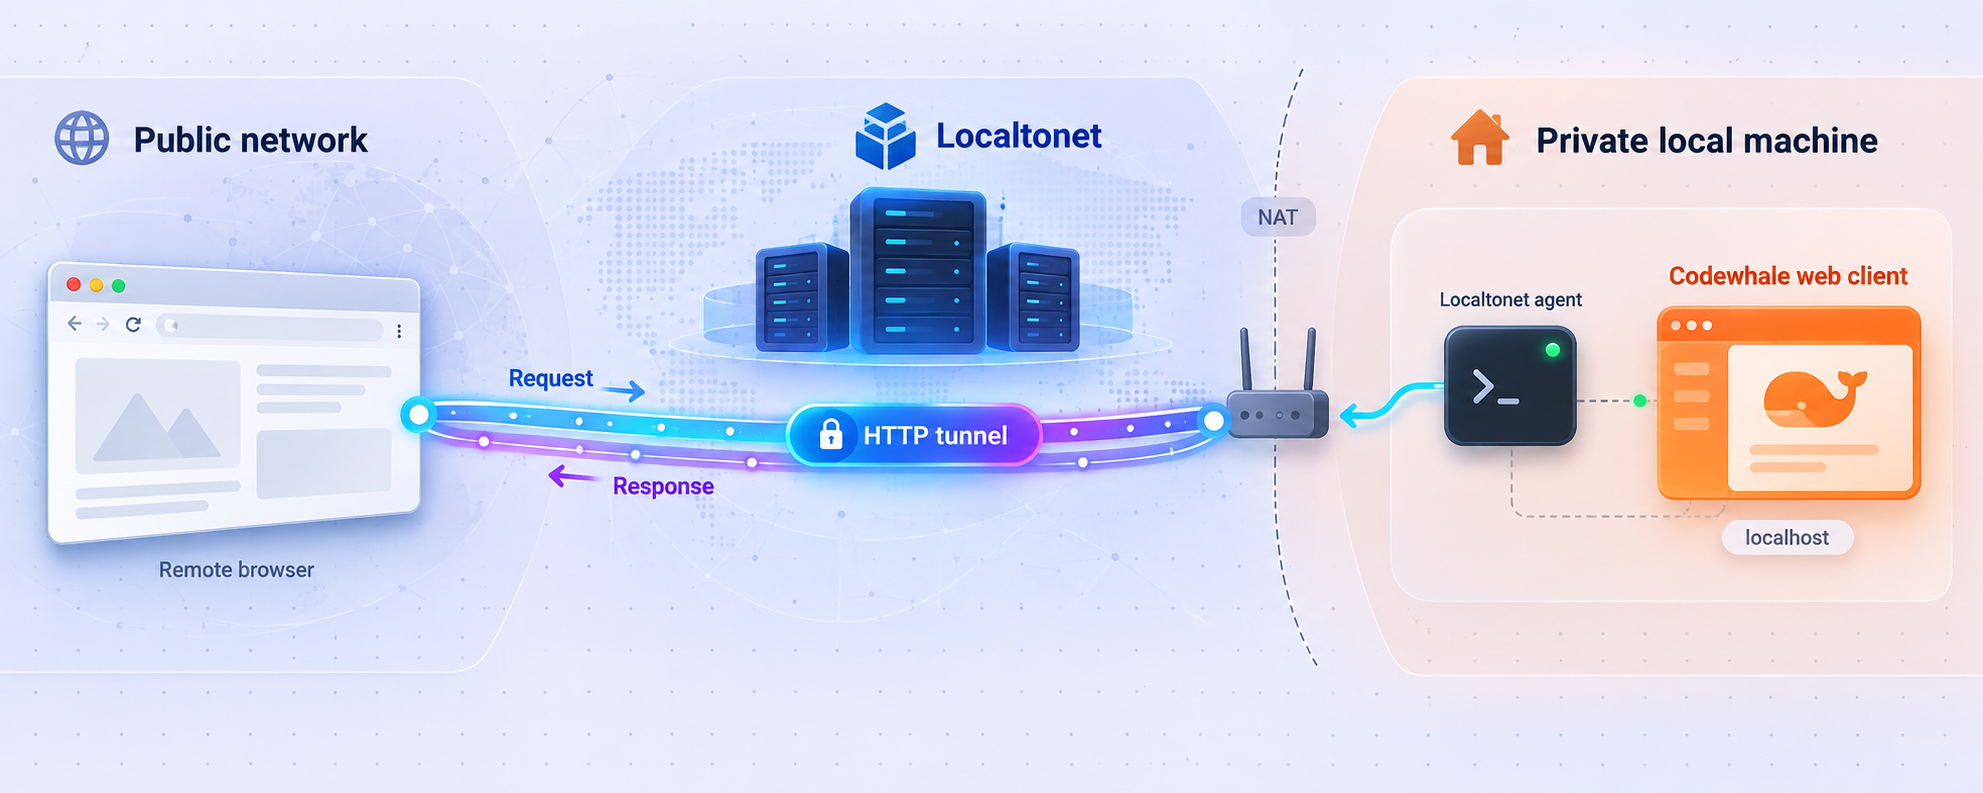
Install and run our client on the same computer as Codewhale. This placement matters because the documented browser listener is bound to 127.0.0.1. A Localtonet client running on another machine cannot normally reach the Codewhale computer’s loopback interface. The project evidence supplied for this guide does not establish a supported Codewhale option for changing that bind address, so this workflow keeps both processes together.
Before configuring the tunnel, record the exact port used by the currently running codewhale web process. Continue only after loading that local endpoint successfully in a browser.
Install and run our client on the Codewhale host
Use the Localtonet application for the host operating system. The device must be able to reach the verified Codewhale listener, which in this workflow means running the client on the same machine.
Authenticate or select the device
Use the device-specific authentication token associated with the client that will run the tunnel. Keep this token private and never paste it into an article, public command transcript, repository, or browser URL.
Select an available relay server
Choose a currently available server or region from the Localtonet product interface. Availability can vary, so do not hardcode a server code taken from another user or an older tutorial.
Create an HTTP tunnel to the local listener
Select the HTTP tunnel family and set the local target to 127.0.0.1 with the exact port verified for the active codewhale web process. Do not use a guessed example port.
Start the tunnel
Creating a tunnel does not start it. Use the Start control, then confirm that both the selected Localtonet device and tunnel are connected. Keep the Codewhale browser process running.
Test the assigned public HTTPS address
Open the assigned public URL from the intended remote device. Confirm that it reaches the same Codewhale workspace, then stop the tunnel immediately if authentication, authorization, session isolation, or application behavior is not what you expected.
HTTP tunnels can use a generated subdomain, a selected subdomain where supported, or a custom domain. These process types serve the same content at a public HTTPS address. Custom-domain DNS requirements can change, so check the current product documentation before changing DNS records rather than relying on an assumed configuration.
For the current dashboard workflow and available options, consult our Localtonet HTTP tunnel documentation. Exact servers, regions, options, and plan availability should always be confirmed in the current dashboard.
A saved tunnel configuration is not necessarily running. The Codewhale endpoint is remotely reachable only while codewhale web is active, our selected client is connected, and the tunnel has been started. You can stop the tunnel without deleting its configuration, or delete it when the remote-access workflow is no longer needed.
Security controls for remotely accessible coding agents
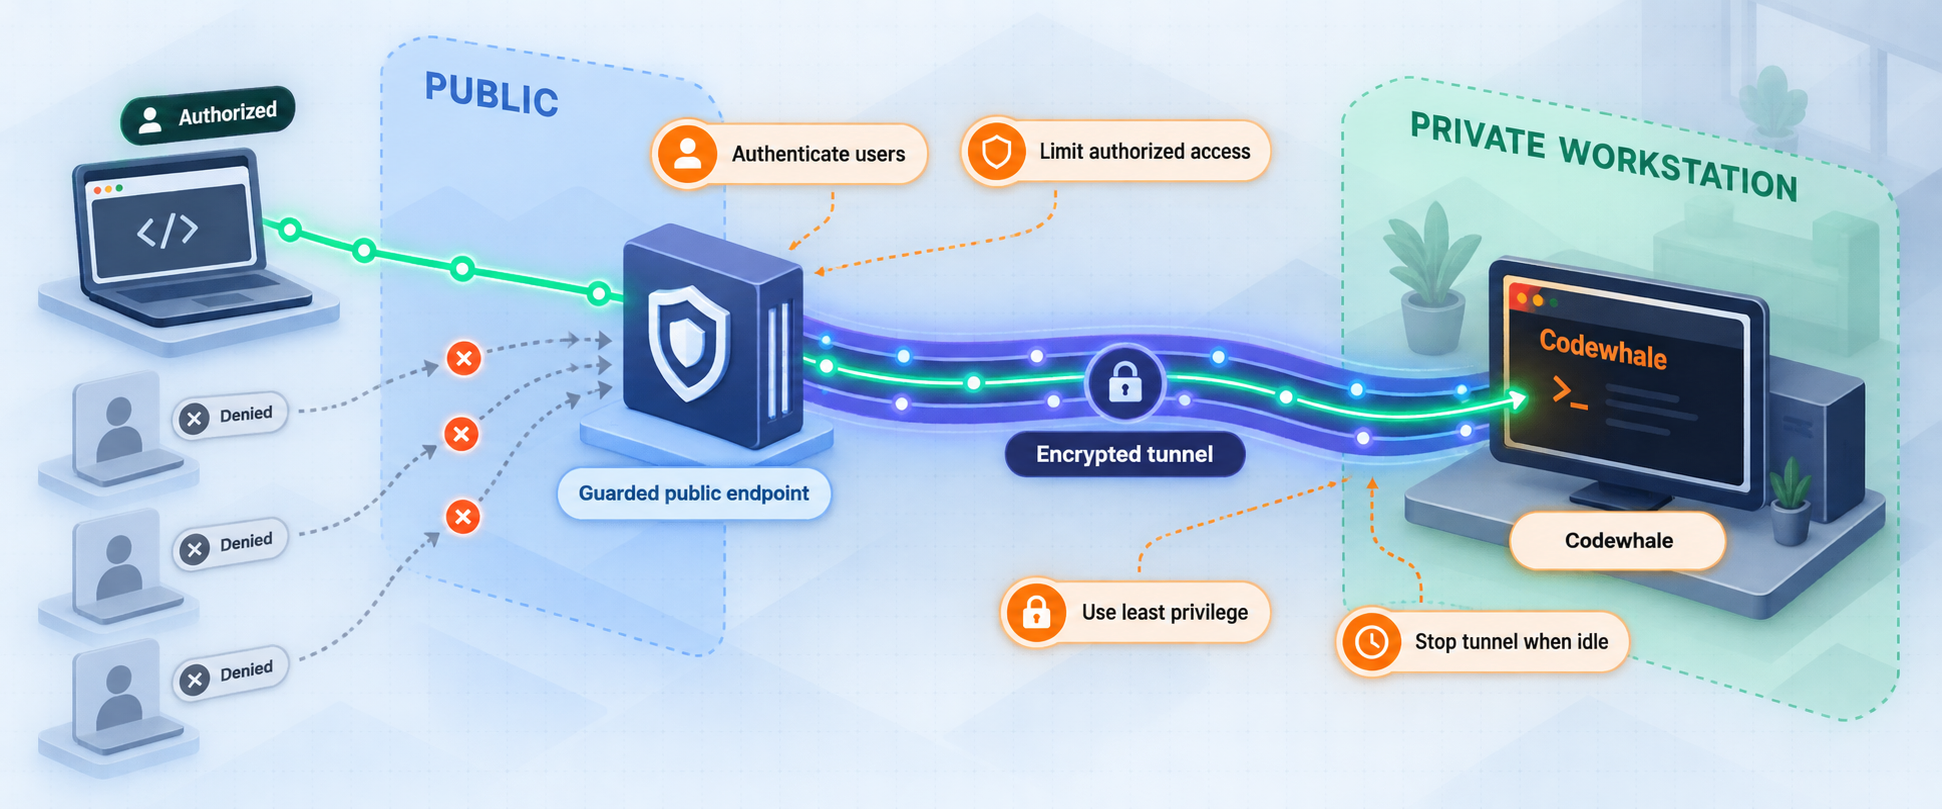
A public URL changes the threat model even when the underlying application remains bound to loopback. The relay forwards requests to the local service, so the remote endpoint should be treated as internet-facing for as long as the tunnel runs. The fact that no router port was opened does not make the exposed application safe by itself.
Verify application authentication before exposure
The evidence available for this tutorial does not establish what authentication or authorization protection, if any, guards the locally served Codewhale browser client in every supported version and configuration. We therefore cannot claim that starting codewhale web creates a safely authenticated public application.
Before starting the tunnel, inspect the behavior of the installed version. Determine whether a new browser session can access the workspace without signing in, whether an existing local session is reused, whether approvals can be accepted remotely, and whether sensitive conversation or project history is visible. If you cannot establish an appropriate access-control boundary, keep the service local.
Limit operating-system and workspace access
Run Codewhale under a user account with only the files and commands required for the task. Avoid launching it from a home directory, filesystem root, shared production checkout, or folder that contains unrelated repositories. A narrow project directory is easier to understand, review, back up, and restore.
Remove unnecessary credentials from the process environment and workspace. This includes cloud keys, package registry tokens, deployment secrets, SSH private keys, database credentials, signing material, and production configuration files. Repository ignore rules prevent files from being committed, but they do not necessarily prevent a locally running tool from reading those files.
Use conservative agent permissions
Start with Plan or another restrictive workflow while validating remote behavior. Require approval for tool calls that edit files, execute shell commands, connect external services, or affect other applications. Review the exact action rather than approving requests reflexively.
Codewhale’s Computer Use plugin can observe and operate other applications when enabled. Review its access before use and leave it disabled if it is not essential. The same principle applies to plugins, MCP servers, hooks, skills, and other connected tools. Each connection introduces its own setup, credentials, capabilities, and trust boundary.
Use short exposure windows
Start the tunnel only when remote access is needed. Stop it after the session, and stop codewhale web if the browser client is no longer in use. Short-lived access reduces accidental exposure and limits the period during which stale sessions or overlooked configuration problems can be reached.
Keep secrets out of tunnel configuration
A Localtonet device token identifies the client device and must remain private. Model provider keys and application credentials are also secrets. None of these values should be embedded in a public hostname, query string, screenshot, copied log, or shared tunnel description.
If the public URL allows a fresh, unauthenticated session to read the project, submit prompts, approve actions, edit files, or run commands, stop the tunnel. Do not compensate by relying on an obscure URL. Keep Codewhale local until you can place the deployment behind controls appropriate to the authority granted to the agent.
Routine operation, updates, and troubleshooting
A safe startup sequence
Repeat the same order each time so that failures remain easy to isolate:
- Open the intended project directory and confirm it contains no newly introduced secrets.
- Start Codewhale locally and verify the selected model, mode, and approval posture.
- Run
codewhale weband note the active local address and port. - Open the local browser client and perform a harmless test.
- Confirm the Localtonet tunnel target still matches the active port.
- Start the tunnel and test the public URL from the intended remote device.
- Stop the tunnel when the remote session is complete.
Updating Codewhale
Codewhale documents the following update command:
codewhale update
Because this guide uses npm packaging, also keep your package-management method in mind and avoid creating a second installation through another channel during an upgrade. After an update, verify the executable again, review release behavior relevant to permissions and the browser client, restart codewhale web, and confirm the local port before starting the tunnel.
The codewhale command is not found
First close and reopen the terminal, then run npm --version to confirm the same shell can find npm. Check where npm places global executables and whether that directory appears in your PATH. Also check whether a different Codewhale installation is shadowing the npm-installed command.
Do not repeatedly install the package through npm, Cargo, a shell installer, and manual archives. Multiple copies make troubleshooting harder because the command you execute may not correspond to the package you just updated.
The terminal client starts but cannot use a model
Open the provider selection with /provider and verify that the intended route is configured. Use /model to choose an available model. For hosted providers, confirm that the credential is valid and permitted to access that model. For local or self-hosted inference, verify the inference service independently before diagnosing Codewhale.
The web client does not load locally
Confirm that codewhale web is still running and inspect its current output. Use the exact active address instead of a remembered port. Make sure the browser is running on the same machine because 127.0.0.1 is local to each device. If the process reports an error, resolve that error before changing the tunnel.
The public URL returns an error
Test the Codewhale endpoint locally first. If local access fails, restart or repair Codewhale. If local access works, confirm that the Localtonet client is connected, the HTTP tunnel has been started, and its target uses 127.0.0.1 with the current Codewhale port. A tunnel created earlier may still point to an old port after Codewhale restarts.
The public page loads but behaves differently
Browser clients can depend on multiple HTTP interactions, persistent event streams, or session state. The supplied evidence does not define every transport used by Codewhale’s browser client, so avoid making assumptions about a specific route or protocol upgrade. Compare local and remote browser behavior, inspect Codewhale’s own visible errors, and verify that both tests use the same running process and workspace.
If a login, approval, event, or session feature behaves unexpectedly, stop public access while investigating. A partially working agent interface is not safe to leave exposed merely because its landing page loads.
The tunnel is connected but Codewhale stops responding later
Check whether the codewhale web process exited, the host went to sleep, the local port changed after a restart, or the Localtonet client disconnected. The tunnel depends on all parts of the chain: remote browser, assigned public address, running tunnel, connected client, active local listener, Codewhale engine, and model route.
| Symptom | Likely area | Next safe check |
|---|---|---|
codewhale is not found |
npm global installation or PATH | Confirm npm works, reopen the shell, and inspect global executable resolution. |
| Agent cannot complete a prompt | Provider, model, credential, or inference runtime | Use /provider and /model, then test the selected backend. |
| Local browser address fails | Codewhale web process or incorrect port | Check the active process and use its current local endpoint. |
| Local works but public URL fails | Localtonet client, tunnel state, or target mismatch | Confirm the client is connected, start the tunnel, and compare its target with the active port. |
| Unknown users can access the agent | Insufficient application access control | Stop the tunnel immediately and keep the service local until proper controls are verified. |
Frequently asked questions
What is the npm command for installing Codewhale?
Run npm install -g codewhale. This globally installs the official npm wrapper around the corresponding Codewhale release binaries. Verify it afterward with codewhale --version.
Which command starts the Codewhale browser client?
Run codewhale web from the project directory you want Codewhale to use. The browser client is documented as binding to 127.0.0.1. Keep the command running while using the interface.
What port does Codewhale web use?
The verified evidence for this guide does not establish a fixed port. Use the exact port reported or otherwise confirmed by your running installation. Test that endpoint locally before entering it into a Localtonet tunnel, and recheck it after restarting Codewhale.
Should the Localtonet client run on the same computer as Codewhale?
Yes, for the documented loopback workflow. Codewhale’s browser client binds to 127.0.0.1, which refers only to the machine on which it is running. Running our client on that same computer lets the HTTP tunnel target the loopback listener directly.
Does creating a Localtonet tunnel make it active immediately?
No. Creating a tunnel and running it are separate lifecycle actions. After creating the HTTP configuration, use the Start control. The selected Localtonet client must also remain connected, and codewhale web must remain active.
Is Codewhale safe to expose publicly without additional checks?
That should not be assumed. Codewhale can read files, edit projects, run commands, and interact with connected tools according to its permissions. The available evidence does not establish an authentication configuration that can be assumed safe for arbitrary public exposure. Verify access control in the installed version, restrict the workspace and process account, use conservative approvals, and stop the tunnel if an unauthorized browser can control the agent.
Can I expose the Codewhale Runtime API instead of the browser client?
Codewhale documents a local HTTP Runtime API for threads, events, and approvals, but the evidence supplied for this article does not establish its exact port, an independent startup command, route details, or authentication protections. Obtain those details from the current official project documentation and verify the API locally before considering a separate tunnel.
Do I need a Codewhale account to use the terminal or local browser client?
No. The project states that the terminal and local browser client do not require a Codewhale account. You still need an appropriate model connection, such as a hosted provider, an OpenAI-compatible endpoint, or supported local or self-hosted inference.
Connect your verified Codewhale web client with Localtonet
First confirm Codewhale works on its local loopback address, record the active port, and review the agent’s workspace, approvals, credentials, and authentication behavior. Then use a Localtonet HTTP tunnel to reach that exact endpoint remotely without inbound router port forwarding or a public IP address.
Get Started Free →

