

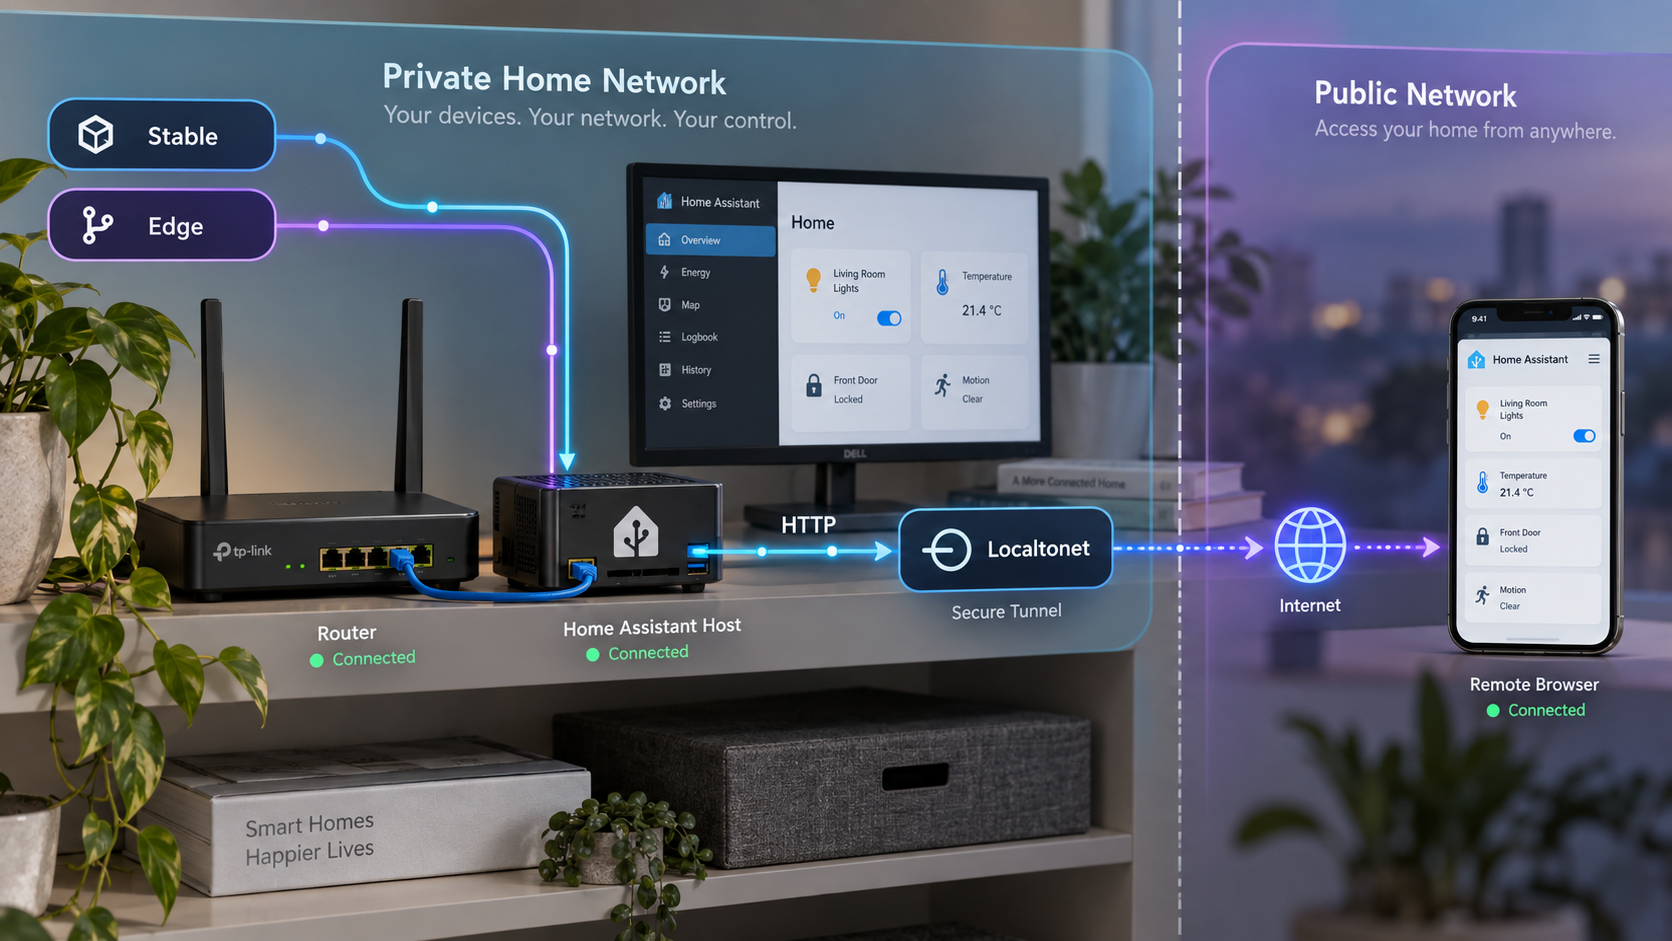
Choose the right FaserF repository channel, verify your app locally, and publish its web interface only when you are ready
FaserF’s Home Assistant Apps repository provides a collection of web servers, dashboards, productivity tools, network utilities, and other self-hosted applications for Supervisor-managed Home Assistant installations. This guide explains how to add the stable or edge repository, select an app, complete its app-specific configuration, start it, and verify that it works on your local network. After the local service is healthy, we show how to expose an HTTP-based app with Localtonet without configuring inbound router port forwarding or requiring a public IP address. Because every app can use different ports, protocols, credentials, and Home Assistant ingress settings, the remote-access section deliberately requires you to confirm the selected app’s actual endpoint instead of relying on guessed values.
📋 What's in this guide
What FaserF’s Home Assistant Apps repository provides
A Home Assistant app repository is a catalog that Home Assistant Supervisor can read. It may contain one app or many apps, with each app stored as a separate repository entry and carrying its own metadata, configuration schema, documentation, supported architectures, startup behavior, network settings, and container definition. Adding a repository does not install every application in it. It makes the repository’s available applications visible in the Home Assistant Add-on Store so that you can inspect and install them individually.
FaserF’s repository, historically described with the name hassio-addons, is now presented as a collection of Home Assistant Apps. Home Assistant formerly called these packages add-ons, so both terms still appear in interfaces, documentation, repository names, and community discussions. In this guide, “app” means the Supervisor-managed package, while “repository” means the catalog from which that package is installed.
The collection includes applications in several categories. Examples visible in the repository include Apache2 variants, NGINX, Wiki.js, WordPress, Planka, Tiny Tiny RSS, ShieldDNS, ShieldFile, Netboot.xyz, OpenSSL, messaging tools, dashboards, and development utilities. These examples do not all have the same maturity, network behavior, architecture support, or remote-access requirements. Some are stable, some are beta, and some are explicitly unsupported.
The documented installation route is through a Home Assistant installation with Supervisor and an Add-on Store. A standalone Home Assistant Container or Home Assistant Core environment does not automatically provide that Supervisor-managed app workflow. Do not copy arbitrary Docker commands in an attempt to reproduce it unless the selected project separately publishes and supports such a method.
The repository maintainer states that the applications are primarily maintained for personal use and that bug fixes, feature requests, or continued support cannot be guaranteed. That matters operationally. Before depending on an app for an important household or business workflow, review its current status, release notes, documentation, backup requirements, and open issues. A working installation today is not a guarantee of a particular maintenance schedule tomorrow.
Stable, edge, and unsupported channels explained
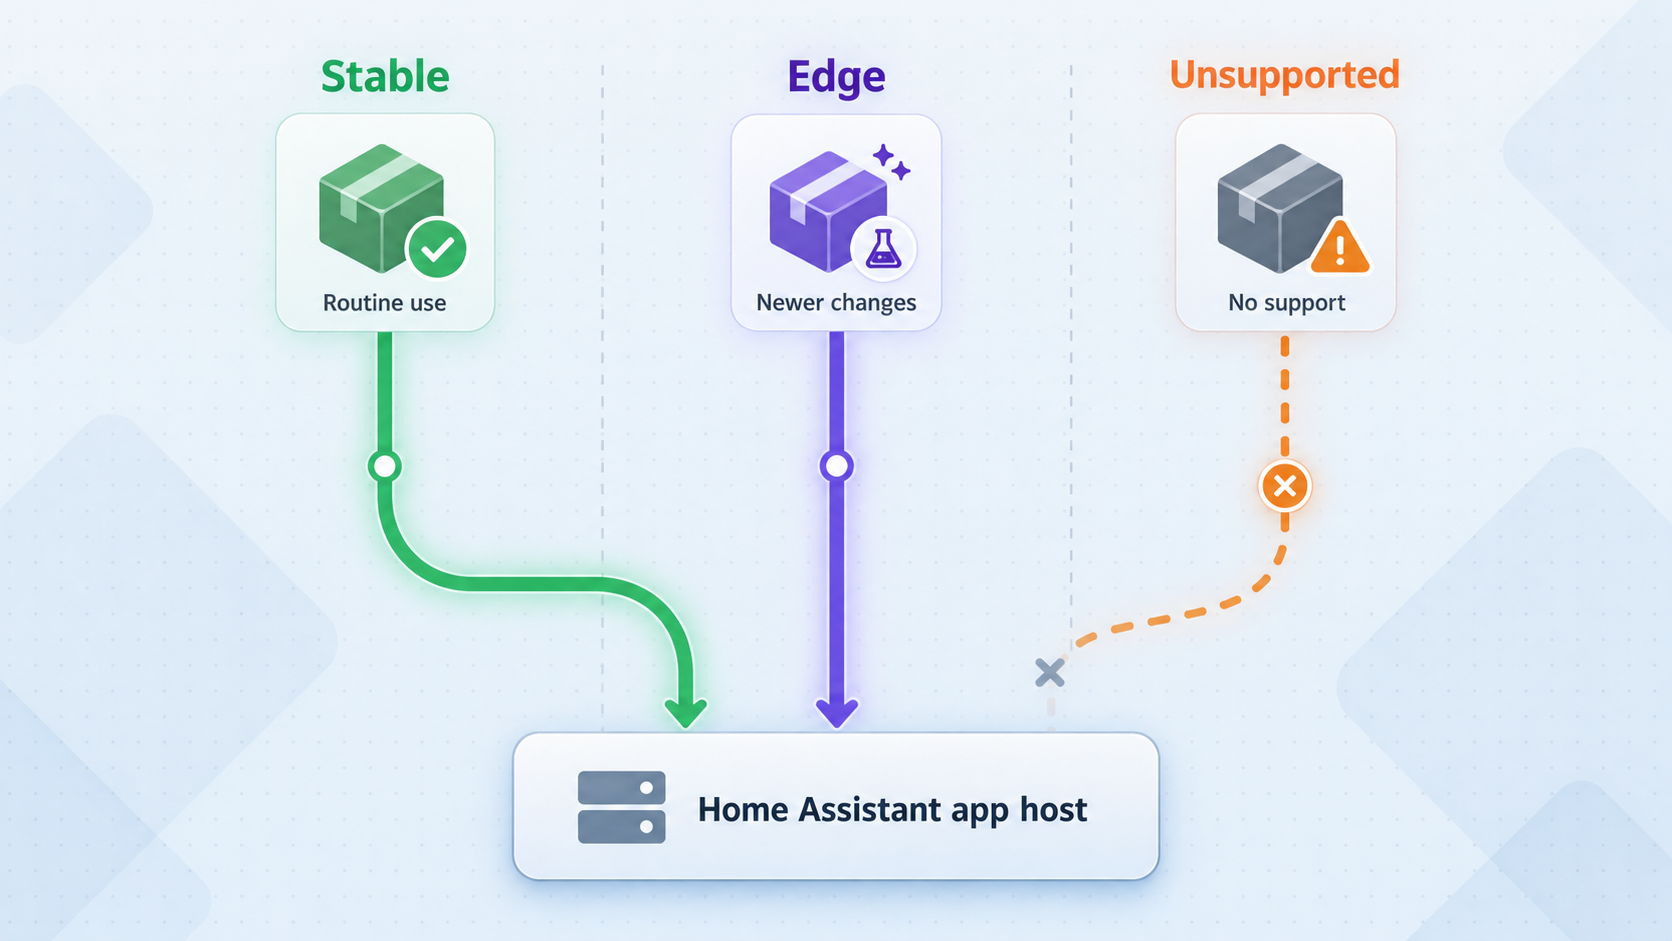
Choosing a repository channel determines which applications and builds Home Assistant can offer. The stable channel is recommended for general use. It includes stable releases and uses pre-built images from official releases. In-development applications are excluded from that channel.
The edge channel includes both stable and in-development applications. It is needed for applications that are not yet included in stable, as well as bleeding-edge builds. Edge applications are built locally on the Home Assistant device from their Dockerfile source rather than installed from the stable channel’s pre-built release images. As a result, an edge installation can take longer and consume more CPU, memory, storage, and network resources during the build.
Unsupported entries are archived or deprecated and do not carry a maintenance commitment. They may still appear in repository information, but their presence should not be interpreted as a recommendation to deploy them. If a workload is marked unsupported, consider a currently maintained alternative before making it reachable outside your private network.
| Channel or status | What it contains | Installation behavior | Best fit |
|---|---|---|---|
| Stable | Stable releases only | Uses pre-built release images | General use where predictable releases are preferred |
| Edge | Stable and in-development apps | Builds locally from Dockerfile source | Testing, development, or an app not yet available in stable |
| Beta app | A functional app with a version below 1.0.0 in this repository’s status model | May change while development continues | Users prepared to test, troubleshoot, and accept change |
| Unsupported app | Archived or deprecated software | No maintenance level should be assumed | Existing users with a migration plan, not a default new deployment |
Decide which channel you actually need before installing an app. Edge is not simply a faster stable channel. It can expose experimental changes and requires local image builds. If you are following this guide for a normal deployment and the desired app is available in stable, begin with the stable repository.
Prerequisites and decisions to make first
Before adding the repository, confirm that your Home Assistant installation exposes the Supervisor-managed Add-on Store. The relevant interface is normally reached through Settings → Add-ons → Add-on Store. Interface labels can change between Home Assistant releases, but the essential requirement is Supervisor support. If there is no Add-ons area or repository management control, stop and identify your Home Assistant installation type before continuing.
You also need administrator-level access sufficient to add a custom repository and install applications. Make a current Home Assistant backup before introducing a new app, particularly if the selected app manages a database, writes persistent content, maps Home Assistant directories, or is still in beta. The precise backup and restore procedure depends on your Home Assistant installation and the app’s storage design.
Check the app’s documentation before installation rather than after it fails. At minimum, determine whether the app supports your hardware architecture, whether it requires another service, how much storage it may consume, which configuration fields are mandatory, and whether it exposes Home Assistant ingress, a host network port, or both. Home Assistant app metadata may declare support for aarch64 and amd64, but support is app-specific. The repository’s general amd64 testing statement does not prove that every entry works identically on every machine.
Remote-access prerequisites
If your eventual goal is remote browser access, keep installation and public exposure as separate milestones. First make the selected app healthy inside Home Assistant. Then identify a direct HTTP or HTTPS endpoint that the device running our Localtonet client can reach.
Home Assistant ingress and a directly published app port are not interchangeable. Ingress can place an app’s interface behind Home Assistant routing and session handling. A direct host port can reach the app independently. The repository-wide evidence does not establish a universal hostname, IP address, port, URL path, or HTTP scheme for all FaserF apps, so this guide cannot safely provide one generic endpoint.
Record the following values from the selected app’s documentation and Home Assistant network configuration:
- The reachable local IP address or hostname.
- The effective host port, not merely an internal container port.
- Whether the endpoint uses HTTP or HTTPS.
- Any required path after the hostname and port.
- Whether direct access has its own login or depends on Home Assistant ingress authentication.
- Whether the app binds only to localhost or is reachable from another device on the LAN.
Never assume that an app opened through Home Assistant ingress has the same authentication when reached through its host port. Test the exact direct endpoint in a private browser session before creating a public tunnel. If the direct service has no suitable authentication or exposes an administrative setup screen, do not publish it until you add the access controls recommended by that app.
Install the stable or edge repository and choose an app
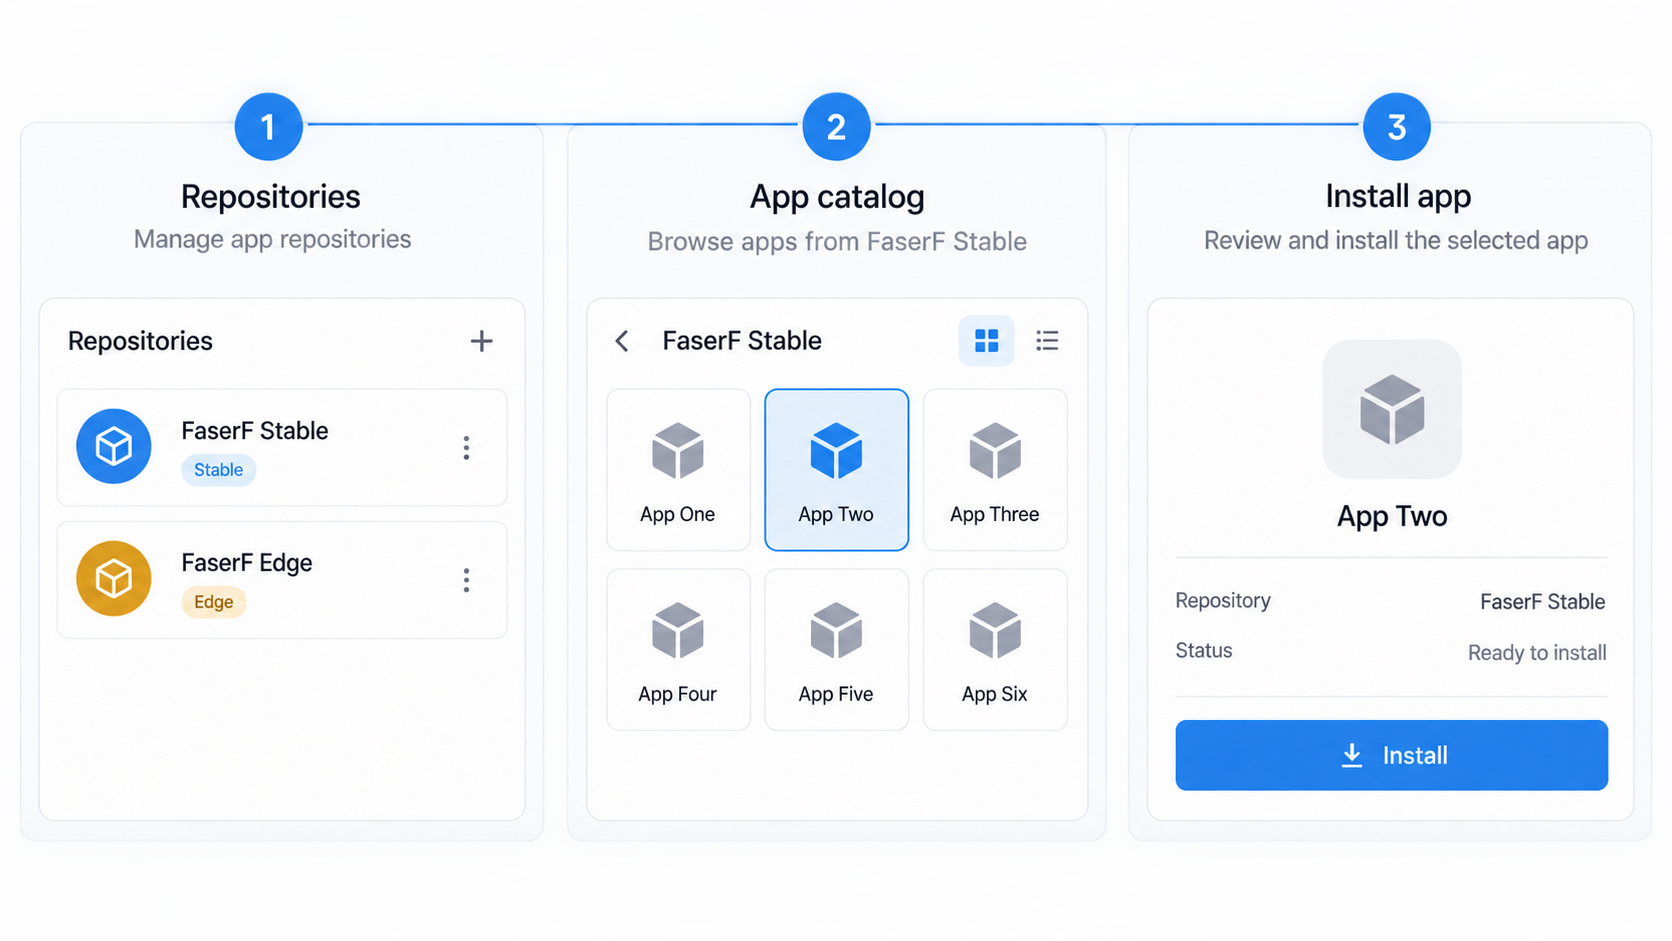
The repository URLs differ by channel. Enter them exactly as documented. Do not remove the #edge suffix when you intend to use edge, and do not add it when you want only the stable catalog.
| Choice | Repository URL | Use it when |
|---|---|---|
| Stable | https://github.com/FaserF/hassio-addons |
The app is available as a stable release and you want the recommended general-use path |
| Edge | https://github.com/FaserF/hassio-addons#edge |
The desired app is in development or you intentionally need bleeding-edge changes |
| Unsupported | Do not choose it as a default installation path | Only when you understand its archived or deprecated status and have evaluated alternatives |
Open the Home Assistant Add-on Store
Sign in to your Supervisor-managed Home Assistant installation and navigate to Settings → Add-ons → Add-on Store. If this area is unavailable, verify your installation type instead of attempting to continue with unrelated container commands.
Open repository management
Open the three-dot menu in the Add-on Store and select Repositories. This is where custom app repository addresses are registered with Home Assistant.
Add the selected channel URL
For stable, enter https://github.com/FaserF/hassio-addons. For edge, enter https://github.com/FaserF/hassio-addons#edge. Choose one according to the channel comparison above, then use the interface’s Add action.
Refresh the Add-on Store
After adding the repository, refresh the store. For the documented edge workflow, open the three-dot menu and choose Check for updates. Allow Home Assistant time to retrieve and process the repository metadata.
Find the app in the correct repository section
Locate the desired entry under FaserF’s Home Assistant Apps. Edge entries appear under the edge repository labeling. Read the app’s status, supported architectures, documentation, configuration requirements, and network information before installing it.
Install the selected app
Open the app and select Install. Stable releases use pre-built images. Edge installations build locally and can therefore take substantially longer or appear resource-intensive while the build runs. Do not interrupt an edge build merely because it takes longer than a typical image download.
Installation success means Home Assistant has installed the app package. It does not prove that the application is configured, started, healthy, or reachable. Continue through the configuration and verification stages before considering the deployment complete.
Configure and start the selected Home Assistant app
There is no repository-wide configuration that applies to every FaserF app. A web server, feed reader, DNS service, dashboard, file-sharing service, and automation utility naturally require different settings. Open the installed app’s Documentation and Configuration tabs and use the schema presented for that exact version.
Home Assistant stores app-specific user configuration in the app’s persistent data area and supplies it to the container. From the user’s perspective, the important rule is to edit settings through the Home Assistant app interface unless the app documentation explicitly instructs otherwise. Do not assume configuration keys from a different app, an older release, or an edge build are compatible.
Read the installed version’s documentation
Review required options, first-run behavior, storage locations, dependencies, credential requirements, and network settings. Pay attention to warnings associated with beta or edge builds.
Complete all required configuration
Enter only values documented by the selected app. Use unique credentials where the app supports authentication, and do not reuse your Home Assistant administrator password for an unrelated application.
Review network exposure
Inspect the app’s network section for enabled host ports and their effective values. A disabled mapping or an empty host-port value may mean there is no direct LAN endpoint even if the app supports Home Assistant ingress.
Save and start the app
Save the configuration and select Start. If the app provides a start-at-boot control and you want automatic recovery after a Home Assistant restart, enable it only after confirming that the application starts cleanly.
Inspect the logs
Open the app log and look for a completed startup rather than relying only on the displayed running state. Resolve invalid options, missing dependencies, permission errors, database initialization failures, or port conflicts before proceeding.
Some web applications perform a first-run setup in the browser. If so, complete that process locally. Create the administrator account, change any documented default credentials, configure the canonical URL if the app requires one, and confirm that a restart does not return the application to an unsecured setup screen.
Apache2 and NGINX users may also be interested in FaserF’s separate Webserver App integration for Home Assistant. Its documented purpose is to monitor and manage supported Apache2 and NGINX app variants, including operational state, selected server metrics, error and warning log information, certificate expiration information, diagnostics, and restart controls. That integration is separate from installing the server app itself and is not required for Localtonet tunneling.
Verify the app locally before exposing it
Verification should happen in layers. First confirm that the app remains started. Next inspect its logs. Then open it through Home Assistant ingress if ingress is supported. Finally, if you plan to create a Localtonet HTTP tunnel, test the exact direct endpoint from the same device that will run our client or from another device with equivalent network access.
How to identify the correct endpoint
Start with the app’s documentation and Home Assistant network settings. If the app declares a web interface, its metadata can use a template containing a host and effective port, but users should rely on the URL presented by Home Assistant and the actual network mapping rather than trying to derive container internals manually.
Use the host address reachable from the Localtonet client device. If our client runs directly on the Home Assistant host and the app’s effective port is available there, a loopback or local host address may be appropriate. If our client runs on another computer, that computer must be able to reach the Home Assistant host over the LAN. In that case, a loopback address would point back to the client computer itself and would not reach Home Assistant.
Do not confuse an internal container port with a host port. Home Assistant app metadata can map a container port to a host port, and the host mapping may be disabled. The correct Localtonet target is the endpoint that the Localtonet client can actually reach.
The available evidence does not establish one hostname, port, path, or scheme shared by Apache2, NGINX, Wiki.js, WordPress, Planka, Tiny Tiny RSS, and the other repository apps. Supplying a generic number would be unsafe. Use the selected app’s current documentation and Home Assistant network configuration.
Expose a verified HTTP app with Localtonet
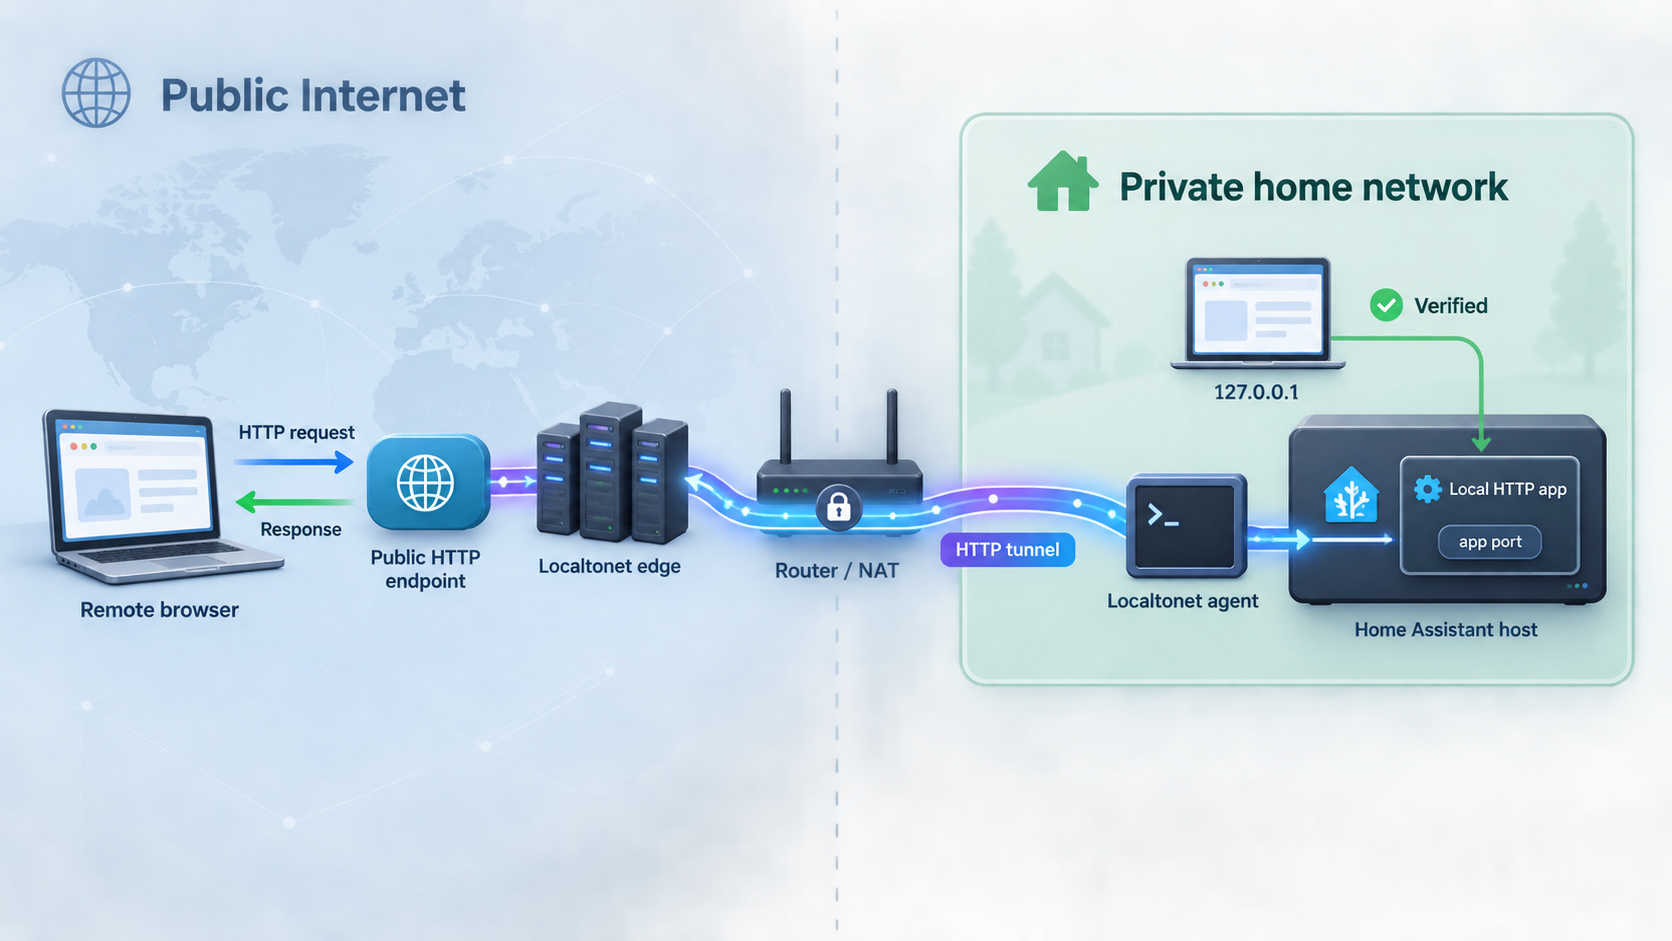
Once the application works at a direct local HTTP or HTTPS endpoint, you can make that service reachable remotely with Localtonet. Our client establishes an outbound connection to a Localtonet relay server, so this workflow does not require inbound router port forwarding, firewall changes, VPN setup, or a public IP address.
The device running our client must be able to reach the app’s local address and port. It can be the same device when a supported Localtonet client is available there, or another always-on computer on the same network. What matters is network reachability from the client device to the target service.
Use an HTTP/s tunnel for a browser-based application. Raw TCP or UDP tunnels serve different protocol needs and should not be selected merely because an application happens to run in a container. HTTP and File Server tunnels may use a random subdomain, a custom subdomain, or a custom domain, but the current dashboard and your available plan determine which choices are available. Exact custom-domain DNS instructions should be taken from the current Localtonet documentation rather than guessed.
Install and run our client
Install the current Localtonet client on a device that can reach the verified Home Assistant app endpoint. Use the installation instructions provided for your operating system in the current Localtonet documentation. We do not provide a generic command here because client installation details can vary by operating system and version.
Authenticate the client device
Connect the client using the device-specific authentication token assigned through our platform. Treat this token as a secret. Never paste it into public documentation, screenshots, issue reports, configuration examples, or shared chat messages.
Select an available relay server
Choose a server or region that is currently offered in your Localtonet dashboard. Available server codes and regions can change and may vary by plan, so do not copy a hardcoded value from an unrelated tutorial.
Create an HTTP/s tunnel
Create an HTTP tunnel for the app and select the connected client device. Choose the available process type appropriate to your use case, such as a random subdomain, custom subdomain, or custom domain. These process types publish the same target content at a public HTTPS address.
Enter the confirmed local target
Set the local IP address and port to the endpoint you already tested from the client device. Use the correct local HTTP or HTTPS behavior shown by the app. Do not substitute an internal container port, an ingress-only URL, or an address reachable solely from a different machine.
Start and test the tunnel
Creating a tunnel does not start it. Select Start, then open the assigned public URL in a private browser session and verify the complete authentication and application workflow. The tunnel remains available only while the selected client is connected and the tunnel is running.
Treat the public URL as an internet-facing entry point. Require strong application authentication, remove default credentials, expose only the intended service, apply least privilege, and use app-supported access restrictions where appropriate. Do not publish an administrative setup page, an unsupported app, or a direct endpoint that relies exclusively on ingress authentication.
Test from outside the home network
A successful test from the same LAN is useful, but it does not fully reproduce a remote user’s path. After the private-browser test, use a separate connection such as a mobile network and confirm that the public URL loads, redirects correctly, presents the expected login, and continues to work after authentication.
Some applications need an external base URL, trusted proxy setting, forwarded-header configuration, or allowed-host entry. Those settings are application-specific and are not established for every app in this repository. If the local page loads but the public page produces redirect loops, rejected hostnames, mixed-content warnings, or broken callback URLs, consult the selected app’s documentation for its reverse-proxy behavior. Do not disable hostname validation or broad security controls merely to suppress an error.
Routine operation, updates, backups, and channel changes
A reliable deployment needs more than a successful first launch. Monitor available updates through Home Assistant, read release notes before applying them, and keep recoverable backups of Home Assistant and any app-specific data. Database-backed applications and content platforms may have additional export or database backup procedures, so a Home Assistant-level backup should not automatically be assumed to cover every recovery scenario without testing.
Stable and edge updates have different operational characteristics. Stable updates normally retrieve pre-built release images. Edge builds are created locally and may use more resources or take longer. Schedule edge updates when temporary load and a longer maintenance window are acceptable.
Before updating an internet-exposed application, consider stopping its Localtonet tunnel. Apply the update locally, review the logs, test authentication and core functions, and then restart the tunnel. This prevents users from reaching a migration screen, incomplete deployment, or accidentally reset authentication state.
A Localtonet tunnel has its own lifecycle. You can stop it when remote access is unnecessary and start it again later. You can delete it when the service is retired. Stopping the Home Assistant app makes the target unavailable even if the tunnel configuration still exists, while disconnecting the selected Localtonet client also takes the tunnel offline.
Moving between stable and edge
Do not assume that changing a repository URL automatically performs a safe downgrade or migration. Edge configuration and stored data may evolve ahead of stable. Before moving an installed app between channels, read that app’s current migration guidance, make a backup, and check whether its version and data format support the direction you intend to move.
If you added both repositories, verify which copy of an app you are viewing before installation or update. Repository labels, version numbers, and app slugs help distinguish them. Avoid running stable and edge variants against the same data unless the app explicitly documents that arrangement as safe.
Troubleshooting installation and remote access
The repository does not appear after adding it
Confirm that the URL is exact, including the #edge suffix only for edge. Return to the Add-on Store menu and use Check for updates. If Home Assistant reports a repository error, inspect the Supervisor or system logs for the specific cause. Also verify that the Home Assistant host can reach GitHub and that its clock, DNS, and network connection are functioning.
The desired app is missing from stable
In-development applications are excluded from stable. Check the repository’s current catalog to determine whether the app requires edge. Do not assume a missing app has been deleted. It may be intentionally available only through the edge channel, or it may be unsupported or removed.
An edge installation takes a long time
Edge builds are built locally from Dockerfile source, unlike stable’s pre-built release images. Longer installation time and increased resource use are expected consequences. Check available storage and system load, and review build logs before deciding that the process is stuck.
The app will not start
Reopen the app’s configuration and compare every required field with the documentation for the installed version. Inspect logs for the first meaningful error rather than focusing only on later shutdown messages. Common categories include invalid options, missing credentials, unavailable dependencies, file permissions, database initialization problems, architecture incompatibility, and port conflicts. The applicable fix depends on the selected app, so do not copy settings from another repository entry.
Ingress works, but the direct LAN URL does not
The app may be configured for ingress without an enabled host-port mapping. Review its Home Assistant network settings and documentation. A Localtonet HTTP tunnel requires a target reachable by the client. If the app does not document or safely support a direct endpoint, do not invent one by targeting internal container addresses.
The Localtonet public URL shows a connection error
Test the same local IP address and port from the Localtonet client device. If that test fails, correct local routing, binding, or the host-port mapping first. Then confirm that our client is connected, that the intended device token was selected, and that the tunnel was explicitly started. Remember that creating a tunnel alone does not make it active.
The public page redirects to a private address
The application may be generating absolute URLs from its local hostname or configured base URL. Look for documented external URL, proxy, host-header, or forwarded-header settings in that specific app. Since no one setting applies across the repository, use the app’s instructions rather than guessing environment variables or disabling validation.
The public page loads but is not authenticated
Stop the tunnel immediately. Verify whether the direct endpoint has separate authentication from Home Assistant ingress. Complete the app’s security configuration locally, test with a private browser session, and only restart the tunnel after the direct endpoint consistently requires appropriate access.
Frequently asked questions
Should I use the stable or edge FaserF repository?
Use stable for general deployments when the desired app is available there. It contains stable releases and uses pre-built images. Use edge only when you need an in-development app or intentionally want bleeding-edge changes and accept local builds, higher installation resource use, and faster-changing software.
Can I install these apps on Home Assistant Container?
The documented repository workflow requires Home Assistant Supervisor and the Add-on Store. A standalone Home Assistant Container installation does not provide this workflow by default. This article does not invent separate Docker commands for the repository’s apps because no universal standalone installation method is established for the collection.
What port should I enter in Localtonet?
Enter the effective host port for the selected app’s direct web endpoint, as shown by its documentation and Home Assistant network configuration. There is no universal port for this repository. Do not use an internal container port unless it is also the confirmed endpoint reachable from the Localtonet client device.
Can Localtonet expose a Home Assistant ingress-only page?
An HTTP tunnel needs a local IP address and port reachable from our client. An ingress page is not automatically equivalent to a direct app endpoint. If the selected app has no documented, safely authenticated direct endpoint, do not guess internal addresses or ports. Use a deployment method explicitly supported by the app.
Does Localtonet require router port forwarding?
No. Our client establishes an outbound connection to a Localtonet relay server. This makes the configured service reachable through its assigned public URL without inbound router port forwarding, firewall changes, VPN setup, or a public IP address.
Is an edge app safe to expose publicly?
Edge indicates active development and possible rapid change. It does not establish that an app is suitable for internet exposure. Evaluate the selected app’s authentication, current documentation, issue status, update process, and security model. If those controls are unclear, keep it private.
Will a Localtonet tunnel stay online if Home Assistant stops?
The tunnel requires the selected Localtonet client to remain connected and the tunnel to remain running. The target application must also be available. If Home Assistant stops the app, the client loses network access, or the tunnel is stopped, the public service will not function normally.
Does adding the repository install all FaserF apps?
No. Adding the repository makes its catalog available in the Add-on Store. You choose and install individual apps. Each installed app then has its own configuration, startup, logs, updates, storage, and network behavior.
Publish your verified Home Assistant app with Localtonet
After the selected FaserF app is configured, authenticated, and reachable at a confirmed local HTTP endpoint, use Localtonet to provide remote access without opening an inbound router port. Keep the tunnel stopped until local verification and security checks are complete.
Get Started Free →

