

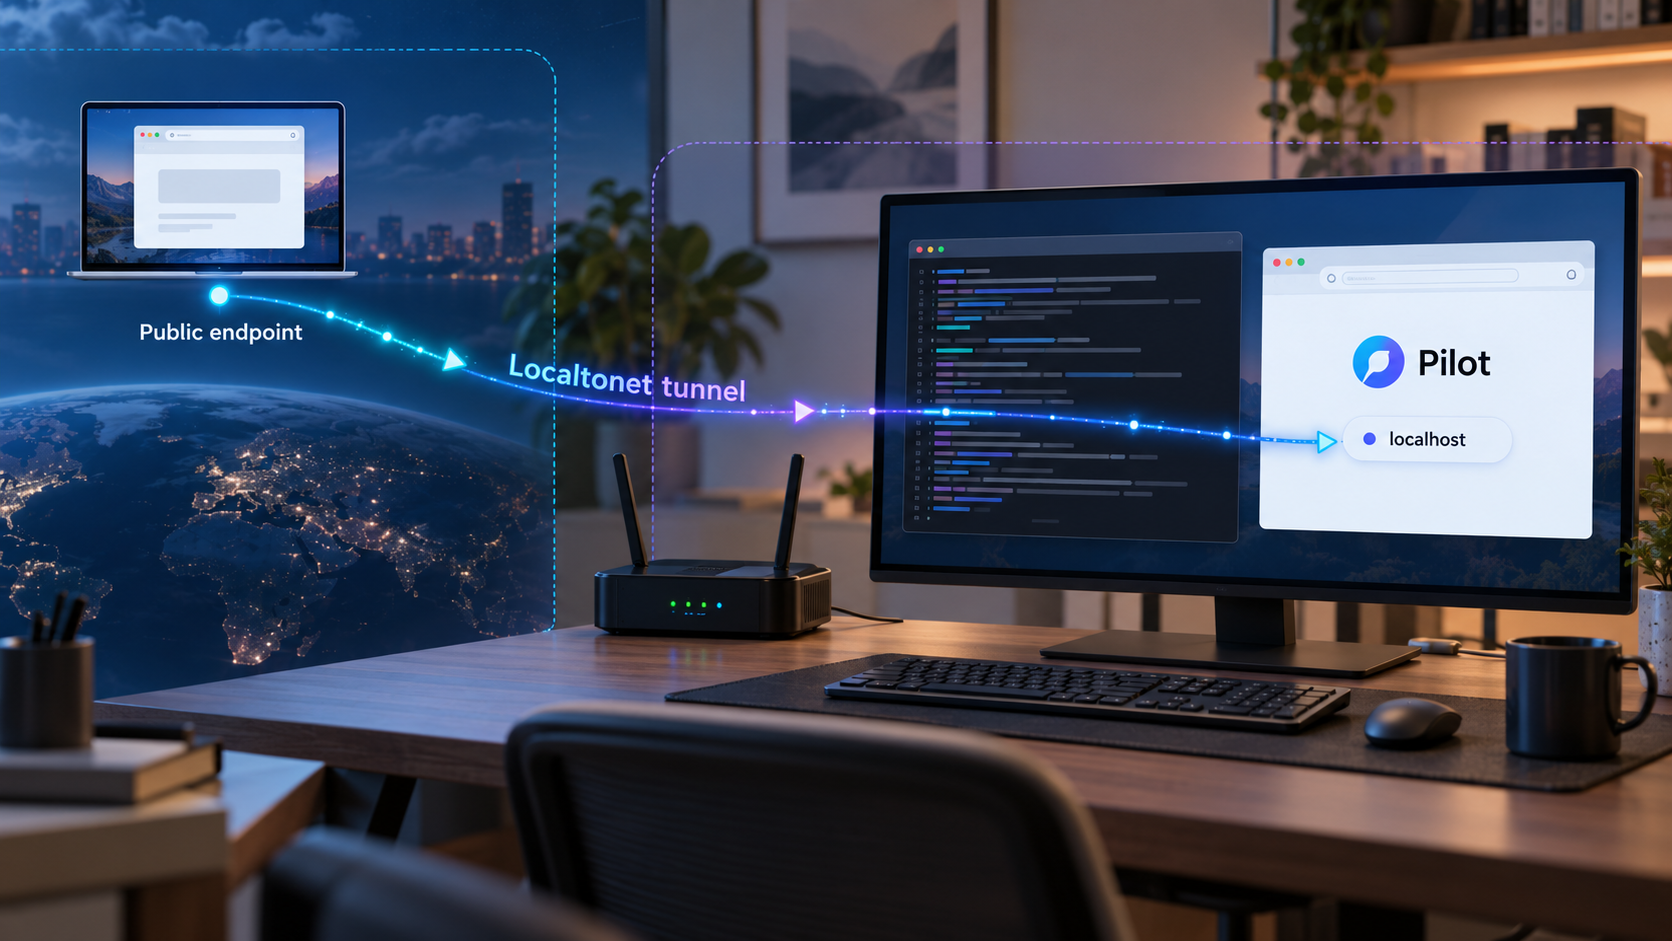
Build a local AI development agent, verify its HTTP gateway, and make that gateway remotely reachable
Pilot is a locally operated development automation system that can pick up tickets, work against a codebase, run quality gates, and open pull requests for review. This guide focuses first on installing Pilot from source, initializing its configuration, starting a documented GitHub workflow, and confirming that its default HTTP gateway is listening locally at 127.0.0.1:9090. Once the local installation works, we connect that gateway to an HTTP tunnel with Localtonet, without inbound router port forwarding, firewall changes, a VPN, or a public IP address. We also cover exposure boundaries, routine operation, and practical troubleshooting without assuming undocumented gateway routes, authentication behavior, webhook paths, or a browser dashboard.
📋 What's in this guide
Understand the Pilot and Localtonet workflow
Pilot is designed around ticket-driven development automation. A typical workflow begins with an issue in a supported work system, such as GitHub Issues. Pilot claims the task, creates a branch, analyzes the codebase, plans and implements the change, runs configured quality gates, and opens a pull request. A human can then review and merge that pull request. This makes Pilot different from an interactive coding assistant that waits for a sequence of prompts, because its primary unit of work is a ticket and its output is intended to fit an existing review process.
Installing Pilot and exposing Pilot are two separate jobs. The installation must be complete and working before a tunnel is useful. Building the binary does not initialize its configuration, initializing it does not prove that a provider integration works, and starting the process does not automatically prove that the local HTTP gateway is reachable. We will validate each layer in order.
The documented Pilot configuration enables an HTTP gateway by default at 127.0.0.1:9090. Binding to 127.0.0.1 limits direct network access to the local machine. That is a sensible local default, but it also means another computer cannot connect to the gateway directly over the LAN. With Localtonet, our client runs on the same machine, or on a device that can reach the service, and establishes an outbound connection to our relay. The resulting HTTP tunnel provides a public HTTPS address while Pilot can remain bound to its local interface.
Localtonet removes the need to configure inbound router port forwarding or obtain a public IP address. It does not remove the need for application security. A public tunnel changes who can reach the service, so access decisions, credentials, least privilege, and the sensitivity of exposed operations remain important.
127.0.0.1:9090. The documented --no-gateway option disables that HTTP server.
The available Pilot documentation establishes the gateway address and port, but it does not establish a specific health-check route, webhook URL path, gateway authentication scheme, or browser-based web dashboard. We will test transport-level HTTP reachability without inventing any of those application details.
Prepare the source-build prerequisites
Pilot's documented source build requires Go 1.22 or newer. It also requires Claude Code CLI 2.1.17 or newer for its development workflow. An OpenAI API key is optional and is used for voice transcription rather than being a general requirement for the source compilation itself.
The documented build sequence uses git, make, and sudo. You therefore need a shell environment in which those commands are available. The use of sudo make install-global indicates a POSIX-style global installation workflow. The supplied evidence does not define an equivalent source-install command for every Windows environment, so do not translate that command into an unverified Windows path. Pilot also publishes desktop release packages for macOS, Windows x64, and Linux x64, but those package workflows are separate from the source-build procedure covered here.
| Requirement | Why it is needed | How to check it |
|---|---|---|
| Go 1.22 or newer | Required when building Pilot from source | go version |
| Claude Code CLI 2.1.17 or newer | Used by Pilot as an execution backend | claude --version |
| Git | Clones the Pilot source repository | git --version |
| Make | Runs the documented build and installation targets | make --version |
| Global installation permission | Needed by the documented sudo make install-global step |
Confirm that your account can use sudo |
| Git provider credentials | Needed when starting a provider-specific workflow such as GitHub polling | Prepare the provider token without placing it in source control |
| Localtonet client | Needed only after Pilot works locally and you are ready to create the tunnel | Install and run our client on the device that can reach Pilot |
Run the basic tool checks before cloning the repository:
go version
git --version
make --version
claude --version
Confirm that the Go version is at least 1.22 and the Claude Code CLI version is at least 2.1.17. If either requirement is missing, install or upgrade it through its official distribution method before continuing. The available Pilot evidence states the required versions but does not provide a universal operating-system-specific installation procedure for Go or Claude Code CLI, so this guide does not invent package-manager commands for them.
Choose the revision you intend to run
The basic source installation clones the repository's current default branch. That is appropriate when you deliberately want the current source. A production-oriented deployment should instead make an explicit revision decision and review the applicable release notes before building. Pilot has tagged releases, but selecting a release is an operational policy decision rather than a mandatory part of the documented source-build sequence.
Record the revision you deploy. That simple step makes it easier to compare behavior, investigate a regression, and reproduce the same build later. Do not assume that a command shown for the current repository will always produce an identical binary when run against a different commit.
Pilot can work with source code, issue systems, branches, tests, and pull requests. Use a dedicated operating-system account where appropriate, grant provider tokens only the permissions the workflow requires, and never commit credentials into the Pilot repository or a project repository. Review generated changes before merging, especially when a task affects authentication, deployment, secrets, databases, or infrastructure.
Build and install Pilot from source
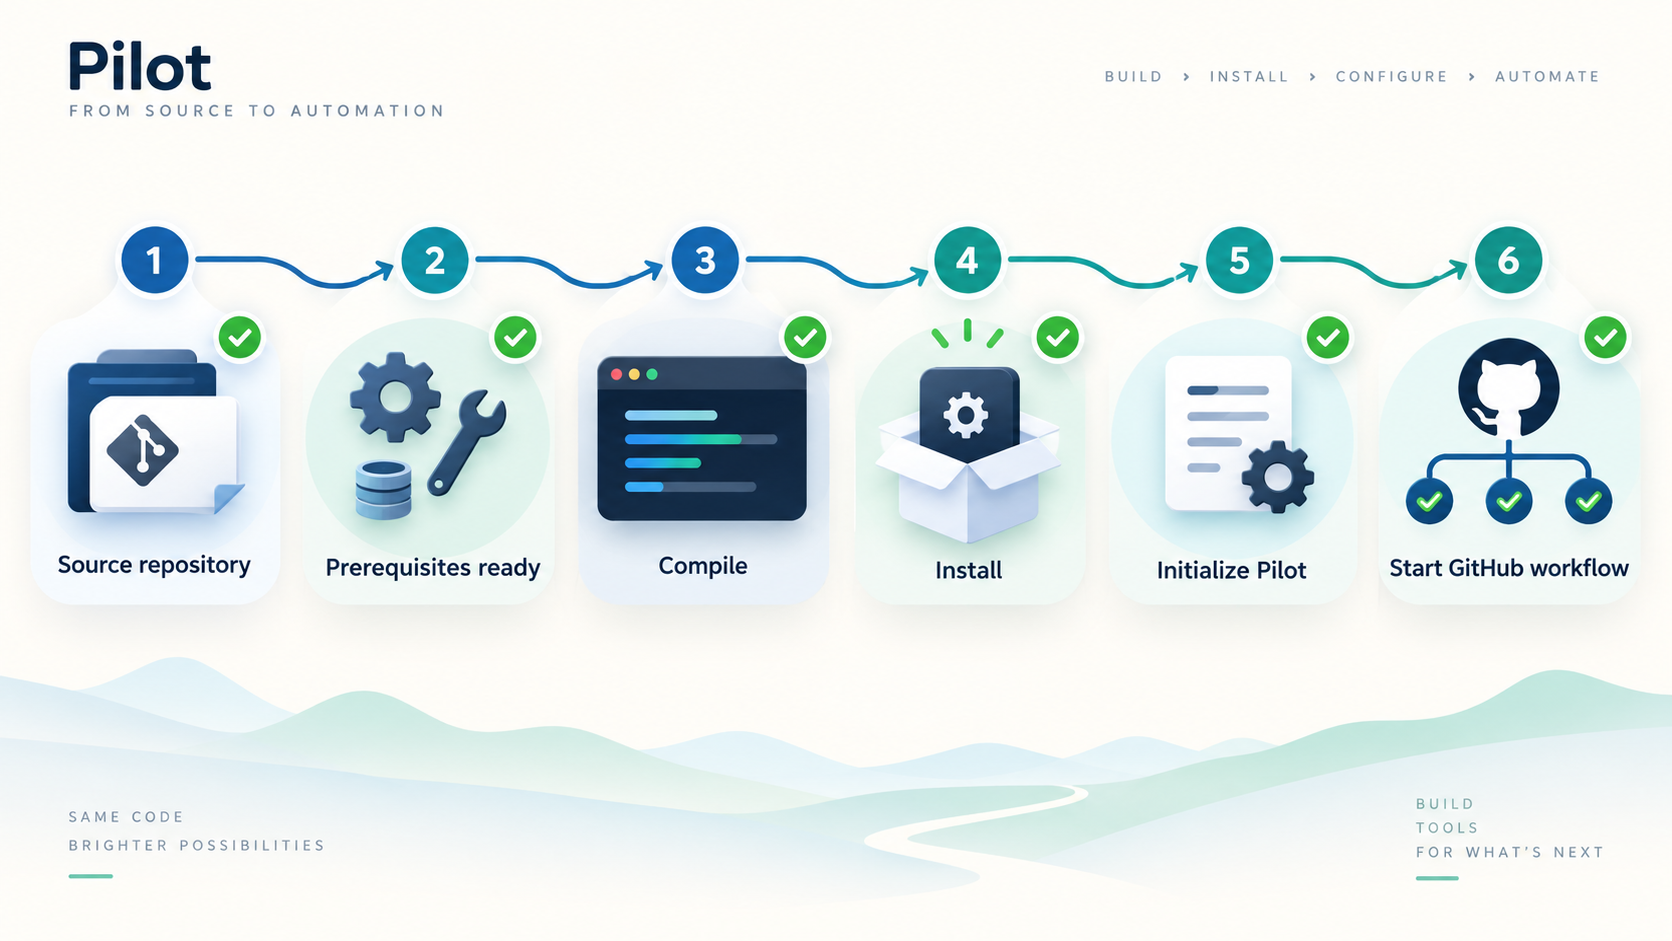
The official source workflow is concise: clone the repository, enter its directory, run the build target, and run the global installation target. Follow that order so that a compilation problem is visible before the process attempts to install anything globally.
Clone the Pilot repository
Use Git to create a local working copy of the official repository. Run this from the parent directory where you want the source tree to live.
git clone https://github.com/qf-studio/pilotEnter the source directory
Change into the newly cloned repository before invoking its Make targets.
cd pilotCompile Pilot
Run the repository's documented build target. Stop here and resolve any Go version, dependency, or compiler error before attempting global installation.
make buildInstall the command globally
After the build succeeds, run the documented global installation target. This command requests elevated privileges and may prompt for the local account password.
sudo make install-globalA successful Make process is the first validation point. Do not treat a partially completed build as an installation. Read the final command output and resolve errors before continuing.
After installation, use the shell's command lookup to confirm that pilot is available:
command -v pilot
This check does not depend on an undocumented Pilot flag. It asks the shell whether it can locate the installed executable. If it returns no path, the binary might have been installed outside the current shell's PATH, the installation target might have failed, or the shell might need to be restarted after an environment change.
Alternative installation methods
Although this article focuses on source compilation, Pilot documents several alternatives. Homebrew is listed as the recommended method, Go can install the command directly, and desktop packages are available from releases. Choose one installation method for a given executable and keep track of which copy your shell resolves. Installing through several methods at once can leave multiple Pilot binaries on the machine and make upgrades harder to reason about.
| Method | Documented command or package | When it fits |
|---|---|---|
| Homebrew | brew tap qf-studio/pilot followed by brew install pilot |
Recommended by the Pilot README for systems with Homebrew |
| Go install | go install github.com/qf-studio/pilot/cmd/pilot@latest |
Useful when a suitable Go toolchain is already configured |
| Source build | make build followed by sudo make install-global |
Useful when you want to build the checked-out source revision |
| Desktop release | Published packages for macOS Universal, Windows x64, and Linux x64 | Useful when a packaged desktop installation is preferred |
Initialize Pilot and start a GitHub workflow
Installation puts the command on the machine, but Pilot still needs initialization and a selected integration. The documented quick-start flow initializes the configuration and then starts Pilot with one or more provider flags. This guide uses GitHub polling because it provides a concrete, officially documented startup path.
Initialize Pilot's configuration
Run the documented initialization command and complete the prompts presented by your installed Pilot version. Do not copy configuration values from another environment unless you have reviewed their credentials, repository scope, and integration settings.
pilot initProvide the GitHub credential safely
Make the required GitHub token available to the process without embedding a real token in scripts, shell history, screenshots, or this article. Replace the placeholder only in your private environment.
export GITHUB_TOKEN="replace-with-your-token"Start Pilot with GitHub polling
Start the documented GitHub workflow. Unless you explicitly add --no-gateway, Pilot's HTTP gateway is configured by default at 127.0.0.1:9090.
pilot start --githubSubmit a bounded test task
In a repository that you are prepared to test, create a GitHub issue with the pilot label. Use a small, clearly specified task and observe the branch, checks, and pull request rather than beginning with a high-risk production change.
Pilot also documents Telegram operation with pilot start --telegram, and both integrations can be enabled with pilot start --telegram --github. Those modes require their own credentials and configuration. Do not enable an integration merely to expose the HTTP gateway. Select only the integrations you actually intend to operate.
For controlled autonomy, Pilot documents three environment modes. Development mode favors faster iteration and can skip CI before auto-merge. Stage mode waits for CI before auto-merge. Production mode waits for CI and human approval. These modes affect Pilot's development workflow rather than Localtonet's networking behavior:
pilot start --env=dev --github
pilot start --env=stage --github
pilot start --env=prod --githubDo not select a mode only because its name sounds appropriate. Understand its merge and approval behavior, start with a low-risk repository, and preserve human review for sensitive changes. A remote HTTP tunnel does not alter Pilot's branch, CI, approval, or merge policy.
Verify Pilot and the local HTTP gateway
Verification should proceed from the inside out. First confirm that the process remains running. Next confirm that the local TCP listener accepts an HTTP connection. Only then create the Localtonet tunnel. This sequence keeps a Pilot startup problem from being mistaken for a tunneling problem.
Check the startup output
Keep the terminal containing pilot start --github visible during the first test. Look for an immediate configuration error, missing credential, provider authorization failure, port conflict, or process exit. The exact wording can vary by Pilot version, so this guide does not prescribe a log message that must appear.
If the process exits, resolve that issue before testing port 9090. A stopped process cannot serve the gateway, and Localtonet cannot make an inactive local target work.
Test the loopback HTTP address
From the same machine, open another terminal and send an HTTP request to the documented root address:
curl -i http://127.0.0.1:9090/
Interpret this command as a connectivity test, not as a promise that / is a supported application route. An HTTP response proves that a server accepted the connection and responded. A response such as a redirect, an authorization response, or a not-found status can still demonstrate HTTP reachability. The available documentation does not establish what status or response body the root route should return.
A connection-refused error means that nothing accepted the connection at that address and port at the time of the test. Check that Pilot is still running, that it was not started with --no-gateway, and that port 9090 was not changed or occupied. A timeout indicates a different connectivity symptom and should be investigated separately from an immediate refusal.
Use only gateway paths documented for the Pilot version and integration you operate. A successful request to the root address confirms basic HTTP transport, but it does not prove that an undocumented webhook path, API route, or browser interface exists.
Verify the intended development workflow
Network reachability is only one part of validation. For the GitHub workflow, use a bounded issue in a test repository and verify that Pilot can see the issue, claim or process it as expected, create the appropriate work, run the configured checks, and produce a reviewable result. Keep the first task reversible and avoid credentials, production deployment changes, or destructive data operations.
This application-level test is important because a listening gateway does not prove that the Claude Code CLI is authenticated, the GitHub token has the required repository access, or a quality-gate command can run in the target project. Validate each dependency through the behavior it supports.
Expose the Pilot HTTP gateway with Localtonet
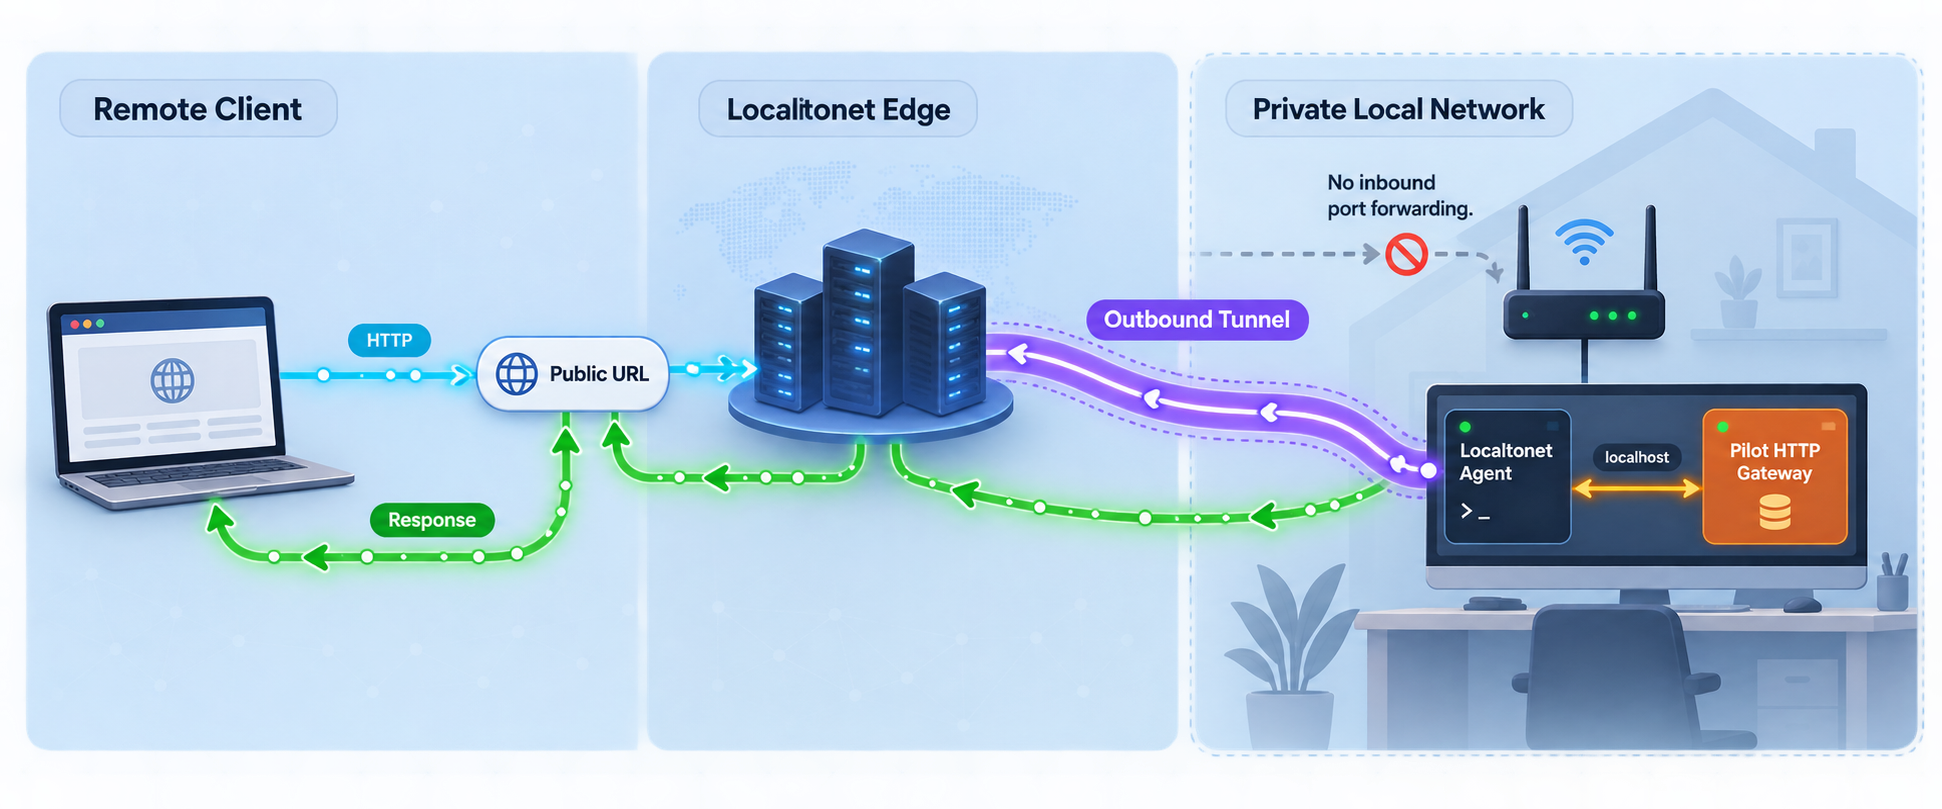
Once curl can reach the local HTTP gateway, the networking target is clear: an HTTP service at local IP address 127.0.0.1 and local port 9090. Install and run our Localtonet client on the same machine so that loopback resolves to the device where Pilot is running.
Our client establishes an outbound connection to a Localtonet relay server. The HTTP tunnel then provides a public HTTPS address for the selected local target. Creating the tunnel configuration alone does not make it active. The selected device must be connected, and the tunnel must be started.
Install and run the Localtonet client
Install our client for the operating system on the device running Pilot, then launch it. Keeping the client on the Pilot host is the simplest way to reach a service bound to 127.0.0.1.
Authenticate or select the Pilot device
Use the device-specific authentication token associated with the client that will run this tunnel. Treat that token as a secret. Never paste it into public documentation, an issue, a repository, or a screenshot.
Select an available relay server
Choose an available server or region from the current Localtonet dashboard. Available server codes and regions can vary, so use the values shown in your account rather than copying a hardcoded value from an article.
Create an HTTP tunnel to Pilot
Create an HTTP tunnel with local IP address 127.0.0.1 and local port 9090. HTTP process types can provide a random subdomain, a custom subdomain where supported, or a custom domain. All three serve the configured content through a public HTTPS address. Check current DNS instructions before configuring a custom domain.
Start the tunnel
Use the Start button after reviewing the target. A saved tunnel is not automatically running. Pilot, the Localtonet client, and the selected tunnel must all remain active for the public URL to work.
Test the assigned public HTTPS address
Copy the assigned public URL and test it from a separate network or device. Compare the result with the local request. Use only documented Pilot routes for real integrations, and do not assume the root route is a dashboard or webhook receiver.
For the current dashboard workflow and field descriptions, consult our
Localtonet HTTP tunnel documentation.
The essential target in this setup remains 127.0.0.1:9090 on the device where our client and Pilot are running.
| Layer | Required state | What happens if it stops |
|---|---|---|
| Pilot | Running with the HTTP gateway enabled | No application accepts connections on the local target |
| Localtonet client | Connected on the device that can reach Pilot | The relay cannot forward traffic to the device |
| HTTP tunnel | Created and explicitly started | The assigned public endpoint is not active |
| Local target | 127.0.0.1 on port 9090 |
Requests are forwarded to the wrong place or fail |
| Pilot route | A route documented for the intended integration | Transport may work while the application returns an error |
Secure the public exposure boundary
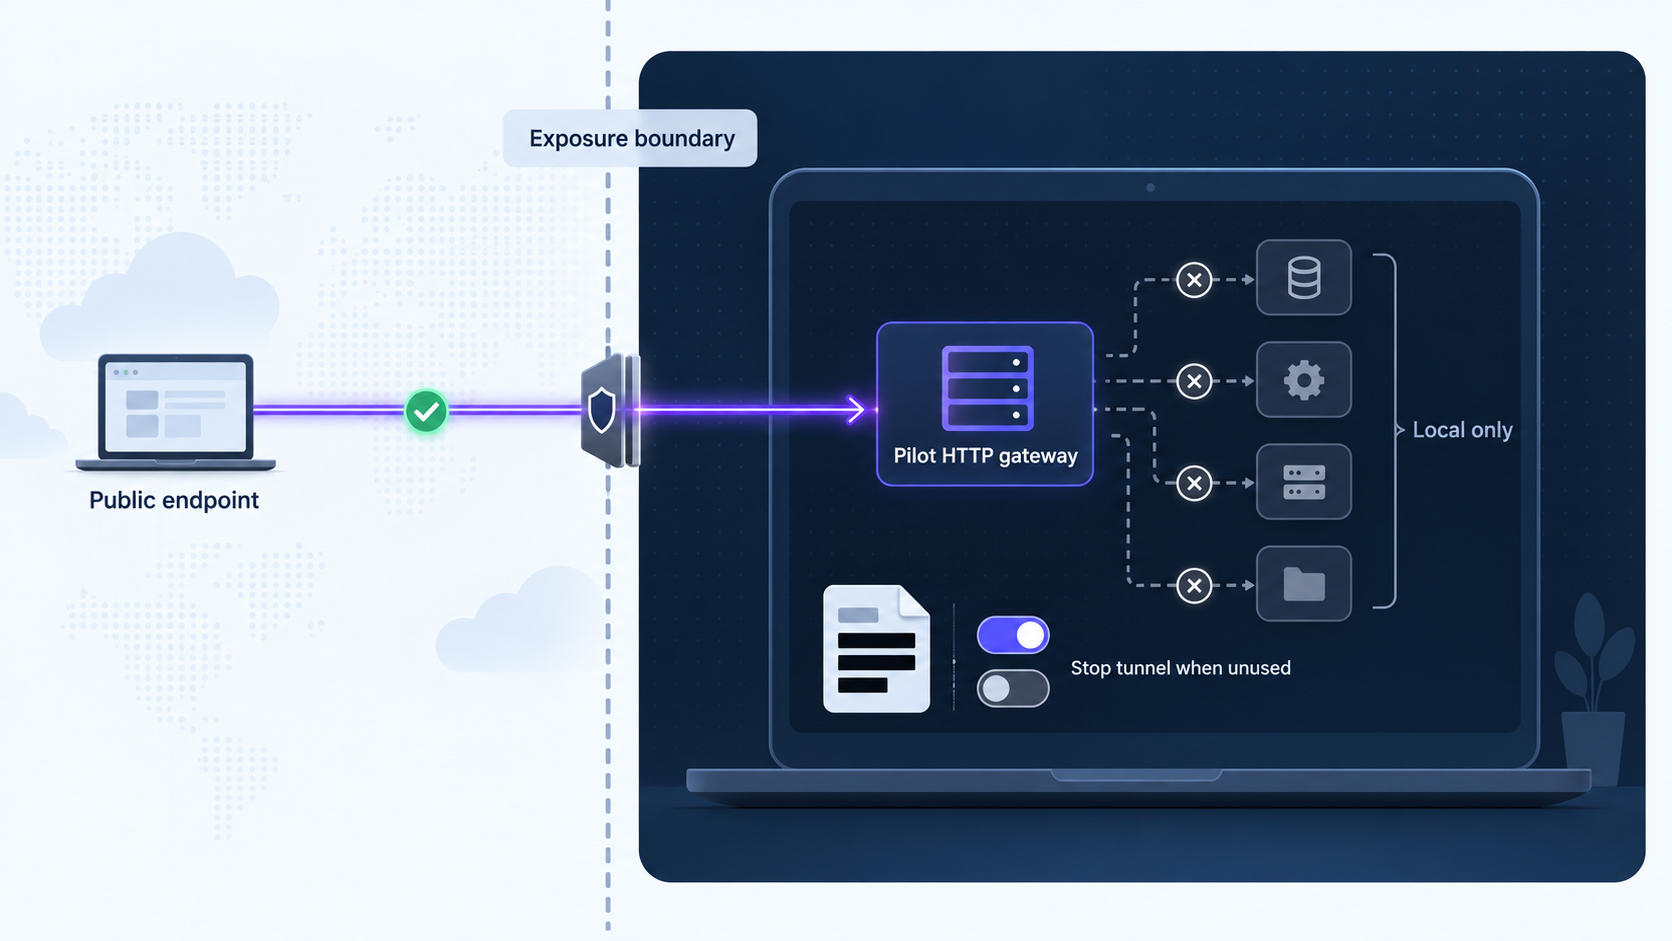
Binding Pilot to loopback and reaching it through our local client avoids opening an inbound router port. It does not make every Pilot route appropriate for anonymous internet access. Before sharing the public URL or entering it into another service, identify exactly which route and method the integration needs, what data it accepts, and what authentication or request validation Pilot supports for that route.
The evidence available for this guide does not establish gateway authentication behavior. It also does not provide specific webhook URL paths. That uncertainty matters. Do not infer that the gateway is protected merely because Pilot requires credentials for GitHub or another provider. Provider credentials used by Pilot and authentication applied to inbound gateway requests are separate security concerns.
Do not share the assigned URL until you have verified the intended route and its access controls. If Pilot's documentation for your integration requires a secret, signature, token, or provider-side verification step, configure and test it before production use. If no adequate access-control mechanism is documented for the route you need, keep the gateway local rather than assuming that the tunnel supplies application authorization.
Apply least privilege to the GitHub token as well. The token should be able to perform the required workflow in the intended repositories, but it should not automatically receive organization-wide or administrative permissions. Keep human review in the path for sensitive changes and inspect pull requests just as you would inspect code submitted by another contributor.
Avoid logging or copying complete request bodies when they may contain source fragments, issue content, tokens, or provider secrets. If you use a process manager or centralized logging system, review its retention and access controls. These controls belong to the operating environment and should be chosen deliberately rather than inferred from Pilot or Localtonet.
Operate and maintain the combined setup
A working deployment has three independent lifecycle states: the Pilot process, the Localtonet client, and the HTTP tunnel. Plan monitoring and restart behavior for each one. A tunnel can remain configured while Pilot is stopped, and Pilot can remain healthy while the Localtonet client is disconnected. Those states produce different symptoms and should be diagnosed separately.
Starting a routine session
Start Pilot with the provider and autonomy settings you have reviewed. Confirm local reachability at 127.0.0.1:9090. Start the Localtonet client, confirm that the correct device is connected, and then start the HTTP tunnel. Testing locally before testing publicly reduces the number of variables involved in each check.
Stopping remote access
When remote access is temporary, stop the tunnel as soon as the integration or test is complete. If the tunnel will not be used again, delete it. Stopping Pilot alone removes the local application but can leave a configured public endpoint attempting to reach an unavailable target. Stopping the Localtonet tunnel communicates the intended exposure state more clearly.
Updating Pilot
Pilot documents a pilot upgrade command and a hot-upgrade action from its dashboard interface. Before using any upgrade method, review the release you are moving to, preserve relevant configuration, and know which installed binary your shell is invoking. If your operational policy requires building an audited source revision, check out the intended revision and repeat the documented build and global installation process instead of assuming that a different installation channel preserves the same source-selection policy.
After any upgrade, repeat the layered verification:
- Confirm that the installed
pilotcommand resolves as expected. - Start Pilot with the intended provider and environment options.
- Verify local HTTP reachability at
127.0.0.1:9090. - Run a bounded application workflow in a test repository.
- Confirm that the Localtonet public URL still reaches the intended route.
Changing the gateway state
If remote gateway access is not needed, Pilot's documented --no-gateway option disables the HTTP server. Do not use that option when the Localtonet HTTP tunnel is expected to work, because there will be no server listening at the configured local target. Conversely, if the HTTP gateway is not part of your operating requirements, disabling it reduces the number of active local interfaces.
Do not silently change the gateway address or port in one layer. If Pilot is configured differently from its default, update the Localtonet local target to match and repeat the local test first. This guide uses 127.0.0.1:9090 because that is the documented default, not because every customized installation must use it.
Troubleshoot installation, gateway, and tunnel failures
The source build fails immediately
Run go version and confirm Go 1.22 or newer. Confirm that make is installed and that you are inside the cloned pilot directory. Preserve the first meaningful compiler or dependency error rather than rerunning the command repeatedly and focusing only on the final Make failure.
If you deliberately checked out a tagged revision, confirm that the working tree is on the revision you intended to build. Avoid mixing unreviewed local modifications with a reproducible installation.
The global installation step is denied
The documented command uses sudo make install-global, so the current account must be allowed to elevate privileges. Do not work around a permission error by recursively changing ownership or permissions on broad system directories. Use an approved installation method for the machine, or ask its administrator to perform the global installation.
The shell cannot find Pilot
Run:
command -v pilot
If no path is returned, inspect the output from sudo make install-global. A successful build does not necessarily mean the global installation succeeded. Also check whether another Pilot installation method previously added a different binary to the shell path. Resolve multiple installations before upgrading or debugging behavior.
Pilot starts but cannot use GitHub
Confirm that GITHUB_TOKEN is present in the environment of the process that launches Pilot. A variable exported in one terminal is not automatically available to an unrelated service, another user, or a different shell session. Verify that the token is valid and has the minimum repository permissions required by your chosen Pilot workflow.
Also confirm that the issue has the documented pilot label and that Pilot is running with --github. A working HTTP gateway does not prove that GitHub polling is configured correctly.
Nothing listens on 127.0.0.1:9090
Confirm that the Pilot process is still running and that it was not launched with --no-gateway. Review its startup output for a port conflict or configuration failure. If you customized the gateway address or port, test that configured value rather than the default from this guide.
Run the local HTTP request again:
curl -i http://127.0.0.1:9090/Do not proceed to Localtonet until the local connection succeeds. Tunneling cannot repair an application that is not accepting connections.
The local request works but the public URL does not
Check each Localtonet lifecycle requirement:
- The Localtonet client is running and connected.
- The selected authentication token belongs to the intended device.
- The HTTP tunnel targets
127.0.0.1and port9090. - The tunnel is started rather than only saved.
- The client runs on the Pilot host when the target is the loopback address.
A frequent architectural mistake is running our client on another computer while configuring 127.0.0.1. On that other computer, loopback refers to the other computer itself, not to the Pilot host. Either run the Localtonet client on the Pilot machine or deliberately configure a network-reachable Pilot address after assessing the LAN exposure implications.
The public URL responds, but the integration fails
Separate transport success from application success. An HTTP response from the public address means the request reached an HTTP server. It does not prove that the route, method, request body, signature, or credentials match a specific Pilot integration.
Consult the Pilot documentation for the exact integration being configured and use only its documented route. The evidence available for this article does not define generic Pilot webhook paths, so appending guessed paths such as /webhook, /api, or /health would be unreliable and potentially unsafe.
The public address stops working intermittently
Determine which lifecycle component changed state. Check whether Pilot exited, whether the machine slept or restarted, whether the Localtonet client disconnected, or whether the tunnel was stopped. The public endpoint is available only while the selected client device is connected and the tunnel is running, and requests also require Pilot to remain available at the local target.
Frequently asked questions
What version of Go is required to build Pilot from source?
Pilot documents Go 1.22 or newer as a build requirement. Check the installed toolchain with go version before running make build.
Is Claude Code CLI required?
The Pilot requirements list Claude Code CLI 2.1.17 or newer. Verify that it is installed and appropriately authenticated before expecting Pilot to complete development work. Building the Go source and executing AI-assisted tasks are separate validation stages.
Is an OpenAI API key required for Pilot?
Pilot lists an OpenAI API key as optional for voice transcription. It is not listed as a general prerequisite for compiling Pilot from source. Configure optional provider credentials only when you use the feature that requires them.
What address does Pilot's HTTP gateway use by default?
The documented default is 127.0.0.1:9090. Because 127.0.0.1 is loopback, the simplest Localtonet setup runs our client on the same machine as Pilot and points the HTTP tunnel to that address and port.
How do I disable the Pilot HTTP gateway?
Pilot documents the --no-gateway startup option for disabling the HTTP server. If you use that option, an HTTP tunnel targeting port 9090 will not work because there is no Pilot gateway for the tunnel to reach.
Does Pilot provide a browser dashboard at the public tunnel URL?
The evidence used for this guide establishes a local HTTP gateway and a terminal dashboard, but it does not establish that the gateway root is a browser-based dashboard. Do not describe or depend on a web interface unless the documentation for your installed Pilot version explicitly provides one.
Which Pilot webhook path should I expose?
This guide cannot name a generic webhook path because the supplied Pilot evidence does not document one. Use the exact route, HTTP method, validation mechanism, and payload format from the documentation for the specific integration you are configuring. Never guess a path.
Does Localtonet require inbound router port forwarding?
No. Our client establishes an outbound connection to a Localtonet relay server, so this workflow does not require inbound router port forwarding, firewall changes, a VPN, or a public IP address.
Is the Localtonet URL always available after I create the tunnel?
No. Creating a tunnel does not mean it is running. The selected client device must be connected, the tunnel must be started, and Pilot must be running at the configured local target. You can later stop or delete the tunnel when remote access is no longer needed.
Does Localtonet make an unauthenticated Pilot route safe to publish?
A tunnel provides connectivity, not a substitute for application authorization. Confirm Pilot's documented authentication or request-validation controls for the route you need. If adequate protection is not documented, keep the gateway local instead of assuming that a public URL is safe.
Connect your verified Pilot gateway with Localtonet
Build and test Pilot locally first, then create an HTTP tunnel to 127.0.0.1:9090 from the same device. Keep credentials private, use only documented Pilot routes, and stop the tunnel whenever remote access is not required.


