

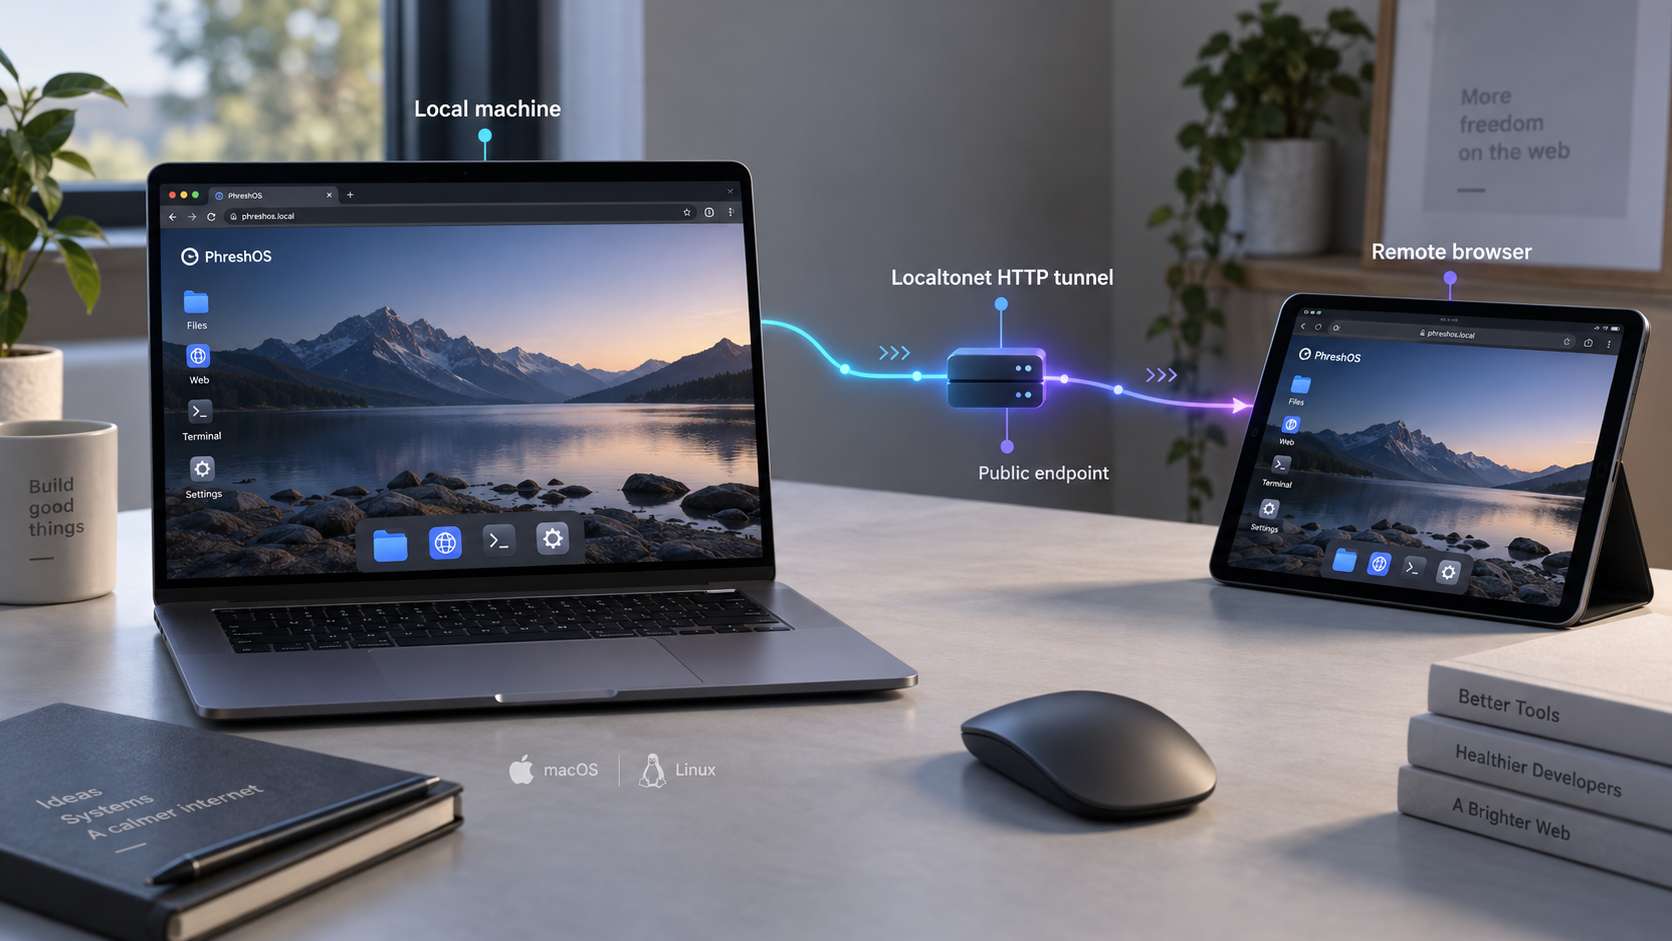
Run a browser-based PhreshOS desktop locally, verify it, and make it available through a controlled HTTP tunnel
PhreshOS is an experimental, open-source system for running web-based Programs on your own machine and using them through a browser desktop. This guide covers the supported installation workflow for macOS and Linux, the initial owner-account setup, local verification, operational boundaries, and practical troubleshooting. After the local system works, we show how to connect its HTTP endpoint to Localtonet without configuring inbound router port forwarding, firewall rules, a VPN, or a public IP address. PhreshOS is explicitly described by its project as experimental and not ready for production use, so remote access should be treated as a testing workflow rather than a production deployment.
📋 What's in this guide
What PhreshOS is and what this installation creates
PhreshOS is a self-hosted system for applications built with web technologies. It runs on the machine where you install it, keeps its Programs running there, and provides a Desktop that you open in a browser. The browser displays the state managed by the System, but it is not the place where that state is held. A Program's server can continue running on the host even when no browser window is open.
The project uses the word Program for an application built on the System. PhreshOS supplies common platform functions such as owner authentication, communication between Programs, storage, uploads, logs, and permissions. The Desktop itself, including elements such as Settings and the file manager, is composed of Programs running on the System.
For an ordinary installation, the important networking detail is simple: PhreshOS starts a local HTTP service and prints the Desktop address. The documented address is usually http://localhost:4300. The word “usually” matters because the project does not guarantee that this address will be identical in every configuration. Always use the address printed by your own installation rather than assuming port 4300.
The PhreshOS project explicitly states that the software is not yet ready for production use. Do not treat this tutorial as a recommendation to place business-critical data, production workloads, or irreplaceable services on the current release. Test with non-sensitive data, keep independent backups, and expect behavior or installation details to change between releases.
Installed release versus development checkout
This article focuses on the normal installation path, which uses the published @phreshos/cli package and the phresh system install command. That is the relevant path when your goal is to run and self-host PhreshOS.
The source repository also documents a development workflow for contributors. That workflow requires Bun 1.3 in addition to Node.js 24.15 or newer, stores development data in a storage/ directory inside the repository, and serves the development Desktop on the first free port beginning at 5300. An installed System instead uses ~/.phreshos and ports beginning at 4300. Because those modes use different storage locations and port ranges, they can run side by side.
Do not clone and run the source-development workflow merely to obtain a normal self-hosted installation. Use it only when you intend to modify, test, or contribute to the PhreshOS source. The global CLI installation described below is shorter and matches the project's standard installation instructions.
Prerequisites for macOS and Linux
Before installing anything, confirm that the host is appropriate for an experimental user-level service. The PhreshOS documentation supports the standard installation workflow on macOS and Linux. Windows is not fully supported yet: the System can install and run there, but some Programs do not work. This guide therefore does not present Windows as an equivalent path.
| Requirement | What you need | Why it matters |
|---|---|---|
| Operating system | macOS or Linux | These are the platforms covered by the documented standard installation workflow. |
| Node.js | Version 24.15 or newer | The PhreshOS CLI and installed System require this minimum version. |
| Package installation | Permission to install an npm package globally for your environment | The supported command installs @phreshos/cli globally. |
| Browser | A browser that can reach the installed System | The Desktop and initial owner-account workflow are browser-based. |
| Persistent user environment | A user account suitable for running the PhreshOS user service | The installer registers and starts the System as a service of the current user. |
| Localtonet, optional | The Localtonet client on the PhreshOS host or another device that can reach it | This is required only for the remote-access part of the guide. |
Check Node.js before installing the CLI
Open a terminal and inspect the installed Node.js version:
node --versionContinue only if the reported version is 24.15 or newer. A version such as 22.x, 20.x, or an earlier 24.x release does not satisfy the documented requirement. If the command is not found, install Node.js using the supported method for your operating system or existing development environment, then open a new terminal and check again.
This guide deliberately does not prescribe one universal Node.js installation command. Package names, repositories, installation prefixes, shell initialization, and available versions differ across macOS distributions, Linux distributions, and Node version managers. Whichever method you use, the final requirement is the same: the terminal that runs npm and phresh must resolve Node.js 24.15 or newer.
You can also confirm that npm is available:
npm --versionA valid version response confirms that the npm command is available. It does not by itself prove that global installation permissions are configured correctly. If global package installation later fails with a permissions error, correct the ownership or package-manager configuration for your Node.js environment rather than repeatedly running the command with elevated privileges.
PhreshOS is installed as a service of the user who runs the installer. Run the CLI installation and System installation from the intended account. Switching between a normal account and an administrator account can result in different global package locations, home directories, service ownership, and data locations.
Plan the first visit before adding remote access
The first browser visit creates the PhreshOS owner account. Complete that step locally before creating a public tunnel. Otherwise, someone who reaches an uninitialized public endpoint before you do may be able to reach the owner-account creation flow. A tunnel should be the final connectivity step, not the first installation step.
For the same reason, do not configure Localtonet until you have confirmed the exact local address, completed the owner setup, signed out and back in successfully, and decided what data is appropriate for this experimental environment.
Install and start PhreshOS
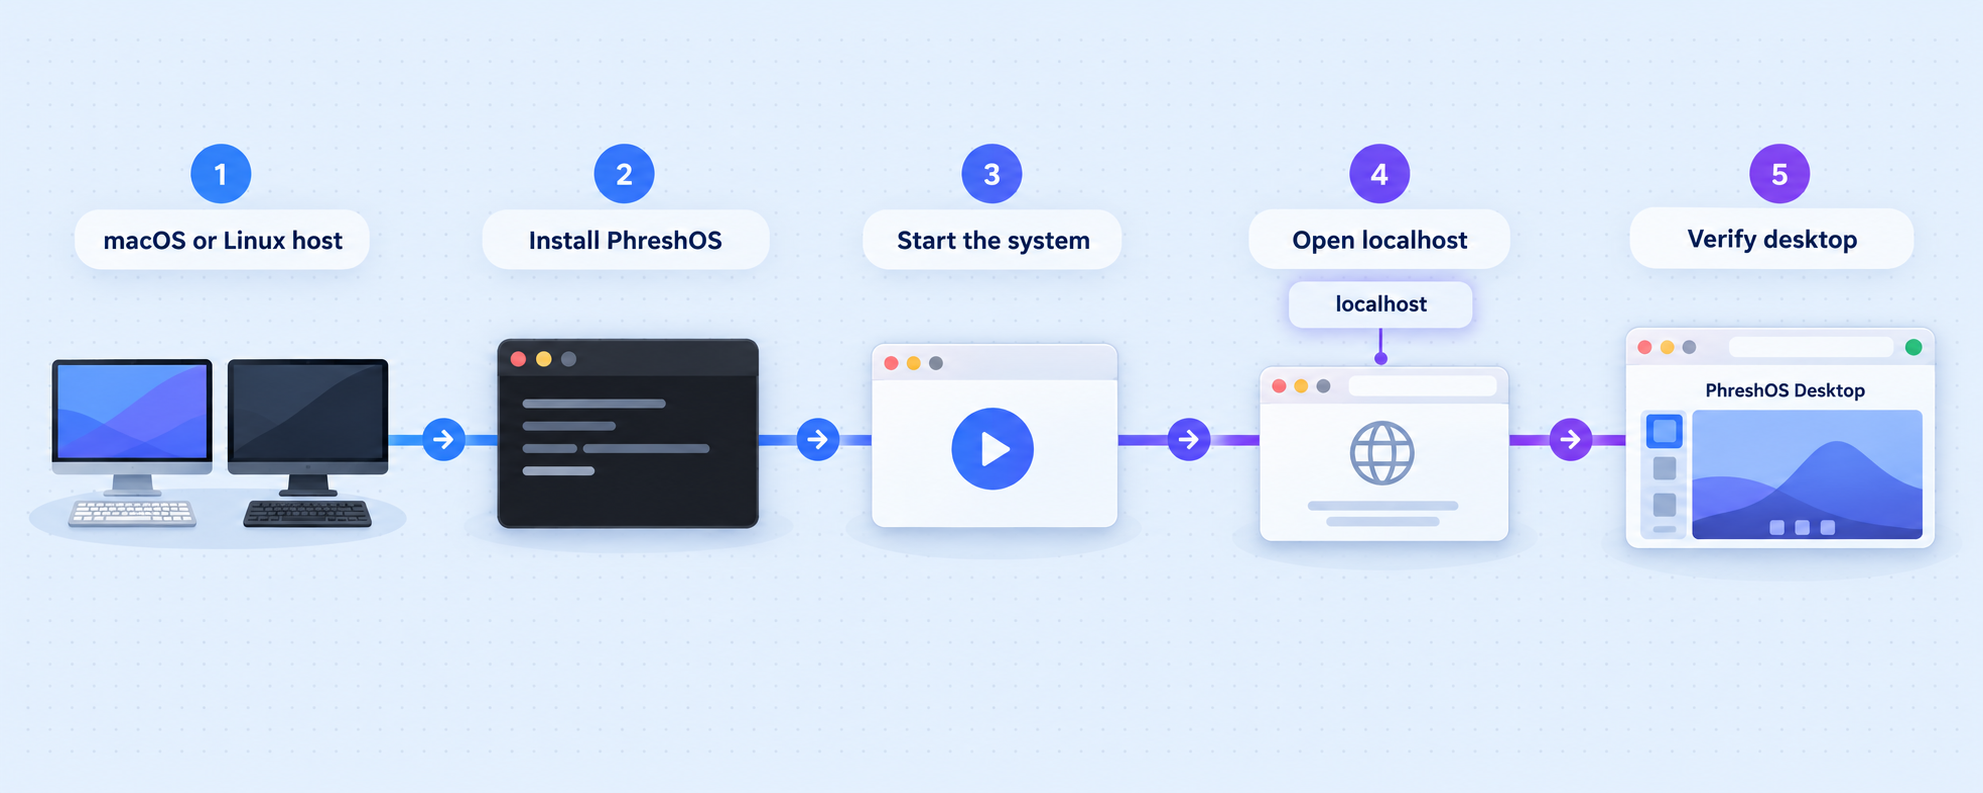
The official standard installation consists of two commands. The first installs the PhreshOS command-line interface globally. The second installs the System as a service for your user, starts it, and prints the Desktop address.
Install the PhreshOS CLI globally
In a terminal running Node.js 24.15 or newer, install the published @phreshos/cli package with npm.
Install and start the System
Run the documented System installation command. It installs PhreshOS as a service of the current user, starts that service, and prints the Desktop address. Save the exact address shown in your terminal.
npm install --global @phreshos/cli
phresh system install
Watch the terminal output from the second command. A normal result includes a Desktop address, usually:
http://localhost:4300Use the address actually printed by the installer. Do not change the port to 4300 merely because it is the usual value. An existing process, a previous installation, or a deliberate configuration can result in a different address.
What the installation command does
The phresh system install command is more than a one-time foreground launch. According to the project documentation, it installs the System as a service belonging to your user and starts it. That means you should not need to leave the installation terminal open merely to keep the service alive.
The installed System normally keeps its data under ~/.phreshos. Treat that directory as application data, not as a disposable package cache. Do not manually edit, partially delete, synchronize, or replace its contents while the service is active unless current PhreshOS documentation specifically instructs you to do so.
PhreshOS supports changing its home directory and port through PHRESHOS_HOME and PHRESHOS_PORT in its documented development and configuration model. However, service-level environment configuration varies by operating system and installation state. This guide does not invent a macOS or Linux service-file procedure for applying those variables. If you need a non-default storage location or port, make that decision before depending on the installation and follow the current PhreshOS installation documentation for the service configuration.
Moving ~/.phreshos while the service is running, or setting an environment variable only in an interactive shell when the background service does not inherit it, can leave the service using an unexpected location. Verify the active configuration before deleting or moving any existing data.
If the global command is unavailable
If npm reports success but the shell says phresh is not found, the most likely category of problem is command-path resolution. Close and reopen the terminal first. Then confirm that the npm global executable location is included in the shell environment used by your account. This often occurs when multiple Node.js installations or version managers are present.
Avoid installing the CLI repeatedly under different users. Doing so can create several copies in different prefixes without fixing the active shell path. First determine which node and npm installation your terminal is actually using, then keep the CLI associated with that environment.
Create the owner account and verify the local Desktop
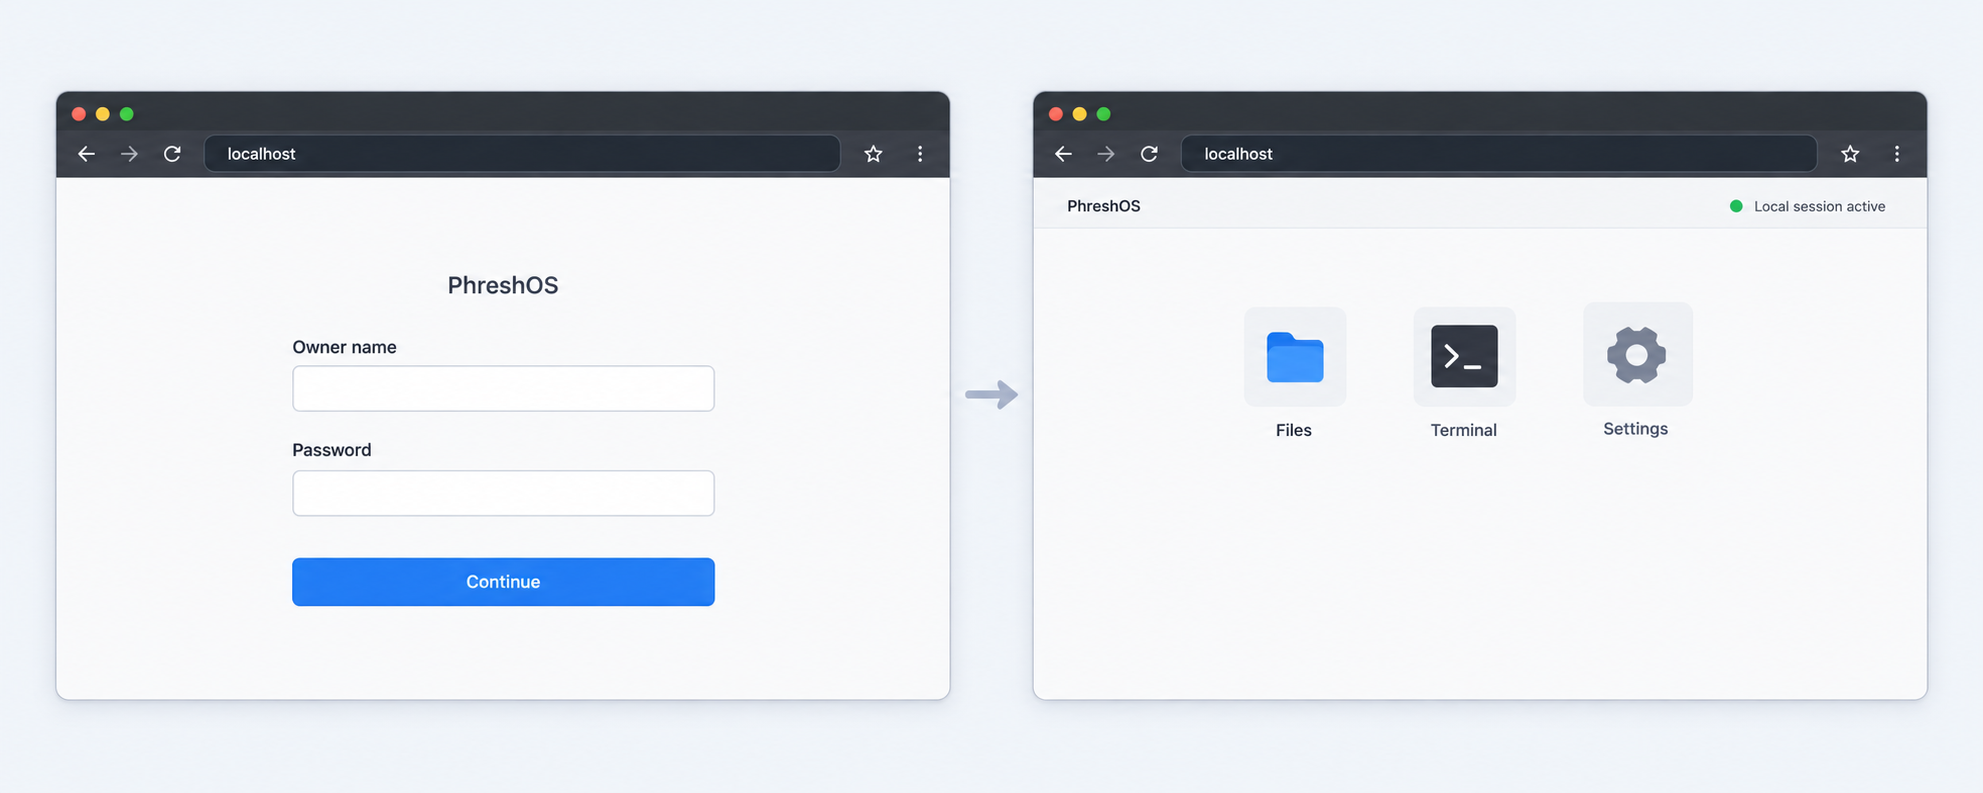
Installation is not complete merely because the command exits without an obvious error. Verify the actual HTTP endpoint, finish the first-visit owner setup, and test a fresh authenticated session before adding a tunnel.
Open the printed Desktop address
On the PhreshOS host, open the exact HTTP address printed by the installer. It is usually http://localhost:4300, but your terminal output is authoritative for your installation.
Create the owner account
Complete the first-visit owner-account workflow in the browser. Use credentials that are unique to this installation and store them securely.
Confirm that the Desktop loads
Verify that the Desktop renders and that its core interface is usable. A partially loaded page or repeated connection error is not a successful verification.
Test a new authenticated session
Sign out if the interface provides that action, or use a separate private browser window, then verify that the owner sign-in works. This confirms more than the initial account-creation state.
Why local verification must come first
Separating application troubleshooting from tunnel troubleshooting saves time. If the Desktop does not load directly on the host, a public tunnel cannot make it healthy. Localtonet forwards traffic to a local target; it does not install, start, repair, or configure the target application.
Begin with the same machine because localhost refers to the device making the connection. If you enter http://localhost:4300 in a browser running on another computer, that browser will look for port 4300 on the other computer, not on the PhreshOS host.
The same rule applies to the Localtonet client. When our client runs on the PhreshOS machine, a target of localhost refers to PhreshOS correctly. If our client runs on a separate device, localhost refers to that separate device. In that arrangement, the client needs a local-network address and port that can actually reach the PhreshOS service. The supplied PhreshOS evidence does not establish a supported procedure for changing its listening interface, so the same-machine arrangement is the clearest documented workflow.
A practical local acceptance checklist
- The installation command prints a Desktop address.
- The printed address opens on the host without a connection-refused error.
- The first-visit workflow allows you to create the owner account.
- The Desktop loads rather than displaying only a blank or partial page.
- A fresh browser session can reach the sign-in flow.
- Your owner credentials work in that fresh session.
- Refreshing the Desktop does not immediately lose access to the running System.
These checks do not prove production readiness, data durability, or compatibility with every Program. They establish only that the installed System is running and that its basic local browser workflow is usable.
Operate, update, and develop around the installed System
Once installed, PhreshOS runs as a user service. Routine administration should preserve three boundaries: the service belongs to the installation user, its normal data resides under that user's home directory, and the browser Desktop is only one client of the running System.
Starting, stopping, updating, and removing PhreshOS
The PhreshOS project states that its installation documentation covers updating, stopping, removing the System, and changing where it stores data. The evidence available for this article does not include the exact commands for those operations. We therefore do not reproduce or guess them.
Before performing an update or removal, consult the currently installed CLI's supported command set and the current PhreshOS installation documentation. Confirm the command against the release you are operating, especially while the project remains experimental. Do not assume that a command from an older release, a development branch, or an unofficial post still matches the installed version.
Stop public access before maintenance. With Localtonet, you can stop the tunnel independently of the PhreshOS service. This allows you to remove the public route while updating, investigating data, or testing a changed configuration locally.
Backups and experimental data
The documented installed data location is ~/.phreshos. That identifies where the installed System normally stores its state, but the supplied project evidence does not define an application-consistent backup procedure, snapshot command, restore command, or compatibility guarantee across releases.
For that reason, do not claim that copying the directory while the service is active creates a reliable backup. A cautious workflow is to stop the System using the currently documented command, preserve the relevant data using your normal host backup process, and then restart it according to the current documentation. Test restoration separately before relying on a backup.
Keep important source files and irreplaceable data outside a single experimental installation. A tunnel changes reachability, not backup quality or application maturity.
Creating a first Program
After the System is working, the project documents a simple developer workflow for creating a Program:
phresh create my-program
cd my-program
phresh dev
The generated Program is intended to provide a window and a server that can run in your System while you edit it. This workflow is separate from installing PhreshOS itself. You do not need to create a Program merely to verify the Desktop or to connect the Desktop through Localtonet.
Program servers can continue running on the machine independently of an open browser. PhreshOS also provides communication, storage, uploads, logs, and permissions at the System level. Applications should still request only the permissions they need, particularly when they can reach host files, network resources, or commands.
Running the repository from source
Contributors who intentionally want the source-development environment need both Bun 1.3 and Node.js 24.15 or newer. From the repository, the documented setup is:
bun install --frozen-lockfile
bun run dev
Development mode stores its data in storage/ within the repository and starts the Desktop on the first free port beginning at 5300. The installed System uses ~/.phreshos and ports beginning at 4300. If both are running, make sure you know which printed endpoint you are testing and which one a Localtonet tunnel targets.
The source repository also documents these validation commands:
| Command | Purpose | When to use it |
|---|---|---|
bun run check |
Type-checks the source | Use while changing the PhreshOS codebase. |
bun run build |
Builds the server and Desktop into dist/ |
Use to validate a source build. |
bun run test |
Runs the tests in tests/ |
Use to check behavior covered by the project tests. |
bun run verify |
Runs checking, building, and testing, including packaging and boot verification | Use for a broader release-style validation. |
bun run pack |
Builds the release archive and checksum | Use when working on release packaging. |
These Bun commands belong to the source repository workflow. They are not required for the normal global CLI installation.
Expose the verified PhreshOS Desktop with Localtonet
Once PhreshOS works locally and the owner account exists, you can connect its HTTP endpoint to Localtonet. Our client establishes an outbound connection to a Localtonet relay server. This provides a public URL without requiring inbound router port forwarding, firewall changes, VPN setup, or a public IP address.
An HTTP tunnel is the appropriate tunnel family because the PhreshOS Desktop is served over HTTP. The tunnel points to a local IP address and port that the Localtonet client can reach. For the simplest arrangement, run our client on the same macOS or Linux machine as PhreshOS and use the address printed by the PhreshOS installer as the basis for the local target.
Creating the configuration does not make it active. You must start the tunnel. It remains available only while the selected Localtonet client is connected and the tunnel is running.
Install and run the Localtonet client
Install our client on the PhreshOS host, or on another device that can reach the PhreshOS HTTP service. The same-host arrangement avoids confusion about what localhost means. Use the current Localtonet installation instructions for your operating system rather than an unverified command.
Authenticate or select the client device
Use the device-specific authentication token associated with the client that will run the tunnel. Keep the token private. Never place it in screenshots, shell history shared with others, source code, or a public article.
Select an available relay server
Choose a server or region currently available in your Localtonet dashboard. Available values can vary, so this guide does not hardcode a server code or promise that every location is available on every plan.
Create an HTTP tunnel to the local PhreshOS endpoint
Configure the HTTP tunnel with the local IP address and port printed by PhreshOS. For a same-machine installation that printed http://localhost:4300, the target is the loopback host and port 4300. If your installation printed another port, use that port instead.
Start the tunnel
Start the configured tunnel in the dashboard. Wait until the selected client is connected and the tunnel is running before testing its assigned public address.
Test the assigned public URL
Open the Localtonet URL from a separate browser session or another network. Confirm that the PhreshOS sign-in flow appears and that an unauthenticated visitor is not placed directly into an authenticated owner session.
HTTP tunnels can use a Random Sub Domain, Custom Sub Domain, or Custom Domain process type, with availability and configuration depending on the current dashboard and plan. All three serve the target content at a public HTTPS address. For an initial experimental test, a generated address avoids adding DNS configuration to the troubleshooting path.
If you later choose a custom domain, follow the current Localtonet documentation for its DNS requirements. DNS record details can change and are not established by the evidence supplied for this tutorial, so we do not invent record names or values here.
For the current dashboard workflow, consult our Localtonet HTTP tunnel documentation. Use it to confirm the current interface labels and available process types while keeping the core sequence above unchanged.
Verify both sides after the tunnel starts
A useful remote test checks more than whether some HTML appears. Open the public URL in a browser that does not already hold your local PhreshOS session. Confirm that the page loads, the owner authentication boundary remains present, and the Desktop functions after sign-in. Then stop the tunnel and verify that the public URL no longer provides access.
Also confirm that local access still works directly. If local access succeeds but public access fails, investigate the Localtonet client, selected device, tunnel state, local target, and public URL. If both local and public access fail, troubleshoot PhreshOS first.
Security boundaries for an experimental web desktop
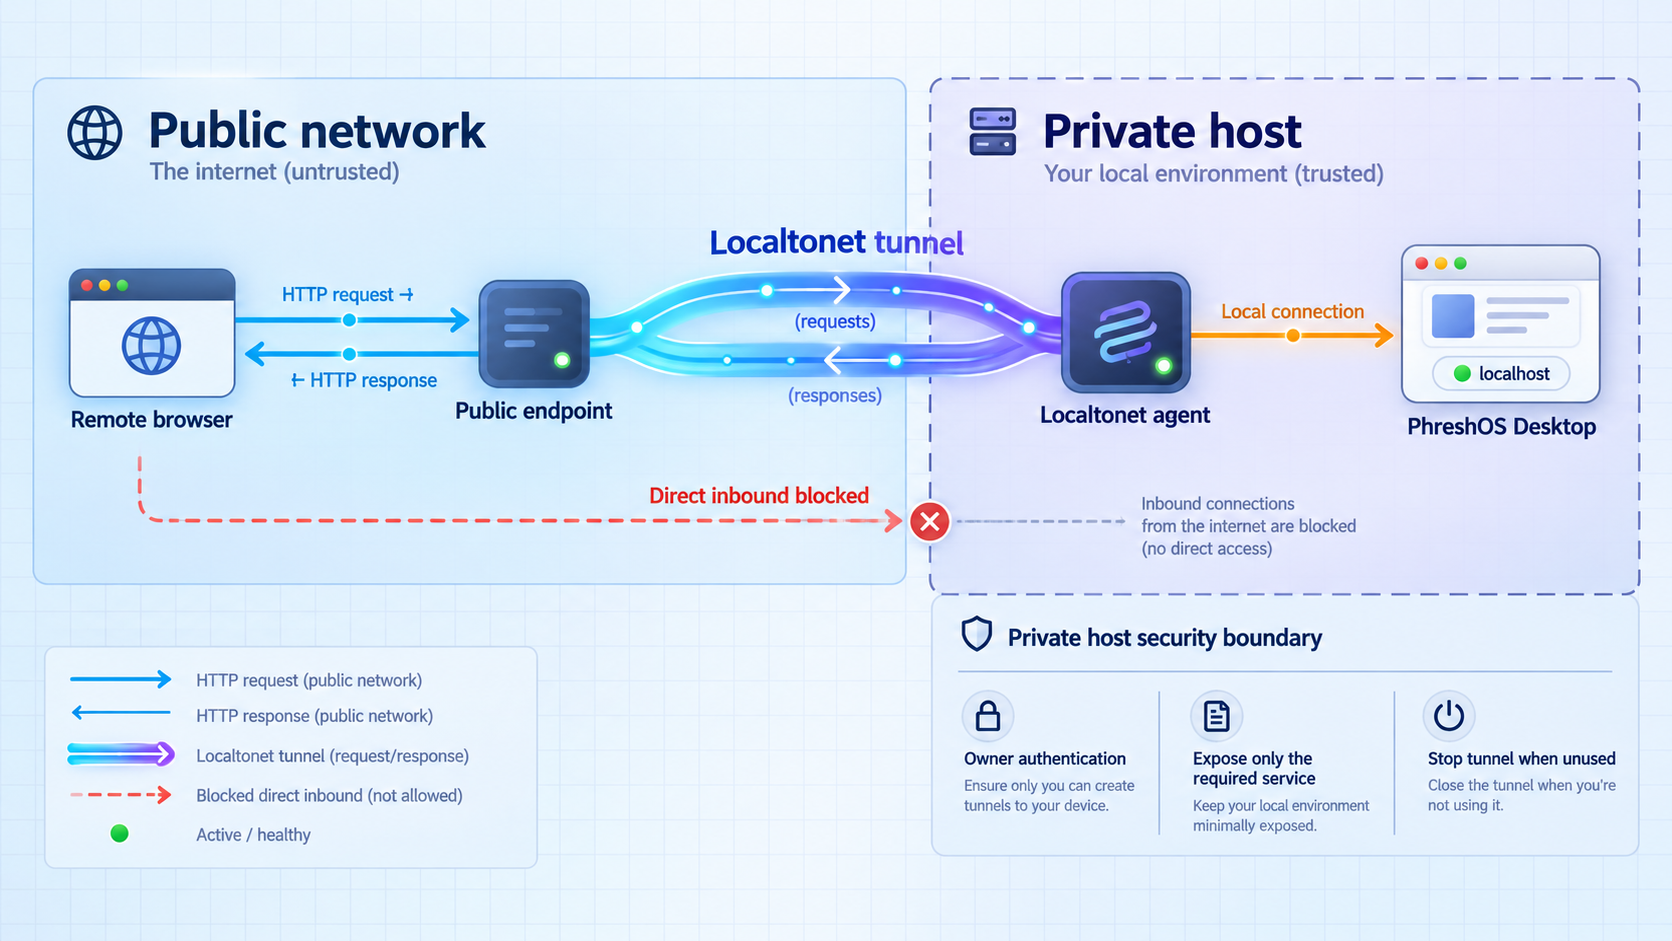
A public URL makes the PhreshOS HTTP service reachable from the internet. It does not make the application production-ready, add application-level authorization, reduce Program permissions, or replace backups. PhreshOS remains responsible for its owner sign-in and application behavior, while Localtonet provides the path from the public address to the configured local endpoint.
Only expose a PhreshOS installation you own or are authorized to administer. Follow workplace, school, hosting-provider, and network policies. A tunnel removes the need for inbound router configuration, but it does not remove your responsibility to use authentication, least privilege, appropriate access controls, and approved connectivity.
Use short exposure windows while evaluating
Because PhreshOS is experimental, a cautious evaluation pattern is to keep it local by default, start the tunnel only when remote testing is needed, and stop it immediately afterward. This reduces the period during which the endpoint is publicly reachable without pretending that limited exposure time fixes application vulnerabilities.
Record the Localtonet tunnel you started, the device selected to run it, and the local port it targets. This is particularly important if you also run a PhreshOS source-development instance beginning at port 5300. Accidentally targeting development mode instead of the installed System can expose test data or unfinished code.
Troubleshooting installation and remote access
The installer rejects the Node.js environment
Run node --version in the same terminal used for installation. PhreshOS requires Node.js 24.15 or newer. If you recently upgraded Node.js but the terminal reports an older version, the shell may still be resolving another installation. Open a new terminal and inspect your version-manager or command-path configuration.
npm reports a global installation permission error
This indicates a problem with the global package location or its ownership, not a reason to guess at PhreshOS service files. Correct the Node.js and npm installation for your user. If a version manager is already in use, make sure it is initialized in the current shell. Avoid mixing repeated administrator-level and user-level installations because the resulting CLI may belong to a different account from the service you intend to run.
The phresh command is not found
Restart the terminal after the global package installation. Confirm that the active shell can find globally installed npm executables and that npm belongs to the same Node.js environment you checked. Multiple Node installations are a common source of mismatched global package paths.
The local Desktop refuses the connection
First verify that you copied the exact address printed by phresh system install. Do not assume the port. Confirm that you are testing on the PhreshOS host when using localhost. If the endpoint previously worked but no longer does, the user service may not be running. Use the current PhreshOS installation documentation for the supported service start or status operation because exact commands were not included in the evidence for this article.
The page loads incompletely or behaves unexpectedly
Test in a fresh browser session and check whether the issue occurs directly at the local URL. If it fails locally, stop investigating the tunnel. Remember that PhreshOS is experimental, so a browser, Program, or release-specific defect is possible. Preserve relevant logs and installation details before making destructive changes.
The local URL works but the public URL does not
Check the problem in this order:
- Confirm that the Localtonet client is running and connected.
- Confirm that the tunnel is associated with that client device.
- Confirm that the tunnel has been started rather than only created.
- Confirm that the target IP address and port match the working local PhreshOS endpoint.
- Confirm that you are using the public URL assigned to that tunnel.
- If the client is on another machine, remember that its
localhostis not the PhreshOS host.
The public URL opens the wrong service
Compare the tunnel target with the address printed by the intended PhreshOS instance. The installed System generally uses ports beginning at 4300, while source-development mode uses the first free port beginning at 5300. Other local services can also occupy nearby ports. Stop the tunnel until you have identified the correct endpoint.
The tunnel worked and then became unavailable
A Localtonet tunnel is available only while the selected client is connected and the tunnel is running. Check whether the machine slept, shut down, changed networks, ended the relevant user session, or stopped the client. Also confirm that the PhreshOS user service itself is still available locally.
Another device cannot reach the local address
An address using localhost is local to the machine where it is opened. The extracted PhreshOS documentation establishes the usual loopback Desktop address but does not provide enough evidence here to prescribe a supported LAN-binding configuration. Run the Localtonet client on the PhreshOS host for the straightforward workflow, or consult current PhreshOS documentation before changing its network listening behavior.
The owner-account creation page appears publicly
Stop the Localtonet tunnel immediately. Complete installation and owner initialization locally, then verify a fresh sign-in session before restarting public access. If there is any possibility that another person completed the owner flow, do not enter sensitive data. Follow the current PhreshOS recovery or removal guidance rather than assuming the installation is trustworthy.
Frequently asked questions
What version of Node.js does PhreshOS require?
The documented minimum is Node.js 24.15. Use node --version in the terminal where you plan to install the CLI. An older major release or a 24.x release below 24.15 does not meet the stated requirement.
What command installs PhreshOS on macOS or Linux?
Install the CLI with npm install --global @phreshos/cli, then run phresh system install. The second command installs the System as a service of your user, starts it, and prints the Desktop address.
Which port does PhreshOS use?
An installed System usually presents the Desktop at http://localhost:4300 and uses ports beginning at 4300. Development mode starts on the first free port beginning at 5300. Always use the address printed by your own process rather than assuming a port.
Where does an installed PhreshOS System store its data?
The documented default for an installed System is ~/.phreshos. Source-development mode instead uses storage/ inside the repository. Do not assume that copying the live directory is an application-consistent backup because the supplied evidence does not document that guarantee.
Is PhreshOS ready for production?
No. The project explicitly describes PhreshOS as experimental and not yet ready for production use. Use it for evaluation and development with non-critical data, maintain independent backups, and expect changes between releases.
Should I expose PhreshOS before creating the owner account?
No. The first visit creates the owner account. Complete that workflow locally and verify a new sign-in session before starting a public tunnel. If an uninitialized installation is already exposed, stop the tunnel and initialize it locally.
Which Localtonet tunnel type should I use for PhreshOS?
Use an HTTP tunnel because the PhreshOS Desktop is an HTTP service. Point it to the local host and port printed by the installer. When our client runs on the same machine, the usual target is the loopback host on port 4300, but the printed address must take precedence.
Does Localtonet make PhreshOS production-ready?
No. Localtonet provides connectivity from a public address to the configured local endpoint. It does not change PhreshOS maturity, repair application vulnerabilities, create backups, or replace the owner authentication and permission model.
Does remote access require router port forwarding?
Not with the Localtonet workflow described here. Our client establishes an outbound connection to a relay server, so you do not need inbound router port forwarding, firewall changes, VPN setup, or a public IP address. The client must remain connected and the tunnel must be running.
Can the Localtonet client run on a different machine?
It can run on a device that can reach the local service, but localhost would then refer to that client device rather than the PhreshOS host. The evidence supplied here does not establish a supported PhreshOS LAN-binding procedure, so running our client on the same machine is the clearest workflow.
Connect your verified PhreshOS Desktop with Localtonet
Install PhreshOS locally, create the owner account, and confirm that the Desktop works first. Then use an HTTP tunnel to provide temporary remote access without opening an inbound router port.
Get Started Free →

