

Install the terminal client, validate your Termix inventory, and prepare safe fleet operations
The Termix CLI connects a terminal to an existing Termix server and uses the hosts, credentials, permissions, and fleets configured there. This guide covers the verified npm installation path, version checks, login, host validation, script-friendly output, maintenance, and troubleshooting. It also establishes a conservative fleet-management preflight without inventing fleet subcommands that are not documented in the current public CLI reference. After the application works locally, you can optionally publish its web endpoint through a Localtonet HTTP tunnel without inbound router port forwarding, firewall changes, VPN setup, or a public IP address.
📋 What's in this guide
How the Termix CLI workflow fits together
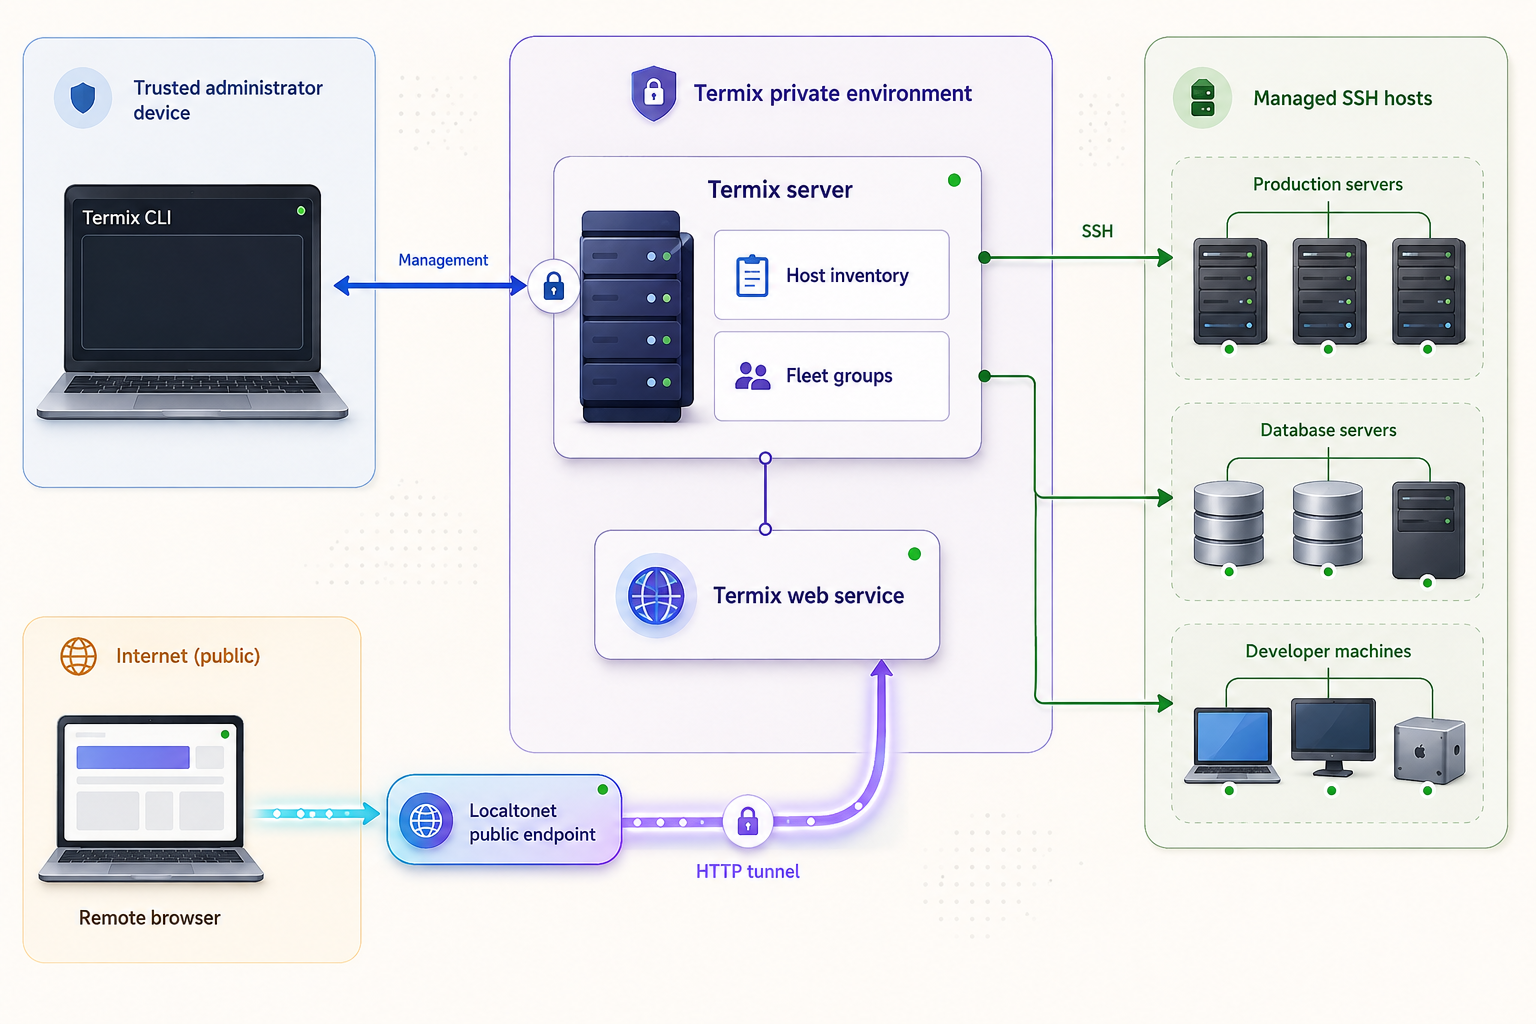
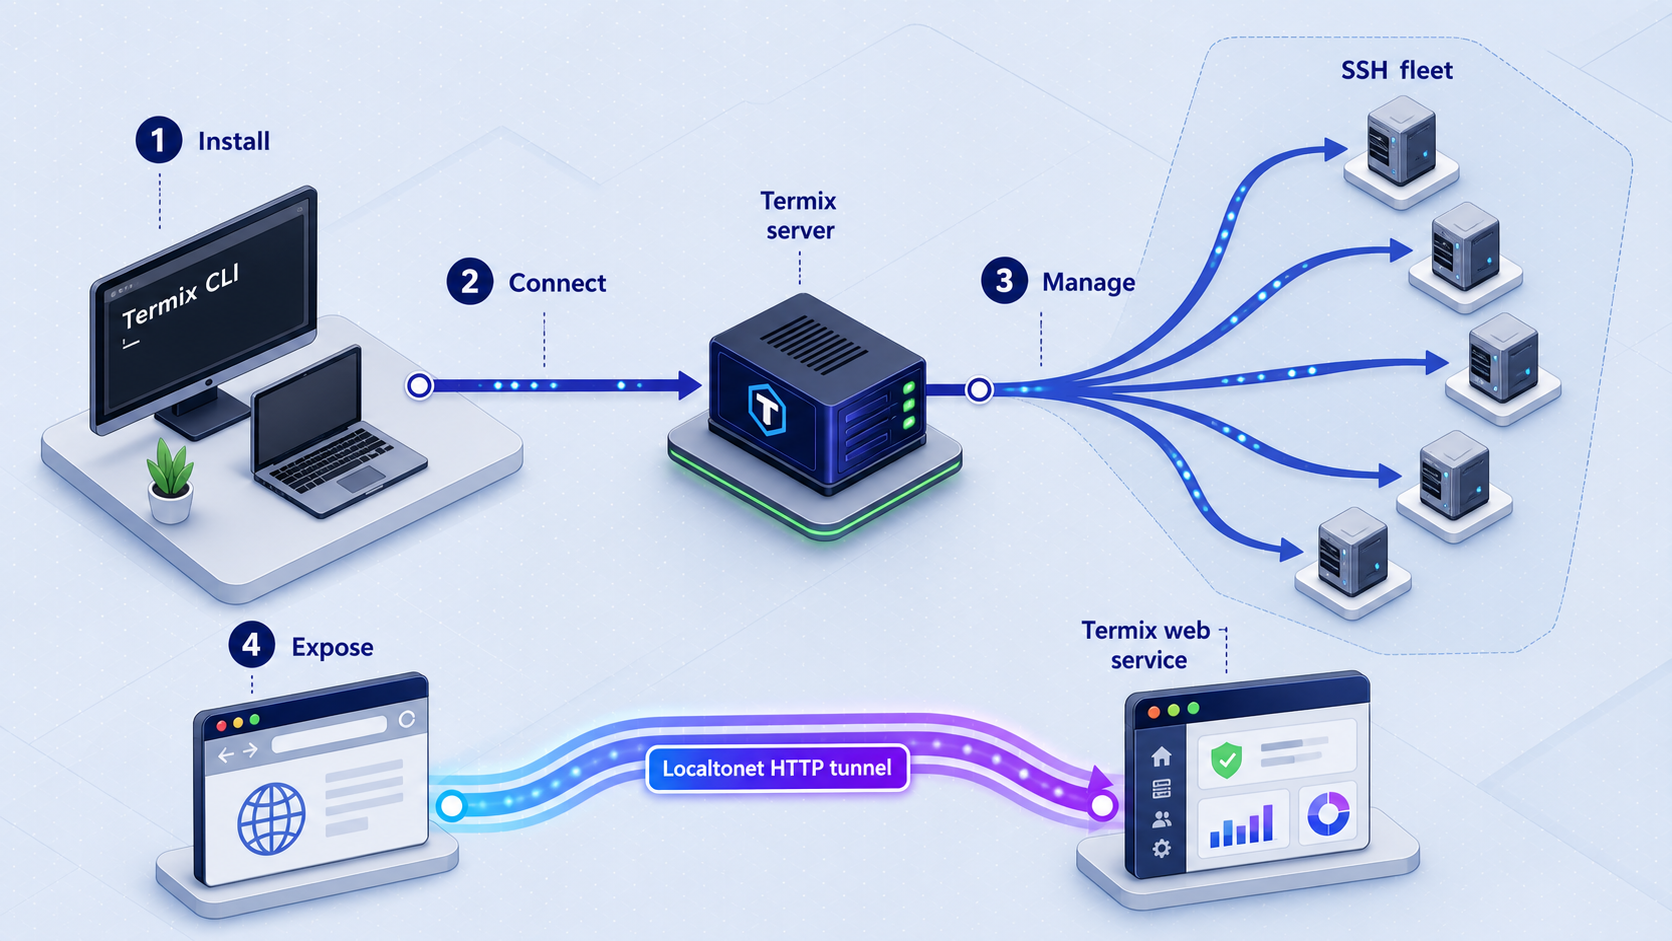
Termix is a self-hosted server-management platform that brings SSH terminals, remote desktops, file transfers, SSH tunnels, Docker and Podman controls, host metrics, alerts, automations, and fleet operations into web, desktop, and mobile interfaces. The separate Termix CLI documentation describes a command named termix that talks to a Termix server from a terminal.
Installing @termix-cli/cli does not install the Termix server, create users, discover SSH hosts, or assemble a fleet. The CLI uses resources already configured on the server and exposes only what the authenticated user is permitted to access. If your organization already operates Termix, obtain its approved base URL and an appropriate account from the administrator, then skip directly to the npm installation.
For local operation, the CLI can connect to a Termix URL reachable from the same machine or an authorized private network. A remote CLI machine likewise needs a reachable Termix URL. Localtonet can provide that route after Termix has been installed, secured, started, and tested locally.
The current public Termix CLI page confirms the fleets command group and documents termix fleets exec --help, but the supplied primary documentation does not establish exact commands for listing fleet IDs, displaying membership, executing a fleet command, or representing per-host failures. We therefore cover installation, inventory validation, JSON output, blast-radius controls, and built-in command discovery. We do not present an unverified fleet execution command as a reproducible procedure.
Prerequisites for the CLI, server, and optional tunnel
The npm-installed Termix CLI requires Node.js 20.11 or newer. Termix also provides standalone downloads for Windows, Linux, and macOS that do not require Node.js, but this tutorial focuses on npm because its package name and installation command are explicitly documented.
The optional manual server build has a different baseline: Git, Node.js 18 or newer, npm, Docker, Docker Compose, and OpenSSL when HTTPS is used. If one machine will build the server and run the npm-installed CLI, Node.js 20.11 or newer satisfies both documented Node.js minimums.
| Component | Requirement | Purpose |
|---|---|---|
| Termix CLI through npm | Node.js 20.11 or newer and npm | Installs and runs the global termix executable. |
| Existing Termix deployment | Reachable base URL and authorized user | Provides the inventory, permissions, and server API used by the CLI. |
| Manual Termix source build | Git, Node.js 18 or newer, npm, Docker, and Docker Compose | Supports the documented development-style build and source-built image workflow. |
| HTTPS for the manual build | OpenSSL available through PATH | Supports the project's HTTPS configuration when enabled. |
| Localtonet remote access | Localtonet client on a device that can reach Termix | Maintains the outbound relay connection for the HTTP tunnel. |
Confirm Node.js and npm
Run both checks in the shell where you intend to install Termix. The Node.js output must be version 20.11 or newer for the npm CLI path.
node --version
npm --version
If Node.js is too old, use the supported upgrade method for your operating system, development environment, or Node.js version manager. Package names and activation steps differ among platforms, so confirm the upgrade in a new terminal by running the version checks again.
Identify the Termix URL and account
Before logging in, identify a base URL that loads successfully from the CLI machine. For a default local source build, this can be http://localhost:8080. On another device, localhost refers to that device itself, so use the authorized hostname or local IP address of the Termix server instead.
Use an individual account with only the access needed for the task. Termix supports local accounts and documented identity-provider options, along with roles and sharing permissions. The account must be able to see the intended hosts or an otherwise successful login may produce an empty inventory.
Termix can control SSH sessions, files, remote desktops, containers, tunnels, and automations. Complete application setup, configure authentication, review user roles, and verify host sharing before publishing its web service to the internet.
Prepare a Termix server if you do not already have one
Skip this section when you already have a working Termix deployment. The authoritative project resources are the Termix server repository and the manual server installation guide.
The manual documentation reports approximately 118 MB of idle memory use and says one CPU core with 1 GB of memory covers most setups. Treat those as project-provided starting guidance rather than a capacity guarantee. Fleet size, concurrent sessions, monitoring, transfers, and automation activity can increase resource requirements.
Manual development-style source workflow
This workflow uses a frontend preview process and a development backend process. It is suitable for following the documented source-build procedure and testing the application, but it is not a complete production deployment design.
Clone the Termix repository
Download the source and enter the project directory.
git clone https://github.com/Termix-SSH/Termix.git
cd TermixInstall dependencies and build the frontend
Install the declared dependency tree and create the frontend build.
npm install
npm run buildStart the frontend preview process
Run the documented preview command and leave the process active.
npm run previewStart the backend services
In another terminal opened in the same project directory, start the documented backend process.
npm run dev:backendKeep both required processes running during testing. For production environments, Termix recommends serving the website through Nginx and points operators to the Nginx configuration in the repository's Docker directory. Production deployment also requires your own decisions about upgrades, backups, HTTPS, monitoring, process supervision, and recovery.
Build a Docker image from the source tree
Termix separately documents building an image named termix:latest. The example maps port 8080 and uses a named volume for persistent application data.
Clone the repository
Clone the project if it is not already available locally.
git clone https://github.com/Termix-SSH/Termix.git
cd TermixInstall dependencies
Install the dependencies required by the source build.
npm installBuild the frontend
Create the frontend build before constructing the image.
npm run buildBuild the Docker image
Use the Dockerfile included in the repository.
docker build -t termix:latest -f docker/Dockerfile .Create the Compose configuration
Save the documented service definition in a Compose file. The named volume persists data independently of a replaced container.
services:
  termix:
    image: termix:latest
    container_name: termix
    restart: unless-stopped
    ports:
      - '8080:8080'
    volumes:
      - termix-data:/app/data
    environment:
      PORT: '8080'

volumes:
  termix-data:
driver: localStart the container
Start the documented Compose project in detached mode.
docker-compose up -dUnderstand storage and verify the application
Termix uses SQLite by default and creates it under db/data on first start. Its manual documentation says there is no separate database setup or migration command for that default path. PostgreSQL and MySQL are documented alternatives, but they require a database and user to exist before startup, plus appropriate connection configuration.
Open http://localhost:8080 on the server when using the documented default port. Complete initial setup and confirm that the login page loads, authentication succeeds, and the expected interface appears. If you add a test host, use only a system you are authorized to access and validate its SSH connection through Termix before introducing a public tunnel.
Install, verify, update, and uninstall the Termix CLI
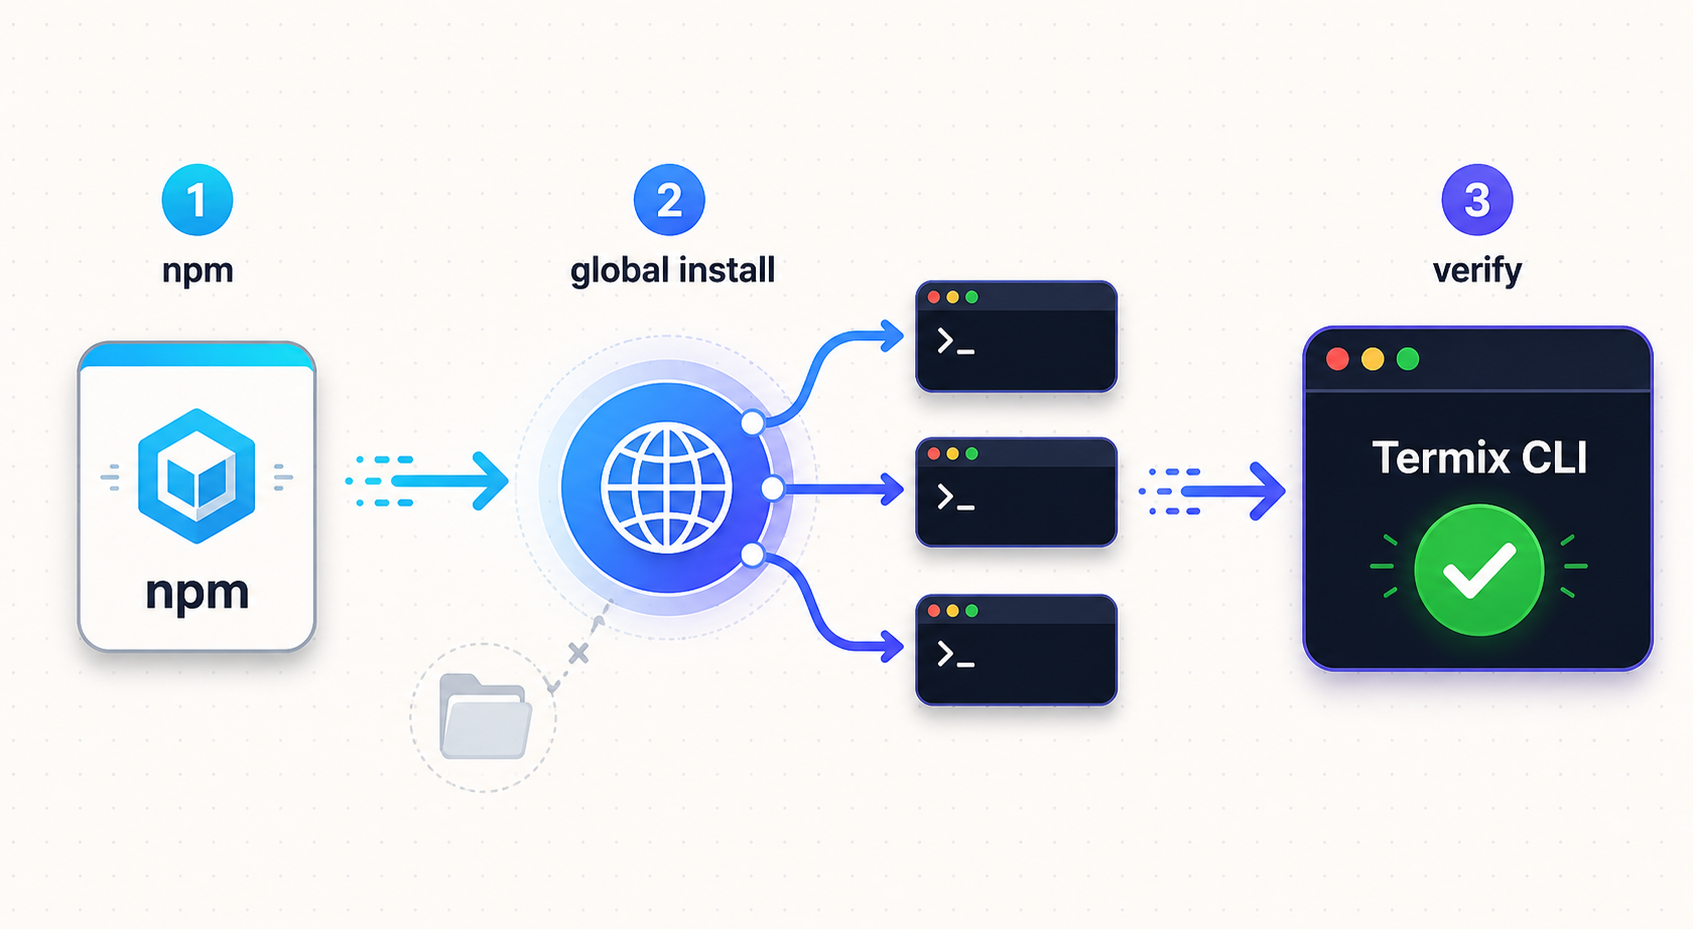
A global npm installation makes the termix executable available to normal terminal sessions through npm's global executable location.
Confirm the active Node.js runtime
Verify that the current shell is using Node.js 20.11 or newer.
node --version
npm --versionInstall the official CLI package globally
Use the package name documented by Termix.
npm install -g @termix-cli/cliCheck the installed CLI version
Termix documents version as its CLI information command.
termix versionOpen the built-in help
Confirm that the executable starts and review the command groups supported by the installed release.
termix --helpUpdate the global package
npm updates a named global package with the following standard command:
npm update -g @termix-cli/cli
termix version
Verify the version after updating. If a newer CLI changes a subcommand or flag used by automation, review termix --help and the relevant command help before placing the updated executable into production jobs.
Uninstall the global package
Remove the npm-installed CLI with:
npm uninstall -g @termix-cli/cli
Open a new shell and run termix version afterward if you want to confirm removal. If the command still exists, another copy may have been installed by a different Node.js version, package manager, standalone distribution, or system account.
Resolve global PATH problems
If npm reports success but the shell cannot find termix, first close and reopen the terminal. Then inspect npm's configured global prefix:
npm prefix -g
On Unix-like installations, global executables are normally linked under the bin directory beneath that prefix. On Windows, global executables are normally placed directly in the prefix directory. Confirm that the applicable directory is in PATH and that the installation was performed under the same Node.js environment now active in the shell.
Node.js version managers commonly maintain a separate global package set for each active runtime. If you install the CLI under one Node.js version and switch to another, the second environment may not contain the executable. Switch back to the intended runtime or install the package under the currently active one.
Do not respond to a global installation error by recursively changing system-directory ownership or running unrelated commands with elevated privileges. Use the Node.js installation method and npm prefix appropriate to your operating system or managed workstation.
Log in and validate the Termix host inventory
The CLI login command requires the Termix server's base URL. The domain below is the official Termix documentation example. It is not a Localtonet-assigned URL:
termix login --url https://termix.example.com
Replace https://termix.example.com with the real URL of your Termix instance. For local testing on the documented default port, that may be http://localhost:8080.
Start the login flow
Supply the exact base URL that you already verified in a browser.
termix login --url http://localhost:8080Complete the interactive prompts
Enter the Termix username and password, followed by a two-factor authentication code when the account uses 2FA. Do not place those values directly in a command or shell script.
Confirm the current identity and state
Use the documented information commands to check which identity and server state the CLI reports.
termix status
termix whoamiList visible hosts
Retrieve the inventory available under the current account's permissions.
termix hostsTermix says login details are saved so the login is normally performed once per machine. The available evidence does not specify the local file path, credential-store implementation, encryption method, or exact persisted fields. Do not assume undocumented storage behavior. Protect the operating-system account and workstation where the authenticated CLI is used.
Host output includes IDs used by other commands. An empty list does not necessarily indicate failed authentication. The current user may not have any hosts configured or shared with it.
Test one authorized host
Start with one known, non-production host. The official documentation demonstrates an interactive SSH connection with host ID 3:
termix ssh 3
Replace 3 with an ID returned by your own server. Host IDs are instance-specific.
For a low-impact non-interactive test, run a read-only command such as uptime:
termix exec 3 uptimeConfirm that the command returns output from the expected host. This single-host check validates the account, host ID, stored host configuration, SSH credentials, and Termix-to-host network path before you consider a broader operation.
Prepare a safe fleet-management workflow
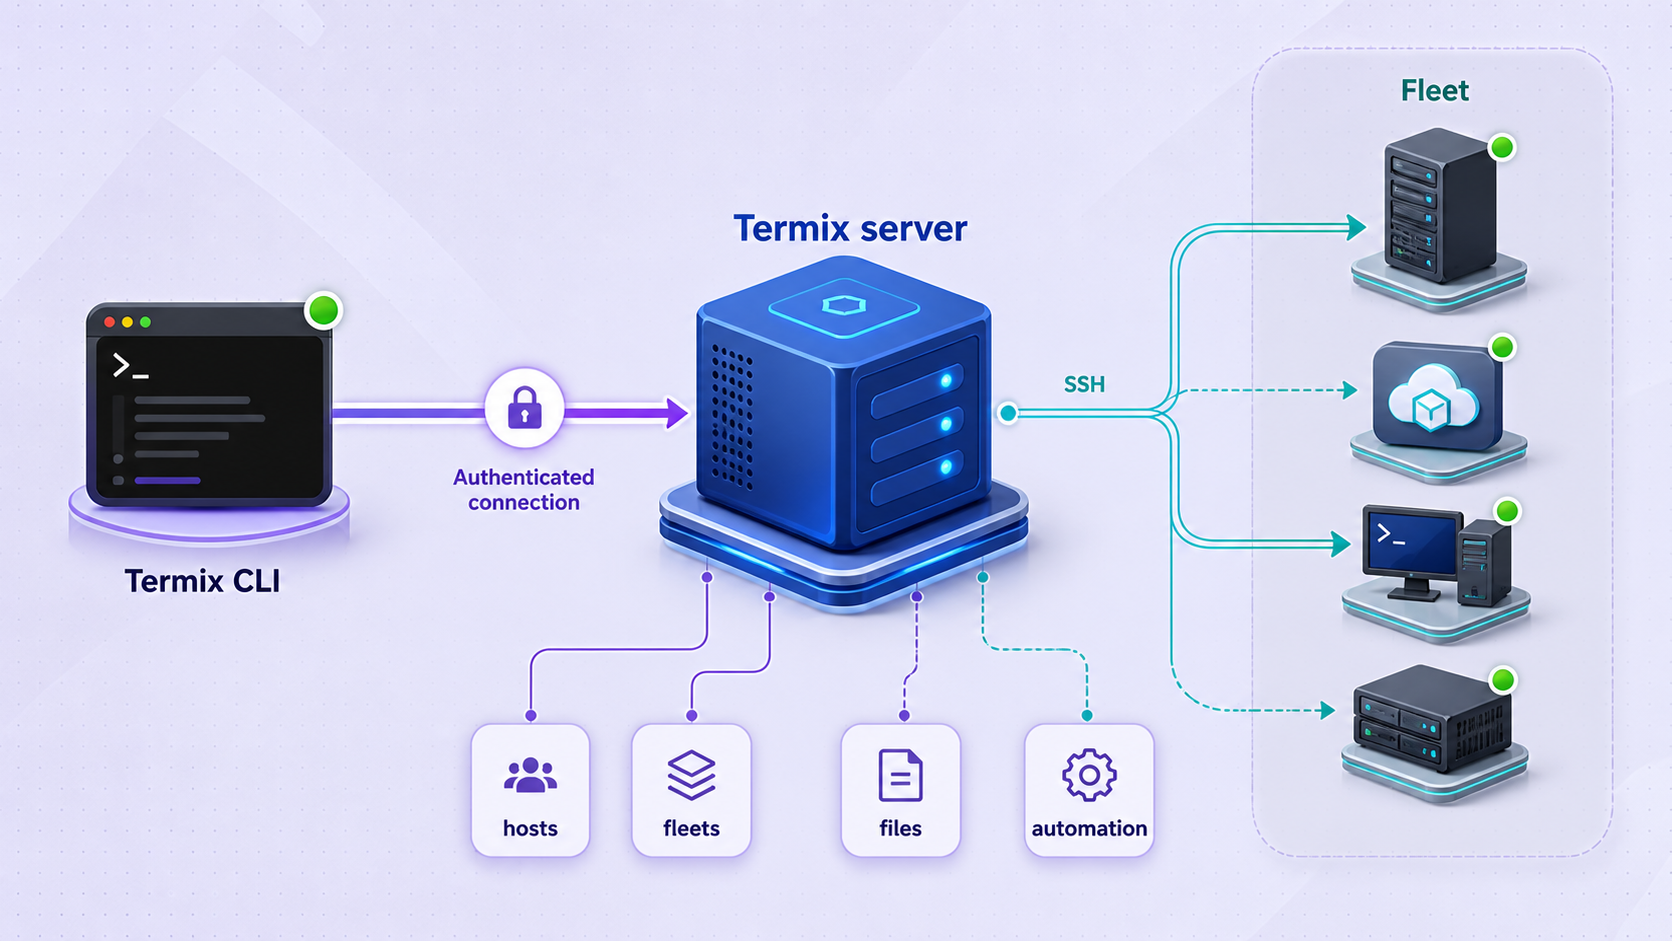
Termix fleets can group hosts through explicit selection or tag rules. A tag-based fleet can gain new members automatically when hosts begin matching its rules. Termix states that fleets can run one command across every member, push and pull files, install packages, and collect inventory including operating system, kernel, architecture, and uptime.
The current public CLI reference confirms the fleets command group and uses termix fleets exec --help as a help example. It does not publish enough syntax in the supplied evidence to establish a complete, copy-and-run fleet sequence. In particular, it does not define a verified command for enumerating fleet IDs, showing resolved membership, choosing a fleet argument, or interpreting mixed per-host results.
The reproducible steps below stop before fleet execution. This is intentional. Use the installed release's help and current Termix documentation to establish exact syntax, then record that syntax in your organization's runbook before authorizing a fleet-wide operation.
Fleet preflight checklist
Record the connected identity and server
Confirm that the CLI is using the intended Termix instance and operator account.
termix status
termix whoamiCapture the visible host inventory as JSON
Explicitly request JSON so the result does not depend on whether the terminal is interactive.
termix hosts --jsonInspect fleet command help
Review the exact fleet options supported by the installed CLI version.
termix fleets --help
termix fleets exec --helpReview resolved membership in Termix
In the Termix interface, identify the intended fleet and review every current member. If it uses tag rules, inspect those rules and check whether recently added or retagged hosts have joined.
Validate a representative host
Select a non-production member from the reviewed fleet and run the documented single-host uptime test before considering fleet execution.
termix exec 3 uptimeDefine success and partial-failure handling
Before running a fleet operation, decide how you will identify successful hosts, failed hosts, unreachable hosts, timeouts, and ambiguous results. Preserve the original output and do not rerun the entire fleet automatically when only some members fail.
Use deterministic output in scripts
In an interactive terminal, Termix displays a readable table. When output is piped, it switches to JSON automatically:
termix hosts | jq '.[].name'
You can force JSON with --json, force the non-JSON form with --no-json, or use -q when only IDs are required. Automation should request a format explicitly rather than relying on terminal detection:
termix hosts --json
termix hosts -q
Verify the actual JSON structure from your installed CLI before writing filters. The example with jq assumes that jq is installed separately and that the returned objects contain the expected name field.
Handle partial fleet failures conservatively
Fleet work should not be treated as one indivisible success or failure. A host can be offline, lose connectivity, reject credentials, time out, or complete a command while another host fails. Because the supplied CLI reference does not document the exact fleet result schema or process exit behavior, scripts must not assume that one exit status fully describes every member.
For any future fleet command established through current built-in help, retain its complete machine-readable output, compare the returned members with the preflight membership snapshot, and isolate failed systems for individual review. Do not immediately rerun a state-changing command against the whole fleet, because hosts that succeeded the first time could receive the change twice.
Confirm the fleet, resolved membership, command text, file paths, and operator permissions immediately before execution. Prefer a read-only test and a small non-production fleet. Tag-based membership must be reviewed again whenever tags or host inventory change.
Use API keys accurately
Termix documents user-scoped API keys with expiration dates for automation and CI. That establishes that a key belongs to a user context and can expire. The available evidence does not establish independently configurable permission scopes for each key, so do not describe Termix API keys as having granular per-key scopes unless the current product documentation explicitly adds that capability.
Protect API keys in the secret-management facility provided by the automation platform and avoid printing them in logs. The supplied CLI page recommends keys for scripts but does not establish the exact environment variable, configuration file, or command option used to supply one. Check the current Termix CLI documentation and built-in help instead of guessing.
Expose the verified Termix web service with Localtonet
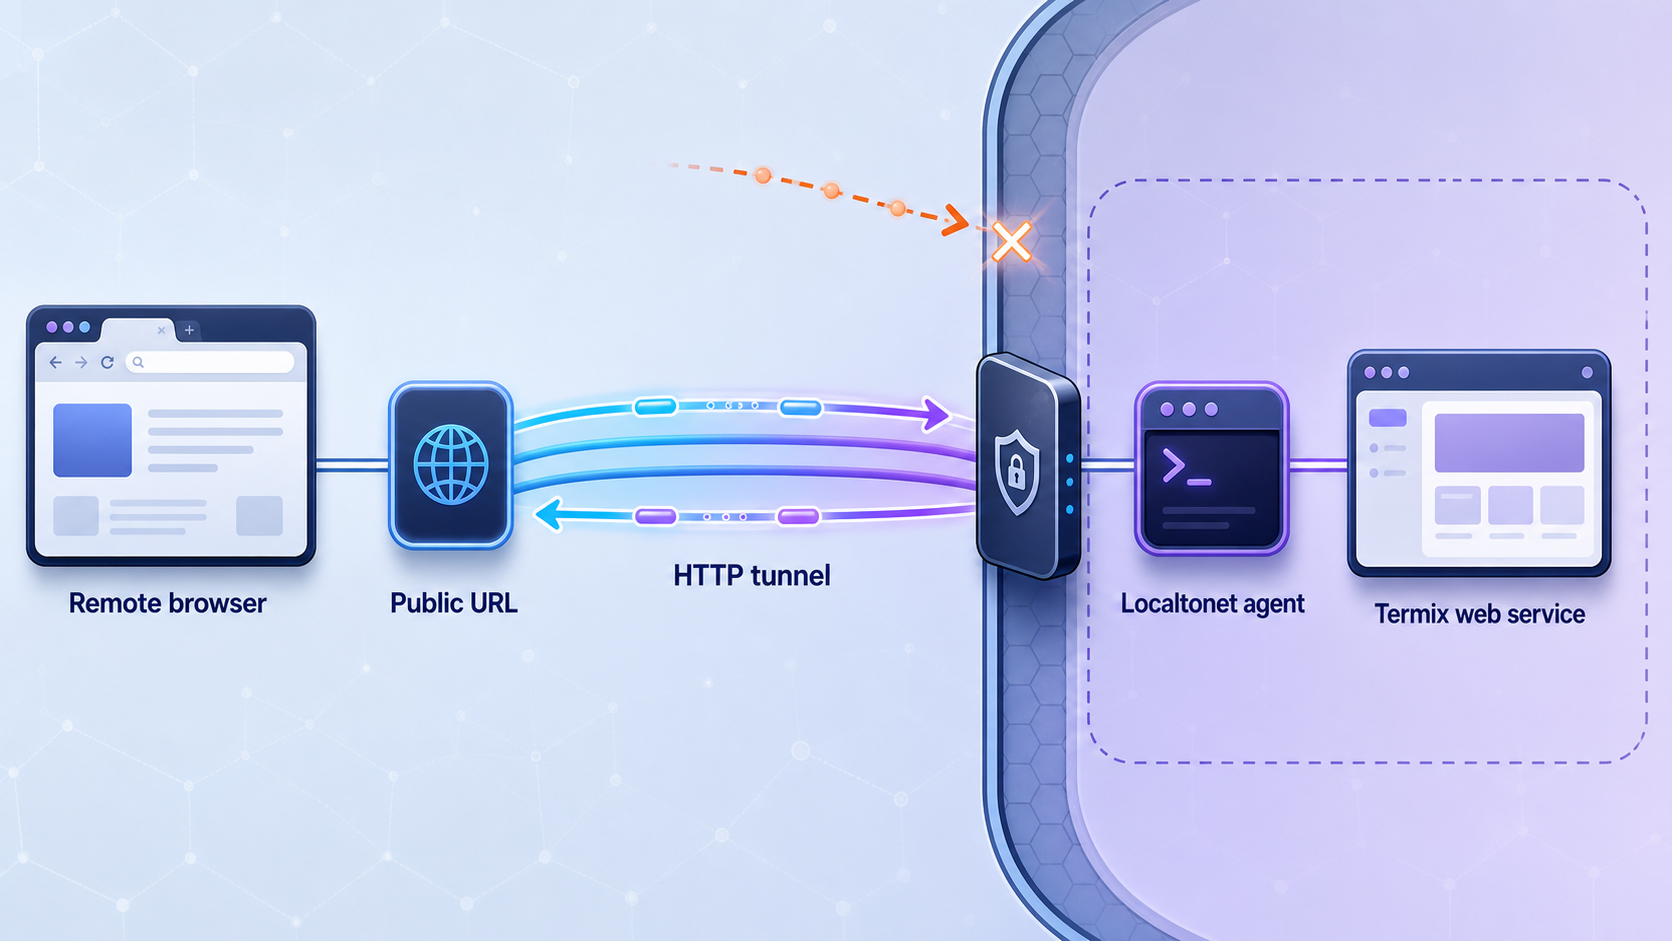
Complete this section only after the Termix login page and an authorized host connection work locally. Our client establishes an outbound connection to a Localtonet relay server. The HTTP tunnel then provides a public HTTPS address and forwards requests to the local IP address and port where Termix is reachable.
Review the current Localtonet HTTP tunnel documentation while configuring the tunnel. Dashboard availability, relay choices, domain options, and plan-specific capabilities can change, so select current values shown in your account rather than copying hardcoded server codes.
Install and run the Localtonet client
Run our client on the Termix server or another authorized device that can reach the Termix service over the local network.
Open the HTTP tunnel configuration
Create an HTTP tunnel for the Termix browser service. Standard HTTP tunneling is not VPN functionality.
Select the process type
Choose Random Sub Domain, Custom Sub Domain, or Custom Domain as applicable. Each process type serves the HTTP tunnel at a public HTTPS address. Do not assume every option is available on every plan.
Select the device token
Select the device-specific authentication token for the connected client that can reach Termix. Keep the token out of screenshots, logs, repositories, and support posts.
Select an available relay server
Choose a currently available relay or region from the dashboard. Do not reuse an old server code from another tutorial.
Configure the local IP address and port
Enter the target verified from the Localtonet client device. For the documented default Termix setup on the same machine, this can be local port 8080. If Termix runs elsewhere, use its reachable LAN address and actual port rather than assuming localhost.
Start the tunnel
Use the Start control. Creating or saving a tunnel does not mean it is running.
Verify external access
Open the assigned Localtonet HTTPS URL from a device or network outside the Termix host's local environment. Confirm that the expected Termix login page loads and that authorized authentication succeeds.
Stop the tunnel and verify shutdown
Stop the tunnel when testing is complete, then confirm that the public URL no longer serves Termix. Delete the configuration if it will not be reused.
Log in through the assigned Localtonet URL
After external browser verification, repeat the documented Termix login syntax with the actual HTTPS URL displayed for your running Localtonet tunnel:
termix login --url https://your-assigned-public-url
https://your-assigned-public-url is a descriptive placeholder, not a real endpoint. Likewise, https://termix.example.com is Termix's documentation example and must not be presented as a Localtonet-assigned address.
Run termix status, termix whoami, and termix hosts after login. Compare the visible inventory with the result obtained through the local address. The Localtonet device token is not a Termix credential and must never be entered into the Termix login prompt.
Localtonet forwards traffic to the target you configure. It does not install Termix, create users, populate hosts, repair SSH connectivity, or replace Termix permissions. The public endpoint exists only while the selected client is connected and the tunnel is running.
Secure remote access and fleet operations
Use strong Termix authentication
Termix supports local accounts as well as OIDC, LDAP, GitHub, and Google sign-in. It also documents TOTP two-factor authentication, WebAuthn passkeys, trusted devices, active-session management, and an audit log. Choose the authentication design appropriate to your environment and require stronger controls for privileged users.
Give each operator an individual identity instead of sharing one administrator account. Individual identities make role assignment, session revocation, and audit review more useful.
Apply least privilege
Termix can share hosts with users or roles at connect, view, edit, and manage levels. Assign the lowest level required. Someone who only needs to connect to an approved host should not automatically receive permission to edit credentials, change host definitions, or administer unrelated resources.
Separate test and production fleets. Review tag rules carefully because membership can change without manually editing the fleet. Require a second review for state-changing commands, package installation, file deployment, and other actions that can affect every member.
Protect each credential boundary
This workflow can involve Termix passwords, 2FA codes, SSH credentials, user-scoped Termix API keys, database credentials, and a Localtonet device token. These secrets serve different systems and should not be reused.
Keep credentials out of shell history, screenshots, committed Compose files, issue reports, and copied output. If a secret is exposed, revoke or rotate it through the issuing system.
Limit public tunnel availability
Stop the Localtonet tunnel when remote access is no longer required. Verify shutdown from an external connection rather than relying only on the dashboard state. Keep Termix authentication enabled even when the public URL appears difficult to guess.
URLs can appear in browser history, logs, screenshots, and shared messages. Use Termix authentication, least-privilege roles, individual accounts, session review, and appropriate organizational access policies.
Troubleshoot installation, login, fleet, and tunnel issues
npm reports an unsupported Node.js version
Run node --version in the exact shell used for npm. The CLI requires Node.js 20.11 or newer. A version manager can activate different runtimes in different shells, terminals, users, or automation jobs.
npm succeeds but termix is not found
Open a new terminal, run npm prefix -g, and inspect PATH. On Unix-like systems, check the bin directory beneath the prefix. On Windows, check the prefix directory itself. Confirm that npm installation and command execution use the same Node.js runtime and operating-system account.
The wrong Termix version runs
Run termix version and inspect how your shell resolves executables using its normal command-discovery tools. Multiple copies can exist when npm, a standalone download, or several Node.js versions have each installed Termix.
Login cannot reach the server
Open the same base URL in a browser from the CLI machine. Confirm that the hostname, scheme, and port match the working endpoint. Use localhost only when the CLI and Termix server are on the same machine.
The application loads but authentication fails
Check the username, password, account status, configured identity provider, and 2FA code. Do not repeatedly retry unknown credentials against a public endpoint. Ask the Termix administrator to confirm the expected sign-in method.
termix hosts returns no entries
Run termix whoami and termix status, then confirm in the web interface that hosts exist and are shared with the current user or role. An empty list can be a valid permissions result.
A single-host SSH or exec test fails
Confirm that the ID came from the current server's termix hosts output. Test the same host in the Termix interface and review its address, credential assignment, jump-host configuration, account permissions, and network reachability. An HTTP tunnel to Termix does not repair the server's SSH path to a managed host.
You cannot identify a fleet or inspect membership from the CLI
Run termix fleets --help and termix fleets exec --help, then consult the current Termix interface and CLI documentation. Do not infer fleet syntax from host commands. The supplied public evidence does not define a complete membership-inspection command, so use the interface to review resolved membership before proceeding.
A fleet operation partially fails
Preserve the complete output and identify affected members individually. Do not rerun a state-changing command against the whole fleet until you know which hosts already completed it. The current supplied evidence does not define the fleet result schema or exit-code semantics, so automation should not guess them.
JSON processing fails
Request JSON explicitly with --json, save a sample result, and verify its structure before applying filters. Confirm that tools such as jq are installed separately. Use the installed command's help to verify flag placement.
The Localtonet public URL does not load
From the Localtonet client device, test the configured local IP address and port directly. Then confirm that the intended device is connected, the correct token and relay were selected, and the tunnel was explicitly started. If Termix runs on another device, do not use localhost as the target.
The public URL remains reachable after testing
Confirm that you stopped the correct tunnel and that no duplicate HTTP tunnel points to the same service. The expected lifecycle is explicit: a tunnel is available only while its selected client is connected and the tunnel is running.
Frequently asked questions
Does npm install the complete Termix server?
No. npm install -g @termix-cli/cli installs the separate terminal client. It must connect to an existing Termix server containing the users, hosts, credentials, permissions, and fleets you want to use.
Which Node.js version does the npm-installed CLI require?
It requires Node.js 20.11 or newer. The manual Termix server build documents Node.js 18 or newer, so version 20.11 or newer satisfies both requirements when one machine handles both components.
How do I check the installed Termix CLI version?
Run termix version. Termix lists version among its documented CLI information commands.
How do I update or remove the npm package?
Update it with npm update -g @termix-cli/cli and remove it with npm uninstall -g @termix-cli/cli. Check termix version after an update.
Can Termix CLI output be used in scripts?
Yes. Output switches to JSON when piped, and you can request JSON explicitly with --json. Use --no-json for non-JSON output and -q when only IDs are needed. Validate the returned structure before building automation around it.
Does this guide include a copy-and-run fleet execution command?
No. Current supplied primary evidence confirms the fleet command group and its built-in help, but not the complete syntax for identifying a fleet, inspecting resolved membership, executing against it, or parsing partial failures. The guide therefore provides a safe preflight and requires current help or documentation before execution.
Are Termix API keys granularly scoped?
The supplied evidence establishes user-scoped API keys with expiration dates. It does not establish independently configurable permission scopes for each key. Apply least privilege to the associated user and verify current documentation before relying on any additional key controls.
Which Localtonet tunnel type should expose the Termix web interface?
Use an HTTP tunnel pointing to the verified local IP address and port where Termix is reachable. The tunnel provides a public HTTPS address while the selected Localtonet client is connected and the tunnel is running.
Does Localtonet replace Termix authentication?
No. Localtonet provides the network route to the local service. Termix remains responsible for application users, authentication, roles, sharing, and host permissions.
For Termix-specific bugs or feature requests, use the project's support repository. Include the CLI version, sanitized command, expected result, actual result, and relevant error output without exposing passwords, API keys, SSH credentials, private host details, or Localtonet device tokens. Developers who need to inspect the terminal client itself can also consult the Termix CLI repository.
Connect your verified Termix service with Localtonet
Install and validate the Termix CLI, review host and fleet access conservatively, then create a Localtonet HTTP tunnel when you need authorized remote access to the secured Termix web endpoint.
Get Started Free →

