

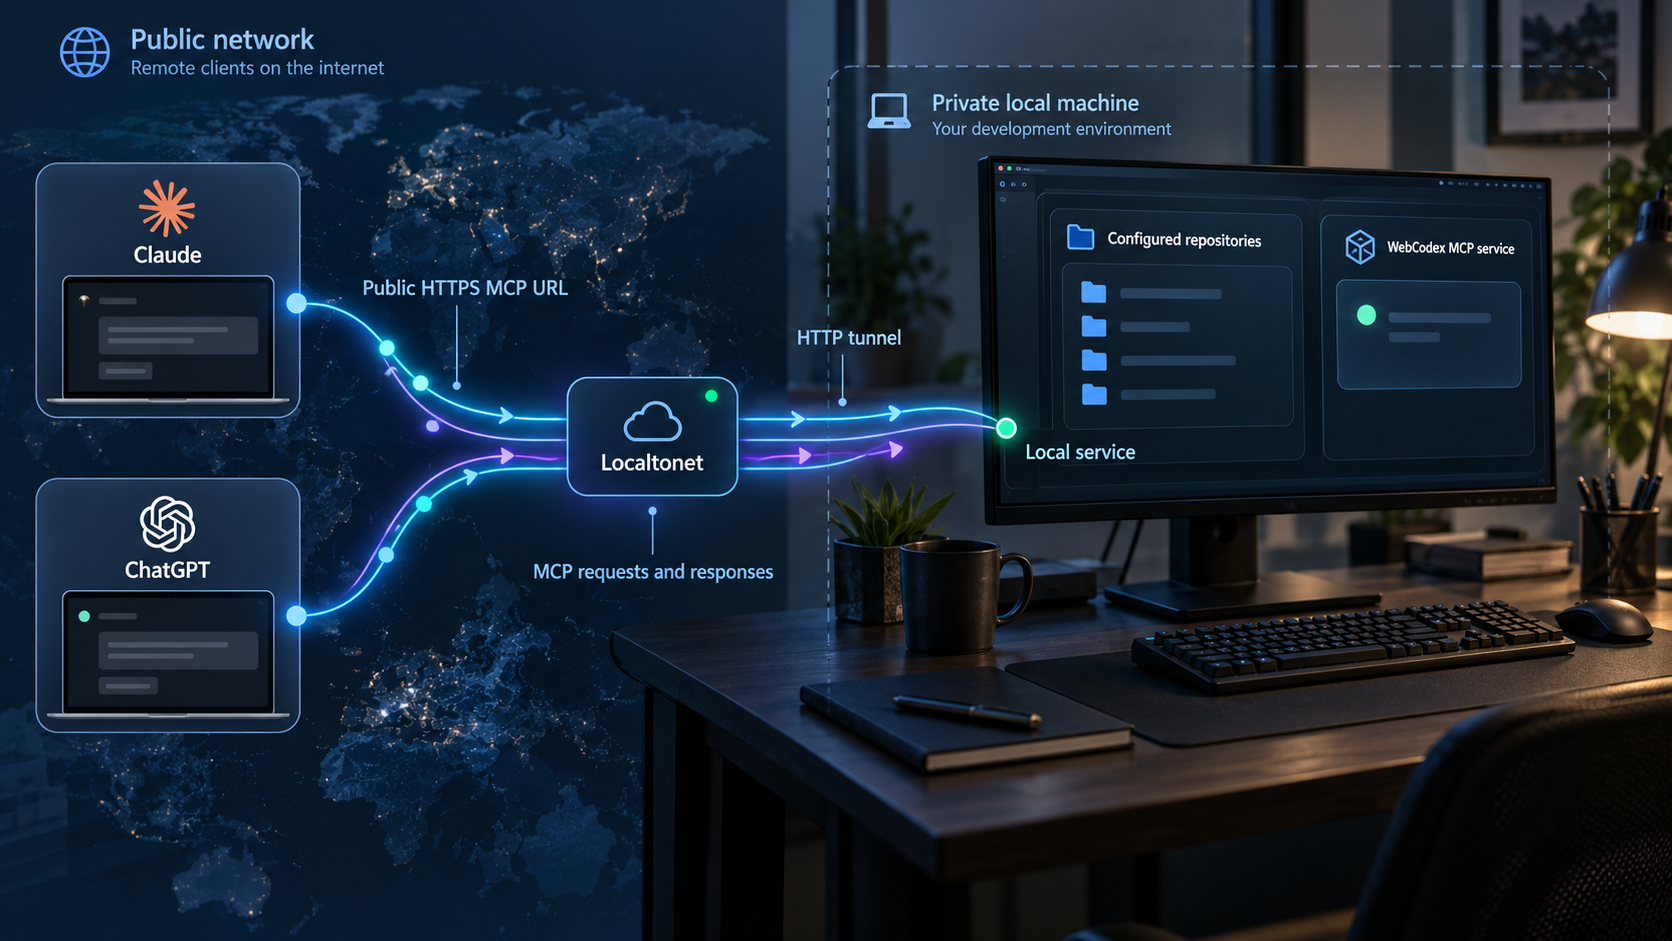
Keep your development environment local while giving approved remote MCP clients a controlled route to it
WebCodex connects MCP-capable AI clients to repositories, Git checkouts, compilers, tests, and development tools running on your own machines. This guide walks through choosing a supported WebCodex installation path, installing the unified package, configuring project access, verifying the local MCP-over-HTTPS service, and troubleshooting the setup. Once WebCodex works locally, we show how to publish its configured HTTP endpoint through a Localtonet HTTP tunnel without inbound router port forwarding, firewall changes, VPN setup, or a public IP address. Because WebCodex installer validation and endpoint details can vary, the guide clearly identifies every value that must come from your installation rather than guessing it.
📋 What's in this guide
How WebCodex and Localtonet fit together
WebCodex is a self-hosted development and MCP service designed to let cloud AI agents work with development environments on machines you control. Its documented capabilities include reading and searching code, making guarded changes inside configured projects, running commands and tests, inspecting Git state and diffs, and keeping long-running work observable. The repository can remain on the machine where it already lives instead of being copied into a separate hosted development workspace.
The basic architecture has three distinct parts. An MCP client such as ChatGPT or Claude sends protocol requests to a WebCodex Server. WebCodex then coordinates access to a machine that owns the repository and its development tools. In a single-computer deployment, the server, runner, desktop interface, and command-line components can be installed together. A multi-computer deployment installs the package on the server machine and on each machine that owns repositories.
Remote access is a separate networking concern. A local WebCodex service can be healthy and reachable on its host without being reachable from a cloud AI client. With Localtonet, the client application on the machine that can reach WebCodex establishes an outbound connection to one of our relay servers. An HTTP tunnel then maps a public HTTPS address to the local WebCodex IP address and port. The tunnel remains available only while the selected Localtonet client is connected and the tunnel is running.
The instructions here apply to the yyjeqhc/webcodex project and its unified platform package. Another repository with a similar WebCodex name publishes a different npm package and a different connection workflow. Do not combine commands, package names, configuration files, or credentials from the two projects.
Prerequisites and installation decisions
Before installing anything, decide where WebCodex Server will run and which machine owns the repository. For the simplest setup, those are the same computer. For a multi-computer setup, WebCodex documents installing the unified package on the machine that hosts the Server and on every machine that owns repositories. This guide concentrates on the single-computer path because it minimizes networking and authority boundaries, but the Localtonet portion also works when our client runs on another device that can reach the configured WebCodex address.
Supported unified-package targets
The WebCodex project defines unified installer targets for Windows NSIS, macOS, Debian 12, and Ubuntu 22.04 or newer. The stated architecture targets are x64 and arm64. The unified package is intended to include Desktop, CLI, Server, and Runner, avoiding the need to assemble those components independently.
| Platform target | Package or installer family | What to confirm |
|---|---|---|
| Windows x64 or arm64 | NSIS installer target | Confirm that the release asset matches the operating system and processor architecture. |
| macOS x64 or arm64 | macOS package target | Confirm the architecture and review the current native installation validation status. |
| Debian 12 x64 or arm64 | .deb package target |
Confirm the Debian version, architecture, package availability, and validation status. |
| Ubuntu 22.04 or newer, x64 or arm64 | .deb package target |
Confirm the Ubuntu version, architecture, package availability, and validation status. |
WebCodex describes the unified installer workflow as under development. Its six platform and architecture variants still require native build and installation acceptance, and the project does not claim identical behavior across Windows, macOS, and Linux. Real-machine installation, reboot persistence, graphical behavior, and upgrades have not been accepted across every target. Treat the package as software that requires evaluation in your environment, especially before relying on it for unattended or production work.
What you need before starting
- A supported Windows, macOS, Debian, or Ubuntu machine with an architecture matching an available release asset.
- A repository or project directory that you are prepared to authorize for WebCodex.
- Version control enabled for important work so that AI-generated modifications can be inspected and reverted.
- An operating-system account with only the permissions needed for the intended repositories and tools.
- A Localtonet account and a supported Localtonet client installed on the machine that can reach WebCodex.
- Access to the current WebCodex release page so you can inspect the actual published files rather than relying on a guessed filename.
- An MCP-capable client whose current account, application version, and configuration support a remote HTTP MCP server.
The WebCodex release information supplied for this guide identifies version v0.4.6 as a stable release and includes an upgrade note for older installations. Release status can change, so inspect the current releases before downloading. Do not select an artifact based only on a filename fragment. Confirm the release tag, operating system, CPU architecture, package type, and any validation notes published for that exact artifact.
Install the WebCodex unified package
WebCodex documents several deployment paths, including the unified installer, npm or runtime archives, Docker, source builds, and historical artifacts. The unified package is the primary path described by the project for personal and multi-computer installations. The other paths are intended for advanced self-hosting, temporary trials, development, or compatibility scenarios.
The extracted project information does not establish exact release filenames, platform-specific installer screens, service names, default installation directories, or unattended installation flags. Those details must be taken from the selected release and its unified installation documentation. The process below therefore stays with the documented package-selection workflow and does not invent commands or interface labels.
Choose the machine role
For a one-computer setup, select the workstation that contains the repositories and developer tools. For several computers, identify the Server host and every separate machine that owns repositories before installing packages.
Check the platform validation status
Review the unified installation and deployment validation information for your exact operating system and architecture. Do not assume that validation of one installer variant proves equivalent behavior on another.
Select the matching release artifact
Open the WebCodex release that you intend to run and select the published file matching Windows NSIS, macOS, or the Debian and Ubuntu package target, together with the correct x64 or arm64 architecture. Use only filenames actually shown on the release page.
Run the native package
Install the selected package using the normal package workflow for your operating system. Review every security or permission prompt instead of approving it automatically. The available evidence does not establish universal installer screens or a shared installation path, so follow the prompts presented by the exact signed or published artifact you selected.
Open WebCodex Desktop and complete its setup
Start the installed Desktop application and follow the unified setup for the local Server and Runner. Record the configured local server address, local port, and complete MCP endpoint path. These values are installation-specific inputs required later for local verification and tunneling.
Why this guide does not provide a guessed installer command
Package commands are safe only when the artifact filename and package behavior are known. The supplied project evidence confirms package families and supported operating-system targets but does not provide a stable filename for every variant. A command containing a fabricated filename could install the wrong build, fail outright, or encourage readers to download an unverified file. Selecting the exact published release asset is therefore a required part of this installation.
Advanced users can instead follow WebCodex's documented npm/runtime archive, Docker, source-build, or temporary one-repository paths. Those methods are not interchangeable with the unified package. They can have different prerequisites, startup procedures, persistence behavior, and network boundaries. Since exact commands for those paths are not established by the evidence available for this article, we do not reproduce or extrapolate them here.
Configure repositories and the local MCP service
Installing WebCodex does not by itself decide which files an AI client may access. WebCodex is designed to operate inside configured project boundaries. Register only the project roots required for the intended task. Avoid authorizing a home directory, an entire drive, a broad shared folder, or a parent directory containing unrelated repositories when a narrower project root will work.
Prepare the project before registering it
- Commit or stash existing changes so that later modifications are easy to identify.
- Review ignored files and confirm that secrets, generated credentials, private keys, local environment files, and build artifacts are not tracked.
- Remove credentials from source files and documentation that an AI tool could read.
- Confirm that tests, formatters, compilers, and other intended tools run under the same operating-system account that will run WebCodex.
- Decide whether commands capable of deployment, package publication, infrastructure changes, or destructive database work should be available to that account.
WebCodex can return requested file excerpts and tool results to the connected AI client. Keeping a repository physically on your machine does not mean its content never leaves the machine. If the client asks WebCodex to read a file or return command output, that selected content can be sent through the MCP connection. Project boundaries, prompt discipline, operating-system permissions, and human review all remain important.
Capture the exact endpoint configuration
The WebCodex Server exposes an MCP-over-HTTPS interface, but the evidence supplied for this guide does not establish a universal hostname, port, path, or default credential. Do not assume values such as localhost, a commonly used development port, or a generic /mcp path. Obtain the complete endpoint details from the installed WebCodex configuration or Desktop interface.
Record these values without publishing them in tickets, screenshots, or logs:
- The local IP address or hostname on which WebCodex listens.
- The exact local TCP port.
- The complete MCP URL path, including any path segment after the host and port.
- The authentication mode and any credential required by WebCodex.
- Whether the local service itself expects HTTP or HTTPS from the connecting application.
This workflow uses a Localtonet HTTP tunnel and therefore requires an HTTP-compatible WebCodex target that our client can reach. The public side can use an HTTPS address while the tunnel forwards to the configured local IP address and port. If your WebCodex deployment requires a different local transport or a configuration not represented by a normal HTTP target, stop and verify the current WebCodex and Localtonet documentation before proceeding.
Verify WebCodex locally before exposing it
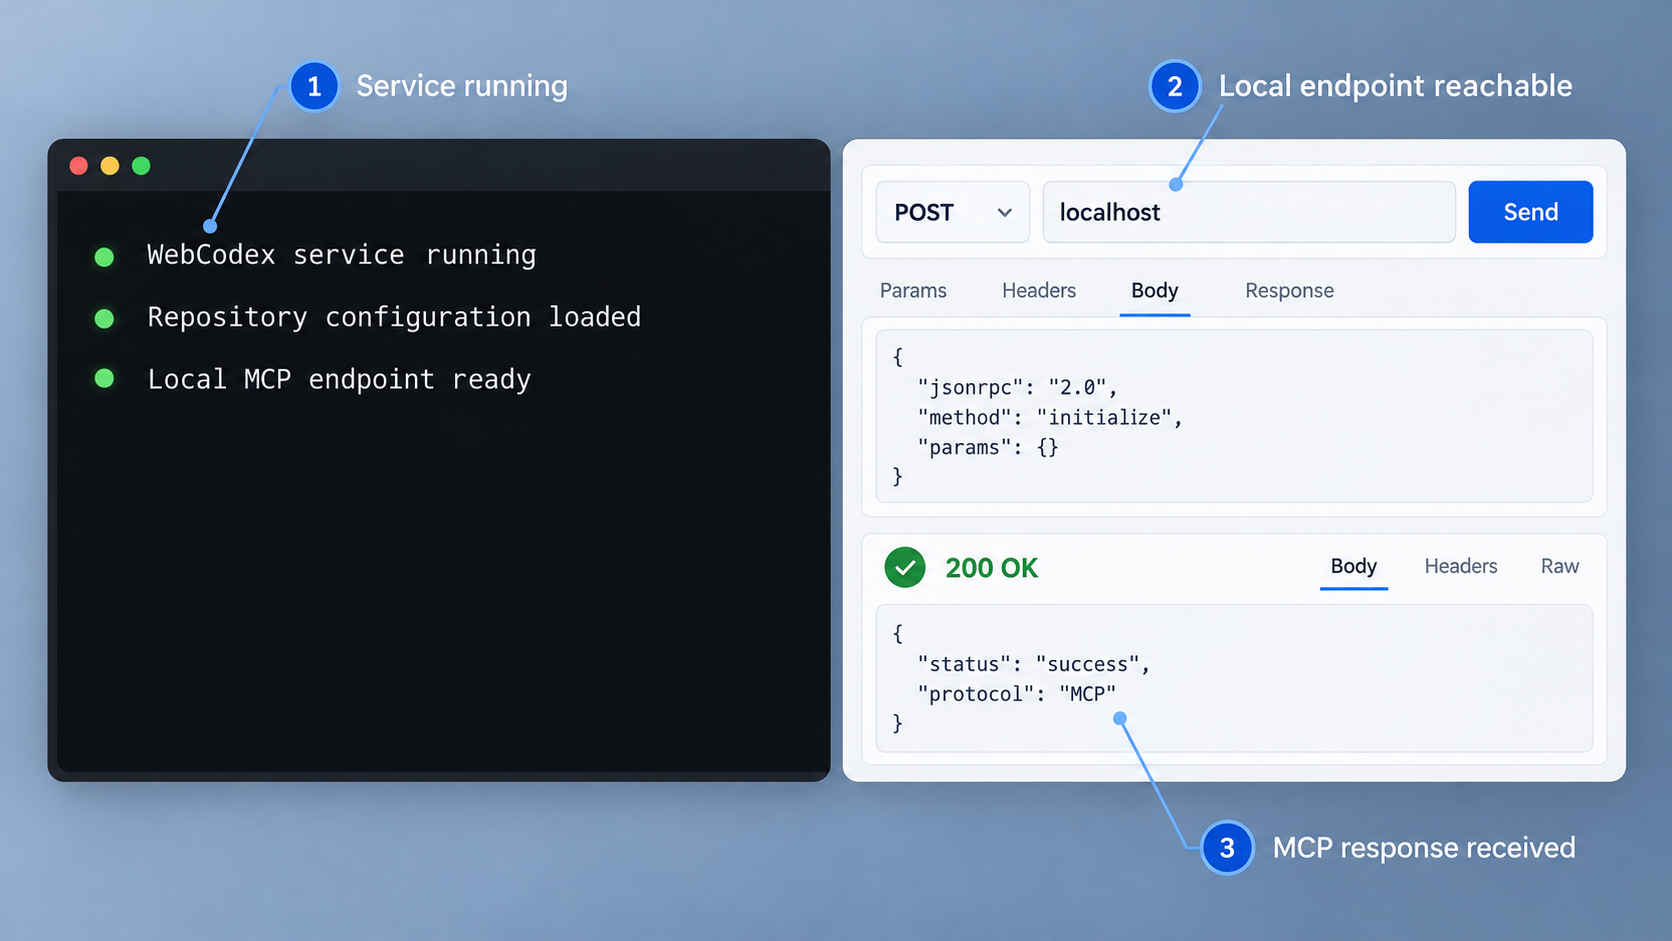
Local verification separates application problems from tunnel problems. If WebCodex is not running, is bound to an unexpected interface, is using a different port, or rejects the configured authentication, creating a public URL will not repair it.
Start with the WebCodex Desktop status, Runtime Console, activity view, or other status surfaces included in the installed version. Confirm that the Server and Runner components required by your deployment are active. Then use a compatible local MCP client or WebCodex's documented connection test against the exact endpoint reported by the installation.
What a useful local test should prove
- The WebCodex Server process starts without an unresolved configuration error.
- The configured local address and port accept a connection from the intended machine.
- The client reaches the complete MCP path rather than only the server's base address.
- Authentication succeeds using the mode configured in WebCodex.
- The expected WebCodex tools are discovered by the MCP client.
- An allowed project can be inspected while an unregistered directory remains outside the intended project boundary.
- A harmless operation, such as reading a non-sensitive project file or checking Git status, produces an observable result.
An MCP endpoint can reject an ordinary browser request even when the service is healthy because the request may use the wrong method, headers, session behavior, or protocol payload. Test through a compatible MCP client or a WebCodex-provided diagnostic workflow. Avoid treating a generic browser page alone as proof that tool discovery and authentication work.
Record a known-good local target
Once the local test succeeds, write down the local IP address and port as separate values for the Localtonet target. Also retain the path portion of the MCP URL for the remote client. An HTTP tunnel targets an IP address and port, while the AI client normally needs the complete public URL, including the WebCodex MCP path.
For example, if the installed configuration reports a complete local URL, separate it conceptually into its scheme, host, port, and path. Enter only the documented local host and port into the tunnel configuration. After Localtonet assigns the public HTTPS address, append the same WebCodex path to that public origin. This is a URL transformation rule, not permission to assume what that path is.
Expose the working WebCodex endpoint with Localtonet
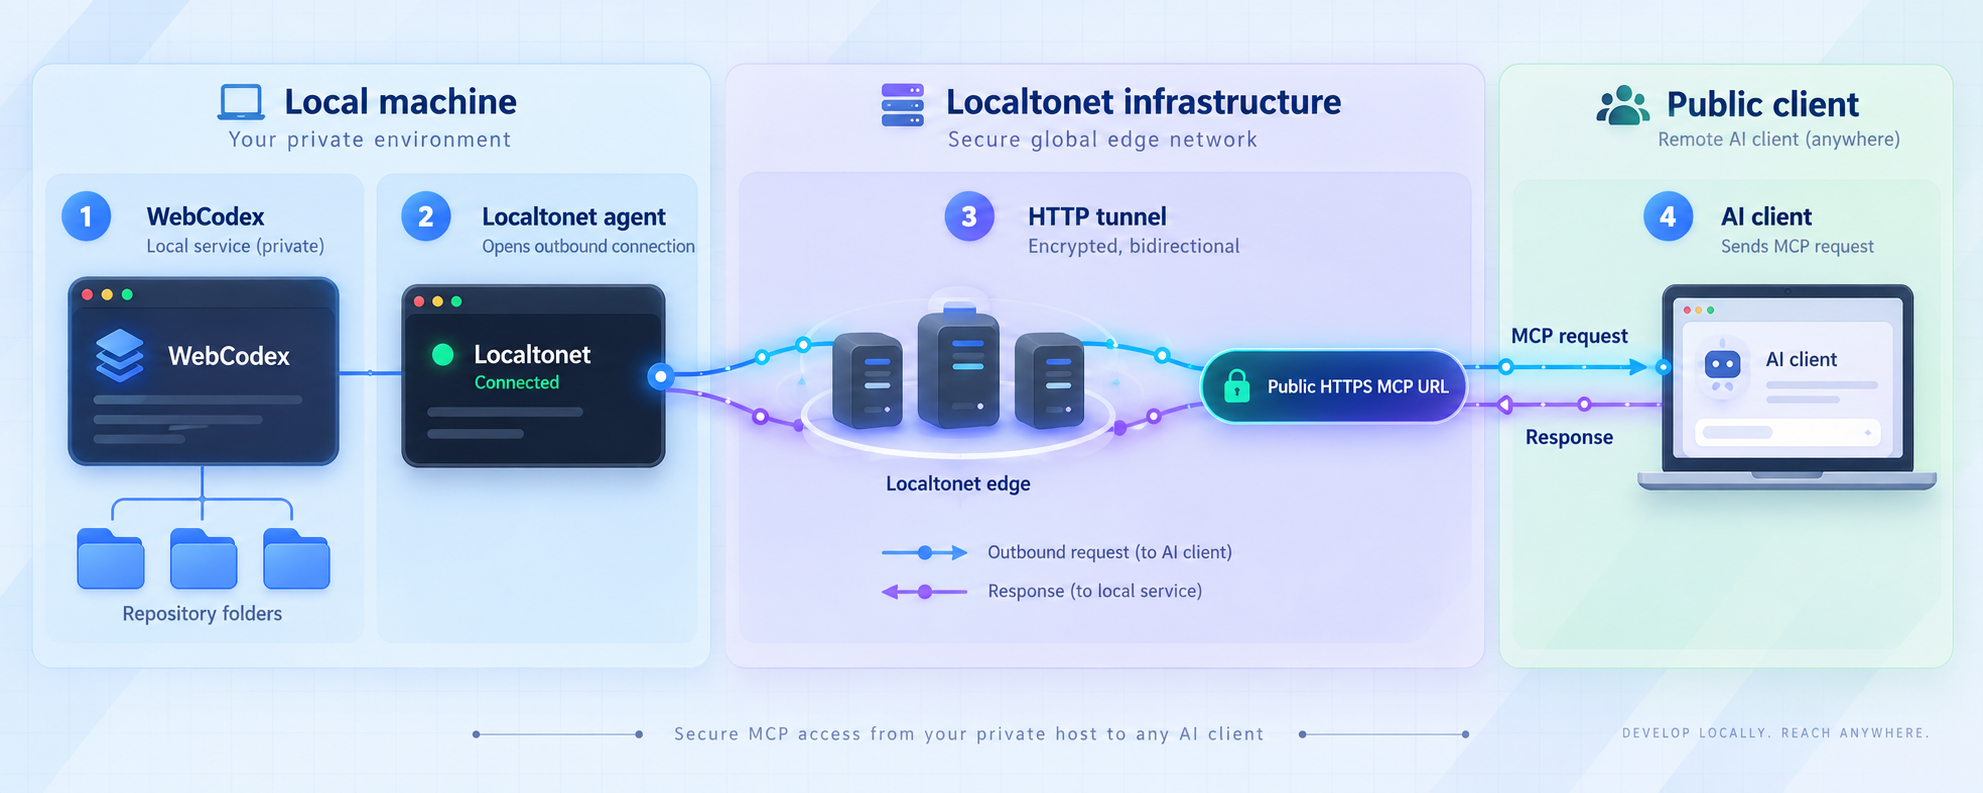
Create the tunnel only after the local service has passed verification. Our HTTP tunnel points to the WebCodex listener on the same machine as the Localtonet client or on another address reachable from that client device. The client establishes the outbound relay connection, so this process does not require an inbound router rule, firewall port opening, public IP address, or VPN.
Install and run the Localtonet client
Install our client on the WebCodex host or on a device that can reach the verified local WebCodex address. Keep the client running for as long as remote MCP access is required.
Authenticate or select the client device
Use the device-specific authentication token associated with the client that will run the tunnel. Treat the token as a secret and never paste it into an article, support post, repository, AI prompt, or shared screenshot.
Select an available relay server
Choose a currently available relay server or region from the dashboard. Available server codes and regions can vary, so use the values displayed in the current product instead of copying a hardcoded value from another setup.
Create an HTTP tunnel configuration
Choose the HTTP tunnel family for the WebCodex HTTP-compatible endpoint. HTTP tunnels can use a random subdomain, a custom subdomain where supported, or a custom domain. If you choose a custom domain, verify the current DNS requirements before changing records.
Enter the verified local target
Enter the exact local IP address and port recorded during WebCodex verification. If Localtonet runs on the same machine, use the address on which WebCodex is actually listening. If it runs on another device, use an address reachable from that device. Do not substitute an assumed port.
Start the tunnel and retain the assigned public address
Start the tunnel using the Start control. Creating a tunnel does not automatically mean it is running. Once it starts, copy the assigned public HTTPS address and combine it with the exact WebCodex MCP path from the verified local URL.
You can manage tunnels from our dashboard or REST API, but this guide does not invent API calls or credentials. For the current product workflow, consult the Localtonet documentation. Stop or delete the tunnel when remote access is no longer required.
Anyone who can reach the URL can attempt to communicate with the endpoint. Keep WebCodex authentication enabled where supported, use strong non-public credentials, expose only the required project roots, and remove remote access when it is not needed. A hard-to-guess URL is not a substitute for authentication.
Connect Claude or ChatGPT to the public MCP URL
The final client URL consists of the Localtonet public HTTPS origin plus the exact WebCodex MCP path. Preserve any path segments defined by WebCodex. Do not give the client only the tunnel's homepage address unless the WebCodex configuration explicitly identifies that address as the MCP endpoint.
Connect Claude Code over HTTP
Claude Code documents remote HTTP as the recommended transport for remote MCP servers. Its command syntax accepts a connection name followed by the complete URL:
claude mcp add --transport http webcodex "PASTE_THE_EXACT_PUBLIC_MCP_URL_HERE"
Replace the quoted placeholder with the full Localtonet HTTPS URL and the WebCodex MCP path. The name webcodex is a local label for the connection. If your WebCodex configuration requires an authentication header, use the authentication method documented by WebCodex and Claude for your versions. This article deliberately does not provide a sample secret or assume a header name that has not been established.
After adding the server, inspect Claude Code's MCP status and confirm that tool discovery completes. Test a narrow, non-destructive request such as listing the registered project or inspecting Git status. Review the returned tool names and the WebCodex activity or runtime view before allowing modifications.
Connect ChatGPT
ChatGPT's available MCP and connector controls can depend on the application surface, account capabilities, workspace policy, and current product version. Open the current ChatGPT application or developer connection interface that supports remote MCP servers, create a connection, and enter the full public WebCodex MCP URL. Configure authentication according to the options offered by the current ChatGPT interface and the mode selected in WebCodex.
The evidence available for this article does not establish one universal sequence of ChatGPT buttons, field names, or account eligibility. We therefore do not invent a fixed interface path. If the expected MCP connection controls are absent, verify current ChatGPT availability and workspace policy rather than changing the WebCodex server or tunnel at random.
Refresh tools after upgrading WebCodex
WebCodex v0.4.6 includes an explicit upgrade note: reconnect the application or MCP connection and refresh its tool schema after upgrading from an older release. Existing conversations or cached client schemas can continue to show retired tool names. If refreshing the schema does not correct the tool list, start a new conversation after reconnecting.
| Test stage | What it proves | If it fails |
|---|---|---|
| WebCodex process status | The Server and required local components started. | Inspect WebCodex configuration and runtime output before testing the network. |
| Local MCP connection | The host, port, path, protocol, and authentication work locally. | Correct WebCodex itself before creating or changing the tunnel. |
| Localtonet tunnel status | The selected device is connected and the tunnel has been started. | Check the client, device selection, relay selection, and tunnel lifecycle. |
| Remote tool discovery | The cloud client can reach and understand the MCP endpoint. | Check the full public path, client transport, authentication, and cached schema. |
| Restricted project operation | The intended repository is accessible within the expected authority boundary. | Review project registration and OS permissions instead of broadening access globally. |
Security and operational boundaries
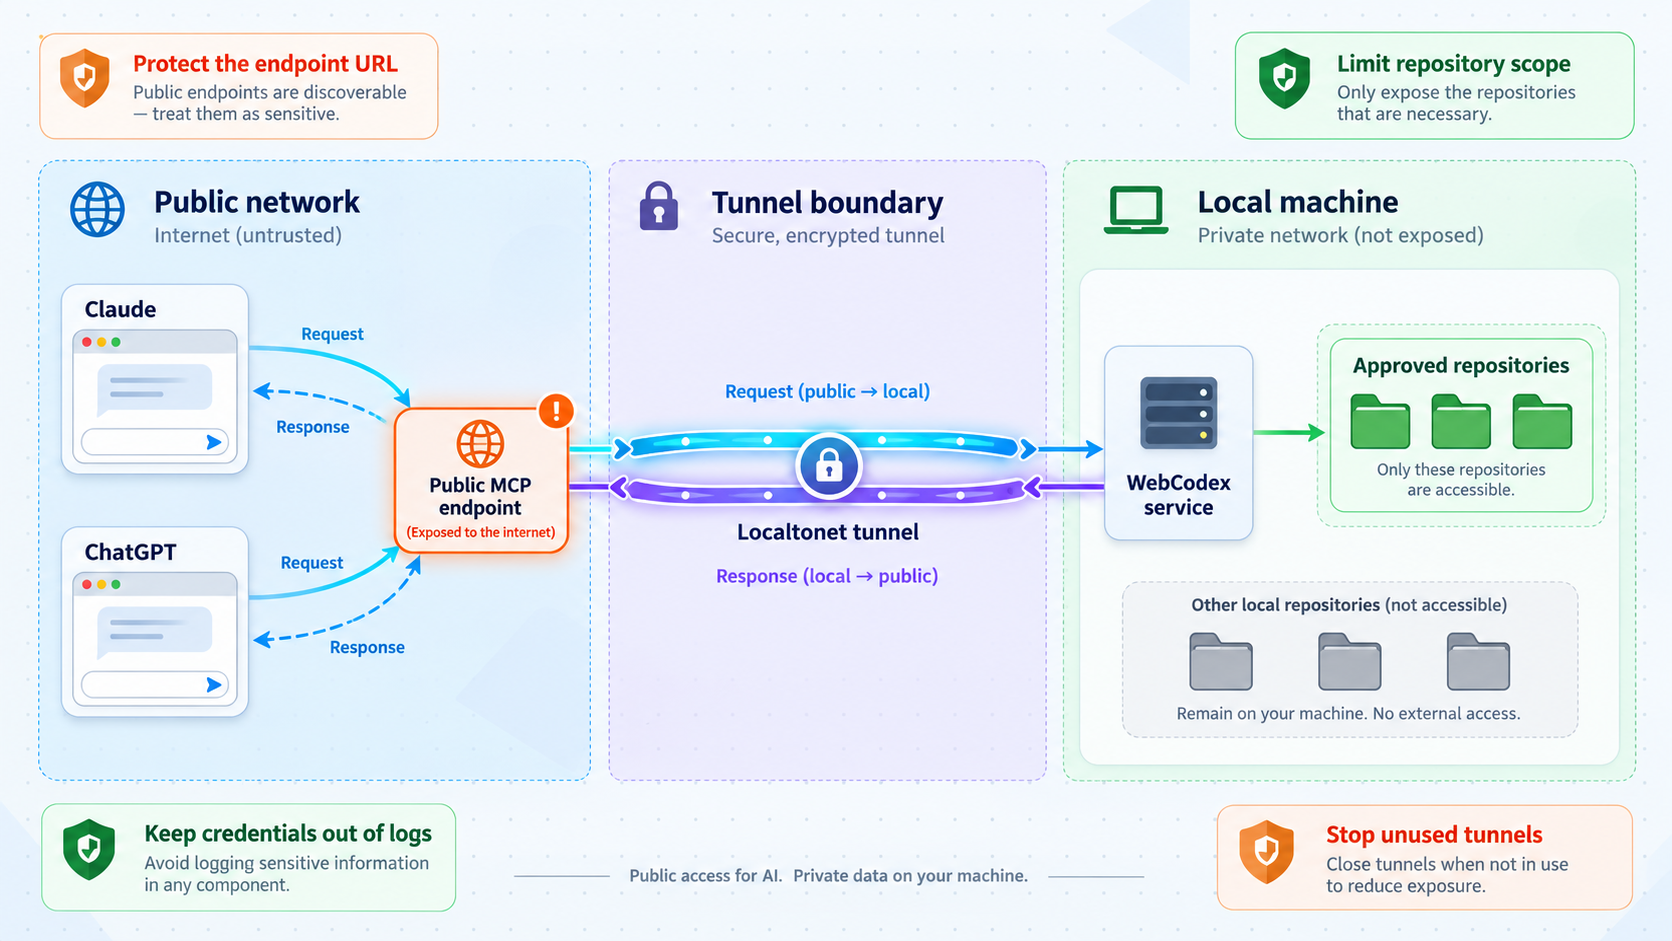
WebCodex is powerful because it can read and modify files and execute commands inside configured project boundaries. The correct security model is not simply to trust the AI client or hide the endpoint. Use multiple controls so that one mistake does not expose unrelated files or permit unnecessary system changes.
Apply least privilege at every layer
- Operating-system account: Run WebCodex as an account with only the filesystem and command permissions required for the approved projects.
- Project registration: Register the narrowest possible project roots. Avoid parent directories containing credentials or unrelated repositories.
- Repository hygiene: Keep secrets out of Git, prompts, source files, logs, test fixtures, and generated output.
- MCP authentication: Use the authentication mechanism documented by the installed WebCodex version. Do not publish or reuse credentials casually.
- Tunnel lifecycle: Start the tunnel only when remote access is needed and stop it afterward.
- Human review: Inspect Git diffs, command output, tests, runtime evidence, and long-running jobs before accepting changes.
Prompt injection is also relevant. A repository file, issue description, downloaded document, dependency output, or external page can contain instructions intended to manipulate the AI client. Treat content retrieved from outside your trusted project as data, not authority. Review requests that ask the agent to expose credentials, change access controls, download executables, publish packages, or run destructive commands.
Separate authentication secrets from the tunnel configuration
A Localtonet device token identifies the client device that runs the tunnel. A WebCodex credential, if configured, controls access to the application. These are different security objects and should not be substituted for each other. Do not place either secret in the public URL unless the relevant product's current official documentation explicitly requires that format.
The relay server or region selection is also not a credential. Select it from the current dashboard because available values may vary by plan, client version, region, or deployment. This guide does not claim that every region, protocol option, or capability is included in every subscription plan.
Plan for shutdown and recovery
Remote access depends on the WebCodex process, the Localtonet client, the selected device connection, and the running tunnel. Stopping any required component can make the endpoint unavailable. This behavior is useful when intentionally closing access, but it also means unattended operation requires deliberate process and restart planning.
Because cross-platform reboot persistence has not been fully accepted across all WebCodex unified installer variants, test a real reboot on the exact target platform before depending on automatic recovery. Verify WebCodex Server and Runner status, local MCP access, Localtonet client connectivity, and tunnel status separately after the restart.
Routine operation and maintenance
A stable workflow benefits from a short operational checklist. Before starting remote work, update or check out the intended branch, ensure the working tree is understood, start WebCodex, verify the registered project, and confirm the local MCP connection. Then start the Localtonet client and tunnel, connect the remote AI client, and perform a harmless tool-discovery test.
During a session, watch WebCodex's Runtime Console, Workflow Session evidence, Jobs, Git status, and diffs. Long-running work should remain observable rather than being treated as an opaque chat response. Review every unexpected command and investigate changes outside the requested scope.
At the end of a session, inspect the final diff, run the project's normal tests, commit or revert changes as appropriate, disconnect the MCP client if needed, and stop the Localtonet tunnel. Deleting the tunnel is appropriate when the endpoint should not be reused. Remember that creating a tunnel and starting it are separate lifecycle events, as are stopping and deleting it.
Upgrading WebCodex
Before upgrading, preserve the current project state and record the working configuration without exposing secrets. Confirm that the new release provides an artifact for the correct platform and architecture. Review its validation status and upgrade notes, then test local startup and MCP tool discovery before restoring remote access.
For an upgrade to v0.4.6, reconnect the application or MCP connection and refresh the tool schema. Cached schemas in existing conversations may retain old tool names, so a new conversation can be necessary. Never diagnose a stale client schema by immediately widening filesystem access or changing tunnel protocols.
Troubleshooting WebCodex and remote MCP access
The unified installer is unavailable for my platform
Confirm the operating system, version, and CPU architecture. The documented unified targets are Windows NSIS, macOS, Debian 12, and Ubuntu 22.04 or newer, across x64 and arm64. A defined build target does not guarantee that every variant has completed native acceptance or that an artifact exists in every release. If the correct asset is absent or unvalidated, do not download a similarly named package from another project. Use a WebCodex-documented advanced deployment path or wait for an appropriate validated artifact.
WebCodex starts, but the local MCP client cannot connect
Recheck the address, port, scheme, and complete MCP path shown by the installed configuration. Confirm that the service is listening and that the client is using the configured authentication mode. A successful Desktop launch does not necessarily prove that the MCP listener started. Inspect the Runtime Console and current WebCodex diagnostics for the exact failure.
The tunnel is configured, but the public URL is unavailable
Confirm that the Localtonet client device is connected and that the tunnel was explicitly started. Creating the tunnel alone does not make it run. Verify that the selected device can reach the local WebCodex IP and port. If our client runs in a container, virtual machine, or different host, an address that works only from the WebCodex machine may not be reachable from the Localtonet client environment.
The public origin responds, but the MCP client finds no tools
Make sure the remote client URL includes the exact WebCodex MCP path. Check that the client is configured for remote HTTP rather than interpreting the entry as a local stdio command. Verify authentication and inspect WebCodex logs for the request. If the server was upgraded, reconnect and refresh the tool schema. Start a new conversation if an existing one retains cached tool definitions.
Claude Code reports a configuration problem
When using a remote server, specify HTTP transport and provide a complete URL. Claude Code's JSON configuration requires a type for URL-based servers; a URL with no type can be interpreted incorrectly as a stdio configuration. Using the documented claude mcp add --transport http form avoids that ambiguity for a normal remote HTTP connection.
ChatGPT does not show the expected MCP controls
Availability can vary by application surface, account capability, workspace policy, and product version. Confirm that the current ChatGPT environment supports adding the required remote MCP connection. Do not change a known-good WebCodex endpoint or expose additional ports merely because the client interface lacks an expected control.
WebCodex can access too many files
Stop the remote session and tunnel, then inspect the registered project roots and the operating-system permissions of the WebCodex account. Replace broad directory registration with the narrow repository directory needed for the task. Also check symlinks, mounted directories, generated workspaces, and tool configuration that may reference locations outside the intended project.
The setup works until the computer reboots
Verify every component independently after restart: WebCodex Desktop, Server, Runner, local MCP connection, Localtonet client, device connection, and tunnel state. WebCodex warns that reboot persistence has not completed acceptance across all unified installer targets, so do not assume identical automatic startup behavior on Windows, macOS, and Linux.
Frequently asked questions
Does WebCodex upload my entire repository to ChatGPT or Claude?
WebCodex keeps the repository on the machine where it lives, so the project does not need to be copied wholesale into a hosted workspace. However, requested file excerpts, command output, Git information, and other tool results can be returned to the AI client. Register only necessary project roots and keep credentials out of files, prompts, logs, and Git.
Which WebCodex repository does this guide cover?
It covers the yyjeqhc/webcodex project and its unified package containing Desktop, CLI, Server, and Runner. A different repository has a similar name and publishes a separate npm package. Its commands and connection workflow must not be mixed into this installation.
What port does WebCodex use?
The evidence available for this guide does not establish one universal port. Read the address and port from the installed WebCodex configuration or Desktop interface, verify that exact endpoint locally, and then use the verified port as the Localtonet HTTP tunnel target.
Should I enter only the Localtonet hostname in my MCP client?
Use the complete public MCP URL. Start with the assigned Localtonet HTTPS origin and preserve the exact MCP path configured by WebCodex. Omitting the path can reach the public host without reaching the protocol endpoint.
Does creating a Localtonet tunnel start it automatically?
No. Creating the tunnel and running it are separate lifecycle actions. Select the correct client device, configure the local target, and use the Start control. The public endpoint remains available only while the selected client is connected and the tunnel is running.
Do I need router port forwarding or a public IP address?
No. The Localtonet client establishes an outbound connection to our relay server. This provides the public URL without inbound router port forwarding, firewall changes, VPN setup, or a public IP address.
Can Localtonet fix a WebCodex service that does not work locally?
No. A tunnel forwards traffic to the configured target. It does not start WebCodex, correct its MCP path, change its authentication, or repair project configuration. Verify the complete WebCodex workflow locally before creating the tunnel.
Why do old tool names remain after a WebCodex upgrade?
The MCP client or an existing conversation may have cached the previous tool schema. After upgrading to WebCodex v0.4.6, reconnect the application or MCP connection and refresh the schema. Start a new conversation if the existing one continues to show retired tool names.
Is this tunnel the same as a VPN?
No. This guide uses a Localtonet HTTP tunnel to publish one HTTP-compatible service. It should not be described as a VPN. VPN Manager is our separate private mesh VPN feature.
Connect your verified WebCodex service with Localtonet
Install and validate WebCodex locally first, then use a Localtonet HTTP tunnel to give an approved remote MCP client a public HTTPS route to the exact configured endpoint. Keep authentication enabled, limit project roots, and stop the tunnel when the session is complete.
Get Started Free →

