

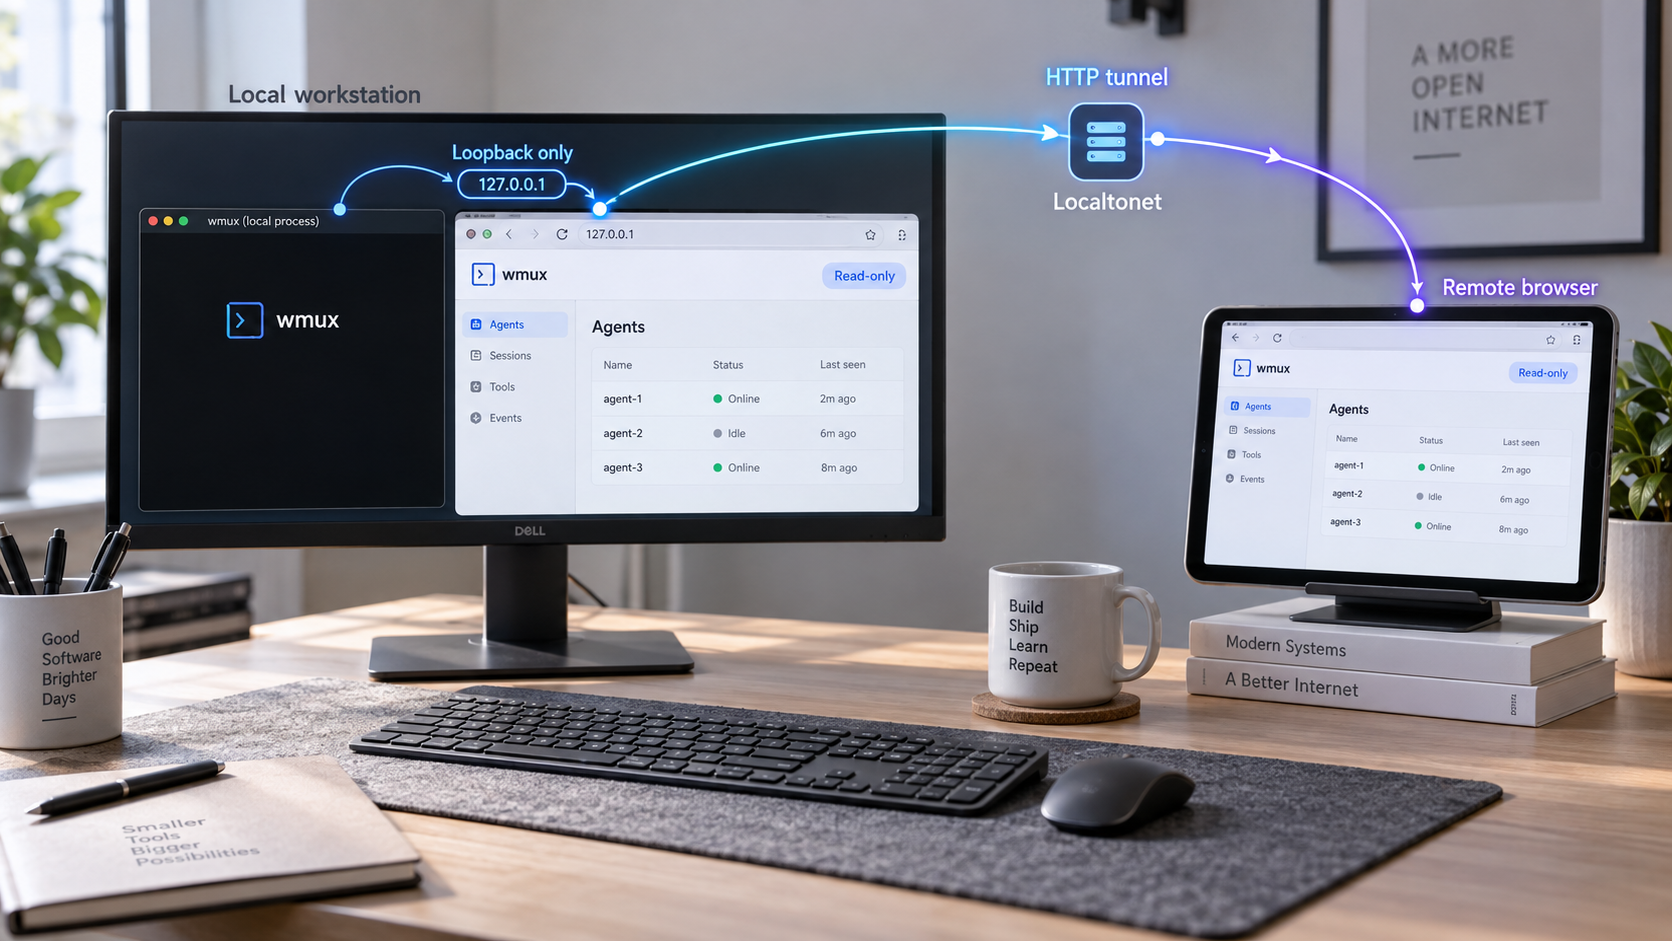
Run your AI agent workspace locally, verify its read-only browser view, and make that view available when you are away
wmux is an open-source agent development environment for supervising CLI-based AI agents in persistent workspaces. Its optional wmux web command serves a browser view of panes that is loopback-only and read-only by default. This guide covers supported installation paths, first startup, local verification, normal operation, troubleshooting, and the security implications of remote access. After the local interface works, we show how to connect it to a Localtonet HTTP tunnel without opening an inbound router port or assigning the computer a public IP address.
📋 What's in this guide
What wmux provides and where the web interface fits
wmux describes itself as an agent development environment, or ADE, for AI agents. Rather than treating each agent as an isolated command in a temporary terminal, it organizes agents into panes and workspaces backed by a daemon running on the user's own computer. Supported CLI agents can run next to one another in real pseudo-terminals, and wmux can coordinate related tools such as Git worktrees, browser sessions, channels, and agent-to-agent messaging.
The native desktop application remains the main environment. On Windows, wmux uses ConPTY directly and does not require WSL. On macOS, it uses forkpty. The background daemon owns the workspace so closing the desktop window does not necessarily end its sessions. The project also documents restoring workspace state after a reboot, including panes, working directories, scrollback, and channel history. Processes cannot continue while a computer is powered off, so restored state should not be confused with an agent process literally running through a shutdown.
For browser-based observation, wmux provides the wmux web command. The project documents this view as loopback-only and read-only by default. Loopback-only means the listener is intended to be reachable from the same computer rather than from other devices on the LAN. Read-only means the browser view is designed for monitoring rather than reproducing every interactive capability of the desktop application.
wmux web provides a browser-oriented view of panes and is documented as read-only by default.
This guide tunnels the loopback-only, read-only wmux web interface for browser monitoring. It does not replace or reconfigure wmux's documented iPhone pairing workflow. Native phone pairing uses the Remote area in wmux, HTTPS over Tailscale, and a QR code. Do not treat a Localtonet HTTP tunnel as an undocumented substitute for that application protocol.
Prerequisites and platform choices
Select the installation route that matches the operating system and architecture of the computer that will run your agents. The current documented primary desktop platforms are x64 Windows and Apple Silicon macOS. Linux packages are available, but Linux support is explicitly experimental. That distinction matters for a monitoring setup because the desktop application, daemon, wmux command, and browser endpoint all need to operate reliably before adding remote access.
The published minimum Windows requirement is Windows 10 build 1903 or later on x64 hardware. The supported macOS package is for Apple Silicon. The project estimates approximately 4 GB of RAM and a few hundred megabytes of disk space as minimum system resources. Actual agent workloads can need considerably more memory, storage, and CPU because wmux is only one part of the system. Every agent CLI, repository, build process, browser session, and test suite adds its own requirements.
You also need at least one CLI-based AI agent if you want to use wmux for its primary purpose. Installing wmux does not automatically provide subscriptions, credentials, or authorization for unrelated agent services. Configure each chosen agent according to that agent's own security and authentication requirements. Never place API keys or access tokens in a pane that you intend to display to people who should not see them.
| Platform | Documented installation path | Important qualification |
|---|---|---|
| Windows x64 | WinGet, Chocolatey, or the downloadable Setup.exe installer | Windows 10 build 1903 or later is documented. The direct installer may show an unknown-publisher SmartScreen warning because it currently uses a SignPath test certificate. |
| macOS | Download the DMG and drag wmux into Applications | The documented package is for Apple Silicon and is Developer ID signed and notarized. |
| Linux | Use an AppImage, DEB, or RPM package from the project's release page | Linux support is experimental. Package names and installation commands can change between releases, so this guide does not invent a distribution-specific command. |
| iPhone | Install the optional wmux companion from the App Store | This is a companion client, not a desktop host for the wmux web service. |
Localtonet prerequisites for the later integration
You do not need Localtonet to test wmux locally. Complete the wmux installation, start its web server, and open the local URL first. For the remote-access stage, install and run the Localtonet client on the same computer as wmux, or on a device that can reach the wmux listener. Because wmux binds to loopback by default, using the same computer is the clearest and least ambiguous arrangement.
The Localtonet device requires its own authentication token. Treat that token as a credential and never paste it into screenshots, public issue reports, scripts committed to a repository, or examples shared with other people. You will also select an available Localtonet relay server from the current dashboard. Region and server choices can vary, so this guide does not hardcode a server code.
A tunnel cannot repair a local service that is not installed, not running, or listening on an unexpected address. It can also make debugging harder by introducing another network layer. Verify the exact loopback URL produced by wmux web before creating any public route.
Install wmux on your computer
Use one supported installation method for your operating system. Do not combine package-manager installation with a second copy from a direct installer unless you deliberately intend to manage multiple installations. Duplicate copies can make it unclear which executable your shell is launching and which version the desktop shortcut opens.
Install on Windows with WinGet
WinGet is the recommended Windows package-manager path in the project's installation instructions. Open PowerShell or a Windows terminal and run:
winget install openwong2kim.wmuxAllow the package manager to complete. If it reports that wmux is already installed, inspect the installed version or use WinGet's normal upgrade workflow rather than repeatedly reinstalling it. Start wmux from the application launcher after installation.
Install on Windows with Chocolatey
If Chocolatey is already your package manager, use the documented package name:
choco install wmuxFollow Chocolatey's prompt and policy behavior on your computer. The project's documentation states that the package-manager methods install the same Windows build. Use either WinGet or Chocolatey, not both, for ordinary package ownership.
Install on Windows with Setup.exe
An offline or direct installer is available from the project's download and release pages. Download the current Setup.exe build, inspect that the file came from the official project location, and launch it. The project currently notes that this installer uses a SignPath test certificate, so Windows SmartScreen can display an unknown-publisher warning. A warning should never be dismissed automatically. Verify the download origin and intended file before deciding whether to proceed.
Package-manager installation is preferable when it is available because it avoids that particular SmartScreen experience. The published Windows build supports automatic updates and verifies a release against a published SHA-256 value before installing it.
Install on Apple Silicon macOS
Download the current DMG from the official wmux site or project release page. Open the disk image, drag wmux into the Applications folder, and launch it from Applications. The documented macOS build is Developer ID signed and notarized.
On first launch, wmux installs its CLI onto your PATH. If a terminal that was already open cannot find the command, close that terminal and open a new one so the shell starts with the updated environment. Do not invent a manual symlink or copy the executable into a system directory unless current project instructions explicitly require that repair for your version.
Install an experimental Linux package
wmux publishes experimental AppImage, DEB, and RPM builds on its release page. Choose the package format intended for your distribution and follow that distribution's standard local-package installation process. The supplied project evidence does not establish one universal Linux command, exact package filename, desktop integration behavior, or dependency list across distributions. For that reason, we do not provide a guessed command.
Treat Linux as an experimental deployment. After installation, verify both the desktop application and the CLI. If the desktop application starts but wmux is unavailable in a terminal, check the package's installed files and release notes before modifying PATH. A Linux-specific packaging issue should be separated from a wmux web issue and from a Localtonet tunnel issue.
Complete the first launch
Open the wmux desktop application before testing remote access. Create or open a workspace and confirm that its panes render correctly. If you plan to supervise a particular agent, start that CLI agent in a pane and verify that its local installation and credentials work. This establishes a known-good workspace for the browser view.
wmux can detect several agent CLIs, including Claude Code, Codex CLI, Gemini CLI, Aider, OpenCode, and GitHub Copilot CLI. Each pane owns its own terminal and agent process, allowing different agents to run at the same time. Detection does not grant credentials or permissions to those tools, and it does not mean every tool is installed automatically.
Start the wmux web interface
After the desktop application and a workspace operate normally, open a terminal on the wmux computer and run the documented web command:
wmux webRead the command's output carefully. The current evidence establishes the command and confirms that it binds to loopback by default, but it does not establish a fixed port, the complete set of startup options, or a universal printed URL. We therefore do not supply a guessed port. Use the address and port shown by the installed version's own output.
Leave the process running while you test it unless your wmux version explicitly documents another service-management mode. If the process exits immediately, record its error message. An error at this stage belongs to the local wmux setup and should be resolved before creating a tunnel.
Open a working wmux workspace
Start the desktop application and confirm that the workspace and panes you want to monitor are visible locally.
Launch the documented web command
Run wmux web in a terminal on the wmux computer. Keep the terminal visible so you can read startup status and errors.
Record the emitted loopback address
Use the host and port reported by your installed version. Do not assume a port from an unofficial example or another release.
Keep the local server available
The browser view can respond only while its server is running and the underlying wmux environment remains available.
The supplied project evidence does not establish whether wmux web provides its own authentication, what authentication options might exist in a particular release, or whether sensitive terminal content is redacted. Do not infer an access-control guarantee from the phrase “read-only.” A read-only viewer can still expose source code, prompts, command output, repository paths, hostnames, errors, or credentials printed by another program.
Verify the interface locally before tunneling it
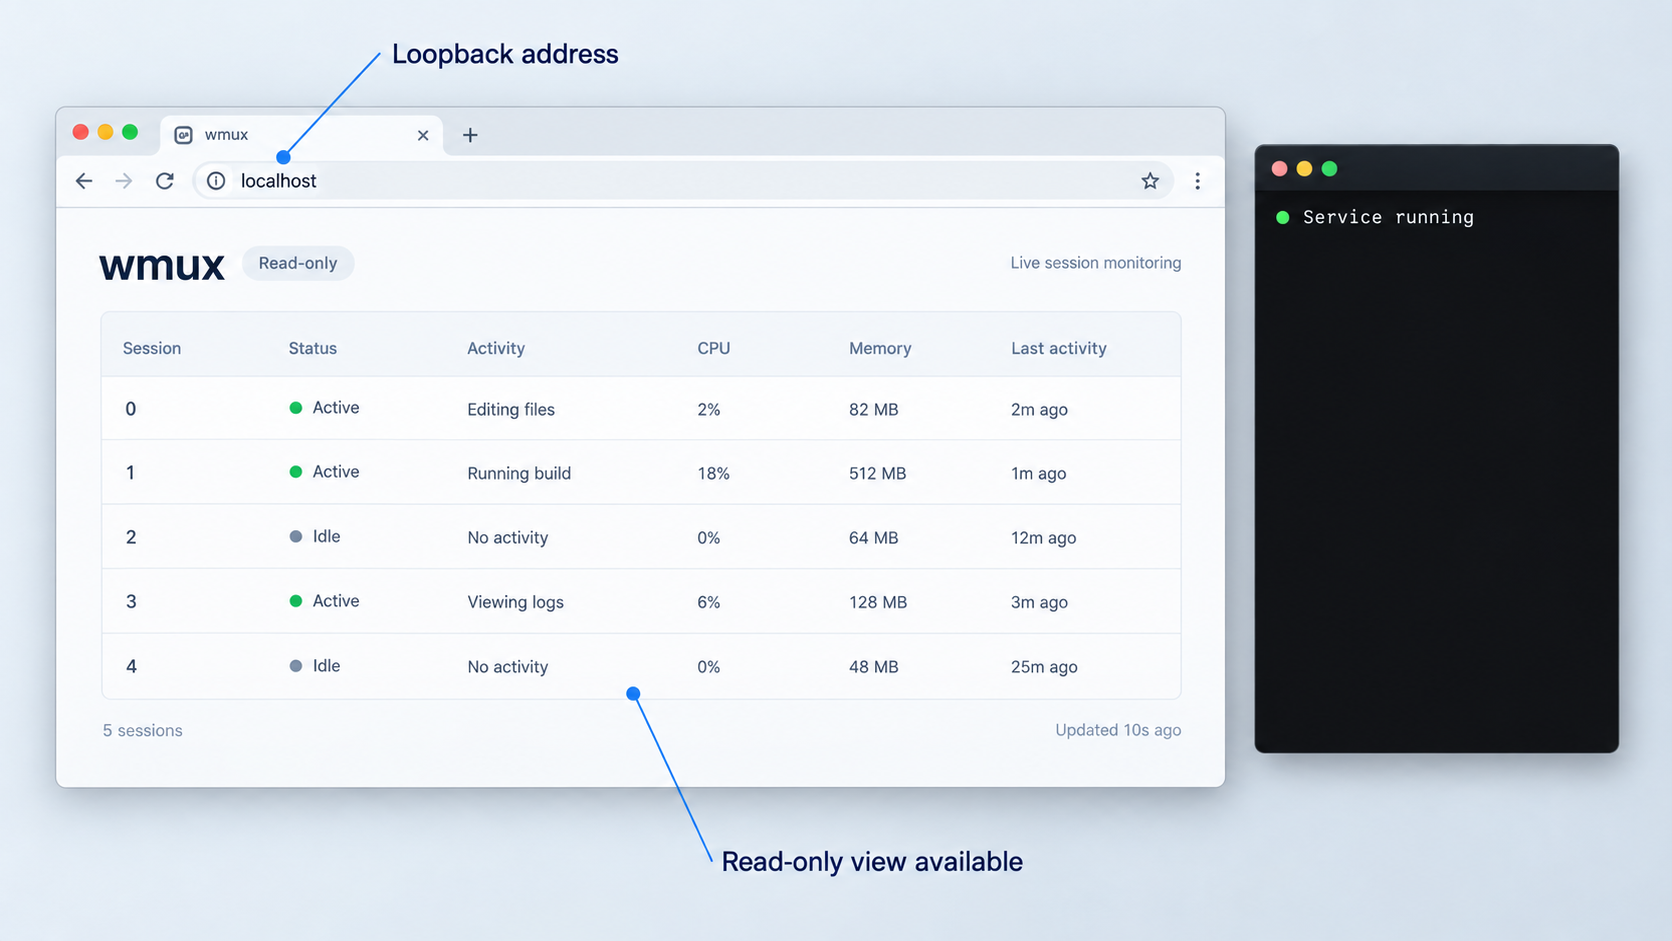
Open a browser on the same computer and enter the exact loopback URL emitted by wmux web. A loopback URL commonly uses a loopback hostname or address, but the command's actual output is authoritative. The page should load without requiring another device to reach the wmux computer.
Confirm that the expected workspace or pane information appears. The web view is documented as read-only by default, so verify it as a monitoring interface rather than expecting it to behave like the complete desktop application. If the page loads but shows no useful content, return to the desktop application and confirm that an active workspace exists.
Use a simple local acceptance checklist
- The wmux desktop application starts successfully.
- The intended workspace opens and its panes display current output.
wmux webremains running without an immediate error.- The command reports a loopback host and port.
- A browser on the same computer opens that exact URL.
- The page displays the expected pane or workspace information.
- The browser view behaves as a read-only view rather than an interactive terminal.
Refresh the browser once after the initial load. Then generate harmless output in a test pane and confirm that the web view reflects it as expected. Avoid using a pane that contains secrets for this test. This verifies that you are looking at live or updated workspace information rather than an unrelated page, stale browser tab, or different local service.
Confirm loopback isolation
The default loopback binding is a useful security boundary. It means another device should not be able to connect directly through the wmux computer's LAN address merely because the web process is running. Do not change wmux to a broad network bind just to make remote access easier. With Localtonet, the client can connect to the local loopback target from the same computer while the original service remains unavailable as a direct LAN listener.
This architecture separates two responsibilities. wmux serves the view locally, while our client establishes an outbound connection to a Localtonet relay. The public side receives an assigned URL, and requests reaching it are forwarded to the selected local host and port. No inbound router port forwarding, public IP address, VPN setup, or inbound firewall change is required for this standard HTTP tunnel workflow.
Operate and maintain the local wmux environment
Remote monitoring is useful only when the underlying workspace is healthy. Keep wmux, its daemon, the selected agent CLIs, and the web process conceptually separate. A pane can exist while an agent has stopped. A workspace can be restored while a previous process is no longer running. The web page can also be unavailable even though the desktop application is open if the web command has stopped.
Understand persistence boundaries
Closing and reopening the wmux desktop application does not necessarily end daemon-owned sessions. After a full computer shutdown, however, the previous agent processes have stopped. wmux can restore workspace structures, working directories, scrollback, pane state, and channel history, but restored context is not proof that a former process is still alive.
After a reboot, perform a short operational check: open wmux, inspect the required panes, restart any workload that did not resume, and confirm whether wmux web must be started again. The supplied evidence does not document an automatic startup guarantee for the web command, so do not assume that the browser endpoint returns automatically after login or reboot.
Keep versions current deliberately
The documented Windows x64 and macOS arm64 builds check for releases every 30 minutes and verify an update against a published SHA-256 before installation. Even with automatic update support, review important release notes before relying on a changed build for unattended monitoring. A version update can affect daemon behavior, UI presentation, experimental platform support, or web command options.
Separate monitoring from control
Use the browser view to observe. Return to the native application or a documented native companion workflow when you need interactive control. wmux's iPhone application can receive and answer supported agent questions through its own pairing design, but that is not the same as turning the web view into a writable remote terminal.
This separation limits accidental input through a monitoring page, but it does not remove confidentiality concerns. Terminal output can be operationally sensitive even if no input is accepted. Review what agents print and avoid commands that echo tokens, private keys, environment values, or confidential file contents.
Expose the verified wmux web endpoint with Localtonet
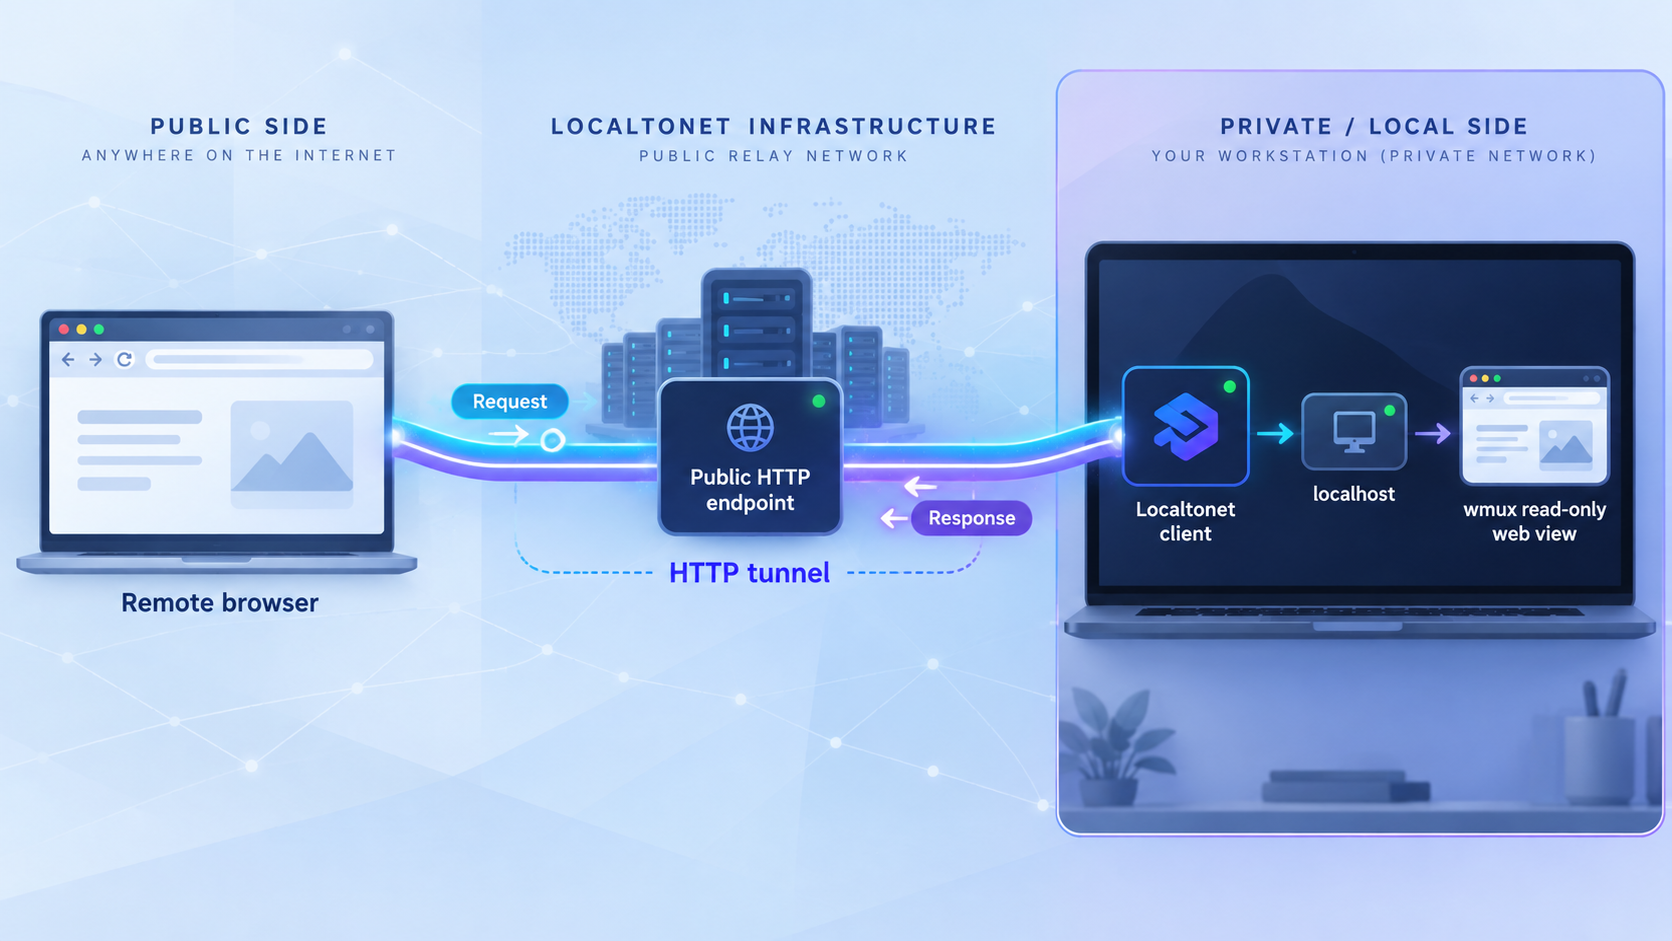
Add Localtonet only after the local browser test succeeds. An HTTP tunnel is appropriate because wmux web serves a browser-oriented endpoint. Raw TCP or UDP tunnels are not required for this workflow, and VPN Manager is a separate feature rather than another name for standard tunneling.
Install and run our client on the wmux computer whenever possible. The client establishes an outbound connection to a Localtonet relay server. You select the device using its token, create an HTTP tunnel that points to wmux's loopback host and observed port, and then start the tunnel. The resulting public HTTPS address remains available only while the selected client is connected and the tunnel is running.
Current dashboard options and available relay locations can vary. Obtain the server or region from the live dashboard rather than copying a server code from an article. Likewise, enter the exact wmux port shown on your computer instead of assuming that every installation uses the same value.
Install and run the Localtonet client
Run our client on the same computer that hosts the loopback-only wmux web service. This lets the client reach the local listener without changing wmux to accept LAN connections.
Authenticate the intended device
Use the device-specific authentication token assigned through Localtonet. Keep it private and confirm that the intended device appears connected before configuring the tunnel.
Select an available relay server
Choose from the current servers or regions shown in the dashboard. Availability can vary, so do not hardcode an old server code.
Create an HTTP tunnel to the local endpoint
Set the local target to the loopback host and exact port reported by wmux web. Use an HTTP tunnel because the target is a browser service.
Start the tunnel
Creating the configuration does not start it. Use the Start control and wait until the tunnel is running and the selected client remains connected.
Test the assigned public address
Open the assigned public HTTPS URL from a different network or device. Confirm that it shows the same intended read-only wmux view, then stop the tunnel when remote access is no longer required.
For current dashboard details, consult our Localtonet HTTP tunnel documentation. Use the documentation to confirm any UI labels that may have changed since this draft, while retaining the core sequence: run the client, select the authenticated device, select a current relay server, configure the local HTTP target, and start the tunnel.
Saving or creating a tunnel does not make it active. It must be started. It can later be stopped or deleted, and its public endpoint works only while the tunnel is running and the selected Localtonet client is connected.
Security considerations for remote AI agent monitoring
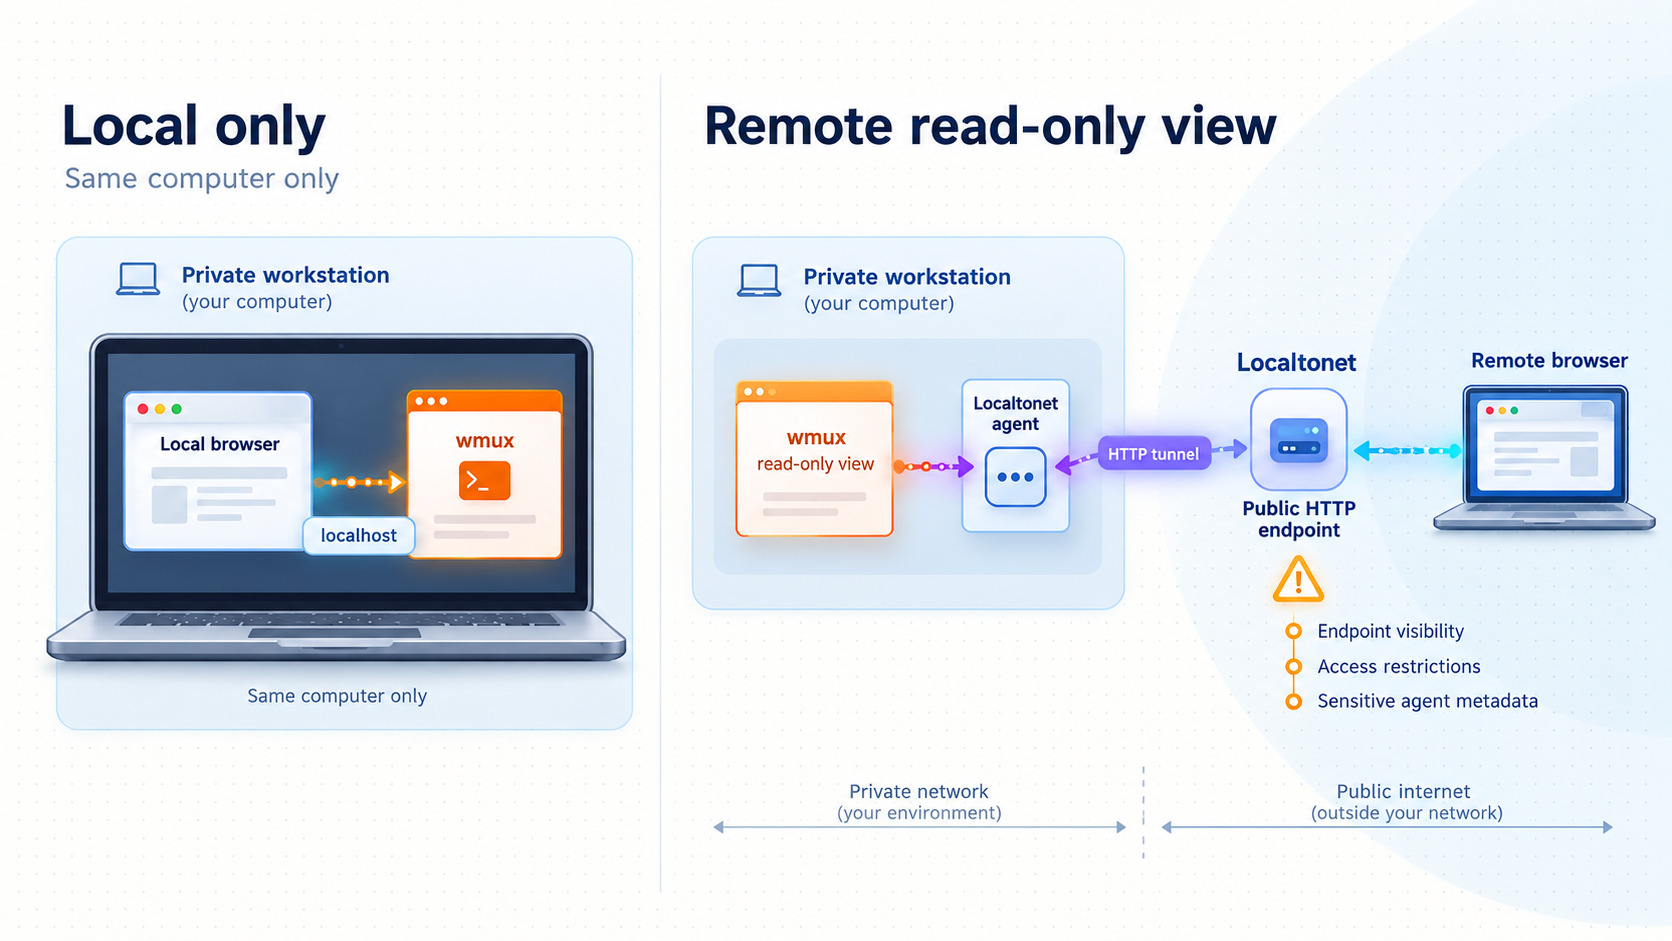
A public address changes the risk model even when the underlying page is read-only. Local loopback binding normally limits direct access to processes on the host. A tunnel intentionally makes the service reachable through a public endpoint, so anyone who can access that endpoint may be able to see whatever the page displays unless a separate, verified access-control layer prevents it.
The available evidence does not confirm built-in authentication for wmux web. It also does not establish every access-control option available for Localtonet HTTP tunnels or every subscription plan. Consequently, this guide does not claim that the resulting endpoint is private merely because it has a difficult-to-guess URL. Before exposing sensitive workspaces, confirm the current authentication and restriction options available in your wmux release and Localtonet configuration.
Read-only access still carries confidentiality risk
Terminal output often contains more information than expected. Build logs can reveal internal paths and package versions. Git commands can reveal branch names, issue references, and repository remotes. Agent prompts and answers can include proprietary requirements. Error messages can expose hostnames, usernames, local directories, or fragments of configuration. A viewer does not need write access for those disclosures to matter.
Do not broaden the wmux bind unnecessarily
If Localtonet runs on the wmux host, retain the default loopback behavior. Binding wmux to every interface could create an additional path through the LAN firewall and is not necessary for this arrangement. If you intentionally run our client on a different device, that client must be able to reach the target, which may require a documented wmux network-binding change. The supplied evidence does not establish the exact option for that change, so we do not guess it. Prefer co-location unless current wmux documentation gives a clear, secure alternative.
Use least privilege around agent tooling
Remote observation should not become a reason to weaken the host's security. Keep operating-system accounts, repository permissions, agent permissions, and browser profiles scoped to the work being performed. If an agent can drive a browser or other applications, review wmux's current permission settings independently of the web tunnel. The HTTP tunnel transports requests to the selected web service; it does not define what the underlying agent is authorized to do.
Troubleshooting the installation and tunnel
The wmux command is not found
First confirm that the desktop application was actually installed. On macOS, the project documents that the CLI installs itself onto PATH on first launch, so launch the application and then open a new terminal. Existing shells may retain an older environment. On Windows, confirm that the package-manager operation completed and open a fresh terminal.
If multiple installation methods were used, determine which copy owns the command before reinstalling anything. On experimental Linux builds, consult the package contents and release-specific instructions because a universal CLI path is not established by the available evidence.
wmux web starts but no URL is obvious
Read the complete terminal output, including lines printed immediately before or after startup. Do not try random common ports. If the command provides help output or an error instead of starting, confirm that your installed version includes the web command and that the command syntax has not changed. Version-specific options are outside the verified evidence for this guide.
The local browser reports that it cannot connect
Confirm that the terminal running wmux web is still open and the process has not exited. Re-enter the exact host and port it reported. Check for a mistyped port, an omitted scheme, or a stale URL from an earlier run. Resolve local endpoint errors before examining Localtonet.
The web page loads but does not show the expected workspace
Open the desktop application and verify that the intended workspace and panes exist. Confirm that you did not connect to another process on a reused port. Restart the web command if necessary, read its new output, and test the new local URL. Use a harmless, recognizable line of terminal output to identify the correct pane.
The local page works but the public URL does not
Check the layers in order. Confirm that the Localtonet client is connected. Confirm that the HTTP tunnel was started rather than merely created. Verify that the selected device is the one running wmux. Compare the tunnel's local target with the host and port currently reported by wmux web. Finally, confirm that the wmux web process is still running.
If the Localtonet client is on another computer, remember that the target's loopback address refers to the client computer itself, not the wmux computer. This is why running both processes on the same host is recommended for the default loopback configuration.
The tunnel worked before a reboot but no longer works
A reboot stops operating-system processes. Open wmux, verify restored workspace state, restart any required agent workloads, and run wmux web again if it did not start automatically. Check whether the emitted port changed, then update the tunnel's local target if necessary. Also confirm that the Localtonet client has reconnected and that the tunnel is running.
The public page shows sensitive information
Stop the Localtonet tunnel immediately. Then remove or hide the sensitive output locally, review the pane and workspace that were exposed, and determine whether any credential should be rotated. A read-only display can still disclose a usable secret. Do not restart public access until you have verified both the content and the applicable access controls.
The Windows installer triggers SmartScreen
The project states that the direct Setup.exe currently uses a SignPath test certificate and can appear as an unknown publisher. Verify that the file came from the official wmux project before proceeding. If WinGet or Chocolatey is available, the project's installation guidance recommends a package-manager route to avoid that prompt. Never disable SmartScreen globally merely to install one application.
The Linux build behaves differently
Linux support is experimental, so differences can come from the distribution, package format, desktop environment, missing dependencies, or the wmux build itself. Test the native desktop application and CLI independently. Do not diagnose an experimental packaging problem as a Localtonet networking failure until the local web URL works in a browser on the Linux host.
Frequently asked questions
What port does wmux web use?
The verified project evidence does not establish a universal port. Run wmux web and use the address and port reported by your installed version. Do not copy an unverified port from another tutorial or release.
Is the wmux browser interface interactive?
The project documents wmux web as read-only by default. Use it for viewing panes rather than assuming it provides a complete remote terminal or all native application controls.
Does read-only mean the public page is safe without authentication?
No. Read-only limits interaction, but terminal output can still contain source code, prompts, repository details, host information, and secrets. The available evidence does not establish built-in authentication for the web command, so verify current access controls before exposing sensitive panes.
Must I change wmux from loopback to a LAN address?
Not when the Localtonet client runs on the same computer. Our client can forward to the local loopback host and observed wmux port, allowing wmux to retain its default loopback-only behavior.
Does Localtonet require router port forwarding or a public IP address?
No. The Localtonet client establishes an outbound connection to a relay server. Standard tunnel use does not require inbound router port forwarding, a public IP address, firewall changes, or VPN setup.
Is the Localtonet address always available after I create the tunnel?
No. Creating a tunnel does not start it. The endpoint is available only while the tunnel is running and the selected client device is connected. The local wmux web process must also remain available.
Is Localtonet the same as wmux's iPhone pairing feature?
No. This guide uses a Localtonet HTTP tunnel to expose the read-only browser view. wmux's native iPhone workflow is a separate feature that pairs its companion app through HTTPS over Tailscale and a QR code.
Does wmux require WSL on Windows?
No. wmux uses Windows ConPTY directly. Its documented Windows requirement is an x64 system running Windows 10 build 1903 or later.
Can I use wmux on Intel macOS?
The documented macOS package is for Apple Silicon. The available evidence does not establish an Intel macOS build, so this guide does not claim support for it.
Is Linux fully supported?
Linux AppImage, DEB, and RPM builds are available, but the project describes Linux support as experimental. Test the complete local workflow before depending on it for remote monitoring.
Connect your verified wmux view with Localtonet
Once wmux web works on its loopback URL, create a Localtonet HTTP tunnel to the exact local host and port, start it only when needed, and monitor the public endpoint without opening an inbound router port.


