

Install the visual display editor correctly, validate it in Home Assistant, and provide controlled remote access
ESPHome Designer is a browser-based visual editor for ESPHome, OpenEpaperLink, and OpenDisplay layouts. This tutorial shows how to obtain a current release, copy the complete custom component into the correct Home Assistant directory, validate the configuration, add the integration, and verify the editor locally. It also explains version-sensitive upgrades, storage and rollback considerations, practical log-based troubleshooting, and optional public access through a Localtonet HTTP tunnel. Remote access comes last because the Home Assistant integration and its authentication must work locally before a tunnel can be diagnosed safely.
📋 What's in this guide
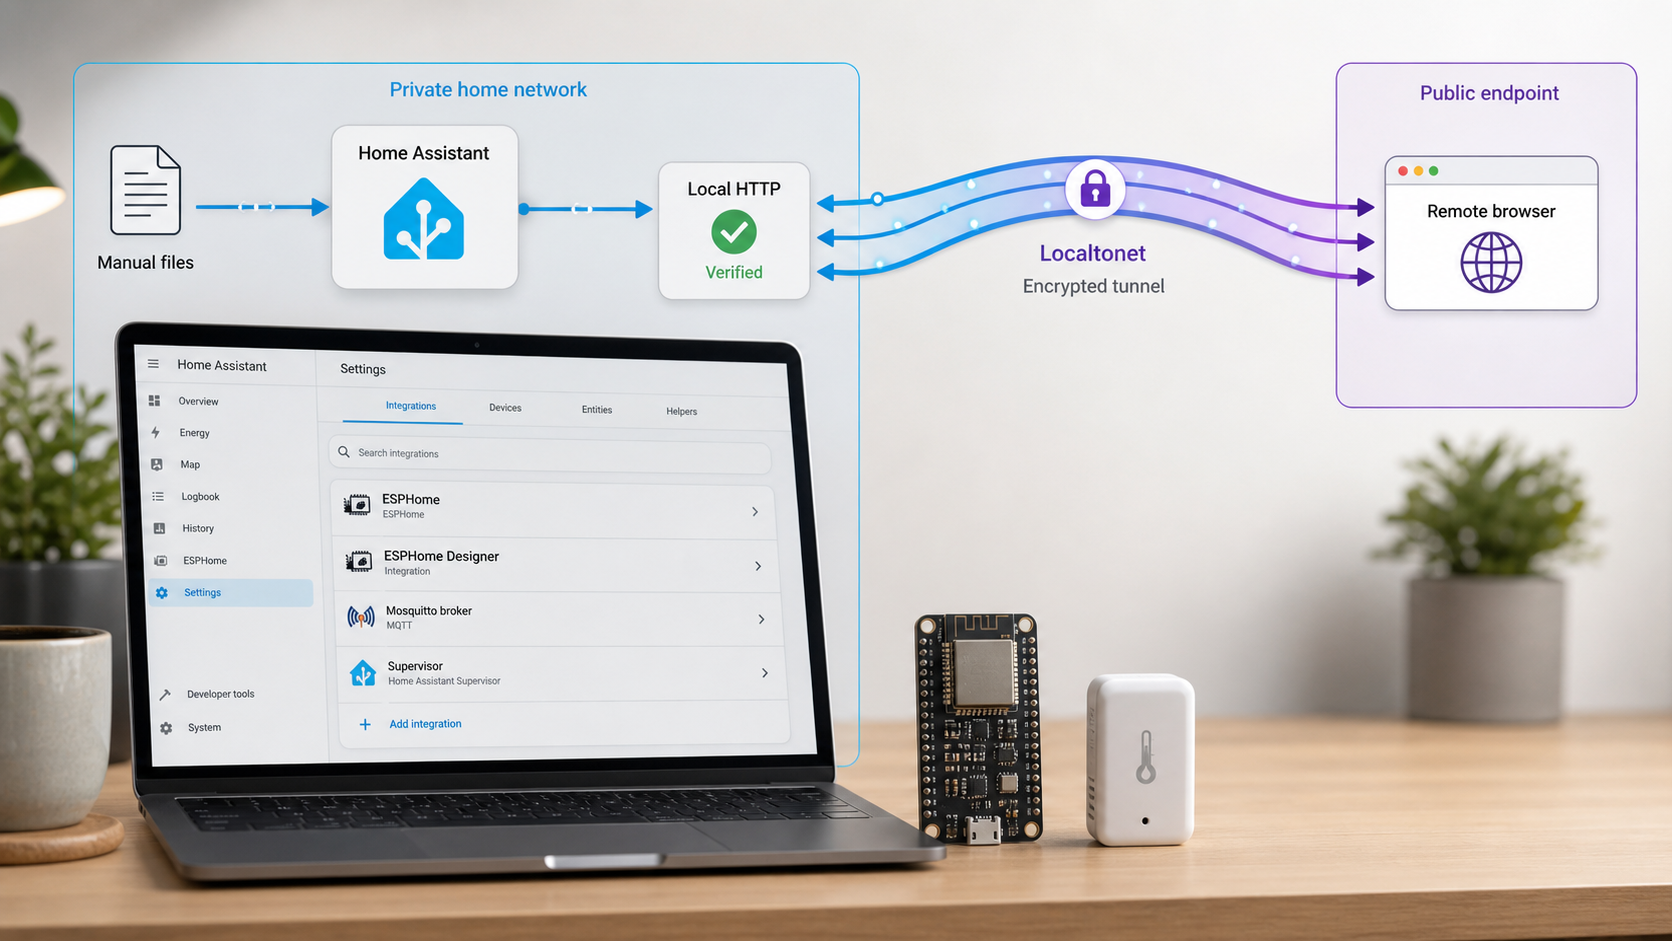
What ESPHome Designer adds to Home Assistant
ESPHome Designer is a visual drag-and-drop editor for smart-display layouts. The upstream project supports ESPHome C++ lambda output and LVGL YAML, OpenEpaperLink Home Assistant service-call data, and OpenDisplay JSON actions. It can run as a Home Assistant custom integration or as a standalone web application.
The editor provides a browser-based design canvas, multiple project pages on a unified stage, Home Assistant entities and MQTT topics as data sources, conditional widget visibility, scheduled pages, round-trip import of supported formats, and more than 55 independent widget modules. The available output still depends on the selected platform, hardware profile, widget, and current project release.
Installing the integration does not grant the editor direct ownership of an ESPHome device configuration. The normal deployment workflow remains:
- Design the layout in ESPHome Designer.
- Generate the appropriate ESPHome, OpenEpaperLink, or OpenDisplay output.
- Review and copy or merge that output into the intended configuration.
- Validate, compile, and deploy it through the normal platform workflow.
For ESPHome specifically, saving a layout does not overwrite the real device YAML. Generated output must be reviewed before it is merged, especially after either ESPHome or ESPHome Designer has been upgraded.
/esphome-designer path.
Choose the correct way to use ESPHome Designer
The upstream project offers a live web editor, a recommended HACS installation, a manual Home Assistant custom-component installation, and local development-server workflows. This article concentrates on the manual Home Assistant method, but the distinction matters because the alternatives have different storage, authentication, and operational characteristics.
| Method | Best suited to | Important behavior |
|---|---|---|
| Live web editor | Trying the editor without installing the integration | Runs at the upstream project site and requires a Home Assistant URL, a long-lived access token, and an appropriate cors_allowed_origins entry when connecting to Home Assistant. |
| HACS custom repository | Home Assistant users who want the upstream recommended installation route | HACS installs and updates the repository, after which Home Assistant must be restarted and the integration added. |
| Manual custom component | Home Assistant users installing without HACS | The complete component directory is copied to config/custom_components/esphome_designer. |
| npm development server | Local frontend development and testing | The documented development endpoint is http://localhost:5174. |
| Python HTTP server | Locally serving the packaged frontend during development | The documented local endpoint is http://localhost:8000. |
Live web option
The easiest upstream option is the hosted editor at
the ESPHome Designer live web application.
It requires no custom-component installation. To connect it to Home Assistant, the project instructs users to open the editor settings, enter their Home Assistant URL and a long-lived access token, and add the designer origin to Home Assistant's cors_allowed_origins.
Do not place a Home Assistant token in screenshots, shell history, shared layout files, issue reports, or public examples. Revoke a token if it may have been disclosed. The manual integration described below avoids relying on the hosted editor for routine Home Assistant access, but all Home Assistant authentication material still requires careful handling.
The npm and Python options are development conveniences. They should not be treated as remotely deployable production services merely because a browser can reach their ports. This tutorial does not recommend exposing either development server publicly.
Prerequisites, permissions, and recovery planning
Complete these checks before modifying the Home Assistant configuration:
- A supported, working Home Assistant installation that you can restart safely.
- Administrator access to add an integration through Settings and Devices & Services.
- Write access to the active Home Assistant configuration directory.
- A file-transfer method that preserves the complete directory and all files.
- A current ESPHome Designer release selected from the upstream release page.
- A backup and a practical plan for restoring the previous component and stored data.
- A known working local Home Assistant origin, including its existing scheme, hostname or IP address, and port.
- Access to Home Assistant logs so component-loading failures can be diagnosed after restart.
A Home Assistant configuration directory is commonly represented as /config inside Home Assistant documentation and add-ons. The host-side filesystem location varies by installation type. In this guide, config/ means the active directory that contains your Home Assistant configuration, not a new directory that you should create somewhere else.
Create a recoverable backup
Create a Home Assistant backup before adding or replacing the custom component. Follow the official
Home Assistant backup guidance
appropriate to your installation. Confirm that the backup completed and that you know how it would be restored. If this is an upgrade, separately preserve the currently installed esphome_designer directory until the new release has passed local testing.
Layout state is stored under /config/.storage/esphome_designer. Home Assistant manages files in .storage, so do not edit them casually. A filesystem copy made while Home Assistant is actively writing data is not a substitute for a supported backup.
The Home Assistant process must be able to read every component file and traverse each parent directory. When files are transferred from another computer, extracted as a different user, or copied through a network share, verify that their ownership and permissions remain compatible with the rest of custom_components. Do not solve a permissions problem by making the configuration broadly writable.
Select a current release
Obtain the project from the official ESPHome Designer repository and review the current ESPHome Designer releases before downloading. Prefer a current release that is compatible with your Home Assistant and ESPHome environment. Do not install an old archive simply because an earlier tutorial links to it.
At the time covered by the supplied upstream evidence, RC41 contains important Home Assistant action-syntax and LVGL rotation updates, while RC40 and RC39 contain security and authentication fixes. Later releases may supersede these builds, so the release page remains the authoritative place to select the current package.
Security and compatibility changes from RC39 through RC41
Existing installations deserve an upgrade review rather than a blind file replacement. The following changes can affect authentication, previously shared data, or generated ESPHome YAML.
| Release | Change | Action for administrators |
|---|---|---|
| RC39 | Fixed hardware-profile requests that could be sent without authentication when an absolute Home Assistant API base was detected. Repeated failures could produce HTTP ban warnings and eventually ban the client IP. | Install RC39 or newer. If access is blocked, inspect Home Assistant HTTP ban logs and configuration rather than repeatedly refreshing the editor. |
| RC40 | Stopped embedding configured AI provider API keys in exported layout JSON, Home Assistant-saved layouts, and shared snippets. Imported layouts now ignore embedded keys. | If a layout file or snippet created before the fix was shared while AI provider keys were configured, rotate those specific keys. Do not assume every older installation exposed a key if no key was configured or no affected content was shared. |
| RC40 | Updated js-yaml to address a quadratic CPU-consumption issue reachable while parsing imported YAML. |
Use a current release and be cautious with untrusted imported YAML. |
| RC41 | Changed generated ESPHome actions from the deprecated homeassistant.service form to homeassistant.action with an action: payload. |
Regenerate and review output used by buttons, switches, checkboxes, sliders, bound touch areas, and direct-mode touch toggles. |
| RC41 | Moved rotation for LVGL output to lvgl: rotation:. ESPHome 2026.4 rejects a display-level rotation: key when LVGL is enabled. |
Regenerate LVGL YAML with a current designer release. Direct, non-LVGL output continues to use display rotation. |
If you shared an exported layout or snippet created before the RC40 fix while an AI provider key was configured, treat that key as exposed and rotate it with the provider. Deleting the shared file does not invalidate a copied credential. If no AI key was configured or no affected layout or snippet was shared, the release note does not establish that a key was exposed.
Generated configuration is version-sensitive. An old saved layout can remain useful, but its previously generated YAML may no longer match a current ESPHome schema. After upgrading ESPHome Designer, regenerate the output from the saved layout and compare it with the deployed configuration before compiling.
How to manually install ESPHome Designer
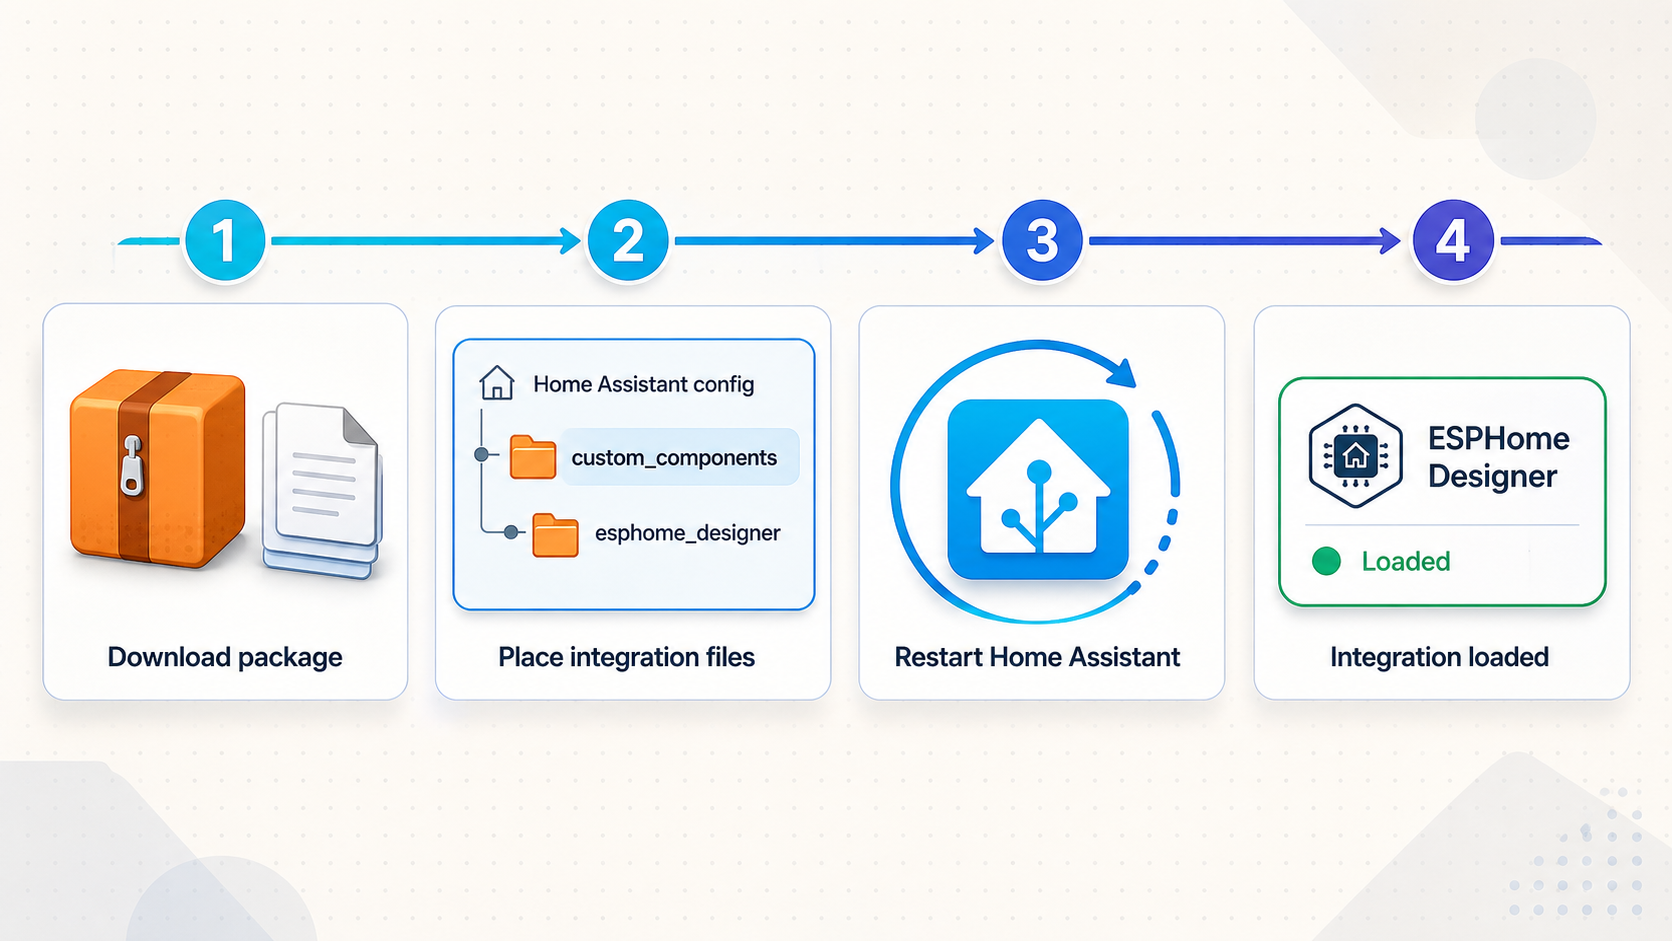
Obtain the complete component directory
Practical acquisition methods include downloading a release archive from the repository's Releases page, downloading the repository archive, or cloning the repository on a workstation. Whichever method you choose, the directory to transfer is the complete upstream custom_components/esphome_designer directory.
Extract archives on a trusted workstation or directly in a staging directory. Do not copy only the files visible in a browser preview, and do not save the repository HTML page as though it were the component. A partial download can leave the manifest present while omitting Python modules or built frontend assets, producing confusing load or blank-page failures.
Check the expected directory tree
The final nesting must look like this, where config represents the active Home Assistant configuration directory:
config/
└── custom_components/
    └── esphome_designer/
        ├── __init__.py
        ├── manifest.json
        └── ...all other files and directories shipped in the same release
manifest.json is the integration manifest, and __init__.py is part of the Python integration package. Both should be directly inside esphome_designer, not one level deeper. The omitted entries vary as the project evolves, which is why they must be copied from one complete release rather than reconstructed from this abbreviated tree.
These examples are incorrectly nested:
config/custom_components/ESPHomeDesigner-main/custom_components/esphome_designer/
config/custom_components/esphome_designer/esphome_designer/
config/custom_components/custom_components/esphome_designer/Download the ESPHome Designer custom component
Choose a current release and obtain the complete custom_components/esphome_designer folder. Keep the directory name, hidden files, modules, and packaged assets intact.
Copy it into the Home Assistant configuration
Transfer the esphome_designer folder to the existing config/custom_components/ directory. The result must be config/custom_components/esphome_designer. If custom_components does not exist, create that directory under the active configuration directory, then verify permissions.
Validate and restart Home Assistant
Use the configuration validation facility available in your Home Assistant installation before restarting. Resolve reported configuration errors first. Then perform a controlled Home Assistant restart from its administrative controls, wait for the system to become available, and inspect the startup logs. A browser refresh alone does not load a newly copied Python integration.
Add the ESPHome Designer integration
Open Settings, select Devices & Services, choose Add Integration, and search for ESPHome Designer. Complete the integration flow shown by Home Assistant.
Configuration validation can detect many configuration problems, but it does not prove that every custom component will initialize successfully. Review the Home Assistant startup log after the restart for messages naming esphome_designer, its manifest, dependencies, or frontend assets.
Verify the integration and editor locally
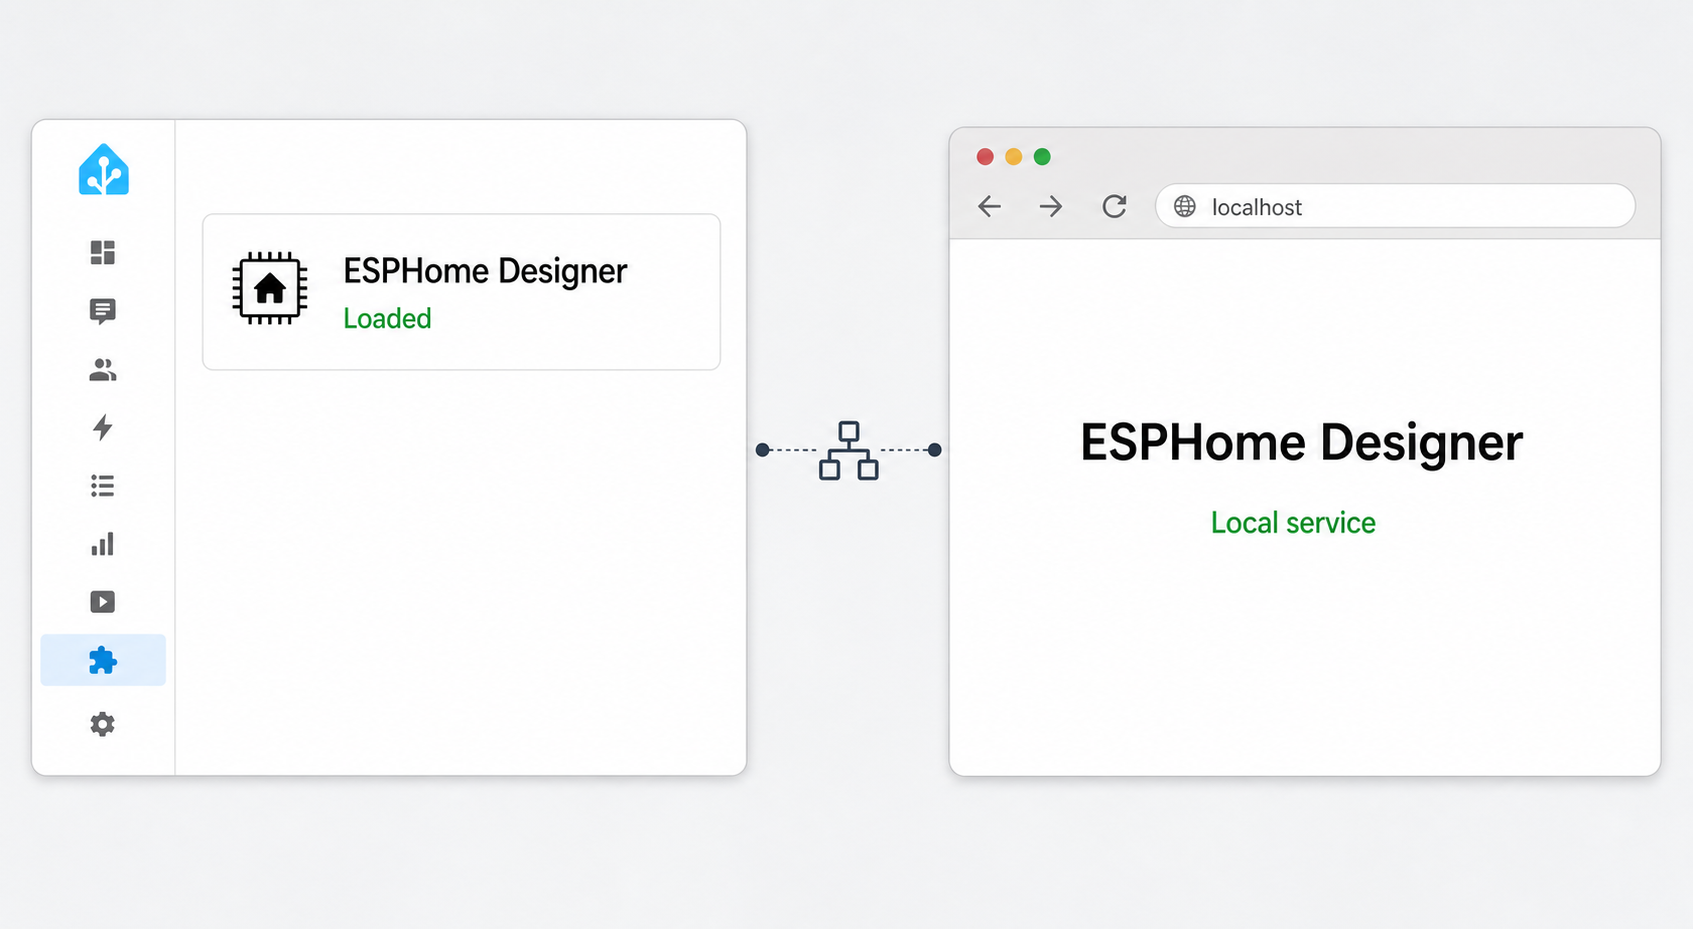
Do not create a public tunnel until Home Assistant and the editor work on the local network. Start with the same local Home Assistant origin that you already use successfully. Append the documented editor path:
HOME_ASSISTANT_ORIGIN/esphome-designer
HOME_ASSISTANT_ORIGIN is a placeholder. Replace it with the complete scheme, hostname or IP address, and port already used for Home Assistant. Do not guess a port based on another installation.
Run a complete local acceptance check
- Confirm ESPHome Designer appears in Settings and Devices & Services.
- Open
/esphome-designerwhile authenticated to Home Assistant. - Confirm the editor shell, controls, icons, fonts, scripts, and other assets load rather than displaying a blank or partially styled page.
- Create or open a test layout and confirm the canvas responds.
- Save the test layout, reload the page, and verify that the state returns.
- Perform a normal browser refresh and a direct navigation to the editor path.
- Open the browser developer console and network panel if the interface is incomplete. Look for failed assets, authentication responses, or JavaScript errors.
- Review Home Assistant logs for integration exceptions or failed requests.
Confirm the loaded version
Check the release identifier before troubleshooting compatibility. The upstream release notes state that releases refresh the Home Assistant manifest version and the visible editor header label. Compare the version displayed by the editor or Home Assistant integration metadata with the version field in the installed manifest.json and the release you intended to copy.
If those values disagree, Home Assistant may still be loading an older directory, the replacement may have been incomplete, or the browser may be using old frontend assets. Confirm the filesystem contents, restart Home Assistant, then test in a private browser window or clear only the relevant site data. Do not repeatedly reinstall without first identifying which version is actually loaded.
Understand storage and migration
Home Assistant installations store ESPHome Designer data in these locations:
- Layouts and editor state:
/config/.storage/esphome_designer - Manual YAML snippet edits: inside the active layout entry in the same storage file
- Uploaded custom hardware profiles:
/config/esphomedesigner_custom_profiles/*.yaml
Legacy installations at version 0.8.6.2 and older may still have data under /config/.storage/reterminal_dashboard. The current integration can read that legacy data and migrate it on a later save. Back up both locations before an upgrade, open the expected layouts after upgrading, and save only after confirming that the correct data was loaded.
Save Layout preserves the canvas, settings, and persisted manual YAML override in the active layout. It does not replace an ESPHome device configuration. Review generated output, merge it into the intended device YAML, validate it, and compile or flash it through the established ESPHome workflow.
Update and rollback safely
A manual installation does not receive the same managed update workflow as a HACS installation. Monitor the upstream release page, read the release notes between your installed version and the target version, and repeat the backup and local verification process for every update.
Manual update procedure
- Record the currently loaded ESPHome Designer version.
- Create and verify a current Home Assistant backup.
- Preserve the existing
custom_components/esphome_designerdirectory outside the active path. - Download one complete current release.
- Stop making layout changes during the maintenance window.
- Replace the component as a complete unit rather than mixing old and new files.
- Verify ownership, permissions, nesting,
manifest.json, and__init__.py. - Validate the Home Assistant configuration, restart safely, and inspect logs.
- Confirm the loaded version and rerun the local acceptance checks.
- Regenerate version-sensitive ESPHome output before using it in a current device configuration.
Rollback procedure
If the updated component fails, capture the relevant logs before changing files. Then restore the previous complete component directory and, if required, restore Home Assistant data using the backup created before the update. Restart Home Assistant and confirm the previous integration version loads.
Avoid combining a newer storage format with an arbitrarily old integration unless the upstream project documents that path. If a layout migration has already been saved, restoring only the component files may not restore the previous state. This is why a Home Assistant backup is more reliable than keeping only the old Python files.
Troubleshoot installation, authentication, and generated YAML
ESPHome Designer is missing from Add Integration
Verify that the directory is exactly config/custom_components/esphome_designer. Open that directory and confirm that manifest.json and __init__.py are directly inside it. Remove extra repository, archive, or duplicate component levels. Then check permissions, restart Home Assistant fully, and search the startup log for esphome_designer.
If Home Assistant reports that the manifest cannot be parsed, compare it with a fresh copy from the same release. A zero-byte file, HTML downloaded in place of raw project content, or files mixed from different releases can cause discovery to fail.
The integration is discovered but setup fails
Read the complete exception in the Home Assistant log, including the first error and its traceback. Messages about a missing Python module, import failure, dependency installation, incompatible Home Assistant API, or invalid manifest point to different causes. Confirm that the release download completed and that no security software or transfer tool removed files.
Do not conceal a dependency error by deleting random imports or editing the manifest. Reinstall the complete release and verify its compatibility notes. If reporting the problem upstream, include sanitized versions, the relevant traceback, and reproduction steps. Remove hostnames, tokens, entities, and private layout data.
The editor path returns 404
A 404 generally means the route was not registered, the integration was not added, or the request reached a different Home Assistant instance. Confirm the integration appears under Devices & Services, verify the exact origin, restart Home Assistant, and retest locally. If a reverse proxy is already in use, compare direct local behavior with proxied behavior before changing ESPHome Designer.
The editor opens but is blank or incomplete
Inspect the browser console and network panel. Failed JavaScript, stylesheet, font, or image requests often indicate an incomplete component copy, stale cached assets, or routing behavior that changes asset paths. Compare the visible version with the installed manifest, test in a private window, and perform a targeted cache or site-data clear after confirming Home Assistant was restarted.
A hard refresh can update browser assets, but it cannot load missing files or activate a new Python component. If asset requests are 404 responses locally, recopy the complete release rather than repeatedly refreshing.
Layouts are missing after an upgrade
Check whether the expected data exists in /config/.storage/esphome_designer. For installations upgraded from 0.8.6.2 or older, legacy data may remain in /config/.storage/reterminal_dashboard. Do not manually merge JSON while Home Assistant is running. Preserve both files, review logs for migration messages, and restore from backup if the expected data cannot be loaded safely.
Home Assistant reports HTTP ban warnings
RC39 fixed unauthenticated hardware requests that could cause repeated homeassistant.components.http.ban warnings and eventually ban the client IP. Confirm that RC39 or newer is actually loaded. Stop repeated refreshes while diagnosing the issue, inspect Home Assistant HTTP logs and ban configuration, and follow your normal Home Assistant recovery process for a legitimately banned client.
If the warning persists on a current release, determine whether requests originate from ESPHome Designer, a reverse proxy, a browser with stale assets, or another client. A Localtonet tunnel cannot correct an authentication failure generated by the application.
Generated YAML fails after an ESPHome update
First identify whether the output is LVGL or direct mode. With current ESPHome versions, regenerate Home Assistant actions using a release that emits homeassistant.action. For LVGL configurations, verify that rotation is under the lvgl: section rather than the display: section. Direct, non-LVGL output continues to use display rotation.
Do not perform a blind text replacement across an entire device configuration. Regenerate from the saved layout, compare the new snippet with the existing YAML, preserve hand-written customizations, and run ESPHome validation before compiling or flashing.
Connect the verified Home Assistant service with Localtonet
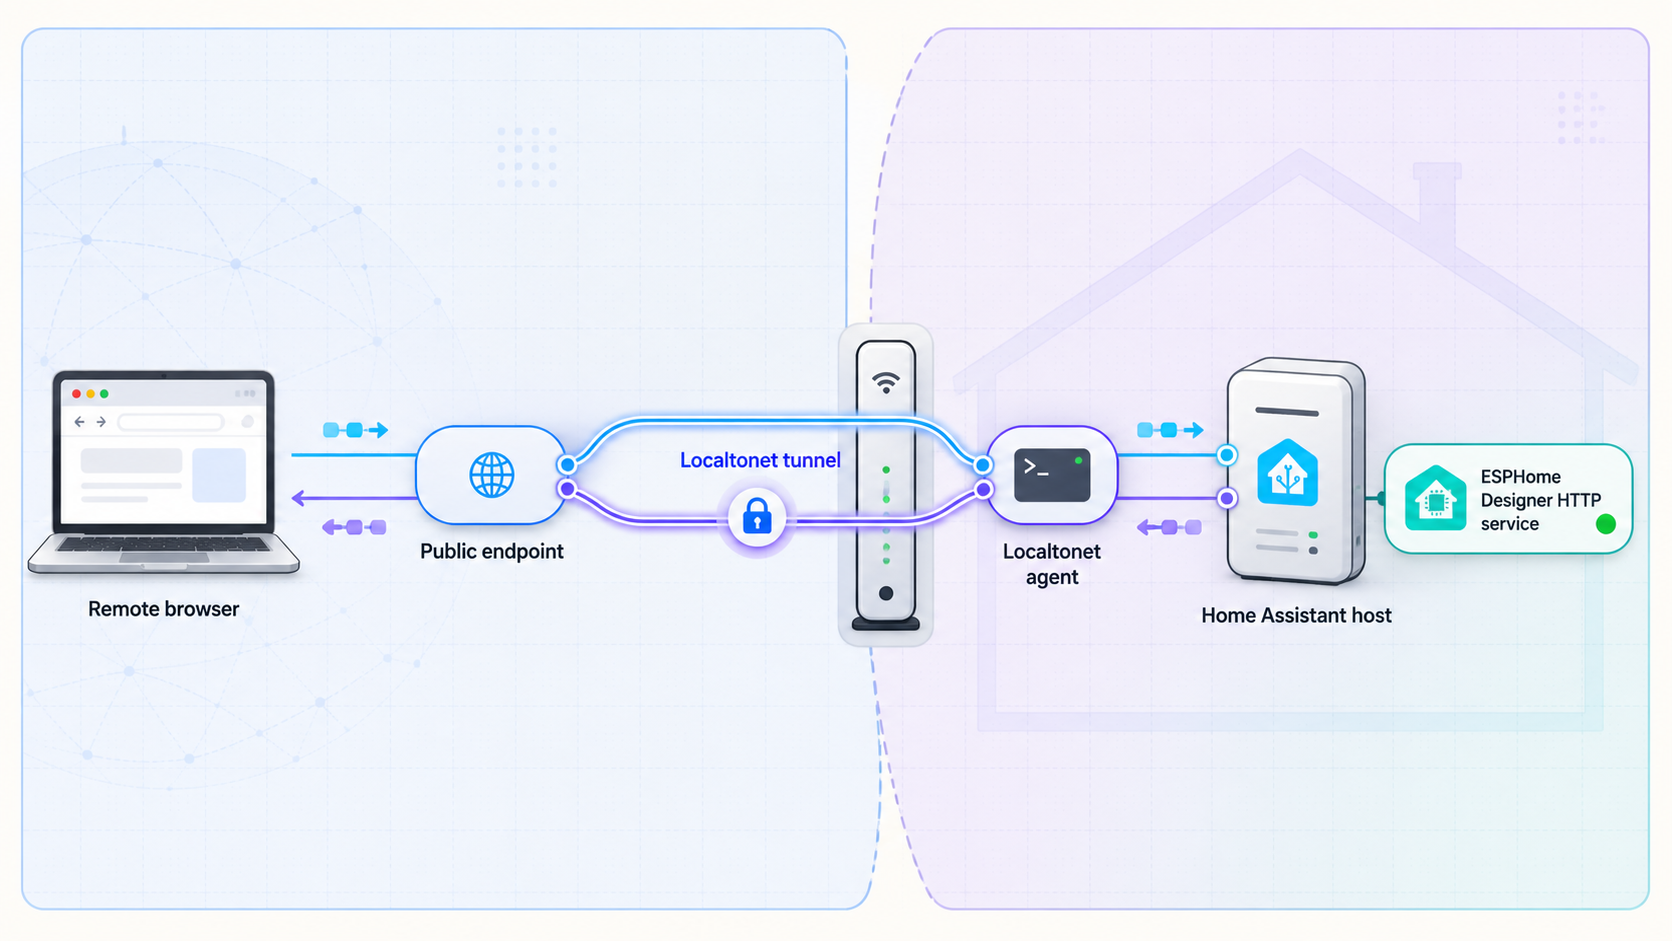
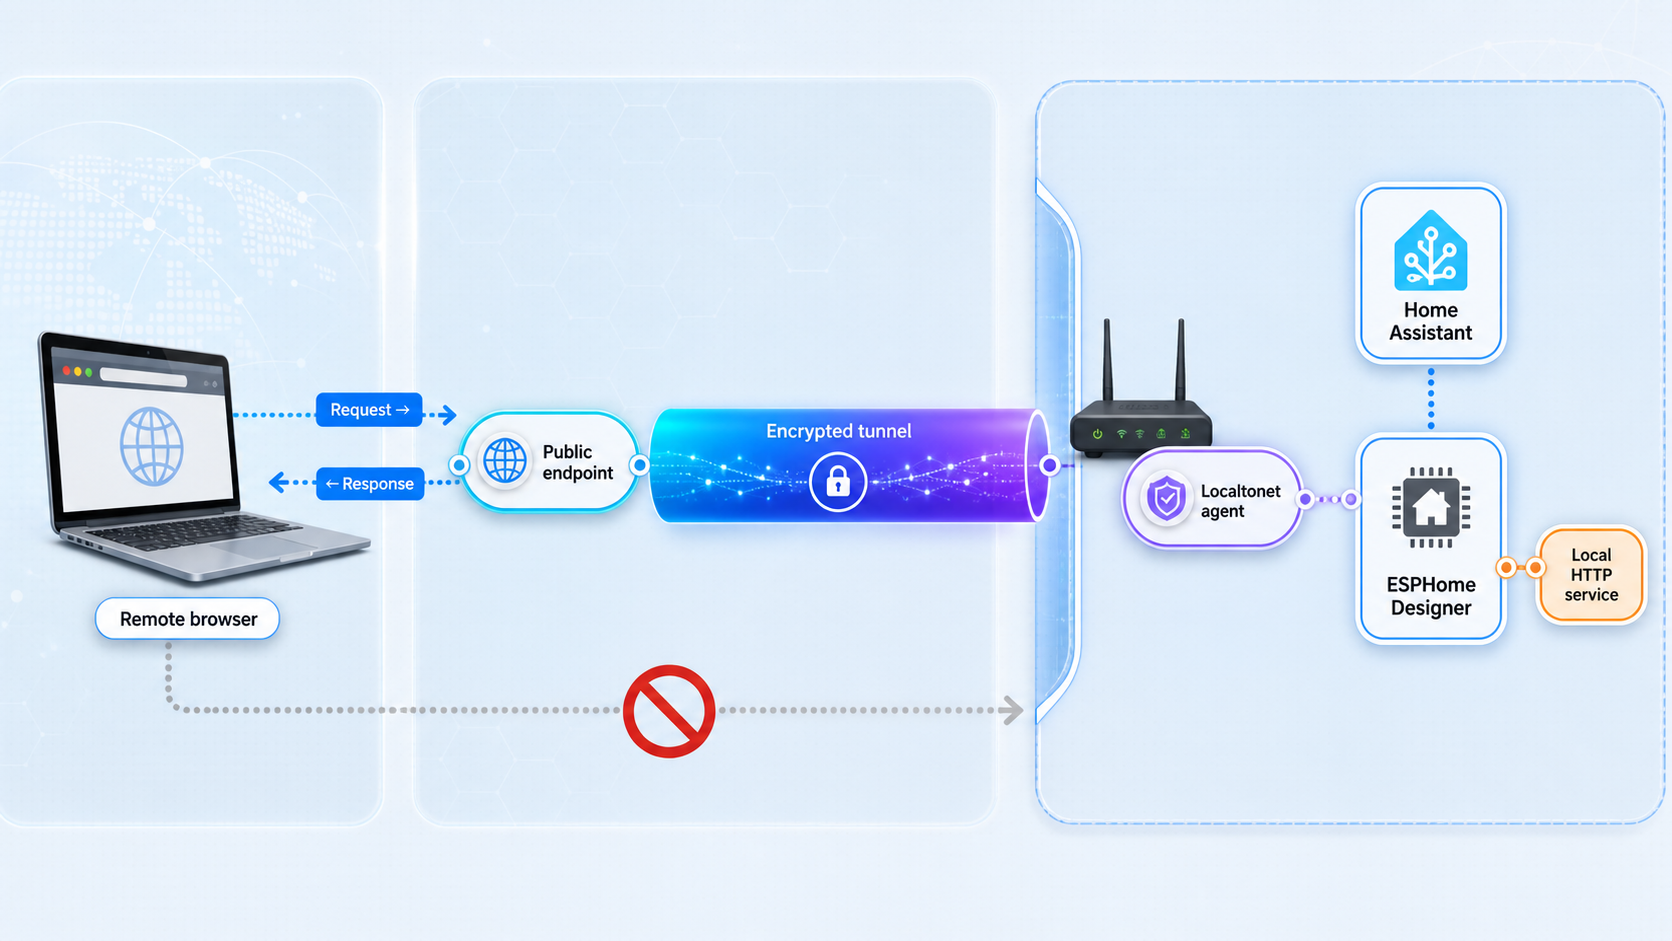
Once ESPHome Designer works locally, you can connect the reachable Home Assistant HTTP service through Localtonet. Our client runs on the Home Assistant device or another device that can reach it, then establishes an outbound connection to a Localtonet relay server. This avoids inbound router port forwarding, firewall changes, VPN setup, and the need for a public IP address.
A Localtonet HTTP tunnel targets the Home Assistant IP address and port, not an individual URL path. The public endpoint therefore reaches the Home Assistant HTTP service, and the browser can request /esphome-designer through that endpoint. Do not describe this setup as path-only exposure. Review Home Assistant authentication and every other route reachable on the same service before starting the tunnel.
Install and run the Localtonet client
Run our client on the Home Assistant host or on another device that can reach the exact local Home Assistant IP address and port already tested.
Authenticate the client device
Select the device using its device-specific authentication token. Keep the token private and never place it in screenshots, examples, logs, or issue reports.
Select an available relay server
Choose an available relay server or region from the current dashboard. Obtain current server values from the product rather than copying a hardcoded code from a tutorial.
Create the HTTP tunnel configuration
Point the tunnel to the local IP address and port of the verified Home Assistant HTTP service. Do not enter /esphome-designer as though it were a local port target.
Start the tunnel and verify the public session
Creating a tunnel does not start it. Press Start, open the assigned public HTTPS address, complete the expected Home Assistant login, and then navigate to /esphome-designer.
Stop or delete the tunnel when finished
The tunnel remains available only while the selected client is connected and the tunnel is running. Stop it after temporary access, or delete it when the configuration is no longer required.
For the current dashboard workflow, see our Localtonet HTTP tunnel documentation. HTTP and File Server process types can use a random subdomain, a supported custom subdomain, or a custom domain. Check the current documentation before making custom-domain DNS changes.
Verify more than the public login page
A successful Home Assistant login proves only that the public request reached Home Assistant. Complete these checks from a network that is not the same local network as the server:
- Open the public HTTPS address and confirm the expected Home Assistant authentication flow appears.
- Authenticate with an appropriately limited account rather than sharing an administrator session.
- Navigate to the public address followed by
/esphome-designer. - Confirm editor scripts, styles, icons, fonts, and hardware-profile requests load without 401, 403, or 404 responses.
- Open a layout and confirm canvas controls and entity-backed functions behave as expected.
- Refresh the editor page directly and confirm it returns to the authenticated application rather than a blank page or routing error.
- Review Home Assistant logs for failed authentication, HTTP ban warnings, integration errors, and unexpected requests.
- Stop the tunnel and confirm the public address is no longer usable before ending a temporary-access session.
Separate tunnel failures from application failures
| Observed result | Likely layer | Next check |
|---|---|---|
| The public address cannot connect at all | Localtonet client, tunnel state, relay selection, or local target reachability | Confirm the client is connected, the tunnel is started, and the client device can reach the configured Home Assistant IP and port. |
| Home Assistant opens publicly, but Designer returns 404 | Integration loading or route registration | Test the same path locally and confirm the integration is added and loaded. |
| The login repeats or requests return 401 or 403 | Home Assistant authentication, session, proxy, or authorization behavior | Inspect browser requests and Home Assistant authentication logs. Do not recreate the tunnel as the first response. |
| The editor shell opens but assets fail | Incomplete release, browser cache, frontend routing, or compatibility | Compare local and public network requests, confirm the loaded version, and verify the complete component directory. |
| Generated YAML does not compile | ESPHome Designer and ESPHome version compatibility | Regenerate with a current release and inspect action syntax and LVGL rotation placement. |
Use Home Assistant authentication, least privilege, IP restrictions, and other available controls where relevant. Do not share the public address with unauthorized users. A tunnel provides connectivity to the configured service, but it does not repair application authentication, enforce path-only access, or convert a development server into a production service.
Frequently asked questions
What URL should I use for ESPHome Designer in Home Assistant?
Use the known working Home Assistant origin followed by /esphome-designer. The path is documented by the project, but the Home Assistant hostname, scheme, and port depend on your installation.
Where exactly should the manual component be copied?
Copy the complete upstream component to config/custom_components/esphome_designer. The component's manifest.json and __init__.py must be directly inside that directory, with all other release files preserved.
Is manual installation required if I use HACS?
No. HACS and manual copying are separate installation methods. The upstream project recommends adding its repository to HACS, installing ESPHome Designer, restarting Home Assistant, and then adding the integration through Settings and Devices & Services.
Do I need to rotate an AI provider key after upgrading?
Rotate the key if you shared an affected layout file or snippet created before the RC40 fix while that AI provider key was configured. The release information does not establish exposure when no key was configured or no affected content was shared.
Does saving a layout update my ESPHome device YAML automatically?
No. Saving preserves the layout and its state in Home Assistant storage. Copy or merge the generated output into the actual device configuration, then validate, compile, and deploy it through ESPHome.
Why does older generated LVGL YAML fail on a current ESPHome release?
ESPHome 2026.4 rejects a display-level rotation: key when LVGL is enabled. RC41 changed LVGL output to use lvgl: rotation:. Regenerate the YAML with a current ESPHome Designer release and validate it before deployment.
Can Localtonet expose only the /esphome-designer path?
The Localtonet HTTP tunnel points to a local IP address and port. For this integration, that target is the reachable Home Assistant HTTP service. The browser then requests /esphome-designer, but the tunnel itself is not a path-only access rule.
Does creating a Localtonet tunnel make it immediately available?
No. Creating the configuration does not start it. You must press Start, and the tunnel remains available only while the selected client device is connected and the tunnel is running.
Are the npm and Python servers production deployment methods?
No production hardening is established for those documented workflows. They are local development options, using http://localhost:5174 for npm and http://localhost:8000 for Python. Do not expose them as production services based only on those examples.
Connect your verified Home Assistant service
After ESPHome Designer works locally, its version is confirmed, and Home Assistant access controls have been reviewed, use Localtonet to provide an on-demand public HTTPS address without inbound router port forwarding.
Get Started Free →

