

NSPanelManager Setup for Sonoff NSPanel + Remote Access
Set up NSPanelManager for the original Sonoff NSPanel, verify the web UI on port 8000, then add secure remote access to the Manager Web UI with Localtonet HTTP.
In this article 11 sections
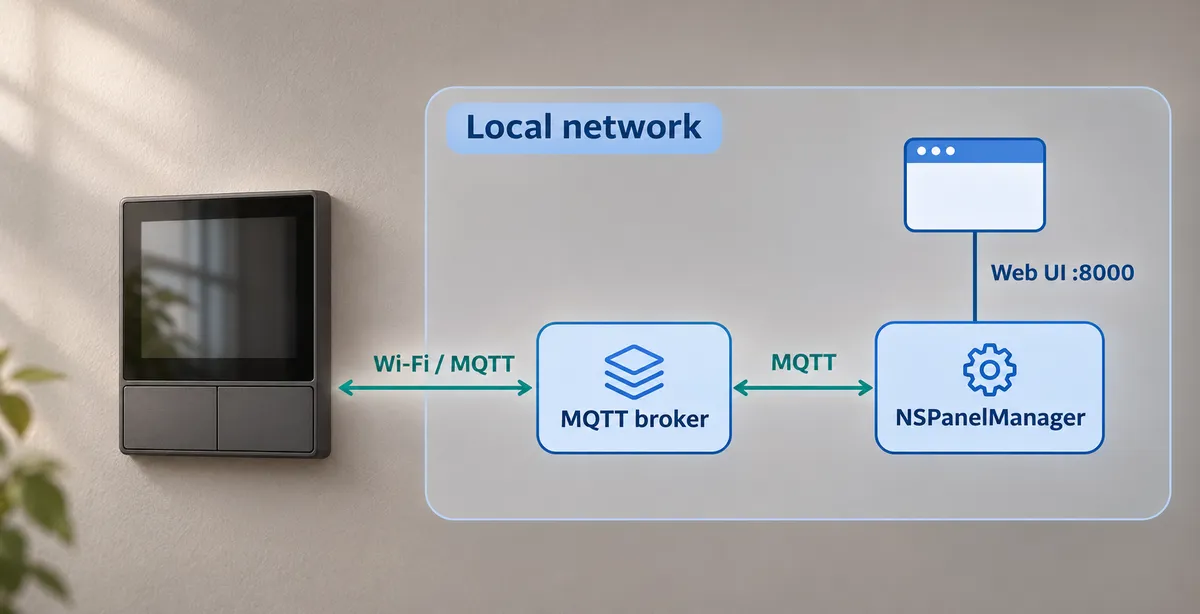
Flash, configure and verify your Sonoff NSPanel setup locally first, then reach the Manager Web UI from anywhere
NSPanelManager is a self-hosted management service for the Sonoff NSPanel. It runs the web interface where you set up your panels, your MQTT connection and, optionally, Home Assistant or OpenHAB. This guide follows the documented order: flash the panel with the custom firmware, connect it to Wi-Fi and MQTT, run the Manager, complete the configuration wizard on port 8000 and verify it on your LAN. Only then do we add remote access to the Manager Web UI with a Localtonet HTTP tunnel, and we are explicit about which traffic must stay on your local network.
📋 What's in this guide
How NSPanelManager and the Sonoff NSPanel fit together
The Sonoff NSPanel is a wall-mounted touch panel built around an ESP32. NSPanelManager replaces the stock behavior with custom panel firmware plus a separate management service. You do not configure everything on the panel itself. The panel only needs the minimum (Wi-Fi and MQTT), and, in the words of the project documentation, the rest can be configured from NSPanel Manager directly.
The README describes the management service as a Docker container, and the documentation also mentions a Home Assistant add-on. In both cases the web interface is on port 8000. That web interface is what you will use to run the first-time wizard, manage panels and review settings, and it is the only part of this setup that we will publish through a tunnel.
The reason this distinction matters for remote access: the panels reach the Manager over your local network, using the Manager address you enter in the wizard. The web interface is a separate concern, and it is the one we expose with Localtonet later. We do not suggest tunneling the panel-to-Manager or panel-to-broker traffic.
Prerequisites and what the documentation does not specify
Based on the documented workflow, you need the following before you start.
- A Sonoff NSPanel that you are willing to open and flash. This guide covers the Sonoff NSPanel as described in the NSPanelManager flashing and configuration documentation. We have not verified other panel models and do not cover them here.
- A USB to UART (TTL) converter that can be set to 3.3 V, plus jumper or Dupont cables, a flat screwdriver and a cross (Phillips) screwdriver.
- A computer to run the flashing tool: ESP Home Web in Chrome or Edge, the Espressif flash tool on Windows, or esptool.
- An MQTT broker reachable from both the panel and the Manager, and its address, port and, if used, username and password.
- A server to run the Manager (Docker is the documented container route, or the Home Assistant add-on if you use Home Assistant). The Manager host needs a fixed address that every NSPanel can reach, because the wizard asks for an IP address.
- Optional: a Home Assistant address and long-lived access token, or an OpenHAB address and token.
The evidence we used for this article shows the Manager is a Docker container and that its web interface is on port 8000, but it does not include the Docker image name, a compose file, volume mappings, environment variables or Docker version requirements. We will not invent those. Follow the official NSPanelManager installation walkthrough and the documentation at nspanelmanager.com for the exact container or add-on installation, then return here for the configuration, verification and remote access steps.
A note on versions and maintenance
The release we reviewed is 2.1.8-stable, marked Latest at the time of writing. Its notes list two fixes: a bug that prevented creating new lights, and a crash on the panel when a thermostat mode was changed and the new or old mode had no icon. The release page showed seven commits to main after it, but we did not have a reliable release date or a full commit history, so we cannot make a statement about how actively the project is maintained. Check the releases page for what is current before you flash. The flashing documentation offers both a stable and a beta firmware and the reset procedure differs between them.
Step 1: Flash the NSPanel with the custom firmware
The documentation offers a video guide and a detailed written guide. The sequence below follows the written guide. Read the warnings first, because this involves opening the device and connecting a serial adapter.
The NSPanel is a mains-powered wall device. Flash it on a bench with the power block detached and never connect it to mains while the USB to UART converter is attached. The documentation is explicit that the converter must be set to 3v3 and not 5V, which is typically a jumper on the converter. It also warns that when detaching the power block you should orient the panel so the text reads naturally, which reduces the risk of hurting the bottom diode.
Detach the power block
Keep the panel oriented so you can read the text naturally. Place a flat screwdriver behind the small metal part and lift it, then repeat on the other side. Work softly until the power block separates from the rest. You should end up with two parts: the power block and the screen enclosure.
Remove the plastic cover from the screen enclosure
Unscrew the cover screws with a cross screwdriver, then detach the plastic cover from the PCB. You now have two options. The documentation calls them the Lazy way and the Complicated way.
Choose how to access the PCB
The Lazy way is to flash without detaching the screen or removing the PCB from the housing. Insert the cables and tilt them slightly so the pins do not touch the metal behind the PCB, which risks short circuiting the USB to TTL adapter, and hold them tilted during the entire flash. The Complicated way detaches the screen from the PCB and removes the PCB from the housing. It requires gently releasing the 2 mm black part of the FFC cable connector and sliding the cable out slowly. The documentation says to do this very smoothly. It also says the black part of the FFC cable has no electronic or conductive function, so you can hold it with tweezers.
Put the ESP32 into flash mode
GPIO0, marked IO0 on the PCB, has to be connected to GND. Either connect a cable between IO0 and GND on the PCB, or add an extra cable to the ground pin on the USB to TTL converter.
Connect the USB to UART converter
Wire VCC to the PCB VCC pad (marked by a square), converter RX to PCB TX, converter TX to PCB RX, and GND to GND. RX and TX are crossed between the devices, so it is not TX to TX and RX to RX. Confirm again that the converter is set to 3.3 V.
Download and write the merged firmware image
Download the latest firmware file, stable or beta, which the documentation calls merged-flash.bin, and write it at address 0x0 with one of the tools below.
Flashing tool options
| Tool | Platform | Documented procedure |
|---|---|---|
| ESP Home Web | Chrome or Edge (not supported in Firefox) | Open web.esphome.io, connect the USB to TTL converter, press Connect and choose the USB device, press Install, then Choose file, select the .bin file, press Install and wait for completion. |
| Espressif flash tool | Windows | Open the tool and choose an ESP32 chip, click the ... button and select the firmware file, enter 0x0 as the upload address, tick the first checkbox next to the file, click START and wait for FINISH. |
| esptool | Windows, macOS, Linux | Run a flash_id check to confirm communication, then write the image at 0x0 with a baud rate of 921600. |
For esptool, the documented commands look like this. Replace the port with your actual serial port: something like COM4 on Windows, or something like /dev/ttyUSB0 on Linux and macOS. On Windows the executable may be just esptool without the .py suffix.
esptool.py flash_id --port /dev/ttyUSB0
esptool.py --baud 921600 --port /dev/ttyUSB0 write_flash 0x0 merged_flash.bin
Note that the documentation spells the file name both merged-flash.bin and merged_flash.bin in different places. Use the exact name of the file you downloaded.
The documentation states that after flashing the firmware you will not see any visible change on the NSPanel display, and that this is normal at this stage. The visible UI comes after the panel is configured and accepted by the Manager.
Step 2: Connect the flashed panel to Wi-Fi and MQTT
Reassemble the panel and connect it to power. A freshly flashed panel boots as a Wi-Fi access point, and you only enter the minimum configuration there.
Join the panel's access point
Look for a Wi-Fi network named NSPMPanel-XXXXXX, where XXXXXX is unique to each panel. No password is required. The configuration page should open automatically. If it does not, visit http://192.168.4.1 manually.
Fill in the Wi-Fi section
Enter your own Wi-Fi network details. The documentation describes this page as a simplified configuration page: the rest is configured later from NSPanel Manager.
Complete the MQTT section and save
Enter your MQTT broker details and click Save. The device reboots and connects to your Wi-Fi. It no longer hosts the NSPMPanel network and is no longer reachable at the previous URL.
If the panel cannot join your Wi-Fi because of a typo, you need to reach the configuration page again. The recovery method depends on the firmware branch. On the stable firmware, press the reset/reboot button through the hole at the bottom quickly five times in a row, which starts the access point again. On the beta firmware, restart the panel and wait one minute, after which the access point should be available again. With beta you can also still reach the panel at its new IP address from your own Wi-Fi network, which you can find in your router.
Once the panel has been accepted into the Manager, you will be able to reach it more easily from the Manager interface. The documentation says that if your panel can connect to Wi-Fi and to MQTT, you can move on to installing the Manager.
Step 3: Run NSPanelManager
NSPanelManager is distributed as a Docker container according to the project README, with a Home Assistant add-on also available. The documentation mentions the add-on when explaining how to open the web interface, but the extracted evidence we have does not cover the add-on's installation steps either.
Here is what is established and what you need to take from the official installation guide:
| Detail | Status in our evidence | Where to get it |
|---|---|---|
| Web interface port | Established: port 8000 for both Docker and the Home Assistant add-on | Used throughout this guide |
| Docker image name, run or compose command | Not established | Official installation walkthrough and the docs at nspanelmanager.com |
| Volumes and persistent data paths | Not established | Official installation guidance |
| Home Assistant add-on installation | Mentioned, steps not covered | Official add-on documentation |
| Authentication on the web interface | Not established | Treat it as unauthenticated until you confirm otherwise (see the security section) |
Whichever installation route you use, make sure the host has a stable IP address on the same network as your panels, and that port 8000 is reachable from the machines you will use for administration. A DHCP address that changes will break the Manager address stored on your panels.
Step 4: Complete the configuration wizard
Open the web interface at http://your-server-ip:8000 for Docker, or http://<your-home-assistant-address>:8000 if you installed the Home Assistant add-on. The first time you log in, you are greeted by a configuration wizard. Click Next and fill in the requested information.
Manager config
- Manager address: this address is sent to each NSPanel over MQTT when the panel requests to connect to a manager. The "Load from URL" button can fill it from the URL in your browser. It must be reachable by all NSPanels. The documentation is strict about the format: it may only be the IP address of the server, with no http(s) prefix and no DNS name or hostname.
- Manager port: the port used to connect to that address.
MQTT config
- MQTT address: the address of your broker. If the broker runs as a Home Assistant add-on, enter your Home Assistant address, again as an IP only.
- MQTT port: the port of the broker.
- MQTT username and password: leave both empty if you do not use authentication.
Home Assistant config (optional)
- Home Assistant address: must include http or https at the beginning and the port at the end, for example ending in :8123 (change it to your port).
- Home Assistant token: a long-lived access token used to authenticate to Home Assistant.
OpenHAB (optional)
- OpenHAB address: also with http or https at the beginning and the port at the end. The documentation uses :8123 as its placeholder, so use the port your own OpenHAB instance actually listens on.
- OpenHAB token: the access token used to authenticate to OpenHAB.
The Manager address is stored and then pushed to your panels, and the documentation requires it to be a plain IP address reachable by every panel. If you later open the Manager through a public tunnel URL, do not use "Load from URL" or enter that public hostname as the Manager address. This is our precaution derived from the documented rule that no DNS name or hostname is allowed. Run the wizard and any address changes from the local address.
Once the wizard finishes, the documentation considers the initial setup complete and NSPanel Manager ready to use. It then points to a separate guide for the web interface itself, which covers the day-to-day UI. This article does not reproduce it.
Step 5: Verify the setup locally before touching remote access
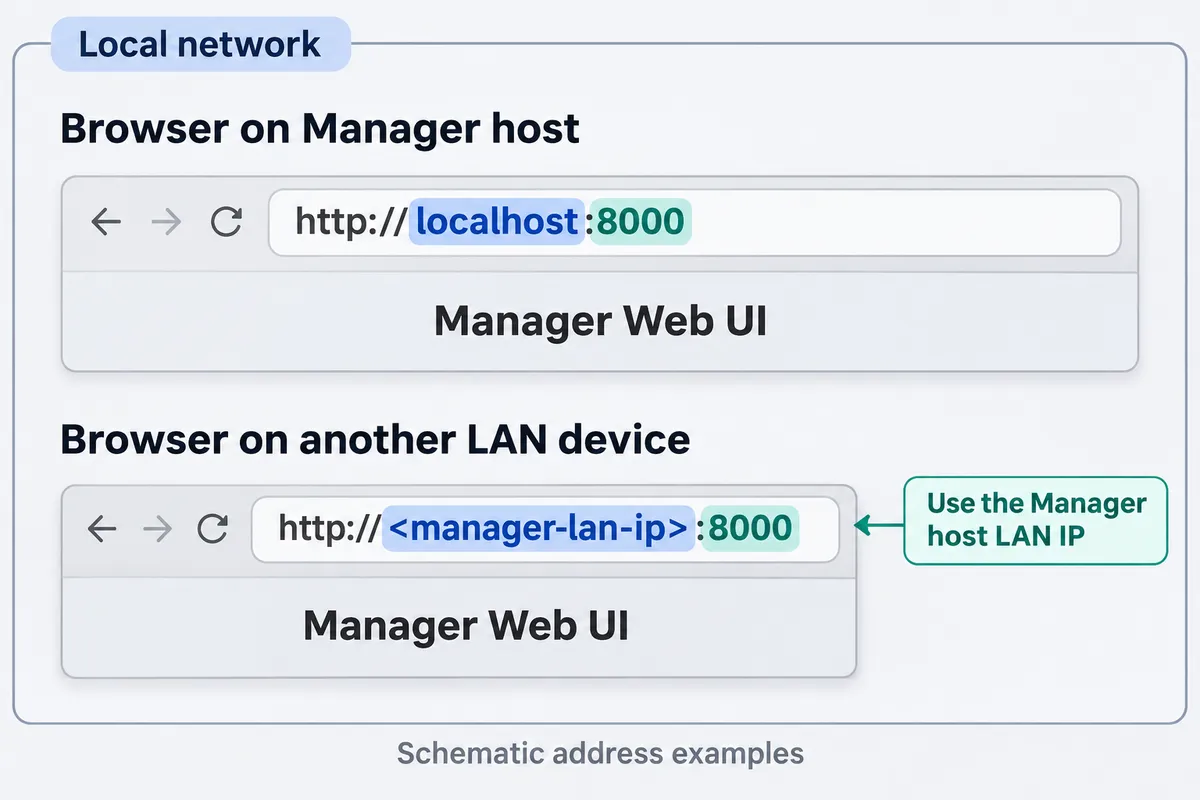
Do not publish anything until the local setup works. A tunnel only forwards what is already running, so debugging is much easier on the LAN. Work through this checklist:
- The web interface answers on port 8000. From another computer on the same network, open
http://your-server-ip:8000in a browser. As a quick generic check from a terminal, you can also request the headers:
curl -I http://your-server-ip:8000- The wizard has been completed. You should see the Manager interface rather than the first-run wizard when you reload.
- The panel is on your network. The panel no longer broadcasts NSPMPanel-XXXXXX. If it still does, Wi-Fi setup did not succeed.
- The panel is accepted into the Manager. The documentation says the panel is requested to connect to a manager over MQTT and then accepted into the Manager. Confirm in the web interface that it is listed and accepted.
- Your integration works (optional). If you entered Home Assistant or OpenHAB details, confirm the Manager can use them, since an address missing http(s) or the port is a common mistake.
The documentation does not provide an exact list of what the interface shows for each of these states or the precise wording of any status indicators, so rely on what your own Manager displays.
Step 6: Add remote access to the Manager Web UI with Localtonet
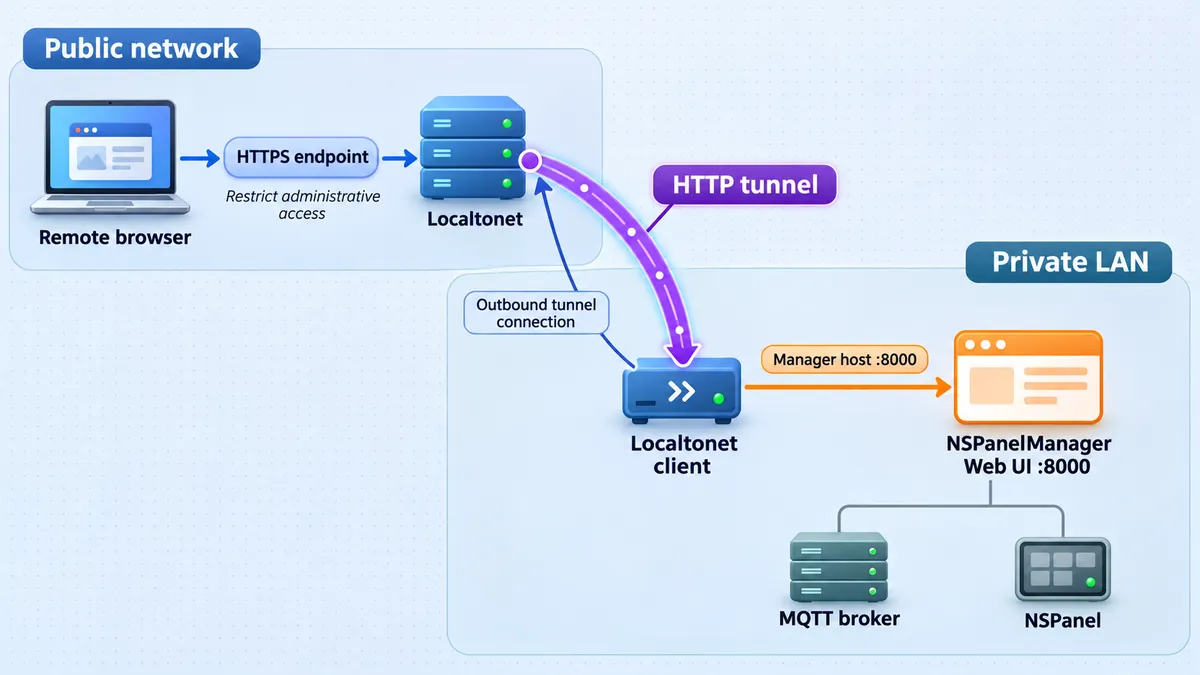
With the Manager working locally, you can reach its web interface when you are away from home without router port forwarding, firewall changes or a public IP address. The Localtonet client on a device that can reach the Manager makes an outbound connection to a Localtonet relay server, and the HTTP tunnel gives you a public HTTPS address for the web interface. The tunnel is available only while the selected client is connected and the tunnel is running.
What the tunnel is for, and what it is not for
| Traffic | Path | Tunnel it? |
|---|---|---|
| Browser to Manager Web UI (port 8000) | Administrator's browser to the Manager | Yes, with an HTTP tunnel, if you need remote administration |
| Panel to Manager (address sent over MQTT) | Panels to the Manager IP you entered in the wizard | No, keep on the LAN. The Manager address must be an IP reachable by all panels |
| Panel and Manager to MQTT broker | Local network to the broker | No, not part of this guide |
| Manager to Home Assistant or OpenHAB | Manager to the configured address | No, not required for the Web UI tunnel |
The Localtonet client can run on the Manager host, or on another device on your network that can reach the Manager's address and port 8000. The local target of an HTTP tunnel is an IP address and port on, or reachable from, the client device.
Create and start the HTTP tunnel
The sequence below follows our general workflow. For the exact current screens and fields of the HTTP tunnel page, see the Localtonet HTTP tunnel documentation, and use the Localtonet dashboard for the available relay servers, since we do not hardcode those values.
Install and run the Localtonet client
Install the client on the device that can reach the Manager. This can be the Manager host itself. Installation instructions for each operating system are in our documentation.
Authenticate the device with its token
Use the auth token for that device from your dashboard. Tokens are device-specific, so keep yours private and never paste it into a forum post, issue or screenshot.
Select a relay server
Pick one of the relay servers or regions currently offered in the dashboard.
Create an HTTP tunnel to the Manager
Select the HTTP tunnel type and set the local target to the Manager's IP address and port 8000. Choose a Process Type: Random Sub Domain, Custom Sub Domain or Custom Domain. If you want a custom domain, check the current DNS requirements in our documentation first, because we do not give exact DNS instructions here.
Start the tunnel
Creating a tunnel does not start it. Press the Start button. The tunnel only works while the client is connected and the tunnel is running.
Open the public address and stop the tunnel when you are done
Open the assigned public HTTPS address in a browser and confirm the Manager Web UI loads. When you no longer need remote access, stop the tunnel, or delete it if you will not use it again.
The Manager Web UI is a web interface, which is what the HTTP tunnel type is for. The documented evidence does not state whether the interface itself serves HTTP or HTTPS locally; the documentation addresses it as plain http:// on port 8000. If your own deployment is configured differently, test the local URL in a browser first and match the tunnel target to what actually answers.
Security: treat the Manager like an administrative console
A public URL makes the Manager reachable by anyone who finds it. A tunnel does not bypass any authorization or network policy, it simply carries your traffic to the service you point it at. What the Manager does with that traffic is determined by the Manager.
The documentation we reviewed shows a configuration wizard but does not describe a login screen or user accounts for the web interface, and the wizard collects an MQTT password and a Home Assistant long-lived access token. We cannot confirm that the web interface requires authentication. If it does not, anyone who opens the public address could potentially view or change your configuration. Do not leave the tunnel running unattended until you have confirmed what protects the interface in your deployment, and use any access control options available in your Localtonet dashboard and your own setup. We do not list specific access-control features here because they are not covered by the information we verified for this article.
A few habits reduce the risk regardless:
- Start the tunnel only when you need remote administration, and stop it afterwards.
- Prefer a random subdomain over a memorable one so the address is harder to guess, and never post the URL publicly.
- Use an MQTT account with the least privilege your setup allows, and a Home Assistant token created specifically for the Manager so you can revoke it independently.
- Keep the auth token for your Localtonet device out of screenshots, repositories and chat logs.
- Do not run the first-time wizard through a public URL. Do it on the LAN.
Troubleshooting
The panel does not connect to Wi-Fi after the first save
The most likely cause is a typo in the Wi-Fi details. On the stable firmware, press the reset/reboot button through the bottom hole five times quickly to bring the access point back. On the beta firmware, restart the panel and wait about a minute. Then rejoin NSPMPanel-XXXXXX and re-enter the details.
The flashing tool cannot talk to the panel
Check the crossed RX/TX wiring, check that IO0 is tied to GND while powering up, and confirm the converter is at 3.3 V. With esptool, run the flash_id check first. If it fails, the wrong port or wiring is the likely cause. If you are using the tilted-cable approach, confirm the pins are not touching the metal behind the PCB, because a short circuit is the documented risk. If you are using ESP Home Web, make sure you are in Chrome or Edge, since Firefox is not supported.
The display shows nothing after flashing
This is expected immediately after flashing. Continue with the Wi-Fi and MQTT setup and then the Manager.
The wizard or Manager rejects the address
The Manager address must be a bare IP address. Remove any http:// or https:// prefix and any hostname. The Home Assistant and OpenHAB addresses follow the opposite rule: they need the http or https prefix and the port.
Panels cannot find the Manager
The Manager address is sent to panels over MQTT and must be reachable by all of them. Check that the panels and the Manager share a routable network, that the Manager host has not changed its IP, and that the MQTT details match on the panel and in the Manager. If you changed networks or IP addresses, update the Manager address.
The browser cannot open port 8000
Confirm the container or add-on is actually running, that the host firewall allows port 8000 from your administration machine, and that you are using the server's real IP. The container run options themselves are in the official installation guide, not in this article.
The Localtonet public address does not load
- Check that the tunnel was started, not just created.
- Check that the Localtonet client is connected and authenticated with the right device token.
- Check that the local target IP and port 8000 are correct and reachable from the device running the client. Test the same address from that device's browser or with curl.
- If you use a custom domain, verify the DNS requirements against the current documentation.
Routine operations
Check the releases page before upgrading, since the stable and beta firmware have different recovery behavior and the 2.1.8-stable release notes mention fixes for light creation and thermostat modes. How to update the container, back up its data and export settings is not covered by the evidence we reviewed, so follow the official documentation for those tasks rather than relying on guesses.
Frequently asked questions
What port does the NSPanelManager web interface use?
Port 8000. For Docker users the documentation gives http://your-server-ip:8000, and for Home Assistant add-on users http://<your-home-assistant-address>:8000.
Should I flash the panel before installing the Manager?
The documented order is to flash the panel, configure its Wi-Fi and MQTT, and then install the Manager. The flashed-panel guide lists flashing as a prerequisite and says that once the panel can reach Wi-Fi and MQTT you can move on to installing the Manager.
Can I use a hostname or my Localtonet URL as the Manager address?
No. The documentation says the Manager address can only be the server's IP address, with no http(s) and no DNS name or hostname, and it must be reachable by all panels. Keep it as the LAN IP and use the Localtonet URL only to open the web interface in a browser.
Does the Localtonet tunnel carry the traffic between the panel and the Manager?
We do not recommend it, and this guide does not set it up. The HTTP tunnel here is for the Manager Web UI only. The panels reach the Manager and the MQTT broker over your local network.
Is the Manager web interface protected by a login?
The documentation we reviewed does not describe one, so we cannot confirm it. Verify this in your own deployment before starting a public tunnel, and add access control where you can.
Does this guide work for other NSPanel models?
The flashing and configuration steps here come from the documentation for the Sonoff NSPanel. We have not verified other models, so check the project documentation before attempting them.
Does the Localtonet tunnel stay up if I close the client?
No. The tunnel is available only while the selected client or device is connected and the tunnel is running. You also need to press Start after creating a tunnel.
Start with Localtonet
Once your Manager answers on port 8000 at home, create an HTTP tunnel to it with Localtonet and open the Manager Web UI from anywhere, only when you need it.
Get Started Free →
Localtonet is a secure multi-protocol tunneling and proxy platform designed to expose localhost, devices, private services, and AI agents to the public internet supporting HTTP/HTTPS tunnels, TCP/UDP forwarding, mobile proxy infrastructure, file server publishing, latency-optimized game connectivity, and developer-ready AI agent endpoint exposure from a single unified control plane.

