

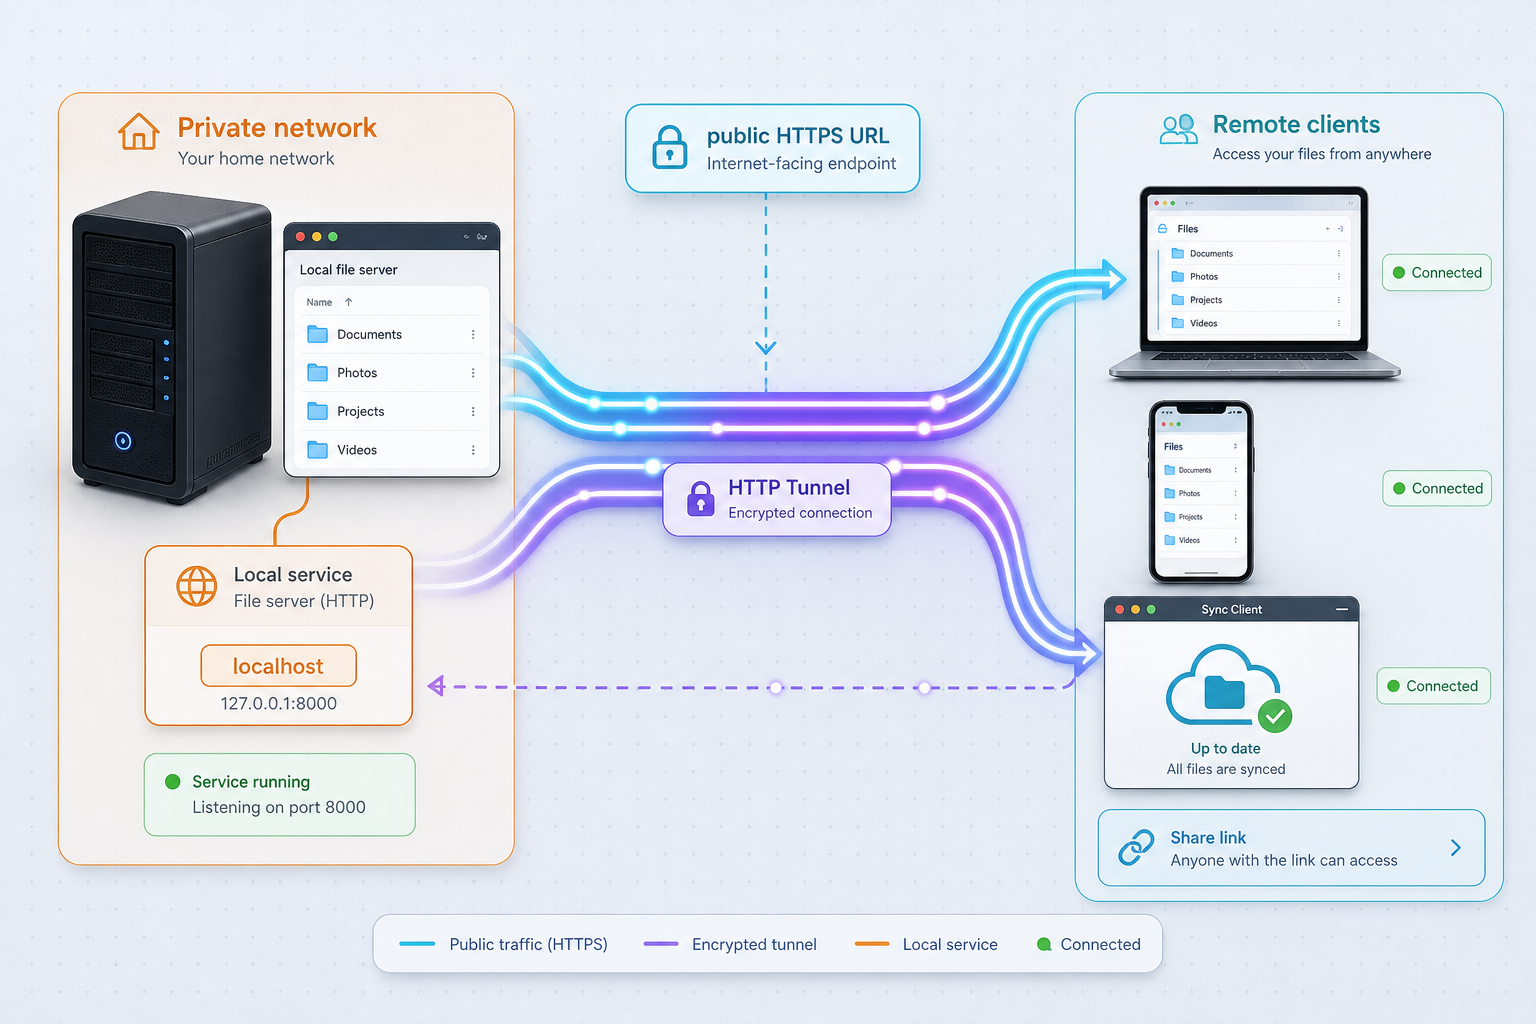
Run ownCloud Core from its official manual, prove it works on your own network, then let sync clients and sharing links reach it from anywhere
ownCloud Core is a PHP-based, self-hosted file storage, sync and sharing server that speaks WebDAV, CalDAV and CardDAV and exposes a REST API. Its value shows up when your laptop, phone or a colleague is outside your LAN. In this guide we separate the work into two phases: first a verified local installation that follows the official installation manual, then a distinct remote-access step where we publish the working web service through a Localtonet HTTP tunnel. We are also upfront about what the public project page does and does not tell us, so you never have to rely on invented commands or ports.
📋 What's in this guide
Why put ownCloud behind a remote-access tunnel?
A file sync server is only half useful if it works exclusively inside your home or office network. The desktop and mobile sync clients, calendar and contact apps (CalDAV and CardDAV), and public sharing links are all designed for people who are somewhere else. The classic way to make that possible is to forward a port on your router, open a firewall rule, and hope your ISP gave you a reachable public IP address. Many networks cannot do that at all, for example when the connection sits behind carrier-grade NAT or when you do not control the router.
With Localtonet the direction is reversed. The Localtonet client on the device that can reach your ownCloud server makes an outbound connection to a Localtonet relay server. The tunnel then gives you a public URL that forwards to the local address and port you chose. Because the connection is outbound, we do not need inbound router port forwarding, firewall changes, a VPN, or a public IP address on your side. The tunnel is available only while the selected client is connected and the tunnel is running.
ownCloud is a web service, so the natural tunnel type is HTTP. That matters because WebDAV, the REST API, the web interface and share links are all carried over HTTP(S), so one HTTP tunnel can in principle cover all of them.
What we can and cannot verify about this setup
Before we get to commands, we want to be transparent about the evidence behind this article. The public ownCloud Core repository describes the project as the ownCloud web server core (Files, DAV and related components) and points administrators to the official installation manual at doc.owncloud.com for the real installation procedure. It also mentions a Docker image published on Docker Hub as owncloud/server. The latest release we reviewed is v10.16.6, a signed tag on the core repository.
The repository page does not give production installation commands, a Docker run or compose file, a list of system requirements, a default port, a web server configuration, or default credentials. The only commands it shows belong to the development build (a make based workflow that needs Composer v2, Yarn and Node.js v14 or newer), and that is meant for contributors, not for running a production server.
Because the exact install commands, supported PHP and database versions, web server directives, local port and file paths are not established by the evidence we have, this guide does not print them. Take those specifics from the official ownCloud installation manual for the version you deploy. We cover everything around that step: how to choose a path, how to confirm the result, how to find the local address that Localtonet needs, and how to troubleshoot the remote layer.
There is a second point worth knowing. ownCloud's main website currently puts ownCloud Infinite Scale in front as its newer platform, while the repository we are working from is the classic ownCloud Core (the PHP server, release line 10.x). They are different products with different installation procedures. If you follow a tutorial or manual page, check that it is for ownCloud Core (server 10.x) and not for Infinite Scale. The Localtonet part of this guide is identical in both cases, because it only cares about the local HTTP address that the service listens on.
Prerequisites
Because the product requirements for ownCloud Core live in the official manual, we describe prerequisites in two groups: what the manual will tell you, and what you need for the Localtonet step.
For the ownCloud installation
- A machine or server that will host ownCloud and stay powered on while you want to sync. The manual defines the supported operating systems, PHP version, database and web server for the release you choose. Read that list before you start, because PHP-based applications are sensitive to version mismatches.
- Enough storage for the files you plan to sync, plus room for backups. ownCloud itself does not remove the need to plan capacity.
- Administrator access to that machine, since installing services and changing web server settings normally requires it.
- A decision on how you will install: following the manual's documented procedure for your platform, or using the
owncloud/serverDocker image if you prefer containers. If you pick Docker, follow the image's own documentation for volumes, environment variables and ports. We do not repeat them here because they are not established by our evidence.
For the Localtonet step
- A Localtonet account and a device (auth) token for the machine that will run the Localtonet client. Treat that token as a secret and never paste it into tickets, screenshots or public repositories.
- The Localtonet client installed on a device that can reach the ownCloud web service. This can be the same machine that hosts ownCloud, or another device on the same network that can reach its address and port.
- The exact local IP address and port where your ownCloud web server answers. You will confirm this during local verification.
Install ownCloud Core from the official manual
The installation itself is the part that should come directly from the maintainers. The official manual covers the supported deployment methods, and the repository README links to it as the authoritative route. What we can do here is help you choose a path and avoid the common mistake of confusing the contributor build with a server install.
| Path | Who it suits | What our evidence says |
|---|---|---|
| Official installation manual (doc.owncloud.com, admin manual, installation) | Anyone running ownCloud Core as a real service | This is the route the project README points to for installation. Follow the section matching your operating system and version. |
Docker image owncloud/server |
People who prefer containers | The README mentions the image on Docker Hub. Concrete run or compose settings are not given in the README, so use the image's own documentation. |
Development build from the repository (make, Composer v2, Yarn, Node.js v14+) |
Contributors working on the code | This is for development, not for a production installation. Do not use it to host your files. |
Whichever path you take, write down four things as you go, because the Localtonet step depends on them: the address the web server listens on (the machine's IP address or localhost), the port, whether the local service uses plain HTTP or HTTPS, and the admin account you created. Do not guess any of those values. Read them from your installation, the web server configuration, or the container port mapping you set.
The release we reviewed is v10.16.6, tagged as the latest at the time. Use a release the manual lists as supported, and plan to apply updates over time, since a server that is reachable from the internet should not be left on an old version.
Verify ownCloud locally before exposing it
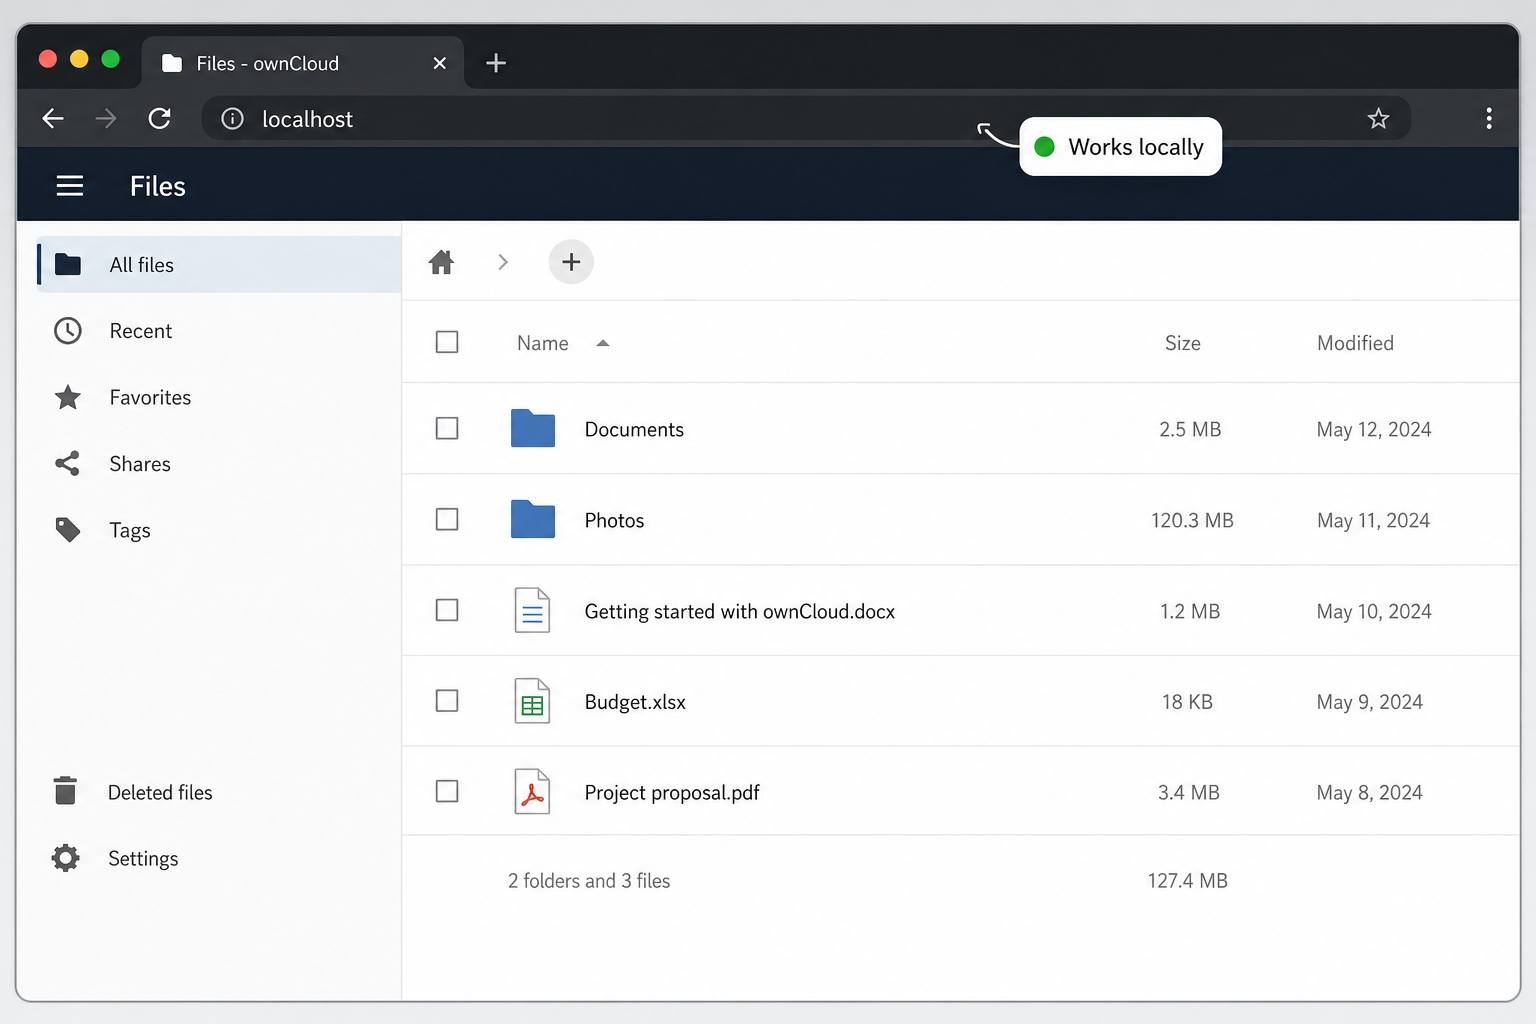
This is the most valuable habit in the whole guide: prove the service works on your own network first. If something is wrong with the install, a tunnel will only make the problem harder to diagnose, because you will be debugging two layers at once.
A local verification routine
- Open the web interface from another device on your LAN. Use the address and port you recorded. If it loads from a second device, the web server is listening on a reachable interface and not only on loopback.
- Log in as the admin account created during installation, and look for any administrative warnings or setup checks the interface shows. Resolve the ones the official manual tells you to resolve before going further.
- Upload a small test file and download it again. This confirms that storage, permissions and the database work together.
- Create a second, non-admin user for daily syncing. Day-to-day clients should not use the administrator account.
- Connect one sync client on the LAN. Point an ownCloud sync client at the local address and confirm that a file you drop into the synced folder appears in the web interface. This proves the WebDAV path end to end before any tunnel exists.
- Create a public share link to the test file and open it in a private browser window to confirm that link sharing works.
Take note of how the web interface and share links behave: they generate URLs based on the address you used to reach the server. This detail becomes important in the next phase, because once you publish the service, the address visitors use will be the Localtonet one, not your local IP.
Locate the local address Localtonet needs
For an HTTP tunnel, Localtonet needs the local IP address and port where the service is reachable from the client device. If the Localtonet client runs on the same machine as ownCloud, that is typically a loopback or the machine's own address plus the port your web server uses. If the client runs on a different device, it must be the address of the ownCloud host on the network, and that device must be able to connect to it. Take both values from the verification you just completed rather than assuming a default.
Your Localtonet public address is served over HTTPS. What the local service uses is a separate question, determined by how you configured ownCloud and its web server. We do not have verified guidance on pointing a Localtonet HTTP tunnel at a local HTTPS-only listener, so the safest approach is to confirm the behavior in the Localtonet HTTP tunnel documentation and test it, rather than assuming.
Publish ownCloud through a Localtonet HTTP tunnel
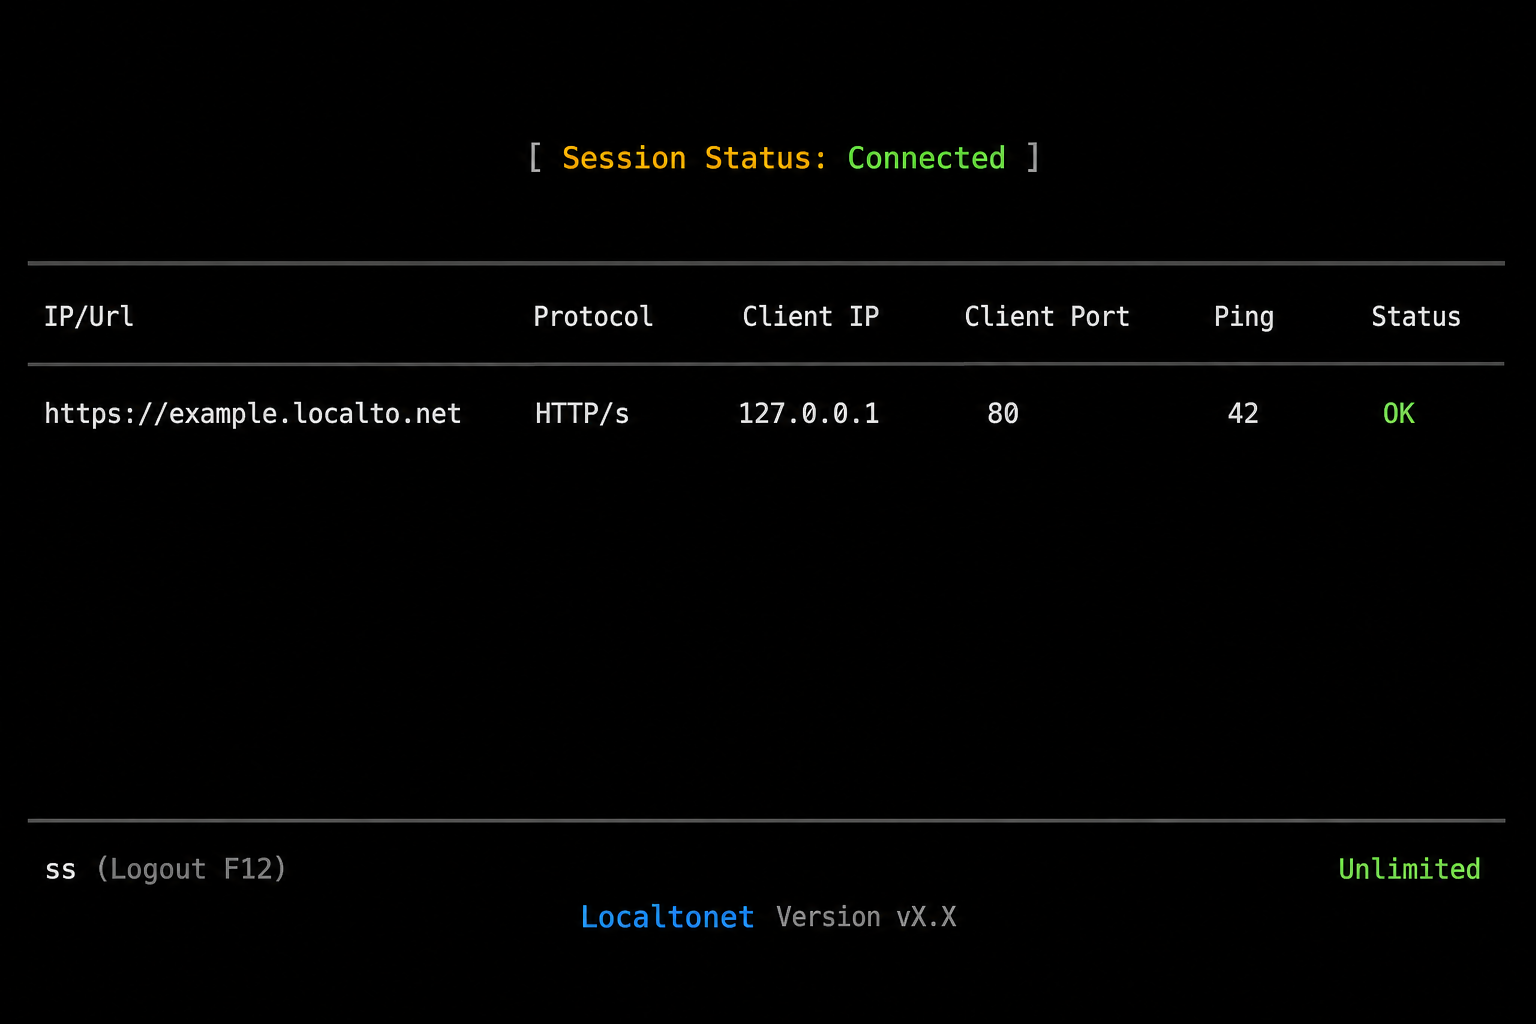
Now that the local installation is verified, we can add the remote-access layer as its own distinct step. The general Localtonet flow is the same for any web service: install the client on the device that can reach the service, authenticate that device with its token, select a relay server, create the tunnel with its local target, and start it. For field-level detail, refer to the Localtonet HTTP tunnel documentation, and use the dashboard's current labels where they differ from the wording below.
Install the Localtonet client on the right device
Install the Localtonet app for your operating system on a device that can reach your ownCloud web service. Using the ownCloud host itself is the simplest layout because the local target is then on the same machine.
Authenticate the device with its token
Use the device token from your dashboard to connect the client. Tokens are device-specific, so keep it private and do not paste it into shared notes.
Open the HTTP tunnel page and choose a Process Type
For HTTP tunnels the Process Type options are Random Sub Domain, Custom Sub Domain, or Custom Domain. All of them serve the same content at a public HTTPS address. A random subdomain is the quickest way to test. A custom subdomain or custom domain gives clients a stable name, which matters for sync clients, so choose one of those for long-term use. Check the current Localtonet documentation for custom-domain DNS requirements before you configure one.
Select the AuthToken and server, then set the local target
Pick the token for your device and choose an available relay server from the options your dashboard offers. Then enter the local IP address and port of your ownCloud web service, exactly as you confirmed during local verification.
Create the tunnel and press Start
Creating a tunnel does not make it run. Start it from the dashboard. The tunnel is available only while the client is connected and the tunnel is started.
Open the public URL and test
Visit the assigned public HTTPS address from a device that is not on your home network, for example a phone on mobile data. You should see the ownCloud login page. If you see an error instead, check the trusted-domain note below and the troubleshooting section.
Trusted domains and the address ownCloud sees
Web applications that generate absolute links often validate the hostname in each request. ownCloud Core has a notion of trusted domains for this purpose, and a request that arrives under a hostname the server does not recognize is commonly refused with a warning page. Because your visitors will now arrive under the Localtonet hostname, you should expect to tell ownCloud that this hostname is allowed.
We have to be careful here: the public repository page we reviewed does not describe this setting, so we are not going to print a configuration key or command from memory. Look in the official administration manual for the sections on trusted domains and on running ownCloud behind a proxy or with a different public URL, and apply exactly what it prescribes for your release. Do the same for any option that controls the URL used in generated share links, so that links you send to others contain the public address rather than a local one.
Sync clients remember the server address you gave them. If you test with a random subdomain and later switch to a custom one, every client and every share link you already created will point at the old name. Decide on the final hostname first, add it to ownCloud's trusted configuration as the manual describes, and only then configure real clients.
Connect sync clients, WebDAV tools and share links
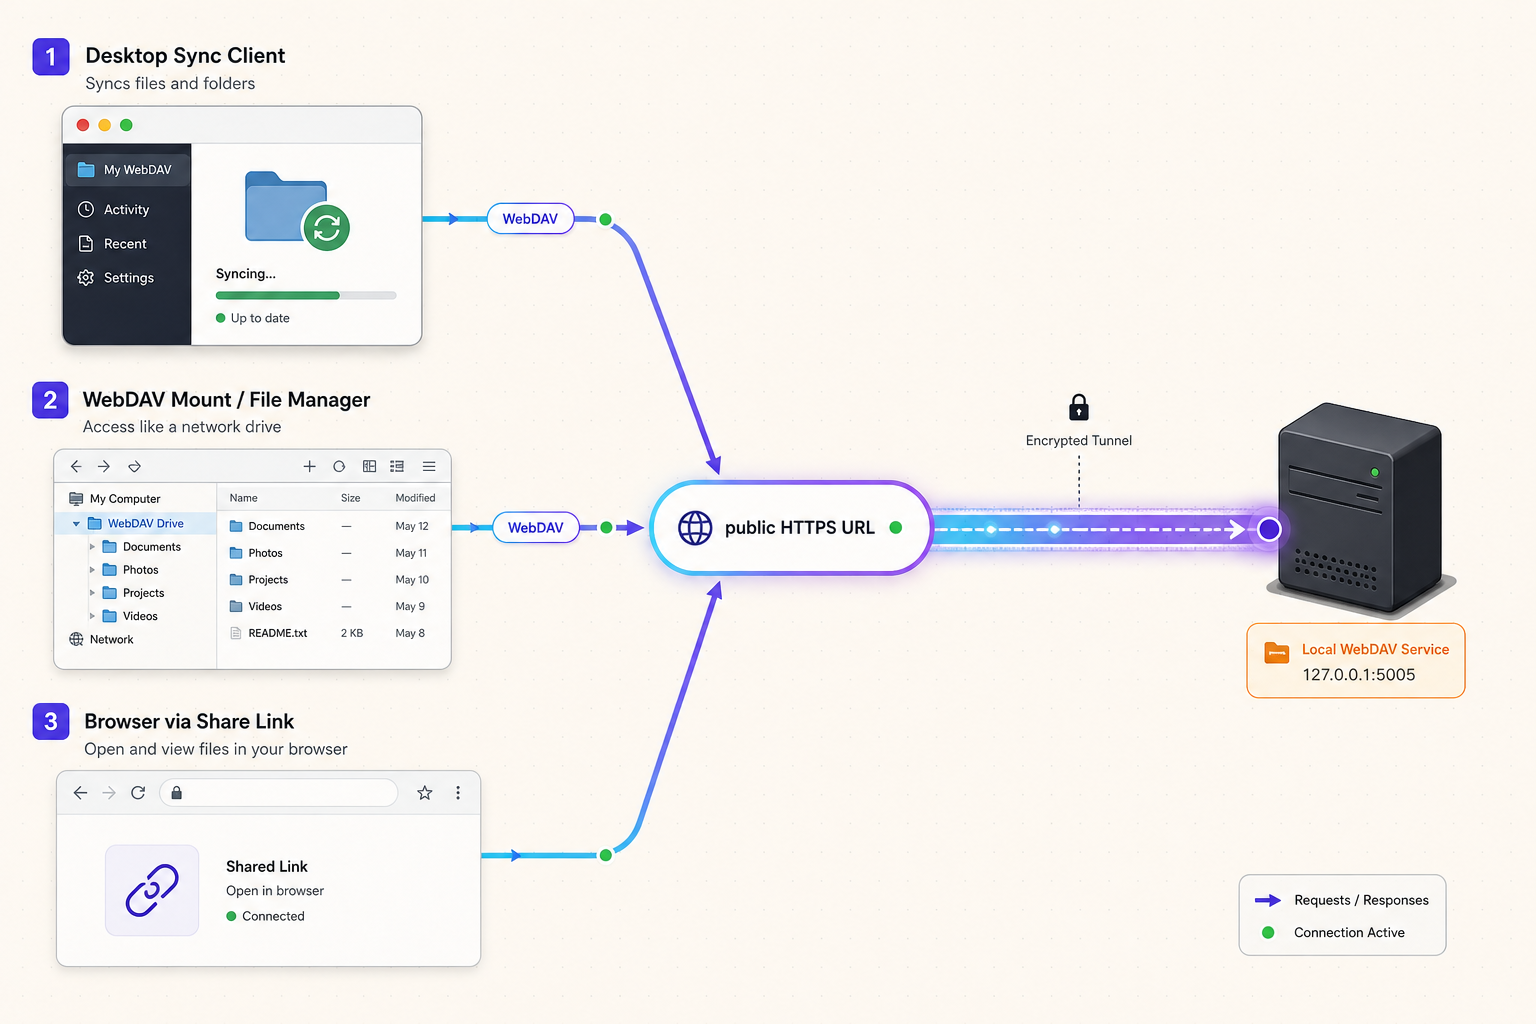
With the tunnel running and the hostname accepted by ownCloud, remote access becomes ordinary use of the service. A few practical points follow from how the pieces fit together.
Desktop and mobile sync clients
When a sync client asks for a server address, give it the public Localtonet HTTPS address instead of the local IP. Sign in with the non-admin user you created during verification. The initial sync can move a lot of data, so run it on a good connection and expect it to take a while for large libraries. We have not verified any bandwidth or transfer limits for HTTP tunnels in this guide. If you plan to sync large amounts of data, check the limits that apply to your Localtonet plan rather than assuming there are none.
WebDAV, CalDAV and CardDAV
Because these protocols are carried over HTTP(S), they should work through the same tunnel as the web interface. The exact WebDAV URL that a third-party client needs is shown by ownCloud itself and documented in its manual, so copy it from there and swap in your public hostname instead of guessing a path. For calendar and contacts apps, follow the same approach: take the DAV address from ownCloud's own documentation, then test with a single account before rolling it out.
Public sharing links
Share links work for people who have no account on your server, which is exactly why they are useful through a tunnel. Open a link from a device outside your network to confirm it resolves to the public address. When creating links to sensitive files, use the protections the ownCloud interface offers, such as a password and an expiry date where available, and remove links you no longer need.
Clients will report that the server is unreachable whenever the Localtonet client is disconnected, the tunnel is stopped, or the host machine is off. Sync clients generally retry on their own, but shared links will simply fail during an outage. If you want to be notified, Localtonet's platform-wide webhooks can send a POST request to a URL you choose when a token or tunnel in a selected Token Group changes to Connected or Disconnected. The payload includes the id, the action date, the type (Token or Tunnel) and the status.
Security checklist for an internet-reachable file server
A tunnel makes your service reachable from the internet, so everything that was only a LAN concern becomes a public one. A tunnel does not bypass authorization or security controls, and it does not replace them either. Your ownCloud login page is now the front door, so treat it that way.
- Strong, unique passwords for every account, especially the administrator. Consider any additional sign-in protections the official manual documents for your release.
- Separate admin and daily accounts. Do not sync with the administrator account.
- Keep ownCloud, PHP and the operating system updated. Public-facing PHP applications are scanned constantly, so patch promptly and follow the project's release announcements.
- Limit sharing. Prefer password-protected, expiring share links, and review existing links periodically.
- Protect the Localtonet token. Anyone holding it can act as that device. If you suspect exposure, rotate it from the dashboard.
- Stop the tunnel when you do not need remote access. If you only need access during a trip, start the tunnel for that period and stop it afterwards.
- Back up your data. A sync service is not a backup. Deleting a file on one client can propagate to others. Keep independent backups of the data directory and the database according to the official manual's backup guidance.
- Apply IP restrictions or other access controls where your plan and the dashboard offer them. We do not state which options exist on which plan, so check what your account provides.
Do not start the tunnel while the ownCloud setup is still unfinished, uses a placeholder password, or shows unresolved security warnings. Finish the installation, resolve what the manual requires, and complete local verification first. Only then publish it.
Day-to-day operation
Once the setup is stable, routine care is mostly about keeping two things healthy: the ownCloud host and the Localtonet client connection.
| Task | What to do | Why it matters |
|---|---|---|
| Start after reboot | Make sure the ownCloud services start with the host, then confirm the Localtonet client reconnects and the tunnel is running. | A tunnel is only available while the client is connected and the tunnel is started. |
| Updating ownCloud | Follow the upgrade procedure in the official manual for your version, and take a backup before you begin. | Upgrades touch both code and database. Our evidence does not include the upgrade steps, so use the manual. |
| Changing the hostname | Update the trusted configuration in ownCloud first, then change the tunnel's Process Type or domain, then re-point clients. | Clients and share links are tied to the address they were created with. |
| Pausing remote access | Stop the tunnel from the Localtonet dashboard. Delete it if you no longer need it. | Local LAN sync keeps working, and the public address stops answering. |
When ownCloud is more than you need
ownCloud is a full application stack: a PHP application, a database, user management, sync clients and calendar integrations. That is the right tool when you want accounts, shared folders and DAV-based sync for several people. If your goal is simply to publish a folder, Localtonet offers its own File Server tunnel, which publishes a local folder path rather than an IP and port. It has three sub-types: Default (a browser-based file manager), SFTP (for SFTP clients and automation) and WebDAV (which mounts the folder as a native network drive on Windows or macOS). It does not require setting up a PHP stack. You can read more in our File Server documentation.
| Need | ownCloud Core plus HTTP tunnel | Localtonet File Server |
|---|---|---|
| Multi-user accounts and sharing inside a server application | Designed for this; managed in ownCloud | Permissions and public share links are part of the Default web file manager; it is not a PHP application with its own sync clients |
| Calendar and contact sync (CalDAV and CardDAV) | Part of the ownCloud Core feature set | Not part of the File Server feature set we have described |
| Publish an existing folder quickly | Requires installing and maintaining the ownCloud stack | Enter the local folder path in the File Server tunnel and press Start |
| Mount as a network drive | Possible through WebDAV clients; take the URL from ownCloud | WebDAV sub-type mounts the folder as a native OS network drive |
These are different tools for overlapping jobs, and the right choice depends on whether you need an application with its own account model or just a published folder.
Troubleshooting remote ownCloud access
Work from the inside out. Confirm the service on the LAN, then the Localtonet client, then the tunnel, then the application's hostname handling. The table below maps common symptoms to the layer to check. We do not list ownCloud log file locations or diagnostic commands, because those are not established by our evidence. The official manual covers them.
| Symptom | Likely layer | What to check |
|---|---|---|
| The public URL does not load at all | Tunnel or client | Is the Localtonet client connected, and is the tunnel started rather than just created? Does the local IP and port match what you verified on the LAN? |
| The public URL shows a message about an untrusted or unrecognized domain | ownCloud configuration | The Localtonet hostname has not been added to ownCloud's trusted configuration. Follow the official manual's guidance for your release, then retry. |
| The login page loads but links or redirects point to a local address | ownCloud URL settings | Check the manual's sections on the public URL and on running behind a proxy, and confirm which address ownCloud uses to build links. |
| Works on the LAN but not through the tunnel for large uploads | Limits on one of the layers | We have not verified upload size limits for HTTP tunnels or for your web server and PHP settings. Test with a small file first, then check your plan limits and the manual's upload settings. |
| Sync client says the server is unreachable intermittently | Availability | Did the host sleep, lose its network, or did the Localtonet client disconnect? Consider setting up a Connected/Disconnected webhook for alerts. |
| Nothing works even on the LAN | Installation | Return to the local verification routine and the official manual. Do not debug the tunnel until the local service works. |
| Clients stopped working after changing the tunnel hostname | Client configuration | Clients and share links hold the old address. Update the trusted configuration, then re-enter the new server address in each client. |
Frequently asked questions
Which Localtonet tunnel type should I use for ownCloud?
Use an HTTP tunnel. ownCloud's web interface, WebDAV, CalDAV, CardDAV and REST API are all web protocols carried over HTTP(S), so a single HTTP tunnel pointing at the local web service address and port can carry them. The tunnel gives you a public HTTPS address.
What local port does ownCloud Core use?
The public project page we reviewed does not state a port, so we will not name one. The port depends on how you installed ownCloud: the web server configuration for a manual install, or the port mapping you chose for a container. Confirm it by opening the interface from another LAN device and note the address and port that work, then give those to the Localtonet tunnel.
Can I install ownCloud by cloning the repository and running make?
The make based workflow in the repository, which needs Composer v2, Yarn and Node.js v14 or newer, is the development build for contributors. It is not a production installation. For a server you intend to use, follow the official installation manual, or the Docker image the README mentions.
Do I need to open ports on my router?
No router port forwarding, firewall changes, VPN or public IP address are needed for the Localtonet tunnel itself, because the Localtonet client makes an outbound connection to a relay server. Your local firewall still needs to allow the Localtonet client to reach the ownCloud service on the machine where it runs.
Why does ownCloud complain about an untrusted domain when I use the tunnel URL?
Web applications commonly check the hostname of incoming requests, and requests arriving under a hostname the server was not told about are refused. Your visitors now arrive under the Localtonet hostname. Our evidence does not describe the exact setting, so follow the official administration manual's guidance on trusted domains for your release.
Is ownCloud Core the same as ownCloud Infinite Scale?
No. ownCloud Core is the PHP server in the repository we used for this guide (the 10.x line). ownCloud's website presents Infinite Scale as its newer platform with a different architecture. Their installation procedures differ, so use the manual for the product you chose. The Localtonet HTTP tunnel step depends only on the local address and port of the web service.
Does the tunnel run all the time?
It runs while the selected client is connected and the tunnel has been started. Creating a tunnel does not start it. You can stop it when you do not need remote access, or delete it when you are finished.
Start with Localtonet
Finish and verify your ownCloud installation on your own network, then create a Localtonet HTTP tunnel to give your sync clients and sharing links a public HTTPS address without touching your router.
Get Started Free →