

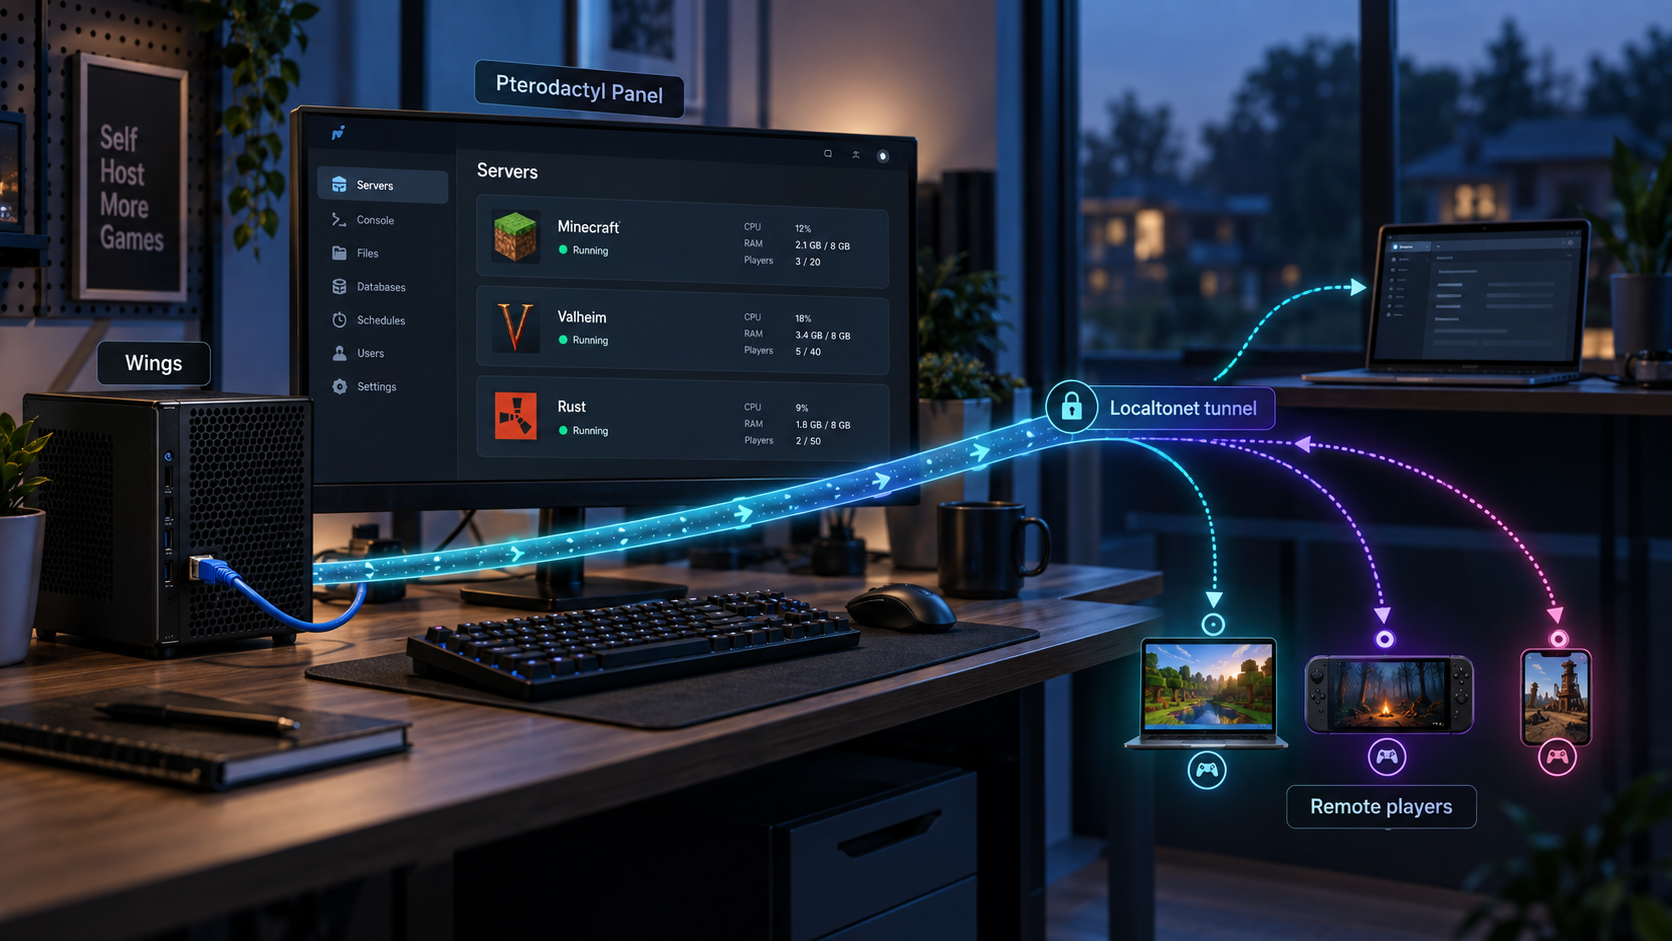
Build the panel correctly, keep management traffic controlled, and publish each game with the protocol it actually requires
Pterodactyl provides a central web interface for managing game servers while Wings runs workloads in Docker containers on one or more Linux nodes. A reliable deployment requires more than installing a panel and opening a single port: you need a database, Redis, a queue worker, scheduled tasks, Docker, node allocations, backups, and a deliberate network plan. This guide follows the documented manual installation model, explains how Panel and Wings communicate, and shows how to expose the web interface and game traffic with Localtonet without router port forwarding. Version-sensitive package names, supported operating systems, and game definitions should always be checked against the current Pterodactyl documentation before production deployment.
📋 What's in this guide
How Pterodactyl is structured
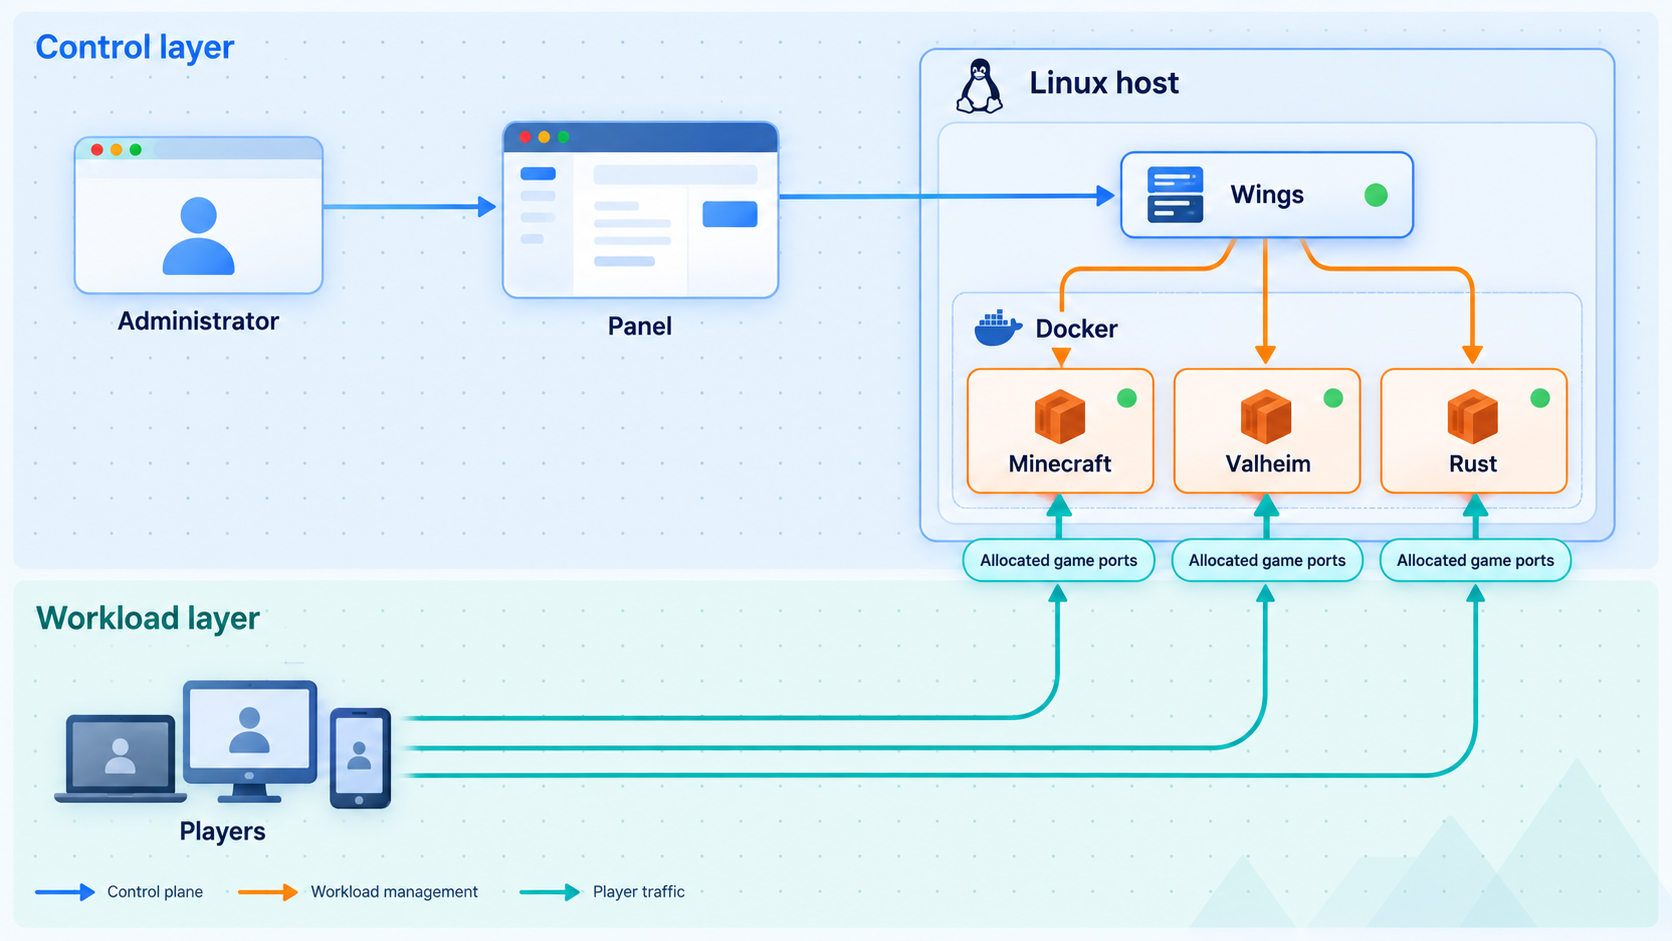
Pterodactyl is an open-source game server management system with two primary components. The Panel is the Laravel web application used by administrators and server users. It stores configuration in a database, uses Redis for queues and related application functions, and depends on a background queue worker and a scheduler. Wings is the node daemon. It communicates with Docker, manages server files and lifecycle operations, applies configured resource limits, and exposes the node API used by the Panel.
Panel and Wings can run on the same host, but they remain separate services. In a multi-node deployment, one Panel can manage Wings nodes on other machines. The network design must therefore account for three different traffic categories: browser access to the Panel, management communication between the Panel and Wings, and player traffic to each game server.
Traffic direction matters
The Panel calls the Wings API address configured for a node. Wings also needs to reach the Panel address recorded in its generated configuration. This is application management traffic, not player traffic. Wings commonly listens for API requests on a configured port, while its SFTP service uses another configured port. Those values should be read from the current node configuration rather than assumed.
A separate Wings node does not automatically require publishing its management ports to the entire internet. Prefer private routing, tightly restricted firewall rules, or another controlled path between the Panel and node. If a management endpoint must cross a public network, use TLS, validate the configured address, restrict source access where possible, and never expose configuration tokens.
A crashed game process will normally remain within its container, and configured CPU, memory, and disk limits can reduce contention. That does not mean a malicious plugin or compromised server can never affect another workload or the host. Docker socket access, privileged containers, unsafe volume mounts, vulnerable kernels, excessive permissions, and exposed daemon interfaces can all weaken isolation. Patch the host and Docker, use trusted images and eggs, avoid unnecessary mounts, and keep administrative credentials out of game containers.
Prerequisites and deployment planning
Decide whether you are building a test system, a small all-in-one host, or a production-style multi-node installation before installing packages. Moving a database, changing the Panel URL, or splitting Wings onto another host later is possible, but it introduces certificate, firewall, backup, and address changes that are easier to plan in advance.
Supported environment and architecture
Pterodactyl Panel and Wings are intended for supported Linux environments. The exact distribution releases, PHP versions, database versions, and architecture support can change between Pterodactyl releases. Check the current Pterodactyl documentation before selecting an operating system or upgrading an existing host.
Use a clean, supported 64-bit Linux installation with root or equivalent administrative access. Verify the machine architecture with uname -m before downloading Wings. An x86_64 host requires the amd64 build, while an aarch64 or arm64 host requires the arm64 build when that architecture is supported by the current release. Do not install an amd64 binary blindly on an ARM server.
Required services
| Component | Purpose | Planning requirement |
|---|---|---|
| Web server | Serves the Panel application | Configure a supported Nginx or Apache virtual host, PHP handling, the correct document root, and TLS where applicable. |
| PHP and Composer | Run and install the Laravel Panel | Use the versions and extensions listed for the current Panel release. Do not assume an older distribution package is sufficient. |
| MariaDB or MySQL | Stores users, nodes, allocations, and Panel state | Create a dedicated database and least-privilege database user. Keep credentials out of shell history and articles. |
| Redis | Supports queues and application operations | Keep it private to trusted hosts and start it automatically at boot. |
| Queue worker | Processes background jobs | Install it as a supervised service and enable it at boot. |
| Scheduler | Runs recurring Panel tasks | Add the documented one-minute cron entry for Laravel's scheduler. |
| Docker | Runs game server containers under Wings | Install Docker from a supported source and confirm the daemon works before starting Wings. |
| DNS and certificates | Provide stable names and TLS for management services | Choose the Panel and node names before generating application and node configuration. Follow current DNS and certificate instructions. |
DNS, storage, and resource planning
A normal internet-facing Panel deployment uses a fully qualified domain name that resolves to the web entry point. If you place the Panel behind a tunnel, reverse proxy, or other edge, the application's configured URL, proxy handling, web server virtual host, and certificate model must agree. A generated public hostname does not automatically match a local name-based virtual host. Test that the web server returns Pterodactyl rather than its default site when addressed through the intended path.
Avoid generic hardware estimates. Game requirements vary dramatically by title, map size, mod count, player count, tick rate, and save behavior. Add the Panel, database, Redis, Docker, operating system, backups, and monitoring overhead to the documented requirements of every game. Leave free disk space for image layers, installation archives, logs, temporary files, world growth, and restore operations.
Fast local storage is usually preferable for active worlds and databases. Backups must be stored independently from the live disk if they are expected to survive disk failure. A backup copied to another directory on the same physical drive is useful for mistakes, but it is not disaster recovery.
Firewall plan
List every required flow before adding firewall rules. Typical categories include administrator access to the Panel, Panel access to each Wings API, Wings access back to the Panel, optional user access to the Wings SFTP service, database and Redis access only from approved local or private hosts, and player access to game allocations. Do not open an entire broad port range simply because it was reserved as an allocation range.
Scripts such as pterodactyl-installer.se are community projects, not official Pterodactyl installers, and Pterodactyl does not provide support for those scripts. Running a remote shell script as root gives its current contents complete control of the host. If you choose a community installer, inspect the exact version first, understand every package and configuration change, pin a reviewed revision where possible, and be prepared to support the resulting system yourself. The workflow below uses the documented manual model instead.
Install and configure the Pterodactyl Panel
Package installation commands differ across supported distributions and Pterodactyl releases. Before continuing, install the web server, current supported PHP runtime and extensions, Composer, a supported MariaDB or MySQL release, Redis, cron, curl, tar, and the utilities listed in the current Panel requirements. Start the database and Redis services, enable them at boot, and create an empty database with a dedicated application user.
Create the application directory and download the current Panel release
Download the release archive from the official Pterodactyl GitHub release location, extract it into the Panel directory, and set the documented writable permissions.
mkdir -p /var/www/pterodactyl
cd /var/www/pterodactyl

curl -Lo panel.tar.gz https://github.com/pterodactyl/panel/releases/latest/download/panel.tar.gz
tar -xzvf panel.tar.gz

chmod -R 755 storage/* bootstrap/cache/Create the environment file and install production dependencies
Copy the example environment, install Composer dependencies, and generate the application key. Keep the resulting .env file private because it contains application and database secrets.
cd /var/www/pterodactyl
cp .env.example .env
composer install --no-dev --optimize-autoloader
php artisan key:generate --forceConfigure the application, database, and mail transport
Run the interactive configuration commands. Enter the Panel's intended URL, timezone, cache and session choices required by the current documentation, the dedicated database details, and a real mail transport. Mail configuration matters for account and password workflows, so verify it instead of leaving an untested placeholder.
php artisan p:environment:setup
php artisan p:environment:database
php artisan p:environment:mailCreate the database schema and first administrator
Apply the current migrations and seed data, then create an administrator through the supported Artisan command. Use a unique password and an email address you control.
php artisan migrate --seed --force
php artisan p:user:makeAssign ownership to the web service account
The account varies by operating system and web server. The following uses the common Debian or Ubuntu account www-data. Substitute the service user documented for your environment.
chown -R www-data:www-data /var/www/pterodactylInstall the scheduled task
Add the Laravel scheduler to root's crontab so it runs once per minute. Confirm cron is enabled on the host.
* * * * * php /var/www/pterodactyl/artisan schedule:run >> /dev/null 2>&1Install and enable the queue worker
Create the queue worker service using the current unit from Pterodactyl's documentation. Its PHP path and web account must match your host. Then reload systemd, enable the worker, and start it.
systemctl daemon-reload
systemctl enable --now pteroq.service
systemctl status pteroq.serviceConfigure the web server and TLS
Use the current official Nginx or Apache configuration for your Panel version. Set the document root to the Panel's public directory, configure PHP-FPM correctly, use the intended hostname, and enable HTTPS for any public administrative deployment. Reload the web server only after validating its configuration.
Verify the Panel locally
Open the Panel through its local or internal web address and sign in with the administrator account. Confirm that the correct site loads, static assets render, and the browser does not report redirect loops or mixed-content errors. Then check the underlying services:
systemctl status redis-server
systemctl status pteroq.service
systemctl status nginx
systemctl status php-fpm
Service names differ by distribution and PHP version, so replace the examples with the actual units installed on your host. Also verify that the scheduler runs and inspect the Panel log under /var/www/pterodactyl/storage/logs/ if the interface returns an application error.
Install Docker and Wings
Install Docker Engine using the method supported for your Linux distribution. Do not expose the Docker API over an unauthenticated network socket. Verify the daemon before installing Wings:
docker version
systemctl status docker
In the Panel administration area, create a location and then create a node in that location. Supply the node's address, communication settings, resource capacity, and other values required by the current form. The address must be reachable from the Panel using the configured scheme and port. Generate the node configuration only after those values are correct.
Identify the node architecture
Run the architecture check on the Wings host. Select only the matching official binary from the current Wings release.
uname -mDownload the matching Wings binary
Use the amd64 artifact for an x86_64 host or the arm64 artifact for a supported aarch64 host. Run only the command that matches the machine.
# x86_64 / amd64 host
curl -L -o /usr/local/bin/wings \
  https://github.com/pterodactyl/wings/releases/latest/download/wings_linux_amd64

# aarch64 / arm64 host
curl -L -o /usr/local/bin/wings \
  https://github.com/pterodactyl/wings/releases/latest/download/wings_linux_arm64

chmod u+x /usr/local/bin/wingsInstall the generated node configuration
Create /etc/pterodactyl and copy the complete configuration generated by the node's Configuration page to /etc/pterodactyl/config.yml. Treat it as a secret. Do not paste it into tickets, screenshots, repositories, or public articles.
mkdir -p /etc/pterodactyl
chmod 700 /etc/pterodactylTest Wings in the foreground
Start Wings manually once so configuration, certificate, Docker, and connectivity errors remain visible in the terminal. Stop the foreground process after a successful test.
wings --debugInstall the official systemd service definition
Create the Wings systemd unit from the current official Wings documentation. It should start the installed binary from the Pterodactyl configuration directory, depend on Docker, restart according to the documented policy, and run with the required privileges. Do not call systemctl start wings until this unit exists.
Enable and start Wings
Reload systemd after creating the service, enable Wings at boot, and start it now.
systemctl daemon-reload
systemctl enable --now wings
systemctl status wingsConfirm node communication
Return to the Panel and verify that the node reports successfully. If it does not, compare the configured node address with the actual Wings listener and certificate, then inspect the Wings journal. Do not solve a private routing or certificate error by immediately publishing the management port.
journalctl -u wings -n 100 --no-pagerConfigure allocations, eggs, and the first game server
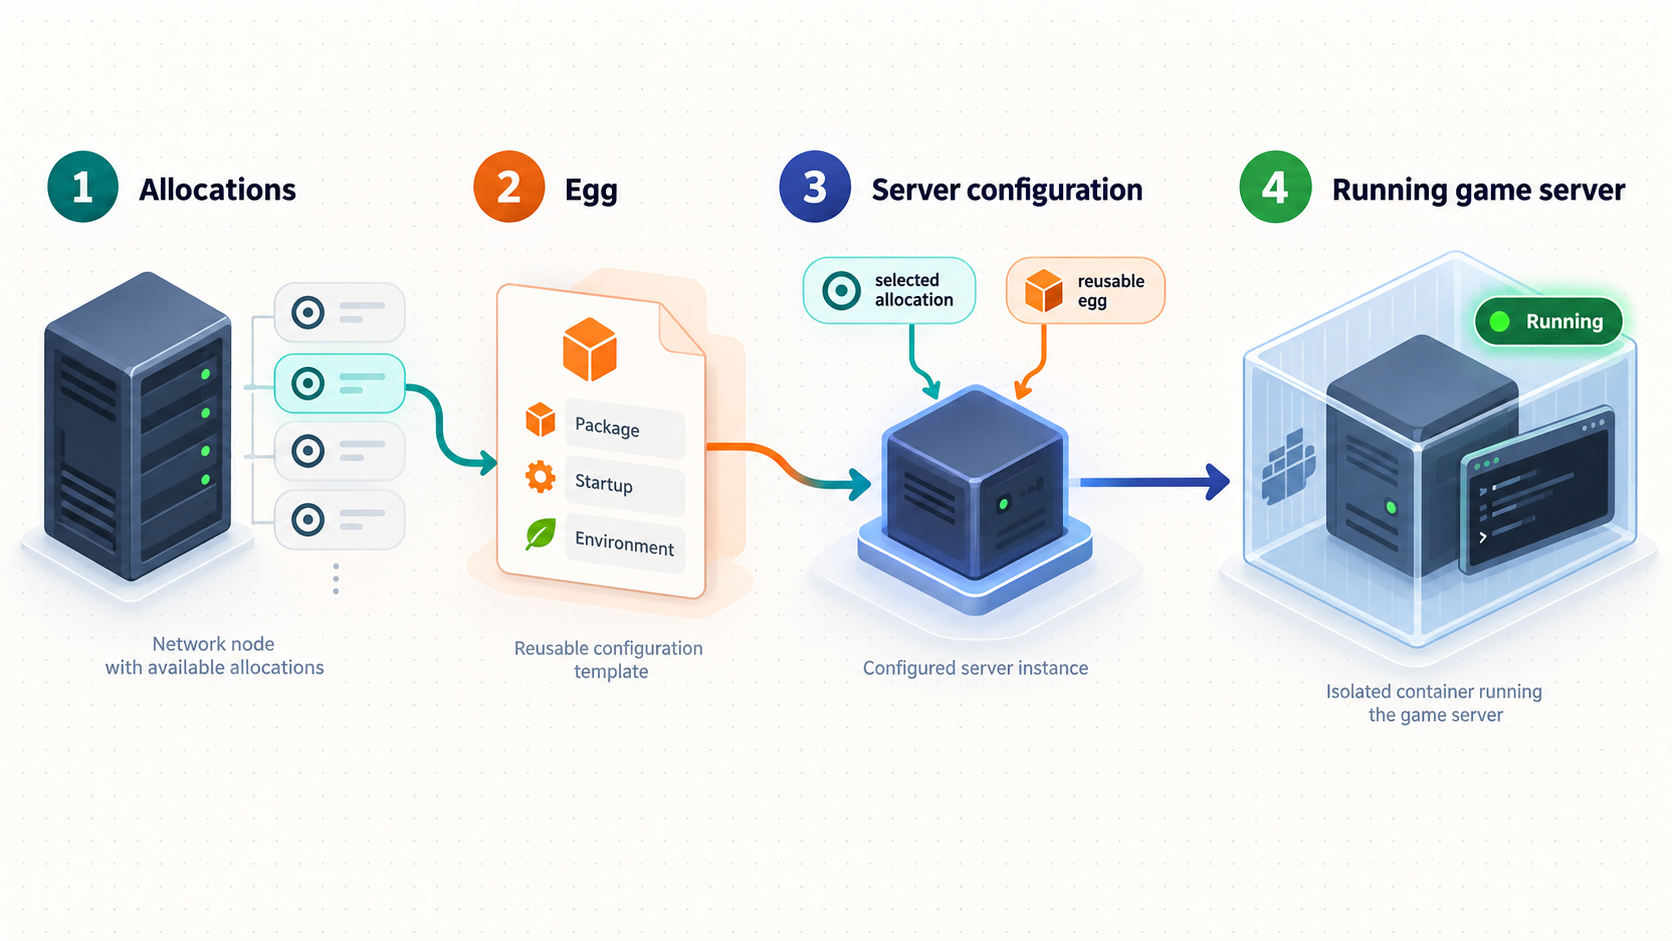
An allocation associates a node IP address and port with a server. Create allocations only for ports you intend to use and that the host can actually bind. The address represented in Pterodactyl must make sense for the node's networking arrangement. Container networking, host listeners, firewalls, and any Localtonet target must ultimately refer to the same reachable service.
Do not assume every game needs one TCP port. A game may use TCP, UDP, both protocols on one port, several adjacent UDP ports, a separate query port, a remote console port, or a range. Voice communication and server discovery may use different ports from gameplay. Consult the server software's current official network documentation and the selected egg before creating allocations or tunnels.
| Requirement found in game documentation | Pterodactyl planning | Localtonet planning |
|---|---|---|
| One TCP listener | Create the required allocation and assign it to the server. | Create a TCP tunnel to the reachable local address and port. |
| One UDP listener | Create and assign the required UDP-facing allocation. | Create a UDP tunnel. Do not transport it through a TCP-only tunnel. |
| TCP and UDP on the same port | Confirm the server and host bind both protocols as required. | Use the documented combined UDP/TCP tunnel where appropriate. |
| Gameplay plus query or voice ports | Create every required allocation and configure the application to use them. | Create coverage for every required public port and matching protocol. |
| Port range | Reserve enough allocations without exposing unrelated services. | Check current Localtonet support and configuration for the complete requirement rather than assuming one tunnel is sufficient. |
Choose and review the egg
Inspect the eggs currently bundled with your installed Panel under the administrative Nests and Eggs area. The bundled set is version-dependent, so this guide does not claim that every popular game ships by default. Additional community eggs may be available, but they are code and configuration supplied outside the core Panel release. Review the image, installer, startup command, variables, update history, and maintainer before importing one.
Create the server with explicit memory, disk, CPU, database, backup, and allocation limits appropriate to that game. Start it and watch the console through its first installation. Accept any game-specific license agreement only after reading it. Confirm that the process reaches its documented ready state and remains healthy after one controlled restart.
Verify the game locally before creating a tunnel
Use a game client or protocol-appropriate tool from the same LAN or host network to confirm the allocation is listening. Check both TCP and UDP requirements independently. A successful TCP connection test does not prove a UDP game path works, and an open UDP firewall rule does not prove the server process is listening.
docker ps
docker logs --tail 100 <container-name-or-id>
ss -lntup
Container names and identifiers are deployment-specific. Never publish a service until it starts correctly without the tunnel. This separation makes later troubleshooting much faster.
Expose the Panel and game servers with Localtonet
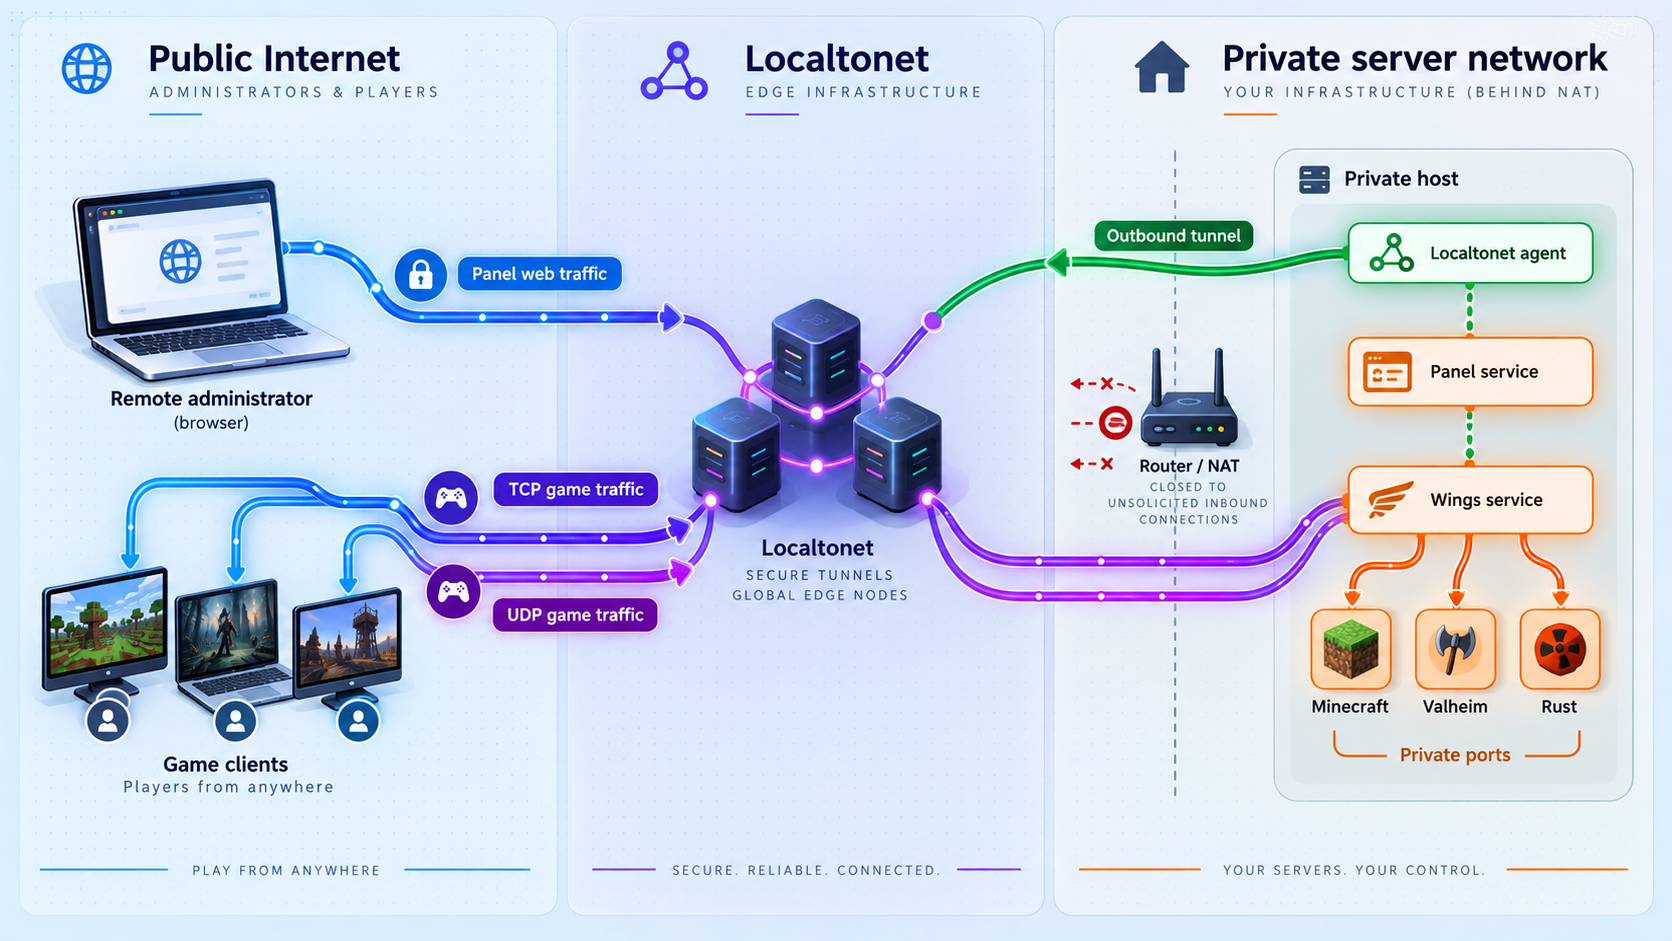
With Localtonet, the client running on the device establishes an outbound connection to our relay. You do not need inbound router port forwarding, a public IP address, VPN setup, or broad firewall changes for the tunnel itself. The tunnel remains available only while the selected client is connected and that tunnel is running.
Treat the Panel and game traffic as separate publishing tasks. The Panel is a web application and normally belongs behind an HTTP tunnel pointed at the web server that serves it. Game traffic uses raw TCP, UDP, or combined UDP/TCP tunnels according to the actual server requirements.
The correct target is the address and port where the Panel's web server is reachable from the Localtonet client device. It might use local HTTP, local HTTPS, a container address, or another host on the LAN. Name-based virtual hosts may also expect a particular hostname, and local TLS can fail if its certificate does not match the address used by the client. Test the exact local target first and align the web server, application URL, proxy handling, and certificate configuration.
Create the Panel tunnel
Install and run the Localtonet client
Install the Localtonet application on the Panel host or another device that can reach the Panel's local web server. Keep the client running for as long as remote access is required.
Select the device token
Select the AuthToken for the device that will run the tunnel. Tokens are device-specific credentials. Never publish, guess, or reuse a token from an untrusted device.
Select a currently available relay server
Choose from the server or region values currently offered in your Localtonet dashboard. Availability can vary, so do not copy a hardcoded server code from an old tutorial.
Create an HTTP tunnel to the tested Panel target
Enter the local IP address and port that successfully serves the Panel from the client device. HTTP tunnels provide a public HTTPS address. Generated, selected, and custom hostname options depend on the current Process Type and product configuration, so follow the current dashboard rather than assuming a custom domain is available.
Start the tunnel
Creating a tunnel does not start it. Press Start and wait for the assigned public address to become active.
Verify the public Panel address
Test from a device outside the server's LAN, sign in with a non-administrative test account where possible, and verify navigation, console updates, file operations, and logout behavior. Investigate any redirect, asset, cookie, or certificate problem before inviting users.
Create game tunnels
Repeat the Localtonet workflow for the game's complete public network requirement. Choose TCP, UDP, or combined UDP/TCP, select the correct device token and current relay, and point the tunnel to the allocation's reachable local IP address and port. Start the tunnel, then use the assigned public host and port in the game client.
The assigned public port does not need to equal the internal allocation unless the current product configuration explicitly provides and requires that behavior. Give players the public endpoint displayed by Localtonet, not an assumed port copied from the game's default configuration.
If a game uses additional query, voice, discovery, or remote-console ports, handle them according to their protocols. A successful connection to the primary gameplay port does not validate those secondary services. Avoid exposing remote-console interfaces unless they are required, authenticated, and deliberately protected.
Understand the tunnel lifecycle
A Localtonet tunnel is reachable only while the selected device is connected and the tunnel is running. Restarting Pterodactyl does not automatically prove that the Localtonet client or tunnel has recovered. Include the client and every required tunnel in your operational checks.
When remote access is no longer needed, stop the tunnel. Delete obsolete tunnels instead of leaving unused configurations attached to old services. Localtonet also supports management through its REST API, but credentials and private endpoints must never be embedded in public examples.
Security model for a remotely managed panel
Publishing a management interface creates a larger attack surface than keeping it on a private LAN. The tunnel removes the need for router port forwarding, but it does not replace application authentication, patching, access control, or host security.
This guide does not rely on tunnel-level Basic Auth because its current availability and scope are not established by the supplied product documentation. Protect the Panel with its own supported authentication, least-privilege accounts, TLS, restricted management networking, and any additional access controls confirmed in the current Localtonet dashboard or documentation.
Updates, backups, monitoring, and recovery
Routine health checks
Monitor the complete request path instead of checking only whether the Panel page opens. Confirm the database and Redis are healthy, the queue worker is processing jobs, cron is invoking the scheduler, Wings is connected, Docker containers are running, disks have free space, required allocations are listening, the Localtonet client is connected, and each required tunnel is running.
systemctl status pteroq.service
systemctl status wings
systemctl status docker
docker ps
journalctl -u wings --since "1 hour ago"
df -h
ss -lntup
Review web server and PHP logs for Panel errors, storage/logs for Laravel application failures, the system journal for Wings, and container logs for game-specific crashes. Configure log rotation so a noisy game or repeated connection failure cannot consume the entire disk.
Back up the complete system
A recoverable Pterodactyl deployment needs more than world folders. Back up the Panel database, Panel environment and web-server configuration, Wings configuration, game server data, user-uploaded files, application-specific databases, certificates where appropriate, and any scripts or service units needed to reconstruct the host.
The Panel database contains users, nodes, allocations, server records, and other management state. Game files contain worlds, saves, configurations, plugins, and application data. Losing either side can leave an incomplete recovery. Protect backup credentials, encrypt sensitive copies, keep at least one copy on independent storage, and test restoration on a separate system.
Update Panel and Wings deliberately
Before an update, read the release notes and current upgrade documentation, confirm supported PHP, database, Docker, and operating-system versions, take a verified backup, and schedule a maintenance window. Put the Panel into maintenance mode when instructed by the official upgrade process, replace application files using the documented release procedure, install production dependencies, run migrations, repair permissions, and restart the queue worker.
Update Wings separately by downloading the correct architecture-specific release, replacing the binary atomically, and restarting the service. Verify node connectivity and start a noncritical game server before declaring the change complete. Container images and game software may have their own update mechanisms and compatibility requirements.
Rollback and recovery
Application files alone are not a safe rollback after a database migration. If an upgrade fails, follow the release's documented recovery guidance and restore a mutually consistent set of Panel files, database state, configuration, and dependencies. Record the previous versions before upgrading. For Wings, retain the previously working binary until the new version has passed verification, but confirm that it remains compatible with the Panel version.
Practice recovery from a failed disk or fresh Linux host. A useful test recreates the web server, restores the database and environment, reinstalls the worker and scheduler, restores Wings configuration and game data, verifies Docker containers, and then restores Localtonet connectivity. A backup that has never been restored is only an assumption.
When a different management approach may fit better
Pterodactyl is useful when you need a web interface, multiple users, server-scoped permissions, Docker-based workloads, and one or more Wings nodes. It also introduces operational dependencies that must be maintained. For one server managed by one experienced administrator, a systemd service or carefully maintained container configuration may be simpler and easier to audit.
Other game panels, including PufferPanel, use different installation, account, container, and permission models. Their current commands and supported versions must be taken from their official documentation. In particular, any deployment that mounts /var/run/docker.sock into a panel container gives that container highly privileged control over Docker and potentially the host. Do not copy an old Docker command without reviewing the current image, account-creation procedure, volume layout, published ports, supported versions, startup checks, and Docker socket implications.
Localtonet can publish a locally reachable web panel or raw game service regardless of which management approach you choose, provided you select the correct tunnel family and target. The same security rule applies: validate the service locally first, publish only what is required, and stop or delete access when it is no longer needed.
Troubleshooting Panel, Wings, and tunnel problems
| Symptom | What to inspect | Corrective direction |
|---|---|---|
| Panel returns an application error | Laravel logs, PHP-FPM, database connectivity, Redis, permissions, and the application key | Repair the failed dependency or ownership issue. Do not regenerate an existing production application key casually. |
| Jobs remain pending | pteroq.service, Redis, queue logs, and PHP path |
Correct the service account or command, restart the worker, and verify it is enabled at boot. |
| Scheduled actions do not run | Cron service and the one-minute scheduler entry | Install the documented cron line and confirm the command runs with the correct PHP binary. |
| Node appears unavailable | Wings status, journal, generated configuration, Panel node address, DNS, TLS, and firewall route | Restore authenticated Panel-to-Wings connectivity. Do not assume a public tunnel is the required fix. |
| Wings will not start | Binary architecture, executable permission, configuration syntax, Docker status, and systemd unit | Install the correct amd64 or arm64 binary, validate the foreground run, then repair and reload the service. |
| Game works locally but not remotely | Localtonet client, tunnel state, target address, assigned public endpoint, protocol, and secondary ports | Start the correct TCP, UDP, or combined tunnel and test the exact public host and port shown in the dashboard. |
| TCP test succeeds but players still fail | Game documentation for UDP, query, voice, discovery, and ranges | Add the missing protocol or port coverage. A TCP handshake does not validate UDP gameplay. |
| Public Panel shows the wrong site | HTTP target, virtual-host name, web server default site, application URL, and proxy configuration | Point the tunnel at the correct listener and align the web server host configuration with the public request path. |
| Panel enters a redirect loop | Application URL, HTTPS detection, trusted proxy configuration, and forwarded request behavior | Make the Panel's scheme and proxy settings agree with how requests arrive. Avoid disabling HTTPS checks as a shortcut. |
| Tunnel disappears after a restart | Localtonet client connection and tunnel running state | Reconnect the selected device and start the tunnel. Remember that creating a tunnel does not mean it is running. |
| Server fails during installation | Container logs, egg installer, image pull, DNS, free disk, memory, and file ownership | Fix the specific installer or resource failure and review whether the egg and image are maintained and trusted. |
A disciplined test order
Start at the service and move outward. First verify the game process inside its container. Next verify the host listener and local firewall. Then connect from another device on the LAN if the design permits it. After that, verify the Localtonet client and tunnel state. Finally, test the assigned public endpoint from an unrelated network.
For the Panel, verify PHP and the database, then the local web server, then the intended local tunnel target, and finally the public HTTPS address. This order prevents tunnel settings from hiding an underlying application failure.
Frequently asked questions
Is pterodactyl-installer.se the official Pterodactyl installer?
No. It is a community project, and community installation scripts are not the official supported installation method. Running any remote script as root carries significant trust risk. Review its exact contents and support implications before choosing it over the documented manual process.
Can Panel and Wings run on the same machine?
Yes. An all-in-one deployment is possible when the host has enough resources for the operating system, Panel dependencies, Docker, backups, and every game workload. Panel and Wings still remain separate services and should be configured and monitored independently.
Do I need to expose the Wings API publicly?
Not automatically. The Panel must be able to reach the Wings API address configured for the node, and Wings must reach the Panel, but that path can use local or private routing. For separate nodes, prefer a controlled network path and restrictive firewall policy rather than indiscriminate public exposure.
Does every game server need only one Localtonet tunnel?
No. Some games use one port, while others require TCP and UDP, multiple gameplay ports, a query port, voice traffic, or a range. Check the current server documentation and egg configuration, then create TCP, UDP, combined UDP/TCP, or additional tunnels as required.
Does a Localtonet tunnel stay online if the client stops?
No. The public endpoint is available only while the selected Localtonet client is connected and the tunnel is running. Creating the tunnel is not enough. It must be started, and client connectivity should be included in monitoring.
Does Docker guarantee that a compromised game plugin cannot affect the host?
No. Containers provide useful process and resource isolation, but they are not an absolute security boundary. Host vulnerabilities, privileged settings, unsafe mounts, Docker socket exposure, excessive permissions, or vulnerable images can create paths beyond a container. Keep every layer patched and minimize privileges.
Which games are included with Pterodactyl?
The bundled nests and eggs can change by release. Inspect the administrative Eggs area in your installed version rather than relying on an old list. Additional community definitions may exist, but they should be reviewed as third-party executable configuration before import.
What must be backed up for a full Pterodactyl recovery?
Back up the Panel database, environment and web configuration, Wings configuration, game server files, application-specific databases, certificates where needed, service definitions, and any deployment automation. Keep an independent copy and test a full restore before depending on it.
Publish your verified game services with Localtonet
Install and test Pterodactyl locally first, document every required game port and protocol, then use Localtonet to create the appropriate HTTP, TCP, UDP, or combined tunnel without inbound router port forwarding.
Get Started Free →

