

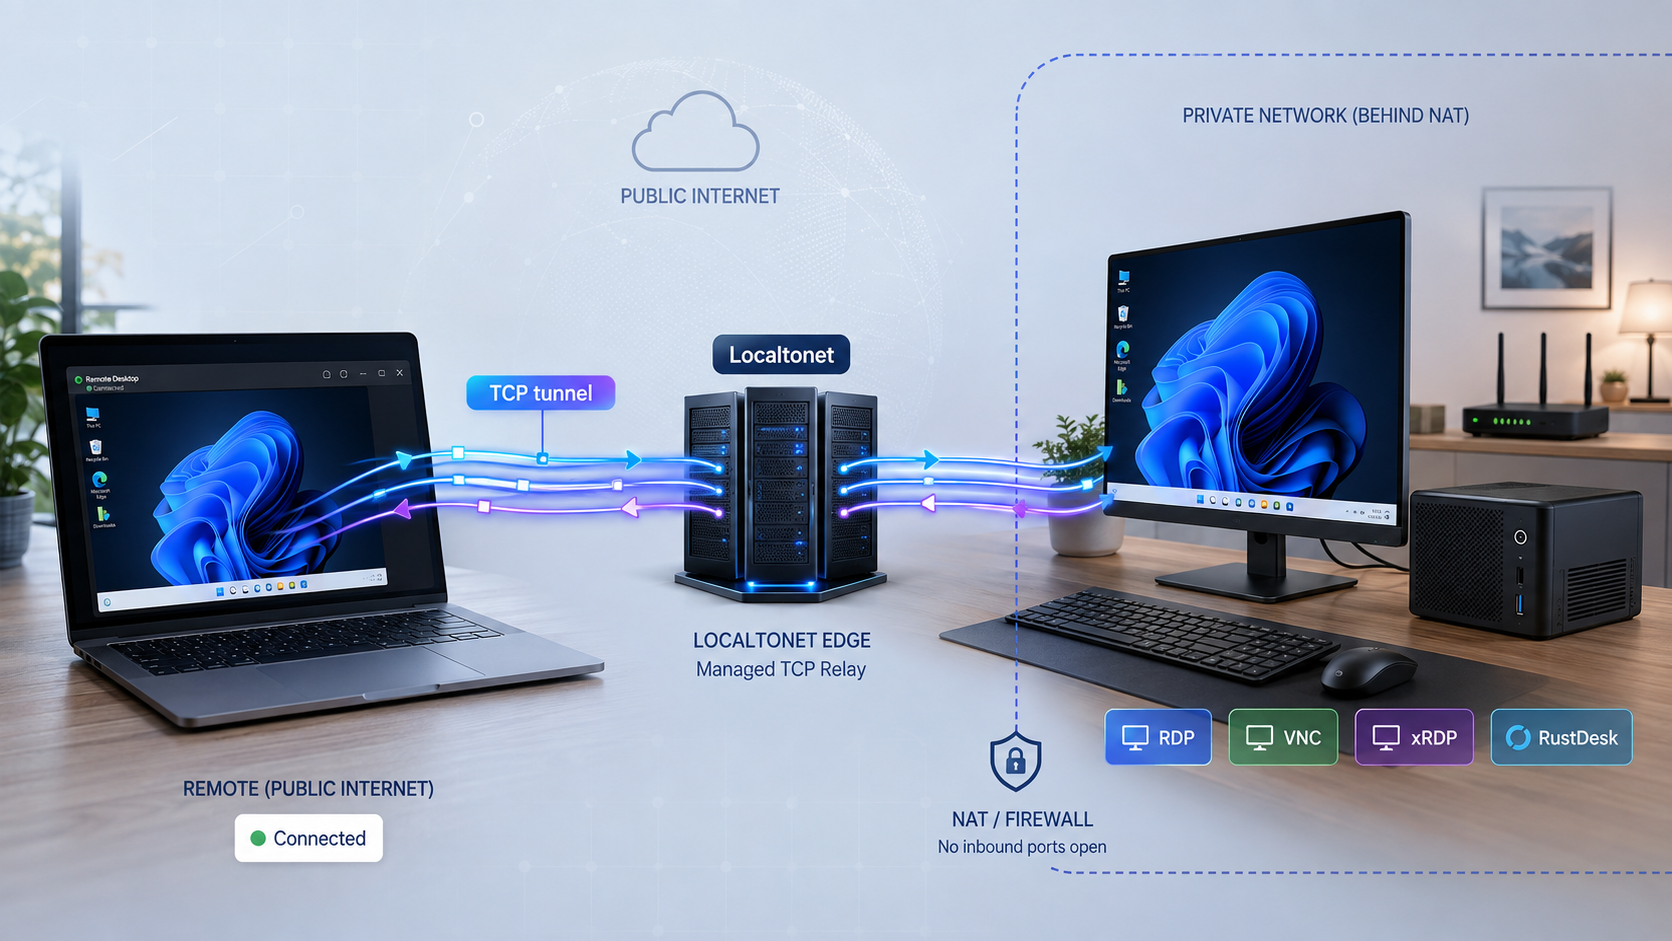
Reach a Windows or Linux desktop without opening a router port
Remote desktop access has two separate parts: a desktop protocol such as RDP or VNC, and a network path that lets the remote client reach that protocol. This guide explains the difference between attended screen sharing, control of the visible console, and a separate remote desktop session. It then walks through preparing and testing an RDP or VNC service locally before publishing it through a Localtonet TCP tunnel. You will also learn how to verify the assigned endpoint from an external network, operate the connection safely, configure supported service-mode startup, and diagnose common failures.
📋 What's in this guide
Screen sharing, console control, and remote desktop sessions are not the same
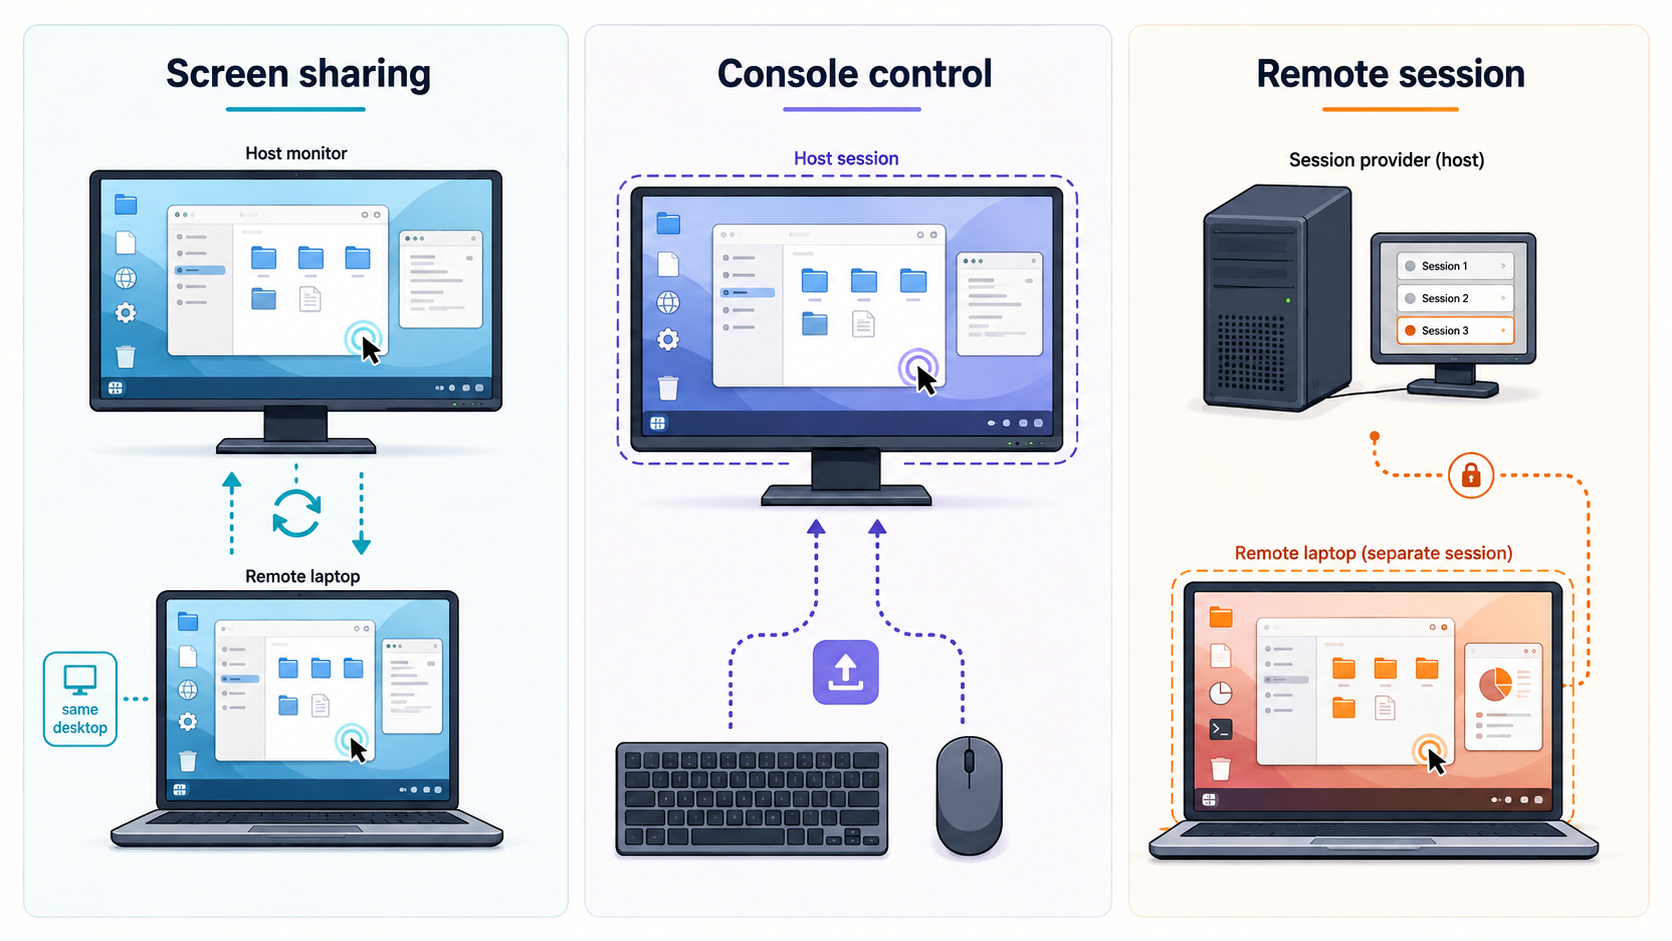
The phrase remote desktop is often used for several different experiences. Before selecting software, decide whether the remote user must see and control the desktop already visible on the host, receive a separate graphical session, or join an attended support session with a person at the computer. The distinction affects privacy, login behavior, concurrent use, and what happens on the physical display.
On desktop editions of Windows, an incoming RDP connection can lock the physical console or switch the active user context rather than showing both people the same screen. Exact behavior depends on the Windows edition, user accounts, policy, and whether the session is being resumed. Do not choose RDP for an attended demonstration if both users must watch and interact with the same visible desktop.
VNC is not automatically console sharing. Some VNC servers attach to an existing display, while virtual-session servers create a new display such as :1. Likewise, a Linux desktop reached through xRDP may be a separate Xorg-backed session rather than the session visible on the monitor. Headless operation and concurrent sessions depend on the desktop environment, display server, VNC or RDP implementation, and operating-system configuration.
A Localtonet TCP tunnel transports connections to the local RDP or VNC listener. It does not change whether that service shares the console, creates a virtual desktop, requires attendance, or permits concurrent sessions.
Prerequisites and planning checklist
Build and verify the local remote-desktop service before creating public connectivity. This separation makes troubleshooting much easier. If RDP or VNC fails on the local network, adding a tunnel will not repair the desktop service, credentials, host firewall, or graphical session.
Host computer requirements
- A Windows or Linux computer that will remain powered on during remote access.
- A supported RDP or VNC server installed and enabled on that host.
- A graphical desktop environment when the selected Linux server requires one.
- A user account permitted to sign in remotely, protected by a strong, unique password.
- Current operating-system and remote-desktop software updates.
- A host firewall rule that permits the intended local connection where required.
- Sleep and power settings that will not make the machine unreachable unexpectedly.
Localtonet requirements
- A Localtonet account and a device-specific AuthToken.
- The Localtonet client installed on the desktop host or another device that can reach the host's listening IP and port.
- Outbound network connectivity from the Localtonet client to our relay infrastructure.
- A currently available relay server selected from the dashboard.
- A TCP tunnel pointing only to the intended local RDP or VNC service.
Remote-client requirements
- An RDP client for an RDP host or a compatible VNC viewer for a VNC host.
- The public host and port assigned by the Localtonet dashboard after the tunnel is created.
- Valid credentials for the RDP or VNC service. The Localtonet AuthToken is not a desktop login credential and must never be shared with the remote viewer.
- A separate internet connection for the final external test, such as mobile data or another site.
Only expose computers and accounts you own or are explicitly authorized to administer. For attended support, tell the person at the host what the remote session can see and control. Do not use tunneling to evade organizational access policies, endpoint controls, or network rules.
Choose the desktop protocol that matches the job
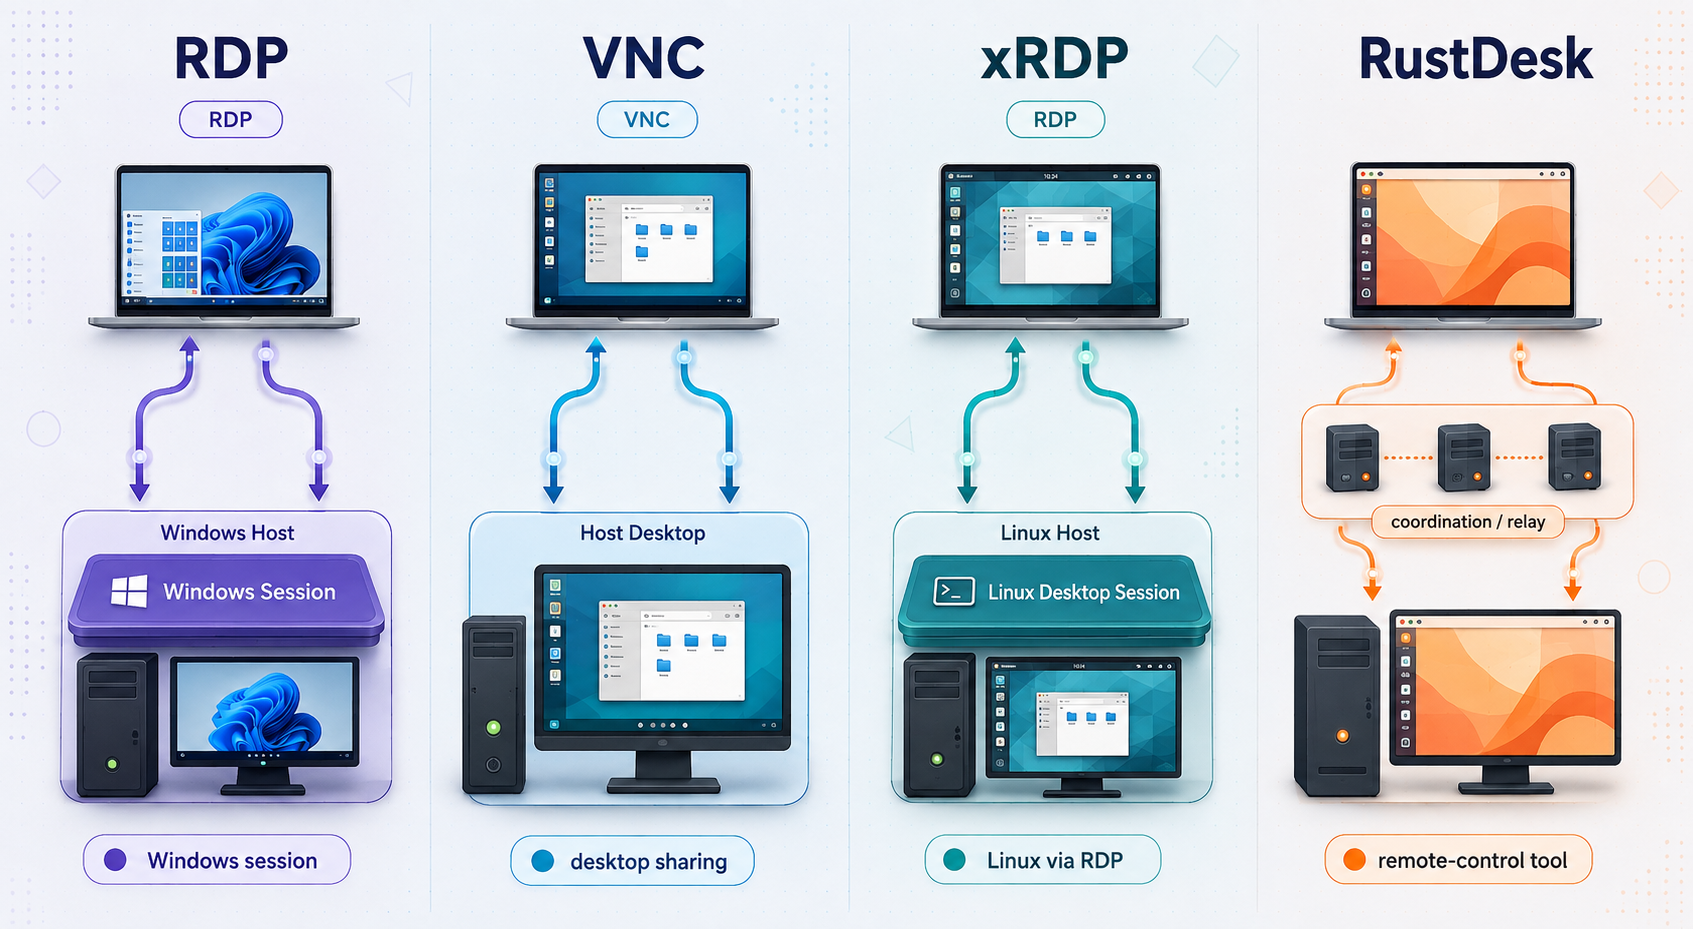
Protocol choice should be based on host compatibility, session behavior, client availability, and security configuration rather than a universal performance ranking. Responsiveness depends on latency, host upload capacity, display resolution, visual activity, codec support, server implementation, and client settings. Test the actual workflow instead of assuming one protocol will always be faster.
| Option | Typical session model | Local listener | Important qualifications |
|---|---|---|---|
| Windows RDP host | Remote login or resumed remote session | TCP 3389 by default | Supported Windows host edition is required. Desktop editions can affect the physical console when a remote user signs in. |
| xRDP on Linux | Usually a separate Linux graphical login session | TCP 3389 by default | Packaging and desktop compatibility vary. Current deployments commonly use an Xorg backend with xorgxrdp rather than requiring VNC. |
| Console-sharing VNC | Existing visible desktop | Implementation-defined, often in the 5900 series | Useful when both people must see the same desktop. Authentication and transport protection vary by server. |
| Virtual-session VNC | Separate virtual display | Commonly 5900 plus the display number | A session on display :1 commonly maps to TCP 5901, but the configured listener is authoritative. |
| Attended support application | Usually shared visible screen | Application-managed | Often simpler for one-time support. Account, relay, approval, and unattended-access behavior depends on the selected product. |
Windows includes the Remote Desktop Connection client, commonly opened with mstsc.exe, even on systems that cannot act as an RDP host. Current Windows releases require an eligible host edition to accept incoming Remote Desktop connections. Check the current Microsoft documentation for the exact edition installed on the host. Windows Home is generally a client rather than a supported built-in Remote Desktop host.
On Apple platforms, Microsoft's current client direction is the Windows App. Older instructions that refer only to an app named Microsoft Remote Desktop may no longer match the current store listing or user interface. On Linux, clients such as Remmina and FreeRDP can connect to RDP services, but installation and credential-prompt behavior depend on the distribution and package version.
RustDesk and similar attended-support tools represent a different architecture. They manage their own identifiers, connection negotiation, permissions, and relay behavior, so they do not need a Localtonet TCP tunnel for ordinary use. If you self-host such a product, follow that product's current server documentation. Ports used by a self-hosted server should not be presented as requirements for ordinary use of a vendor-operated public service.
Prepare and test a Windows RDP host
Use this path when the Windows computer has a supported Remote Desktop host edition and you want an RDP login session. If the computer runs an edition that cannot host built-in RDP, choose a maintained VNC implementation or an attended-support application instead of applying unsupported operating-system modifications.
Confirm the Windows edition and install updates
Open the Windows system information or activation settings and confirm that the installed edition supports hosting Remote Desktop. Install current Windows updates before enabling remote access. A Windows Home computer can run an RDP client, but it should not be treated as a supported built-in RDP host.
Enable Remote Desktop
Open Settings, select System, then Remote Desktop, and enable Remote Desktop. Windows may ask you to confirm the change. The exact wording can differ between supported Windows versions.
Select the permitted account
Use a named, least-privilege account that is allowed to connect remotely. Protect it with a strong, unique password. Do not rely on a blank password, a shared household credential, or an administrator account when a more limited account is sufficient.
Keep Network Level Authentication enabled where supported
Review the Remote Desktop advanced settings and require Network Level Authentication when the host and clients support it. NLA authenticates the user earlier in the connection process. Do not disable it merely to make an obsolete client connect.
Verify the Windows firewall configuration
Enabling Remote Desktop normally configures the related Windows firewall rules, but policy or security software can still block access. Confirm that the rule applies to the intended network profile. Avoid opening a router port for TCP 3389.
Test RDP over the local network
From another device on the same trusted LAN, open an RDP client and connect to the host's private LAN address. Sign in through the client's normal secure credential prompt rather than placing a password in a shell command. Confirm that login, keyboard, pointer, display, and logout behavior match your expectations before continuing.
If the Localtonet client will run on the Windows host, the TCP target can usually be the local listener, such as 127.0.0.1 with port 3389, provided RDP is listening there. If Localtonet runs on another LAN device, use the Windows host's reachable private address and confirm that address remains stable enough for the tunnel configuration.
Prepare a Linux desktop with xRDP or VNC
Linux setup is more implementation-specific than Windows setup. Distribution packages, display managers, Wayland or Xorg use, desktop environments, session scripts, and security defaults can all affect the result. The safe workflow is to install a server supported by your distribution, inspect its actual listener, and prove that it works locally before adding Localtonet.
Option A: xRDP for an RDP-compatible Linux login
xRDP accepts connections from standard RDP clients. Current Linux deployments commonly use the xorgxrdp Xorg modules to provide the graphical session. It is inaccurate to assume that xRDP necessarily uses VNC as its backend. Your distribution may install xorgxrdp as a dependency or require it as a separate package.
Install a supported graphical desktop
A minimal or server-only Linux installation may not include a desktop environment, display manager, or graphical session components. Install a desktop environment supported by your distribution and xRDP packaging. Confirm that the selected desktop can start successfully before diagnosing remote access.
Install the distribution's xRDP packages
Use the package names and repository instructions for the exact Linux release. On Debian-derived systems, the package is commonly named xrdp, with xorgxrdp used for the Xorg backend. Package availability and dependencies can differ, so verify them in the distribution's current package documentation.
Enable and start the packaged service
Use the service-management method documented by the distribution. On a systemd-based installation, inspect the xRDP service status after starting it and review its journal if startup fails. Do not assume that package installation alone proves the listener or desktop backend is working.
Confirm the listener and local firewall rule
xRDP normally listens on TCP 3389 unless reconfigured. Inspect the active socket and service configuration rather than relying only on the default. Permit only the local testing path in the host firewall, and do not forward TCP 3389 through the router.
Test from an RDP client on the LAN
Connect to the Linux host's private address and actual xRDP port. Complete a login, confirm that the desktop loads, and test logout and reconnect behavior. A blank screen or immediate disconnect is usually a desktop-session, permissions, display-manager, or backend problem rather than a tunneling problem.
Option B: VNC for console sharing or a virtual display
Choose a maintained VNC server supported by your operating system. TigerVNC is one option, but its packages, service units, session files, and startup commands differ between distributions and releases. Some distributions manage sessions through systemd templates or administrator configuration instead of the older vncserver helper. Follow the primary documentation packaged for the installed version.
Decide between the visible console and a virtual session
Select a console-sharing server if the remote person must see the physical user's current desktop. Select a virtual-session server if a separate graphical desktop is appropriate. This decision determines the server component, display number, headless behavior, and whether a local user sees remote activity.
Install the current distribution package
Install the server and viewer packages recommended for the exact Linux release. Do not copy service files or commands from another distribution without checking paths, account ownership, and version-specific syntax.
Configure authentication and session startup
Set a strong VNC credential or use the implementation's supported system-authentication method. Configure the intended desktop session and review whether the server listens only on loopback or on the LAN. Never assume that a VNC password or transport has the same properties as Windows account authentication.
Identify the actual TCP port
Traditional VNC display mapping commonly uses TCP 5900 for display :0, 5901 for :1, and so on. Servers can override this mapping. Inspect the active listener and use that verified port as the Localtonet target.
Complete a local VNC test
Connect with a compatible VNC viewer from the host or another trusted LAN device, according to the server's bind setting. Confirm the expected desktop appears, authentication succeeds, and input control is appropriate. If the server is loopback-only, the Localtonet client should normally run on that same machine and target the loopback listener.
VNC authentication and transport protection vary substantially between implementations and configurations. A generic Localtonet TCP tunnel forwards the selected TCP service through our relay infrastructure, but no additional encryption property for generic TCP tunnels is asserted here. Verify the security mode of the VNC server and viewer you actually deploy.
Create and start the Localtonet TCP tunnel
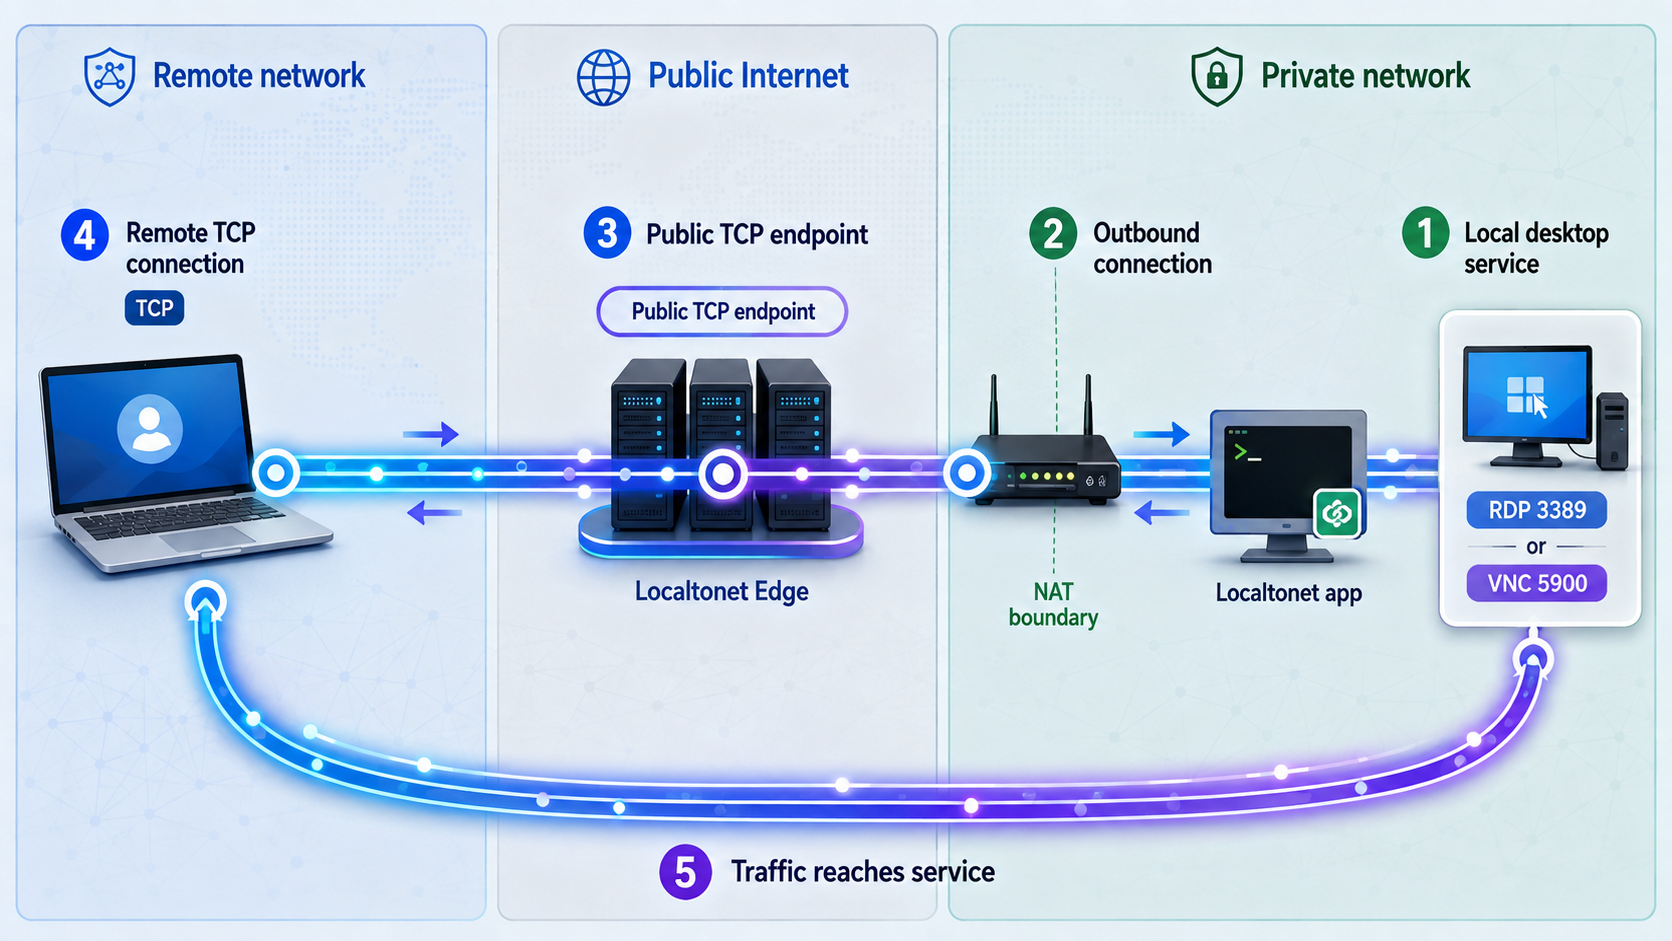
Once the desktop protocol works locally, configure Localtonet using the documented RDP sequence. Our client establishes an outbound connection to a Localtonet relay, so you do not need inbound router port forwarding or a public IP address. The relay's assigned public host and port become the address entered in the remote RDP or VNC client.
Install the Localtonet app
Install the current Localtonet client for the operating system on the device that can reach the verified RDP or VNC listener. This can be the desktop host itself or another machine on the same network with a reliable route to the host.
Select the device-specific AuthToken
Open the Localtonet app and select the AuthToken assigned to this client device. The token identifies the device that will run the tunnel. Keep it private and confirm that the corresponding device appears connected before proceeding.
Open the TCP-UDP configuration page
In the Localtonet dashboard, open the TCP-UDP tunnel page. This is the configuration area used for raw TCP services such as RDP and VNC.
Select TCP as the protocol type
Choose TCP. RDP and the VNC listeners discussed in this guide are TCP services. Do not select UDP or combined UDP/TCP unless separate current documentation for your specific application requires it.
Choose a currently available relay server
Select a server from the choices currently shown in your dashboard. Availability can vary, so do not copy a hardcoded server code or region from an old tutorial.
Enter the verified listening IP and port
Enter the local address that the selected Localtonet device can reach. Use the verified RDP port, commonly 3389, or the actual configured VNC port. Use 127.0.0.1 only when the Localtonet client and desktop server are on the same device and the service accepts loopback connections. Otherwise, enter the host's reachable private LAN address.
Create the tunnel
Create the configuration and review the new tunnel in the list. Creation stores the configuration, but it does not mean the tunnel is running or that its endpoint is ready.
Press Start and record the assigned endpoint
Press Start for the tunnel. Wait until the dashboard shows the relevant device and tunnel as connected, then copy the exact public host and port assigned by the dashboard. Use a neutral notation such as <assigned-host>:<assigned-port> in your private notes rather than substituting an invented endpoint.
The current Localtonet RDP documentation confirms this sequence: install the app, select the provided AuthToken, open the TCP-UDP page, select TCP, choose a server, enter the listening IP and port, create the tunnel, and activate it with the Start button.
Avoiding router port forwarding does not make the service private or remove internet exposure. Connections arrive at a public Localtonet relay host and port and are forwarded through our relay infrastructure to your local service. RDP or VNC authentication, patching, least privilege, lockout controls, and protocol-appropriate protection remain essential.
Verify the tunnel from an external network
A successful local test proves that the desktop server works. A connected dashboard status proves that the Localtonet client and tunnel are available. Neither test alone proves that the complete remote path works. Perform a controlled connection from a genuinely external network.
Confirm all three runtime layers
Verify that the RDP or VNC server is listening, the selected Localtonet device is connected, and the specific TCP tunnel is started. If any one of these layers is unavailable, the public endpoint will fail.
Move the client off the host LAN
Use mobile data, a different Wi-Fi network, or another authorized external connection. Testing from the same LAN can hide routing, firewall, or endpoint-entry mistakes.
Enter the dashboard-assigned host and port
In the RDP client or VNC viewer, enter the exact Localtonet public host and assigned public port. Do not enter the host's private address, the Localtonet AuthToken, or an example endpoint copied from a tutorial.
Authenticate through the desktop client
Use the client's normal credential prompt. Avoid command examples that place passwords directly on a command line because credentials can be exposed through shell history, process inspection, logs, or copied transcripts.
Validate session behavior
Confirm that you reached the intended computer and user session. Test keyboard input, pointer control, display scaling, reconnect behavior, and a clean sign-out or disconnect. If console visibility matters, check what appears on the physical monitor during the test.
Stop the tunnel and confirm revocation
Stop the tunnel in the dashboard and verify that a new connection to the public endpoint no longer succeeds. Start it again only if ongoing access is required. This confirms that you understand the tunnel lifecycle and have an effective cleanup action.
Secure remote desktop access as a public service
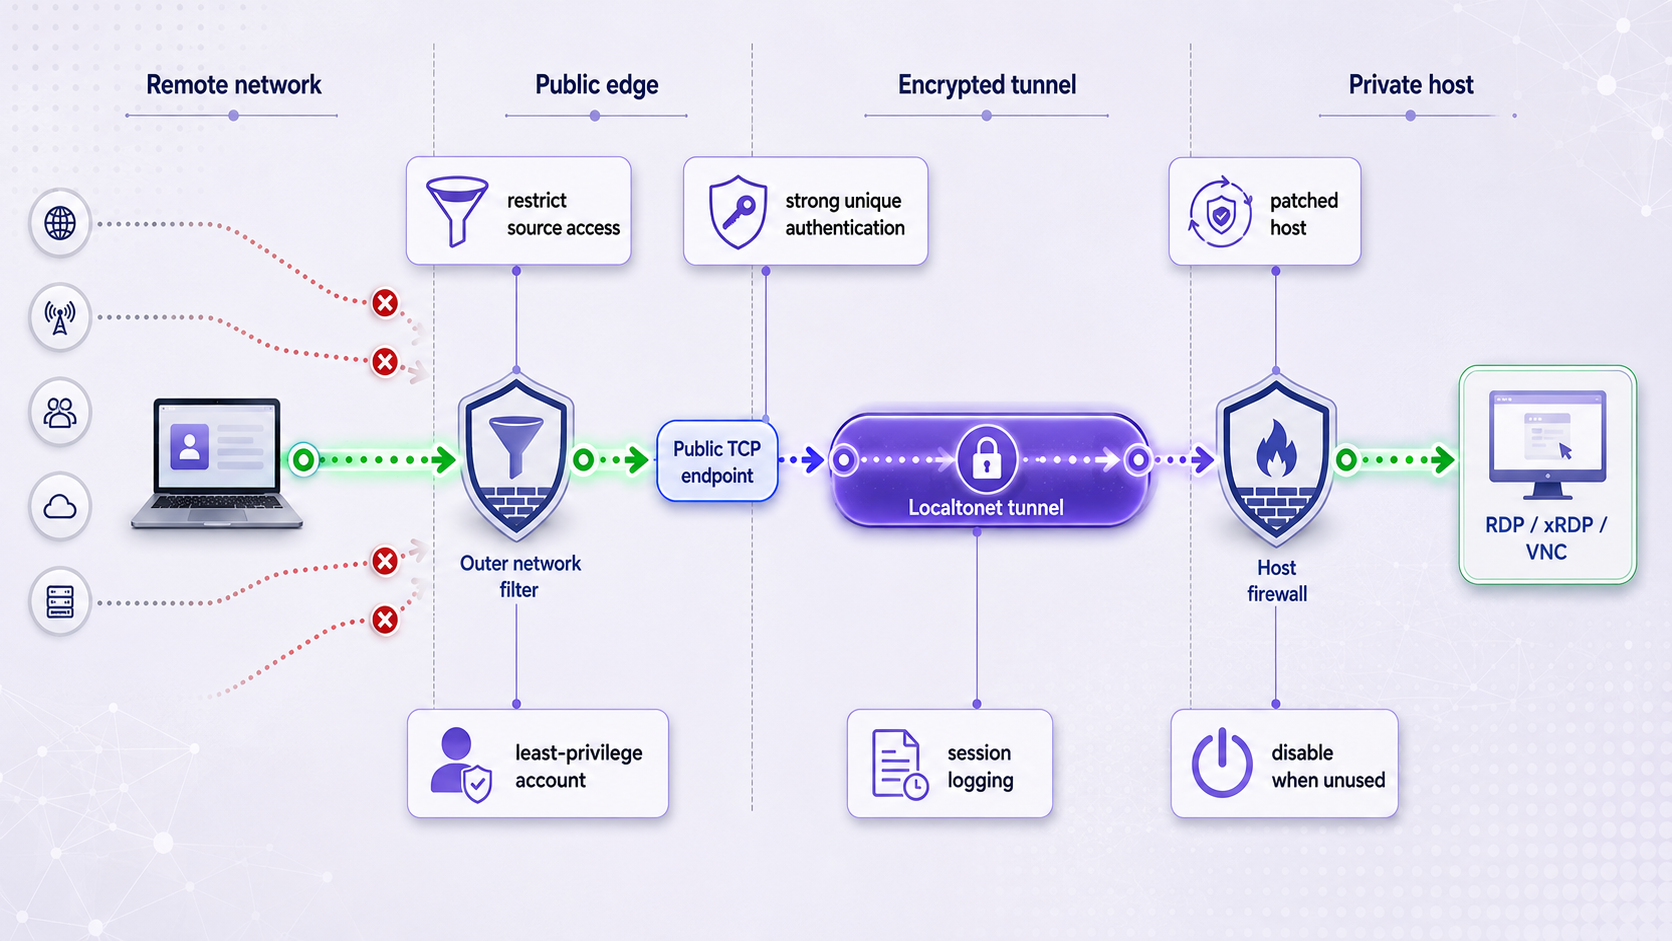
A TCP tunnel removes the need to expose a port on your own router, but it still publishes a relay endpoint that can receive internet traffic. Treat the forwarded desktop service as internet-reachable. A changing or unfamiliar public port is not an authentication control and should not be described as a meaningful security layer.
If your current dashboard, subscription, or deployment provides source restrictions or other access controls for the selected tunnel, apply them according to the current product documentation. Availability can vary, so this guide does not claim that every restriction is present in every plan or client version.
Review protocol-specific protection separately. RDP security depends on Windows policy, client compatibility, NLA, account controls, and negotiated protocol settings. VNC security differs among implementations, and some configurations are intended only for trusted or separately protected networks. Do not assume that every VNC product provides the same authentication or encryption behavior.
An AuthToken identifies a Localtonet client device. Do not publish it in screenshots, repositories, support messages, shell transcripts, or articles. If you use a service-management command containing the token, treat the command and resulting shell history as sensitive.
Routine operation, service mode, and cleanup
For a short support session, running the Localtonet client interactively can be appropriate because closing it intentionally ends device connectivity. For recurring unattended access, an operating-system service can start the Localtonet client after reboot and keep it running after logout. Service mode does not start a local RDP or VNC server, create a tunnel, or override the tunnel's Start and Stop state.
Install service mode only when unattended access is intended
Localtonet documents service-management flags for Windows, systemd-based Linux distributions, and macOS launchd. Administrator privileges are required on Windows, while Linux and macOS use elevated commands. Termux is not supported by these service commands.
On Windows, open Command Prompt or PowerShell as Administrator in the directory containing the Localtonet executable when necessary:
localtonet --install-service --authtoken <YOUR_TOKEN>
localtonet --start-service --authtoken <YOUR_TOKEN>
localtonet --status-service --authtoken <YOUR_TOKEN>
On a supported systemd-based Linux installation:
sudo localtonet --install-service --authtoken <YOUR_TOKEN>
sudo localtonet --start-service --authtoken <YOUR_TOKEN>
sudo localtonet --status-service --authtoken <YOUR_TOKEN>
Replace the placeholder only in your private elevated shell. The same documented service flags are available for stopping or removing the service:
sudo localtonet --stop-service --authtoken <YOUR_TOKEN>
sudo localtonet --remove-service --authtoken <YOUR_TOKEN>
On Windows, run the corresponding commands without sudo. For full platform-specific details, see our Localtonet automatic startup guide.
Installing and starting the operating-system service keeps the Localtonet client available. The selected device must still connect, the desktop protocol must still be listening, and the configured tunnel must still be running. Check the dashboard rather than assuming a running background process proves end-to-end access.
Perform a reboot test
- Confirm that RDP or VNC is configured to start in the intended way.
- Confirm that the Localtonet service reports a healthy state.
- Reboot the host or client device during a maintenance window.
- Wait for the machine and network connection to become available.
- Check that the device reconnects in the Localtonet dashboard.
- Check that the specific tunnel is running.
- Repeat the external RDP or VNC connection test.
On Windows, the installed service can also be inspected in services.msc. On systemd-based Linux, the documented unit can be checked with:
systemctl status localtonet
journalctl -u localtonet -f
Stop versus delete
Stop the tunnel when you want to make its endpoint unavailable temporarily while retaining the configuration. Delete it when the remote-access workflow is retired or the configuration is no longer needed. If you no longer want the Localtonet client to start with the operating system, stop and remove its service separately.
Cleanup should also include the local layer. Disable Remote Desktop or stop the VNC server if it is no longer required, remove unneeded remote-access accounts, and revoke permissions granted solely for the retired workflow.
Troubleshooting common RDP, VNC, and tunnel failures
The public endpoint times out or refuses the connection
- Confirm that the Localtonet client device is powered on and connected.
- Confirm that the correct device-specific AuthToken was selected.
- Confirm that the tunnel was started. Creating it is not enough.
- Verify that you copied the current dashboard-assigned host and port exactly.
- Check whether the RDP or VNC process is still listening on the configured local IP and port.
- Confirm that the selected Localtonet device can reach that local target.
- Check host firewall, endpoint-security software, and network policy.
The tunnel is connected, but the desktop protocol fails
Return to a local test. Connect directly to the private address and listening port from the trusted LAN. If that fails, repair the desktop service first. A connected tunnel cannot compensate for a stopped RDP service, a missing Linux desktop, an invalid VNC session, or a firewall rule blocking the target.
RDP reports invalid credentials
- Use the account format expected by the Windows or Linux host.
- Confirm that the account has permission to sign in remotely.
- Use the client's credential prompt instead of embedding a password in a command.
- Check whether the account is locked, disabled, expired, or required to change its password.
- Confirm that keyboard layout or input-method differences are not changing the password.
RDP reports an NLA or certificate-related error
Update the client and host first. Confirm that the account and client support the host's NLA policy. Do not disable NLA as the first troubleshooting action. Certificate prompts can occur when connecting through a host name that differs from the desktop host's identity, but you should inspect the warning and verify the intended endpoint rather than accepting every prompt automatically.
xRDP connects to a blank screen or immediately disconnects
- Confirm that a supported desktop environment is installed.
- Verify that the xorgxrdp backend and required dependencies are present for the distribution package.
- Inspect xRDP, session-manager, display-manager, and system logs.
- Check ownership and permissions for the user's home and session files.
- Review whether the selected desktop supports the active display-server arrangement.
- Test with a clean, authorized user account to separate profile issues from server issues.
VNC connects to the wrong desktop or port
Verify the display number and active listener. Display :0 commonly maps to TCP 5900 and :1 commonly maps to 5901, but custom ports and service-managed configurations can differ. Confirm whether the server shares the physical console or creates a virtual session. Point Localtonet to the actual socket, not to a port inferred from an outdated command.
Remote access worked until the host rebooted
- Check whether the RDP, xRDP, or VNC service started successfully.
- Check Localtonet service status and logs.
- Confirm that the device reconnected in the dashboard.
- Confirm that the tunnel is running after reconnect.
- Check whether the host's private address changed if Localtonet runs on another LAN device.
- Review sleep, hibernation, and network startup timing.
The session is slow or visually degraded
Measure both network paths and the host's upload capacity. Reduce display resolution, number of monitors, visual effects, or color depth using settings supported by the selected client. High-motion video and graphics-heavy applications are more demanding than administration, file management, or text work. Relay distance and general internet latency can also affect responsiveness. Select only from currently available Localtonet relay choices and test the practical result rather than relying on subjective protocol labels.
When another remote-access design is a better fit
RDP or VNC over a Localtonet TCP tunnel is useful when you already operate a standard desktop protocol and want a public host and port without router changes. It is not the only valid design.
| Approach | Best fit | Operational trade-off |
|---|---|---|
| RDP or VNC over Localtonet TCP | Access to one established desktop service | You manage the desktop server, credentials, tunnel lifecycle, and public relay endpoint. |
| Attended support application | One-time help where a user is present | The application manages connection approval and relay behavior. Product-specific account and service terms apply. |
| Private mesh VPN | Access to several devices or services as members of a private network | Every participating device needs appropriate VPN configuration and access policy. |
| On-site or local-only access | Systems that do not need remote administration | No public remote-access endpoint is maintained, which removes this exposure path. |
If the requirement is private network membership rather than publishing one TCP service, evaluate Localtonet VPN Manager. VPN Manager is our private mesh VPN feature with granular firewall rules. A standard TCP tunnel is not a VPN and should not be described as one.
Frequently asked questions
Does a Localtonet TCP tunnel make RDP or VNC private?
No. The tunnel avoids inbound router port forwarding, but it provides a publicly reachable Localtonet relay host and port. Traffic is forwarded through our relay infrastructure to the configured local service. Keep RDP or VNC authentication enabled, patch the host, use least privilege and lockout controls, and stop the tunnel when it is unnecessary.
Can Windows Home accept an incoming built-in RDP connection?
Windows Home generally includes RDP client capability but not the supported built-in Remote Desktop host. Confirm the exact edition against current Microsoft documentation. For an unsupported host edition, use a maintained VNC server or an attended-support application rather than an unofficial RDP-enabling modification.
Will the remote user see the same desktop as the person at the host?
Not necessarily. A console-sharing VNC server or attended-support tool commonly shows the visible desktop. Windows RDP and xRDP can create or resume a remote login session that is different from the physical console. Virtual-session VNC servers also create separate displays. Verify the behavior of the exact host implementation before using it for support or demonstrations.
Can I use Localtonet when my internet connection is behind CGNAT?
Yes. The Localtonet client establishes an outbound connection to our relay, so the workflow does not require a directly reachable public IP or inbound router port forwarding. The client device, local desktop service, network connection, and tunnel must remain available.
Which port should I enter for VNC?
Enter the port on which your VNC server is actually listening. Traditional display mapping commonly uses 5900 for display :0, 5901 for :1, and 5902 for :2, but implementations can override this. Inspect the listener and complete a local test before configuring the tunnel.
Does creating a Localtonet tunnel start it automatically?
No. Creating the tunnel stores its configuration. You must press Start and confirm that the tunnel is connected before using the assigned host and port. Starting the Localtonet operating-system service is also separate from starting an individual tunnel.
Can I run Localtonet without leaving a terminal open?
Yes. Localtonet supports service mode on Windows, systemd-based Linux systems, and macOS launchd. Service mode can start the client after reboot and continue after logout. It does not replace the need for a running RDP or VNC service, a connected device, and a started tunnel.
Can a headless Linux computer provide a graphical remote desktop?
It can when the chosen desktop environment and xRDP or VNC implementation support a virtual graphical session. This is not universal. Console-sharing servers may depend on an existing display, graphics configuration, or logged-in session. Verify headless support in the documentation for the exact distribution and server version.
Publish only the desktop service you have verified
Prepare RDP or VNC, prove it works locally, install the Localtonet client, select the correct device and current relay server, then create and start a TCP tunnel for the verified listener. Test the assigned endpoint from an external network and stop or delete it when remote access is no longer required.
Get Started with Localtonet →

