

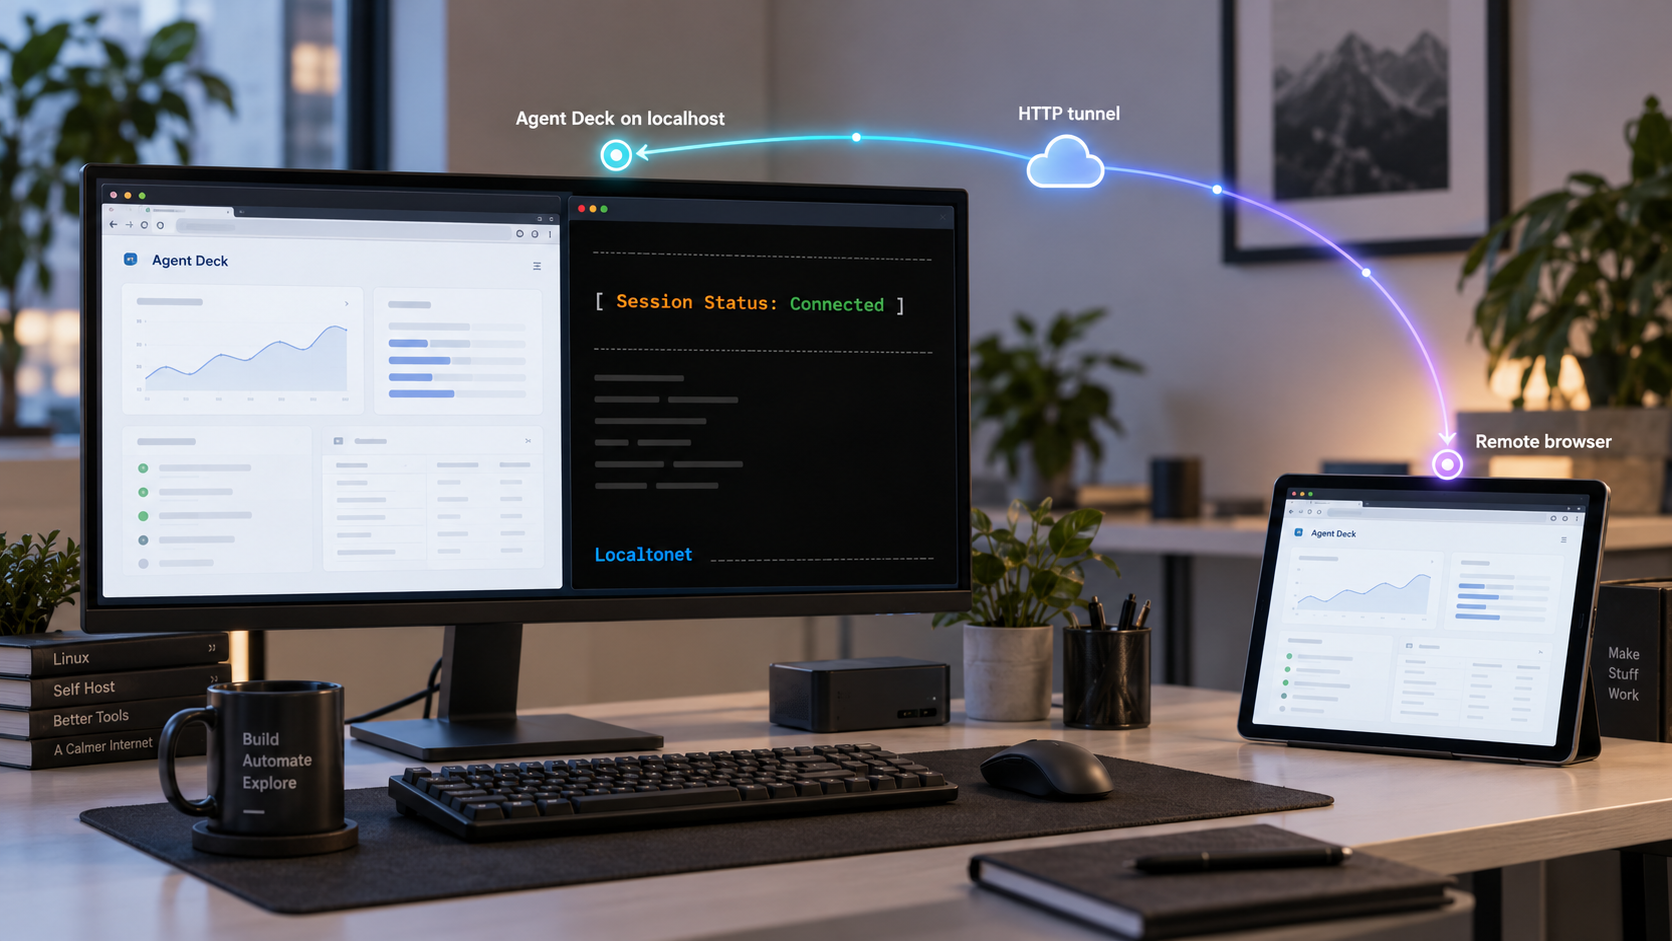
Run one dashboard for your local AI coding sessions, then make it reachable when you are away
Agent Deck is a terminal session manager for coordinating AI coding agents across multiple projects. Its documented web command starts a dashboard at http://127.0.0.1:8420, giving Linux users a local browser interface alongside the terminal UI. This guide covers the supported installation methods, local startup and verification, routine operations, troubleshooting, and the security questions that matter before remote access. After confirming that Agent Deck works locally, we connect that HTTP service through Localtonet as a separate step without requiring inbound router port forwarding, firewall changes, a VPN, or a public IP address.
📋 What's in this guide
How Agent Deck and Localtonet fit together
Agent Deck is designed as a command center for AI coding agent sessions. Instead of keeping unrelated terminal windows open for every project, you can use one interface to see sessions that are running, waiting, or finished and move between them. The project documents support for workflows involving tools such as Claude Code, Gemini, OpenCode, and Codex, while also providing session grouping, search, forking, Git worktree workflows, skills, MCP attachment, and cost tracking.
The primary Agent Deck interface is a terminal UI launched with agent-deck. The project also includes a web interface launched with agent-deck web. According to the documented quick start, that command listens at http://127.0.0.1:8420. The loopback address is important: it means the service is intended to be reached from the same machine unless another approved networking layer provides access.
That local-only starting point is useful for a careful deployment. We can first install Agent Deck, make sure its terminal interface works, start the web service, and test the dashboard directly on Linux. Only after those checks pass do we introduce remote connectivity. This separation makes troubleshooting much easier because a local application problem cannot be mistaken for a tunnel problem.
agent-deck web command starts the web UI at the documented local endpoint 127.0.0.1:8420.
Localtonet does not install, configure, or authenticate Agent Deck itself. Our role begins after the local HTTP service is working. The Localtonet client running on the Linux host connects the local target to a public HTTPS address assigned to the HTTP tunnel. The tunnel remains available only while the selected client device is connected and the tunnel is running.
The supplied Agent Deck documentation establishes the web command and local address, but it does not establish built-in web authentication, authorization, or TLS behavior. Treat the dashboard as sensitive. A public HTTPS address protects the browser-to-tunnel connection at the edge, but HTTPS is not a substitute for application authentication or authorization.
Linux prerequisites and deployment decisions
Agent Deck documents support for Linux, macOS, and Windows through WSL. This guide focuses on a Linux installation. Before running an installer, decide which Linux user will own and operate the Agent Deck sessions. Running it under a dedicated, non-root account where practical limits the files and commands available to the process.
The primary installation command requires curl, Bash, network access to GitHub, and permission to install the resulting binary in the location selected by the project installer. The extracted project documentation does not provide a complete Linux distribution package list or identify a universally required package-manager command. For that reason, this guide does not invent an apt, dnf, pacman, or zypper prerequisite sequence.
Check whether the two commands used by the primary installation path are available:
command -v curl
command -v bash
Each command should print an executable path. If either command is missing, install it through the supported package-management process for your Linux distribution before continuing.
Prepare the AI tools you plan to manage
Agent Deck manages sessions for AI coding tools, but installing Agent Deck should not be treated as proof that every supported agent is installed, authenticated, or ready to use. Install and configure the coding agent or agents required for your own workflow according to their current documentation. Keep their credentials out of shell history, shared project files, screenshots, tunnel configuration, and public troubleshooting output.
Choose where Localtonet will run
Because Agent Deck listens on 127.0.0.1, the simplest supported topology is to run the Localtonet client on the same Linux machine. A process on another computer normally cannot reach a service bound only to the first computer's loopback interface.
We do not recommend changing Agent Deck's listening address based on guesswork. The evidence supplied for this guide confirms the default endpoint but does not establish a documented bind-address flag. Running our client on the same host avoids depending on an undocumented Agent Deck option and avoids opening a LAN-facing port.
| Requirement or decision | Why it matters | How to confirm it |
|---|---|---|
| Supported environment | This guide targets native Linux. Agent Deck also documents macOS and Windows through WSL. | Confirm that commands are being run inside the intended Linux environment. |
curl and Bash |
The primary installer is fetched with curl and executed by Bash. |
Run command -v curl and command -v bash. |
| AI coding agent tools | Agent Deck organizes agent sessions but does not replace each agent's own installation and authentication. | Run the relevant agent directly before expecting Agent Deck to manage it. |
| Local browser access | The first web verification should be performed against the loopback endpoint. | Be able to open http://127.0.0.1:8420 from the Linux host. |
| Localtonet client placement | A same-host client can reach the loopback-only Agent Deck target. | Plan to install and run our client on the Agent Deck host. |
Install Agent Deck on Linux
Agent Deck provides four documented installation paths: its installation script, Homebrew, Go, and installation from source. Use one path rather than combining them. Multiple installations can place different copies of the same executable in separate directories, making upgrades and troubleshooting confusing.
Option 1: Use the primary installation script
The project README presents the following command as its main installation method:
curl -fsSL https://raw.githubusercontent.com/asheshgoplani/agent-deck/main/install.sh | bashRun it as the Linux account that will use Agent Deck. When it completes, open a new shell if necessary and check that the executable can be found:
command -v agent-deckThe command should print the path selected by the installer. The supplied evidence does not establish one universal installation path for every Linux environment, so this guide does not claim that the binary will always appear in a particular directory.
The documented one-line installer downloads a script from the project's main branch and pipes it directly to Bash. That is convenient, but it also executes the retrieved content immediately. Review the current install.sh in the Agent Deck repository and confirm the repository URL before using the command, especially on a machine that holds source code, agent credentials, or production access.
Option 2: Install with Homebrew
If Homebrew is already part of your Linux package workflow, Agent Deck documents this command:
brew install asheshgoplani/tap/agent-deckThis option requires a working Homebrew installation. The Agent Deck command does not install Homebrew for you. After installation, verify the selected executable with:
command -v agent-deckOption 3: Install with Go
Developers with an existing Go toolchain can install the latest published command using:
go install github.com/asheshgoplani/agent-deck/cmd/agent-deck@latest
Go normally places installed commands in its configured binary directory. That directory must be included in your shell's PATH before agent-deck can be run by name. Because Go environments can customize this location, inspect your own Go configuration rather than assuming a fixed filesystem path.
For reproducible deployments, the release evidence also documents installing a specific version by replacing @latest with a release version, for example:
go install github.com/asheshgoplani/agent-deck/cmd/agent-deck@v1.16.26
A pinned version can make repeatable testing easier, while @latest follows the newest version available when the command is executed. Check current Agent Deck release information before choosing a production version.
Option 4: Install from source
The documented source installation sequence is:
git clone https://github.com/asheshgoplani/agent-deck.git
cd agent-deck
make install
This path requires Git, make, and whatever build toolchain the current source tree expects. The supplied excerpt does not enumerate every build dependency or supported compiler version, so confirm those requirements in the checked-out repository before using source installation in an automated build.
| Installation method | Best fit | Important consideration |
|---|---|---|
| Install script | A direct setup using the project's primary documented command | Review the remote script before piping it to Bash. |
| Homebrew | Linux systems already managed with Homebrew | Homebrew must already be installed and working. |
| Go install | Go developers who want a latest or pinned version | The Go binary directory must be in PATH. |
| Source build | Contributors or users who need a repository checkout | Build prerequisites are not fully established by the supplied evidence. |
Configure the initial Agent Deck workflow
Agent Deck does not require a separate web-server configuration file for the documented quick-start path. Start with the terminal interface so that you can confirm the binary launches and begin organizing sessions before adding remote access.
Launch the terminal interface
Run agent-deck in a terminal. A successful launch confirms that the executable is available and can initialize its terminal UI in the current environment.
Add a project when needed
From a project directory, the documented quick-start example agent-deck add . -c claude adds the current directory using Claude. Use this exact example only when Claude is the intended tool and is already installed and authenticated.
Create or inspect sessions in the TUI
Use the terminal interface to confirm that your project and intended agent workflow behave correctly. Resolve agent authentication, project permissions, and working-directory issues before starting the web dashboard.
The project documents a large set of terminal shortcuts. Relevant examples include n for a new session, Enter to attach to a session, Ctrl+Q to detach, r to rename, R to restart, d to delete, and ? for full help. Review the help displayed by your installed version because interaction behavior can change between releases.
The project notes that newer versions use Enter to advance through fields in the new-session dialog. Session creation occurs from the trailing Create session button or with Ctrl+S. If a video or older tutorial suggests that Enter immediately creates a session from any row, rely on the behavior and help shown by your installed version.
Start and verify the Agent Deck web UI locally
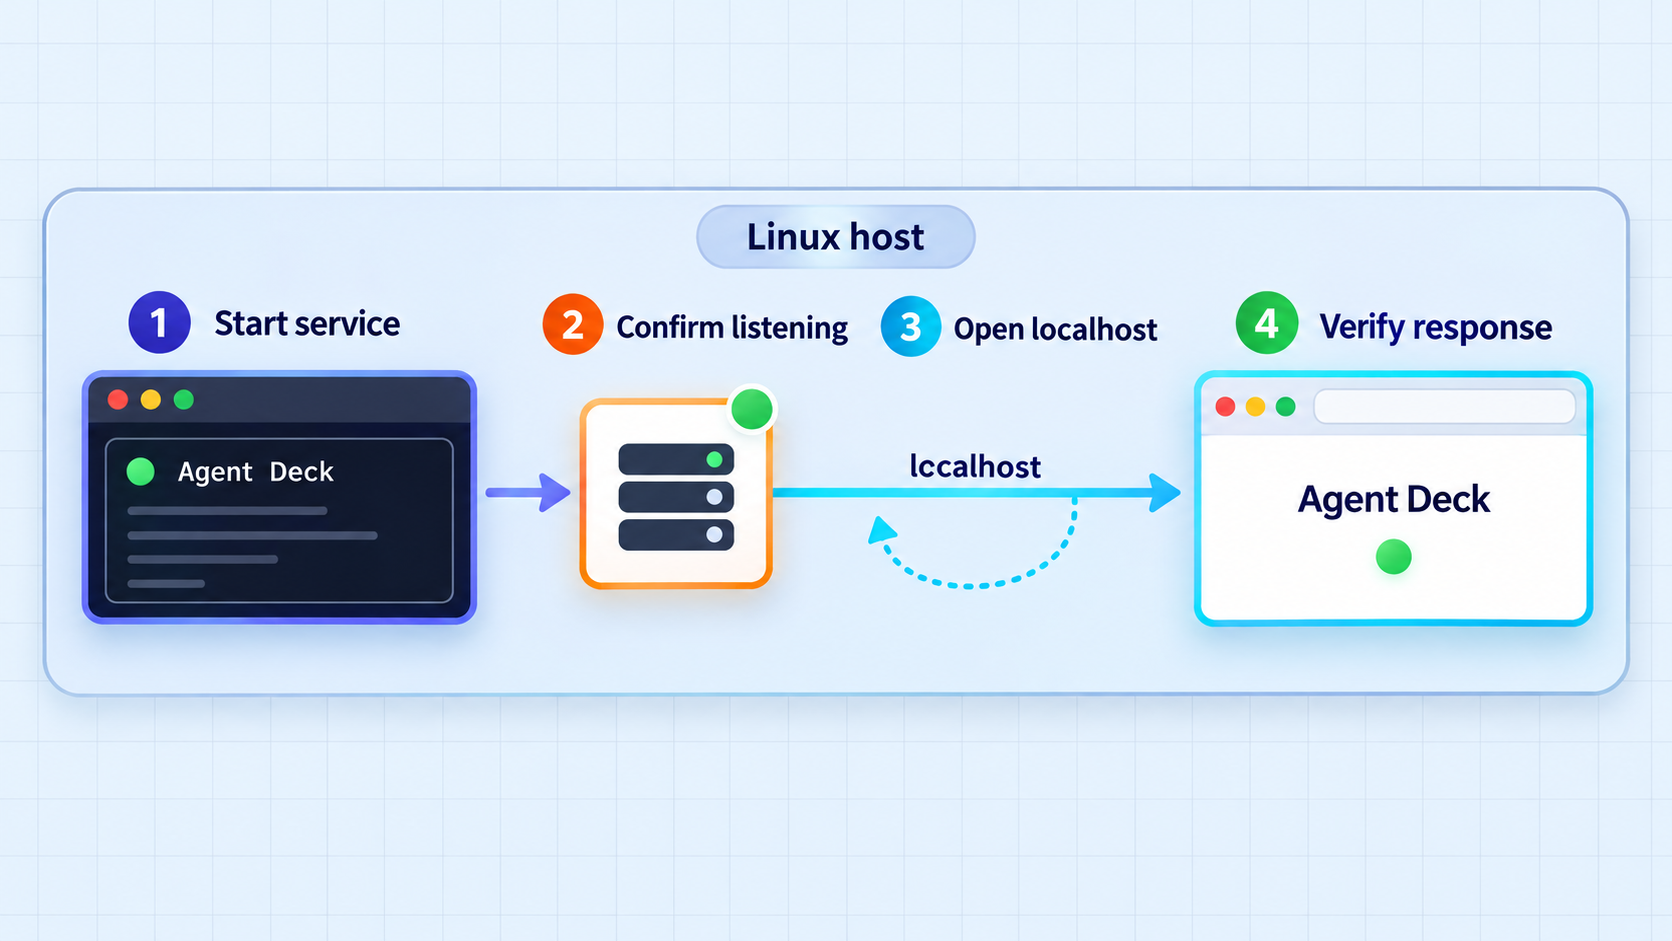
Do not configure public access until local verification is complete. Start the dashboard from the same Linux account and environment used for the working Agent Deck installation:
agent-deck webThe documented endpoint is:
http://127.0.0.1:8420Keep the terminal that launched the web process open while testing. From a browser running on the same Linux machine, open that address. If the Linux machine is headless, you can perform a basic HTTP retrieval from another terminal on the same host:
curl http://127.0.0.1:8420A successful response establishes that a process is accepting HTTP connections at the documented local target. Browser verification remains important because it confirms that the dashboard's page assets and interactive interface load rather than proving only that the TCP port is open.
What a complete local verification should establish
- The
agent-deckexecutable can be found from the intended user's shell. - The terminal UI launches without an immediate fatal error.
- The coding agent needed for the workflow works with the intended project.
agent-deck webremains running.http://127.0.0.1:8420loads from the same Linux host.- The web interface displays the expected sessions or application state.
If the local URL fails, stop at this layer. A Localtonet tunnel cannot repair a web service that is not running or not responding on its local address. Read the terminal output from agent-deck web, check whether another process already occupies port 8420, and make sure the request is being made on the same machine.
The documented command establishes the default endpoint, but the supplied evidence does not document a supported custom-port flag, bind-address flag, daemon mode, service file, or background startup mechanism. We therefore do not invent those options. Use the command and endpoint documented by the Agent Deck version you installed.
Routine Agent Deck operations
Run commands against named sessions
Once sessions exist, Agent Deck documents commands for session operations. For example, a supported session can be forked with:
agent-deck session fork my-projA multiline task stored in a file can be sent to a session with:
agent-deck session send my-proj --message-file task.md
Replace my-proj and task.md with resources that actually exist in your environment. Review task files before sending them because they may instruct an agent to modify source code, invoke tools, or access project data.
To remove a stopped or errored session from the registry while preserving its transcripts, the project documents:
agent-deck session remove my-projUse shell completion
Agent Deck can print completion scripts for Bash, Zsh, and Fish. For Bash, the documented setup is:
echo 'source <(agent-deck completion bash)' >> ~/.bashrcFor Zsh:
echo 'source <(agent-deck completion zsh)' >> ~/.zshrcFor Fish:
agent-deck completion fish > ~/.config/fish/completions/agent-deck.fishOpen a new shell or reload the relevant shell configuration afterward. Before appending any command to a shell startup file, inspect the file and avoid creating duplicate completion lines.
Stop the local web dashboard
If agent-deck web is running in the foreground, return to its terminal and stop the process using the normal terminal interrupt. Once the local process stops, requests to 127.0.0.1:8420 should fail. A Localtonet tunnel left running at that point has no working local application to forward to, so stop the tunnel as well when remote access is no longer needed.
Uninstall Agent Deck
Agent Deck provides an interactive uninstall command:
agent-deck uninstallTo remove the binary while retaining session data, the documented command is:
agent-deck uninstall --keep-dataRead the interactive prompts carefully before confirming removal. If Agent Deck was installed through Homebrew or a manually maintained source workflow, keep the installation method in mind when auditing any remaining package or source files.
Connect the working dashboard through Localtonet
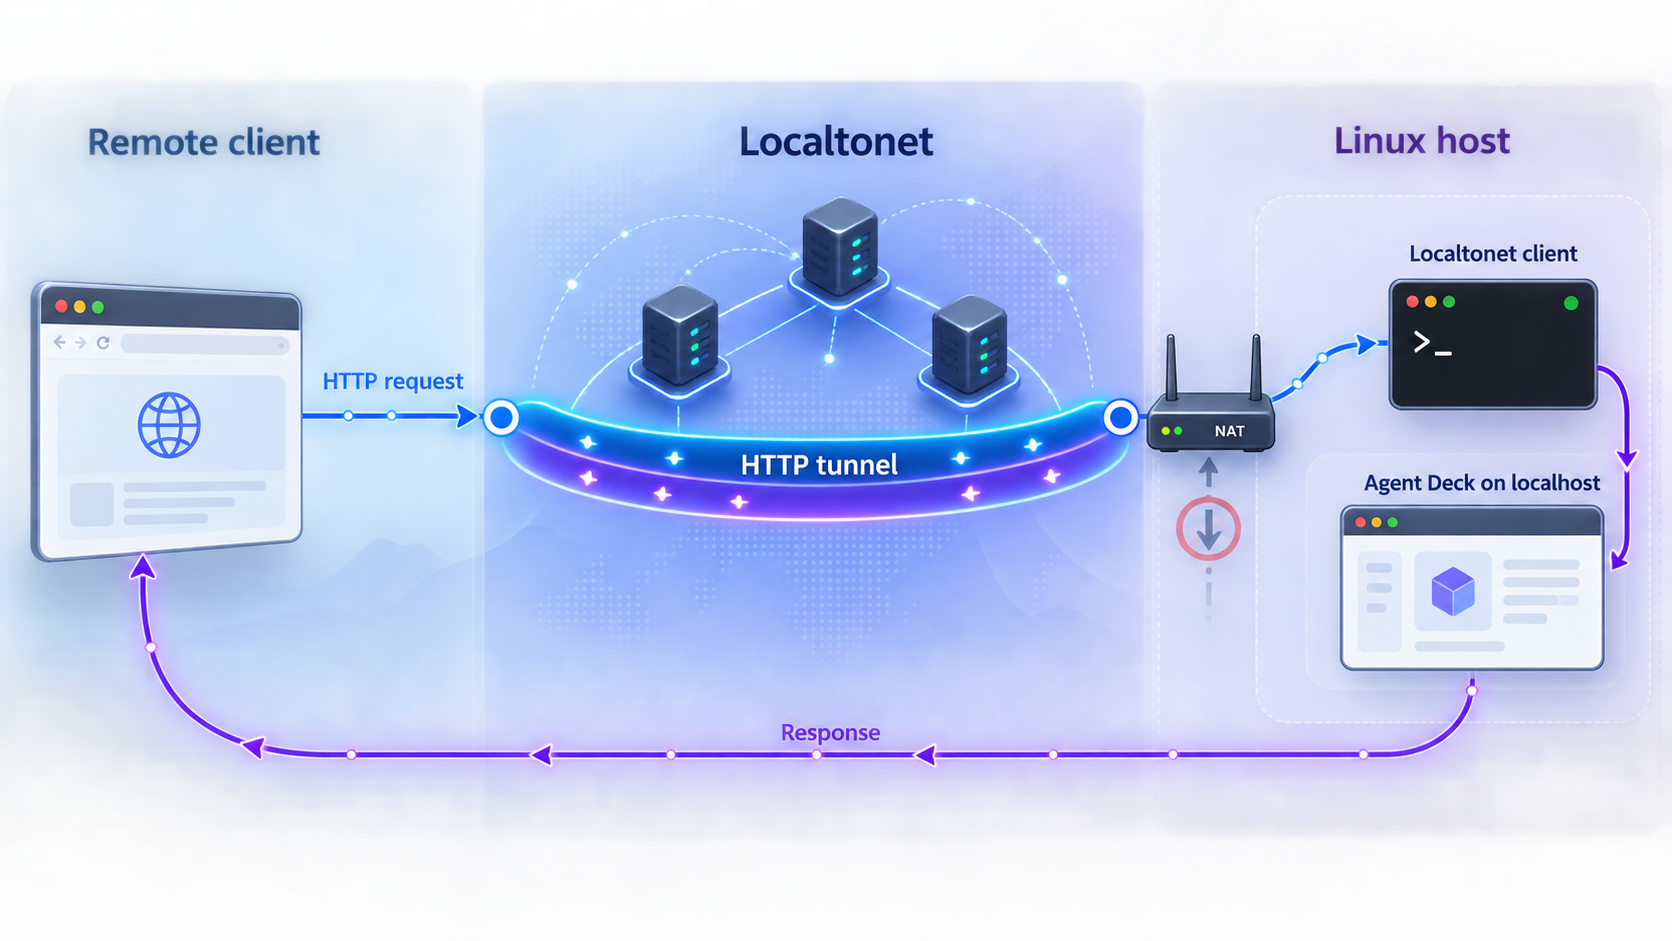
Begin this section only after http://127.0.0.1:8420 works locally. An HTTP tunnel is the appropriate Localtonet family because Agent Deck provides a local HTTP web service. This is standard HTTP tunneling, not VPN functionality.
Our client establishes an outbound connection to a Localtonet relay server. The public side receives a URL, while the local side targets Agent Deck at 127.0.0.1 on port 8420. No inbound router port forwarding, public IP address, firewall change, or VPN setup is required for this workflow.
Install and run our client on the Agent Deck host
Run the Localtonet client on the Linux machine where agent-deck web is listening. Same-host placement allows the client to reach the loopback target at 127.0.0.1:8420.
Authenticate and select the correct device
Use the device-specific auth token associated with this client and select the connected device in the dashboard. Never publish, share, or place that token in commands, screenshots, repositories, or documentation.
Select an available relay server
Choose a server or region currently available in the Localtonet dashboard. Availability can vary, so obtain the valid server value from the current product rather than copying a hardcoded code from an older guide.
Create the HTTP tunnel configuration
Choose an HTTP tunnel and set the local target to IP address 127.0.0.1 and port 8420. HTTP tunnels can use a random subdomain, a custom subdomain where supported, or a custom domain. Check the current dashboard and documentation before relying on a specific domain or DNS workflow.
Start the tunnel and test its assigned URL
Creating a tunnel does not start it. Press Start, wait for the selected client and tunnel to be connected, then open the assigned public HTTPS address from the intended remote device.
Stop or delete access when it is no longer required
Stop the tunnel to end public availability while preserving the configuration, or delete it when the configuration is no longer needed. The public endpoint works only while the selected client is connected and the tunnel is running.
Saving the HTTP configuration does not make Agent Deck remotely reachable. The Agent Deck web process must be running, the selected Localtonet client must be connected, and the tunnel must be started. If any one of those conditions is missing, the public URL will not deliver the dashboard.
Verify the public path in layers
Test the result from a device that is not relying on the Linux host's loopback interface. Confirm that the assigned HTTPS URL opens and that the displayed sessions match the local dashboard. If the public URL fails, immediately retest http://127.0.0.1:8420 on the Linux machine. This separates an Agent Deck process failure from a Localtonet client, target, or tunnel-state problem.
The final request path is:
Remote browser
  -> Localtonet public HTTPS address
  -> connected Localtonet client on the Linux host
  -> http://127.0.0.1:8420
  -> Agent Deck web UI
Security guidance for an AI agent dashboard
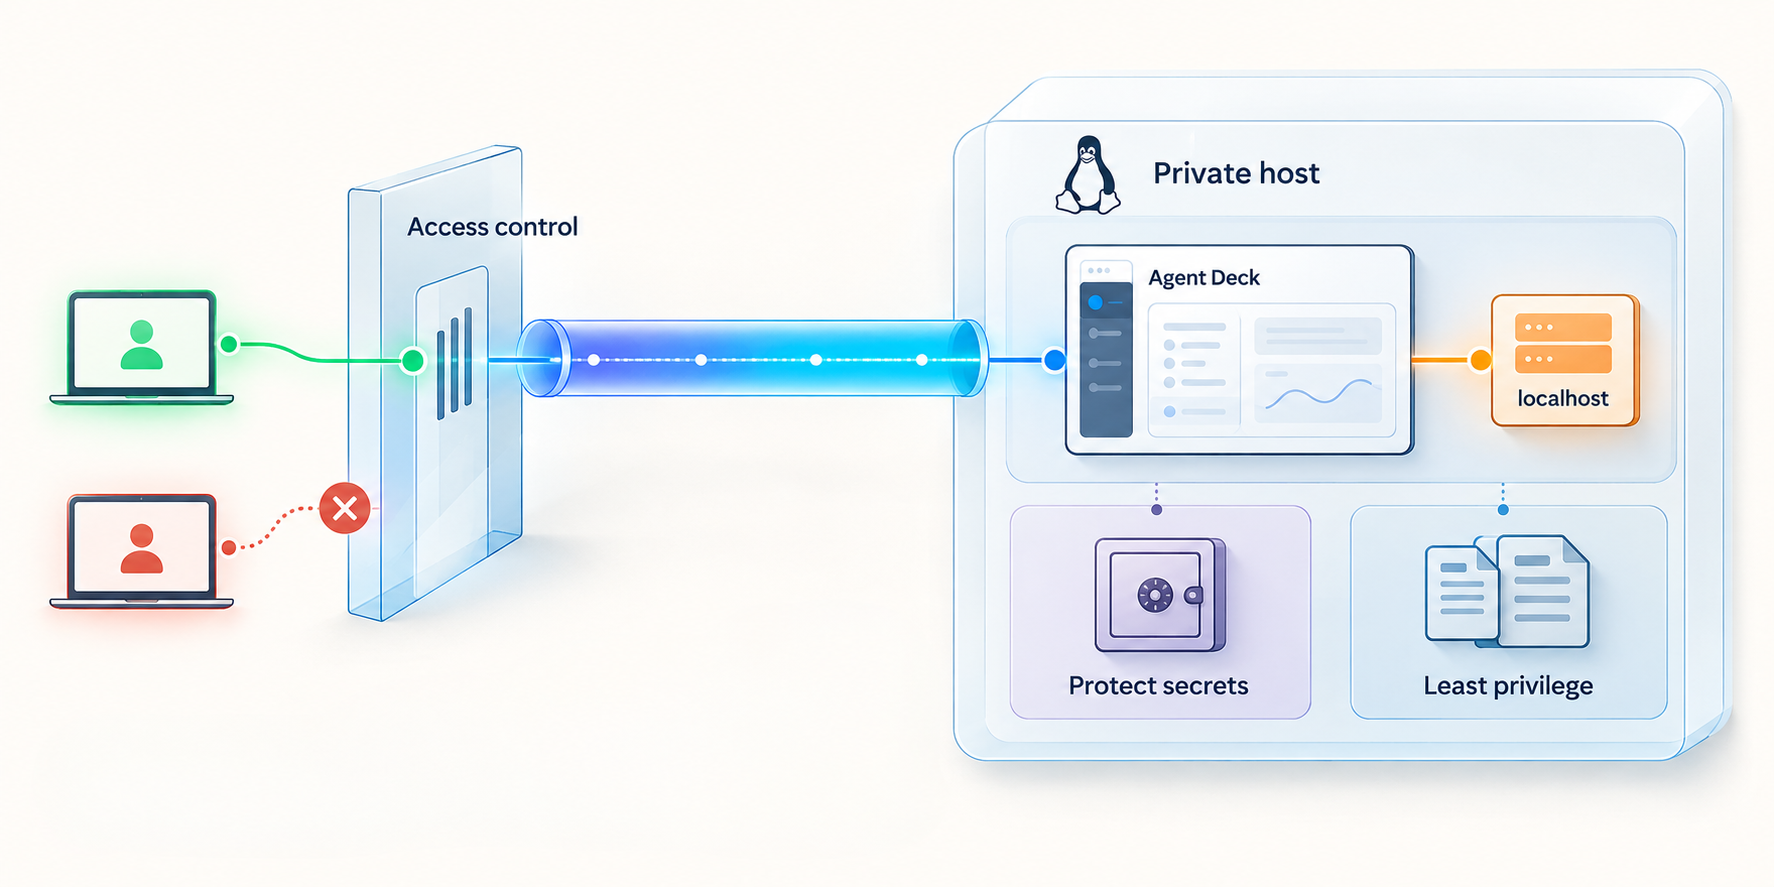
An AI session dashboard may reveal project names, working directories, prompts, outputs, repository context, session state, tool activity, and operational controls. Depending on the agents and projects involved, access may also lead indirectly to source-code changes or command execution. Treat the dashboard as an administrative interface rather than a harmless status page.
Do not confuse HTTPS with user authentication
Localtonet HTTP and File Server tunnels provide public HTTPS addresses, but transport security and identity checks solve different problems. HTTPS protects traffic in transit to the tunnel edge. Authentication determines who may use the application, while authorization determines what an authenticated user may do.
The Agent Deck evidence available for this article does not establish built-in web authentication or role-based authorization. It also does not establish a Localtonet HTTP authentication option that can safely be promised for this exact workflow. Do not expose the dashboard on the assumption that an undocumented login prompt will protect it.
If your organization requires authentication, identity-aware access, network allowlists, or another control in front of administrative tools, implement and verify that control before sharing the public URL. Use least privilege, restrict the Linux account running Agent Deck, avoid exposing production credentials through sessions, and stop the tunnel when remote access is not actively required.
Protect Localtonet device tokens
A Localtonet device auth token identifies the client device that runs the tunnel. It is not an example value to paste into an article, ticket, public command, or repository. Obtain the correct token through the dashboard and keep it out of logs and screen recordings. If you believe a token was disclosed, treat it as sensitive and follow the current account process for replacing it.
Limit the Linux account's reach
Run Agent Deck and the managed coding agents with only the filesystem, repository, and tool permissions they need. Avoid operating the dashboard as root simply to work around a path or package problem. Review project directories for secrets, environment files, cloud credentials, signing keys, and production configuration before allowing remote interaction with sessions.
Control the tunnel lifecycle
A short-lived tunnel reduces the time during which a sensitive interface is reachable. Start it for the remote task, verify that it points to the expected local service, and stop it afterward. Deleting an obsolete tunnel also reduces configuration ambiguity when several devices or environments exist in the same dashboard.
Troubleshooting Agent Deck and the tunnel
agent-deck is not found after installation
Open a new shell and run:
command -v agent-deck
If there is no output, the executable is not in the current PATH. Review the output from the installation method you used. For a Go installation, confirm that the configured Go binary directory is included in PATH. Avoid installing another copy until you understand where the first method placed its executable.
The terminal UI works, but an agent session does not
Test the selected coding agent directly from the same Linux account and project directory. Confirm that the agent is installed, authenticated, and permitted to access the project. This isolates an agent-specific failure from the Agent Deck interface. Do not place API keys or login tokens into issue reports or public diagnostic output.
agent-deck web exits immediately
Read the terminal output produced by the command. Make sure it is being run as the same user whose Agent Deck environment already works. Check whether port 8420 is already occupied by another process. The available evidence does not establish an official alternative-port option, so do not guess at flags. Consult the help and documentation matching the installed release if the default port cannot be used.
The browser cannot open 127.0.0.1:8420
Confirm that agent-deck web is still running and that the browser test occurs on the same Linux host. The address 127.0.0.1 always refers to the loopback interface of the device making the request. Entering it on a phone or another laptop points to that device, not to the Agent Deck server.
From another terminal on the Agent Deck host, try:
curl http://127.0.0.1:8420If this local request fails, resolve the Agent Deck service first. Do not spend time changing tunnel settings while the local target is unavailable.
The local dashboard works, but the public URL does not
Check the tunnel chain in order:
- Confirm that
agent-deck webstill responds locally. - Confirm that the Localtonet client is running on the same Linux host.
- Confirm that the selected dashboard device matches that client.
- Confirm that the HTTP target is
127.0.0.1with port8420. - Confirm that the selected relay server is currently valid.
- Confirm that the tunnel was started rather than only created.
- Retest the currently assigned public URL.
The public page opens but shows unexpected content
Recheck the target port and confirm what responds locally at 127.0.0.1:8420. An incorrect target can expose a different local service. Stop the tunnel while investigating any mismatch, then restart it only after the local response is confirmed to be Agent Deck.
The public URL stopped working after a reboot or terminal closure
Verify both processes independently. Agent Deck's web process may no longer be running, the Localtonet client may be disconnected, or the tunnel may be stopped. The supplied Agent Deck evidence does not document a Linux service unit or automatic startup procedure, so this guide does not provide an invented background-service configuration. If persistent startup is required, use only lifecycle instructions supported by the current Agent Deck and Localtonet versions and review them under your organization's service-management policy.
A remote browser is showing an authentication warning or no login page
Stop and review the security design. The supplied evidence does not promise an Agent Deck web login. Do not assume that an unfamiliar prompt or URL secrecy is sufficient protection. Confirm any access-control layer independently before using the dashboard with sensitive repositories or credentials.
Frequently asked questions
What address does the Agent Deck web dashboard use?
The documented agent-deck web command starts the dashboard at http://127.0.0.1:8420. Because this is a loopback address, test it from the same Linux host and run the Localtonet client on that host for the straightforward tunneling configuration described here.
Which Agent Deck installation method should I use on Linux?
The project presents its curl and Bash installation script as the primary method. Homebrew is appropriate if you already manage Linux packages with Homebrew. Go installation suits an existing Go environment and can use either @latest or a pinned release. Source installation is most suitable when you need a repository checkout and have confirmed the current build prerequisites.
Does Localtonet require router port forwarding for Agent Deck?
No. Our client establishes an outbound connection to a Localtonet relay server. This workflow does not require inbound router port forwarding, firewall changes, a VPN setup, or a public IP address.
Is the Agent Deck web dashboard authenticated by default?
The supplied official evidence documents the web command and local URL but does not establish built-in web authentication or authorization. Do not assume that a login layer exists. Treat the interface as sensitive and expose it only after applying and verifying the access controls required by your environment.
Does the Localtonet HTTPS URL make an unauthenticated dashboard private?
No. HTTPS protects traffic in transit, but it does not by itself identify users or authorize their actions. If the application lacks authentication, an HTTPS address alone does not create application-level access control.
Must the Localtonet client run on the same machine as Agent Deck?
For the documented Agent Deck endpoint at 127.0.0.1:8420, running our client on the same machine is the clearest configuration. Another device cannot normally reach that loopback address. This guide does not recommend changing the bind address because the supplied evidence does not establish an official Agent Deck option for doing so.
Why does the public URL fail when the tunnel appears configured?
Creating a tunnel does not start it. Agent Deck must be running locally, the selected Localtonet client must be connected, and the tunnel must be started. Verify the local URL first, then check the client, target, relay selection, tunnel state, and assigned public URL.
Can I run Agent Deck and its web dashboard automatically after a reboot?
The evidence supplied for this guide does not document an official Agent Deck systemd unit, daemon flag, or automatic-start procedure. We therefore do not provide a guessed service definition. Check the documentation matching your installed release before implementing persistence, and review any service account, environment, credential, and filesystem permissions carefully.
Connect your verified Agent Deck dashboard with Localtonet
Once agent-deck web is working locally at 127.0.0.1:8420 and your access controls are ready, create an HTTP tunnel from the same Linux host and manage its lifecycle from our dashboard.


