

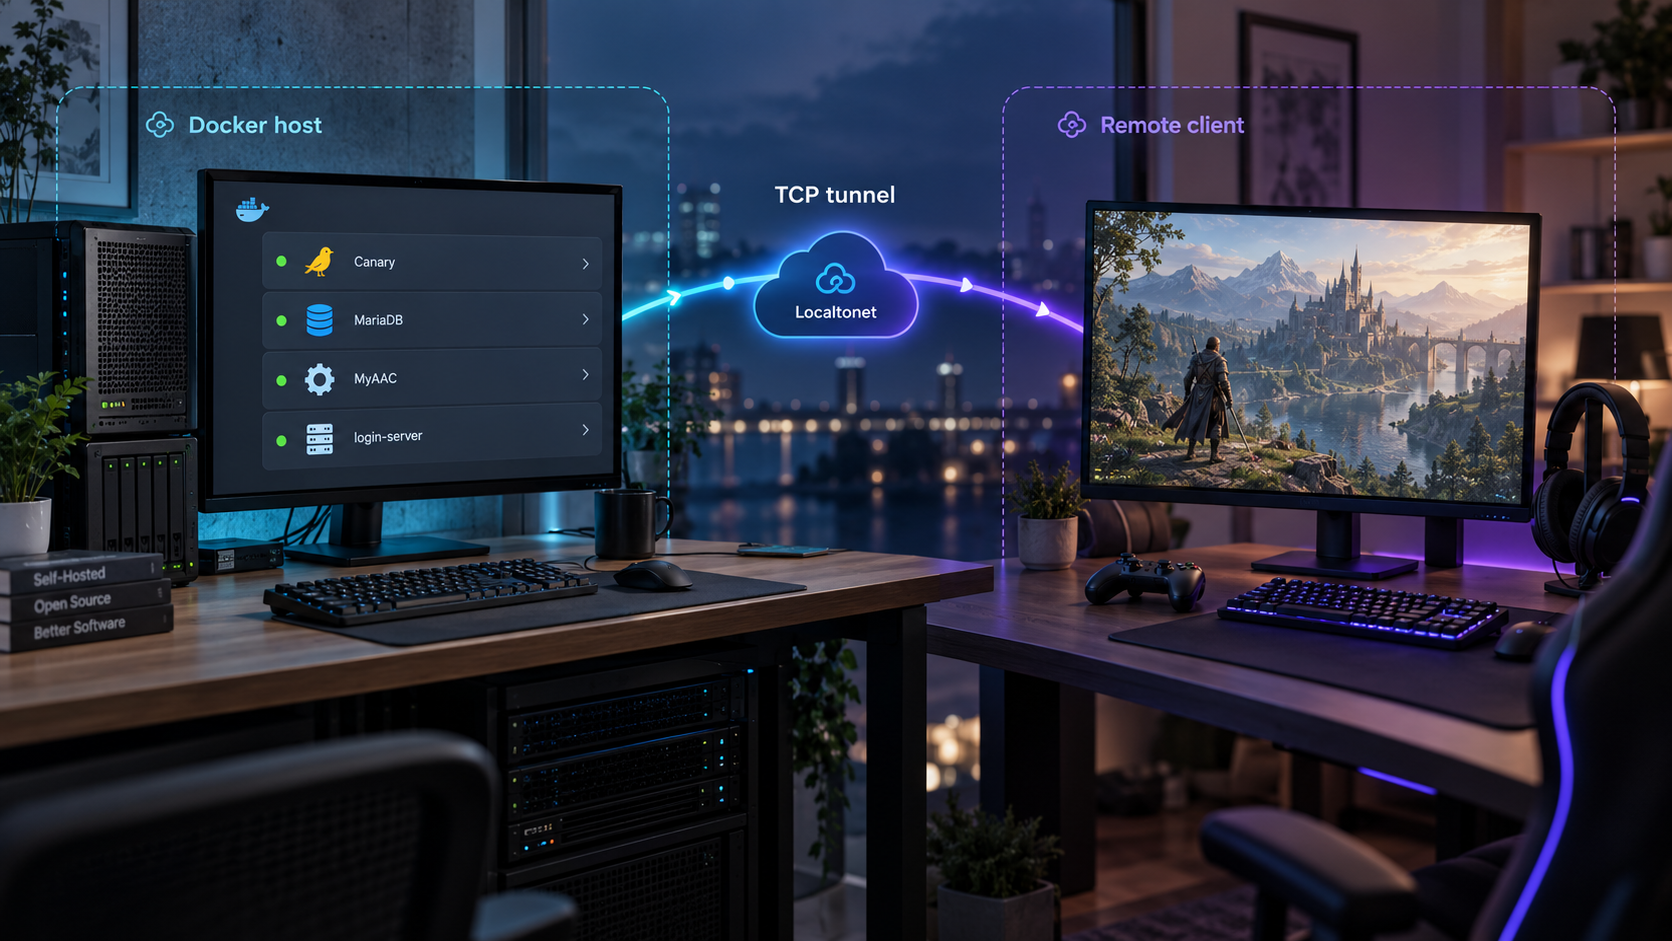
Build and verify the complete OpenTibia stack locally, then publish only the endpoints your players require
Canary is a free, open-source MMORPG server emulator for the OpenTibia community. Its official Docker quickstart starts the Canary runtime, MariaDB, MyAAC, and a dedicated login-server without requiring you to compile Canary locally. This guide explains the current quickstart, verifies every container and endpoint, and then maps the separate login and game connections through Localtonet. It also addresses the most important remote-access constraint: the standard Compose configuration uses CANARY_GAME_PORT both in the world information sent to the client and as the Docker host port, so the public and local game ports cannot be treated as independently adjustable without a verified override.
📋 What's in this guide
Understand the Canary Docker architecture
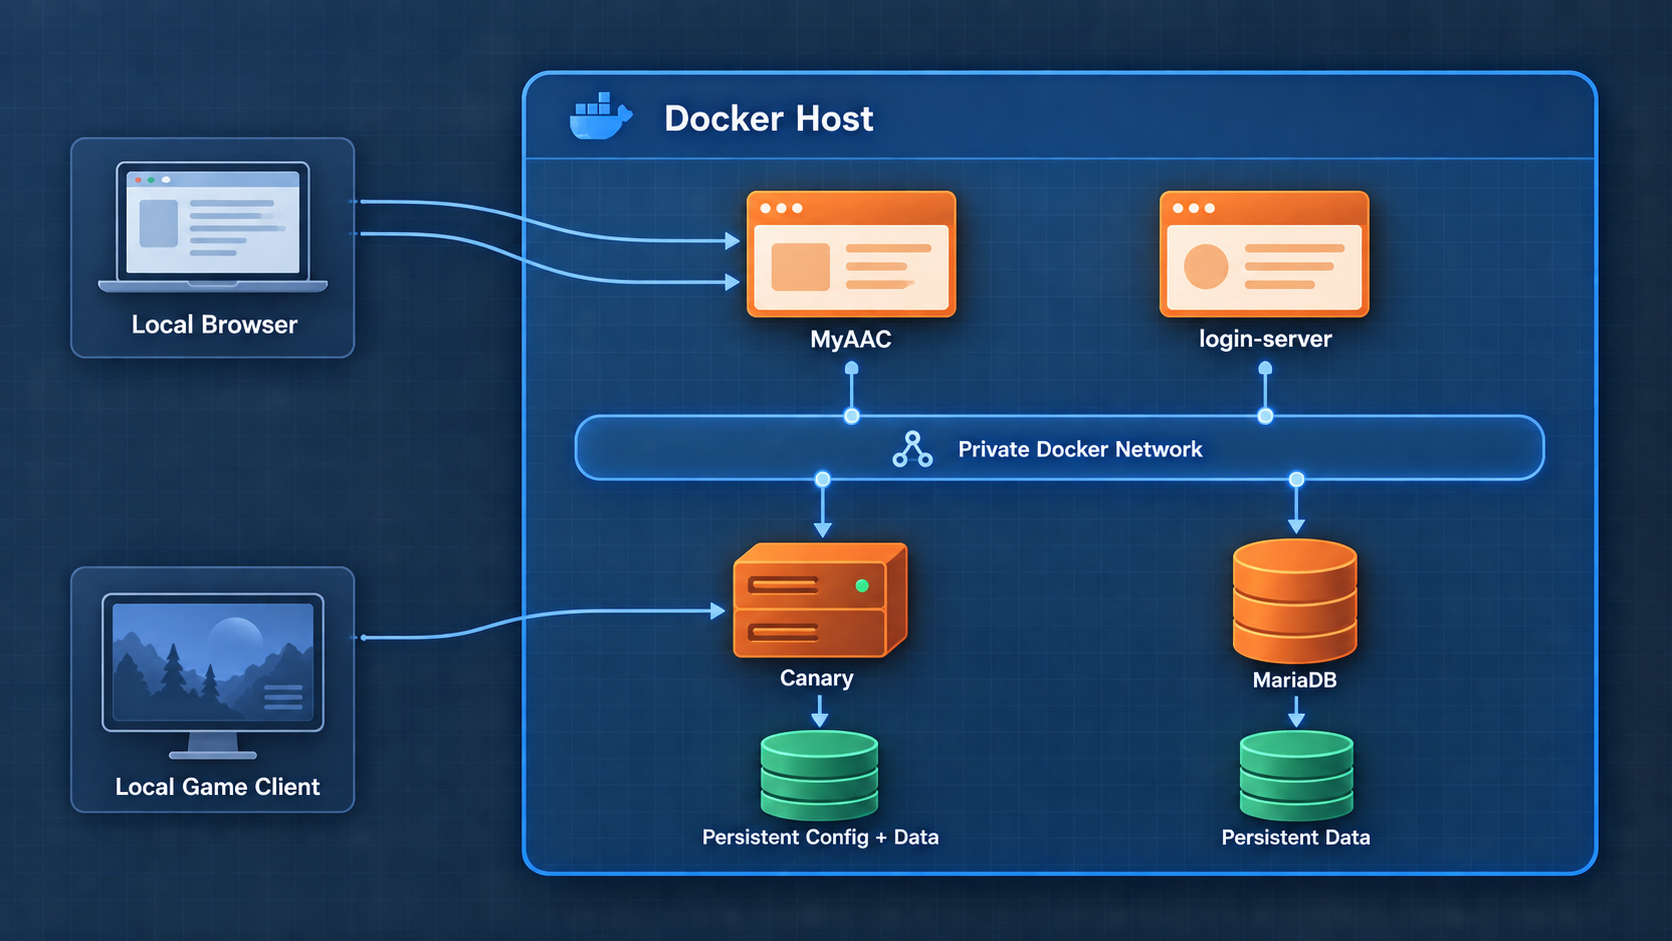
Canary is an OpenTibia MMORPG server emulator written in C++20 and Lua. The canonical opentibiabr/canary repository includes the server core, datapacks, Lua scripts, database schema, build presets, tests, and development tools. Canary can be compiled as a native project, but the repository also contains a lightweight Docker quickstart for local development, testing, and LAN demonstrations.
The instructions in this article were reviewed against the canonical repository's moving main branch on August 20, 2026. Main-branch files can change after that date. Before applying an update to an existing installation, compare your checkout with the current canonical Canary Docker guide and Canary beginner quickstart.
Docker Compose creates a private service network, starts MariaDB, runs Canary from its published runtime image, builds the MyAAC website image, and starts the dedicated opentibiabr/login-server. The services cooperate, but they do not all perform the same role and they should not all be exposed publicly.
The default MyAAC website is available at http://localhost:8080. The dedicated client login webservice is at http://localhost:8088/login. The default current game protocol uses TCP port 7172. A remote current-client workflow can therefore involve two independent public connections: an HTTP tunnel for login-server and a TCP tunnel for the game protocol. Publishing MyAAC is optional and requires a third mapping.
The official quickstart intentionally removes MyAAC's login.php. Point a compatible current client at the dedicated login-server endpoint. Publishing the MyAAC website alone does not publish the documented client login workflow.
| Component or endpoint | Default local location | Purpose | Remote-access decision |
|---|---|---|---|
| MyAAC website | http://localhost:8080 |
Website and account management | Use a separate HTTP tunnel only if visitors need the site remotely |
| MyAAC administration | http://localhost:8080/admin |
Website administration | Do not expose casually; protect administrative access |
| Client login webservice | http://localhost:8088/login |
Current-client login flow | Use a separate HTTP tunnel if a compatible remote client needs it |
| Canary login protocol | TCP port 7171 |
Legacy account login workflow | Publish only for a locally verified legacy profile that requires it |
| Canary current game protocol | TCP port 7172 |
Default current game connection | Primary TCP target for the current-client workflow |
| Canary status protocol | TCP port 7173 |
Configured status service | Do not publish unless your use case specifically requires it |
| Legacy game profiles | TCP ports 7174 and 7175 |
Documented 11.00 and 8.60 profile defaults | Publish only the port for the exact profile you tested |
| MariaDB | Port 3306 inside the Compose network |
Application database | Keep private; players do not need direct database access |
A successful login request and successful world entry are separate milestones. The client first reaches login-server, receives world information, and then opens a new connection to the advertised game host and port. This is why a public login URL can work while world entry fails.
Prepare the Docker host
Install the stack on a machine that can remain running while it is in use. A desktop can be suitable for local testing. A remotely available service also needs operating-system maintenance, monitoring, backups, and capacity appropriate to its datapack, scripts, map, and player workload. There is no verified universal CPU or memory requirement that fits every Canary deployment.
You need:
- Docker installed and running.
- Docker Compose v2, invoked with
docker compose. - Network access to pull the published Canary image and build the MyAAC image.
- A local checkout or archive of the canonical Canary repository.
- Permission to run Docker commands on the host.
- Available host ports for the services enabled by the Compose configuration.
- A Canary-compatible client profile for complete login and gameplay testing.
- The Localtonet client when you are ready to add remote access.
If Docker is not installed, use the current Docker installation documentation for your operating system. The MariaDB container documentation provides additional background on container lifecycle, persistence, and database image operation.
Confirm that Docker and the Compose plugin are available:
docker --version
docker compose version
If either command fails, install or repair Docker before starting Canary. An error such as Cannot connect to the Docker daemon generally means that Docker is not running or the current user cannot access it. Resolve that host-level problem instead of changing Canary's Compose files.
Clone the canonical repository and enter its Docker directory:
git clone https://github.com/opentibiabr/canary.git
cd canary/docker
You can instead download an official archive, extract it, and open a terminal in the extracted docker directory. The commands in this guide assume that the current directory contains the quickstart's Compose files, scripts, and .env.dist.
Canary documents this stack for local development, testing, and LAN demonstrations. Do not expose it with default database passwords, the default MyAAC administrator password, or enabled test accounts. Finish local installation and verification first, replace the defaults, review host bindings, and publish only the required services.
Install Canary, MariaDB, MyAAC, and login-server
The canonical quickstart has two essential actions: create the working environment file from the distributed template, then start the Compose project with a build. Run both commands from the repository's docker directory.
Create the local environment file
Copy .env.dist to .env. The distributed file is the current template, while .env is the working configuration read by Docker Compose.
Build and start the Compose stack
Run the documented Compose command. Docker pulls the required images, builds locally defined components, creates the network and volumes, and starts the services in detached mode.
cp .env.dist .env
docker compose up -d --build
In Windows PowerShell, use:
Copy-Item .env.dist .env
docker compose up -d --build
A successful return from docker compose up means that Docker accepted the project startup operation. It does not prove that MariaDB finished initializing or that every application can connect to it. Continue through the container, database, endpoint, and client checks below.
Guarded startup scripts
The repository also provides guarded startup scripts. On Windows PowerShell:
.\up.ps1On Linux or macOS:
sh ./up.shThese scripts start Compose with orphan removal and perform constrained cleanup. They remove stopped containers and dangling images associated with the Compose project, then prune Docker build cache older than seven days. They do not remove Docker volumes, so MariaDB and Canary runtime data are preserved.
The documented LAN configuration forms are:
.\up.ps1 -LanLAN=true sh ./up.shLAN mode is not internet publication. It configures the environment for another computer on the local network. Remote access still requires separate public endpoints, and the destination returned to the game client must match the endpoint that the client can actually reach.
Do not use docker system prune -a --volumes as routine Canary maintenance. It can remove data and resources belonging to unrelated Docker projects. The guarded scripts deliberately retain volumes and use narrower cleanup operations.
Configure the Canary environment safely
Open docker/.env after copying the template. The public Docker configuration contract uses variables beginning with CANARY_. The Compose configuration translates these values into settings used by MariaDB, MyAAC, login-server, and Canary.
Do not substitute unrelated MYSQL_, OT_, or raw Lua variable names when the current template already defines a corresponding CANARY_ setting. Unsupported names can be ignored or can leave dependent services configured inconsistently.
Database configuration
The documented database variables are:
CANARY_DB_HOST
CANARY_DB_PORT
CANARY_DB_NAME
CANARY_DB_USER
CANARY_DB_PASSWORD
CANARY_DB_ROOT_PASSWORD
In the supplied Compose network, CANARY_DB_HOST normally remains db and MariaDB listens on port 3306. The applications reach it through Docker's private service network. No player-facing workflow requires MariaDB to be published to the host or through Localtonet.
Replace both database passwords before remote use. Use separate, high-entropy values and protect the working .env file. Do not commit that file, distribute it with a client, or reveal it in screenshots and diagnostic output.
Server identity and port contract
The current canonical quickstart documents these server-related variables:
CANARY_IMAGE
CANARY_SERVER_NAME
CANARY_SERVER_IP
CANARY_SERVER_LOCATION
CANARY_LOGIN_PORT
CANARY_GAME_PORT
CANARY_LEGACY_1100_GAME_PORT
CANARY_LEGACY_860_GAME_PORT
CANARY_STATUS_PORT
CANARY_STATUS_TIMEOUT
The default current-client game port is 7172. The login protocol defaults to 7171, the status protocol to 7173, and the documented legacy 11.00 and 8.60 game profiles to 7174 and 7175.
CANARY_SERVER_IP is the address login-server sends to the current client in the world information. It is not a Docker service name. For a same-machine test, the documented value is 127.0.0.1. A client on another device cannot use that value because loopback always refers to the client device itself.
CANARY_GAME_PORT has two linked purposes
In the canonical quickstart, login-server advertises CANARY_GAME_PORT to the current client, and Compose publishes the Canary game service on the Docker host using that same configured value. The standard configuration therefore does not provide one variable for an external advertised port and another for an independent host-side port.
With the unmodified quickstart, the safest remote mapping is a matched-port mapping. If the public game endpoint is port 7172, keep CANARY_GAME_PORT=7172, verify 127.0.0.1:7172, and target that same local port with the TCP tunnel.
If Localtonet assigns another public game port, such as a value represented here as PUBLIC_GAME_PORT, the canonical contract supports setting CANARY_GAME_PORT to that value and recreating the services. Compose will then publish the game service on the Docker host at that same value, login-server will advertise that value, and the Localtonet TCP target must also use that value. Confirm that the host port is free before restarting.
CANARY_GAME_PORT=PUBLIC_GAME_PORT
Replace the placeholder with the actual numeric port. After saving the environment file, run docker compose up -d --build, verify the new local port, and configure the TCP tunnel to that same host port.
Do not set CANARY_GAME_PORT to the public port while leaving the tunnel pointed at local port 7172. Under the canonical Compose contract, changing the variable also changes the host-side published port. Likewise, do not assume an arbitrary public-port-to-local-7172 translation can be advertised correctly without additional configuration.
If you specifically need public port P to forward to host port 7172, you need a separately validated Canary or Compose override that decouples the advertised value from the host binding. This article does not provide or claim a tested override for that arrangement. Keep the deployment private until the exact override has been reviewed and tested from a remote network.
Image pinning
CANARY_IMAGE can use the project's rolling image reference for a convenient first run. Rolling tags can change. For a reproducible shared environment, choose a specific published tag or digest that you have confirmed exists and tested with your data and client.
Do not invent a container tag from an application version number. Confirm the exact image reference in the project's package registry before changing CANARY_IMAGE.
Test accounts and MyAAC administration
The quickstart can create test accounts and characters. Disable that behavior before remote exposure:
CANARY_TEST_ACCOUNTS=false
Replace the default MyAAC administrator password as well. Use the variable names in the .env.dist from your current checkout because the surrounding website settings can change over time.
Verify every local service before creating a tunnel
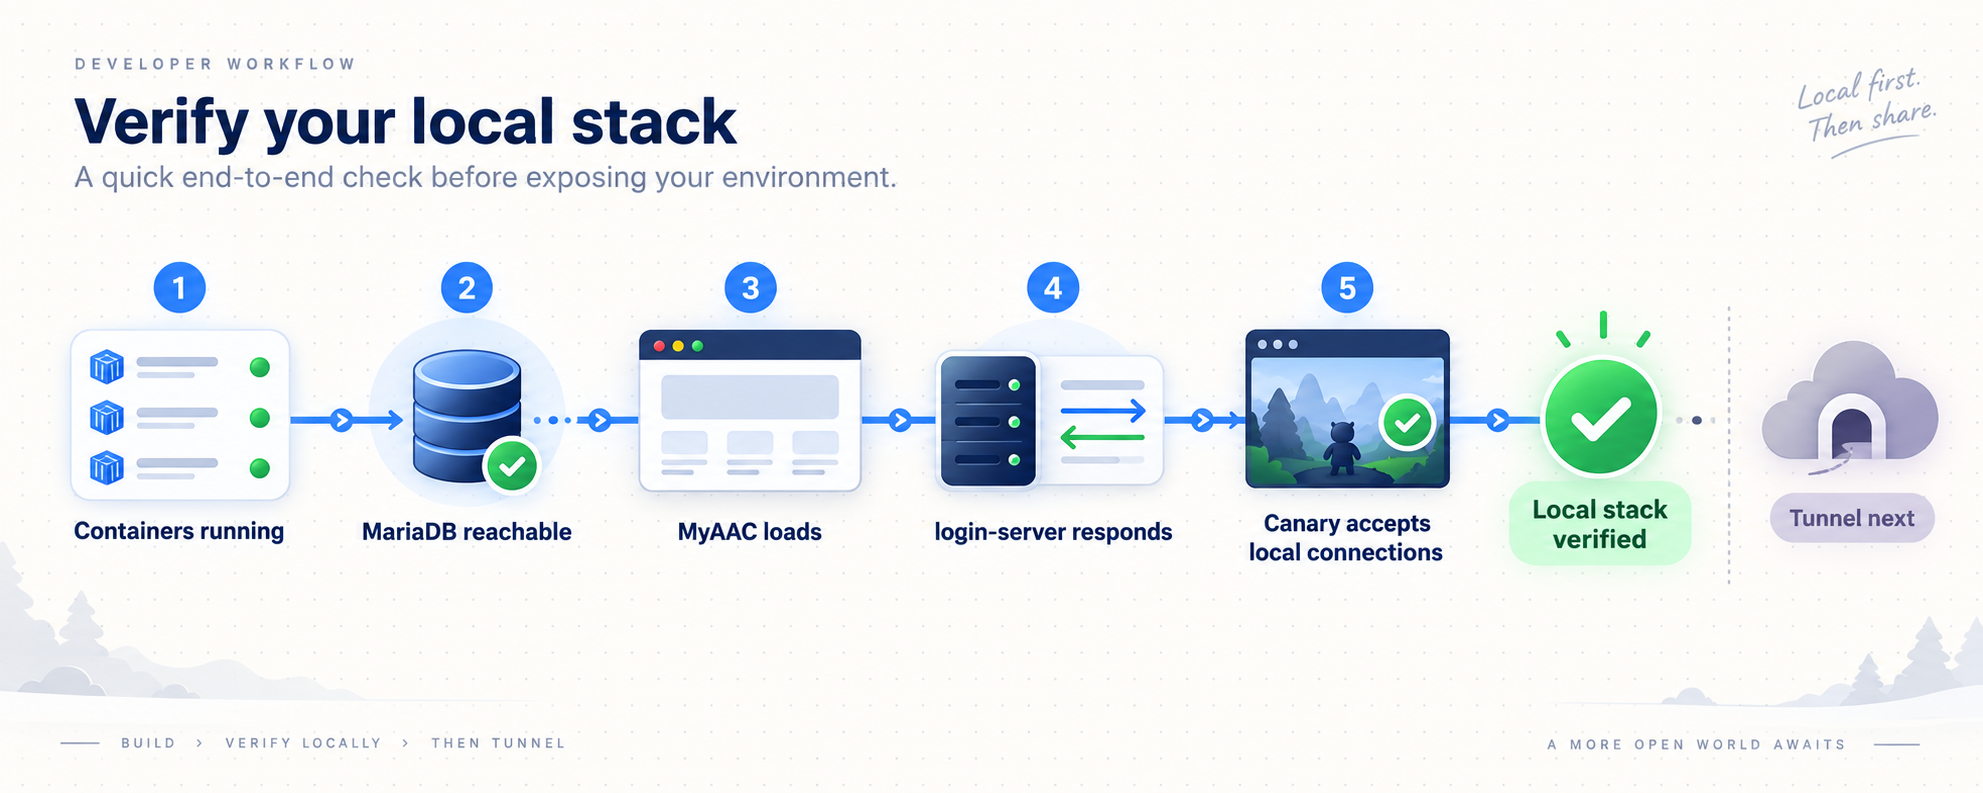
A tunnel adds a network path to an existing service. It cannot repair failed database initialization, invalid credentials, an occupied host port, or an incompatible game client. Verify the entire local sequence first.
Check all container states
docker compose psReview every service listed by Compose, including the database service. A container that is restarting, exited, or unhealthy requires investigation even if the website loads. MariaDB can require time for first-run initialization, so check the state again after startup completes.
Inspect MariaDB state and logs
The database service is named db in the canonical quickstart. Confirm that it appears in docker compose ps, then follow its logs:
docker compose logs -f db
Look for initialization failures, permission problems, storage errors, repeated restarts, or authentication-related messages. Use Ctrl+C to stop following the log. This does not stop MariaDB.
Do not consider the stack verified merely because MariaDB's container exists. Canary, MyAAC, and login-server must also be able to authenticate to the configured database. Inconsistent values for CANARY_DB_NAME, CANARY_DB_USER, or CANARY_DB_PASSWORD can leave the database running while an application repeatedly fails to connect.
Inspect all application logs
Follow the Canary server log:
docker compose logs -f serverFollow MyAAC:
docker compose logs -f myaacFollow the dedicated login service:
docker compose logs -f login-serverLook for database connection failures, configuration parsing errors, port conflicts, missing data, and restart loops. Read the first relevant error rather than repeatedly rebuilding the same configuration.
Verify MyAAC
Open the website on the Docker host:
http://localhost:8080The documented administration path is:
http://localhost:8080/admin
Confirm that the public website loads before testing administration. If it does not, inspect the myaac and db logs and confirm that another host application is not already using port 8080.
Verify login-server
The current-client login endpoint is:
http://localhost:8088/loginCheck basic HTTP reachability:
curl -i http://localhost:8088/loginThis is an application webservice, not necessarily a conventional browser page. An HTTP response proves basic reachability, not client compatibility or successful authentication. Inspect the login-server log and complete a login with the specific client profile you intend to use.
Verify the configured game port
For the default port on Windows PowerShell:
Test-NetConnection 127.0.0.1 -Port 7172On Linux or macOS with Netcat installed:
nc -vz 127.0.0.1 7172
If you changed CANARY_GAME_PORT, replace 7172 with the configured value. A successful probe proves that a TCP listener accepts a connection. It does not prove that the client protocol, account, character, scripts, map, and datapack work together.
Complete a local gameplay test
For a same-machine test using the documented current-client workflow, configure the selected client to use http://localhost:8088/login. The login response should provide the address from CANARY_SERVER_IP and the port from CANARY_GAME_PORT. With default local values, that destination is 127.0.0.1:7172.
Complete all of these checks:
- The client reaches login-server.
- Authentication succeeds with an intended test or configured account.
- The expected world appears.
- The client opens the game connection.
- A character enters the world successfully.
- No related errors appear in the
server,login-server, ordblogs.
A working MyAAC page verifies only the website. A response from port 8088 verifies basic login-server reachability. A listener on the game port verifies only TCP reachability. Test the complete client flow through world entry before adding Localtonet.
Operate the stack and preserve its data
Run routine Compose commands from the same canary/docker directory. This helps Compose identify the intended project and environment file.
Start or rebuild the stack
docker compose up -d --buildUse the guarded platform script instead when you want its documented orphan and old-cache cleanup.
Stop without deleting volumes
docker compose downThis removes the Compose containers and network while preserving named volumes. It is the normal stop operation when you intend to retain MariaDB and Canary runtime data.
Delete persisted data
docker compose down -v-v option is destructive
This removes persisted database and server data associated with the project. Use it only for an intentional clean installation after preserving anything important. It is not a restart or troubleshooting shortcut.
Run guarded scripts without cleanup
On Windows:
.\up.ps1 -SkipCleanupOn Linux or macOS:
SKIP_CLEANUP=true sh ./up.shThe documented default build-cache retention window is seven days. The guarded scripts also accept a different cleanup age. The documented 72-hour forms are:
.\up.ps1 -CleanupUntil 72hCLEANUP_UNTIL=72h sh ./up.shBack up before changes
Docker volume persistence is not a backup. Before changing image versions, Compose definitions, datapacks, scripts, database settings, or port contracts, back up the database and important runtime data using a process appropriate to your installation.
The current evidence does not establish one universal Canary backup and restoration command for every Compose revision. Inspect the volumes and database configuration used by your checkout, document the procedure, and perform a restoration test before depending on the backup.
Keep a private operations record containing the tested Canary revision or release, image reference, environment choices, client profile, local ports, public endpoints, and custom files. Do not include passwords or Localtonet device tokens.
Configure remote Canary access with Localtonet
Once local gameplay works, Localtonet can expose the required services without inbound router port forwarding, a public IP address, or VPN setup. Our client establishes an outbound connection from a device that can reach the local Canary services to a Localtonet relay server. Review the current Localtonet documentation before configuring a tunnel because available relay servers, regions, and options can vary.
Current-client remote access normally has two paths:
- An HTTP tunnel to login-server at local port
8088. - A TCP tunnel to the configured Canary game port.
MyAAC on port 8080 is optional. MariaDB on the private Compose network should not receive a player-facing tunnel.
Install and run the Localtonet client
Run our client on the Docker host or on another device that can reach the Docker host's published ports. The selected device must remain connected for its tunnels to remain available.
Select the correct device token
Authenticate or select the device-specific token belonging to the client that can reach Canary. Treat the token as a secret and never place it in source control, screenshots, client configuration, or this Docker environment file.
Select an available relay server
Choose a currently available relay server or region from the dashboard. Use displayed values instead of copying a server code from an older tutorial.
Create the required tunnel configuration
Create a TCP tunnel for the game service and, for the documented current-client flow, an HTTP tunnel for login-server. Each tunnel must target the IP address and port reachable from the Localtonet client device.
Start each tunnel
Creating a tunnel does not start it. Use the Start button and confirm that the selected device and tunnel are connected. Record the public URL or public host and port without exposing the device token.
Test from an external network
Use a remote device and the exact client profile you intend to distribute. Verify the public login endpoint, inspect the world destination returned to the client, and complete a real world-entry test through the TCP tunnel.
The selected Localtonet device must be connected and the tunnel must be started. Stopping the tunnel, closing the client, losing the client's outbound connection, or shutting down the host makes the public endpoint unavailable.
Configure the game tunnel with matching ports
Begin with the public TCP endpoint shown for the game tunnel. Compare its assigned public port with the current CANARY_GAME_PORT.
If the public port matches the configured Canary port, target that same verified host-side port. With an all-default matched configuration, the relationship is:
Login-server advertises: PUBLIC_GAME_HOST:7172
Localtonet public endpoint: PUBLIC_GAME_HOST:7172
Localtonet local target: 127.0.0.1:7172
CANARY_GAME_PORT: 7172
Replace PUBLIC_GAME_HOST with the hostname assigned to the tunnel only after confirming that the selected client accepts it.
If the assigned public port is different, set CANARY_GAME_PORT to that numeric port, recreate the Compose services, verify the new host-side listener, and make the TCP tunnel target the same new local port. The supported relationship described by the canonical quickstart is:
Login-server advertises: PUBLIC_GAME_HOST:PUBLIC_GAME_PORT
Localtonet public endpoint: PUBLIC_GAME_HOST:PUBLIC_GAME_PORT
Localtonet local target: 127.0.0.1:PUBLIC_GAME_PORT
CANARY_GAME_PORT: PUBLIC_GAME_PORT
This is a matched-port configuration. It does not preserve local port 7172 after assigning another value to CANARY_GAME_PORT. Re-run the local TCP test against the new value before testing remotely.
The canonical quickstart does not independently configure an advertised game port and a different Docker host port. If the tunnel exposes public port P but continues targeting local 7172, do not advertise P and assume the standard Compose configuration supports that split. Use a verified override that explicitly decouples the values, or use the matched-port procedure above.
Publish login-server separately
A TCP game tunnel does not publish http://localhost:8088/login. Create a separate Localtonet HTTP tunnel with local IP 127.0.0.1 and local port 8088 when the Localtonet client runs on the Docker host. If it runs on another device, use an address through which that device can reach the Docker host.
Localtonet HTTP tunnels provide a public HTTPS address. HTTP and File Server process types can use a random subdomain, a supported custom subdomain, or a custom domain. Check current documentation before configuring custom-domain DNS because the required records can change.
Start the HTTP tunnel and append /login to its public base URL. Test the resulting HTTPS URL from an external network. Whether the game client accepts that URL must be verified separately, as explained in the compatibility section.
Publish MyAAC only when needed
MyAAC is another independent HTTP service on local port 8080. If players need the public website or account interface, create a separate HTTP tunnel to that port. Do not use the MyAAC URL as a replacement for login-server in this quickstart.
Publishing MyAAC can also make its administration route reachable through the same tunnel. Change the administrator password first and apply the narrowest practical access controls. If only administrators need the site, keeping it private is safer than making it generally available.
| Remote need | Default local target | Localtonet tunnel | Requirement |
|---|---|---|---|
| Current game connection | 127.0.0.1:7172, or the configured matching game port |
TCP | Required for the current game workflow |
| Current-client login | 127.0.0.1:8088 |
HTTP | Required when the selected remote client uses login-server |
| Public MyAAC website | 127.0.0.1:8080 |
HTTP | Optional |
| Legacy login protocol | 127.0.0.1:7171 |
TCP | Only for a verified legacy workflow |
| Legacy game profile | Profile-specific verified port | TCP | Only for the selected legacy profile |
| MariaDB | Private Docker service on 3306 |
None for players | Keep private |
Validate hostname, HTTPS URL, and client-profile compatibility
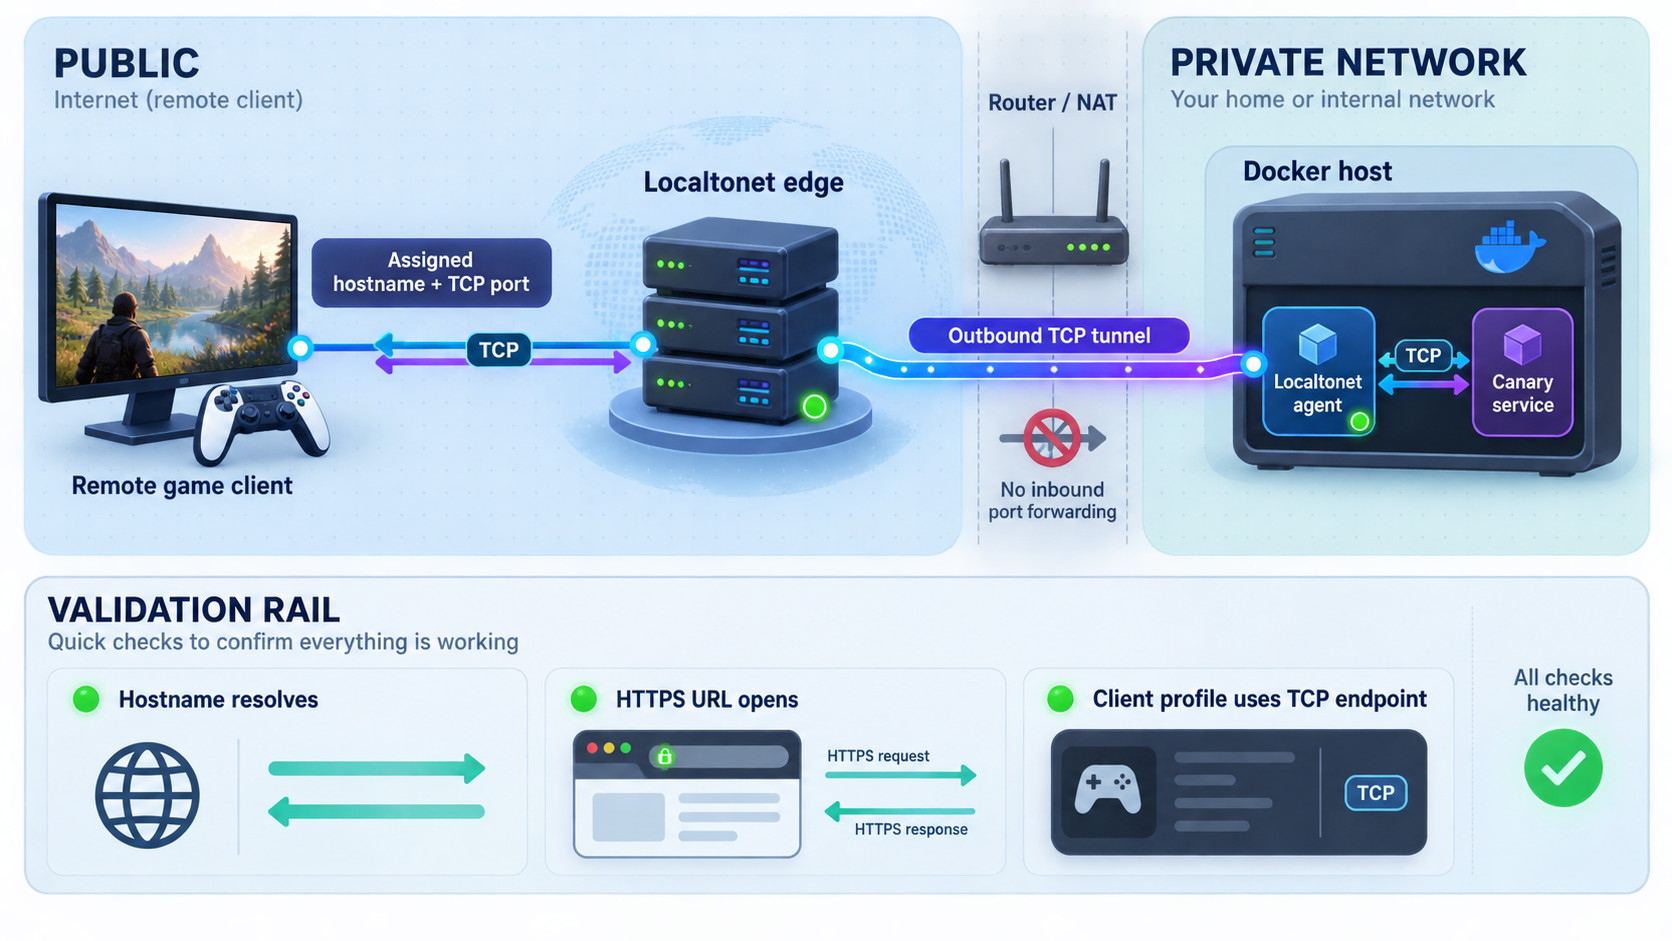
Localtonet can provide the required public transport, but it does not determine what address formats a Canary client build accepts. Canary also supports multiple runtime profiles. A URL or hostname accepted by one client build may not be accepted by another client, launcher, profile, or local configuration.
The canonical Canary documentation confirms that the current login-server workflow uses an HTTP login endpoint and advertises CANARY_SERVER_IP plus CANARY_GAME_PORT. It does not establish that every possible Canary-compatible client accepts every Localtonet public hostname, every HTTPS login URL format, or every certificate and redirect behavior.
| Compatibility item | What must be verified | Failure symptom |
|---|---|---|
| Public game hostname | The selected client profile accepts a hostname in the world destination and resolves it correctly | Login succeeds, but world entry fails before reaching Canary |
| Assigned TCP port | The advertised port equals the reachable public port and follows the matched-port contract unless a verified override is used | The world appears, but the game connection targets the wrong port |
| Public HTTPS login URL | The client accepts the complete Localtonet HTTPS URL, including the /login path |
The client cannot fetch the login response even though a browser or curl can |
| Client runtime profile | The client matches Canary's current, 11.00, or 8.60 runtime contract and uses the correct login flow and game port | Protocol errors, missing world data, or disconnection during entry |
| Redirect behavior | The client follows only the behavior supported by that build; test the final URL rather than assuming browser behavior applies | A browser succeeds while the game client rejects or ignores the response |
Use a bounded remote test
Before distributing an endpoint, test one identified client build and profile from a network outside the server's LAN. Record the client name, build or revision, runtime profile, public login URL format, public game hostname, and public game port. The test should prove all of the following:
- The client accepts the public HTTPS login URL with its required
/loginpath. - The login response is processed successfully by that client.
- The returned world destination contains the intended public hostname and matching public port.
- The hostname resolves from the remote device.
- The TCP game tunnel reaches the locally verified Canary game listener.
- The player can enter the world and remain connected.
Do not describe the result as universal compatibility. It proves compatibility for the tested client build, profile, Canary revision, and endpoint configuration. Repeat the test after changing the client, Canary image, login-server, runtime profile, public hostname, or port mapping.
A browser or curl response confirms that the public HTTPS route reaches login-server. It does not prove that the selected game client supports that hostname, URL syntax, TLS behavior, response format, or runtime profile. The game client itself is the authoritative compatibility test.
Harden the stack before inviting remote users
Localtonet removes the need to configure inbound router port forwarding, but a tunnel does not turn a development quickstart into a hardened production platform. Any published application route or TCP service must be treated as internet-accessible.
Protect the Localtonet device token because it identifies the client device that runs a tunnel. Do not place it in Canary's repository, .env, a container image, a client package, or public support output.
Review host firewall and interface exposure as well. Localtonet does not require inbound router firewall changes, but Docker's published host ports may still be reachable from local interfaces depending on your Compose configuration, operating system, and host policy. Restrict that local exposure according to your deployment model.
Keep the MyAAC administration route private where practical. If you publish the website for players, do not assume that changing the visible homepage also restricts /admin. Apply authentication and access controls at the appropriate application or network layer.
Troubleshoot Canary, MariaDB, and tunnel failures
Docker Compose does not start
Confirm that Docker is running and that docker compose version succeeds. Run the command from canary/docker. Confirm that .env exists and was copied from the current .env.dist in the same checkout.
MariaDB exits or restarts
Run:
docker compose ps
docker compose logs -f db
Check the first database error for storage permissions, failed initialization, incompatible persisted data, or invalid configuration. Do not delete the volume unless you intentionally accept losing its data and have a usable backup.
An application cannot connect to MariaDB
Compare the CANARY_DB_* values in the current environment file. The internal host should normally remain db, not localhost. Inside an application container, localhost refers to that container rather than the MariaDB service.
Inspect the logs for server, myaac, and login-server. A running database container does not prove that the applications have matching credentials.
MyAAC works, but the client cannot log in
MyAAC and login-server are separate. Verify http://localhost:8088/login, inspect docker compose logs -f login-server, and confirm that the selected current client points to login-server rather than MyAAC's removed login.php.
Login works, but world entry fails
Inspect the host and port returned in the world information. For a local same-machine test, the default is 127.0.0.1:7172. For remote access, the response must contain the reachable public game hostname and the public TCP port.
Then confirm that CANARY_GAME_PORT, Docker's host-side game port, the Localtonet local target port, and the assigned public port follow the matched-port configuration. If one value differs, do not assume the standard Compose file compensates for it.
The public TCP port differs from 7172
Set CANARY_GAME_PORT to the assigned public numeric port, recreate the stack, verify the new local listener, and target that same local port with the Localtonet TCP tunnel. If you must retain local port 7172 while advertising another external port, stop and create a separately verified Compose or Canary override. That split mapping is outside this guide's validated configuration.
The Localtonet tunnel exists but is unreachable
Verify the layers in this order:
- The relevant container is running.
- The service accepts a connection on the Docker host.
- The Localtonet client device can reach that exact local IP and port.
- The selected Localtonet device is connected.
- The tunnel has been started, not merely created.
- The external test uses the assigned public endpoint.
If our client runs on another computer or in another network namespace, 127.0.0.1 refers to that execution environment, not automatically to the Docker host. Use an address reachable from the Localtonet client and test it from that same device.
The public login URL works in a browser but not in the client
Confirm that the client is configured with the complete HTTPS URL, including /login. Then verify that the selected client build accepts HTTPS, the assigned hostname, and the response format. Browser success does not establish game-client compatibility.
The public login request works but gameplay still fails
The login HTTP tunnel and game TCP tunnel are independent. Confirm that the login response advertises the public game endpoint, not the login URL, MyAAC URL, 127.0.0.1, a private LAN address, or a Docker service name.
Environment changes do not appear
Save .env and recreate the affected services:
docker compose up -d --build
Check docker compose ps, inspect the affected logs, and repeat the local endpoint tests. Do not use docker compose down -v as a generic refresh command because it deletes persistent volumes.
A legacy client cannot connect
Do not assume that it uses the current HTTP login-server flow or game port 7172. Canary documents separate current, 11.00, and 8.60 runtime contracts. Identify the exact client profile, verify it locally, and expose only the protocol and profile-specific ports it requires.
Frequently asked questions
Do I need to compile Canary for this tutorial?
No. The canonical Docker quickstart runs Canary from its published runtime image and starts MariaDB, MyAAC, and login-server through Docker Compose. It is intended for local development, testing, and LAN demonstrations.
Which port should the Localtonet game tunnel target?
Target the verified Docker host port configured by CANARY_GAME_PORT. The default is TCP 7172. If you change CANARY_GAME_PORT to match another assigned public port, the canonical Compose configuration publishes that same new value on the host, so the tunnel target must change to it as well.
Can Localtonet use a different public game port while Canary stays on local port 7172?
A TCP tunnel can have a public endpoint and a local target, but the canonical Canary quickstart uses CANARY_GAME_PORT both as the client-advertised value and the Docker host port. This guide therefore uses matching public, advertised, and host-side ports. Keeping local 7172 while advertising another external port requires a separately verified Canary or Compose override that is not provided here.
Is one TCP tunnel enough for remote current clients?
The TCP tunnel publishes the game protocol. The documented current-client workflow also uses login-server at local port 8088, so a compatible remote client normally needs a separate HTTP tunnel for that service. MyAAC on port 8080 is optional.
Will every Canary client accept a Localtonet hostname and HTTPS login URL?
Universal compatibility is not established. Test the exact client build and runtime profile with the assigned hostname, public port, and complete HTTPS login URL. A successful browser request does not prove that the game client accepts the same URL or world destination.
Why can a player log in but not enter the world?
Login-server may be reachable while returning an unusable game destination. Check CANARY_SERVER_IP, CANARY_GAME_PORT, Docker's host-side port, and the Localtonet public TCP endpoint. The returned host and port must be reachable by the remote client and must lead to the running game tunnel.
Should MariaDB be exposed through Localtonet?
No player-facing workflow in this guide requires public database access. MariaDB remains private inside the Compose network by default, where Canary, MyAAC, and login-server can reach it. Keep it private unless you have a separately designed and secured administrative requirement.
How do I verify MariaDB instead of checking only the application containers?
Confirm the db service state with docker compose ps, then inspect it with docker compose logs -f db. Also inspect the application logs because a running MariaDB container does not prove that Canary, MyAAC, and login-server have matching credentials.
Does stopping Canary delete the MariaDB database?
docker compose down preserves the named volumes used for persistent data. docker compose down -v removes those volumes and is destructive. The guarded startup scripts also avoid deleting database volumes during cleanup.
Does Localtonet require router port forwarding or a public IP?
No. Our client establishes an outbound connection to a Localtonet relay server, so this workflow does not require inbound router port forwarding, a public IP address, or VPN setup. The selected client device and each required tunnel must remain running.
Publish your verified Canary endpoints with Localtonet
Start with a locally working Canary, MariaDB, MyAAC, and login-server installation. Secure its credentials, verify your exact client profile, and then create only the matched TCP game mapping and HTTP login mapping that workflow requires.
Get Started Free →

