

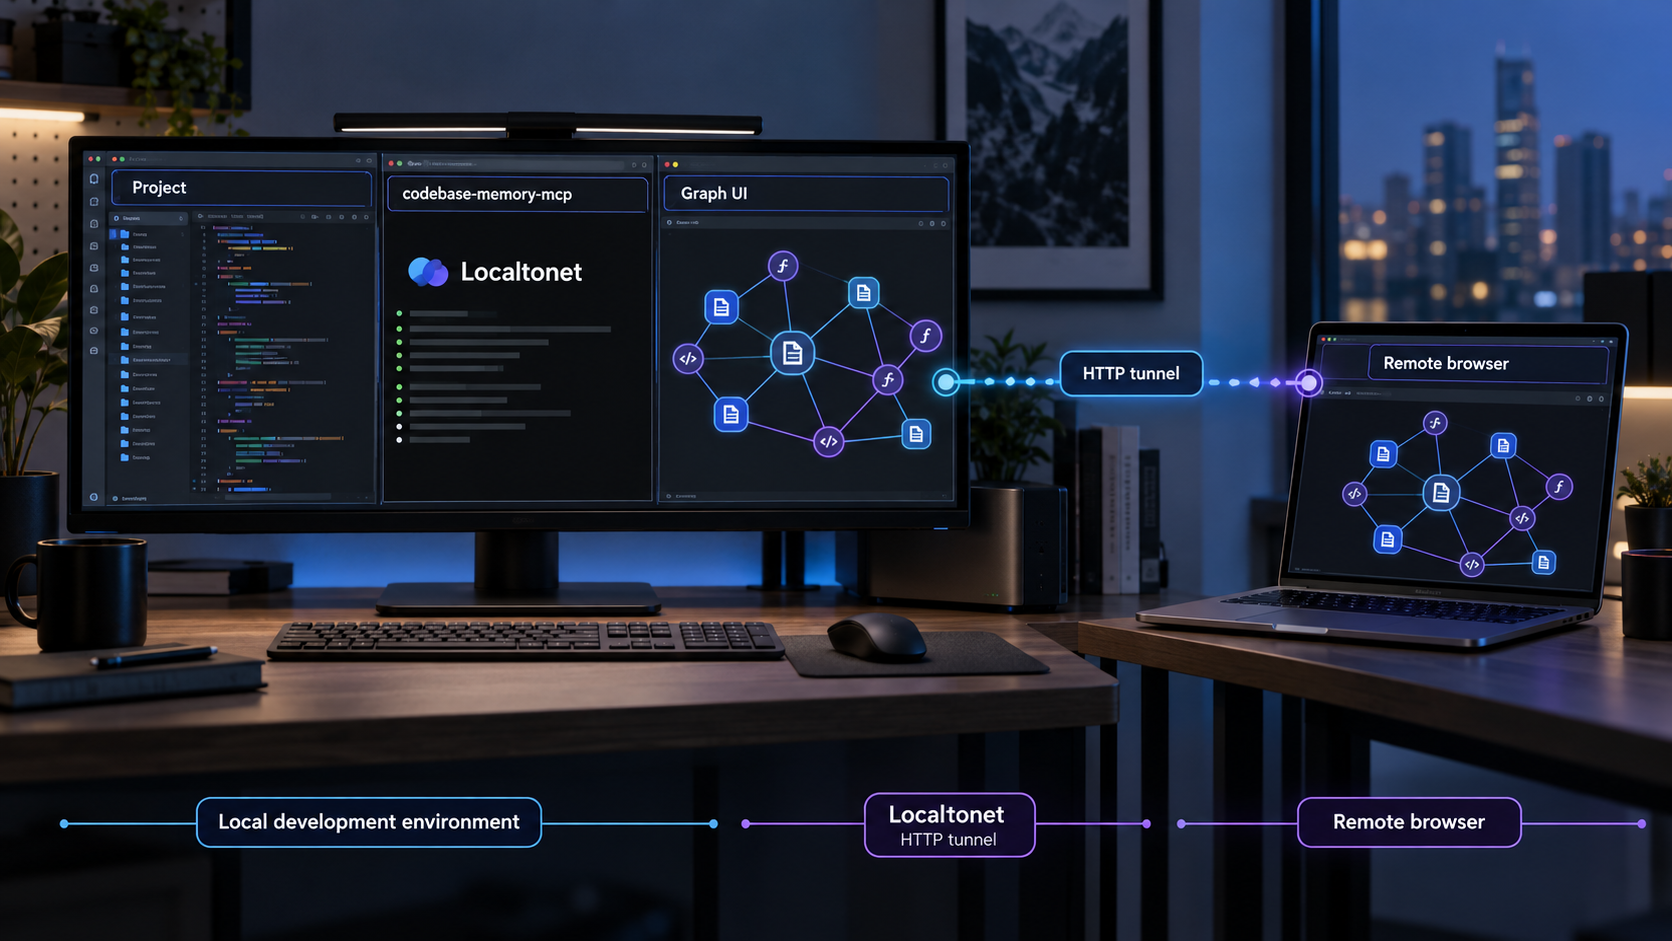
Build a local code knowledge graph, verify its browser interface, and make the working UI available remotely
codebase-memory-mcp is an open-source Model Context Protocol server that indexes source code into a persistent knowledge graph for AI coding agents. This guide covers the native installation workflow on macOS, Linux, and Windows, client configuration, project indexing, and verification of the graph interface on localhost:9749. After the service works locally, we explain how to expose only that browser interface through a Localtonet HTTP tunnel. We also address installation trust, source-code exposure, tunnel lifecycle, upgrades, and common troubleshooting scenarios.
📋 What's in this guide
What codebase-memory-mcp does
codebase-memory-mcp is a structural-analysis backend for MCP-compatible coding agents. It parses a repository and represents code relationships as a persistent knowledge graph containing elements such as functions, classes, call chains, HTTP routes, and cross-service links. An MCP client can then ask structural questions through the server instead of repeatedly opening and searching individual files.
The project is not a chatbot and does not contain an embedded large language model. The MCP-compatible coding agent remains the intelligence layer. codebase-memory-mcp supplies that agent with indexed structural information and graph-query tools. Its native installation does not require an API key, Docker, or a separate language runtime.
The project documentation states that parsing and indexing happen locally. That local-first design is useful when working with private repositories, but it does not remove the need for careful access control. The built-in graph visualization can reveal architecture, names, relationships, routes, and other information derived from a repository. Publishing that interface changes the threat model even if the underlying indexing process remains local.
localhost:9749 when the installed build and configuration include the UI.
Separate the MCP transport from the graph interface
This guide exposes the browser-based graph interface, not the MCP transport used by the coding agent. Those are different surfaces. The available project evidence clearly documents a graph UI at localhost:9749, but it does not establish a separately supported remote network endpoint for the MCP protocol itself.
Keep the agent integration local unless the project documentation for your exact version explicitly supports another topology. If your goal is to let a remote browser inspect the graph, tunneling port 9749 is the narrowest documented workflow. If your goal is to connect a remote MCP client, do not assume the browser port provides that capability.
A tunnel cannot fix an incomplete installation, a missing UI build, or a server that has not been started by the MCP client. Complete the local installation, index a project, and verify localhost:9749 from the host before creating any public endpoint.
Prerequisites and planning
Prepare the host and repository before running the installer. The native project packages reduce dependency setup, but installation still modifies the machine and may update detected coding-agent configuration files.
- A supported macOS, Linux, or Windows system matching an available release architecture.
- A user account allowed to download files, run the installer, and write to the chosen installation and client-configuration locations.
- An MCP-compatible coding agent that the installer supports or that you can configure using its documented MCP interface.
- A local source-code repository that the host account is permitted to read.
- A browser on the host for testing the graph interface at
localhost:9749. - For remote access, the Localtonet client installed on the same machine as the UI, or on a device that can reach the UI over the local network.
- A Localtonet device authentication token obtained from your account. Treat the token as a secret and never paste it into public documentation, screenshots, commits, or chat transcripts.
Choose the right host
Install codebase-memory-mcp on a machine that can access the repository and remain online for as long as you need the MCP server and graph UI. The browser interface is available only while the relevant server process is running. A Localtonet tunnel is likewise available only while its selected client is connected and the tunnel is running.
For a development workstation, this normally means the graph and public address disappear when the workstation sleeps, disconnects, or closes the process that serves the UI. For a persistent development host, consider how updates, restarts, filesystem permissions, and repository access are managed before enabling remote access.
Review installer trust before execution
The one-line macOS and Linux command downloads a script and pipes it directly to a shell. That is convenient, but it gives the retrieved script permission to act as your user. The Windows workflow is more review-friendly because it downloads install.ps1 before execution. Security-conscious users can apply the same pattern on macOS and Linux by downloading the script, reviewing it, and then running the reviewed local copy.
The project also documents manual installation from a release archive. That option makes it easier to select a specific release asset and inspect the included installation script. Match the operating system and architecture exactly, and use the project’s published verification information where your organizational process requires artifact validation.
| Installation path | Best for | Important consideration |
|---|---|---|
| One-line shell installer | Fast installation on macOS or Linux | The downloaded script executes immediately, so review it first if your security policy requires inspection. |
| Downloaded PowerShell installer | Windows installation with an inspection step | Windows may apply Mark-of-the-Web restrictions, which the documented workflow handles with Unblock-File. |
| Release archive | Version selection, offline preparation, or closer artifact review | Choose the correct operating-system and architecture archive, extract it, and use its included installer. |
| Package ecosystem | Teams already managing software through a package manager | The project lists several package channels, but this guide uses the release-owned native installer workflow because exact commands and versions vary by channel. |
Install codebase-memory-mcp
Use one installation path for the host. Do not run every method. The repository-provided installers can place the executable and configure detected MCP clients. The project documents --skip-config for a binary-only installation and --dir=<path> for a custom location, but use optional flags only according to the installer help and documentation for the exact revision you downloaded.
Current project material describes a built-in UI at localhost:9749. One official page also refers to adding a --ui option, while the repository’s displayed quick-start example labels the standard installer command as including graph visualization. Because the available evidence does not establish one universal flag invocation for every release, this guide does not invent a command-line form. Install the current release and test port 9749. If that release distinguishes a UI variant, follow the option syntax printed by that release’s installer or release notes.
macOS or Linux one-line installation
The official quick-start command downloads the repository installer and runs it with Bash:
curl -fsSL https://raw.githubusercontent.com/DeusData/codebase-memory-mcp/main/install.sh | bashWait for the installer to finish and read its output. It may report which detected client configurations were updated and where the executable was installed. Do not ignore errors about permissions, unsupported architecture, downloads, or client configuration.
On macOS, the installer is also responsible for handling the quarantine behavior described by the project. If execution still fails after installation, do not disable system protections globally. Recheck the selected release asset, installer output, and the project’s platform-specific guidance.
Windows PowerShell installation
Open PowerShell in a directory where you can save and inspect the installer. Download it, optionally review it, remove the downloaded-file restriction, and then run it:
Invoke-WebRequest -Uri "https://raw.githubusercontent.com/DeusData/codebase-memory-mcp/main/install.ps1" -OutFile "install.ps1"
notepad .\install.ps1
Unblock-File .\install.ps1
.\install.ps1
The project recommends inspecting the script before execution. If PowerShell reports a script execution policy error, the project documents a process-scoped bypass:
Set-ExecutionPolicy -Scope Process Bypass
.\install.ps1
A process-scoped policy change applies to the current PowerShell process rather than permanently changing the machine policy. In managed environments, follow organizational policy instead of overriding an administrator-controlled restriction.
Manual installation from a release archive
Manual installation begins by downloading the archive matching the host. The documented naming patterns are codebase-memory-mcp-<os>-<arch>.tar.gz for macOS or Linux and a ZIP archive for Windows. Every archive includes the corresponding installation script.
On macOS or Linux, change to the directory containing the downloaded archive, extract the exact filename you selected, and run the included script:
tar xzf codebase-memory-mcp-<os>-<arch>.tar.gz
./install.sh
Replace the placeholders with the actual operating-system and architecture values from the release asset. Do not type angle-bracket placeholders literally.
On Windows, extract the downloaded ZIP, unblock the included script, and execute it:
Expand-Archive .\codebase-memory-mcp-windows-amd64.zip -DestinationPath .
Unblock-File .\install.ps1
.\install.ps1
Archive names can change between releases. If the downloaded filename differs, use that exact filename rather than assuming the example is current.
Alternative package channels
The project documentation lists npm, pip, Homebrew, Scoop, Winget, Chocolatey, AUR, and go install as additional installation routes. Those channels have separate package names, version timing, permissions, and upgrade behavior. Since the supplied evidence does not provide a complete verified command sequence for every channel, this guide does not guess those commands. The repository installer or release archive is the clearest documented cross-platform route for this workflow.
Configure and restart the MCP client
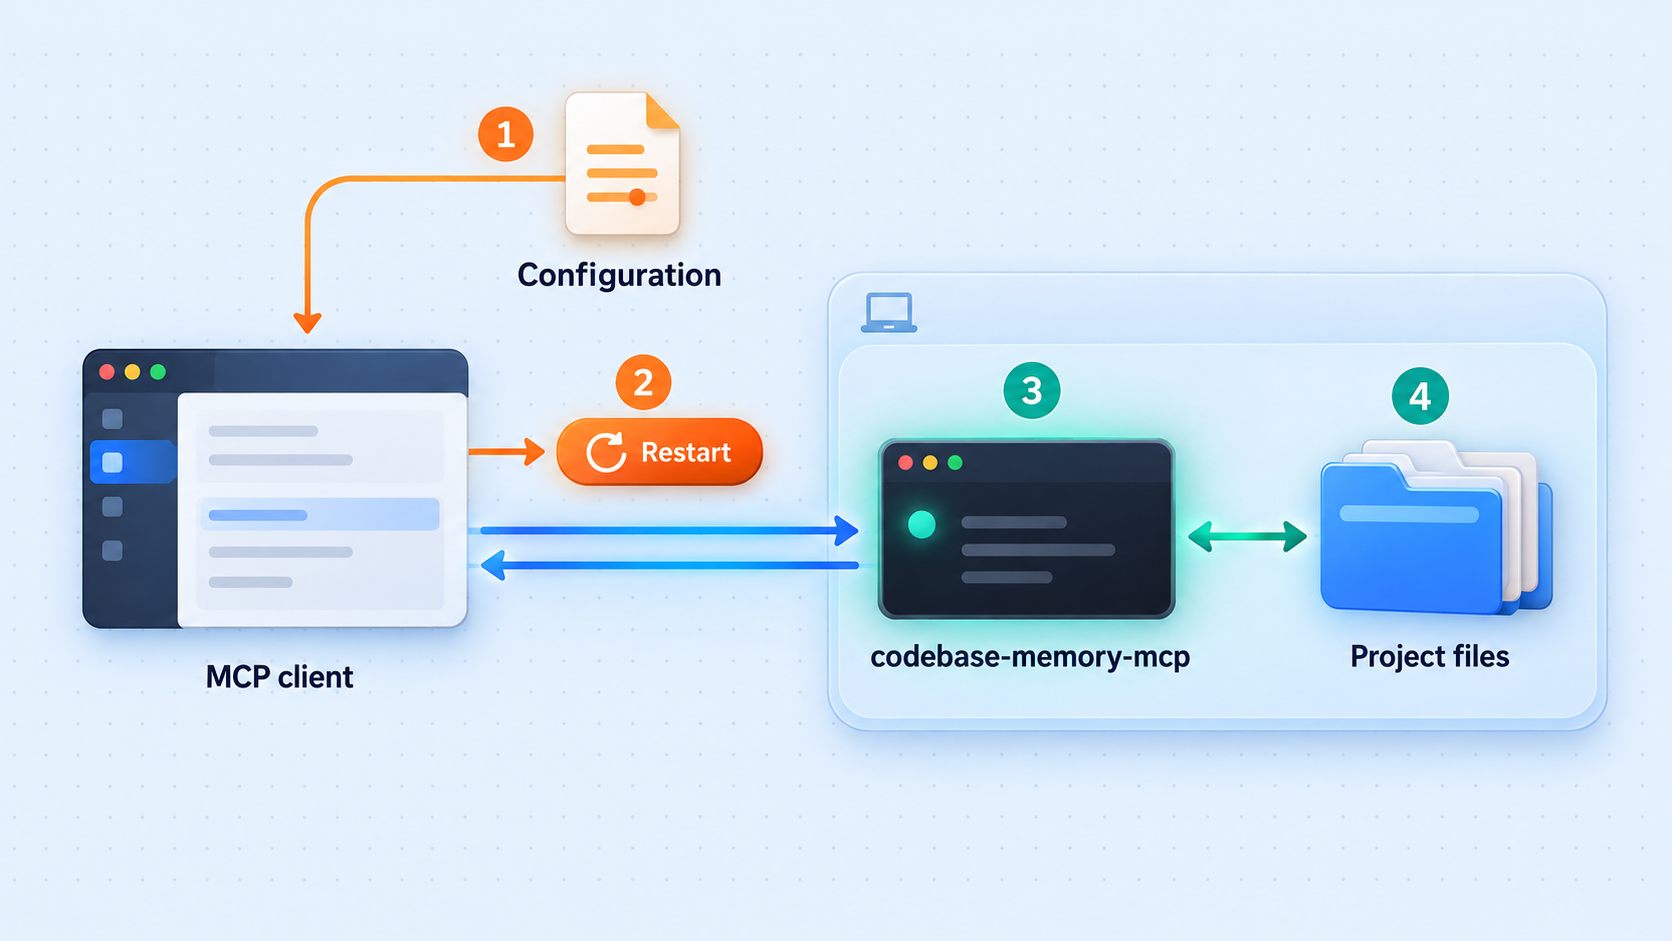
The standard installer attempts to configure detected coding-agent clients. That configuration tells the client how to launch or communicate with codebase-memory-mcp. Automatic support depends on the client, platform, and whether the installer can find an eligible existing configuration.
Detection should not be confused with universal configuration. Some clients are automatic, some are conditional or explicit, and some require manual UI configuration. If the installer says that no supported client was found, do not create an unverified configuration path or schema. Use the current client-specific instructions from codebase-memory-mcp and the MCP configuration format documented by your coding agent.
Review the installer result
Confirm that installation completed and note whether the installer detected and configured your intended MCP client. Resolve any reported permission or configuration error before continuing.
Close the coding agent completely
Exit the application or terminate the CLI session rather than opening only a new conversation. The project requires an agent restart after installation so that the client reloads its MCP configuration.
Start the agent again
Reopen the agent in the repository you want to analyze. If the client has an MCP status view, use it to confirm that the server is available before requesting an index.
What the installer can change
The project explicitly notes that the tool reads code and writes to agent configuration files. Review configuration changes if the machine contains customized MCP settings. Preserve unrelated servers and client preferences, and keep a backup where your normal configuration-management process requires one.
If you intentionally used the binary-only --skip-config option, automatic client setup is not expected. You must then use the current manual configuration instructions for the chosen agent. Exact file paths and JSON structures differ by client and can change, so they should not be inferred from another client’s setup.
A successful file installation does not prove that the coding agent has loaded the MCP server. Restart the agent after installation. If the agent was left open, it may continue using its previous configuration and the indexing request may not reach codebase-memory-mcp.
Index a project and create the knowledge graph
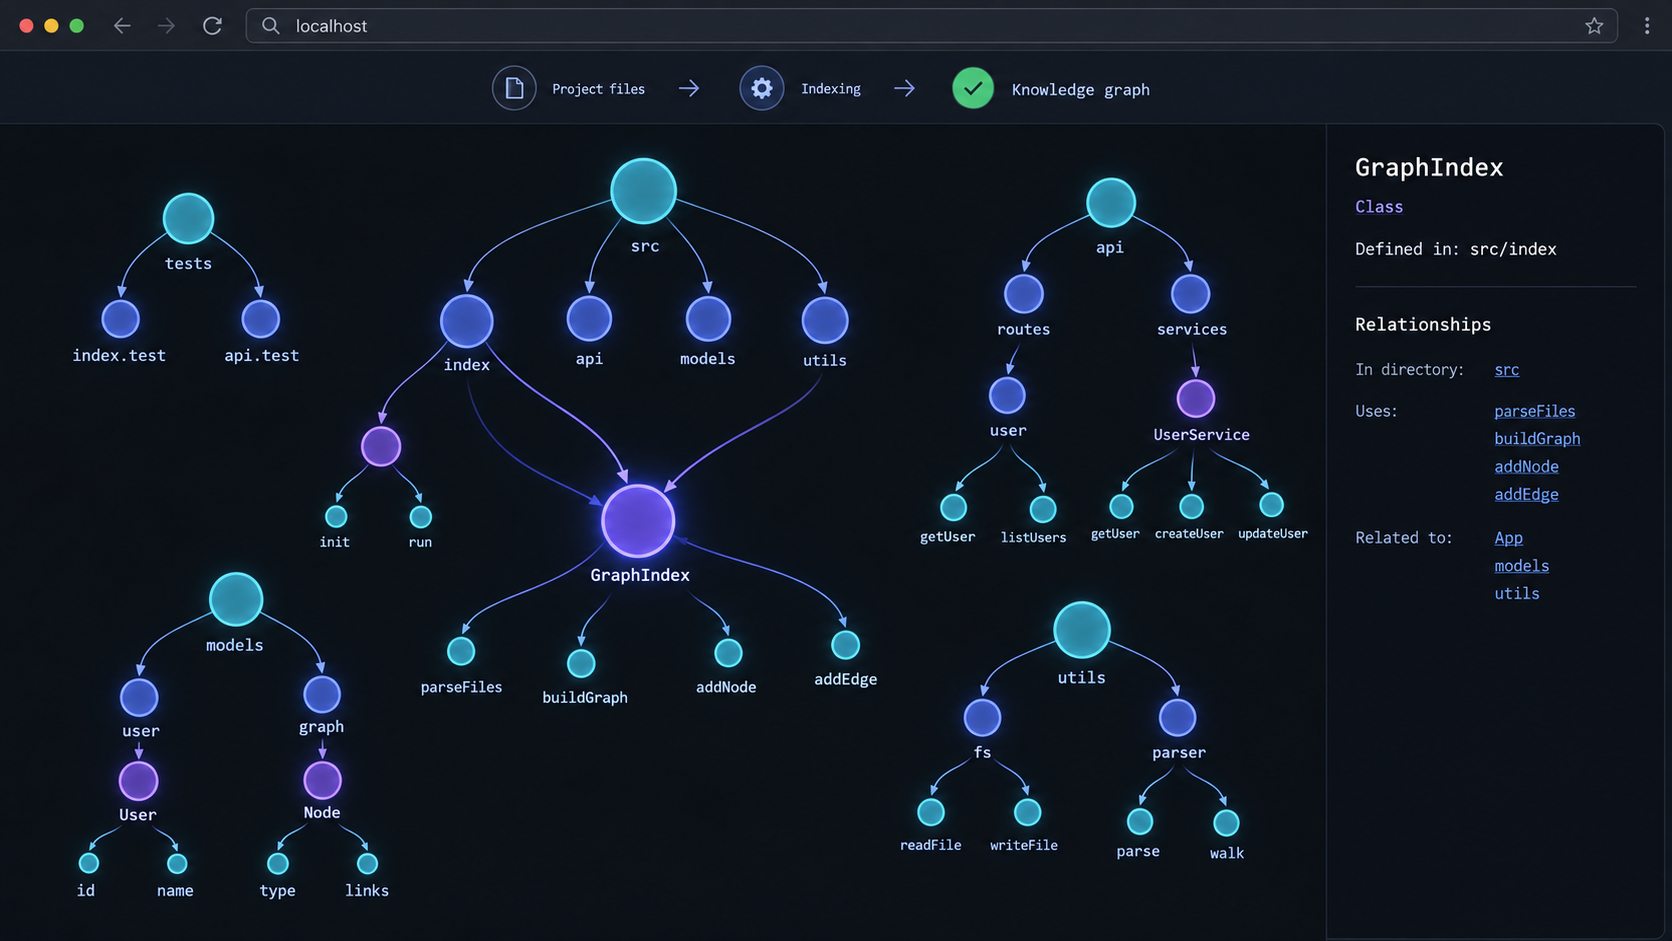
Open the coding agent with the target repository as its current project or workspace. The host account must be able to read the project files. Avoid indexing directories that include repositories or confidential material outside the intended scope.
The documented first interaction is:
Index this projectSend that request to the MCP-enabled coding agent. The agent should invoke codebase-memory-mcp to index the current repository. A first index can require more time and memory than later incremental updates because the server must parse the project and build the graph.
Indexing time depends on repository size, language mix, file complexity, hardware, available memory, and whether the current release must rebuild an older index format. Do not use a benchmark from another repository as a completion deadline for your own project.
Confirm that indexing targeted the intended directory
Before accepting the result, verify that the agent opened the correct repository. A successful index of the wrong working directory can produce a valid but irrelevant graph. This is especially easy to miss when a client restores an old workspace or launches from a home directory.
Ask a simple structural question whose answer you already know, such as the name of a major module or the location of an entry point. The response should correspond to the intended repository. This is a practical end-to-end check of client configuration, server startup, repository selection, and graph availability.
Understand upgrade-related reindexing
Releases can change the persistent index format. The v0.11.0 release, for example, documents a one-time full reindex for indexes created by v0.10.8 or earlier because file-node identities changed. That first run after upgrade can take as long as a cold index. Subsequent indexing returns to incremental behavior.
A one-time reindex after an upgrade is not necessarily corruption. Review the release notes for the version you installed before deleting data or repeatedly reinstalling the executable. If a large repository appears busy immediately after an upgrade, allow the documented rebuild to complete and inspect its output for a real failure.
A graph derived from private source code can expose internal class names, routes, service boundaries, call relationships, and architectural details. Treat the graph UI as sensitive even if it does not display every source file in full. Do not expose it publicly until the local graph has been reviewed and remote access has been intentionally approved.
Verify the graph UI locally
Local verification is the boundary between project setup and network exposure. The project documents the built-in graph visualization at localhost:9749. Keep the coding agent and server process active, then enter the following address in a browser on the same machine:
localhost:9749The project material describes this as the graph visualization endpoint but does not explicitly specify a URL scheme in the supplied evidence. Using the documented host-and-port form avoids claiming a scheme that the project excerpt does not state. A browser may infer the applicable scheme, while Localtonet configuration should use the HTTP tunnel family for the documented browser workflow.
A successful test should produce the graph interface associated with the indexed repository. Confirm more than the presence of a web page. Check that graph data appears, that it belongs to the intended project, and that basic navigation responds.
Use three levels of local verification
| Check | What it proves | If it fails |
|---|---|---|
| The MCP server appears available to the agent | The agent loaded a usable server configuration | Restart the agent and review installer or client MCP errors. |
| The agent can index and query the repository | The server can read the project and build or load its graph | Check repository selection, filesystem permissions, memory, and indexing output. |
localhost:9749 opens on the host |
The graph UI is present, running, and listening locally | Confirm that the installed release includes the UI and that the server process remains active. |
| The graph displays the expected project | The UI and index correspond to the intended repository | Return to the correct workspace and explicitly index that project. |
Do not create a Localtonet tunnel if the local browser test fails. A public tunnel forwards traffic to a local target, but it does not start codebase-memory-mcp, add the UI to a non-UI build, repair an index, or change the project’s listening behavior.
Check for a port conflict
If another application already uses port 9749, the graph UI may fail to start or the browser may display an unrelated service. The supplied project evidence does not establish a supported configuration variable or command-line option for changing the graph UI port, so this guide does not invent one. Identify the conflicting process and decide which application should own the documented port. If the project version supports a configurable port, use only the syntax documented for that release.
Expose the working graph UI with a Localtonet HTTP tunnel
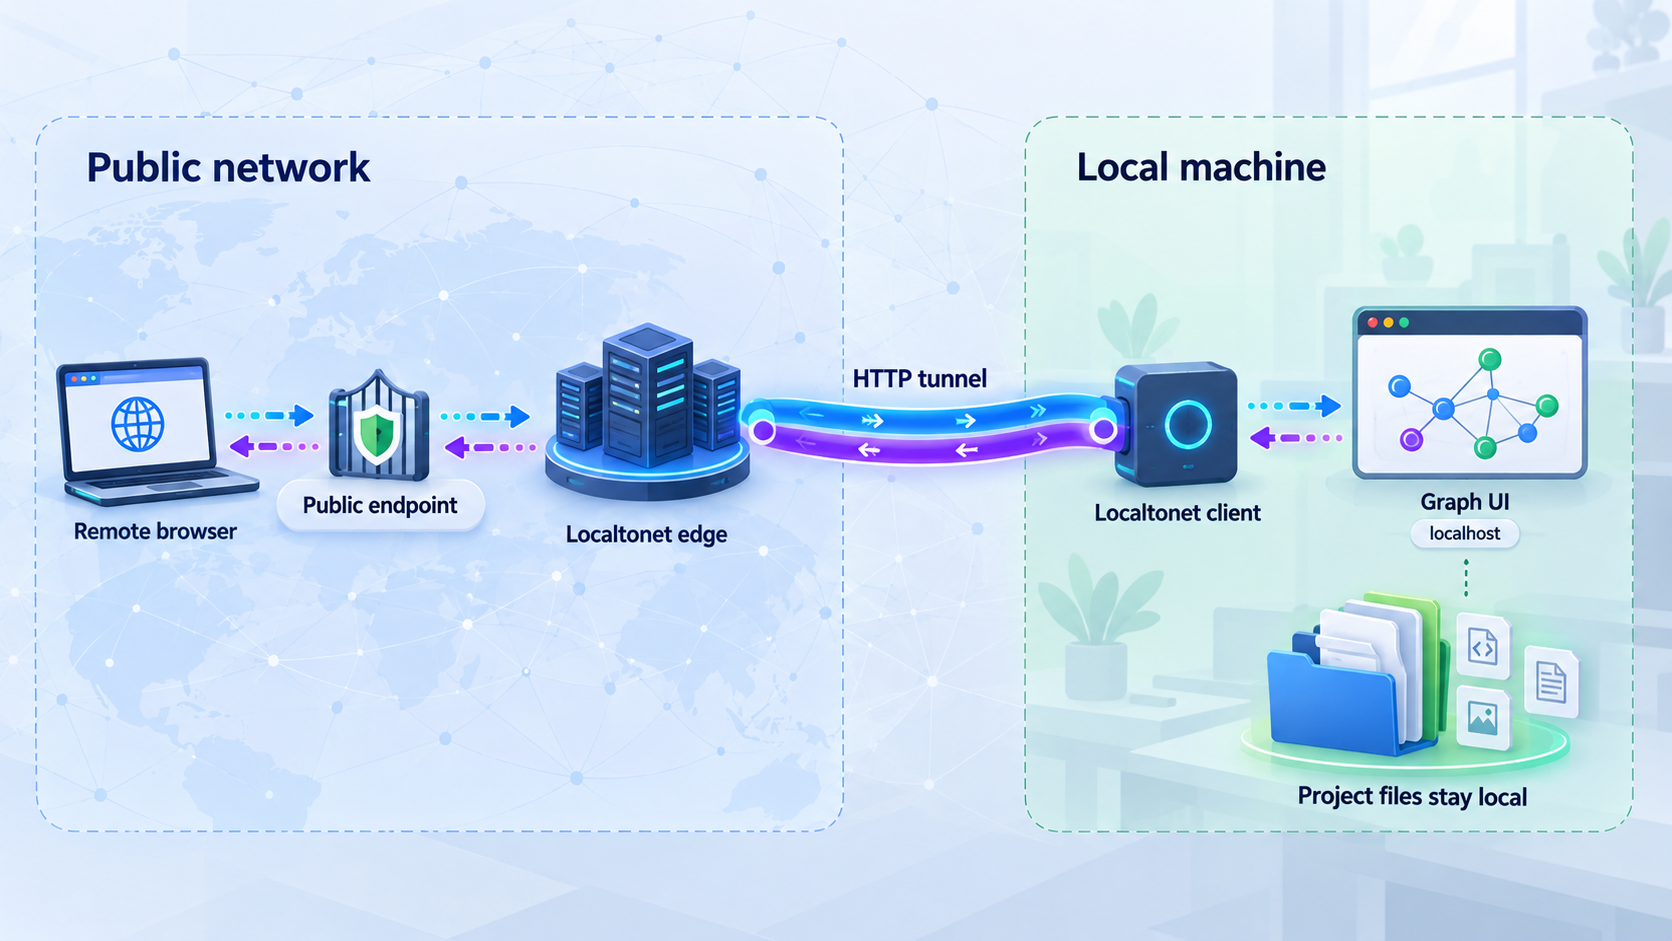
After local verification succeeds, Localtonet can make the graph interface reachable from outside the host network. Our client establishes an outbound connection to a Localtonet relay server, so this workflow does not require inbound router port forwarding, a public IP address, firewall changes, or VPN setup.
The tunnel should point only to the local graph UI. It should not expose the repository directory as a file share, and it should not be described as a remote MCP transport. For this browser-based interface, use the HTTP tunnel family with local port 9749.
Install and run the Localtonet client
Install our client on the codebase-memory-mcp host, or on another trusted device that can reach the UI. Running it on the same host keeps the forwarding path simple. Confirm that the client remains connected before configuring the tunnel.
Authenticate or select the device
Use the device-specific authentication token associated with the client. Select the intended device in the dashboard and keep its token private. Never substitute a guessed value or reuse a token copied from public material.
Select an available relay server
Choose a currently available server or region from the dashboard. Availability can vary, so use the values shown in your account rather than copying a hardcoded server code from an article.
Create an HTTP tunnel to the local UI
Choose the HTTP tunnel family and enter the local address on which the project’s documented localhost service is reachable from the Localtonet client device. Set the local port to 9749. If the client runs on another device, first confirm that the project intentionally listens on an address reachable from that device. The documented localhost binding may not permit that topology.
Choose the appropriate process type
HTTP tunnels can use Random Sub Domain, Custom Sub Domain, or Custom Domain where available. All three serve the target through a public HTTPS address. Options and plan availability can vary, so choose from the values currently shown in the dashboard. Custom-domain DNS details should be taken from current Localtonet documentation rather than inferred.
Start the tunnel and test the assigned address
Creating the configuration does not start it. Press Start, then open the assigned public URL from an external browser or network. Confirm that it shows the same graph as the local test. Stop or delete the tunnel when remote access is no longer required.
Our HTTP tunnel gives the browser interface a public HTTPS address while forwarding requests to the selected local target. The Localtonet tunnel exists only while the selected client is connected and the tunnel is running. If the client exits, the host sleeps, the MCP server stops, or the tunnel is stopped, the remote address will no longer deliver the graph UI.
A service bound only to localhost is normally reachable from the same host, which is why installing our client there is the clearest setup. If Localtonet runs on another computer, do not assume that computer can reach localhost:9749 on the development machine. On the second computer, localhost refers to the second computer itself.
Verify from outside the local network
Test the public address from a device that is not relying on the host’s local network path. A mobile browser using cellular data is one practical option. Compare the public result with the locally verified graph. If the public URL returns an error while the local page remains healthy, focus troubleshooting on the Localtonet client, selected device, target address, target port, relay selection, and tunnel state.
If the public page loads but contains stale or unexpected project data, the tunnel is probably forwarding correctly. Return to the codebase-memory-mcp index and active workspace rather than changing the tunnel.
Secure the graph and remote-access workflow
The supplied project documentation does not establish built-in graph UI authentication, per-user authorization, remote-deployment hardening, or a supported access-control model for a publicly reachable interface. It also does not say that the UI is safe to publish without another protection layer. Treat the endpoint as potentially unauthenticated unless your installed version explicitly proves otherwise.
HTTPS protects browser transport to the tunnel edge, but it does not by itself decide who is allowed to view the graph. If the graph UI does not enforce authentication, anyone who obtains the active public address may be able to access it. Use short exposure windows, share the address only with intended users, and place an approved authentication or access-control layer in front of the UI when your risk model requires one.
Apply least exposure
- Keep the UI local when remote access is not necessary.
- Start the Localtonet tunnel only for the period in which access is required.
- Stop or delete the tunnel after the remote task is complete.
- Do not publish the assigned URL in public issues, logs, screenshots, or source files.
- Do not expose unrelated local ports or repository folders.
- Use a dedicated development host or least-privileged user where practical.
- Review the graph for sensitive project names, routes, internal service relationships, and architecture details before sharing access.
- Follow repository licensing, client confidentiality, and organizational security requirements.
Protect device tokens and credentials
A Localtonet authentication token identifies the client device that runs the tunnel. It is not an example value to include in a tutorial or configuration committed to version control. Obtain the token from your account, store it according to your credential-management policy, and rotate or revoke it if exposure is suspected.
codebase-memory-mcp does not require an API key for its native local analysis, according to the project documentation. That does not mean the surrounding coding agent is credential-free. Protect any credentials used by the MCP client independently and never display them in the graph, tunnel configuration, screenshots, or support output.
Keep tunnel scope and application scope separate
Localtonet forwards traffic to the target you configure. It does not add application roles to codebase-memory-mcp, decide which graph nodes a visitor may inspect, or sanitize indexed data. Application authorization and network reachability are distinct layers.
| Layer | Responsibility | Recommended check |
|---|---|---|
| Repository permissions | Determines which code the indexing account can read | Run with an account limited to the intended repositories. |
| codebase-memory-mcp | Indexes code and serves the graph interface | Verify the selected repository and inspect what the graph reveals. |
| Application authentication | Determines who may use the graph UI | Do not assume it exists unless the installed version documents and demonstrates it. |
| Localtonet HTTP tunnel | Provides remote reachability to the configured local target | Use the correct device and port, and stop the tunnel when finished. |
| Operational controls | Limit duration, audience, and handling of the public URL | Use short sessions, least privilege, and approved access policies. |
Troubleshooting installation, indexing, and remote access
The coding agent cannot find the MCP server
First restart the agent completely. Then review the installer output to confirm that it detected the intended client. If you used --skip-config, no automatic agent configuration should be expected. For conditional or manual clients, use the current client-specific setup rather than copying configuration from a different application.
Also verify that the executable is present at the location referenced by the client. A successful download does not prove that the agent configuration points to the correct file or that the current user can execute it.
The indexing request does nothing
Confirm that the conversation or workspace is attached to the target repository and that the MCP server appears connected in the client. Reissue the documented request, Index this project, after the restart. Look for server startup, permission, memory, or repository-path errors instead of repeatedly reinstalling without diagnosis.
The first index after upgrading is unexpectedly slow
Check the release notes for an index-format migration. Version 0.11.0 documents a one-time full rebuild for older indexes. A large repository can therefore take as long as a cold index on the first post-upgrade run. Let that rebuild finish unless the process reports a concrete failure.
The browser cannot open localhost:9749
Keep the agent and server active, and confirm that indexing has begun or completed. Verify that the installed release contains the graph UI. Because project documentation revisions differ on whether a UI-specific installation option is required, inspect the installer help and release instructions for the exact version in use.
Check whether another process already owns port 9749. If there is a conflict, do not invent an undocumented port flag. Resolve the conflict or use only a port-setting mechanism documented by the installed project release.
The local UI works but the public address does not
Confirm that the Localtonet client is connected, the intended device is selected, an available relay server was chosen, and the tunnel was actually started. Creating a tunnel is not the same as starting it.
Recheck the local target. The port must be 9749 for the documented graph endpoint. The target address must resolve to the codebase-memory-mcp host from the machine running our client. If our client is installed on another machine, that machine’s localhost cannot refer to the development host.
The public URL opens the wrong application
This usually indicates that the tunnel points to the wrong local port or that another process is listening on 9749. Compare the page returned by the public address with the page returned locally. Stop the tunnel while correcting the target so an unintended local service is not left publicly reachable.
The graph is empty or shows the wrong project
The network path may be working correctly while the active graph is not. Return to the coding agent, open the intended repository, and request indexing there. Confirm the result with a structural question about a known module before retesting the browser UI.
Windows blocks the installer or executable
For the installer script, use the documented Unblock-File step after reviewing the downloaded file. If an execution policy prevents the script from running, the project documents a process-scoped bypass, but managed-device policy takes precedence.
The project also documents the possibility of antivirus false positives for release binaries. Do not blindly allow a file solely because a detection is described as known. Confirm that the artifact came from the expected release, perform the project’s recommended integrity checks, and follow your organization’s malware-review process.
The remote address stops working after a period of time
Verify every lifecycle dependency. The codebase-memory-mcp process must still be serving the UI, the host must remain awake and connected, the Localtonet client must remain connected, and the tunnel must remain running. Failure of any one of those components interrupts remote access.
Frequently asked questions
Does codebase-memory-mcp require Docker or a language runtime?
No. The documented native installation uses platform release assets and does not require Docker, a separate language runtime, or an API key. You still need an MCP-compatible coding agent to use the server as an AI code-intelligence backend.
What should I expose through Localtonet?
For this workflow, expose only the documented graph UI on local port 9749 through an HTTP tunnel. Do not assume that this port is a supported remote MCP transport, and do not expose the repository directory or unrelated development services.
Must the Localtonet client run on the same machine?
It is the clearest arrangement because the project documents the UI at localhost. Our client can also forward a service reachable over the local network, but a localhost-only binding is not reachable from another device. Do not use a second-device topology unless the UI is intentionally and securely listening on an address that device can reach.
Does the public HTTPS address mean the graph UI requires a login?
No. HTTPS transport and application authentication are different controls. The supplied project evidence does not establish built-in authentication for the graph interface. Treat it as potentially unauthenticated unless your exact installed version documents and verifies an access-control feature.
Why does the tunnel fail when localhost:9749 works on another computer?
Localhost always refers to the machine on which the request is made. If our client runs on a different computer, its localhost is not the codebase-memory-mcp host. Install our client on the server host or use a deliberately configured local-network address that the client machine can reach.
Does creating a Localtonet tunnel start codebase-memory-mcp?
No. The application must already be installed, started, indexed, and serving its UI locally. The tunnel only forwards traffic to that working target. Creating the tunnel also does not start it automatically, so press Start after configuration.
Can I change the graph UI port?
The supplied evidence establishes port 9749 but does not establish a supported environment variable or command-line option for changing it. Use only a configuration method documented by your exact project release. Do not guess a flag or variable.
Why is a full reindex happening after an upgrade?
Some releases change the persistent index format. Version 0.11.0 specifically documents a one-time rebuild for older indexes. Review the release notes for the installed version before treating a post-upgrade rebuild as a fault.
Will the public graph remain available when my computer sleeps?
No. Remote access depends on the host, codebase-memory-mcp process, Localtonet client connection, and tunnel all remaining active. Sleeping or disconnecting the host interrupts that chain.
Access your verified graph UI with Localtonet
Install and index codebase-memory-mcp first, confirm the graph at localhost:9749, then create a narrowly scoped HTTP tunnel for the working interface. Keep the tunnel active only while remote access is needed.


