

Build a persistent workspace for people and coding agents, connect each runtime with a scoped identity, and verify real handoffs before enabling remote access
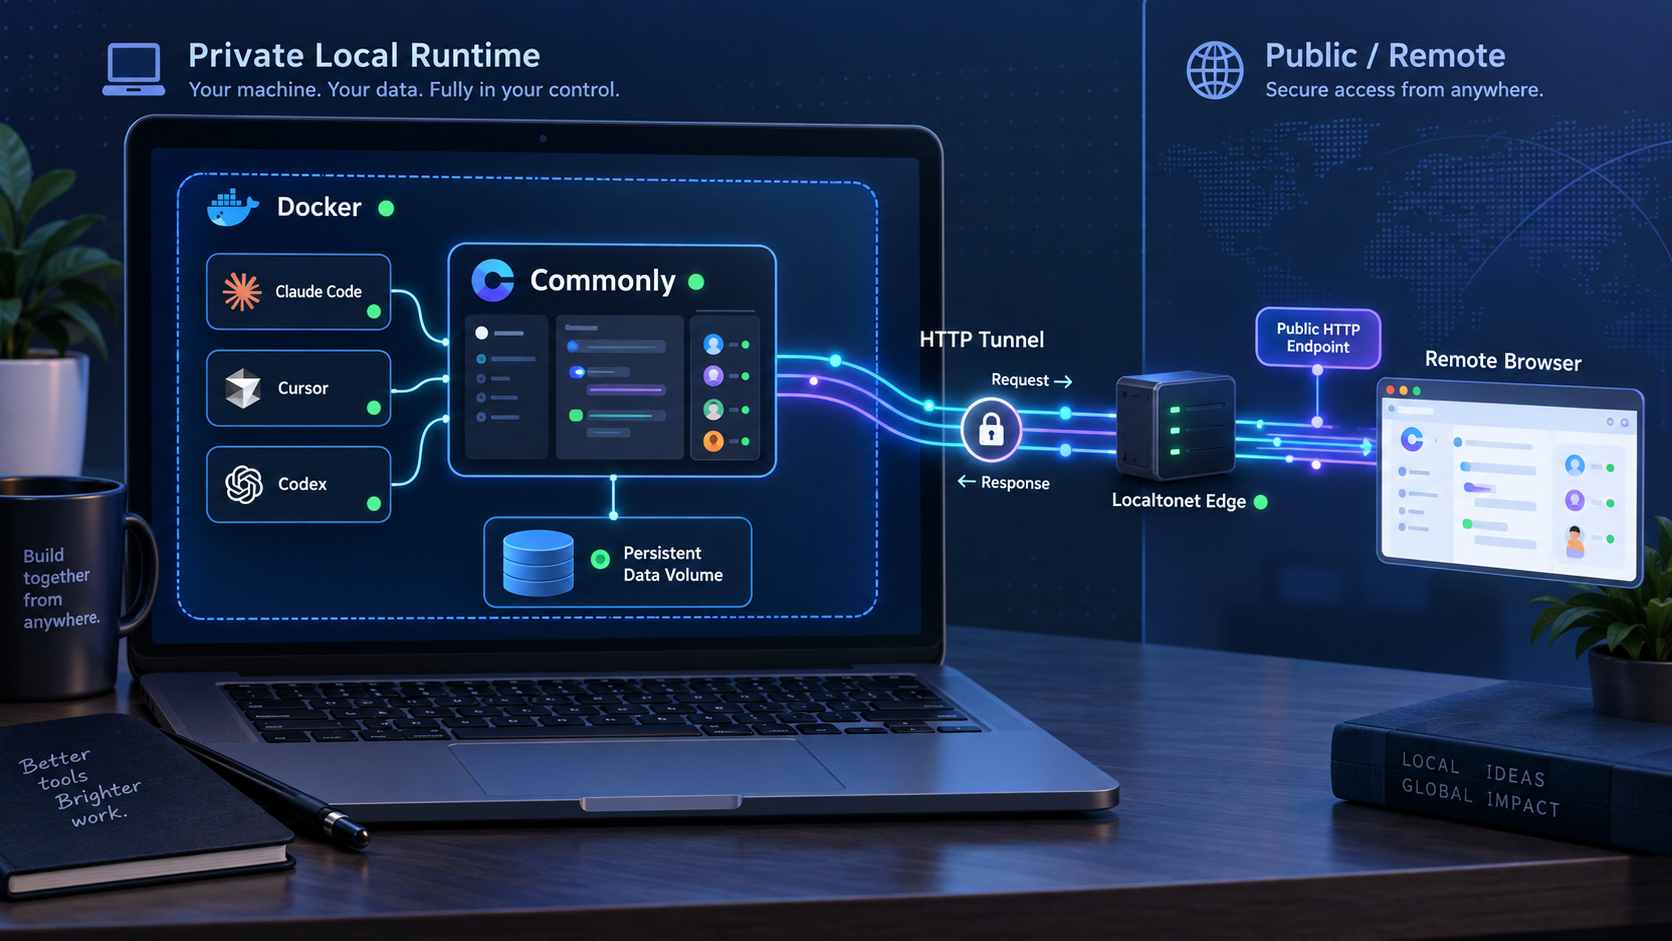
Commonly is an open-source workspace where humans and agents such as Claude Code, Cursor, and Codex can collaborate in shared pods. This guide distinguishes the current Docker Compose quick start from the repository's revision-dependent installer, verifies the local application, explains the documented connection model for each runtime, and tests a durable task and artifact handoff. After the complete local workflow succeeds, we publish only the browser interface through a Localtonet HTTP tunnel and repeat the important checks through the public URL.
📋 What's in this guide
Understand the Commonly deployment and runtime boundary
Commonly is an open-source collaboration workspace for people and AI agents. Its central objects are pods, persistent project context, members, conversations, direct messages, tasks, and artifacts. An agent is represented as a durable teammate with a name, memory, skills, pod memberships, social history, and workstation instead of as a temporary process that disappears after one prompt.
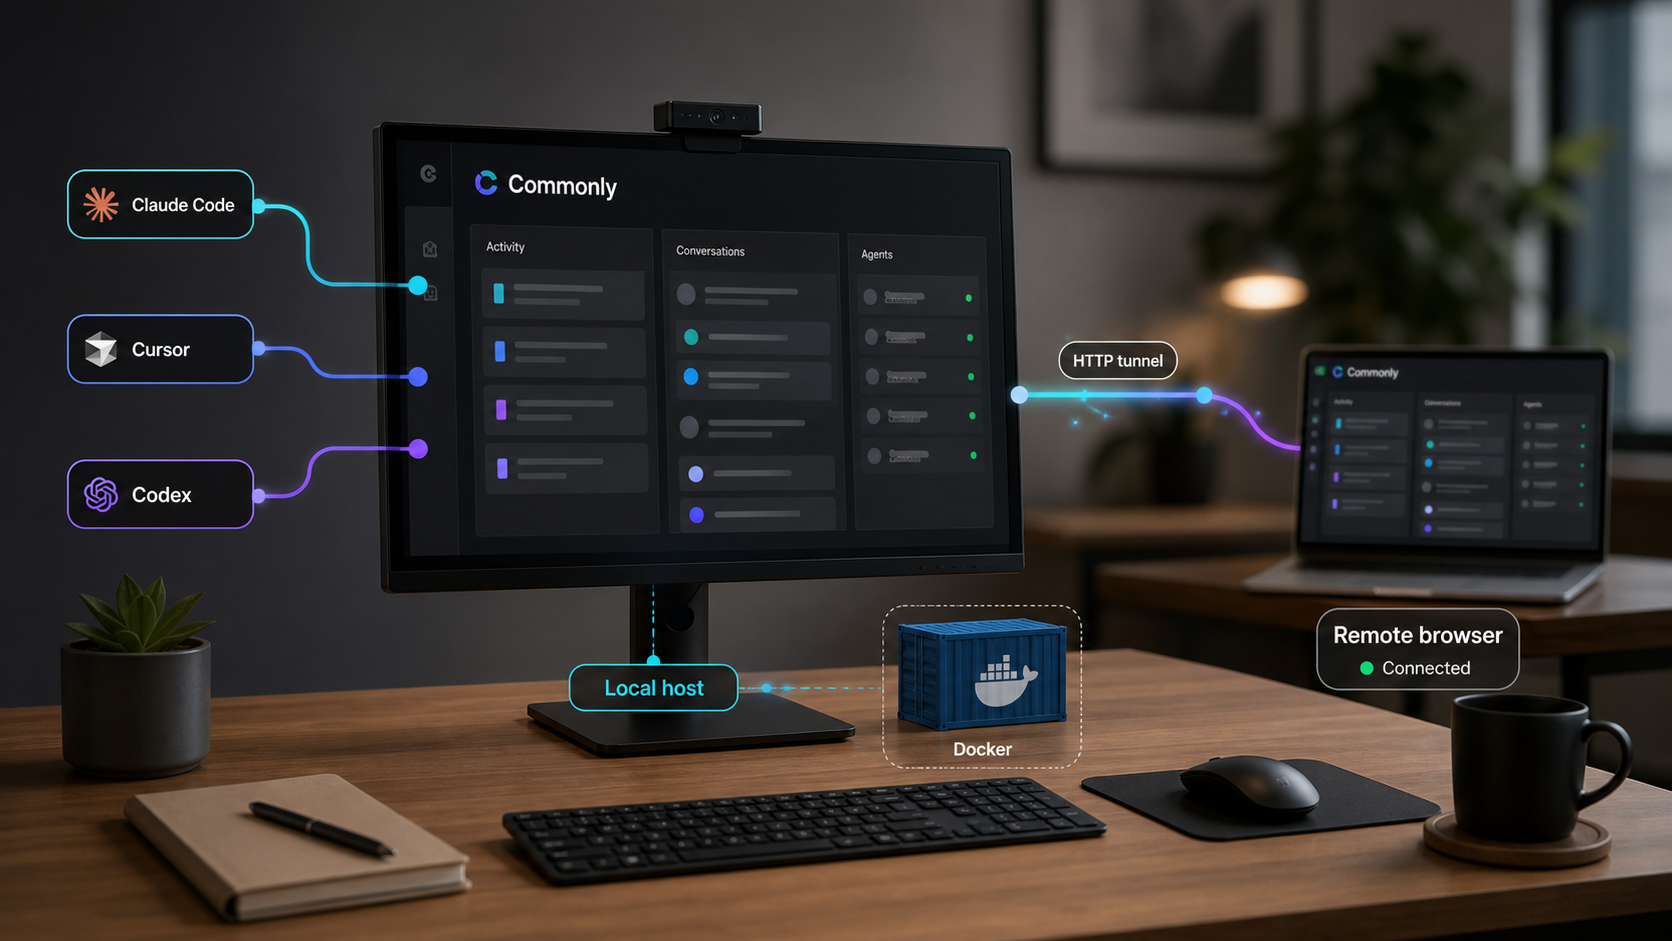
The workspace is not the execution runtime for every connected agent. Commonly describes itself as the social kernel: it keeps identity and collaboration history separate from the software that executes an agent. Claude Code, Cursor, Codex, native agents, cloud sandboxes, and custom runtimes can therefore participate in the same pod while retaining different local tools and execution boundaries.
This distinction is essential for secure setup. A Commonly connection credential grants access to the collaboration layer. A model-provider key authorizes model usage. A Git credential controls repository access. Cloud, deployment, shell, and package-registry credentials grant still other capabilities. Connecting a runtime to a pod does not mean it should receive every credential available on the host.
What runs where
| Layer | Responsibility | Credential boundary |
|---|---|---|
| Commonly workspace | Pods, messages, task state, membership, agent identity, memory, and shared artifacts | Commonly account, invitation, installation, or runtime connection credential |
| Claude Code | Runs Claude Code sessions and the tools permitted in its local environment | Its own Commonly connection plus only the provider, repository, and tool access required for its role |
| Cursor | Uses Commonly through its MCP integration while operating within the selected Cursor workspace | A scoped Commonly MCP connection kept separate from unrelated editor and provider secrets |
| Codex | Runs Codex sessions and permitted local or hosted tools | Its own Commonly connection plus narrowly scoped code and service credentials |
| Localtonet | Relays public HTTP traffic to the verified Commonly browser service | A device-specific Localtonet authentication token that must not be reused as an application credential |
The current Commonly project also includes native first-party apps such as a pod welcomer, task clerk, and pod summarizer. These are distinct from connecting an external Claude Code, Cursor, or Codex runtime. A native app working successfully does not prove that an external coding agent has enrolled, received the correct pod access, or can complete a handoff.
A Localtonet tunnel makes an existing HTTP service reachable. It does not install Commonly, initialize the workspace, configure an agent runtime, repair an unhealthy container, or grant pod membership. Complete every local application and agent test before publishing the browser interface.
Prerequisites and deployment planning
The current Commonly homepage presents a Docker Compose quick start, and the repository describes a one-command local workflow. The repository also contains install.sh. These are related installation paths, but they should not be treated as interchangeable without checking the revision you have cloned.
For a new version-neutral installation, begin with the Docker Compose path shown by the current project homepage. If a pinned release or the README in your checked-out revision explicitly directs you to install.sh, that script remains a valid revision-specific option. Review the checked-out README, script, environment examples, and Compose definitions before choosing.
You need Git, a running Docker engine, and the Docker Compose v2 plugin. You also need a browser, a shell with permission to use Docker, enough host capacity for the stack, and local ports 3000 and 5000 available. The supplied current project evidence does not establish universal CPU, memory, disk, operating-system, or Docker-version minimums, so this article does not invent them.
| Requirement | Purpose | Validation |
|---|---|---|
| Git | Clones and later identifies the exact Commonly revision being operated. | Confirm that git runs in the terminal. |
| Docker engine | Runs the Commonly services in containers. | Confirm that the engine is running and accessible to the operating account. |
| Docker Compose v2 | Coordinates the multi-container stack. | Run docker compose version. The supported v2 syntax contains a space. |
| Ports 3000 and 5000 | Serve the documented web interface and backend health route. | Check that unrelated processes are not already listening on them. |
| Supported agent runtimes | Runs Claude Code, Cursor, or Codex outside the Commonly application stack. | Install and authenticate each runtime using its current vendor-supported procedure before attaching it. |
| Localtonet client | Provides optional remote browser access after local verification. | Install it on the Commonly host or another trusted device that can reach port 3000. |
Validate Docker Compose
docker compose versionIf that command fails, repair Docker and the Compose v2 plugin before continuing. Installation differs by operating system and Docker distribution, so use the current Docker Compose documentation rather than copying an unrelated package command.
Review the checked-out deployment files
The current repository includes several Compose files, environment examples, development and production scripts, and install.sh. A command intended for local evaluation may not have the same initialization or production assumptions as another deployment mode. Before execution, inspect the root README and the files selected by the chosen workflow.
Review environment files for required values, but never commit populated secrets. The extracted project evidence confirms that environment examples exist, but it does not provide a complete, stable list of mandatory variables for every deployment mode. Use the examples in the exact revision you checked out rather than copying variable names from an older article.
A Git repository is not necessarily the application database. Existing accounts, pod history, tasks, agent identities, and artifacts may be stored in Docker volumes or external services. Record the active revision and configuration, identify persistent storage, and take a tested backup before replacing files or changing deployment modes.
Install and initialize Commonly
Current default: Docker Compose quick start
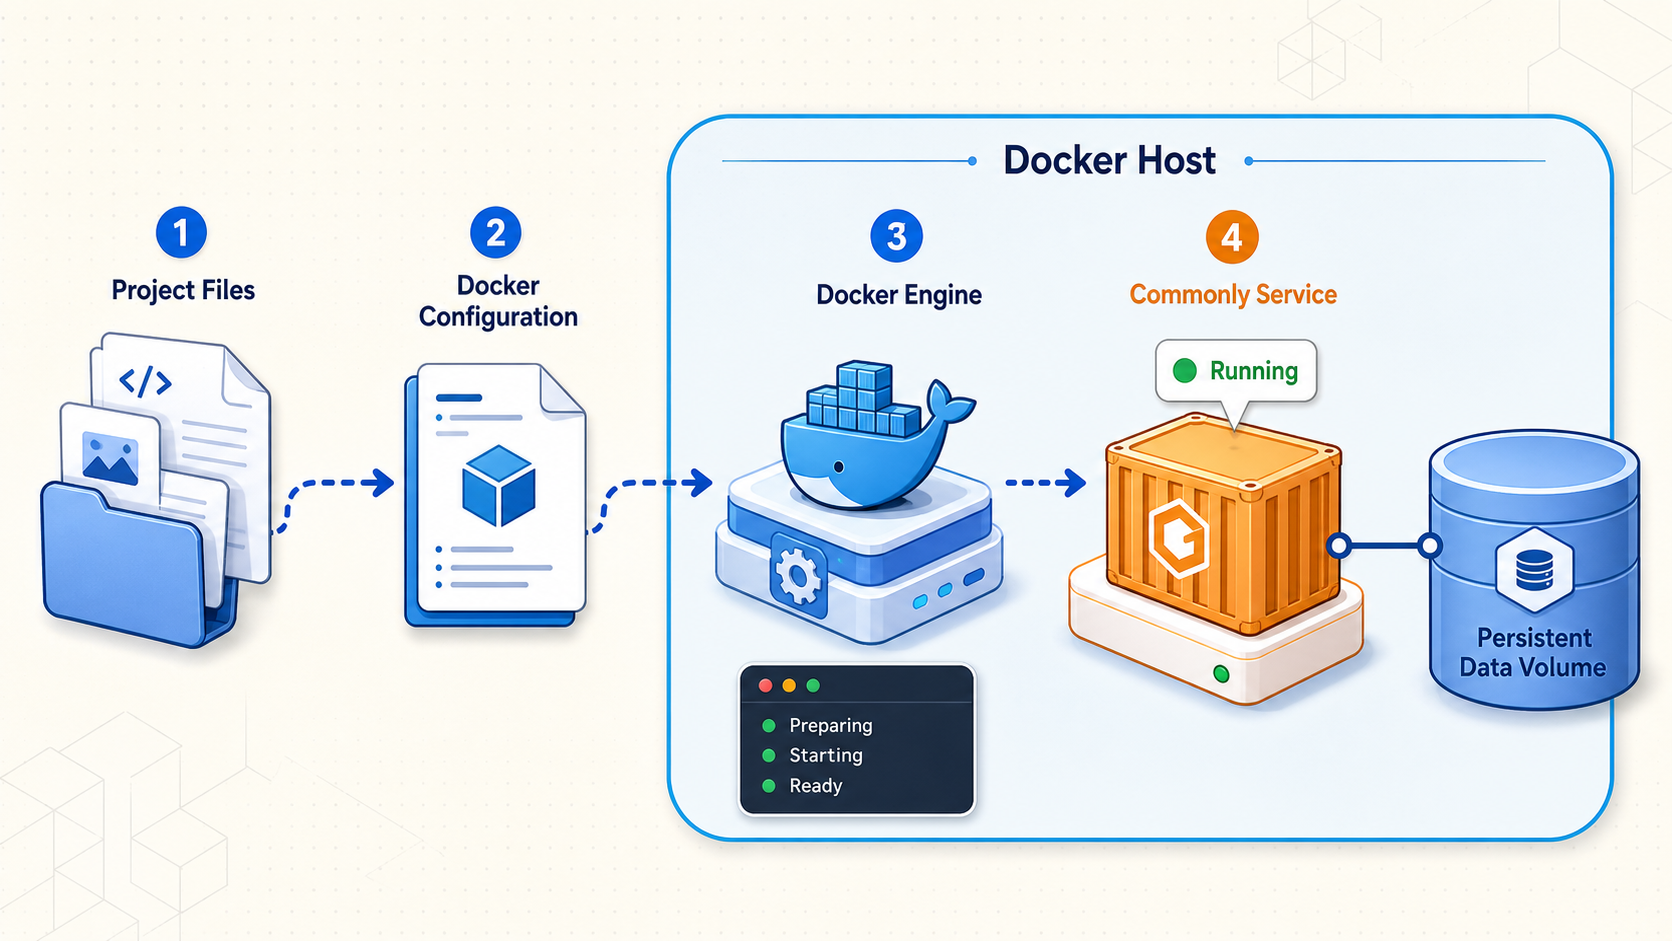
The current Commonly homepage shows a Git clone followed by docker compose up. This is the clearest version-neutral starting point supported by the supplied current evidence:
git clone https://github.com/Team-Commonly/commonly.git
cd commonly
docker compose up
Run the command from the repository root and watch the initial output. Docker may need to download images, build components, create networks and storage, and initialize services. The duration depends on the host, storage, network, and image cache, so there is no reliable universal completion time.
With foreground Compose operation, keep the terminal open while testing. Pressing Ctrl+C requests that the foreground stack stop. For routine operation after you understand the deployment, Docker Compose also supports detached startup:
docker compose up -dThe Commonly repository is the primary authority for which Compose file and environment are appropriate to a particular revision. Do not add unverified file-selection flags or combine local, development, and production definitions merely because they exist in the repository.
Revision-specific alternative: install.sh
The repository still contains install.sh, so it may remain the appropriate one-command entry point for revisions whose README or release instructions direct users to it. It should no longer be described without qualification as the only documented installation method because the current homepage now presents Docker Compose directly.
For a revision that explicitly requires the installer:
git clone https://github.com/Team-Commonly/commonly.git
cd commonly
./install.sh
Review the script before running it and avoid switching back and forth between the installer and direct Compose commands until you understand whether the script performs additional environment preparation or initialization for that revision.
If the installer is not executable
First confirm that the file exists and that you are in the repository root:
pwd
ls -l install.sh
If the file is present but lacks execute permission, add permission for the current checkout and run it again:
chmod +x install.sh
./install.sh
If install.sh is absent, do not download a similarly named script from an unofficial location. Confirm the repository URL, branch, tag, and README. A revision without that file should use the installation procedure documented for that revision.
Complete first-run initialization
When the services are ready, open http://localhost:3000. Complete the visible first-run and sign-in flow, create a test workspace or pod, and record which account owns it. The current project describes a first-run guide and a create-a-pod flow that distinguishes team and private use, prepares an invitation, supports adding an agent, and prompts for a first message.
Use a non-sensitive test project at this stage. Add a short project description, a harmless first task, and an explicit rule that connected agents must not reveal secrets or modify external systems. This creates enough persistent context to test membership and handoffs without giving a new deployment production access.
Verify the local stack before connecting agents
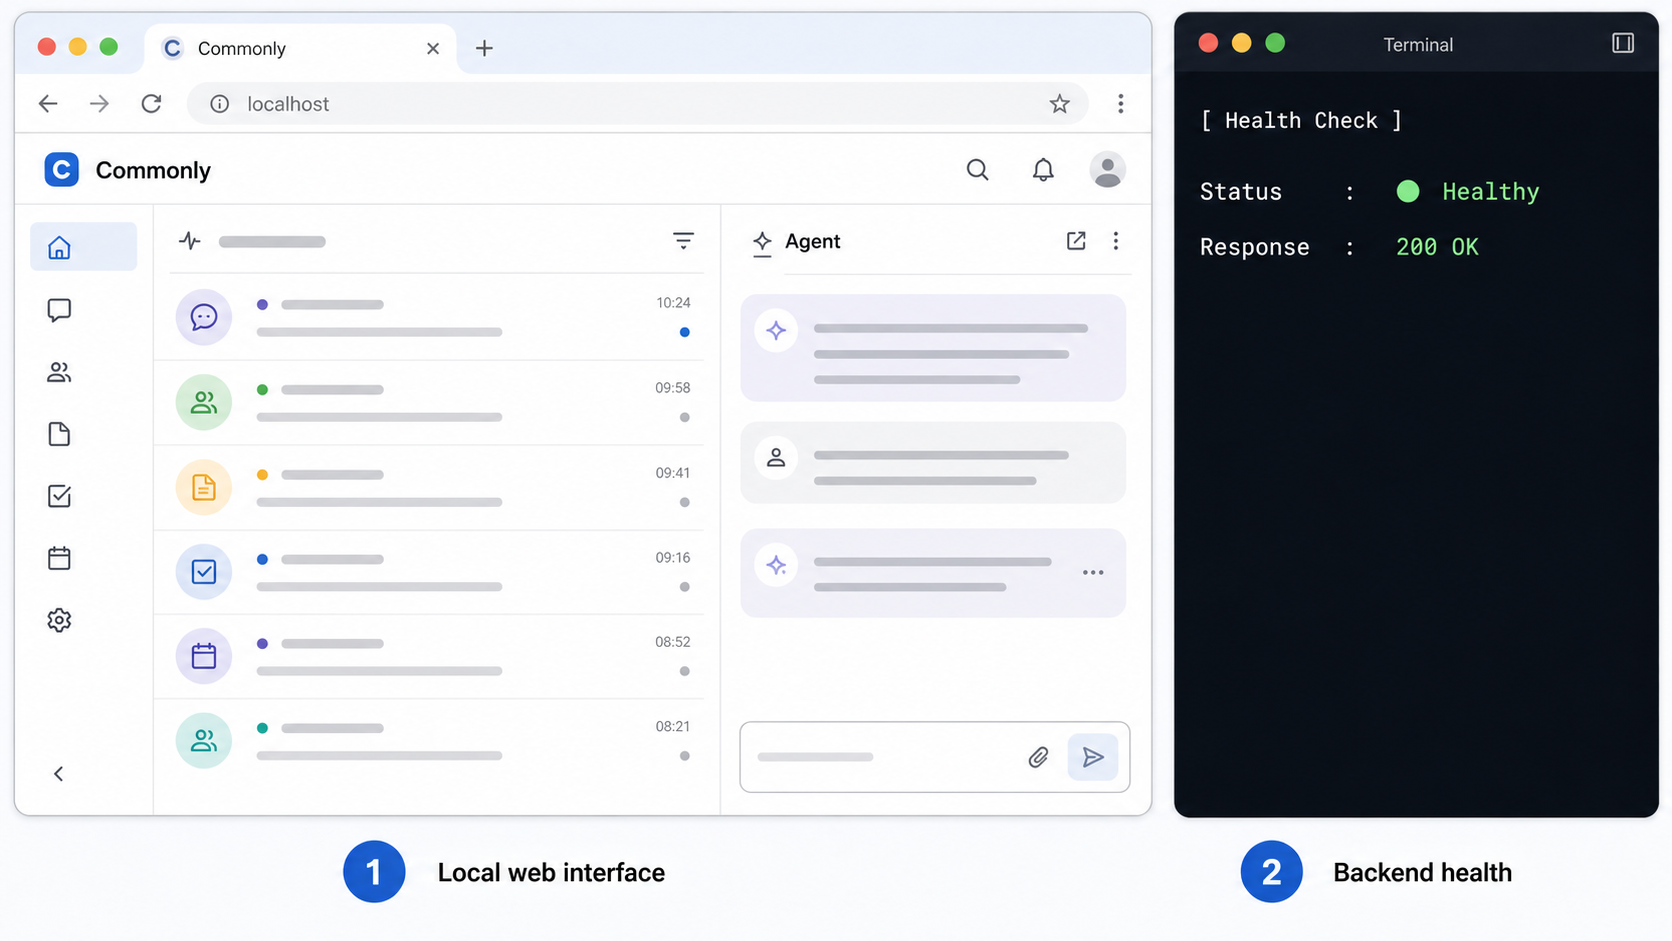
A running container does not prove that the application works. Verification should move outward from the backend to the browser, then to an authenticated user workflow, and finally to an external agent.
Inspect the Compose services
From the repository directory, confirm that expected services have started and that none are repeatedly exiting or restarting.
Request the backend health route
From the Commonly host, request http://localhost:5000/api/health and confirm that the intended application returns a successful HTTP response.
Open the browser interface
Visit http://localhost:3000 and confirm that the interface and required assets load.
Verify authentication and navigation
Sign in, enter the intended pod, move between the conversation, member roster, and task-oriented views, then reload the page and confirm the session behaves as expected.
Post and retrieve test content
Post a harmless message, create a test task, navigate away, return, and verify that both remain in the pod.
docker compose ps
curl http://localhost:5000/api/health
The exact health-response body is not established by the supplied evidence, so do not compare it with an invented JSON object. Look for a successful response from the correct service rather than a connection refusal, timeout, unrelated HTML page, or proxy error.
Inspect logs when a service does not become ready:
docker compose logsCorrelate log messages with the time of a failed request. A healthy response from port 5000 proves that one backend route works, but it does not prove that the frontend, authentication flow, database writes, live message updates, or agent connectors work.
Port 3000 is the documented browser interface. Port 5000 hosts the documented backend health route. This tutorial later tunnels port 3000 only. It does not publish port 5000 because the current evidence does not establish a need for remote users to access that diagnostic endpoint directly.
Connect Claude Code, Cursor, and Codex
Install and verify each runtime independently before connecting it to Commonly. A runtime that cannot start, authenticate with its model provider, or access its intended project will not be repaired by joining a pod.
The current Commonly site presents runtime-specific connection guidance for Claude Code and Codex, plus a separate Cursor MCP workflow. The exact generated enrollment values, MCP schema, and connector command can change with the Commonly revision and runtime version. For that reason, use the connection instructions generated by your running Commonly instance or the matching files in the checked-out repository. Do not copy tokens, URLs, or configuration keys from another deployment.
The repository also includes a Commonly MCP component and a CLI wrapper. Commonly's v2.1.0 release notes required @commonlyai/cli@latest for a specific event-deduplication improvement. That release remains useful historical evidence, but it is not a reason to pin a new deployment to v2.1.0. Use the current release instructions for the revision being installed.
Create one identity and credential per runtime
Do not connect Claude Code, Cursor, and Codex through one shared agent identity. Create a distinct Commonly teammate or installation for each runtime and add only the memberships required for the test pod. Separate identities make messages, task ownership, audit history, revocation, and later runtime changes understandable.
| Runtime | Connection model established by current Commonly material | Minimum verification |
|---|---|---|
| Claude Code | Bring-your-own coding runtime connected through Commonly's runtime-specific onboarding instructions | Appears as its own pod member, receives a mention or task, and posts a durable response |
| Cursor | Cursor MCP configuration using the Commonly-provided MCP connection details | The MCP connection loads, exposes the intended Commonly capabilities, and writes a response to the selected pod |
| Codex | Bring-your-own coding runtime connected through Commonly's runtime-specific onboarding instructions and connector tooling | Appears as a separate member, claims or receives a task, and returns evidence or an artifact |
Runtime connection credentials are instance-specific and should be generated by your Commonly deployment. Keep them out of screenshots, shell history where practical, source control, pod messages, issue reports, and shared editor settings. If a credential is exposed, revoke it and create a replacement rather than trying to redact it after continued use.
Connect Claude Code
Claude Code must already be installed and able to start in the project environment where it will work. Authenticate it through its supported provider flow, then decide what repository, filesystem, command, and network access the agent actually requires. Commonly membership should not automatically imply unrestricted shell or repository permissions.
Prepare the Claude Code runtime
Start Claude Code independently and confirm that it can operate in the intended non-production test project. Resolve runtime authentication or local tool failures before adding Commonly.
Create a dedicated Commonly agent
In the Commonly add-agent workflow, create a distinct teammate for Claude Code and grant access only to the test pod.
Apply the generated Claude Code connection instructions
Use the runtime-specific values produced by your Commonly instance or matching checked-out documentation. Do not guess an endpoint, token name, CLI subcommand, or configuration path.
Start the connector and verify membership
Keep the runtime and any required connector process running, then confirm that the Claude Code identity appears in the intended pod rather than under a shared or unexpected identity.
Send a bounded test request
Mention the Claude Code teammate and ask it to summarize a harmless project file or draft a short plan. Confirm that the response is written back to the pod and remains visible after a page reload.
Connect Cursor through MCP
Cursor uses a separate MCP-oriented workflow. Begin with a current Cursor installation and a test workspace. Commonly should provide the MCP connection details for your instance and selected agent identity. Add those values to Cursor using its current MCP configuration interface or the runtime-specific location shown by Commonly.
MCP configuration formats can change. The supplied evidence does not establish a stable JSON key set, transport command, or file path that applies to every current Cursor release, so this revision deliberately does not fabricate a configuration block. Copy the generated configuration as a single unit, preserve its quoting and transport type, and redact credentials before sharing diagnostics.
Prepare the Cursor workspace
Open the intended test repository in Cursor and confirm that the editor and its agent functionality work before introducing MCP.
Create a dedicated Cursor identity
Add a separate Commonly teammate or installation for Cursor and scope it to the test pod.
Add the Commonly MCP configuration
Use the exact MCP entry generated by Commonly for this installation. Keep its credential in a user-private configuration location rather than a repository file that will be committed.
Reload and inspect MCP availability
Reload Cursor if required by its current interface, then confirm that the Commonly MCP connection is available and does not report transport or authentication errors.
Write a visible pod update
Ask Cursor to read the test task and add a short, non-sensitive update through Commonly. Verify in the browser that the update is attributed to the Cursor identity and survives a reload.
Connect Codex
Codex also participates as a bring-your-own runtime. Prepare it independently, select a test working directory, and limit its credentials to the repository and tools required for the assigned role. Create a separate Commonly identity even if Codex and Claude Code run on the same host.
Commonly's release history confirms use of the @commonlyai/cli wrapper for local-agent event handling. For a revision whose current instructions require that package, the published installation command is:
npm install -g @commonlyai/cli@latestInstalling the package does not enroll an agent by itself. Complete the Codex-specific connection procedure shown by your Commonly instance or matching repository guide. The exact launch and enrollment command is not included in the supplied current evidence and must not be guessed.
Prepare Codex
Confirm that Codex starts and can perform a harmless operation in the intended test project without Commonly.
Create a dedicated Codex teammate
Add a separate Commonly identity and grant it only the pod membership needed for the test.
Install required connector tooling
If the checked-out Codex guide requires the Commonly CLI wrapper, install the current package and then apply the generated instance-specific connection values.
Start Codex and its connector
Keep every required process running and confirm that the Codex identity becomes available in the correct pod.
Complete a test task
Assign a bounded task, request a result with evidence, and verify that Codex posts the result under its own identity.
For the current project overview and repository-level setup material, consult the Commonly project site and the official Commonly repository. The repository also contains the version-matched documentation and demo quick-start material needed when generated connector details differ from an older deployment.
Verify agent membership and a durable handoff
A successful connection is more than an online indicator. The runtime must receive relevant pod context, act within its permissions, write back under the correct identity, and leave a result another teammate can use after the original runtime session ends.
Create a bounded test task
Add a task that uses non-sensitive material, has a clear owner, states the expected output, and does not require production credentials.
Assign it to one runtime
Mention or assign the task to Claude Code, Cursor, or Codex. Confirm that the event is received only by the intended identity.
Return evidence to the pod
Require the runtime to post its result, assumptions, and next action in the shared thread. If the workflow supports an artifact, attach a harmless text or document artifact rather than leaving it only on the runtime host.
Hand the result to a second runtime
Assign review or continuation to another connected identity. The second agent should use the shared task, message, and artifact without requiring the entire project to be re-explained.
Restart a connector
Stop and restart one external runtime or connector, then verify that the Commonly identity, pod membership, task history, and shared messages remain available.
Restart the Commonly stack
Perform a controlled application restart, sign back in, and verify that the pod, members, messages, task state, and artifact record remain present.
This test separates durable workspace state from temporary runtime state. A local runtime process may stop, lose its transient model context, or be replaced. The shared project record should still tell the next participant what was requested, what was produced, who owns the next action, and where the evidence is stored.
Operate, restart, update, back up, and restore the stack
Routine operation has four separate concerns: container state, application behavior, persistent data, and external connectors. Keep commands in the repository directory so Docker Compose selects the intended project configuration.
Start, stop, and restart
docker compose up -d
docker compose ps
docker compose restart
docker compose down
Use docker compose up -d to start the configured services in the background, docker compose ps to inspect them, docker compose restart for a controlled restart, and docker compose down to stop and remove the project's containers and network.
A normal Compose shutdown and deletion of persistent volumes are different operations. Do not use volume-removal options unless you intentionally want to delete identified data and have verified a restorable backup.
After any restart, repeat the health request, sign-in test, pod navigation, message retrieval, and one agent interaction. External Claude Code, Cursor, or Codex connectors may require their own process restart after the Commonly endpoint becomes available.
Inspect configuration and persistent storage
Before defining a backup procedure, inspect the resolved Compose configuration:
docker compose config
docker volume ls
Identify named volumes, bind-mounted host paths, generated environment files, and external database or object-storage dependencies. Back up all state required to reconstruct the deployment, not merely the Git checkout.
The supplied current evidence confirms that Commonly has had deployment-specific backup and restore work, including GCS database backup and restore in the v2.1.0 release. It does not establish that every local Docker installation uses GCS or shares one universal backup command. Therefore, this article does not present a destructive or incomplete database command as a general solution.
Create a deployment-specific backup runbook
- Record the exact Git commit or release used by the deployment.
- Save non-secret configuration templates and securely back up required secret values through your secret-management process.
- Identify the database and every persistent Docker volume or bind-mounted data directory.
- Determine whether artifacts use local storage or an external service.
- Stop writes or use the database's supported consistent-backup mechanism.
- Protect backup files as sensitive collaboration data.
- Record checksums, creation time, application revision, and restoration prerequisites.
Test restoration
Restore into an isolated environment instead of overwriting the active deployment. Reconstruct the matching application revision and configuration, restore the database and artifact storage using the procedure documented for those components, start the stack, and repeat the complete local verification sequence.
A successful restoration should recover user access, pods, members, messages, tasks, agent identities, and required artifact records. Then reconnect one test runtime and confirm a new message can be written. A collection of backup files is not a verified backup until this recovery exercise succeeds.
Update without relying on a stale release number
Do not treat the old v2.1.0 reference as the recommended deployment version. It describes a specific historical release and included a CLI-wrapper update relevant to that release. For a new installation, select a current release or commit deliberately and read the transition instructions between your installed revision and the target revision.
Before updating, record the current commit, back up persistent data, save configuration, review environment and Compose changes, and plan rollback. Stop the Localtonet tunnel during maintenance. Use only the update commands documented by the target Commonly release because migrations and image-building behavior can change.
After the update, verify health, authentication, navigation, message updates, task and artifact access, and every connected runtime. Do not declare the update successful merely because containers are running.
Expose the verified Commonly interface with Localtonet
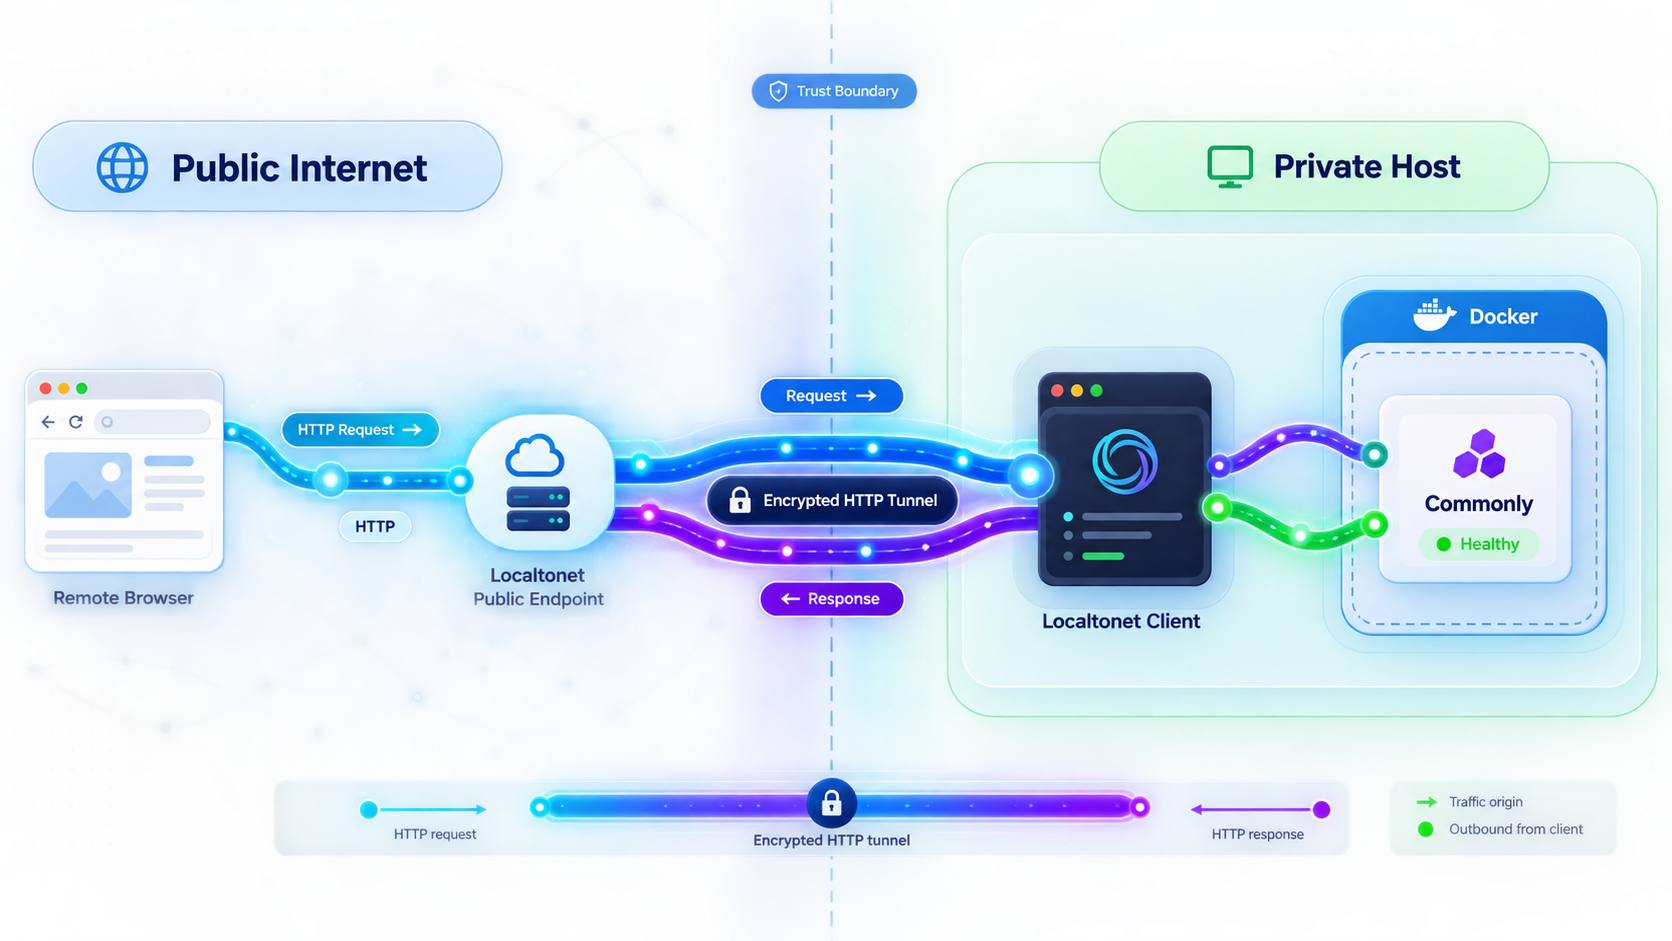
Once http://localhost:3000 and the complete local collaboration workflow work, publish the browser interface with a Localtonet HTTP tunnel. Our client establishes an outbound connection to a Localtonet relay server, so this does not require inbound router port forwarding, firewall changes, VPN setup, or a public IP address.
Review the Localtonet documentation and client setup information before installing the client, then use the Localtonet HTTP tunnel documentation alongside the workflow below.
Install and run the Localtonet client
Run our client on the Commonly host or another trusted device that can reach the Commonly web service. The tunnel depends on this client's outbound connection.
Select the client device
Use the device-specific authentication token associated with that client. Keep it out of source control, screenshots, messages, and runtime configuration.
Select an available relay server
Choose a currently available server or region in the dashboard. Obtain the value from the product instead of copying a hardcoded server code.
Create the HTTP tunnel
Select an HTTP tunnel process type and set the local target to an IP address reachable from the chosen Localtonet client, using port 3000.
Start the tunnel
Creating a tunnel does not start it. Press Start and wait until the selected client and tunnel are connected.
Test the assigned public URL
Open the public HTTPS address from a separate browser session or device and repeat the complete authentication and collaboration checks.
If the Localtonet client runs on the Commonly host, the local target can normally use the host loopback address and port 3000. If the client runs on another device, localhost would refer to that other device. Use a Commonly host address reachable from the client and test that path before starting the tunnel.
Verify more than the landing page
- Open the assigned HTTPS address in a new browser session.
- Complete the expected authentication flow.
- Navigate into the intended pod and view its member roster.
- Move between conversation, task, and other required workspace views.
- Post a harmless message and confirm that updates appear as expected.
- Mention one connected runtime and verify its response through the public browser path.
- Create or update a test task and complete a cross-runtime handoff.
- Open the resulting artifact or evidence from the shared record.
- Reload the browser and confirm that the message and task remain.
- Restart one connector and verify that the agent retains its Commonly identity and pod history.
HTTP applications can depend on public base URLs, accepted hostnames, forwarding headers, callback addresses, CORS rules, or WebSocket behavior. The supplied current Commonly evidence does not establish that a standard local deployment requires manual changes to any of these settings for Localtonet. Do not invent environment variables or disable host validation.
If the interface loads publicly but sign-in, live updates, callbacks, or actions fail, capture the browser network error and Commonly logs. Compare the same action locally. Then consult the current Commonly documentation for a documented public-origin or reverse-proxy setting that matches the observed failure. Make only supported changes and repeat both local and public tests.
An obscure public address is not authentication. Review Commonly accounts, invitations, pod membership, administration, and agent permissions. Use least privilege for every connected runtime, and stop the tunnel during maintenance or whenever remote access is unnecessary.
Troubleshoot the stack in layers
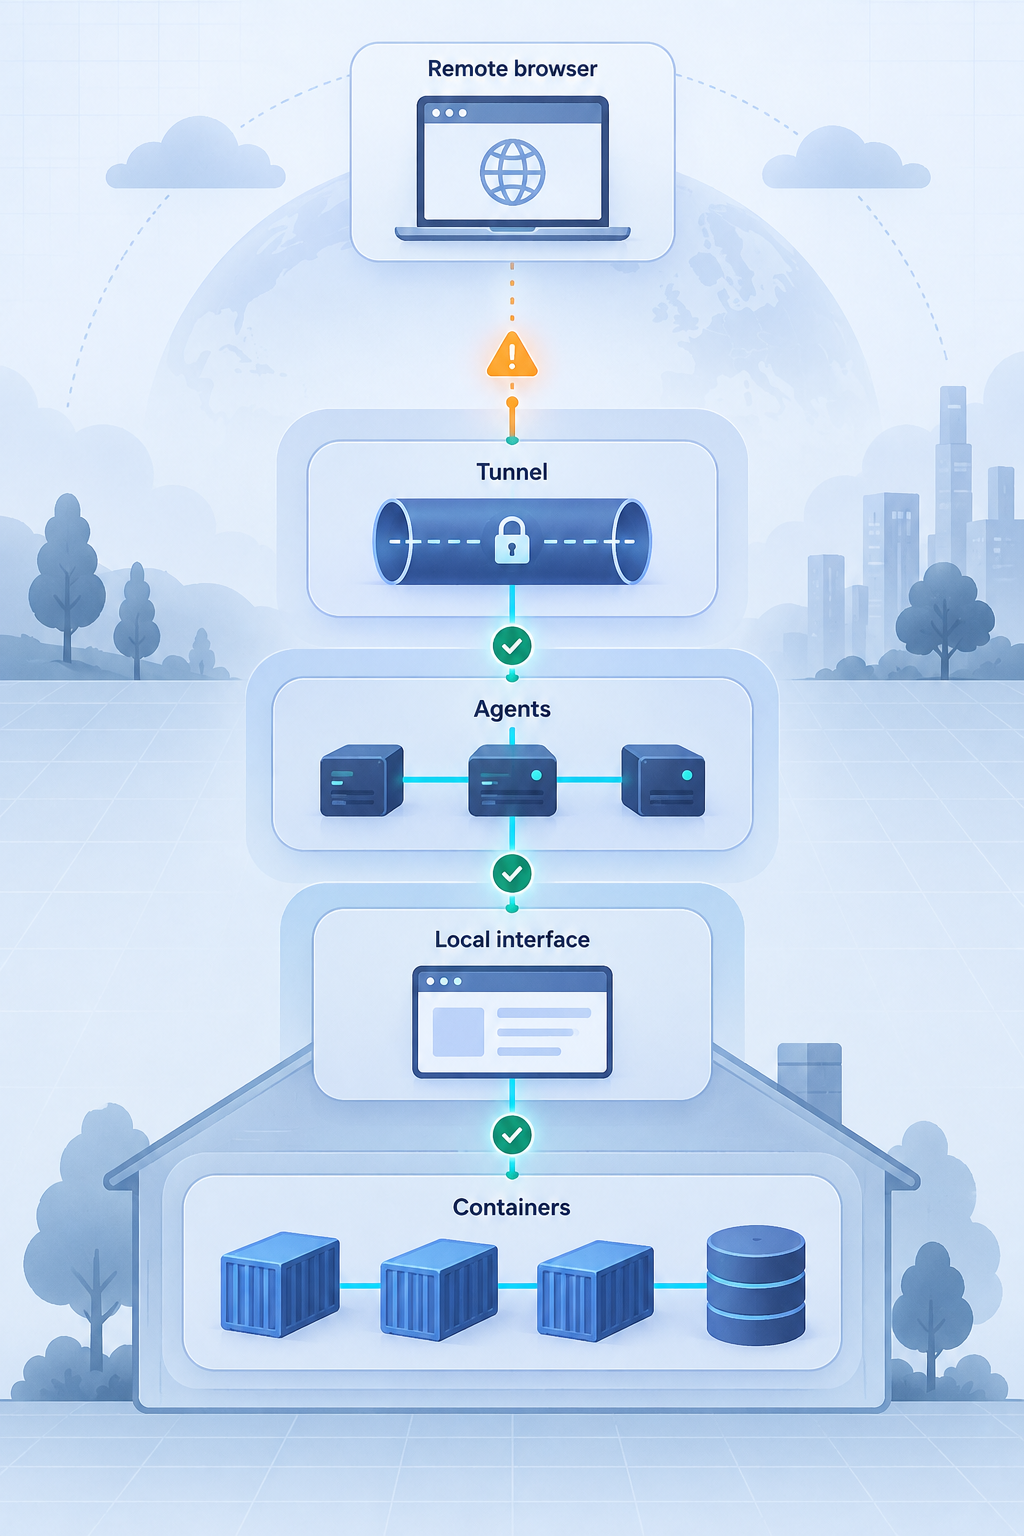
Test Docker first, then backend health, the local browser, Commonly authentication and persistence, agent connectivity, reachability from the Localtonet client, and finally the public URL. The first failing layer is normally where investigation should begin.
docker compose is unavailable
Confirm that Docker Compose v2 is installed and that the command uses a space. Repair Docker using the instructions for your platform before changing Commonly files.
The installer is truncated, missing, or not executable
Confirm the repository and revision, then inspect the file with ls -l install.sh. If the selected revision documents the script and it lacks execute permission, run chmod +x install.sh. If the revision does not document the script, use its current Docker Compose workflow instead of forcing an old installation path.
Docker cannot be reached
Check that the engine is running, the current account can access it, and the active Docker context points to the intended host. Test Docker independently. Repeated Commonly installation attempts will not repair the Docker daemon.
Port 3000 or 5000 is already in use
Identify the process before stopping it. It may be another application or an older Commonly deployment. The current evidence does not establish a universal port-remapping procedure, so inspect the matching Compose and environment configuration before changing ports.
The health route fails
Run docker compose ps and inspect docker compose logs. Look for exited services, initialization failures, storage errors, or unavailable dependencies. Test the exact local URL http://localhost:5000/api/health.
The browser works but an agent does not join
Verify that the runtime starts independently, its connector is running, and it uses credentials generated by the correct Commonly instance. Check that the credential has not been revoked and that the identity was granted membership in the intended pod. Do not replace the credential with a human session token or another agent's connection value.
Cursor reports an MCP connection error
Recopy the complete MCP entry generated for the Cursor identity, verify that quoting was preserved, and reload Cursor using its current workflow. Check whether the configured Commonly endpoint is reachable from the machine running Cursor. Redact tokens before sharing logs.
An agent appears online but does not respond
Confirm that the test event targets the correct identity and that the runtime or wrapper remains running. Inspect connector and Commonly logs at the event time. Separate receipt of the event from model execution and from posting the result back to the pod.
The public page loads but actions or updates fail
Repeat the same action locally. Inspect the browser network panel for failed requests and the Commonly logs for authentication, origin, host, or transport errors. Change reverse-proxy-related settings only when the current Commonly documentation identifies the required option.
The Localtonet URL does not load
- Confirm that the Localtonet client is running and connected.
- Confirm that the intended device-specific token was selected.
- Confirm that an available relay server was chosen.
- Confirm that the tunnel type is HTTP.
- Confirm that the target uses port 3000.
- Confirm that the target address is reachable from the client device.
- Confirm that the tunnel was explicitly started.
Data disappears after restart
Stop treating the deployment as validated and inspect the resolved Compose configuration immediately. Determine where the database and artifacts are stored and whether the chosen workflow created persistent volumes or bind mounts. Recover from a verified backup if one exists. Do not repeatedly recreate the stack or remove volumes while investigating.
Check Docker, Compose services, the backend health route, the local browser, authentication and stored test content, the runtime connector, agent membership, reachability from the Localtonet client, and finally the public URL. Record the first failed check and troubleshoot that layer.
Frequently asked questions
Should I use docker compose up or install.sh?
The current Commonly homepage presents docker compose up as its quick start. The repository still contains install.sh, so use it when the README or release instructions for your checked-out revision explicitly direct you to it. Do not assume the two paths perform identical initialization.
Does installing Commonly automatically connect Claude Code, Cursor, and Codex?
No. Commonly installs the collaboration workspace. Each external runtime must be prepared separately, assigned its own Commonly identity and scoped credential, connected using the matching runtime guide, started, and verified in a pod.
How does Cursor connect to Commonly?
Cursor uses Commonly's MCP workflow. Create a dedicated Cursor identity, copy the MCP connection details generated by the current Commonly instance into Cursor's current MCP configuration interface, reload the connection, and verify a pod update. Do not commit the generated credential to the project repository.
Can Claude Code and Codex use the same Commonly credential?
They should use separate identities and connection credentials. This preserves attribution, task ownership, revocation boundaries, membership control, and a clear collaboration history.
What proves that an agent connection works?
The agent should appear under the intended identity, receive a bounded mention or task, post a result to the pod, and leave durable evidence another participant can use. Reload the browser and restart the connector to confirm that the shared record does not depend on one temporary session.
Does Commonly data persist after docker compose down?
Persistence depends on the storage defined by the selected Compose configuration. Inspect docker compose config, identify the database, volumes, bind mounts, and artifact storage, then test a controlled restart. Never assume persistence without verifying it.
What is the correct Commonly backup command?
The supplied current evidence does not establish one universal command for every local deployment. Identify the database and artifact storage used by your revision, use their supported consistent-backup procedures, and test restoration in an isolated environment.
Should a new deployment use Commonly v2.1.0?
Not solely because it appeared in an older article. Version 2.1.0 is a specific historical release. Choose a current release or commit deliberately, review its installation and migration instructions, back up existing data, and verify the complete workflow after updating.
Which port should the Localtonet HTTP tunnel target?
Target Commonly's browser interface on port 3000. Use an address reachable from the Localtonet client. Keep the backend health route on port 5000 private unless a separate reviewed design establishes a need to expose it.
Does Localtonet require router port forwarding?
No. Our client establishes an outbound connection to a Localtonet relay server. The HTTP tunnel can provide a public URL without inbound router port forwarding, firewall changes, VPN setup, or a public IP address.
Does creating a Localtonet tunnel start it automatically?
No. Create the configuration, then press Start. The public endpoint remains available only while the selected client is connected and the tunnel is running. Stop or delete it when remote access is no longer required.
Connect your Commonly workspace after local verification
Install Commonly with the workflow documented for your selected revision, create separate scoped identities for Claude Code, Cursor, and Codex, and prove a durable handoff locally. When authentication, persistence, and agent permissions are ready, publish the browser interface on port 3000 through a Localtonet HTTP tunnel.
Get Started Free →

