

Build a persistent domain portfolio dashboard, verify it locally, and make it available remotely
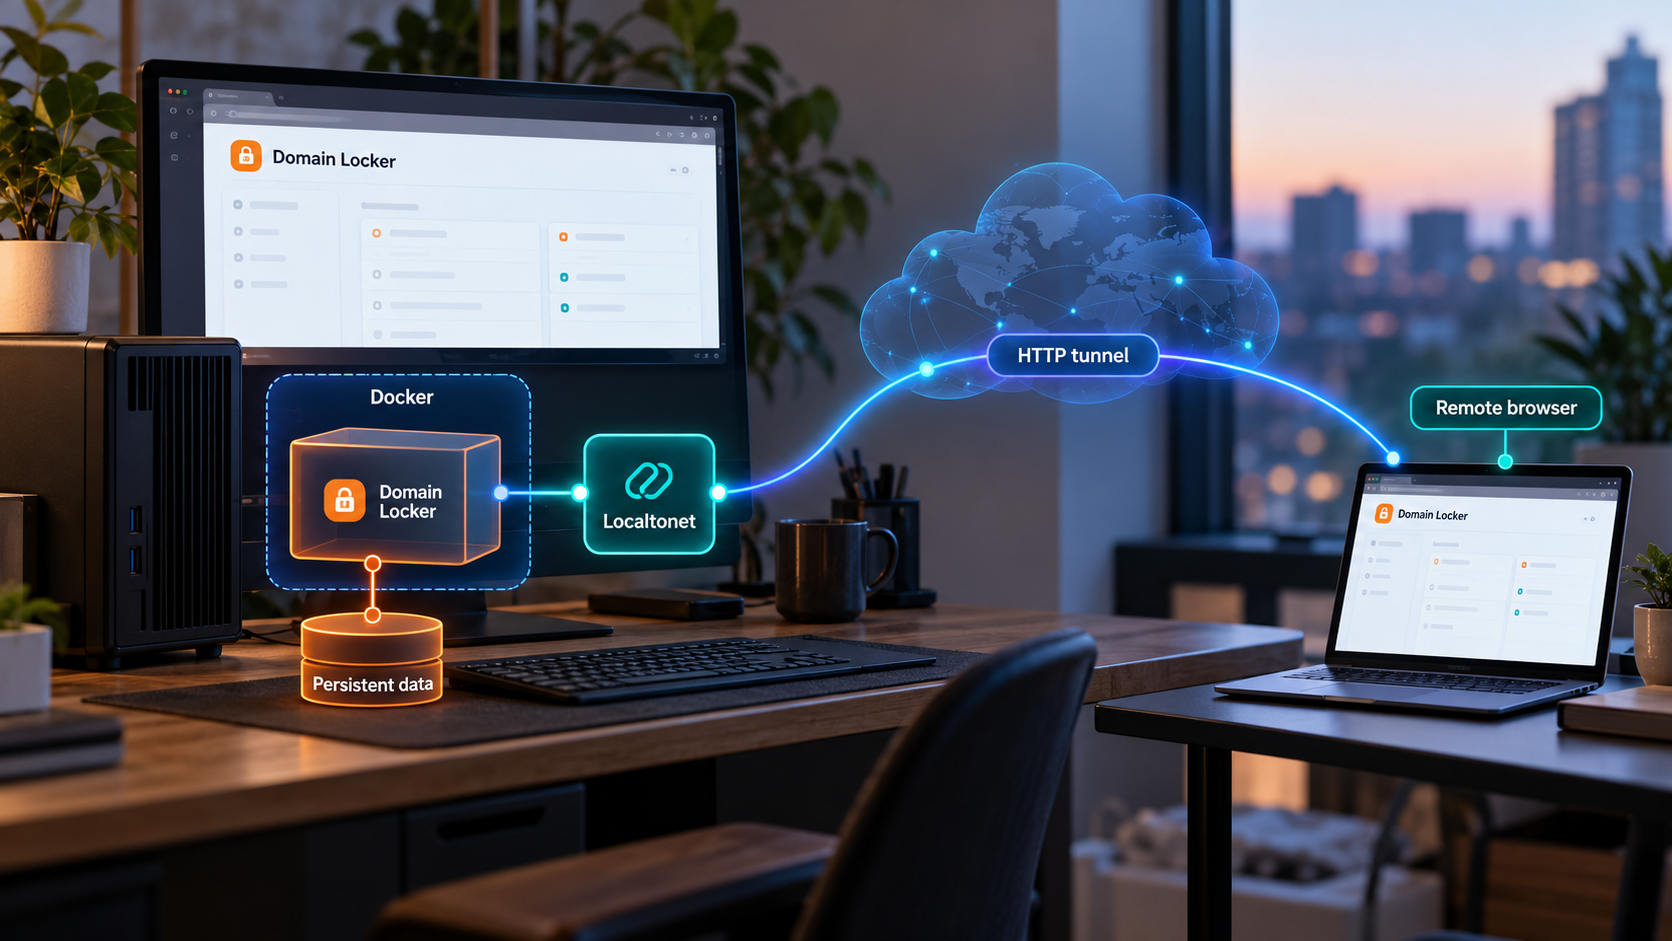
Domain Locker is an open-source dashboard for tracking domain registrations, expiration dates, DNS information, certificates, providers, costs, monitoring data, and related portfolio details. In this guide, we install it with the project’s published Docker image, preserve its SQLite data in a Docker volume, confirm that the web interface works on port 3000, and cover routine container operations. Once the local installation is working, we connect it to an HTTP tunnel with Localtonet so authorized users can reach it without configuring inbound router port forwarding, firewall rules, a VPN, or a public IP address.
📋 What's in this guide
How the Domain Locker deployment works
Domain Locker provides a central place to organize and monitor a portfolio of domain names. For domains added to the application, it can retrieve information such as registrar details, IP addresses, DNS records, hosts, subdomains, and SSL certificate data. Its broader feature set includes expiration reminders, change history, configurable notifications, portfolio analytics, website health monitoring, cost and valuation records, categories, notes, import and export, and programmatic data access.
The self-hosted installation is designed to run in a container. The project publishes the lissy93/domain-locker Docker image, listens on container port 3000, and uses SQLite by default. The application stores persistent data under /data inside the container. Mounting a Docker volume at that location keeps the database and other persisted application data outside the disposable container layer.
The documented installation maps host port 3000 to container port 3000. That creates a local HTTP endpoint such as http://localhost:3000. The project documentation does not state that this local port provides TLS, so this guide treats it as an HTTP origin. When we later add an HTTP tunnel, Localtonet provides a public HTTPS address while forwarding requests to the local HTTP service.
/data preserves application data independently of the container lifecycle.
3000, which can be mapped to a host port for local browser access.
Local installation and remote access are separate layers
It is important to troubleshoot these layers independently. Docker runs Domain Locker and maps its web port onto the host. Domain Locker stores and processes the portfolio data. The Localtonet client then reaches that already working host port and carries traffic through an outbound connection to a Localtonet relay server.
A tunnel does not repair an application that is failing to start, listening on the wrong port, or unable to access its database. We therefore complete the Docker installation and verify http://localhost:3000 before creating a tunnel.
An HTTP tunnel publishes the selected local web service. It does not join the remote user to the host network and should not be described as VPN access. VPN Manager is our separate private mesh VPN feature.
Prerequisites and deployment decisions
The only prerequisite explicitly required by the Domain Locker self-hosting instructions is Docker on the host system. Docker must be able to download images, create containers, publish a host port, and create or mount a named volume. You also need a browser on the host or another device that can reach the chosen host port.
Before continuing, confirm that the Docker engine is running:
docker versionA successful result normally includes information about both the Docker client and server. If the command is unavailable, install Docker using the supported procedure for your operating system. If the client is installed but cannot connect to the server, start the Docker engine and resolve any local permission issue before attempting to run Domain Locker.
Check whether host port 3000 is already occupied. The exact inspection command varies by operating system, so the simplest portable test is to consider any existing development server or container that already uses that port. Docker will report a port allocation or bind error if it cannot claim the requested host port.
Choose how broadly to bind the host port
Domain Locker’s basic published command uses -p 3000:3000. In a normal Docker configuration, that publishes host port 3000 on available host interfaces, not only on the loopback interface. This is convenient when other computers on the LAN need direct access, but it may expose the service more broadly than necessary.
If the Localtonet client runs on the same host as Docker and no other machine needs direct LAN access, Docker also supports binding the published port to loopback:
-p 127.0.0.1:3000:3000
With that form, the host exposes the application only at 127.0.0.1:3000. The Localtonet client on that same host can target it, while other LAN devices cannot connect directly to the Docker-published port. This is a Docker networking choice rather than a Domain Locker requirement.
| Decision | Recommended starting point | Reason |
|---|---|---|
| Database | SQLite | It is the documented default and requires no separate database service. |
| Persistent path | Named volume mounted at /data |
The container can be replaced without intentionally discarding its persistent application data. |
| Host port | 3000 |
It matches the project’s documented example and maps directly to container port 3000. |
| Host interface | 127.0.0.1 when only local access is needed |
A loopback bind reduces direct network exposure when the tunnel client runs on the same machine. |
| Remote publication | Only after local verification | This separates application problems from tunnel configuration problems. |
Resource sizing and operating system support
The supplied project documentation does not establish a minimum CPU count, memory allocation, disk capacity, or complete host operating system compatibility matrix. Do not infer a production sizing guarantee from the simplicity of the Docker command. The appropriate capacity depends on factors such as portfolio size, monitoring history, concurrent use, notification activity, and retention settings.
Start on a Docker-capable host, monitor actual resource consumption, and make sure the storage backing /data has enough free space for the database and accumulated monitoring records. For a business-critical portfolio, test the application and backup process with representative data before relying on it operationally.
Install Domain Locker with Docker
The shortest supported path uses the published image, maps port 3000, and mounts the named volume domain-locker-data at /data. The following is the project’s documented basic command:
docker run -p 3000:3000 -v domain-locker-data:/data lissy93/domain-locker
This command runs in the foreground. The terminal remains attached to the container and displays its output. Pressing Ctrl+C stops the foreground process. The named volume remains available even after the container stops.
Confirm Docker is available
Run docker version and resolve installation, service, or permission errors. Domain Locker’s documented self-hosted path assumes a working Docker environment.
Start the published Domain Locker image
Run the documented docker run command. Docker downloads lissy93/domain-locker if it is not already present, creates the named volume when necessary, and starts the application.
Keep the initial terminal open
Watch the attached output for startup failures. Do not create a remote tunnel yet. First confirm that the application remains running and that Docker did not report a port or volume error.
Open the local dashboard
Visit http://localhost:3000 from a browser on the Docker host. If Docker is on another machine and the port was published to its network interface, use that host’s permitted LAN address instead.
Complete the application’s visible setup flow
Follow the onboarding or account prompts shown by the installed version. The supplied evidence does not establish a universal default self-hosted username, password, or first-run screen, so do not try demo credentials or invented defaults.
A practical detached-container variation
For routine operation, it is useful to assign a predictable container name and run the process in detached mode. The following variation retains the documented image, container port, and persistent path while binding the host endpoint to loopback:
docker run -d \
  --name domain-locker \
  -p 127.0.0.1:3000:3000 \
  -v domain-locker-data:/data \
  lissy93/domain-locker
The -d option detaches the container, and --name domain-locker gives subsequent Docker commands a stable target. The loopback bind is suitable only when the browser, Localtonet client, or another local proxy can reach the service from the same host. If the Localtonet client runs on a different device, 127.0.0.1 on that device refers to the client device itself, not the Docker server.
If you need automatic restart behavior after a host reboot or daemon restart, Docker provides restart policies. Choose one according to your host’s operating model rather than copying an unreviewed policy into production. The Domain Locker command supplied in the project documentation does not prescribe a restart policy.
Using the official Compose alternative
The Domain Locker repository also contains an official docker-compose.yml. Compose is useful when you want the deployment definition stored as a file and managed as a small stack. From a directory containing the official file, the standard command to start it is:
docker compose up -dBefore starting it, inspect the current file in the Domain Locker repository. Confirm its image, ports, volumes, and any environment values rather than assuming that a copied historical version still matches the current project. This guide does not reproduce unverified Compose contents.
The standard Compose commands for viewing status, following logs, stopping the stack, and starting it again are:
docker compose ps
docker compose logs -f
docker compose stop
docker compose start
Run these from the directory containing the Compose file. Be cautious with commands that remove volumes. Persistent database data should not be deleted unless you intend to erase the installation or have a verified backup.
Configure persistence, database behavior, and scheduled work
Why the /data mount matters
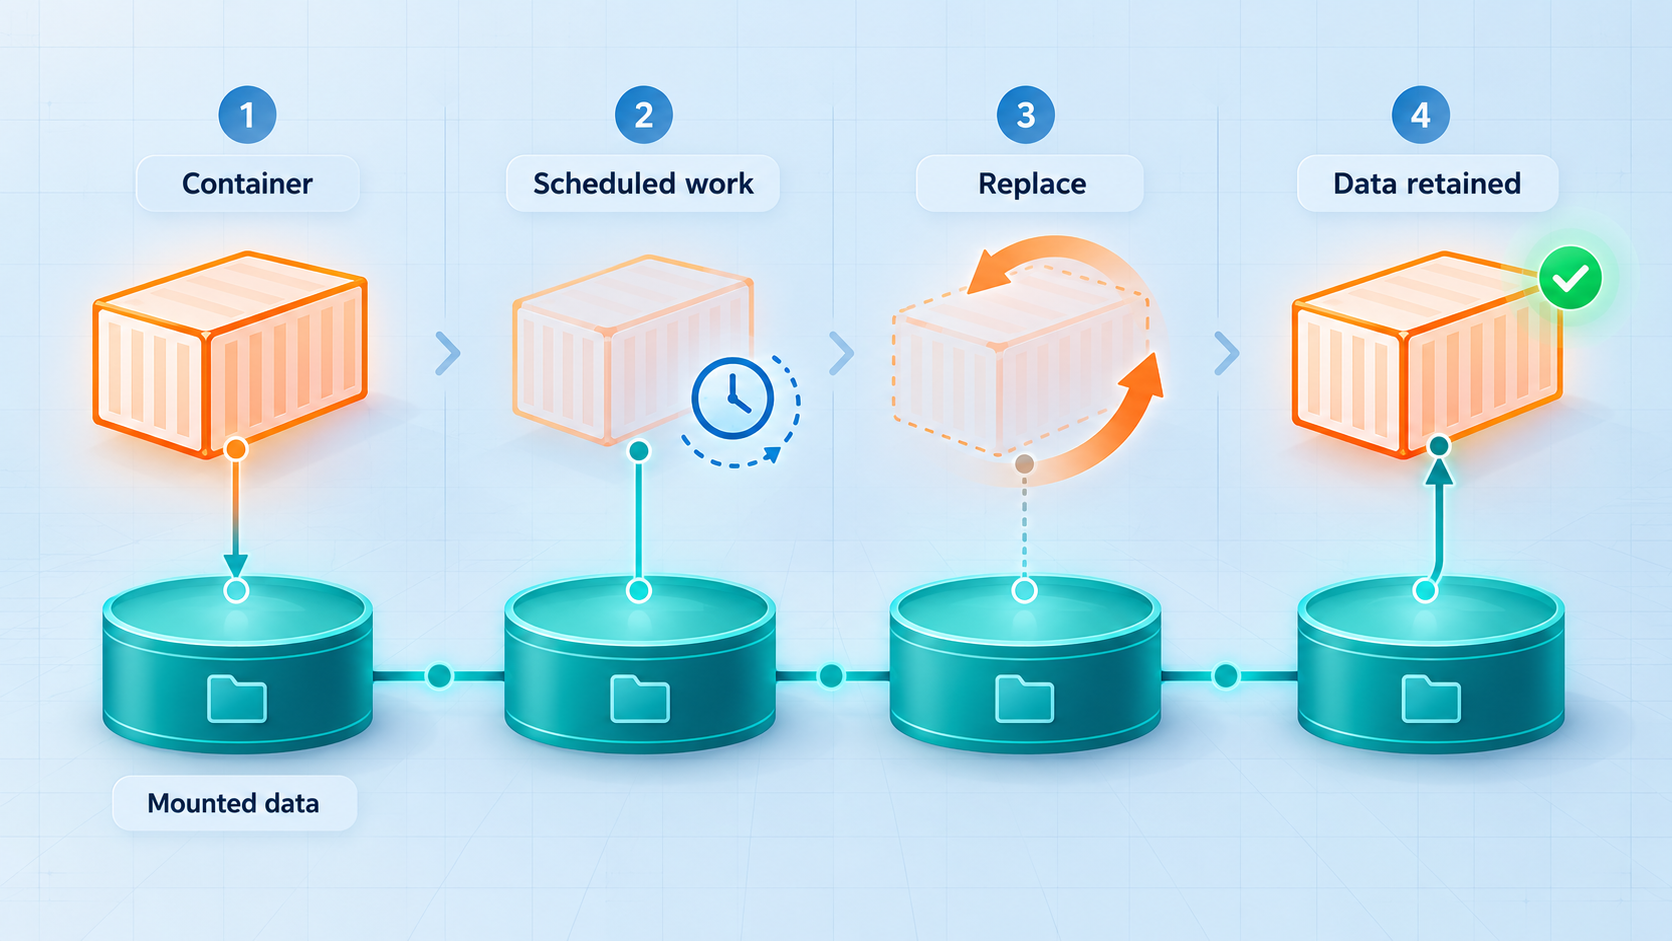
A container’s writable layer is not a safe place to treat as permanent application storage. Recreating or removing the container can discard data stored only in that layer. Domain Locker’s documentation specifically directs self-hosters to mount a volume at /data.
The argument below connects a Docker-managed named volume to that path:
-v domain-locker-data:/data
Here, domain-locker-data is the volume name on the Docker host, and /data is the container path expected for persistence. Reusing the same named volume when replacing the container reconnects the new container to the existing persisted data.
Verify that Docker created the volume:
docker volume inspect domain-locker-dataThe output should describe the volume without reporting that it cannot be found. The physical implementation and host-side mount location depend on Docker’s storage configuration. Avoid editing SQLite files directly while Domain Locker is running.
A named volume protects data from ordinary container replacement, but it can still be deleted, corrupted, or lost with the host. Establish a backup process appropriate to SQLite and your Docker environment, store copies separately from the Docker host, and test restoration before relying on the deployment.
Default SQLite and optional PostgreSQL
SQLite is the default self-hosted database and is the simplest choice for this installation. Domain Locker also supports PostgreSQL. The documented PostgreSQL variables are:
DL_PG_HOSTfor the PostgreSQL hostDL_PG_PORTfor the PostgreSQL portDL_PG_USERfor the database userDL_PG_PASSWORDfor the database passwordDL_PG_NAMEfor the database name
A complete PostgreSQL deployment additionally requires a reachable PostgreSQL server, database provisioning, credentials, persistence for the database server, network configuration, and a backup strategy. Those exact values are deployment-specific, and the supplied evidence does not establish a universal database image, password, network name, or complete production Compose definition. For that reason, this guide does not invent a PostgreSQL command.
Remain with SQLite unless you have a clear reason to operate PostgreSQL and can manage it safely. Never place real passwords directly into a public repository, shell history shared with other users, screenshots, or an article.
Understand Domain Locker’s internal schedules
Domain Locker schedules its recurring application work itself. The documented jobs are:
| Internal endpoint | Schedule | Purpose |
|---|---|---|
/api/domain-updater |
Daily | Keeps domain data current and triggers configured notifications. |
/api/domain-monitor |
Every 15 minutes | Monitors website uptime and performance. |
/api/cleanup-monitor-data |
Weekly | Aggregates older monitoring data and removes data beyond configured retention limits. |
You do not need to create host cron jobs merely to reproduce these documented schedules. The application handles them internally. The container must remain running, and it needs the network access required to retrieve external domain and website information.
Verify the dashboard before exposing it
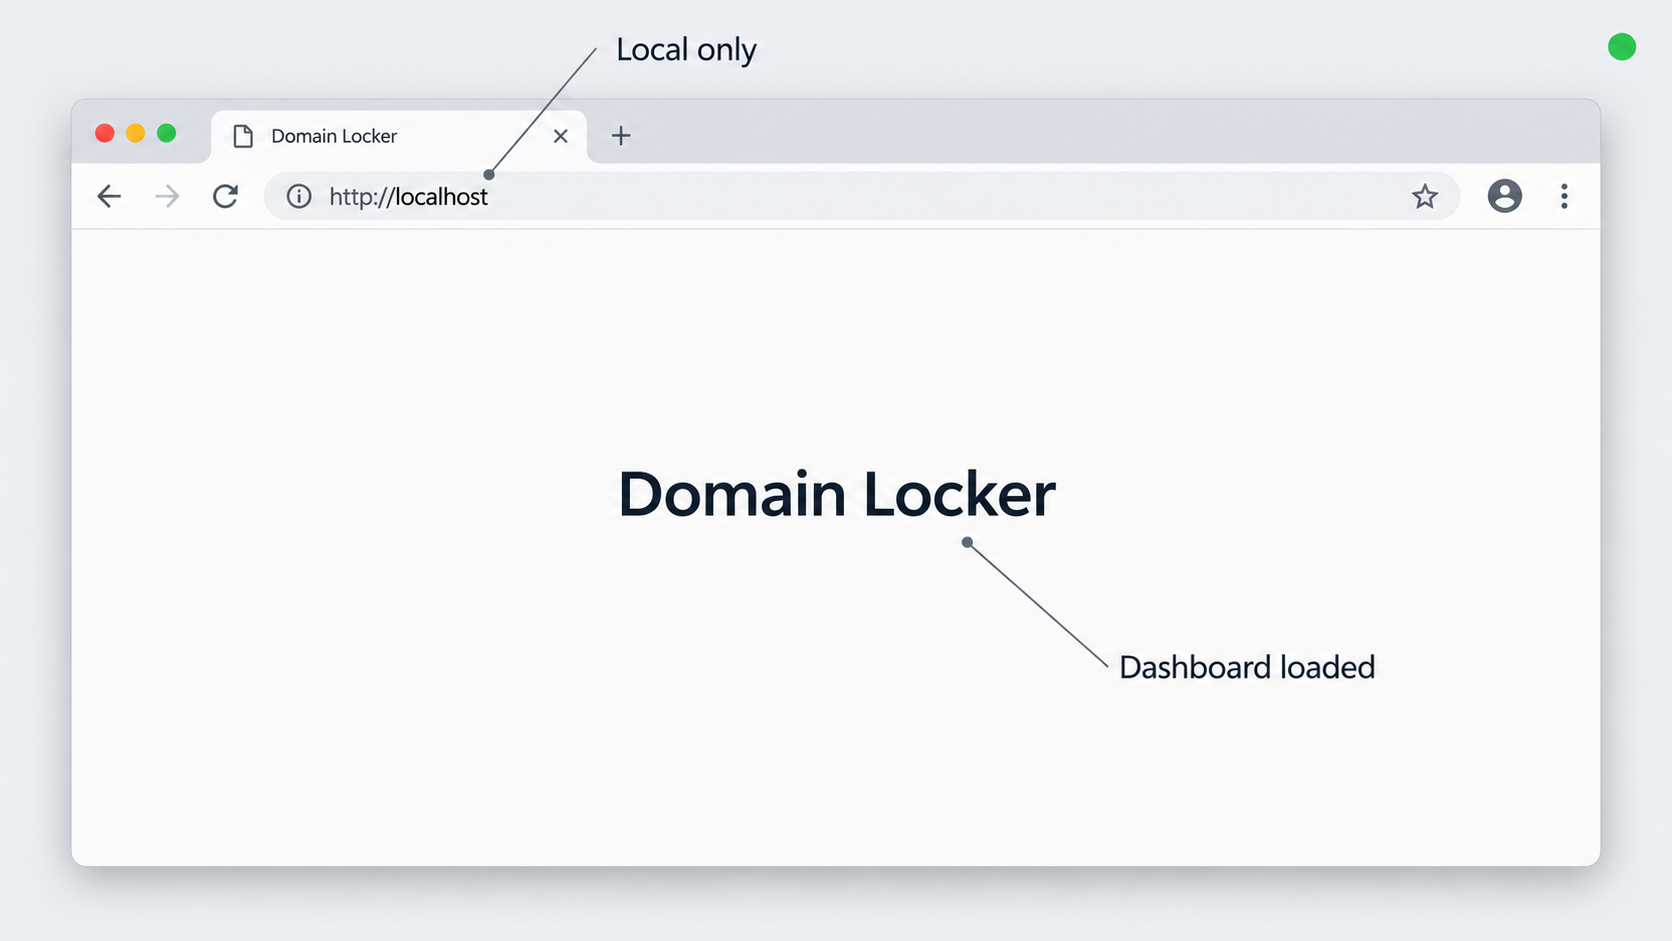
Local verification should cover more than seeing that a container exists. Confirm that the process remains running, inspect its logs, request the web endpoint, and test persistence before adding remote access.
Check container status
If you used the named detached example, run:
docker ps --filter name=domain-lockerThe container should appear in the running list, and the port mapping should match the bind you selected. If it exits, include stopped containers and inspect the logs:
docker ps -a --filter name=domain-locker
docker logs domain-locker
Do not assume that a created container is healthy simply because Docker accepted the command. A process may start and then terminate because of a runtime, storage, database, or configuration error.
Request the HTTP endpoint
Open the following address in a browser on the Docker host:
http://localhost:3000You can also test whether the endpoint responds over HTTP:
curl -I http://127.0.0.1:3000A returned HTTP response confirms that a web server is reachable. The exact status code can depend on the installed version’s routing and authentication flow, so this guide does not require one specific code. A connection refusal, timeout, or reset indicates that the local service needs attention before tunneling.
Test persistence deliberately
After completing the application’s visible setup flow, create a small non-sensitive test record through the interface. Then restart the named container:
docker restart domain-lockerReopen the dashboard and confirm that the test state remains. This validates the normal restart path, but it is not a complete backup test. A stronger validation is to follow your backup procedure, restore to an isolated test environment, and confirm that the restored application can read the expected records.
Credentials advertised for the Domain Locker public demo belong to that demo environment. The supplied project evidence does not document them as self-hosted defaults. Use the account or onboarding workflow displayed by your own installation.
Routine container operations and updates
A self-hosted dashboard needs regular operational attention. At minimum, know how to view logs, stop and start the service, verify the volume, replace the container, and confirm that data remains available.
View live logs
docker logs -f domain-locker
Press Ctrl+C to leave the log stream without stopping the detached container. Logs can help identify startup failures, database connectivity errors, scheduled task problems, and application-level exceptions. Avoid sharing raw logs publicly until you have reviewed them for domain names, email addresses, endpoints, or other sensitive portfolio information.
Stop, start, and restart
docker stop domain-locker
docker start domain-locker
docker restart domain-locker
Stopping the Domain Locker container makes the local dashboard unavailable. If a Localtonet tunnel remains running while the target is stopped, the public address cannot produce a working application response because there is no reachable local service behind it.
Inspect the effective container configuration
docker inspect domain-lockerUse the inspection output to confirm port bindings, mounted volumes, container state, and environment configuration. Treat the output as potentially sensitive if you have configured database credentials or other secrets.
Plan updates as a controlled replacement
The basic image reference does not specify an image tag. Pulling and recreating later may therefore retrieve a different image than the one currently running. Before updating, review the project’s current release notes and migration guidance, then back up the persistent data.
A typical Docker image replacement involves pulling the selected image, stopping the existing container, removing only the container, and creating a replacement attached to the same persistent volume. Do not remove domain-locker-data as part of an ordinary container update.
docker pull lissy93/domain-locker
docker stop domain-locker
docker rm domain-locker
docker run -d \
  --name domain-locker \
  -p 127.0.0.1:3000:3000 \
  -v domain-locker-data:/data \
  lissy93/domain-locker
This example follows the loopback deployment used earlier. If your existing installation uses a different approved host binding or additional reviewed configuration, preserve those choices when recreating it. After replacement, inspect the logs, open the local interface, and verify important data before restoring remote availability.
Do not assume every update is backward-compatible with your current data or configuration. Back up first, read the applicable release information, and test updates when the dashboard is operationally important.
Connect the working dashboard through Localtonet
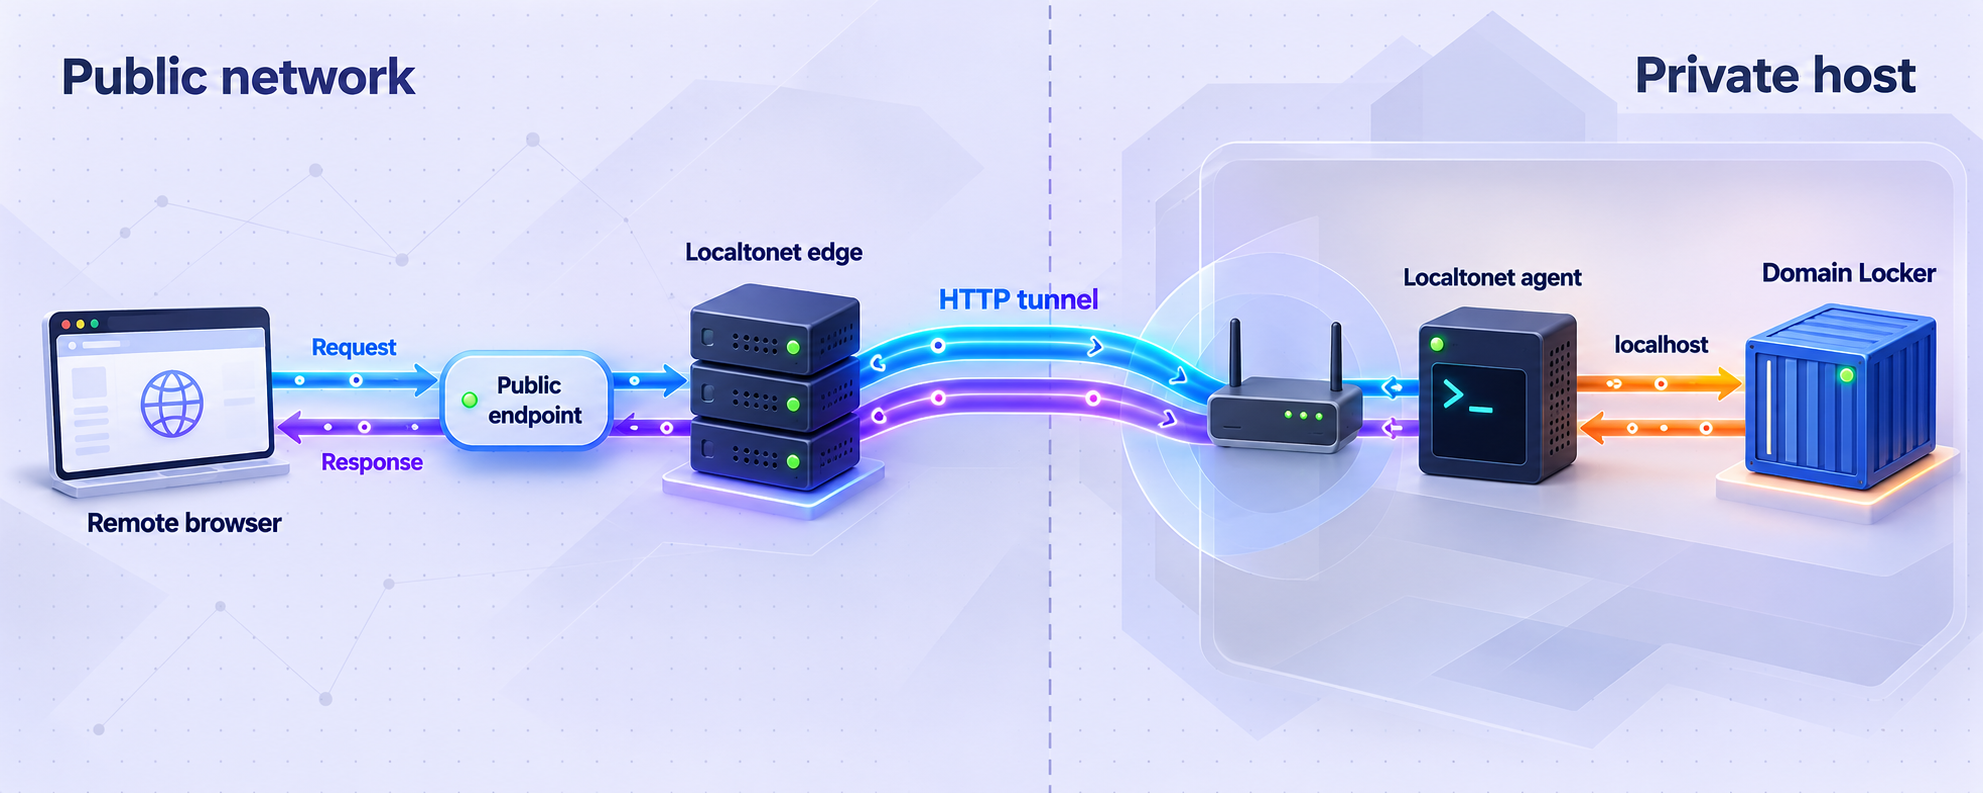
Once http://127.0.0.1:3000 works locally, we can publish it with an HTTP tunnel. The Localtonet client establishes an outbound connection to a selected Localtonet relay server. This means the Docker host does not need inbound router port forwarding, a public IP address, firewall changes for an inbound public listener, or VPN setup.
The client must run on the Docker host or on another device that can reach the Domain Locker host and port. If Domain Locker is bound only to 127.0.0.1, the Localtonet client must run on that same host. If the client runs elsewhere, use a deliberately permitted LAN address and ensure the Docker host listens on an interface reachable from that client.
Install and run the Localtonet client
Install the current Localtonet application for the operating system on the device that can reach Domain Locker. Current installation details can vary by platform and client version, so use the current application provided by our platform rather than copying an unverified command.
Authenticate the client device
Use the device-specific authentication token associated with that client. Keep the token private. Do not place it in a Docker image, Compose file committed to source control, screenshot, support post, or article.
Select an available relay server
Choose a currently available server or region from the Localtonet product interface. Availability can vary, so obtain the server value from the current dashboard instead of using a hardcoded server code from a tutorial.
Create an HTTP tunnel to Domain Locker
Select an HTTP tunnel and set the local target to the address reachable from the client. Use 127.0.0.1 and port 3000 when the client and Docker run on the same host. If they run on separate devices, use the Docker host’s reachable private address and the published host port.
Choose the supported public address process
HTTP tunnels can use Random Sub Domain, Custom Sub Domain, or Custom Domain process types. They serve the local content at a public HTTPS address. Options can vary by current plan or product availability, and exact custom-domain DNS instructions should be checked against the current documentation.
Start and test the tunnel
Creating a tunnel does not start it. Use the Start control, wait for the selected client and tunnel to be connected, and open the assigned public URL. Test sign-in, navigation, and an ordinary read operation before depending on remote access.
For the current product workflow, consult our HTTP tunnel documentation. Dashboard labels and available address options can change, so the current interface remains authoritative for account-specific selections.
What address should the tunnel target?
| Deployment layout | Likely local target | Important condition |
|---|---|---|
| Docker and Localtonet client on the same host | 127.0.0.1:3000 |
Works with either the documented host publication or the loopback-only bind. |
| Docker on one LAN device, client on another | Docker host’s private address and port 3000 |
The container port must be published on a reachable host interface and permitted by local network policy. |
| Domain Locker host port changed | The selected host port | The tunnel targets the host-side port, while the container still listens on its configured container port. |
For example, if Docker maps host port 8080 to container port 3000 using -p 127.0.0.1:8080:3000, the Localtonet target on the same host is 127.0.0.1:8080. The tunnel does not target container port 3000 directly unless the client itself is operating in a network context that can reach that container address.
Domain Locker’s documented local endpoint is HTTP on port 3000. An HTTP tunnel can provide a public HTTPS address while forwarding to that local HTTP origin. Keep this distinction clear when reviewing the complete traffic path and host security.
Secure the dashboard and its remote access
A domain portfolio can reveal registrars, infrastructure providers, certificate details, DNS records, renewal timing, costs, notes, and operational relationships. Treat the dashboard as sensitive administrative software rather than a public informational website.
Verify application authentication before exposure
Domain Locker advertises support for SSO and two-factor authentication, but the supplied installation evidence does not define one universal first-run authentication configuration for every self-hosted version. Before starting the tunnel, confirm that your installation requires authentication and that you can sign out and sign back in.
Use unique credentials and enable stronger authentication options when they are supported and correctly configured for your deployment. Do not expose an installation that opens directly into administrative data without the access controls you expect.
Minimize the directly reachable surface
If the Localtonet client is on the Docker host, bind Docker’s host port to 127.0.0.1. This prevents the published Docker port from listening directly on ordinary LAN interfaces while still allowing the local client to reach it.
If the client must run on another device, expose the host port only to the required private network path and follow local firewall and organizational policy. Localtonet avoids the need for public inbound router forwarding, but it should not be used to evade authorization, acceptable-use requirements, or network security controls.
Protect tokens and secrets
A Localtonet authentication token identifies the client device. Keep it out of logs, issue reports, shell scripts shared with others, screenshots, and public repositories. PostgreSQL passwords and any notification credentials deserve the same protection. Rotate a secret if you believe it has been exposed.
Control the tunnel lifecycle
A configured tunnel is not necessarily running. Start it when remote access is needed, and stop it when the dashboard should no longer be reachable publicly. Deleting a tunnel removes its configuration, while stopping it preserves the configuration for later use. The public address works only while the selected client is connected and the tunnel is running.
Back up and test recovery
Protect the Domain Locker database separately from the container image. A useful recovery plan records the application version, Docker options, volume name, database mode, non-secret configuration, and restoration procedure. Backup copies should be stored separately from the host and protected according to the sensitivity of the portfolio.
A backup is not proven until it can be restored. Test recovery in an isolated environment where it cannot interfere with the production container or send unintended notifications. Verify that the recovered dashboard contains expected records before declaring the process successful.
127.0.0.1 when Docker and the Localtonet client share a host.
Troubleshooting Domain Locker and the tunnel
Docker reports that port 3000 is already allocated
Another container or host process is already listening on port 3000. Stop the conflicting service or choose another host-side port while keeping the container-side port at 3000:
docker run -d \
  --name domain-locker \
  -p 127.0.0.1:8080:3000 \
  -v domain-locker-data:/data \
  lissy93/domain-locker
With this mapping, browse to http://127.0.0.1:8080 and configure the HTTP tunnel to target local port 8080. Do not target port 3000 merely because it is the container’s internal port.
The container starts and immediately exits
List stopped containers and inspect the application output:
docker ps -a --filter name=domain-locker
docker logs domain-locker
Look for the first relevant error rather than only the final shutdown line. Confirm that the image was downloaded, Docker can mount the named volume, no incompatible environment values were added, and the host has adequate storage. If PostgreSQL was enabled, verify each documented DL_PG_* value and database reachability.
The browser reports connection refused
Confirm that the container is running and inspect its published ports with docker ps. Make sure the browser is using the host-side port. If Docker is remote, localhost in your workstation browser refers to the workstation, not the Docker server.
A loopback bind intentionally rejects connections made through the host’s LAN address. Test from the Docker host or change the bind only after deciding that LAN reachability is appropriate.
Data disappears after the container is recreated
Inspect the replacement container and verify that it mounts domain-locker-data at /data. A similarly named new volume is not the same as the original one. Do not create more containers or delete volumes until you determine which volume contains the expected data.
docker volume ls
docker inspect domain-locker
docker volume inspect domain-locker-data
If the original deployment omitted the /data mount and its container was deleted, data stored only in that container layer may no longer be available. This is why persistence must be configured from the initial installation.
The local dashboard works but the public URL does not
Check the system in order:
- Confirm Domain Locker still responds on the exact local target.
- Confirm the Localtonet client is running and connected.
- Confirm the tunnel uses the correct device token selection.
- Confirm the selected relay server is current and available.
- Confirm the tunnel target uses the host-side address and port.
- Confirm the tunnel was started, not merely created.
When the client runs in a different container, virtual machine, or physical device, 127.0.0.1 points back to that environment. Use an address that is actually reachable from the Localtonet client, and test that address from the client device before changing tunnel settings.
The public URL loads, but authentication or redirects behave unexpectedly
First reproduce the behavior at the local URL. If it also happens locally, troubleshoot Domain Locker rather than the tunnel. If it happens only through the public URL, record the browser-visible behavior, inspect the application logs, and compare the local and public requests without sharing credentials or private portfolio data.
The supplied evidence does not establish every Domain Locker setting related to external URLs, reverse proxies, cookies, or identity providers. Avoid inventing environment variables to solve the issue. Use configuration documented for the exact installed version.
Scheduled updates or monitoring appear inactive
Confirm that the container remains continuously running and has outbound network connectivity. Review logs around the documented daily domain updater, 15-minute monitor, and weekly cleanup work. Also confirm that the relevant domains and notification preferences are configured in the application.
Do not create duplicate host cron jobs merely because a result is delayed. Domain Locker already schedules these tasks internally, and duplicate triggering could create unnecessary load or repeated notifications.
Frequently asked questions
What port does self-hosted Domain Locker use?
The documented Docker image listens on container port 3000. The basic installation maps host port 3000 to container port 3000, producing a local endpoint such as http://localhost:3000. You may select another host-side port, but the tunnel and browser must then use that selected host port.
Where does Domain Locker store persistent data?
The project instructs self-hosters to mount persistent storage at /data inside the container. The documented command uses the named Docker volume domain-locker-data. SQLite is the default database, while PostgreSQL is optional.
Does removing the container delete the named volume?
Removing an ordinary container does not normally remove a separately named volume unless a command explicitly requests volume removal. However, verify the command before running it and maintain an independent backup. Persistence in a Docker volume is not equivalent to a recoverable backup.
Does Domain Locker require PostgreSQL?
No. SQLite is the default for the documented self-hosted deployment. PostgreSQL is optional and uses the documented DL_PG_HOST, DL_PG_PORT, DL_PG_USER, DL_PG_PASSWORD, and DL_PG_NAME environment variables.
Does the local Domain Locker port use HTTPS?
The supplied project documentation establishes an HTTP service on port 3000 but does not state that TLS is enabled on that local port. This guide therefore configures it as an HTTP origin. A Localtonet HTTP tunnel can serve that content from a public HTTPS address.
Does the Domain Locker host need a public IP address?
Not when using Localtonet for remote access. Our client initiates an outbound connection to a relay server, so the host does not require a public IP address or inbound router port forwarding for the tunnel.
Must the Localtonet client run on the Docker host?
No, but it must be able to reach the Docker host’s published port. If Docker publishes Domain Locker only on 127.0.0.1, the client must run on that same host. A client on another device needs a deliberately reachable private host address and port.
Does creating a Localtonet tunnel make it active immediately?
No. Creating the configuration does not mean the tunnel is running. The selected client must be connected, and the tunnel must be started. It can later be stopped or deleted from our platform.
Should I expose Domain Locker before completing its account setup?
No. Complete the visible setup flow locally, verify authentication, use strong credentials, test persistence, and confirm that the dashboard does not reveal data without authorization. Start the public tunnel only after those checks pass.
Connect your self-hosted Domain Locker dashboard
After Domain Locker responds locally and its data is safely persisted, create an HTTP tunnel with Localtonet to reach the dashboard remotely without opening an inbound router port.
Get Started Free →

