

Install evcc, validate your charging components, and create a controlled remote HTTP access path
evcc is an open-source EV charge controller and home energy management system that runs on your own hardware. This guide installs the stable evcc package on Debian or Ubuntu, configures the system service, validates meters, chargers, and vehicles, and verifies the local web service before creating an HTTP tunnel with Localtonet. It also covers service operation, backup and restore, updates, downgrades, focused troubleshooting, and safe remote-access testing. Because the supplied current evcc documentation does not establish a version-independent REST endpoint and authentication procedure, this revision verifies the public HTTP path without inventing an API route or credential format.
📋 What's in this guide
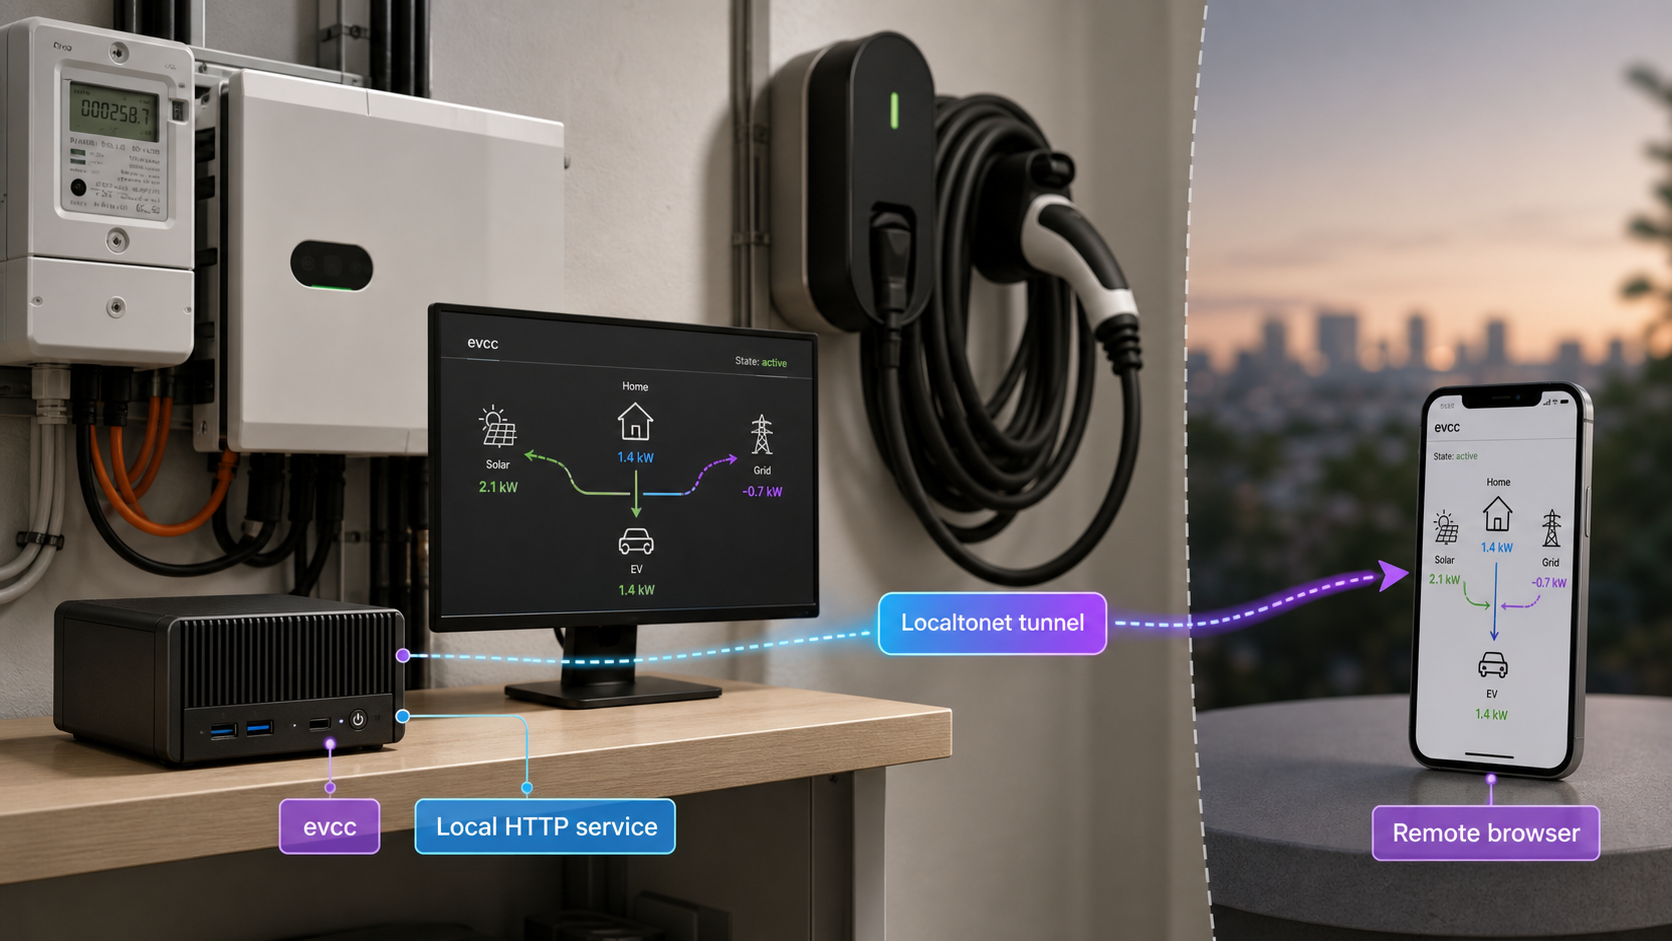
What you are installing and exposing
evcc is an extensible EV charge controller and home energy management system. Its purpose is to provide local energy management without requiring the core application to run as a cloud-hosted service. Depending on the equipment you configure, evcc can collect grid consumption, solar production, household load, battery state, charging-point information, and vehicle state of charge. It can then coordinate charging with available solar energy, dynamic tariffs, load limits, and other configured energy conditions.
The project provides a responsive browser interface and documents REST and MQTT APIs for home-automation integrations. Its integrations and plugin system cover technologies such as HTTP, MQTT, Modbus, WebSocket, JavaScript, Go, and shell scripts. Actual capabilities depend on the charger, meter, vehicle, inverter, battery, or other device selected in your configuration.
In this guide, “evcc” means the evcc.io smart-charging and home energy management project. It is not the electric vehicle communication controller abbreviation used in ISO 15118 implementations.
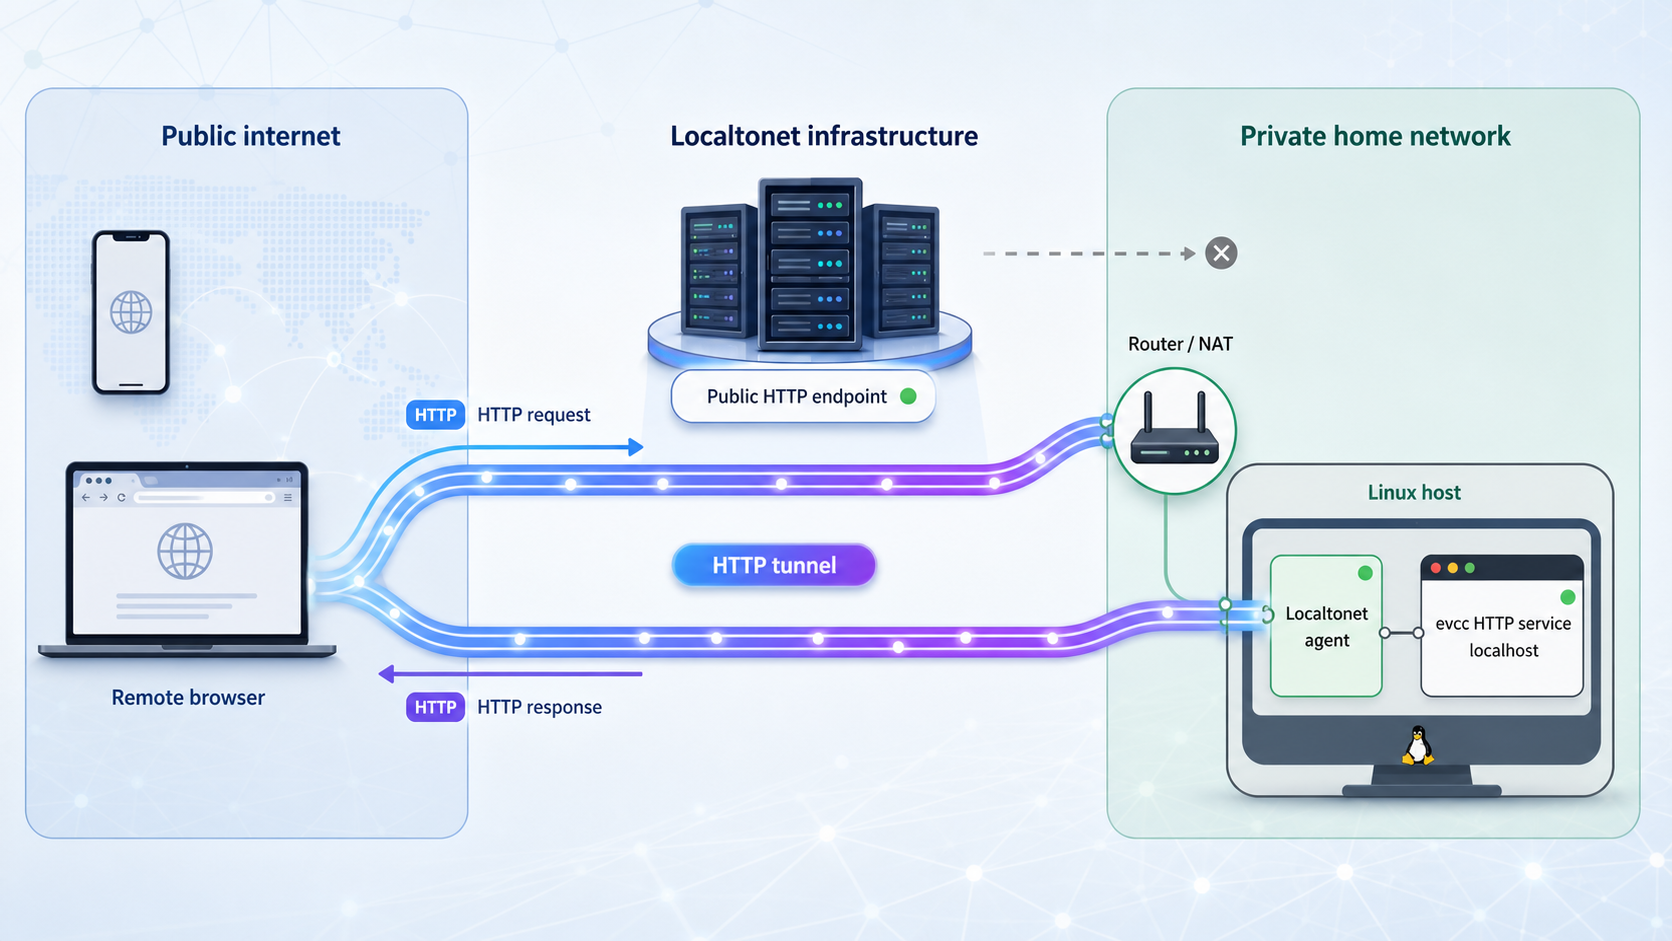
A Localtonet HTTP tunnel does not convert evcc into a different application or add API authorization. Our client creates an outbound connection to a Localtonet relay and maps a public HTTPS address to the evcc HTTP target that the client can reach. The same origin may serve both the web interface and HTTP API paths, but evcc remains responsible for application behavior and authentication.
Prerequisites and installation scope
The installation procedure below follows the current official evcc Linux documentation for apt-based distributions such as Debian and Ubuntu. For Raspberry Pi, evcc recommends its Linux image as the easier installation path. For other Linux distributions, use the current Docker or manual-installation instructions rather than adapting the APT commands without checking compatibility.
Before starting, prepare the following:
- An apt-based Debian or Ubuntu host that will remain available while evcc is needed.
- A Linux account with permission to run
sudo. - Working internet access for retrieving the repository setup and package.
- A browser for setting the administrator password and configuring devices.
- Network access from the evcc host to the meters, chargers, vehicles, or other integrations it must contact.
- A Localtonet client installed either on the evcc host or on another device that can reach the evcc HTTP service.
The logged-in Linux account must not already be named evcc. The package installation creates a dedicated system user with that name. If an integration uses a USB or serial interface, the service account may also need membership in the plugdev group.
The documented installation sends the official evcc repository setup script to a privileged shell. Confirm the URL against the current evcc Linux documentation and review the script when required by your security policy. Do not replace it with a repository script from an unverified source.
Install evcc on Debian or Ubuntu
The stable repository is appropriate for this tutorial. evcc also publishes an unstable repository with nightly development versions, but those versions may be unstable and are not used here.
Install the repository dependencies
Install the Debian keyrings, HTTPS transport support, and curl packages required by the documented repository setup.
sudo apt install -y debian-keyring debian-archive-keyring apt-transport-https curlAdd the stable evcc APT repository
Run the setup script for the current stable release after confirming the URL against the official documentation.
curl -1sLf 'https://dl.evcc.io/public/evcc/stable/setup.deb.sh' | sudo -E bashUpdate APT and install evcc
Refresh the package list after adding the repository, then install the evcc package. The installation creates the dedicated evcc service user.
sudo apt update
sudo apt install -y evccGrant plug-in device access when required
Run this only if your configuration uses a serial or applicable USB interface. It adds the service account to the plugdev group without running evcc as root.
sudo usermod -a -G plugdev evccStart the evcc service
Start evcc through systemd. The packaged application runs as a background service and does not require an interactive terminal to remain open.
sudo systemctl start evccOpen the local web interface
On the evcc host, open http://localhost:7070. Set an administrator password and configure the devices used by your installation. Do not expose the service remotely until the local page loads and authentication is configured.
Configure through the browser
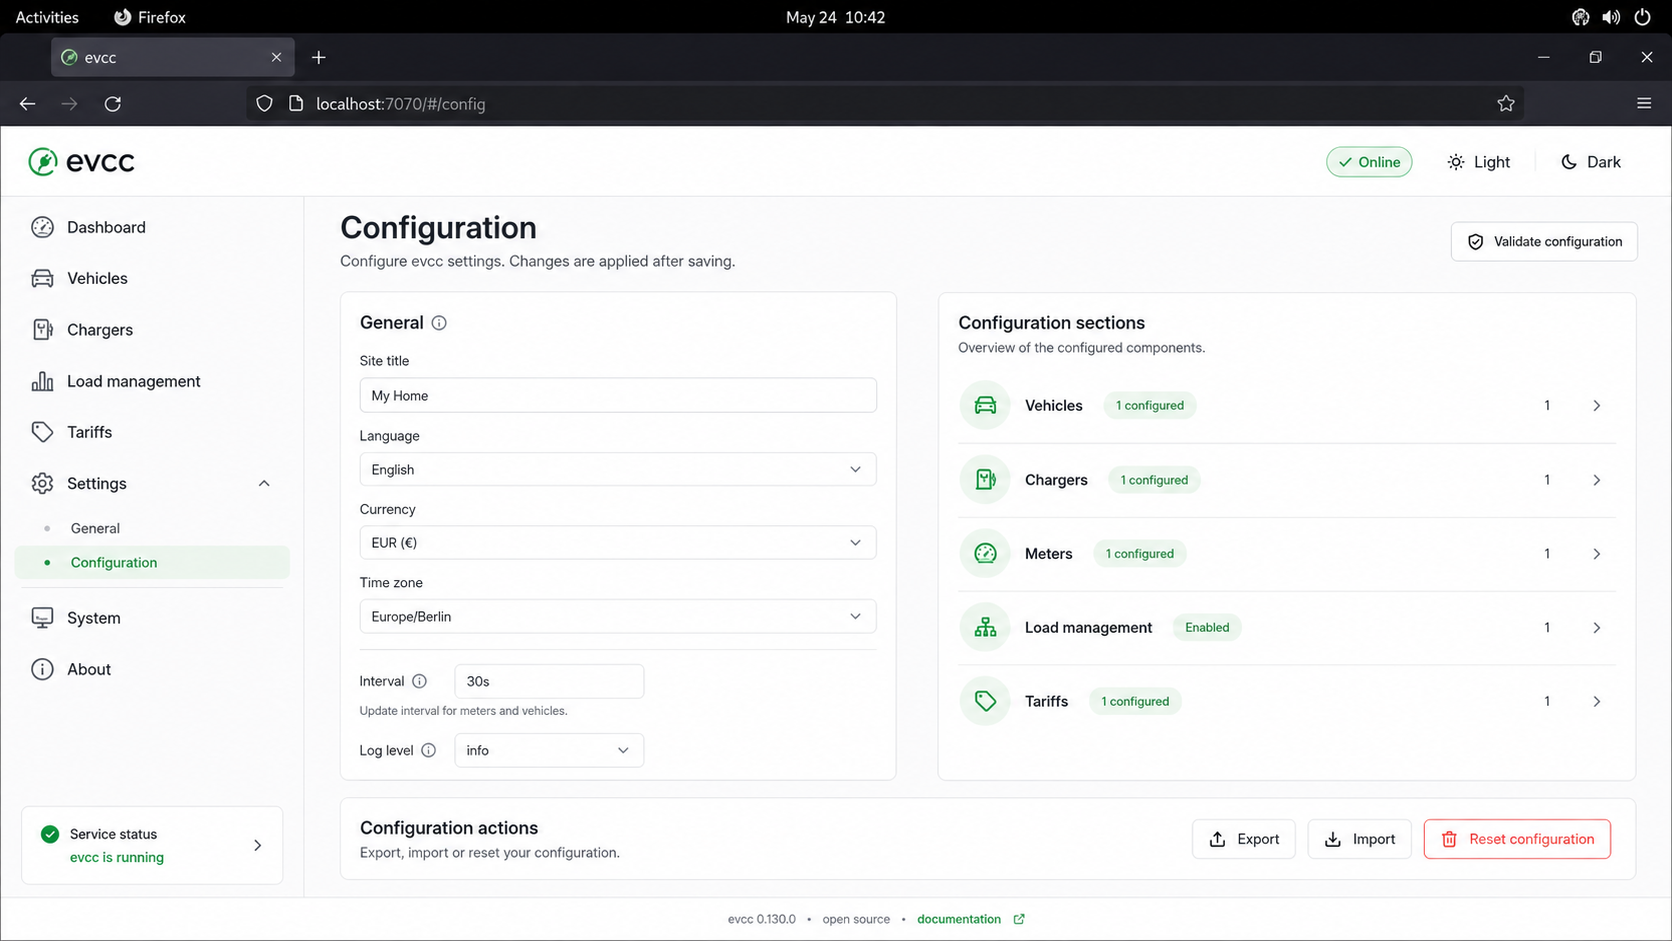
Configuration through the web interface is the recommended workflow. Settings entered there are saved automatically in the evcc database. Begin with the administrator password, then add only the chargers, meters, vehicles, batteries, inverters, or other devices present in your installation. Compatibility with a device family does not guarantee automatic discovery, correct network permissions, or support for every firmware version, so follow the integration-specific evcc instructions.
Optional configuration-file workflow
evcc also supports a traditional YAML configuration. If you use that method with the APT package, place the configuration at /etc/evcc.yaml. Restart the service after creating or changing it:
sudo systemctl restart evccAvoid maintaining conflicting settings through multiple configuration methods unless you understand how your installed evcc version combines them. For a new deployment, the browser workflow is the simpler documented choice.
Use sudo systemctl edit evcc when you need supported environment variables or command-line customization. Do not edit /lib/systemd/system/evcc.service directly because an APT update can overwrite that package-managed file.
Validate the service and configured components
Test evcc in layers before creating a tunnel. First verify systemd, then inspect the journal, validate each configured component category, and finally test the browser interface. This order separates application, device, operating-system, local-network, and tunnel failures.
Check the system service
Confirm that systemd reports evcc as active and inspect the displayed process information for immediate startup failures.
sudo systemctl status evccRead recent evcc logs
Review the service journal for configuration parsing errors, permission failures, unavailable devices, and network connection problems.
sudo journalctl -u evcc --since "yesterday"Validate configured meters
Run the documented meter validation command. Its debug output helps distinguish an evcc service problem from a meter address, protocol, credential, or connectivity problem.
sudo evcc -l debug meterValidate configured chargers
Test charger configuration independently before relying on charging control through the running service.
sudo evcc -l debug chargerValidate configured vehicles
Test vehicle integrations and review the debug output for authentication, availability, or provider-specific errors.
sudo evcc -l debug vehicleOpen the loopback address
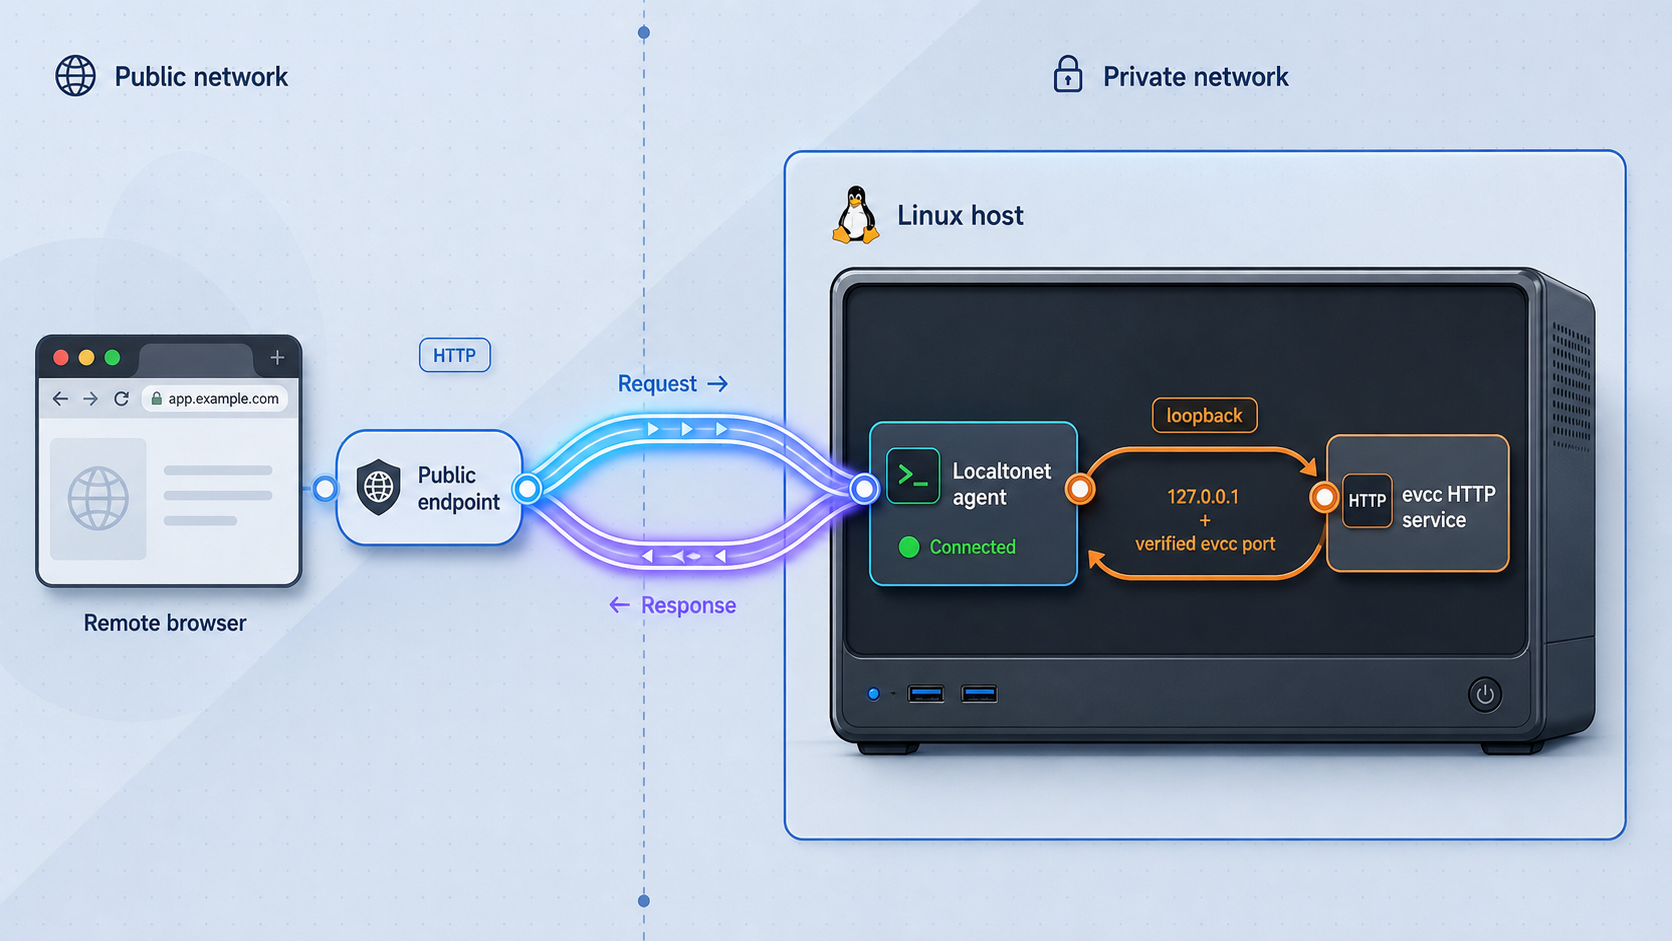
On the evcc computer, open http://127.0.0.1:7070. Confirm that the interface loads and displays the expected configured system. Browser success proves that the web origin responds, but it does not independently prove a particular REST endpoint.
Test from the Localtonet client host
If Localtonet will run on another device, open evcc from that device using the evcc host's verified LAN IP address or hostname. Resolve bind-address, host-firewall, or LAN-routing problems before creating the tunnel.
| Test location | Address to test | What success establishes |
|---|---|---|
| Browser on the evcc host | http://127.0.0.1:7070 |
The local evcc HTTP service is running and responding over loopback. |
| Browser on another LAN device | Verified evcc hostname or LAN IP on port 7070 |
The service is reachable across the LAN from that device. |
| Separate external network | The assigned Localtonet HTTPS URL | The client, relay, running tunnel, and local target form a working remote HTTP path. |
API access scope and safe verification boundary
The current primary evidence supplied for this revision confirms that evcc provides REST and MQTT APIs, but it does not establish a stable, non-destructive REST endpoint or a complete authentication procedure that applies across current installations. We therefore do not publish an invented /api/... request, assume that a GET endpoint is anonymous, or guess a bearer-token, cookie, or password format.
This distinction matters because there are two different tests. Loading the evcc page in a browser verifies the web interface. Sending a request to a documented REST endpoint verifies the API. A successful browser response cannot be represented as a successful API call, even when the interface and API share the same host and port.
You can safely test the HTTP origin locally with curl without claiming that the result is a REST API response:
curl -i http://127.0.0.1:7070/Expect an HTTP response from the evcc web service. The status may reflect the authentication and routing behavior of the installed release. HTML or a redirect is evidence that the web origin responded, not evidence that a JSON API endpoint worked.
After starting the Localtonet tunnel, repeat that origin test against the assigned public base URL. Store the URL in a shell variable so it is not repeatedly pasted into commands:
EVCC_PUBLIC_BASE='https://your-assigned-public-host'
curl -i "$EVCC_PUBLIC_BASE/"
Replace the example with the public URL actually assigned to your tunnel. Do not paste an administrator password, API token, session cookie, or private URL into a shared terminal recording, issue report, shell history example, or public repository.
How to verify a real API call for your installed version
Before making an API request, identify the installed evcc release:
evcc -vThen obtain a non-destructive endpoint and its authentication requirements from the documentation or API definition corresponding to that release. Prefer a read-only status endpoint when the installed version documents one. Avoid charging-mode changes, vehicle commands, load-point controls, or other state-changing requests merely to test connectivity.
Perform the same documented request in two stages:
- Send it locally to
http://127.0.0.1:7070and record only the HTTP status and non-sensitive response shape. - Send the identical path and authentication method through the assigned Localtonet base URL from a separate network.
A valid comparison keeps the HTTP method, path, headers, and body consistent while changing only the base URL. If the local request succeeds but the public request fails, investigate the tunnel and public authentication path. If both fail in the same way, investigate the selected endpoint, credentials, permissions, and installed evcc version.
A 401 Unauthorized or 403 Forbidden response can prove that a request reached an authenticated application route, but it does not prove successful API access. A complete API verification requires the documented successful status and expected response shape for the selected endpoint.
Once you have a version-matched endpoint, preserve its authentication behavior through the tunnel. Localtonet provides the network path. It does not authorize API operations on behalf of evcc. If evcc supports separate read-only or least-privilege credentials in your installed release, use them for monitoring clients instead of reusing an administrator credential. If it does not, treat remote API access as administrator-sensitive and reconsider whether the endpoint needs public reachability.
Create the Localtonet HTTP tunnel
Use an HTTP tunnel because evcc exposes a browser and HTTP service. Our client establishes an outbound connection to a Localtonet relay, so the workflow does not require inbound router port forwarding, firewall changes, a public IP address, or VPN setup. Review the current Localtonet HTTP tunnel documentation alongside the sequence below.
Install and run the Localtonet client
Install the Localtonet application on the evcc host or on another device that can reach the verified evcc service. Keep the client running because the tunnel is available only while the selected client is connected.
Open the HTTP tunnel configuration
Create an HTTP tunnel for the evcc web service. HTTP and File Server tunnels can use a generated subdomain, a selected subdomain where supported, or a custom domain. Use only options currently displayed for your account and client version.
Select the intended device token
Select the device-specific authentication token for the Localtonet client that will run the tunnel. Never paste that token into this article, a public script, a repository, a support screenshot, or a command transcript.
Select an available relay server
Choose a server or region currently available in the product interface. Do not copy a hardcoded server code from an old tutorial because availability can vary.
Enter the verified local target
If Localtonet and evcc run on the same host, use local IP 127.0.0.1 and port 7070. If the client runs on another device, use the evcc hostname or LAN IP that already worked from that client device, with port 7070.
Start the tunnel
Creating a tunnel does not start it. Press the Start button and confirm that the selected client is connected and the tunnel is running.
Test the public URL from another network
Use a device on a separate network, such as a mobile connection not joined to the home Wi-Fi. Confirm the expected evcc authentication boundary and web response. Then test only a version-documented API endpoint if you have established its safe method, path, authentication, successful status, and response shape.
The target-address distinction is essential. 127.0.0.1 always refers to the machine where the connecting process runs. If the Localtonet client is on a gateway, server, or workstation separate from evcc, setting the target to 127.0.0.1:7070 points back to that separate device, not to the evcc host.
Secure remotely reachable charging and energy controls
evcc can monitor and coordinate equipment that affects vehicle charging and household energy use. Remote exposure therefore has a higher consequence than publishing a static page. Treat the interface, API credentials, Localtonet device token, configuration backups, and database as sensitive operational assets.
Keep credentials out of URLs and logs
Query strings, complete URLs, command lines, and HTTP headers can appear in browser history, reverse-proxy logs, application logs, shell history, process listings, monitoring systems, or copied support output. Use only the authentication mechanism documented by evcc for the installed version. Never improvise by placing a password or token in a URL.
Separate connectivity credentials from application credentials
The Localtonet device token identifies the client device that runs the tunnel. The evcc administrator password or API credential controls access to evcc. They serve different purposes and should be stored, rotated, and revoked separately. Compromise of either secret deserves investigation.
Plan revocation before deployment
If an evcc credential may have leaked, revoke or replace it using the procedures supported by that evcc version. If a Localtonet device token may have leaked, replace or revoke it through the current Localtonet product workflow and reconnect only the intended device. Stop the tunnel while investigating. Removing public access does not by itself invalidate an application credential, and changing an evcc password does not revoke a Localtonet device token.
Test from a genuinely separate network
A public URL tested only from inside the home network may hide DNS, session, or routing assumptions. Test from a mobile connection or another external network. Use a fresh browser session so an existing local evcc session does not create a false impression that unauthenticated access is protected.
Keep the tunnel stopped during initial configuration, backup restoration, credential changes, and troubleshooting that may weaken authentication. Start it only after local verification succeeds, and stop or delete it when remote access is no longer required.
Operate, back up, update, and recover evcc
Useful systemd controls
The APT package runs evcc as a system service. Use systemd rather than launching a second unmanaged instance from a terminal:
sudo systemctl status evcc
sudo systemctl start evcc
sudo systemctl stop evcc
sudo systemctl restart evcc
sudo systemctl enable evcc
sudo systemctl disable evcc| Command | Purpose | Remote-access effect |
|---|---|---|
systemctl stop evcc |
Stops the application service. | The tunnel may remain running, but its local target will not respond. |
systemctl restart evcc |
Restarts evcc after configuration or maintenance. | The target is briefly unavailable and must be tested again. |
systemctl enable evcc |
Configures evcc to start during system boot. | Application startup does not guarantee that the Localtonet client or tunnel is also running. |
systemctl disable evcc |
Disables automatic service startup. | After a reboot, the tunnel cannot reach evcc until the service is started manually. |
Enable evcc at boot when the host is intended to provide continuous energy management:
sudo systemctl enable evccAfter a reboot, confirm the service status and local interface rather than assuming startup succeeded. Localtonet public availability separately depends on the selected client being connected and the tunnel being started.
Back up and restore through the web interface
The evcc documentation recommends the web-interface backup and restore workflow as the easiest method. Use the Backup & Restore area in the configuration interface to create a current backup before package upgrades, large configuration changes, credential changes, or migration to another host.
Store the exported backup somewhere other than the evcc system disk. Protect it as sensitive data because it may contain configuration and operational information. To restore, keep public access stopped, use the web interface's restore workflow for the installed release, restart evcc if instructed, and validate the service, components, browser interface, and authentication before restarting the Localtonet tunnel.
Create a manual backup
For a traditional configuration, back up evcc.yaml and the evcc database. Their exact locations are shown in the evcc startup log. Typical APT locations are /etc/evcc.yaml and /var/lib/evcc/evcc.db.
The official documentation gives these example copy commands for a host whose backup account is pi:
sudo cp /etc/evcc.yaml /home/pi/evcc.yaml.bak
sudo cp /var/lib/evcc/evcc.db /home/pi/evcc.db.bak
Adjust the backup destination to an existing protected directory on your system. If you configured evcc only through the web interface, the YAML file may not be part of your installation, but the database remains important. Confirm actual paths in the startup log instead of assuming the typical locations.
For a manual restoration, stop evcc and the public tunnel first. Copy the validated backup files to the storage locations reported by your installation, preserve appropriate ownership and permissions, and start evcc again. Because the supplied documentation does not specify universal ownership commands for every customized deployment, verify the package's expected file ownership on your host rather than applying guessed values. Review the journal immediately after startup.
Update the stable package
Review the relevant evcc release notes for breaking changes before upgrading. Create a backup, stop unnecessary public access, update APT metadata, and upgrade only evcc:
sudo apt update
sudo apt --only-upgrade install -y evcc
If the unstable repository was previously added and nightly updates are no longer wanted, the official Linux documentation identifies this repository-list file for removal:
sudo rm /etc/apt/sources.list.d/evcc-unstable.listAfter any update, check service status, inspect logs, validate the configured component categories, test the local browser interface, and confirm authentication. Restart the Localtonet tunnel only after the local system passes those checks.
Downgrade when necessary
If a release introduces a problem that requires rollback, the documented APT syntax is:
sudo apt install evcc=x.xxx.x
Replace x.xxx.x with the exact version you intend to install. Confirm that the package version is available and that your database and configuration are compatible with it. A backup taken before the upgrade is important because installing an older binary does not guarantee that newer database or configuration changes can be reversed safely.
Troubleshoot the service, devices, API path, and tunnel
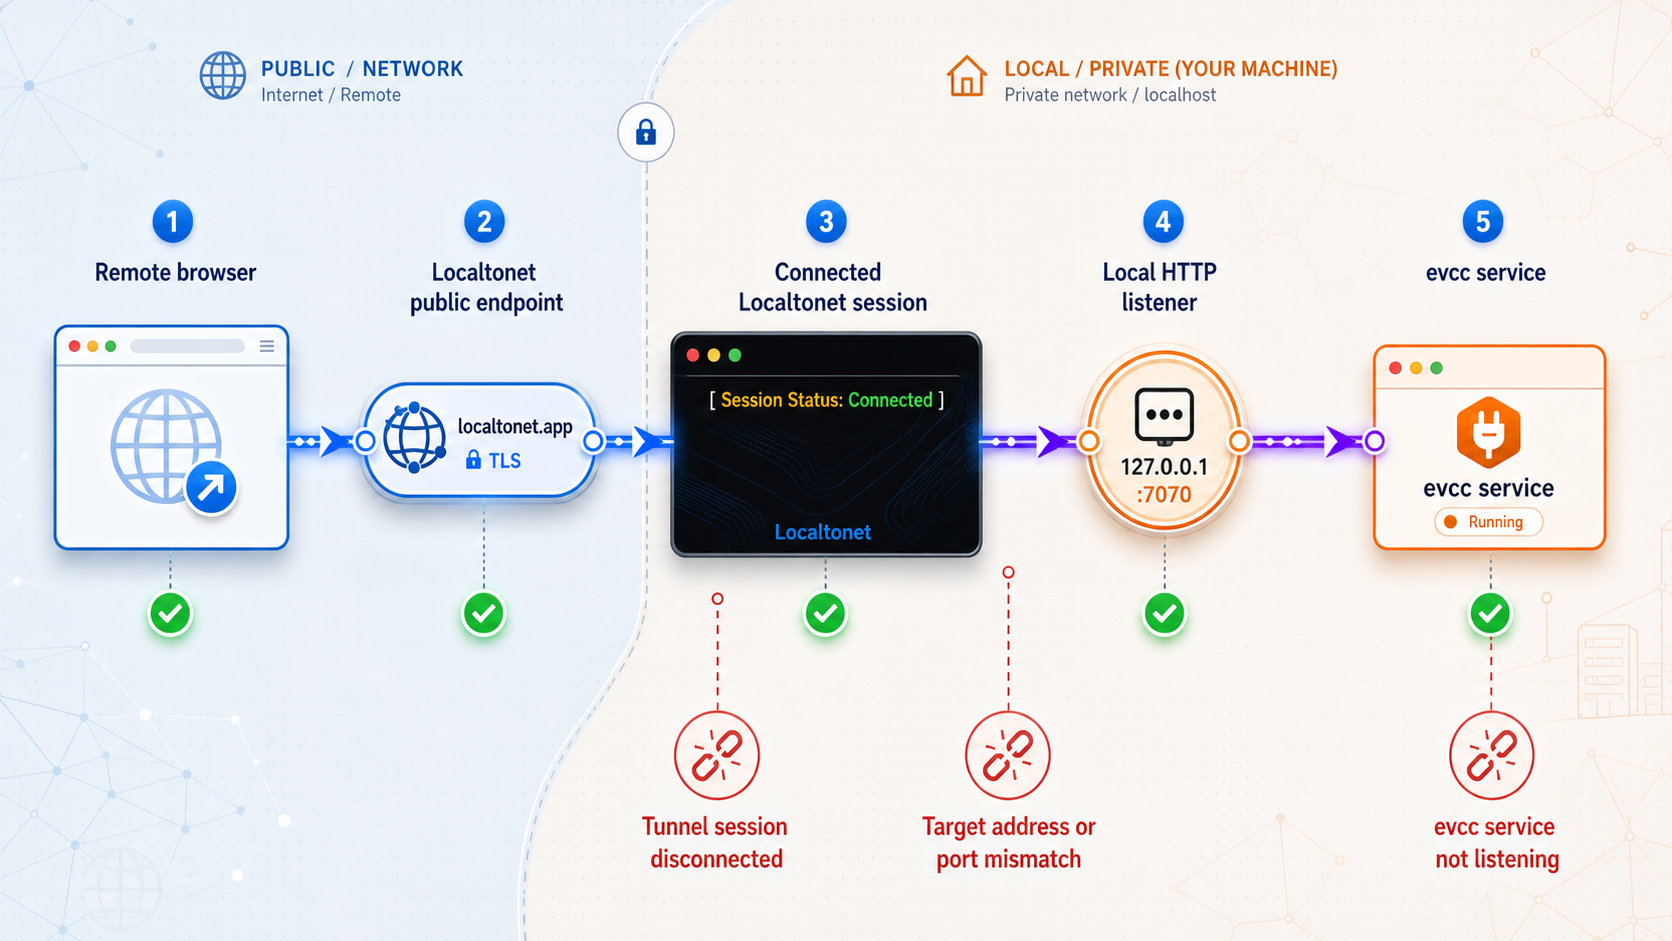
The evcc service will not start
Run sudo systemctl status evcc and inspect sudo journalctl -u evcc --since "yesterday". Look for malformed configuration, unavailable files, database errors, invalid command-line customization, or permission failures. If you recently edited a systemd override, review it with sudo systemctl edit evcc. Do not repair the problem by running the service as root.
A serial or USB device is inaccessible
Confirm whether the integration requires a serial interface. If so, verify that the evcc account was added to plugdev and restart the service after changing group membership. Also confirm that the expected device is present and that another process has not claimed it.
A meter, charger, or vehicle fails validation
Use the dedicated validation command for the affected category. A validation failure should be resolved before tunneling because Localtonet cannot repair local device credentials, incompatible firmware, protocol configuration, DNS, serial permissions, or local routing.
sudo evcc -l debug meter
sudo evcc -l debug charger
sudo evcc -l debug vehicle
Debug output can contain device addresses or other sensitive details. Redact it before sharing.
Loopback works but a LAN address does not
This usually indicates a bind-address, host-firewall, hostname-resolution, or LAN-routing issue. Confirm the address on which evcc listens and whether the Localtonet client host can reach that address. Do not use 127.0.0.1 as the target when Localtonet runs on a different computer.
The LAN target works but the public URL does not
Confirm that the intended Localtonet client is connected, the correct device token is selected, the relay selection is valid, the target address and port match the successful LAN test, and the tunnel was started. A saved tunnel configuration is not an active tunnel.
The browser works but an API request fails
Treat browser and API checks separately. Confirm that the API path exists in the documentation for the installed evcc version, that the HTTP method is correct, and that the request uses the documented authentication format. Compare the local and public requests while changing only the base URL. A redirect to a login page, HTML response, 401, or 403 is not the expected success result for a JSON endpoint unless the version-specific documentation says otherwise.
An update fails or evcc does not recover afterward
Review APT output, package repository configuration, available disk space, service status, and journal entries. Confirm whether an unstable repository is still configured. Do not repeatedly expose a broken deployment through the public tunnel. Stop the tunnel, restore from a known backup if appropriate, or install a documented earlier package version after considering configuration and database compatibility.
Access disappeared after a restart
Check evcc and Localtonet independently. The evcc service may not be enabled at boot, the Localtonet client may not be connected, or the tunnel may not have been started. Public availability requires all three layers: a responding evcc target, a connected selected client, and a running tunnel.
Frequently asked questions
Which port does the documented evcc APT installation use?
The documented web interface is available at http://localhost:7070, and same-host verification uses http://127.0.0.1:7070. If you customize the network address or port, verify the resulting endpoint before configuring Localtonet.
Can the Localtonet client run on another device?
Yes, provided that device can reach the evcc HTTP service. Use the verified hostname or LAN IP address of the evcc host as the target. Do not use 127.0.0.1 unless Localtonet and evcc run on the same computer.
Does loading the evcc page prove that the REST API works?
No. It proves that the web origin responds. API verification requires a documented endpoint for the installed evcc version, the correct HTTP method and authentication, and the expected successful status and response shape.
Why does this guide not publish a fixed evcc REST endpoint?
The current primary evidence supplied for this revision confirms REST API support but does not establish a version-independent, non-destructive endpoint and complete authentication procedure. Publishing a guessed route or credential format would be unsafe. Match the endpoint and authentication to the output of evcc -v and the corresponding evcc documentation.
Does creating a Localtonet tunnel immediately expose evcc?
No. Creating the configuration does not start it. The tunnel becomes available only while the selected Localtonet client is connected, the tunnel has been started, and evcc is responding at the configured local target.
Should evcc start automatically after a reboot?
Run sudo systemctl enable evcc if the service should start at boot. Verify it after reboot with sudo systemctl status evcc. This setting does not independently start the Localtonet client or tunnel.
What should I back up before updating evcc?
Prefer the web-interface Backup & Restore workflow. For a manual backup, preserve the database and, when used, evcc.yaml. Confirm their actual locations in the startup log. Typical APT locations are /var/lib/evcc/evcc.db and /etc/evcc.yaml.
Does this setup require router port forwarding or a public IP?
No. The Localtonet client creates an outbound connection to our relay, so inbound router port forwarding and a public IP address are not required.
Connect a verified evcc service with Localtonet
Install and validate evcc locally, configure its authentication, back up the deployment, and then create an HTTP tunnel to the address that already works from the Localtonet client. Test the public path from a separate network and use only API endpoints and credentials documented for your installed evcc version.
Get Started Free →

