

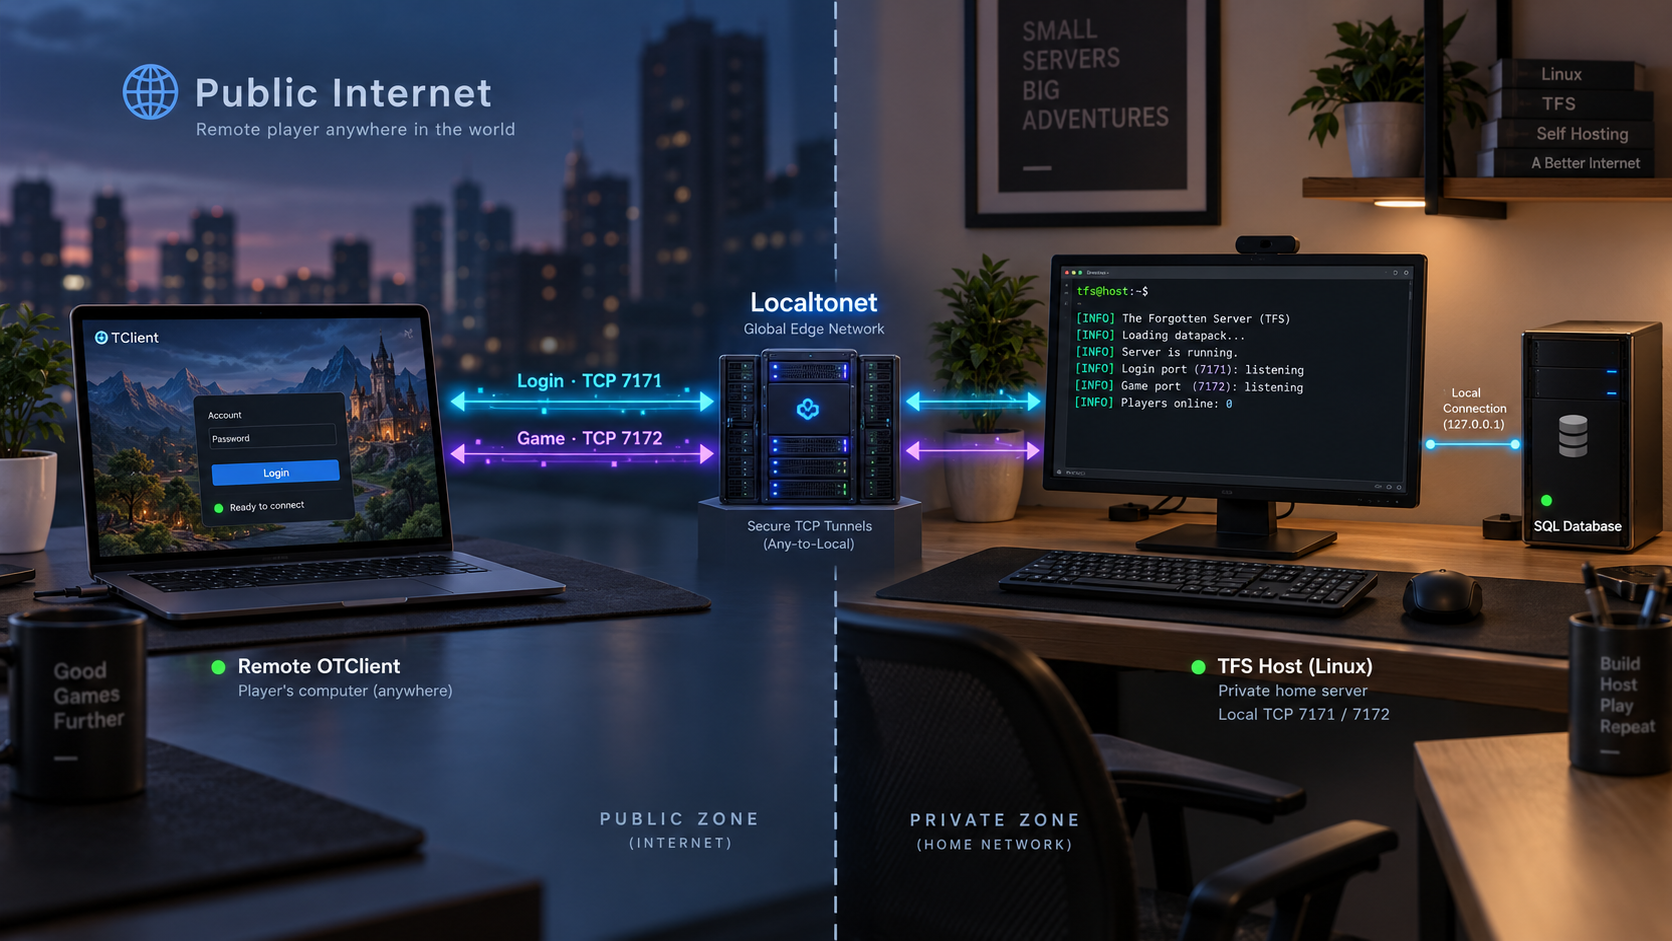
Build a pinned TFS release, prepare its database and runtime configuration, verify a complete OTClient session, then publish the required listeners safely.
This tutorial self-hosts The Forgotten Server 1.6 from the official v1.6 tag, identified by the project as its stable protocol 13.10 release. It covers compilation on Ubuntu and Arch Linux, database creation and schema import, configuration preparation, startup, account prerequisites, listener verification, and a real local client test. It then maps the separate TFS login, game, and status roles to Localtonet TCP tunnels, including the important endpoint-advertisement issue that can affect the second connection made by OTClient. Complete the local deployment first, then use our outbound tunnel workflow to provide remote access without inbound router port forwarding, firewall changes, VPN setup, or a public IP address.
📋 What's in this guide
Understand the TFS 1.6 connection topology
The Forgotten Server, commonly abbreviated as TFS, is a free and open-source MMORPG server emulator written in C++. It is derived from the OpenTibia Server project and is used with a compatible OTClient. A working deployment has several dependent layers: the compiled executable, runtime data, a MySQL-compatible database, an account and character, compatible client assets, and the network listeners used during login and gameplay.
This tutorial uses the official TFS 1.6 release, tag v1.6, at release commit 0986419. The release page identifies it as the stable protocol 13.10 release. All configuration names and repository files discussed below refer to that pinned tag. They should not be treated as universal defaults for older releases, forks, data packs, or the current default branch.
TFS 1.6 distinguishes three protocol roles in its distributed configuration:
loginProtocolPortaccepts the initial client login connection.gameProtocolPortaccepts the separate game session after character selection.statusProtocolPortserves status queries used by compatible status tools and server lists.
In the unmodified TFS 1.6 configuration template, the login and status roles share TCP port 7171, while the game role uses TCP port 7172. These values are defaults from the named v1.6 tag, not guarantees for every TFS installation. Confirm the values in your copied config.lua and verify the live sockets after startup.
| TFS 1.6 role | Template value | Client behavior | Remote-access implication |
|---|---|---|---|
| Login protocol | loginProtocolPort = 7171 |
OTClient first contacts this listener to authenticate and obtain the character or world response | Remote players need a public TCP path to this listener |
| Game protocol | gameProtocolPort = 7172 |
After character selection, OTClient opens a game connection using endpoint information returned by the server | Usually requires a second public TCP path because it is a different local target |
| Status protocol | statusProtocolPort = 7171 |
Status clients query server information through the shared listener | The login tunnel also carries status traffic while both use the same local port |
| Database | Configured separately through the mysql* settings |
OTClient does not connect to it | Keep it outside the public tunnel path |
A Localtonet TCP tunnel maps one public host and port to one local IP address and port. It does not automatically combine 7171 and 7172. For the unmodified TFS 1.6 topology, one tunnel can cover login and status because those roles share local port 7171. A second tunnel is normally required for the game listener on local port 7172.
Reaching the login screen does not prove that remote gameplay will work. After character selection, TFS supplies an address and game port for the next connection. That advertised endpoint must be reachable by the remote client. A public login tunnel alone can therefore produce a successful login exchange followed by a failed game connection.
The ip and gameProtocolPort settings in the pinned configuration participate in the server endpoint presented to clients. A simple TCP tunnel forwards bytes but does not rewrite application-level endpoint information. Before inviting players, verify that the public game endpoint assigned by Localtonet can be represented by the TFS and OTClient combination you use. In particular, compare the assigned public game port with the game port that TFS advertises.
If the assigned public game port differs from the port advertised by TFS, changing only OTClient's initial login address is not enough for an ordinary two-connection flow. Use a supported arrangement in which the advertised address and port resolve to the public game endpoint, or a compatible OTClient configuration that intentionally overrides that behavior. Do not assume Localtonet changes the endpoint embedded in TFS protocol messages. Available public endpoint choices can vary by current Localtonet configuration and plan, so check the dashboard rather than assuming that a particular public port can be selected.
Prepare the host and deployment plan
The official TFS compilation instructions identify Git, CMake, a compiler, Boost, GMP, Lua, a MySQL C connector, PugiXML, and fmt as general requirements. The distribution-specific instructions install the corresponding package set. GCC or Clang is recommended.
For the Ubuntu path in this guide, use Ubuntu 24.04 or later. The current Ubuntu compilation page sets that minimum because of package requirements. The Arch path uses packages from the current Arch repositories as documented by the Arch compilation page.
In addition to the compiler toolchain, prepare a MySQL-compatible database service. The Ubuntu build dependency installs the client development library, not necessarily a configured database server. The Arch build dependency likewise does not by itself establish a running database with a TFS user and schema. Install and initialize an appropriate MySQL-compatible server through your operating system's supported administration process before completing the database section.
| Requirement | Purpose | Verification |
|---|---|---|
| Ubuntu 24.04 or current Arch Linux | Provides the documented compiler and library packages | The package installation commands complete successfully |
| Git and CMake | Obtain the pinned source and generate build files | git and cmake run without command-not-found errors |
| MySQL-compatible server | Stores accounts, characters, houses, items, and other persistent state | An administrator can connect locally and create a database |
| Compatible OTClient and assets | Provides the player client for protocol 13.10 | The selected client explicitly supports the pinned server protocol and required data |
| Localtonet client | Creates the outbound relay connection for public TCP endpoints | The selected device appears connected in the Localtonet dashboard |
| Administrative access | Installs packages and administers the local database | The operator can use the distribution's supported privilege mechanism |
No official minimum CPU, memory, or disk figures are established by the supplied project evidence. Actual consumption depends on the map, scripts, data pack, compiler workload, online player count, and database activity. Monitor the host rather than treating an unsupported hardware estimate as a guarantee.
Use unique database and player administrator credentials. Do not publish config.lua, database passwords, Localtonet device tokens, private endpoints, or client account details. A Localtonet authentication token identifies a particular client device and must not be committed to the TFS repository or shown in screenshots.
Clone and pin The Forgotten Server 1.6
A normal clone follows the repository's current default branch. That is useful for development, but it is not a reproducible TFS 1.6 deployment. Clone the official repository and select tag v1.6 before generating build files:
git clone --recursive --branch v1.6 https://github.com/otland/forgottenserver.git
cd forgottenserver
git rev-parse --short HEAD
git describe --tags --exact-match
For the release used by this tutorial, the revision check should identify the v1.6 release commit beginning with 0986419, and the exact tag check should report v1.6. Stop if the checkout reports another tag or an unexpected commit. Build files, config.lua.dist, schema.sql, source code, and runtime data should all come from the same checkout.
The shallow alternative below is suitable when you only need the named release and do not need repository history:
git clone --recursive --branch v1.6 --depth 1 https://github.com/otland/forgottenserver.git
cd forgottenserver
The official Ubuntu and Arch pages show clone commands that obtain the repository rather than selecting a release. Those commands are preserved below for reference, but this tutorial's deployment procedure uses the explicit v1.6 checkout. Do not describe an unpinned default-branch build as TFS 1.6 merely because compilation succeeds.
Compile TFS 1.6 on Ubuntu or Arch Linux
Ubuntu 24.04 or later
The official Ubuntu sequence has four stages: install the documented packages, clone recursively, generate build files in a build directory, and run make. Because the repository is already pinned in the preceding section, start with package installation and then build that checkout.
Install the Ubuntu build packages
Install Git, CMake, the standard compiler toolchain, Lua and LuaJIT development files, the MySQL client development library, Boost components, PugiXML, Crypto++, and fmt.
Obtain the source recursively
The official default-branch procedure uses a recursive clone. For this tutorial, use the recursive v1.6 clone from the preceding section instead.
Generate the build files
Create a separate build directory and run CMake against the parent source directory.
Compile TFS
Run make from the generated build directory and resolve any compiler error before preparing the runtime.
sudo apt install git cmake build-essential libluajit-5.1-dev libmysqlclient-dev libboost-system-dev libboost-iostreams-dev libpugixml-dev libcrypto++-dev libfmt-dev libboost-locale-dev libboost-json-dev liblua5.3-devThe official default-branch clone command is:
git clone --recursive https://github.com/otland/forgottenserver.git
For this pinned tutorial, do not repeat that command if you already cloned v1.6. From the root of the pinned checkout, generate and compile:
mkdir build && cd build
cmake ..
make
cd ..
Review the final output from both CMake and make. A created build directory is not evidence that configuration succeeded. Resolve missing libraries, headers, or compiler checks at the build layer before moving on.
Arch Linux
The documented Arch sequence updates the system, installs the build packages, clones the repository, generates files with cmake . -B build, and compiles with make -C build. The documentation identifies ./build/tfs as the resulting executable.
Update Arch and install the build packages
Synchronize the system and install the base development group, Git, CMake, LuaJIT, Boost, the MariaDB client library, PugiXML, Crypto++, and fmt.
Obtain the source
The official Arch page shows a default-branch clone. Use the pinned recursive v1.6 clone from this guide for a reproducible release build.
Generate the Arch build directory
Run CMake from the repository root and write generated files to build.
Build the executable
Invoke make against the generated directory and confirm that ./build/tfs exists.
sudo pacman -Syu
sudo pacman -S base-devel git cmake luajit boost boost-libs libmariadbclient pugixml crypto++ fmt
The official Arch clone command is:
git clone https://github.com/otland/forgottenserver.gitUse the pinned checkout for this deployment, then build it from the repository root:
cmake . -B build
make -C build
Confirm the expected executable exists:
test -x ./build/tfs && echo "TFS executable is present"Compilation proves only that the executable was produced. It does not prove that the database exists, the schema is imported, the runtime configuration is valid, the data files can be found, or an OTClient can complete a session.
Create the database and import the TFS 1.6 schema
The pinned repository includes the official schema.sql for TFS 1.6. Import this file from the same checkout as the executable. Do not use a schema copied from another release or an unrelated distribution.
The following SQL creates a dedicated database and a database user restricted to connections from the local host. Replace the example password before running it. Execute the statements while connected through your MySQL-compatible server's supported administrative account:
CREATE DATABASE forgottenserver
  CHARACTER SET utf8mb4
  COLLATE utf8mb4_unicode_ci;

CREATE USER 'forgottenserver'@'localhost'
  IDENTIFIED BY 'replace-with-a-long-unique-password';

GRANT ALL PRIVILEGES
  ON forgottenserver.*
  TO 'forgottenserver'@'localhost';

FLUSH PRIVILEGES;
If TFS and the database run on different machines, localhost is not the correct database-user host restriction. Define the narrowest appropriate source host according to your database server's administration model, secure that private route, and do not expose the database through the player tunnels.
From the root of the pinned repository, import the schema using the dedicated account:
mysql -u forgottenserver -p forgottenserver < schema.sqlEnter the database password when prompted. Supplying the password interactively avoids placing it in shell history or the process command line. The command should finish without SQL errors. Then verify that the schema created tables:
mysql -u forgottenserver -p -D forgottenserver -e "SHOW TABLES;"A list of tables confirms that the import reached the selected database. It does not yet confirm that TFS can authenticate with the same settings, so the first server startup remains an important database test.
Treat schema.sql as initialization material for the pinned release, not as an automatic upgrade command. Back up existing data before any schema operation. For an upgrade, review the selected release's migration requirements instead of assuming that reimporting the initial schema will preserve accounts and characters.
Prepare an account and character
A socket test is not a full game test. OTClient needs an account it can authenticate and a character it can select. TFS stores this state in the imported database. The exact account-creation workflow depends on the account manager or account-management website selected for the deployment, and those components are separate from Localtonet.
Use an account-management method that explicitly supports TFS 1.6 and protocol 13.10. Keep its schema expectations aligned with the pinned server. Before public exposure:
- Create a non-administrator test account with a unique password.
- Create at least one character associated with that account.
- Ensure the character belongs to a valid vocation, town, and starting position supported by the selected TFS 1.6 data.
- Use a separate administrative account for server administration if your chosen management workflow requires one.
- Remove or change any demonstration credentials that came from an imported package, account manager, or website.
This guide does not provide a hand-written INSERT statement for accounts or players. Those rows have linked fields and version-specific password handling, groups, towns, positions, and character attributes. An incomplete manual insert can create an invalid character or weaken authentication. Use a TFS 1.6-compatible account workflow and verify the resulting account locally.
Prepare config.lua and start TFS from the correct directory
TFS ships config.lua.dist as a distributed template. Preserve that file and make a working copy in the repository root:
cp config.lua.dist config.luaRestrict access because the working configuration contains the database password:
chmod 600 config.lua
Open config.lua with your preferred local editor. At minimum, review and set the database connection, server identity, network address, and protocol ports. The relevant TFS 1.6 settings include:
ip = "127.0.0.1"
bindOnlyGlobalAddress = false

loginProtocolPort = 7171
gameProtocolPort = 7172
statusProtocolPort = 7171

mysqlHost = "127.0.0.1"
mysqlUser = "forgottenserver"
mysqlPass = "replace-with-the-database-password"
mysqlDatabase = "forgottenserver"
mysqlPort = 3306
mysqlSock = ""
The listener values above reflect the pinned v1.6 template. The database password is intentionally a placeholder and must match the account created in the preceding section. Check the actual tagged template before editing because a local patch, fork, or repackaged release may differ.
Review the rest of the template rather than copying only this excerpt. Set an appropriate server name, owner information, location, URL, player limits, gameplay options, and other operational values for your deployment. Do not leave misleading public identity information or unknown options unchanged simply because they have defaults.
Choose the bind and advertised address deliberately
The configured ip is more than a casual label. It affects how the server represents its network endpoint to clients. The bindOnlyGlobalAddress option affects listener binding behavior. These settings must satisfy two different requirements:
- The TFS process must listen on an address reachable by the Localtonet client device.
- The endpoint sent to a remote OTClient for the game connection must lead back to the public game tunnel.
During the first host-local test, loopback can be appropriate when OTClient, TFS, and Localtonet all run on the same host. For a LAN test or a Localtonet client on another device, the TFS listener must be reachable through the server's LAN address. Do not expose the database or administrative services while changing game-listener bindings.
For remote use, set the server-advertised address only after you know the Localtonet game endpoint. Confirm whether the exact TFS 1.6 and OTClient combination accepts the assigned public hostname directly or requires a resolved address. Also confirm that the advertised game port corresponds to the public port remote clients can reach. If the public game port cannot match the advertised game port and the client does not provide a supported override, the second connection will fail even though the login tunnel works.
Record the local listener values and public tunnel mapping separately. The TFS local ports are tunnel targets. Remote players use the public Localtonet host and ports. Never replace the tunnel's local target with its public endpoint.
Start TFS from the repository root
The runtime data and configuration are in the source tree. Start the compiled executable while the repository root is the current working directory:
cd /path/to/forgottenserver
./build/tfs
Replace /path/to/forgottenserver with the actual pinned checkout. Watch the console throughout startup. Resolve the first fatal error rather than continuing after a database, schema, map, script, key, or configuration failure.
A successful startup should leave the process running after configuration, database, scripts, and map initialization. Open another terminal for listener checks. Do not move the executable into an arbitrary directory without also supplying the runtime layout expected by the selected version.
Confirm all live listeners
On Linux, inspect listening TCP sockets and the owning process:
ss -ltnp
Find the entries associated with the TFS process and compare them with loginProtocolPort, gameProtocolPort, and statusProtocolPort. For an unmodified TFS 1.6 configuration, expect the login and status roles on 7171 and the game role on 7172. The displayed bind address matters. A listener bound only to 127.0.0.1 cannot be reached from a Localtonet client running on another LAN device.
Verify a complete local OTClient session
Use an OTClient build and client data that explicitly match TFS 1.6's protocol 13.10 release. The TFS release label establishes the server protocol, but it does not establish that every OTClient fork or asset package is compatible. Follow the selected client's documented endpoint configuration rather than assuming that every build exposes the same connection screen.
Confirm clean TFS startup
Leave TFS running and resolve all fatal database, schema, map, script, key, and configuration errors before testing the client.
Verify both protocol ports
Use ss -ltnp to confirm the configured login/status listener and the separate game listener. Record their bind addresses and ports.
Connect to the local login endpoint
Configure the compatible OTClient with the TFS host's local address and the verified login port. Use loopback only when the client runs on the same machine.
Authenticate and retrieve the character list
Sign in with the prepared test account and confirm that the expected character appears. This tests the login listener, account data, and part of the database path.
Enter the game world
Select the character and wait until the game world is rendered. This forces OTClient to leave the login exchange and open the separate game connection.
Exercise and close the session
Move the character, perform a harmless in-game action, log out normally, and confirm that TFS records the connection and disconnection without a protocol error.
If OTClient reaches the account or character stage but cannot enter the world, investigate the advertised game address, game port, client protocol compatibility, character state, and server console. That symptom is particularly valuable because it distinguishes a working login listener from a failed second connection.
When Localtonet will run on another device, repeat the full test from that device's network perspective. A successful same-host connection does not prove that the service is reachable over the LAN. Direct the client to the server's LAN address, complete login, select the character, and enter the world.
A TCP connection to port 7171 proves only that something accepted a connection. The required local milestone is a complete login and game session with the selected character. This validates both TFS protocol listeners before a public relay is introduced.
Publish the verified TFS listeners with Localtonet
Once the complete local or LAN session works, install and run our client on the TFS host or another device that can reach both verified listeners. The Localtonet client establishes an outbound connection to a relay server, so the tunnel workflow does not require inbound router port forwarding, a public IP address, VPN setup, or changes to the router firewall.
Consult the current Localtonet TCP tunnel documentation alongside this topology-specific explanation. Current server and region values must come from the dashboard, and availability can vary.
Plan the two public mappings
| Public path | Local target for unmodified TFS 1.6 | Used for | OTClient requirement |
|---|---|---|---|
| Login/status TCP tunnel | TFS_HOST:7171 |
Initial login and status queries | Enter its assigned public host and port as the initial server endpoint |
| Game TCP tunnel | TFS_HOST:7172 |
Character game session | The endpoint advertised by TFS or deliberately overridden by a compatible client must reach this public tunnel |
| Database | No public tunnel | Private TFS persistence | OTClient never connects directly to it |
Replace TFS_HOST with the address reachable from the Localtonet client. When Localtonet runs on the same host and TFS is reachable over loopback, that can be 127.0.0.1. When Localtonet runs on another LAN device, use the TFS server's reachable LAN address.
Create the login and status tunnel
Install and run the Localtonet client
Run our client on the TFS machine or a device that has already been proven able to reach the login and game listeners.
Select the authenticated device
Choose the device associated with the client that will carry the tunnel. Keep its device-specific authentication token private.
Select an available relay server
Choose a server or region from the values currently offered in the Localtonet dashboard. Do not copy a server code from an unrelated tutorial.
Create a TCP tunnel to the login target
Set the local IP to the verified TFS address and the local port to the configured login/status port, which is 7171 in the unmodified TFS 1.6 template.
Start the tunnel
Creating the tunnel does not run it. Use the Start button and confirm that the selected device remains connected.
Create the game tunnel
Repeat the same documented dashboard sequence for a second TCP tunnel, but target the verified game listener, which is local port 7172 in the unmodified TFS 1.6 template. Start that tunnel as well. Record both assigned public endpoints:
Login/status:
  Public: ASSIGNED_LOGIN_HOST:ASSIGNED_LOGIN_PORT
  Local:  TFS_HOST:7171

Game:
  Public: ASSIGNED_GAME_HOST:ASSIGNED_GAME_PORT
  Local:  TFS_HOST:7172
These are documentation placeholders, not values to paste into the dashboard. Use the actual host and port assigned to each running tunnel.
Align the advertised game endpoint
Configure OTClient's initial endpoint with the public login host and public login port. Then ensure that the game endpoint returned by TFS reaches the separate public game tunnel. Verify all three parts:
- The address advertised by the TFS
ipsetting reaches the Localtonet public game endpoint. - The port advertised through the TFS game configuration is the public port remote clients must use, not merely the local target port.
- The game tunnel forwards that public endpoint to the actual local
gameProtocolPort.
If Localtonet assigns public game port P and forwards it to local port 7172, a remote client must ultimately connect to P. Advertising local port 7172 works only when the public game endpoint is also reachable on 7172, or when the chosen client has a documented mechanism that intentionally substitutes the public endpoint. A standard TCP tunnel does not rewrite the port contained in the TFS login response.
The login screen or character list can work while world entry fails. For the pinned TFS 1.6 template, remote gameplay normally needs both the login/status path and the separate game path, plus correct advertised endpoint behavior.
Verify a full external session
Test from a genuinely external network, such as a separate internet connection. Do not rely on a client that may silently fall back to the LAN route.
- Confirm TFS is running and both local listeners are present.
- Confirm the Localtonet client device is connected.
- Confirm both TCP tunnels are started.
- Enter the assigned public login host and port in the compatible OTClient.
- Authenticate with the non-administrator test account.
- Confirm the character list loads.
- Select the test character and enter the game world.
- Move the character and perform a harmless action to verify live game traffic.
- Log out normally and confirm the server records a clean disconnect.
Watch the TFS console during this test. If the character list appears but world entry times out, focus on the game tunnel and the address or port advertised after login. If no connection reaches TFS at all, check the public login endpoint, tunnel state, selected device, and local login target.
Public access exists only while the selected Localtonet client is connected and each required tunnel is running. TFS and its database must also remain healthy. Stop or delete the tunnels when public access is no longer needed.
Shut down, back up, restore, and upgrade safely
Use an orderly shutdown sequence
For planned maintenance, stop accepting new player activity through your established server-administration workflow. Let active state finish saving, then request a normal TFS shutdown through a method supported by your deployment. If TFS is attached to an interactive terminal, an ordinary interrupt such as Ctrl+C allows the process to handle termination more safely than a forced kill. Avoid kill -9 except as a last resort because it does not allow normal cleanup.
After TFS has exited, stop the Localtonet login and game tunnels. Stopping the tunnels first is also appropriate when you need to remove public reachability immediately, but it will disconnect remote players. Shut down the database only after the game server has stopped using it.
Back up the complete deployment
A useful backup contains more than the executable. Preserve:
- A database dump containing accounts, characters, world state, and other persistent records.
- The private
config.lua, stored securely because it contains credentials. - Customized maps, scripts, XML, Lua, and other files under the runtime data tree.
- The exact TFS tag or commit and any local source patches.
- The compiler environment and package versions needed to reproduce the build.
- The compatible OTClient version and deployment-specific client configuration.
- A record of local listener values and the intended Localtonet tunnel mappings.
Use your MySQL-compatible server's supported logical or physical backup tooling. Test restoration on a non-production instance. A backup that has never been restored is not yet proven.
Restore in dependency order
Restore the database and customized runtime files first. Rebuild the exact pinned source if the executable is not being restored. Start TFS privately, verify database and map loading, inspect both listeners, and complete a local OTClient session. Only then start the Localtonet login and game tunnels and perform an external session test.
Upgrade without mixing releases
Treat an upgrade as a new deployment, not as an executable swap:
- Schedule downtime and create a tested database and data backup.
- Read the target release notes and any migration guidance.
- Clone the target tag into a separate directory.
- Compare its
config.lua.distwith your current configuration. - Review schema differences and apply only the documented migration process.
- Reapply local code, map, script, and data changes deliberately.
- Compile and test with a compatible OTClient away from production.
- Verify login, game, and status ports because defaults or behavior can change.
- Update the Localtonet targets only if the verified local listeners changed.
- Perform a full external login and game test before reopening the service.
Never copy a new executable over TFS 1.6 while retaining an unreviewed old schema and configuration. A build can succeed even when runtime files are incompatible.
Localtonet platform-wide Token and Tunnel webhooks can report Connected and Disconnected changes for selected token groups. They are useful connectivity signals, but they do not report TFS player logins, database health, world state, or successful gameplay. Monitor the TFS process and application behavior separately.
Troubleshoot each layer in order
CMake cannot find a dependency
Verify that the package command for the actual operating system completed successfully. Ubuntu must meet the documented 24.04 minimum for this package set. Do not mix Ubuntu and Arch package names. Confirm that the checkout is the intended v1.6 tag before deleting or regenerating the build directory.
The compiler fails
Start with the first meaningful compiler error. Confirm that recursive source dependencies are present and that CMake generated files from the same pinned checkout. Local modifications can also cause failures. The general TFS compilation documentation recommends debug binaries when investigating crashes so symbols are retained, but use a build method appropriate to the exact source and toolchain rather than guessing at unsupported flags.
TFS reports database access denied
Compare mysqlHost, mysqlUser, mysqlPass, mysqlDatabase, and mysqlPort with the account created in the database. Remember that a MySQL account includes both a username and an allowed source host. Test the same credentials with the database client from the TFS host.
TFS reports missing tables or schema errors
Confirm that the v1.6 schema.sql file was imported into the same database named in config.lua. Do not solve a missing-table error by importing schemas from multiple versions. If the database already contains valuable data, back it up before making changes.
TFS cannot find configuration, map, scripts, or data
Return to the repository root and launch ./build/tfs from there. The current working directory matters because runtime files live in the source tree. Check file ownership and permissions, especially if compilation and runtime use different operating-system accounts.
The process runs but a listener is missing
Compare ss -ltnp with the three protocol settings in config.lua. Read the complete startup output and confirm initialization finished. Check whether another process already owns the configured port. Do not create a Localtonet tunnel to a port that TFS has not opened.
Same-host OTClient works, but another LAN device fails
Check the TFS bind address and bindOnlyGlobalAddress behavior. A loopback-only listener is reachable only from the host itself. Verify the host firewall and LAN route, then repeat the entire login and game test using the server's LAN address.
The login screen works, but the character list does not
Inspect the TFS console for authentication, protocol, database, or account errors. Confirm that the client supports protocol 13.10 and that the test account was created through a TFS 1.6-compatible workflow. Verify that the server and client assets belong to the same intended deployment.
The character list appears, but entering the world fails locally
The login connection worked, so inspect the separate game listener. Confirm that gameProtocolPort is listening, the server advertises an address reachable by the local client, and the selected character has valid deployment-specific state. Watch the console for protocol or character-loading errors.
Local gameplay works, but the public login endpoint does not
Confirm that the selected Localtonet device is connected and that the login tunnel was started. Compare its local target with the endpoint proven from the Localtonet client device. Use the assigned public host and port in OTClient, not the local TFS address.
Public login works, but public gameplay fails
This usually isolates the failure to the second connection. Confirm that the game TCP tunnel exists, is started, and targets the verified local game port. Then compare the game address and port TFS supplies with the public game endpoint assigned by Localtonet. If those values do not lead to the public game tunnel, the remote client cannot enter the world even though authentication succeeds.
The tunnel worked and then stopped
Check every lifecycle dependency: database health, TFS process state, both local listeners, Localtonet client state, selected device connectivity, and both tunnel states. Also check whether the host slept, restarted, changed its LAN address, or lost outbound connectivity. Restore components in dependency order, complete a local session, then retest externally.
Where should TFS-specific support requests go?
The TFS repository directs support questions to the OTLand support forum and notes that the GitHub issue tracker is not a support forum. Use GitHub issues for appropriate project defects and the support forum for deployment assistance. When requesting help, include the exact tag, operating system, first relevant error, configuration names with secrets removed, and whether the failure occurs during login or the game connection.
Frequently asked questions
Which TFS version does this tutorial use?
It uses the official v1.6 tag at release commit 0986419. The project identifies TFS 1.6 as its stable protocol 13.10 release. Configuration values in this guide are tied to that tag rather than presented as universal TFS defaults.
What ports does TFS 1.6 use by default?
In the unmodified v1.6 config.lua.dist, login and status use TCP port 7171, while the game protocol uses TCP port 7172. Verify your copied configuration and live listeners because local changes, forks, and other releases may differ.
Do I need one or two Localtonet TCP tunnels?
The standard TFS 1.6 layout normally needs two. One tunnel targets the shared login and status listener on local port 7171. The other targets the game listener on local port 7172. One tunnel maps to one local target, so it does not publish both ports automatically.
Why can the character list work while entering the game fails?
Login and gameplay use separate connections. OTClient can reach the login listener, authenticate, and receive the character list, then fail when it tries the advertised game endpoint. Check the game listener, game tunnel, public game port, and the address and port TFS provides to the client.
Does Localtonet rewrite the game address sent by TFS?
A standard Localtonet TCP tunnel forwards traffic between its public endpoint and one local target. Do not assume it rewrites application-level address or port information inside the TFS protocol. Configure and test the TFS-advertised endpoint and compatible OTClient behavior explicitly.
Can the database use the same tunnel as the game server?
No single TCP tunnel maps to multiple local targets, and players do not need database access. Keep the database private and allow only the TFS host or other specifically authorized administrative systems to connect to it.
Does compiling TFS create the database and player account?
No. Compilation creates the executable. You must create a MySQL-compatible database, import the pinned release's schema.sql, configure database credentials in config.lua, and create a test account and character through a TFS 1.6-compatible account-management workflow.
Can Localtonet run on another computer?
Yes. The Localtonet client can run on another device that can reach both TFS listeners over the LAN. In that arrangement, target the TFS server's reachable LAN address rather than loopback, and complete a full login and game test from that device's network path first.
Does creating a Localtonet tunnel start it automatically?
No. Creating and running a tunnel are separate lifecycle steps. Start each required TCP tunnel with the Start button. Public access remains available only while the selected Localtonet device is connected and the tunnel is running.
How do I prove the public deployment really works?
Test from an external network. Connect OTClient to the public login endpoint, authenticate, load the character list, enter the world through the game endpoint, move the character, perform a harmless action, and log out normally. A port check or character list alone is not a complete external-session test.
Publish your verified TFS 1.6 listeners with Localtonet
Build and configure the pinned release, import its schema, complete a local login and game session, and verify the separate listeners. Then create and start Localtonet TCP tunnels for the required login/status and game targets, align the advertised game endpoint, and perform a full external OTClient test.
Get Started Free →

