

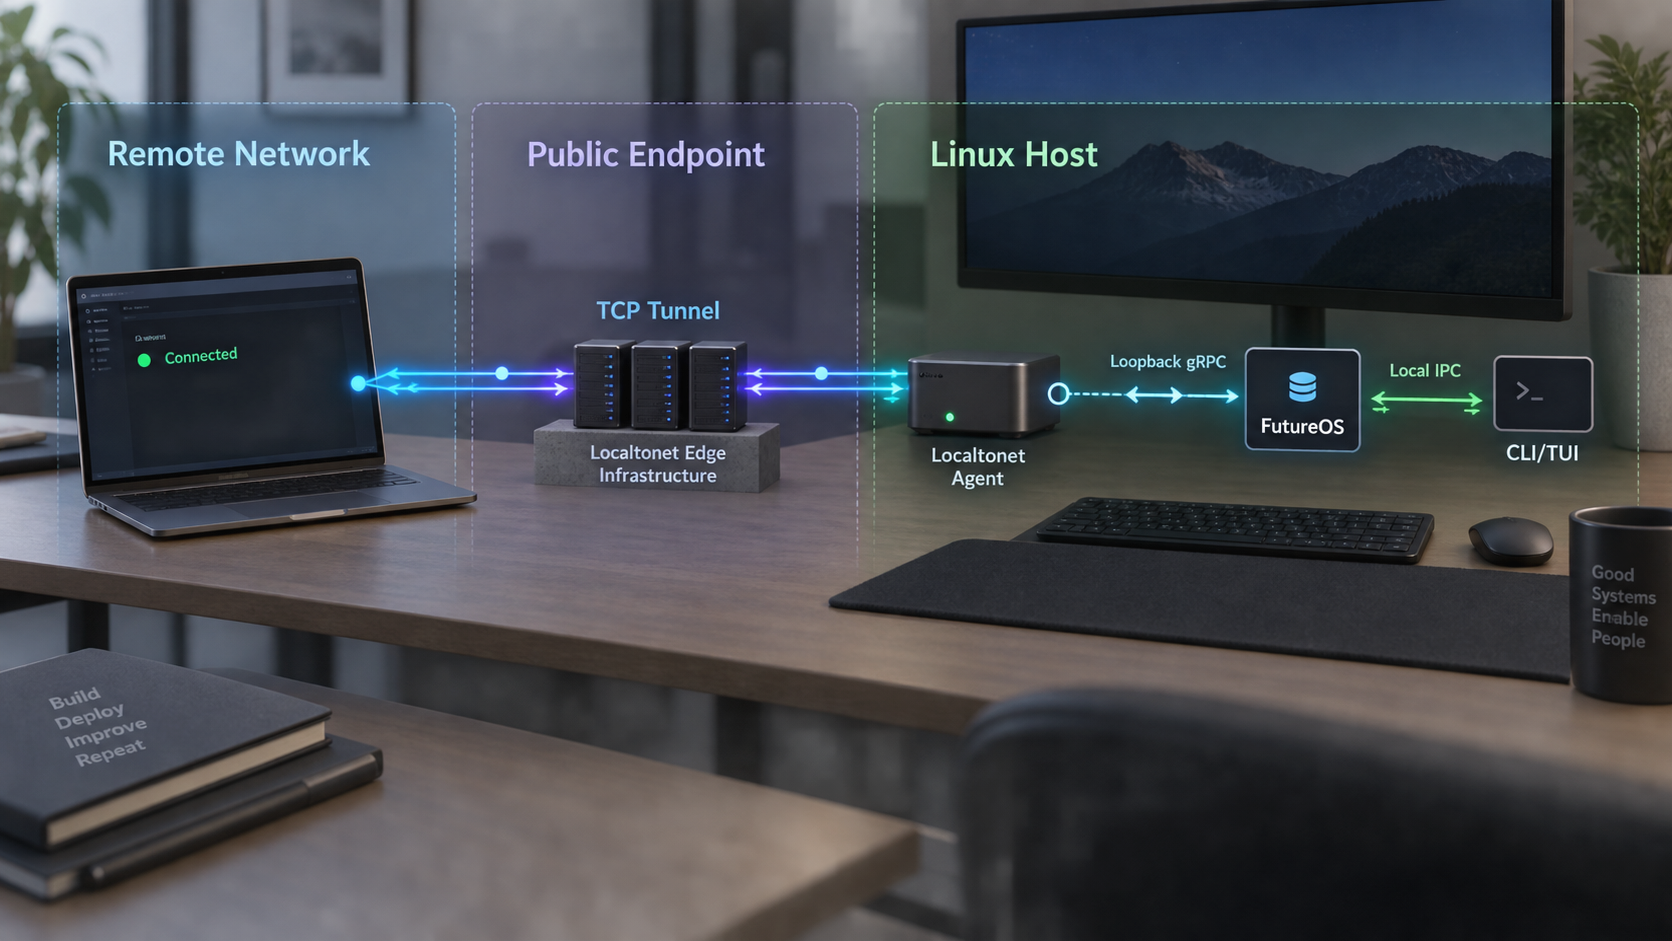
Run FutureOS locally, prepare Localtonet as a managed Linux service, and stop before unsafe public gRPC exposure
FutureOS uses a local agent backend for its terminal, desktop, mobile, CLI, and messaging interfaces. Its normal Linux transport is a per-user Unix-domain socket, so a local installation does not need a public listening port. FutureOS documentation also describes an optional gRPC TCP listener, but the available evidence for the documented configuration does not establish client authentication, client authorization, or encrypted transport for that listener. This guide therefore covers local FutureOS installation and verification, a persistent Localtonet Linux installation, and the checks required before any remote tunnel is created. It does not recommend unrestricted public TCP exposure.
📋 What's in this guide
Version baseline, evidence limits, and tutorial scope
FutureOS is an actively developed project. The release used as the compatibility baseline for this revision is FutureOS v1.2.1. The available release record identifies commit 98f7f3a, while the project's main branch has continued to change substantially after that release. The installation and local-operation commands below are documented in the current FutureOS repository, but the supplied v1.2.1 release evidence does not independently confirm every TCP command and environment variable previously used in this article.
This revision was reviewed against the supplied primary documentation on 2026-08-20. It was not accompanied by a reproducible runtime test report for FutureOS v1.2.1. We therefore do not label the optional gRPC TCP commands as tested against that release, and we do not instruct readers to publish the listener. Before using a different release, compare its release notes, command reference, security documentation, and configuration behavior with the exact binary installed on your host.
The available evidence does not establish authentication, per-client authorization, or encrypted transport for the optional FutureOS gRPC TCP listener. A Localtonet TCP tunnel creates a network path, but connectivity does not create application authentication or encryption. Because no verified TCP access restriction is documented in the supplied Localtonet evidence for this configuration, this guide stops before creating or starting a public TCP tunnel.
The self-contained scope is:
- Install FutureOS using its documented Linux installer.
- Configure a model provider without publishing credentials.
- Run the FutureOS agent in a foreground terminal and verify it through the default local IPC transport.
- Install the matching Localtonet DEB or RPM package on a supported systemd-based Linux host.
- Store the Localtonet device token in the documented root-owned token file, check the configuration, start the service, and inspect its journal.
- Explain which security facts must be verified before a FutureOS TCP endpoint can be exposed.
- Cover supported Localtonet service startup, shutdown, logging, token rotation, and package upgrade behavior.
This article uses FutureOS in a foreground demonstration. The supplied FutureOS evidence says that a futureos-headless backend exists for server use, but it does not provide enough pinned-release startup, service-unit, shutdown, update, or rollback instructions to reproduce a persistent FutureOS deployment here. We do not invent a systemd unit for it. Localtonet, by contrast, has a documented persistent systemd package workflow, and that workflow is included in full.
How the local FutureOS and Localtonet architecture works
FutureOS uses one agent backend for multiple interfaces. According to its repository documentation, terminal and CLI clients are thin gRPC clients. On Linux, their default local connection uses per-user inter-process communication through a Unix-domain socket. When XDG_RUNTIME_DIR is set, the normal path is $XDG_RUNTIME_DIR/future/agent.sock. Otherwise, FutureOS falls back to ~/.future/run/agent.sock. Unix clients can also honor FUTURE_AGENT_SOCKET.
This local design provides a useful boundary. A Unix-domain socket is not automatically reachable from another machine, and access can be constrained by the Linux account and filesystem permissions around the runtime path. It is still important to protect the host account, but the default does not turn the agent into a public network service.
Localtonet serves a different role. Our Linux client establishes an outbound connection to a Localtonet relay server. When a tunnel is deliberately created and started, it can provide a public URL or public host and port for a local target. That removes the need for inbound router port forwarding, a public IP address, an inbound firewall change, or separate VPN setup for standard tunneling.
Those connectivity properties must not be confused with application-layer controls. A raw TCP tunnel forwards bytes to the selected local IP address and port. It does not, by itself, prove that the target protocol authenticates users, authorizes individual operations, or encrypts the end-to-end application session. Those properties must come from verified target-service behavior or another verified protection layer.
Ctrl-C.
| Boundary | What it controls | What it does not establish |
|---|---|---|
| Linux account and local socket | Local process and filesystem access to the normal FutureOS IPC path | Remote identity or internet-facing access policy |
| FutureOS tool approvals and sandbox | How agent tools may read, write, edit, or execute within documented platform limits | Network transport authentication or encryption |
| Localtonet device token | Which Localtonet client device connects to our platform | Who may use the target FutureOS application protocol |
| Localtonet TCP tunnel | Connectivity from an assigned public host and port to a local TCP target | FutureOS client authorization or verified end-to-end gRPC encryption |
Prerequisites for the Linux host
Prepare the host before installing either component. FutureOS and Localtonet have different packaging and runtime requirements, so confirming both sets of prerequisites avoids ending with an agent that works locally but an unsupported service installation.
FutureOS prerequisites
- A Linux environment with a shell and permission to install software for the intended user.
curl, because the documented FutureOS installer is retrieved with it.- A terminal session for initialization, configuration, foreground agent logs, and the TUI.
- At least one supported model provider, configured through FutureOS sign-in or a supported custom-provider path.
- Outbound internet access for installation, model-provider requests, and any optional skill downloads.
Localtonet package prerequisites
The documented installable Localtonet packages are available as DEB and RPM packages for x64 and ARM64. The packaged service requires systemd 247 or newer and OpenSSL 3. The current documentation gives Debian 12, Ubuntu 22.04 or newer, and RHEL 9 as examples of systems meeting those requirements. These examples do not mean that every derivative distribution is automatically supported.
Determine whether the host uses the Debian or Ubuntu DEB path or the Fedora or RHEL RPM path. Also determine whether the machine is x64 or ARM64. Select the matching package from the live Localtonet installation documentation. Architecture-specific package choices should come from that page instead of a copied download URL, because available builds can change.
You also need a Localtonet account and a device-specific authentication token. The token identifies the client device that will connect to our platform. It is not a FutureOS login, model-provider credential, remote-user password, or substitute for application authorization.
FutureOS provider keys belong to the FutureOS user configuration. The Localtonet device token belongs in /etc/localtonet/auth-token for the documented headless package setup. Never put either secret in a repository, screenshot, article example, public support request, or reusable shell script.
Choose the operating model before installation
This guide demonstrates FutureOS in the foreground under a normal Linux user. The agent ends when that process is stopped or its terminal session is terminated. Do not assume that starting it manually provides reboot persistence.
Localtonet follows a persistent headless model. Its package installs localtonet.service, which can be enabled to start now and on future boots. The two processes therefore have different lifecycles in this tutorial. After a reboot, Localtonet may reconnect while FutureOS remains stopped. Since no tunnel is created here, that state does not publish a FutureOS endpoint.
Install and configure FutureOS
FutureOS documents one installation script for macOS and Linux. On Debian and Ubuntu, it installs a DEB containing the desktop application and unified future CLI. Other Linux distributions use the project's portable tarball path. No source build is required for this documented installation method.
The command comes from the current primary FutureOS repository documentation:
curl -fsSL https://dl.future-os.cn/install.sh | bashA downloaded script piped directly to Bash executes immediately. If your organization requires package review, checksum validation, software allowlisting, or staged deployment, follow that policy instead of bypassing it. The existence of an upstream one-line installer does not override local security requirements.
Use the intended FutureOS Linux account
Open a shell as the user that will run the agent and TUI. FutureOS stores per-user state and configuration, so installing or configuring under one account and running under another can produce different settings and socket paths.
Run the documented installer
Execute the installation command after completing any review required by your environment. The installer automatically chooses the Linux package path documented by FutureOS.
Complete initialization
The documented installer finishes by running future init. Follow the prompts. If initialization was interrupted, run the command again from the intended user account.
future initNext, configure a model provider:
future configThe agent needs at least one provider before it can answer. The interactive flow supports FutureOS and custom-provider choices. If you use the FutureOS hosted model flow, the documented device-flow sign-in command is:
future auth login
The current documentation states that this works whether or not the agent is already running. If the agent is running, the key can be applied live. Otherwise, authentication data is written to ~/.future/agent/auth.json and loaded when the agent starts.
Bring-your-own-key configurations also use ~/.future/agent/auth.json for known providers. Custom OpenAI-compatible or Anthropic-compatible providers can be described in ~/.future/agent/models.json. Both files may contain sensitive provider information. Restrict them to the intended account and do not place keys directly into command examples.
Optional skills
Skills are optional capability packs stored under ~/.future/agent/skills/. They are not required for the initial local verification. Once the basic agent works, you can inspect the catalog and install only the skill you need:
future skills list
future skills install <name>
The documentation also says that running future skills install without a name installs every built-in skill. A selective installation is generally easier to review than enabling every optional workflow. Review a skill's behavior before allowing it to process sensitive data or invoke host tools.
Start and verify FutureOS through local IPC
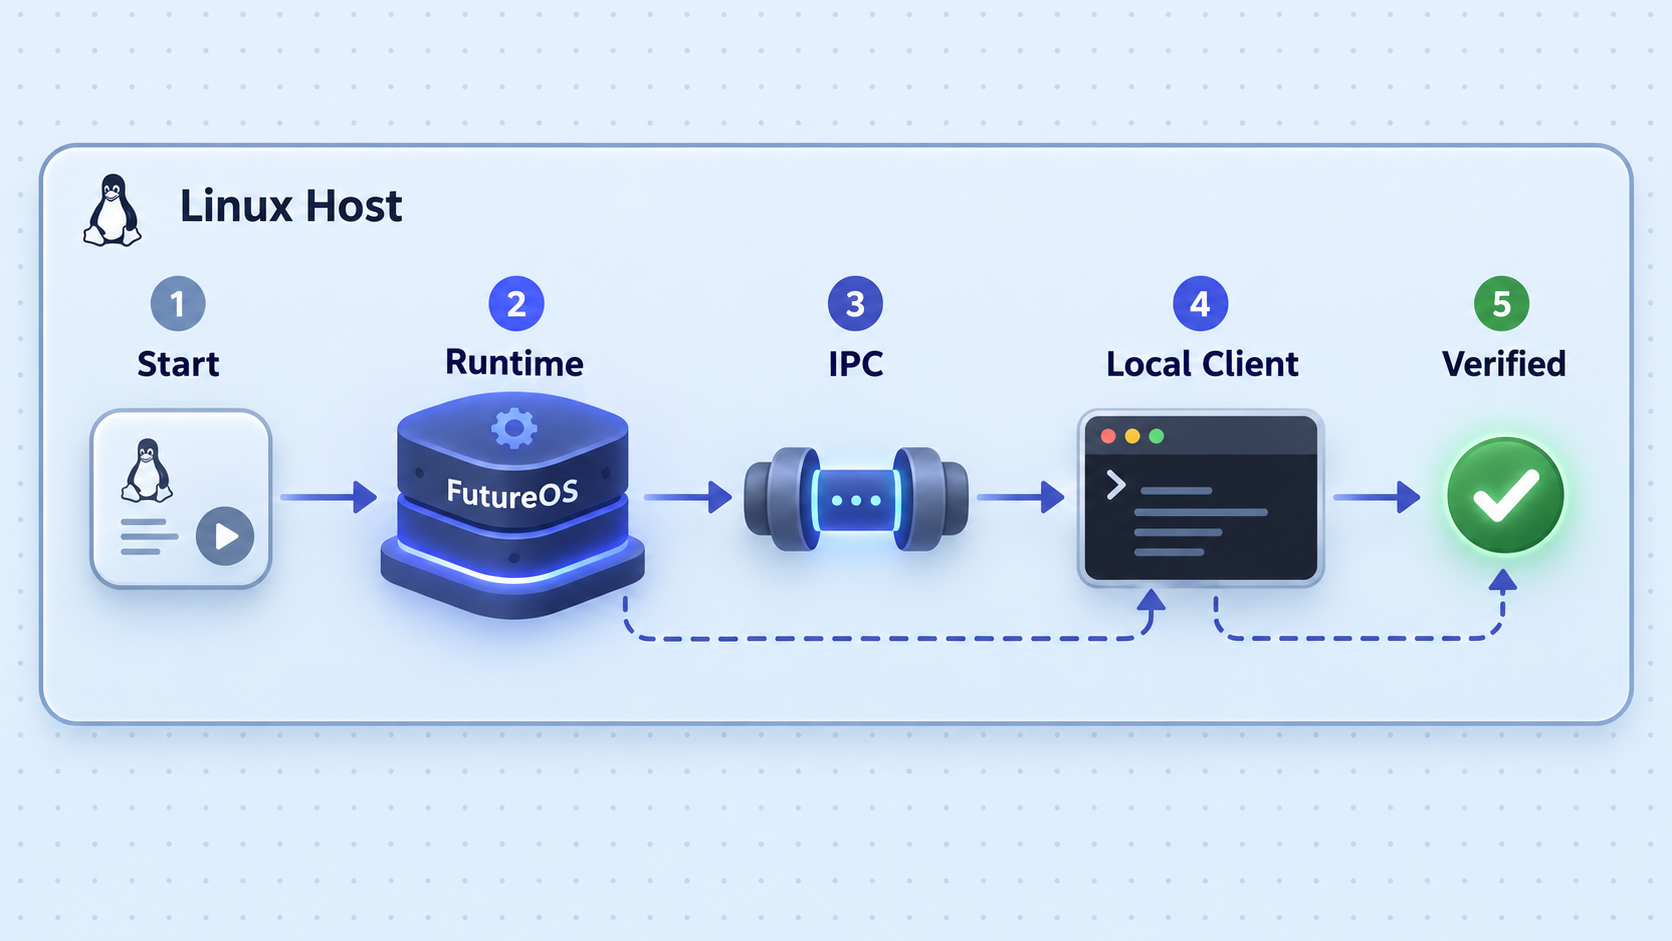
Establish a local baseline before considering any network listener. This confirms the executable, provider configuration, agent process, TUI, and normal socket path without introducing a public endpoint.
Start the agent in the foreground
Run future agent as the configured FutureOS user. Keep the terminal open. The agent logs to standard output, making startup and provider errors visible.
Start the TUI from a second terminal
Open another shell under the same Linux account and run future tui. Without a TCP override, it should use the normal per-user local IPC path.
Send a low-risk test request
Confirm that the client opens a session and receives a model response. Use a prompt that does not require file writes, shell execution, or sensitive data while validating the installation.
Observe the agent logs
Check the first terminal for successful client activity and for provider, model, permission, or runtime errors. Resolve local errors before adding any remote-access component.
Stop the foreground demonstration
Exit the TUI, return to the agent terminal, and press Ctrl-C. This is the documented stop action for the foreground agent.
future agentfuture tui
If the local client cannot connect, first confirm that both commands are running under the same Linux user. Then check whether FUTURE_AGENT_SOCKET is set to an obsolete or unintended path. The default Linux socket is under $XDG_RUNTIME_DIR/future/agent.sock when that variable is available, with ~/.future/run/agent.sock as the documented fallback.
The TUI and desktop application can start an agent sidecar when none is running, but an explicitly started foreground process keeps logs visible and makes shutdown unambiguous. The supplied evidence does not include enough pinned-release detail to define a supported persistent FutureOS service, so this guide does not create one.
Install Localtonet as a persistent Linux service
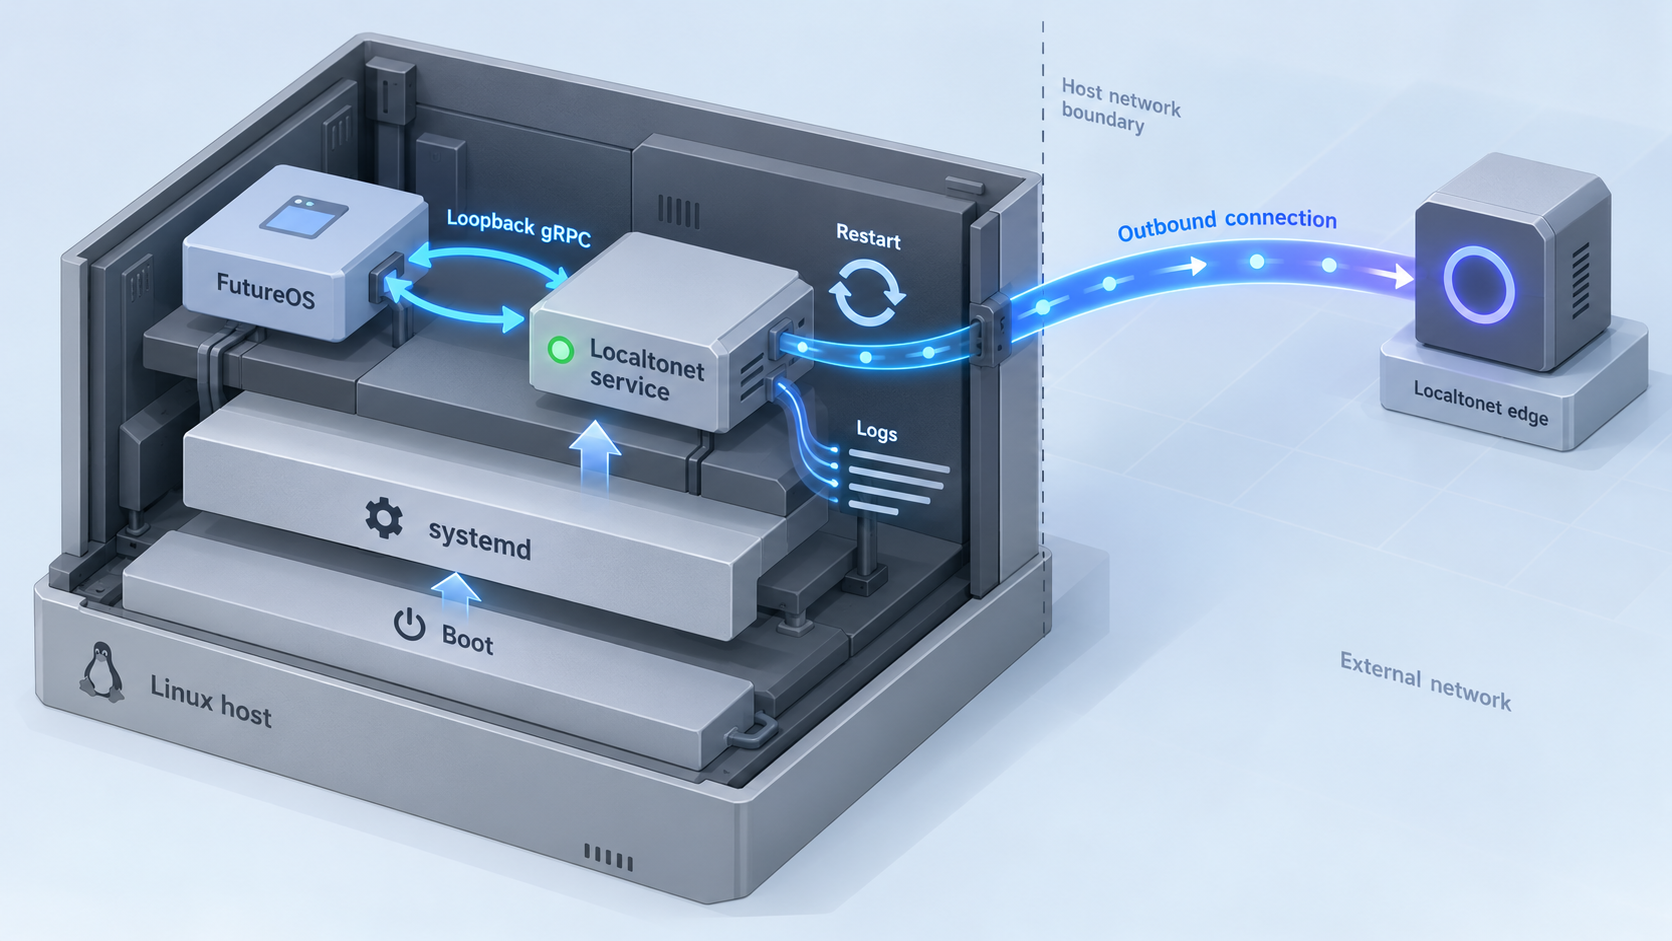
The Localtonet package workflow is suitable for a headless systemd host. Use the live Localtonet documentation and download selector to choose the DEB or RPM matching both the distribution family and CPU architecture. Do not substitute a package intended for another architecture.
Before continuing, confirm that the host has systemd 247 or newer and OpenSSL 3. The package instructions currently cover Debian or Ubuntu and Fedora or RHEL families on x64 and ARM64.
Install the matching package
Download the correct package from the current documentation. For Debian or Ubuntu, install the downloaded DEB with apt. For Fedora or RHEL, install the downloaded RPM with dnf. Replace the placeholder below with the actual downloaded filename.
Set the device token and check the configuration
Edit /etc/localtonet/auth-token as root and replace DUMMY_AUTH_TOKEN with the device-specific token on one line. Set mode 600, then run the documented headless configuration check using that token file.
Enable the service and inspect its journal
Only after the configuration check succeeds, enable and start localtonet.service. Inspect the service journal to confirm that the client starts and connects without configuration errors.
DEB installation path
sudo apt install ./<downloaded-package>.debRPM installation path
sudo dnf install ./<downloaded-package>.rpmToken-file configuration and validation
Open /etc/localtonet/auth-token as root using your normal administrative editor. Place the token on a single line and do not include it in copied terminal output. Then run:
sudo chmod 600 /etc/localtonet/auth-token
sudo localtonet --headless --authtoken-file /etc/localtonet/auth-token --check-config
The permission setting prevents ordinary users from reading the token file. The configuration check validates the documented headless configuration before the persistent service is started. If the check fails, correct the token-file content or reported configuration problem instead of proceeding.
Persistent startup and journal inspection
sudo systemctl enable --now localtonet.service
sudo journalctl -u localtonet.service
The first command enables the service for future boots and starts it immediately. The second displays its journal. Review the latest entries for token errors, startup failures, or connection problems. Avoid publishing journal output without first checking it for identifiers or other sensitive operational details.
Installing and starting localtonet.service connects the selected device to our platform. A tunnel must still be created and started separately. This tutorial intentionally leaves the FutureOS public tunnel uncreated because the target protocol's authentication and encryption properties have not been verified.
Why this guide does not publish the FutureOS gRPC listener
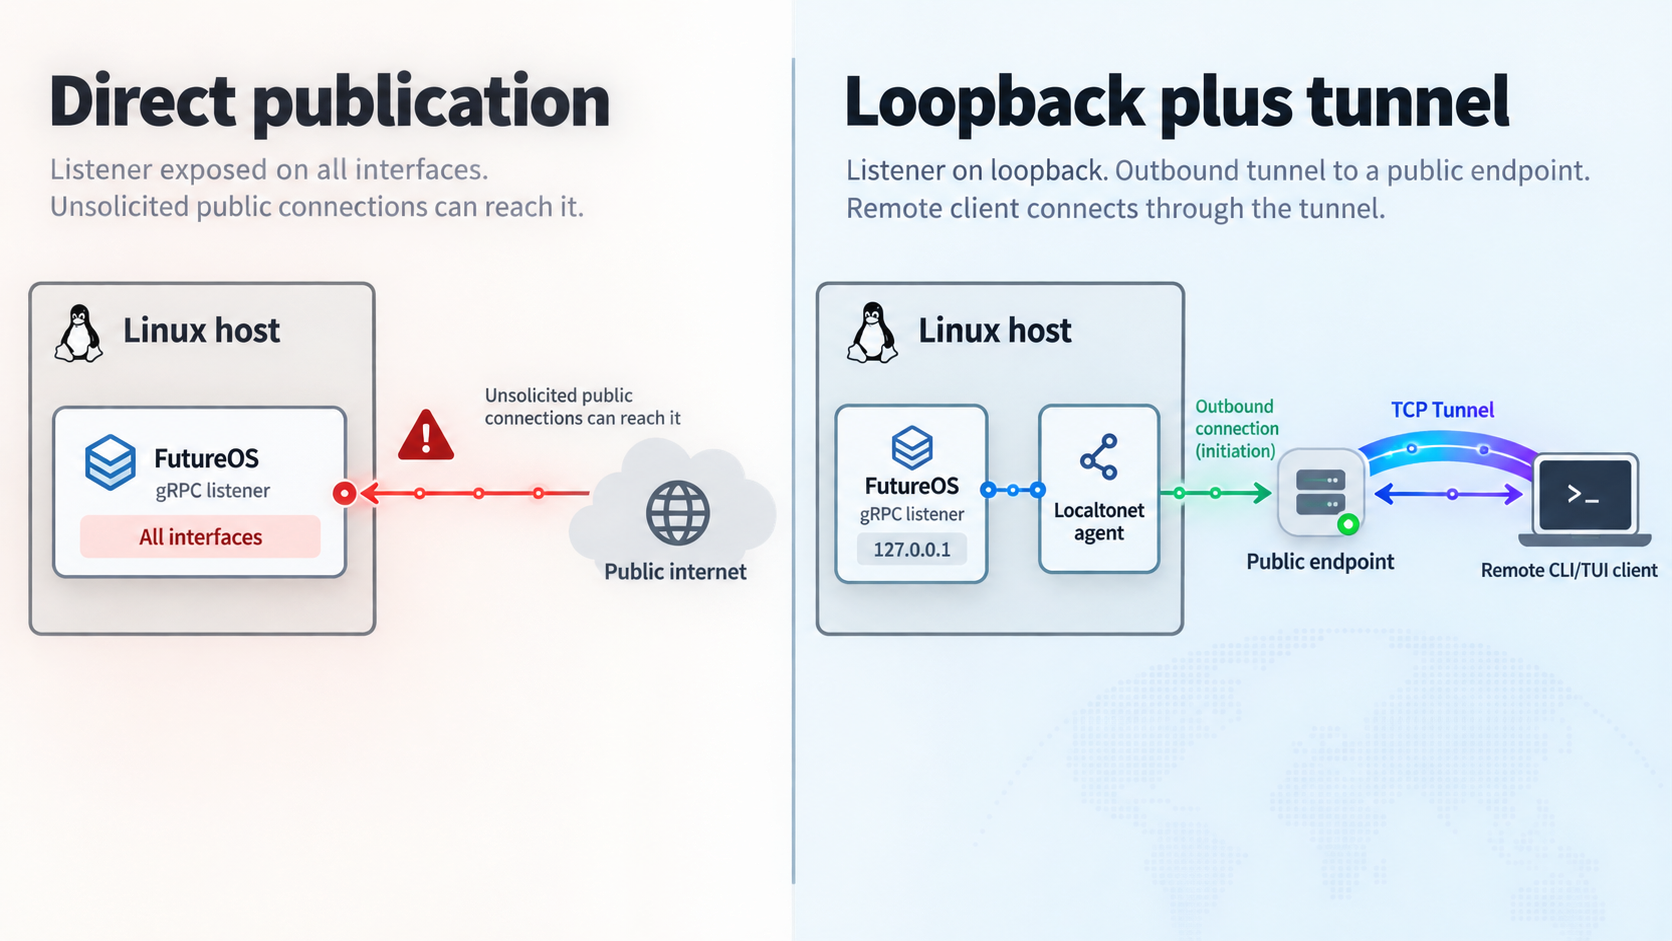
Previous versions of this tutorial directed users to start a loopback gRPC listener, create a Localtonet TCP tunnel to it, and point a remote TUI at the assigned public host and port. Binding a service to 127.0.0.1 is useful because it prevents direct listening on the host's LAN and public interfaces. It does not, however, make a relay-published endpoint private.
Once a raw TCP tunnel forwards a public host and port to that loopback listener, any party able to reach the public endpoint may be able to send traffic to the application. Calling the intended remote operator “authorized” does not create a technical authorization control. Sharing the address with only one person is also not equivalent to authentication.
The supplied FutureOS evidence explicitly identifies end-to-end encryption for its phone-to-desktop remote channel using a Noise handshake and ChaCha20-Poly1305 records. That claim applies to that documented remote channel. It must not be transferred to the separate optional gRPC TCP listener without evidence that the same protections apply.
Before publishing any FutureOS gRPC endpoint, verify all of the following against the exact release and configuration you will run:
- Whether the server authenticates every connecting client.
- How client credentials are issued, stored, rotated, and revoked.
- Whether authorization is scoped per user, client, session, or operation.
- Whether transport encryption is enabled and how the client validates the server identity.
- Whether credentials and session contents remain protected from intermediaries.
- Whether the documented client command refuses an untrusted or mismatched server.
- Whether the exact TCP flags and environment variables are supported by the pinned FutureOS release.
- How failed authentication attempts and remote operations are logged.
Stopping a tunnel after a short test reduces exposure time, but it does not provide authentication or encryption during the test. The available Localtonet evidence does not document a TCP-specific remote-user access restriction that can be applied here, so this article does not claim one. Keep FutureOS on local IPC unless you have a separately verified protection method.
Safer choices supported by the available evidence
For a TUI used on the same Linux host, continue using the default Unix-domain socket. For server administration, an operator can work in an appropriately secured shell session and run the TUI as the same FutureOS user, subject to the organization's normal server-access controls.
For phone-to-desktop use, evaluate the FutureOS remote channel documented by the project, since the primary documentation specifically describes that channel as end-to-end encrypted. Confirm its setup and release compatibility in FutureOS documentation before deployment.
Localtonet also provides VPN Manager as a separate private mesh VPN product with granular firewall rules. It is distinct from a standard TCP tunnel. This article does not provide a VPN Manager configuration for FutureOS because the supplied evidence does not contain the exact workflow required to define and verify that deployment. Do not label a standard TCP tunnel as a VPN.
Startup, shutdown, upgrades, rollback, and credential rotation
Starting and stopping the FutureOS demonstration
Start the local foreground agent with:
future agentStart the TUI from another terminal under the same account:
future tui
Exit the TUI when finished and press Ctrl-C in the agent terminal. That shutdown behavior is supported by the current primary documentation. No persistent FutureOS service is configured by this tutorial.
Starting and stopping Localtonet
The installed Localtonet package uses localtonet.service. The documented installation starts and enables it with:
sudo systemctl enable --now localtonet.serviceTo stop the service temporarily without making assumptions about tunnel state, use the standard systemd stop operation:
sudo systemctl stop localtonet.serviceA Localtonet tunnel is available only while its selected client is connected and the tunnel itself is running. Stopping the service disconnects the device and interrupts tunnels assigned to it. A tunnel can also be stopped or deleted from our dashboard without uninstalling the Linux client.
Inspecting service health
Use the documented journal command whenever the client fails to connect or after changing its token:
sudo journalctl -u localtonet.serviceService logs help distinguish a package or token problem from an application problem. A healthy Localtonet service does not prove that FutureOS is running, that a local TCP listener exists, or that a tunnel has been started. Verify each layer independently.
Upgrading Localtonet
Download the new matching package from the live documentation and install it through the same package manager used for the original installation. The official documentation states that the existing configuration is preserved. After installing the package, restart the service:
sudo systemctl restart localtonet
Then inspect the journal again. If you operate Localtonet VPN Manager, its separate service is localtonet-vpn.service, but this FutureOS tutorial uses neither VPN Manager nor its service.
FutureOS updates and rollback
The current FutureOS documentation says published builds check for updates in the background after TUI startup and display a local notice with the official installer link. It also says nothing is installed automatically. Release builds check the release channel, while test and nightly builds use their corresponding channel.
The supplied evidence does not define a pinned-release Linux rollback procedure or guarantee that user data, database formats, and configuration remain backward compatible. Before upgrading a persistent deployment, review the target release notes and back up the FutureOS state required by your environment. Do not describe reinstalling an older package as a supported rollback unless the exact release documentation confirms it.
Rotating the Localtonet device token
Obtain the replacement device token through your Localtonet account workflow. Edit /etc/localtonet/auth-token as root, keep the token on one line, and preserve mode 600. Run the configuration check again before restarting the service:
sudo chmod 600 /etc/localtonet/auth-token
sudo localtonet --headless --authtoken-file /etc/localtonet/auth-token --check-config
sudo systemctl restart localtonet
sudo journalctl -u localtonet.service
Rotating this token changes device authentication to Localtonet. It does not rotate FutureOS model-provider credentials or create remote-user authentication for a FutureOS endpoint. Rotate those credentials through their respective provider and application procedures.
Troubleshooting FutureOS and Localtonet
The future command is not found
Open a new terminal and retry future init. Review the installer output for failures. The installer uses a DEB on Debian or Ubuntu and a portable tarball on other Linux systems, so do not guess a binary path from instructions written for another distribution.
The FutureOS agent starts but cannot answer
Run future config and confirm that at least one model provider is configured. For the FutureOS hosted flow, complete future auth login. If using another provider, verify that the intended Linux account can read its configuration and that the provider credentials and endpoint details are valid.
The local TUI cannot connect to the agent
Confirm that the agent is still running in its foreground terminal and that both processes use the same Linux account. Check whether FUTURE_AGENT_SOCKET is set to an obsolete path. The documented default is $XDG_RUNTIME_DIR/future/agent.sock when XDG_RUNTIME_DIR is set, with ~/.future/run/agent.sock as the fallback.
The FutureOS agent disappears after logout or reboot
That is expected for the foreground demonstration. This tutorial does not install a FutureOS systemd service. Although upstream documentation mentions a headless backend, the supplied pinned-release evidence does not define enough of its service lifecycle to reproduce it safely here.
The Localtonet package will not install
Confirm the distribution family and processor architecture, then download the corresponding DEB or RPM from the current documentation. Check that the host provides systemd 247 or newer and OpenSSL 3. A package intended for ARM64 will not serve as the x64 package, and an RPM should not be substituted for the documented DEB workflow.
The headless configuration check fails
Verify that /etc/localtonet/auth-token contains the correct device-specific token on one line. Confirm that you edited the file as root and set mode 600. Do not paste the token into a support message. Use the exact documented check:
sudo localtonet --headless --authtoken-file /etc/localtonet/auth-token --check-configThe Localtonet service does not remain running
Inspect its journal:
sudo journalctl -u localtonet.serviceLook for package, dependency, token-file, or connection errors. Re-run the configuration check after correcting the problem, then restart the service. Do not troubleshoot FutureOS until the Localtonet service issue is understood, since the two components have separate configurations.
Localtonet is connected, but there is no public FutureOS endpoint
That is the intended result of this guide. A connected Localtonet client does not automatically publish local services. Creating a tunnel and starting it are separate actions, and this tutorial deliberately does not create a public FutureOS TCP tunnel without verified application authentication and transport security.
A previous FutureOS TCP tunnel still exists
Stop it in the Localtonet dashboard immediately if it is no longer required. Delete the tunnel if the configuration should not be reused. Also stop any FutureOS TCP listener associated with it. Review the exact FutureOS version and security configuration before restoring remote access.
Someone can reach a port but cannot use the application
Port reachability proves only that a network connection can be attempted. It does not prove protocol compatibility, authentication, authorization, encryption, model configuration, or application health. Diagnose those properties independently rather than treating a successful TCP connection as a complete security or functionality test.
Frequently asked questions
Does FutureOS need a TCP port for normal Linux use?
No. FutureOS terminal and CLI clients normally connect through a per-user Unix-domain socket on Linux. Local use does not require a public TCP listener or a Localtonet tunnel.
Why does this guide not create a Localtonet TCP tunnel?
The available evidence does not establish authentication, per-client authorization, or encrypted transport for the optional FutureOS gRPC TCP listener. Publishing that listener as raw TCP would create connectivity without proving those protections, so the tutorial stops before exposure.
Does a loopback bind make a tunneled service private?
No. Binding to 127.0.0.1 prevents direct listening on the host's other interfaces. If a relay tunnel forwards a public endpoint to that loopback port, the service still receives traffic through the tunnel.
Does the Localtonet device token authenticate remote FutureOS users?
No. The device token identifies the Localtonet client device to our platform. It is not a FutureOS user credential and does not authorize individual remote application requests.
Is a Localtonet TCP tunnel a VPN?
No. A TCP tunnel forwards a selected local TCP target. Localtonet VPN Manager is a separate private mesh VPN feature with granular firewall rules. Standard tunneling should not be described as VPN functionality.
Can Localtonet run persistently on a headless Linux server?
Yes. The documented DEB and RPM packages install a systemd service. After the token-file configuration check succeeds, sudo systemctl enable --now localtonet.service starts the client and enables it for future boots.
Can FutureOS run persistently on a headless server?
The current FutureOS repository describes a futureos-headless backend. However, the supplied v1.2.1 evidence does not provide enough pinned startup, service-management, upgrade, and rollback instructions for this article to define a supported persistent deployment. The demonstrated future agent process is foreground-only.
Does Localtonet require inbound router port forwarding?
No. The Localtonet client establishes an outbound connection to our relay server. Standard tunnels do not require an inbound router port forward, a public IP address, an inbound firewall change, or separate VPN setup.
Does creating a tunnel make it run automatically?
No. Creating a tunnel and starting it are separate lifecycle actions. A tunnel is available only while its selected Localtonet client is connected and the tunnel is running.
Does FutureOS tool sandboxing secure the network protocol?
No. Tool approvals and sandbox tiers constrain agent operations within their documented platform limits. They do not establish remote-client authentication, authorization, or transport encryption for a network listener.
Prepare Localtonet without exposing an unverified agent endpoint
Install our Linux package, protect the device token, validate the headless configuration, and confirm the systemd service is healthy. Create a FutureOS tunnel only after the exact application release has a verified authentication and encrypted-transport design appropriate for remote access.
Get Started Free →

