

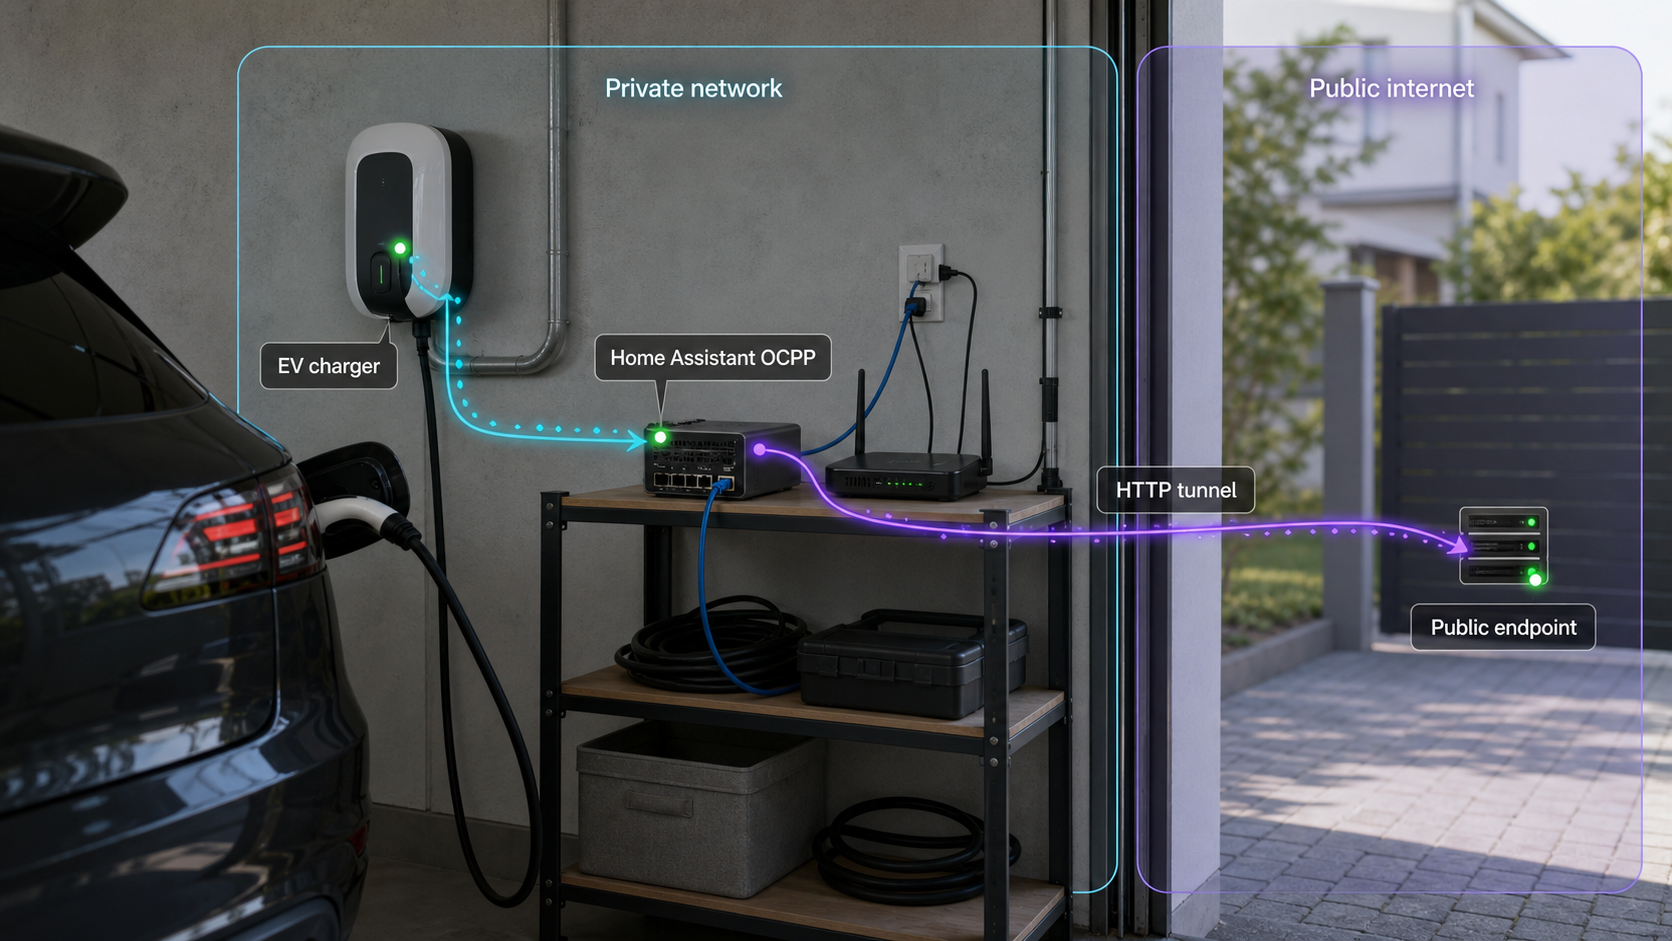
Run your EV charger integration locally, validate every OCPP connection detail, then publish only the required endpoint
The Home Assistant OCPP custom integration connects OCPP-compatible electric vehicle chargers to a Home Assistant installation. This guide explains the installation-first workflow: prepare Home Assistant and HACS, install the integration, configure the charger connection, verify it on the local network, and troubleshoot it before introducing remote access. Once the local endpoint works, we show how to map it to a Localtonet HTTP tunnel without inbound router port forwarding or a public IP address. Because listener ports, URL paths, authentication options, and WebSocket behavior depend on the actual integration configuration, this guide deliberately avoids inventing universal values.
📋 What's in this guide
How Home Assistant OCPP remote connectivity works
The OCPP repository covered here is a custom Home Assistant integration for electric vehicle chargers that support the Open Charge Point Protocol. Its documented protocol coverage includes OCPP 1.6J and OCPP 2.0.1, while OCPP 2.1 support is identified as experimental. Compatibility at the protocol-name level is only the first requirement. The charger and integration must also agree on the exact protocol version, connection URL, charge point identity, optional authentication settings, and any required WebSocket subprotocol behavior.
In a typical OCPP-J arrangement, the charger initiates a WebSocket connection to a central system. For this workflow, the Home Assistant OCPP integration provides the central-system side of that relationship. This differs from opening the ordinary Home Assistant dashboard for a browser. The charger needs the integration's actual OCPP endpoint, which may have a distinct listening port and URL path. Sending the charger to the Home Assistant frontend URL without confirming that endpoint is a common configuration mistake.
Local testing should always come first. If the charger cannot establish and maintain a session with the integration over the local network, adding a public hostname introduces more variables without fixing the original problem. A successful local test confirms that Home Assistant loaded the custom integration, the listener is active, the selected protocol is compatible, the charge point identifier is accepted, and routing between the charger and Home Assistant works.
Remote access becomes relevant when the charger cannot directly reach the Home Assistant host over a private LAN. With Localtonet, the client on a device that can reach the OCPP listener establishes an outbound connection to our relay server. The tunnel then provides a public URL for the selected local IP address and port. This avoids inbound router port forwarding, firewall changes, VPN setup, and the need for a public IP address.
The dashboard and the OCPP listener serve different purposes. Record the listener address, port, URL path, and protocol settings shown by your installed integration. Those are the values that determine the tunnel target and charger URL.
Prerequisites and information to collect
Start with a functioning Home Assistant installation that you can administer and restart. HACS must already be installed because the OCPP repository is HACS compliant and the installation path in this guide uses HACS. You also need administrative access to the EV charger's OCPP settings. Chargers use different names for these settings, including central system, management server, backend, CSMS, OCPP server, or WebSocket URL.
The supplied project evidence does not establish universal minimum Home Assistant versions, operating-system requirements, listening ports, file paths, default credentials, or default WebSocket paths. We therefore do not provide guessed values for any of them. Check the version-specific information presented by the integration and HACS before installation, especially if your Home Assistant environment is pinned to an older release.
Required components
- A working Home Assistant installation with administrator access.
- A working HACS installation that can install custom integrations.
- An EV charger compatible with OCPP 1.6J or OCPP 2.0.1, or a test charger using one of those supported versions.
- Awareness that OCPP 2.1 support is experimental in this integration.
- Access to the charger's central-system URL, charge point identity, protocol, and authentication configuration.
- A network path between the charger and Home Assistant for the initial local test.
- A backup or snapshot appropriate to your Home Assistant deployment before adding a custom integration.
- For remote access, a device capable of running the Localtonet client and reaching the configured OCPP listener.
Record these values instead of relying on examples
| Value | Where it comes from | Why it matters |
|---|---|---|
| OCPP version | The charger and integration configuration | Both sides must use a compatible version. OCPP 2.1 should be treated as experimental here. |
| Listener address | The Home Assistant OCPP configuration and host networking | Determines whether the listener is available only on the host or also from another LAN device. |
| Listener port | The configured integration endpoint | Becomes the local target port for testing and for the Localtonet tunnel. |
| WebSocket path | The integration configuration and charger identity format | The correct host with the wrong path can still produce a failed connection. |
| Charge point identity | The charger and its configured endpoint | The central system uses identity information to associate the connection with the intended charger. |
| Authentication settings | The mutually supported charger and integration options | Mismatched or missing credentials can prevent the WebSocket upgrade or OCPP registration. |
| Public tunnel URL | Assigned after the Localtonet tunnel starts | This replaces the local host portion of the charger-facing URL when remote access is required. |
A HACS integration runs as part of Home Assistant. Use the backup procedure appropriate to your Home Assistant installation, and confirm that you can restore it. Do not make integration upgrades, network changes, and charger firmware changes simultaneously, because that makes failures much harder to isolate.
Install the Home Assistant OCPP integration through HACS
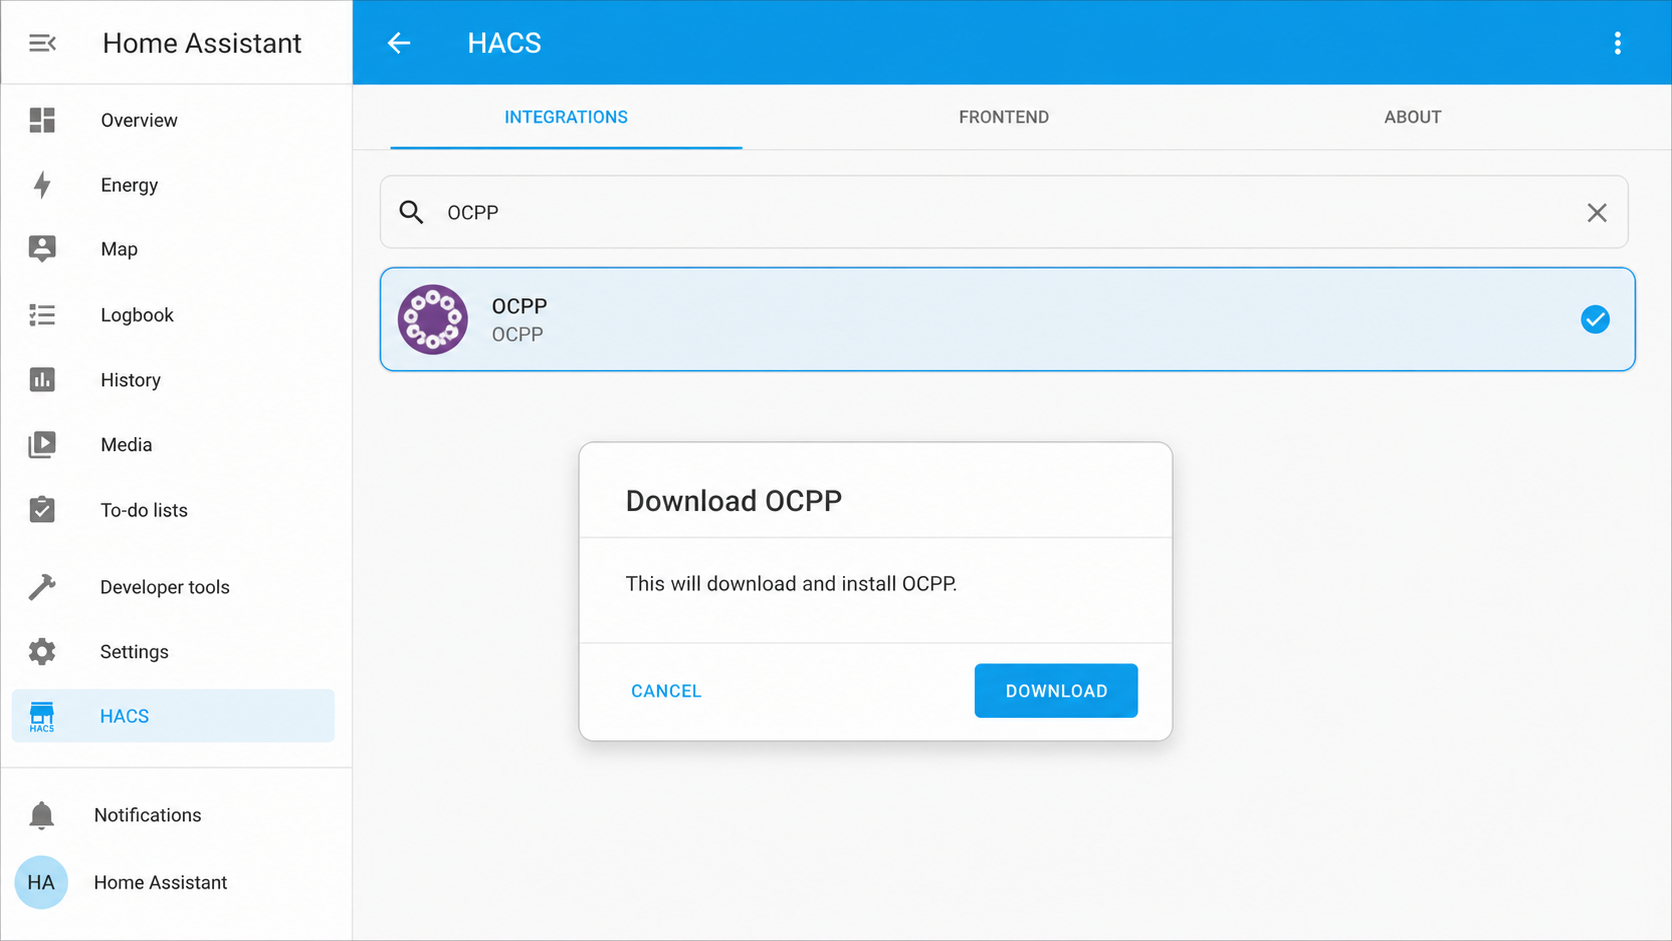
The repository identifies itself as HACS compliant. HACS and Home Assistant interfaces can change between releases, so button labels may differ slightly from those shown in your installation. The reliable workflow is to locate the OCPP integration in HACS, review its compatibility information, download it, restart Home Assistant if prompted, and then add the integration from Home Assistant's integrations interface.
The available evidence does not establish an exact supported Home Assistant version matrix or a universal set of installation prompts. Treat the information displayed by HACS for the version you select as authoritative. Do not manually copy repository files into an assumed configuration path unless you are deliberately following a verified manual-installation procedure for your Home Assistant deployment.
Confirm that Home Assistant and HACS are healthy
Open Home Assistant, verify that the system is operating normally, and confirm that HACS loads without an error. Resolve pending repair notices that could interfere with custom integrations before continuing.
Locate the OCPP integration in HACS
Open the HACS integrations area and search for the Home Assistant OCPP integration from the lbbrhzn/ocpp repository. Confirm the repository identity before downloading it so that a similarly named component is not installed accidentally.
Review the selected release
Check the release information, compatibility notes, and any warnings shown by HACS. The repository supports OCPP 1.6J and 2.0.1 and labels 2.1 as experimental, but that does not remove the need to verify compatibility with your Home Assistant and charger versions.
Download the integration
Use the HACS download action for the selected version. Wait for HACS to finish and read any instructions it displays. Do not interrupt Home Assistant or remove files while the download is in progress.
Restart Home Assistant when required
If HACS asks for a restart, perform a controlled Home Assistant restart. Wait for Home Assistant to become fully available, then inspect its system and integration logs for custom-component loading errors.
Add OCPP as a Home Assistant integration
Open Home Assistant's integrations interface, start the add-integration flow, and select OCPP. Complete the fields presented by your installed version. Record every network value rather than assuming an example port or path applies to your system.
Installation and configuration are separate events. Seeing the repository in HACS confirms that files were downloaded, but it does not prove that the integration loaded, created a listener, or accepted a charger. After adding the integration, check that its entry appears without an initialization or setup error.
Configure the OCPP listener and charger
Configuration must begin with the settings presented by your installed OCPP integration version. The supplied project evidence does not establish a single port, host binding, URL path, TLS mode, credential format, or charge point identity rule that is safe to publish as a universal default. Copying arbitrary values from another deployment can leave the listener unreachable or can associate the wrong charger.
Choose a mutually supported OCPP version
Prefer a stable protocol version supported by both the charger and integration. The integration documents support for OCPP 1.6J and OCPP 2.0.1. OCPP 2.1 is experimental, so it is a less suitable starting point for a deployment where predictable operation matters. A charger advertising OCPP support does not necessarily support every version.
Determine where the listener is reachable
A listener bound only to the local loopback interface can be reached by software on the same host, but not necessarily by a separate charger or a Localtonet client running on another device. A listener bound to a LAN-reachable interface may be accessible from the local network, subject to host networking and firewall policy. Use the actual integration and operating-system configuration to determine this behavior.
If the Localtonet client will run on the same device as Home Assistant, the local target can use whatever local address reaches the listener from that device. If the client runs elsewhere, use a private address that is reachable from the client device. Test that exact route before creating the tunnel.
Build the charger-facing URL carefully
OCPP-J commonly uses a WebSocket URL consisting of a scheme, host, optional port, and path. The path may incorporate or correspond to the charge point identity, depending on the integration configuration. Do not append, remove, encode, or rename path segments without confirming the format expected by the integration.
Enter the resulting local endpoint in the charger's central-system setting for the local test. Preserve case where the charger or integration treats identifiers as case-sensitive. Avoid trailing spaces and typographic quotation marks introduced by copying from formatted documents.
Keep charger identities stable
Automation and service calls may refer to a Home Assistant device identity associated with a charger. Release evidence for version 0.11.2 notes that an action using a device identifier that no longer matches a charger fails with a “No charger found for device id” error. This can occur after renaming a charger, pairing it again, or copying and editing an older script.
That behavior is safer than silently applying an action to the first available charge point, but it means automations should be reviewed after charger identity changes. If you operate multiple chargers or central-system entries, test every automation against the intended device.
Start, stop, current-limit, and other charging actions can affect real equipment. Verify that each Home Assistant entity, device, service call, and automation addresses the intended charger. Recheck identifiers after renaming, repairing, restoring, or replacing a charger.
Verify the complete OCPP workflow locally
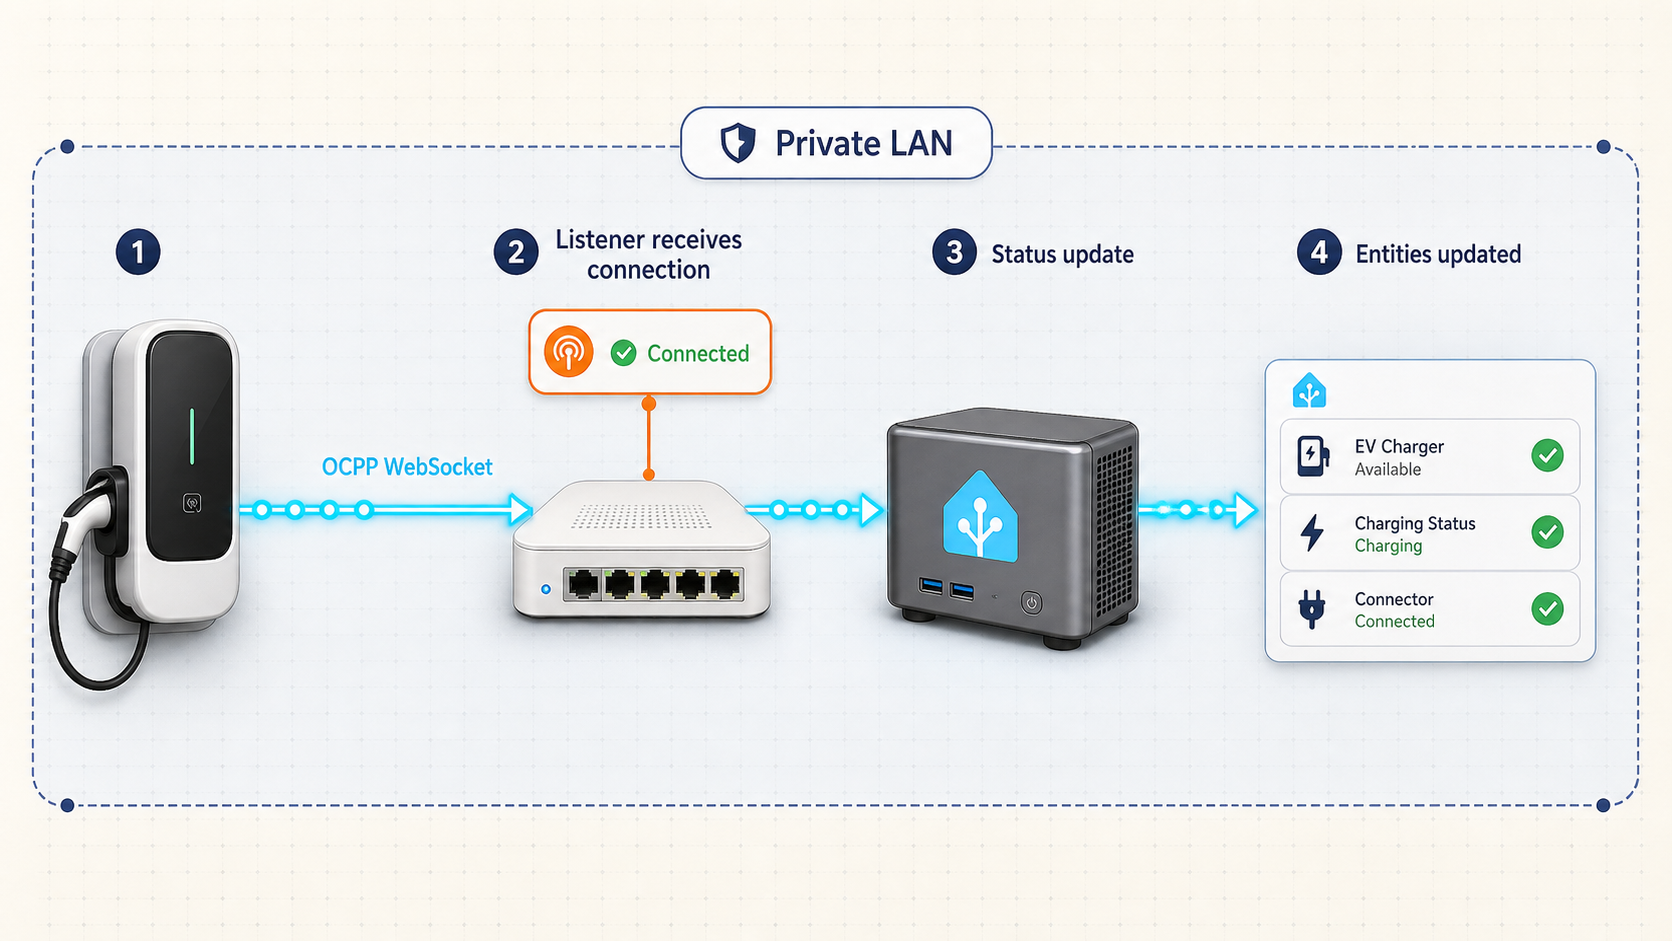
A local verification is more than checking whether a port accepts a connection. OCPP is a stateful application protocol carried over a WebSocket session. You need evidence that the transport connected, the integration recognized the correct charger, the protocol session remained stable, and expected Home Assistant entities or status data appeared.
Confirm that the integration loaded
Open the Home Assistant integrations interface and verify that the OCPP entry is present without a setup or initialization error. Review Home Assistant logs if the entry is unavailable or repeatedly reloads.
Confirm that the listener is active
Use the integration's displayed status and the host's normal administrative tools to confirm that the configured address and port are active. Check the real configured value rather than testing a port copied from an unrelated example.
Point the charger to the local endpoint
Configure the charger with the LAN-reachable WebSocket endpoint, including the required path and identity format. Keep a copy of the previous charger setting so it can be restored if necessary.
Observe connection and registration behavior
Watch the charger status, Home Assistant integration state, and relevant logs. A basic network connection followed by an immediate disconnect often indicates a path, identity, authentication, or protocol mismatch rather than a simple routing failure.
Verify entities and charger data
Confirm that Home Assistant represents the intended charger and receives the expected status information. Entity availability is stronger evidence than merely seeing an open socket.
Test control actions conservatively
If your charger, protocol version, and integration expose control actions, test them in a safe state and verify the target device identifier. Do not test disruptive charging operations on an unattended vehicle or active charging session.
What a successful local test should establish
- The custom integration loads after a Home Assistant restart.
- The configured listener is reachable from the charger's local network.
- The charger uses a protocol version supported by the integration.
- The WebSocket host, port, and path are correct.
- The integration recognizes the intended charge point identity.
- The connection remains active rather than repeatedly reconnecting.
- Home Assistant receives useful charger state or entities.
- Any tested automation or service action targets the correct charger.
Record the working local URL structure, listener address, port, path, protocol version, charger identifier, integration version, and relevant log state. When remote access is added, this baseline lets you separate a tunnel problem from an OCPP configuration problem.
Connect the verified OCPP endpoint remotely with Localtonet
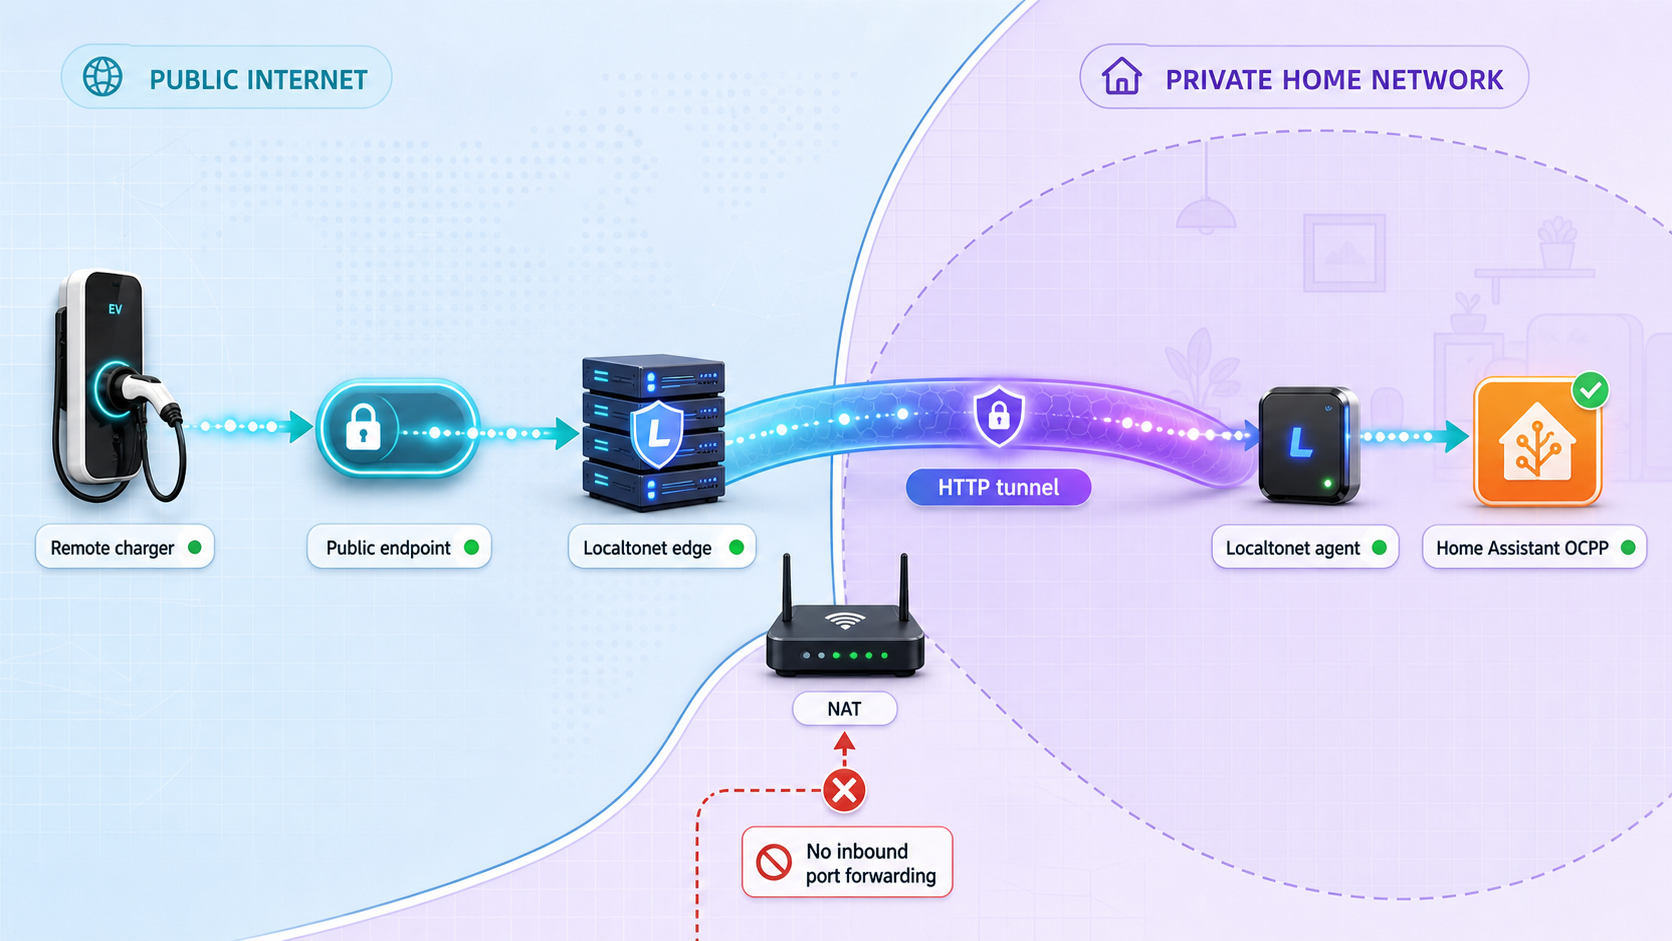
After local verification, Localtonet can expose the listener without opening an inbound router port. The Localtonet client must run on the Home Assistant device or another device that can reach the listener. It connects outbound to our relay, while the tunnel maps a public address to the selected local IP address and port.
An HTTP tunnel is the appropriate conditional starting point for an OCPP-J endpoint because OCPP-J commonly uses WebSockets over HTTP. However, the supplied Localtonet product context does not explicitly confirm WebSocket transport behavior for every current HTTP tunnel configuration. Before relying on this design, verify in the current Localtonet documentation or dashboard that the selected HTTP tunnel configuration supports the WebSocket behavior required by your charger and integration.
Do not substitute a raw TCP tunnel merely because it forwards a port. The charger may expect a specific WebSocket URL, host behavior, path, and TLS scheme. Changing tunnel families changes transport behavior and may not satisfy those expectations.
Install and run the Localtonet client
Install the Localtonet client on the device that can reach the verified OCPP listener. Confirm that the device remains powered, connected, and able to communicate with the local target.
Authenticate or select the client device
Use the device-specific authentication token through the supported Localtonet workflow, or select the already connected device in the dashboard. Never publish, share, or embed the token in charger settings, screenshots, configuration examples, or logs.
Select an available relay server
Choose a server or region from the values currently available in your Localtonet dashboard. Availability can vary, so this guide does not hardcode a server code or region.
Create the HTTP tunnel configuration
Select an HTTP tunnel and enter the exact local IP address and port that reached the OCPP listener during local testing. Select the available process type appropriate to your deployment. Random Sub Domain, Custom Sub Domain, and Custom Domain process types serve content through a public HTTPS address, but availability can vary by plan and current dashboard options.
Start the tunnel and use its assigned address
Creating a tunnel does not start it. Press Start, wait for the tunnel to run, and note the assigned public URL. Construct the charger-facing endpoint by preserving the verified OCPP path and identity structure. Do not expose unrelated Home Assistant paths intentionally.
Stop or delete the tunnel when it is no longer needed
The tunnel is available only while the selected client device is connected and the tunnel is running. Stop it when remote charger access is not required, or delete it when the endpoint should no longer exist.
For the current dashboard workflow and available HTTP options, consult our Localtonet HTTP tunnel documentation. Confirm current WebSocket compatibility there before changing the charger from its working local endpoint.
Translate the local URL without changing its meaning
The public URL normally replaces the local scheme, host, and directly exposed port. The OCPP path and charge point identity still need to follow the format expected by the integration. If the local endpoint contains a charger-specific path, dropping that path from the public URL can route the network request to the listener while still failing application-level identification.
The public HTTP tunnel process types provide an HTTPS address. Your charger must support the corresponding secure WebSocket form and the endpoint behavior presented by the tunnel. Some charger firmware accepts only particular URL schemes, certificate behavior, ports, or hostname formats. Those charger-specific capabilities are outside the supplied evidence and must be confirmed with the charger vendor or its administrative interface.
Verify that the charger accepts the assigned public hostname, the required secure WebSocket scheme, the preserved path, and the tunnel's WebSocket behavior. Keep the known-good local configuration available for rollback. If compatibility cannot be established, do not guess at alternate ports, schemes, or tunnel types.
Secure and operate the public OCPP endpoint
Publishing an OCPP listener makes it reachable beyond the private LAN. Treat it as an operational control endpoint, not as an ordinary informational web page. A tunnel solves reachability, but it does not replace OCPP authentication, charger authorization, Home Assistant account security, safe automation design, or regular software maintenance.
Plan for tunnel and client availability
The public endpoint exists only while the selected Localtonet client is connected and the tunnel is running. If the Home Assistant host restarts, the client device loses connectivity, or the tunnel is stopped, the charger will be unable to maintain that route. Charger retry behavior varies by model and firmware, so confirm how it handles an unavailable central system.
Where practical, monitor three distinct states: whether Home Assistant is healthy, whether the OCPP charger is connected to the integration, and whether the Localtonet token and tunnel are connected. These states describe different layers. A running tunnel cannot repair a failed Home Assistant integration, and a healthy local OCPP session does not prove that the public URL is reachable.
Maintain automations after upgrades and repairs
Version 0.11.2 release information specifically records safer handling for an action whose device ID no longer matches a charger. Such an action now fails rather than being routed to another charge point. If an automation begins reporting “No charger found for device id,” inspect its target after charger renaming, re-pairing, or copied script edits. Do not work around the error by selecting an arbitrary available device.
The same release also includes a fix for OCPP service routing with multiple central systems. Operators with multiple chargers or central-system configurations should still test each route after an update. A release fix reduces a known failure mode, but it does not validate a deployment's identities, scripts, or charger configuration automatically.
Troubleshooting Home Assistant OCPP and Localtonet
Troubleshoot from the inside out. Start with Home Assistant and the integration, continue to the local charger connection, then inspect the Localtonet client and tunnel, and finally test the charger-facing public URL. This order prevents a public networking symptom from hiding a local configuration error.
| Symptom | Likely layer | What to check |
|---|---|---|
| OCPP does not appear in Home Assistant | HACS or integration loading | Confirm the repository was downloaded, restart if prompted, and inspect Home Assistant custom-component errors. |
| Listener is not reachable locally | Integration or host networking | Check the configured bind address, actual port, integration state, host firewall policy, and whether the test originates from the same host or another LAN device. |
| Charger connects and immediately disconnects | WebSocket or OCPP negotiation | Verify URL path, charge point identity, authentication, supported OCPP version, and any required WebSocket subprotocol. |
| Local connection works but public connection fails | Tunnel mapping or charger compatibility | Confirm the Localtonet client is connected, the tunnel is started, the local target matches the verified listener, and the charger supports the public URL scheme and hostname. |
| Public host responds but charger never appears | Application path or WebSocket behavior | Preserve the OCPP path and identity structure, then confirm current HTTP tunnel WebSocket compatibility instead of relying on an ordinary browser response. |
| “No charger found for device id” | Home Assistant automation identity | Review stale identifiers after a rename, re-pair, restore, or copied script edit. Select the intended charger explicitly. |
| Connection fails after an update | Version or configuration change | Read the installed release notes, inspect logs, compare against the saved baseline, and roll back using your tested backup procedure if necessary. |
| Connection drops when the host restarts | Service lifecycle | Confirm Home Assistant, the OCPP integration, the Localtonet client, and the tunnel all returned to their expected running states. |
Do not use a browser page as the only test
A browser can confirm DNS resolution or an HTTP response, but it does not reproduce the charger's complete WebSocket and OCPP exchange. An error page can still prove that traffic reached a server, while a normal-looking response does not prove that the correct OCPP path, subprotocol, identity, or authentication was accepted.
Check the Localtonet target from the client device
If the Localtonet client runs on a separate machine, test the listener from that machine's network perspective. A URL that works on the Home Assistant host through its loopback address may be unreachable from the Localtonet client device. Correct the local routing or move the client to a device that can reach the listener before changing tunnel settings.
Separate tunnel status from OCPP session status
Creating a tunnel does not start it. A configured but stopped tunnel cannot accept public traffic. Conversely, a running tunnel only confirms that the forwarding configuration is active. It does not confirm that the OCPP listener is healthy or that the charger completed its protocol exchange.
If remote connectivity fails, restore the known-good local charger URL first. Then verify the listener, start the tunnel, confirm the target mapping, and change only the charger hostname or scheme required for the public endpoint while preserving the validated path and identity format.
Frequently asked questions
Which OCPP versions does this Home Assistant integration support?
The repository documents support for OCPP 1.6J and OCPP 2.0.1. It also identifies OCPP 2.1 support as experimental. Your charger must support the same version selected in the integration, and protocol compatibility should be verified before remote access is added.
What port does Home Assistant OCPP use?
There is no universal port established by the supplied project evidence. Use the port shown or selected in your installed integration configuration. Verify that exact value locally, then use it as the Localtonet tunnel's local target port.
Is the normal Home Assistant URL also the OCPP charger URL?
Not necessarily. The Home Assistant dashboard and the OCPP listener have different roles. Use the listener address, port, path, identity format, and protocol settings defined by the OCPP integration rather than assuming the frontend URL is correct.
Can Localtonet expose the OCPP listener without router port forwarding?
Yes. The Localtonet client establishes an outbound connection to our relay, so the workflow does not require inbound router port forwarding, firewall changes, VPN setup, or a public IP address. The client device must be able to reach the OCPP listener, and the tunnel must be running.
Should I use a Localtonet HTTP or TCP tunnel for OCPP-J?
HTTP is the conditional starting point because OCPP-J commonly uses WebSockets over HTTP. Before deployment, confirm that the current Localtonet HTTP tunnel configuration supports the WebSocket behavior required by your charger. Do not assume that raw TCP is interchangeable because the charger may depend on an HTTP WebSocket URL, hostname, path, and TLS behavior.
Does creating a Localtonet tunnel make it active immediately?
No. Creating the tunnel saves its configuration, but the tunnel must be started with the Start button. It remains available only while the selected Localtonet client is connected and the tunnel is running.
Why does an automation report “No charger found for device id”?
In version 0.11.2, an action with an unmatched charger device ID fails instead of being applied to another charge point. Check for a stale identifier after renaming or re-pairing a charger, restoring Home Assistant, or copying and editing a script. Update the automation to target the intended current device.
Can the Localtonet client run on a different device from Home Assistant?
Yes, provided that the client device can reach the OCPP listener's local IP address and port. A listener restricted to the Home Assistant host's loopback interface may not be reachable from another device, so test from the Localtonet client's network perspective first.
Connect your verified OCPP endpoint with Localtonet
Install and validate the Home Assistant OCPP integration locally first. When the charger is stable on the LAN, use Localtonet to map the exact listener address and port to a public endpoint without opening an inbound router port.
Get Started Free →

