

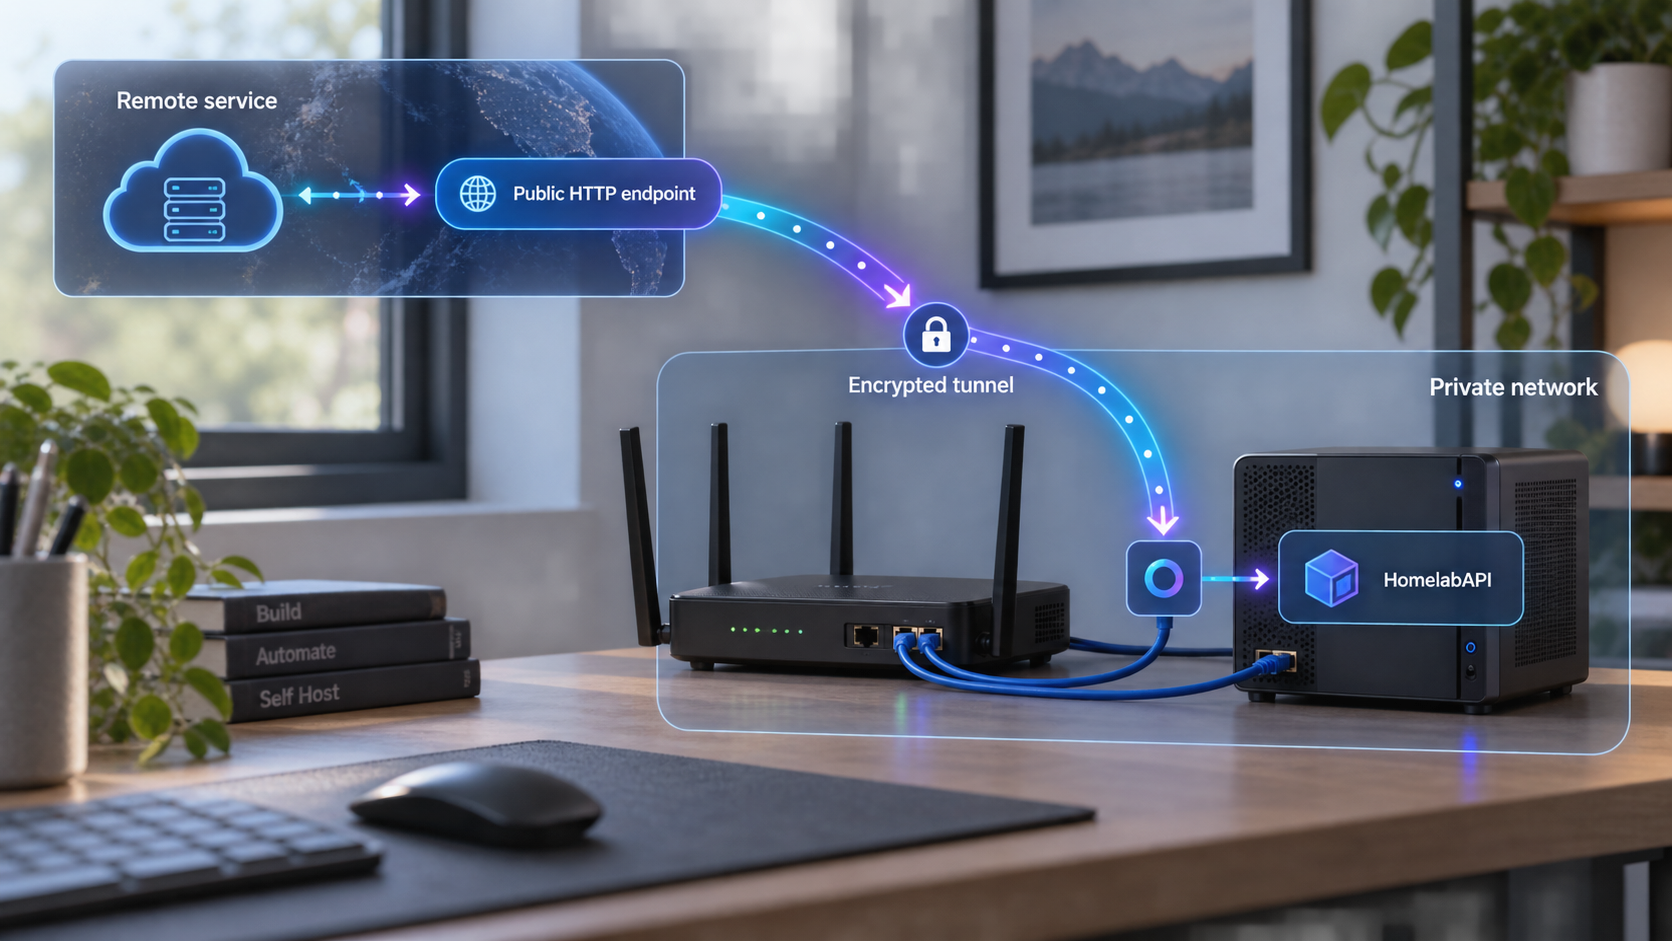
Build one notification endpoint for your homelab, verify it locally, then make it reachable to authorized remote services
HomelabAPI is a self-hosted HTTP API that consolidates notifications from monitoring tools, home automation systems, storage appliances, and generic webhooks. This guide walks through the documented Docker Compose installation, configuration, startup, and local verification workflow before introducing remote access. Once the local service works, we will connect it through a Localtonet HTTP tunnel so an external service can submit notifications without inbound router port forwarding, firewall changes, a VPN, or a public IP address. We will also cover API-key handling, endpoint discovery, routine operations, testing, and common failure modes.
📋 What's in this guide
What HomelabAPI does in a self-hosted notification stack
Homelab environments often accumulate several independent notification configurations. Home Assistant may send one type of alert, a NAS may use another destination, and monitoring tools may each have their own webhook or messaging credentials. That works initially, but changing notification providers later can require editing every individual service.
HomelabAPI provides a central input and output hub. Services submit notifications to HomelabAPI, and HomelabAPI forwards those notifications to the output or outputs selected in its configuration. If the destination changes, the main adjustment can be made in the HomelabAPI configuration instead of independently changing every compatible source.
The documented inputs include ChangeDetection.io, Headphones, HealthChecks, Home Assistant, LazyLibrarian, Monit, Radarr, SmokePing, Sonarr, Synology, Tailscale, UptimeRobot, and any POST webhook that lets the sender specify a request body. Documented outputs include Discord, email, Gotify, Matrix, ntfy.sh, Pushbullet, Pushover, Telegram, and generic POST webhooks.
current_outputs configuration can select multiple comma-separated outputs or use all for every configured output.
Remote access is not required for every deployment. If every sender runs on the same LAN and can reach the Docker host directly, a private local endpoint may be enough. A public endpoint becomes useful when an external monitoring platform, hosted webhook source, mobile network, or remote system must initiate a request into the homelab.
A tunnel cannot correct an invalid HomelabAPI configuration, a failed container, an incorrect output credential, or a missing Docker port publication. Proving the complete local path first makes remote-access troubleshooting much more predictable.
Prerequisites and decisions to make first
The HomelabAPI project lists Docker and Docker Compose as requirements. Install both on the machine that will host the application, then confirm that the account performing the installation is allowed to operate Docker. The exact Docker installation procedure depends on the host operating system and is outside HomelabAPI's documented setup sequence.
You also need a local copy of the current HomelabAPI project files. The repository contains the sample Compose and YAML configuration files used by the installation procedure. Work from a directory where you can safely retain the resulting docker-compose.yml and config.yaml files.
Before editing anything, make four decisions:
- Which applications will submit notifications to HomelabAPI?
- Which notification output or outputs will receive those events?
- Which host port will publish the application from Docker, based on the Compose configuration you use?
- Will the endpoint remain LAN-only, or must an external system reach it through a Localtonet HTTP tunnel?
| Component | Purpose | What to confirm |
|---|---|---|
| Docker | Runs the HomelabAPI container | The Docker service is available and your account can use it |
| Docker Compose | Creates the application from its Compose definition | The documented docker-compose command is available in your environment |
docker-compose.yml |
Defines the container and its runtime settings | The image and port publication match your intended deployment |
config.yaml |
Stores HomelabAPI application and output settings | A random API key and the required output configuration are present |
| Localtonet client | Creates the outbound connection to our relay when remote access is needed | It runs on a device that can reach the published HomelabAPI address |
Generate a completely random value for the HomelabAPI api_key. Treat that value, notification-provider credentials, webhook secrets, and the Localtonet device token as credentials. Do not commit them to a public repository, paste them into screenshots, or include them in support logs.
Install HomelabAPI with Docker Compose
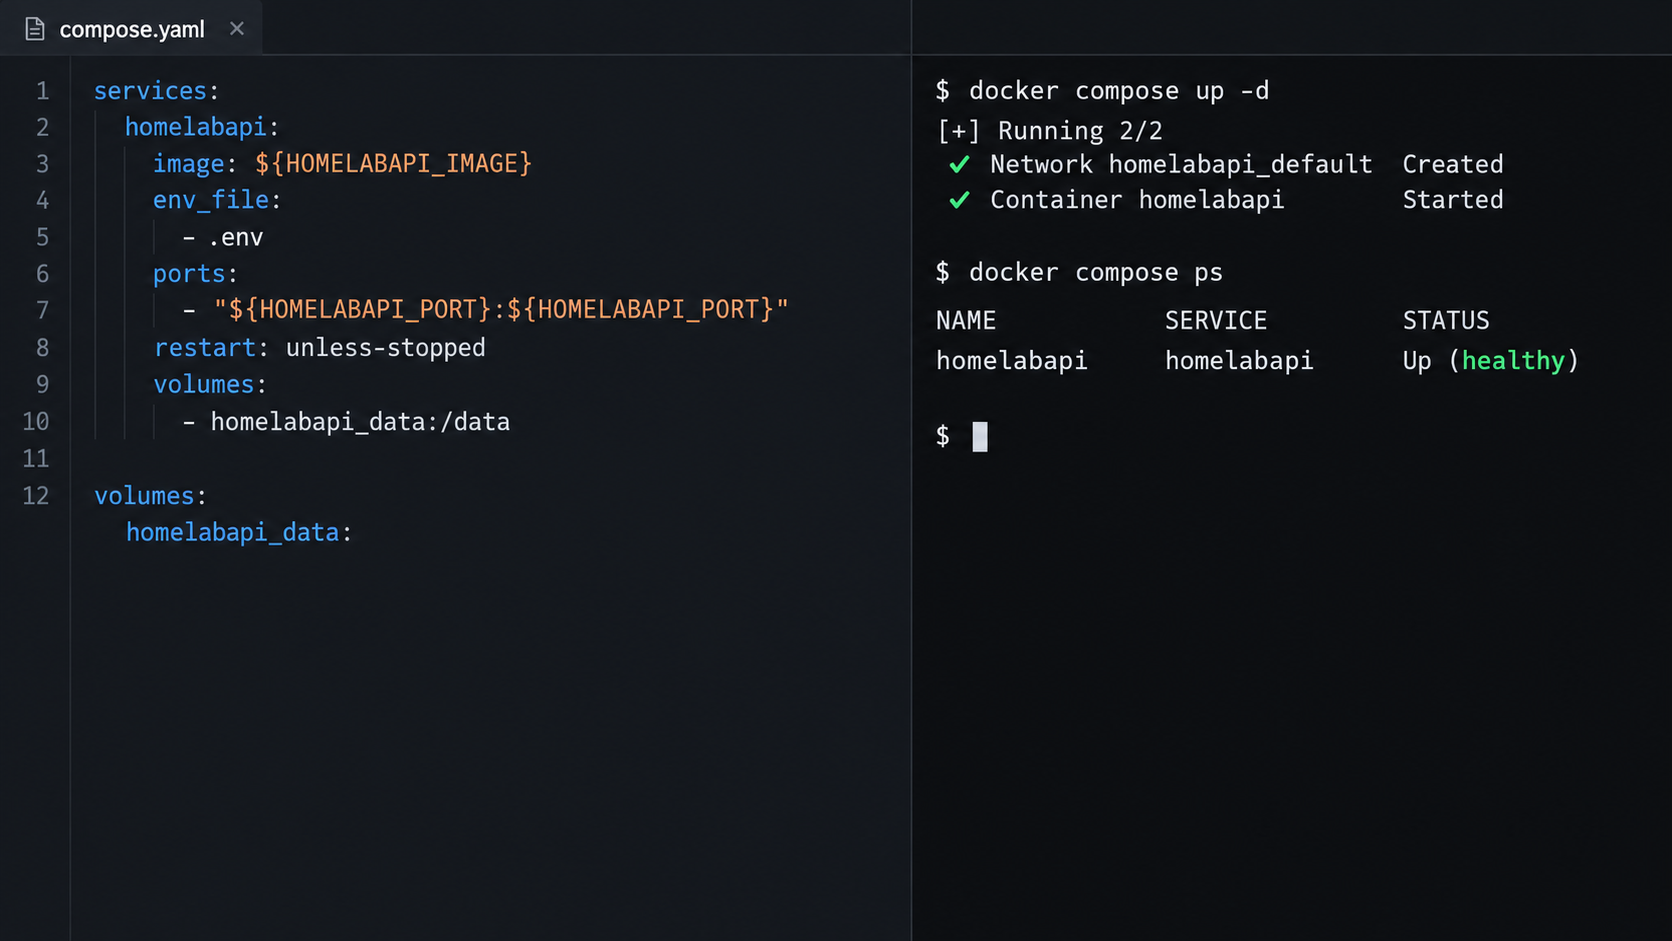
The official project workflow uses the two sample files in the repository. Copy each sample to its active filename, edit the resulting files, and start the application with Docker Compose. Keep the sample files unchanged so they remain useful as references when comparing settings later.
Copy the sample Compose file
From the HomelabAPI project directory, copy docker-compose.yml.sample to docker-compose.yml. Open the new file and update it for your deployment rather than editing the sample directly.
Copy the sample application configuration
Copy config.yaml.sample to config.yaml. This active file is where you configure the application, its API key, selected outputs, and the settings required by those outputs.
Create a random API key and review the remaining settings
In the application section of config.yaml, assign a completely random string to api_key. Configure the notification output or outputs you intend to use and review the Compose file's image and port publication before startup.
Start HomelabAPI
Run the project's documented startup command from the directory containing the active Compose and configuration files. Keep the initial output visible so you can identify configuration, image, or port errors.
The corresponding file-copy and startup commands are:
cp docker-compose.yml.sample docker-compose.yml
cp config.yaml.sample config.yaml
docker-compose up
These commands assume a shell that provides cp. On a platform without that command, create the same two copies using the operating system's file manager or equivalent copy command. The important result is that the project directory contains active files named exactly docker-compose.yml and config.yaml.
Check the container image name
HomelabAPI release v0.11.1 renamed the maintained Docker image from gregdotca/homelab-api to gregdotca/homelabapi. The old image receives no further updates. A current Compose configuration should therefore use:
image: gregdotca/homelabapi:latest
If you are upgrading an older deployment rather than installing from the current sample, inspect the image: entry carefully. Updating other settings while continuing to use the retired image name would leave the deployment on an image stream that is no longer updated.
Determine the real local endpoint from Docker Compose
The HomelabAPI README does not establish a universal local hostname, container port, or published host port. For that reason, this guide does not assign an arbitrary port such as 8080 or 8000. Read the ports: section of your active docker-compose.yml and identify the host-side port mapped to the application.
In a normal Docker port mapping, the host-side value is the port that a browser, local webhook sender, or Localtonet client must contact. Record the complete local target as an IP address or hostname plus that published port. If the client will run on the Docker host, a loopback address may be suitable when the publication allows it. If the client runs on another machine, use an address that machine can actually reach.
A request sent to an assumed port can fail even when the HomelabAPI container is healthy. The authoritative value for this deployment is the active Docker Compose configuration. Any firewall rule between a separate Localtonet client device and the Docker host must also permit that local connection.
Configure the API key, inputs, and notification outputs
Open config.yaml and begin with the application section. Set api_key to a long, completely random value. HomelabAPI clients use this key when connecting to the application, so a predictable value weakens the protection of an internet-reachable input.
Next, configure the destination or destinations to which HomelabAPI should forward notifications. The available destination-specific fields are represented by the sample configuration. Fill in only the settings required for the output integrations you intend to activate, and protect any credentials entered there.
The current_outputs setting controls which configured outputs are active. To use multiple outputs, separate their values with commas. To send to every configured output, use all. Selecting an output does not make invalid provider credentials work, so test each destination before depending on it for operational alerts.
Choose an input method
Dedicated integrations are useful when a supported service has a specific expected format. HomelabAPI also supports any POST webhook that allows a request body to be specified. This generic route is useful for custom scripts, automation systems, and services that are not listed as named integrations.
Some services require a helper script to format and submit their information. The project specifically identifies Monit and SmokePing as examples, and provides functional examples in the repository's helper_scripts directory. Review a helper before deploying it, provide its connection details securely, and test it against the local endpoint before changing it to the public address.
Use URL parameters only when the sender cannot provide JSON
The default /input endpoint can accept values as URL parameters on a POST request when the sending service cannot send a JSON body. The documented pattern includes api_key, subject, and message parameters:
curl -X POST "https://your-public-host.example/input?api_key=YOUR_API_KEY&subject=Backup&message=Backup%20finished"Values must be URL-encoded. The example uses a placeholder host and placeholder key. Replace them only in your local configuration or calling service, never in documentation, a ticket, or a public repository.
When the API key is included in the query string, it can appear in proxy logs, server logs, monitoring records, shell history, and copied URLs. Prefer a supported request-body method when the sending service can provide one. If query parameters are unavoidable, tightly control log access and rotate the API key if it is exposed.
Verify HomelabAPI on the local network
Verification should test more than whether Docker downloaded an image. A meaningful test confirms that the application starts, the published port accepts a request, HomelabAPI processes the input, and the selected output receives the resulting notification.
Observe the initial Compose output
Run docker-compose up and review the visible startup output. Resolve malformed YAML, missing configuration, unavailable images, and port conflicts before testing HTTP.
Build the local URL from the published port
Use the Docker host address and the host-side port from docker-compose.yml. Append the documented /input path. Do not substitute a port copied from an unrelated tutorial.
Submit a controlled POST request
Send a test subject and message using the configured API key. If the sender cannot use a request body, use the documented query-parameter form and URL-encode the values.
Confirm delivery at the selected output
Check the configured notification destination. Receiving the expected test message proves more of the workflow than merely receiving an HTTP connection.
For a local query-parameter test, replace the placeholders in this pattern with the actual host port and API key:
curl -X POST "http://127.0.0.1:YOUR_PUBLISHED_PORT/input?api_key=YOUR_API_KEY&subject=Local%20test&message=HomelabAPI%20is%20working"
Use 127.0.0.1 only when the request originates on the Docker host and the service is published in a way that permits loopback access. From another LAN device, replace it with a reachable address for the Docker host. The exact success response is not established by the supplied project evidence, so verify success through both the application output and arrival at the configured notification destination.
If the request reaches the application but no notification arrives, focus on config.yaml, current_outputs, and destination credentials. If the connection itself is refused or times out, focus first on container startup, the Compose port mapping, the target IP address, and local firewall reachability.
Expose the verified HomelabAPI endpoint with Localtonet
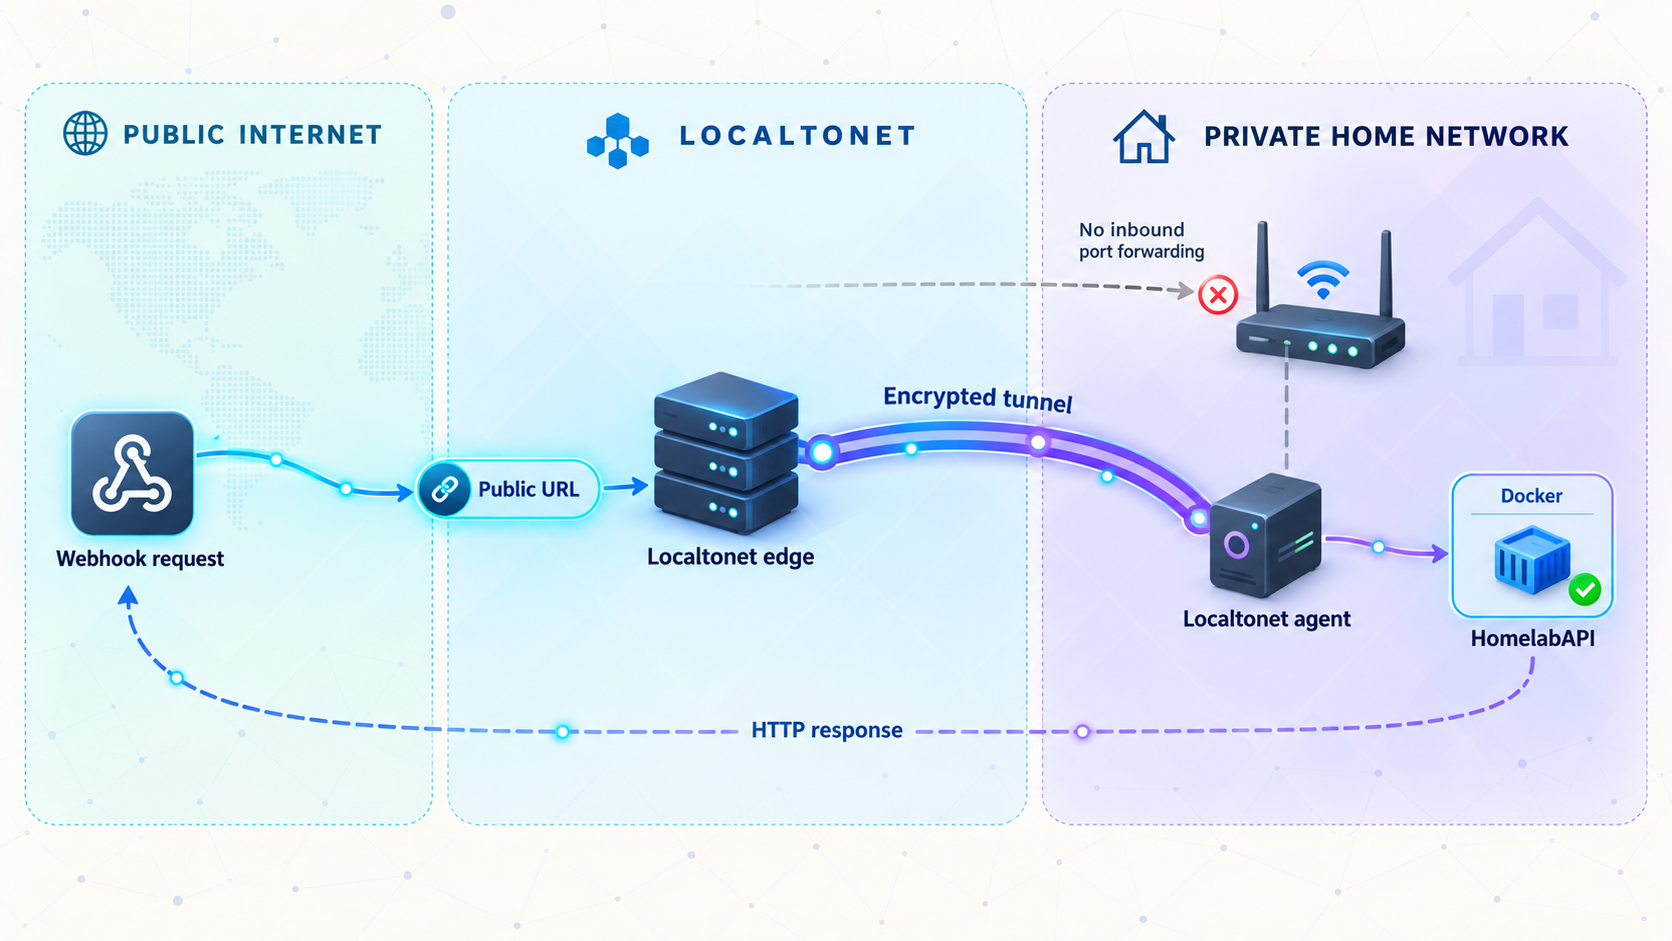
Once local delivery works, Localtonet can expose the HTTP service to an authorized external sender. Our client establishes an outbound connection from the device to a Localtonet relay server. This provides a public address without requiring inbound router port forwarding, firewall changes, VPN setup, or a public IP address.
Use an HTTP tunnel for this workflow because HomelabAPI receives HTTP POST requests. The tunnel's local target is the Docker host address and published host port that you verified in the previous section. The Localtonet client can run on the Docker host or another device that can reach that target over the local network.
HTTP tunnels can use Random Sub Domain, Custom Sub Domain, or Custom Domain as their Process Type. These options serve the same local content at a public HTTPS address. Availability and domain-related requirements can vary, so obtain current options from the dashboard rather than assuming a particular choice is included in every plan.
Install and run the Localtonet client
Run our client on the Docker host or on another device that can reach the verified HomelabAPI local endpoint. The client must remain connected for the tunnel to stay available.
Authenticate or select the client device
Use the device-specific authentication token associated with the client that will run the tunnel. Keep the token private and select the intended device in the dashboard.
Select an available relay server
Choose from the server or region values currently available in your Localtonet dashboard. Do not copy a hardcoded server code from another deployment because available values can change.
Create the HTTP tunnel configuration
Select an HTTP tunnel and an appropriate Process Type. Set the local target to the reachable IP address and published host port established by your active Docker Compose configuration.
Start the tunnel
Creating a tunnel does not start it. Use the Start action, then confirm that the selected client is connected and the tunnel is running.
Use the assigned public HTTPS URL
Copy the public address assigned to the running tunnel and append /input. Configure only the intended external service with that endpoint and test it using a non-sensitive notification.
The final remote endpoint follows this structure:
https://YOUR_ASSIGNED_PUBLIC_HOST/inputFor the current interface and configuration details, consult our Localtonet HTTP tunnel documentation. Use the dashboard's current server choices and assigned public address rather than values copied from an example.
The public endpoint is available only while the selected Localtonet client is connected and the tunnel is running. A tunnel that has merely been created is not active. If delivery unexpectedly stops, check both states before changing HomelabAPI.
Test the public path independently
After starting the tunnel, repeat the controlled POST test against the assigned HTTPS hostname. Use a distinct subject such as Remote test so it is easy to distinguish from the local test. Confirm that the notification reaches the configured output.
This second test validates the complete route: external HTTPS request, Localtonet relay, outbound client connection, Docker host port, HomelabAPI input processing, and the selected notification output. After that succeeds, update one external integration at a time. Incremental migration makes it easier to identify which sender has a malformed URL, unsupported request format, or incorrect API key.
Security guidance for a public notification endpoint
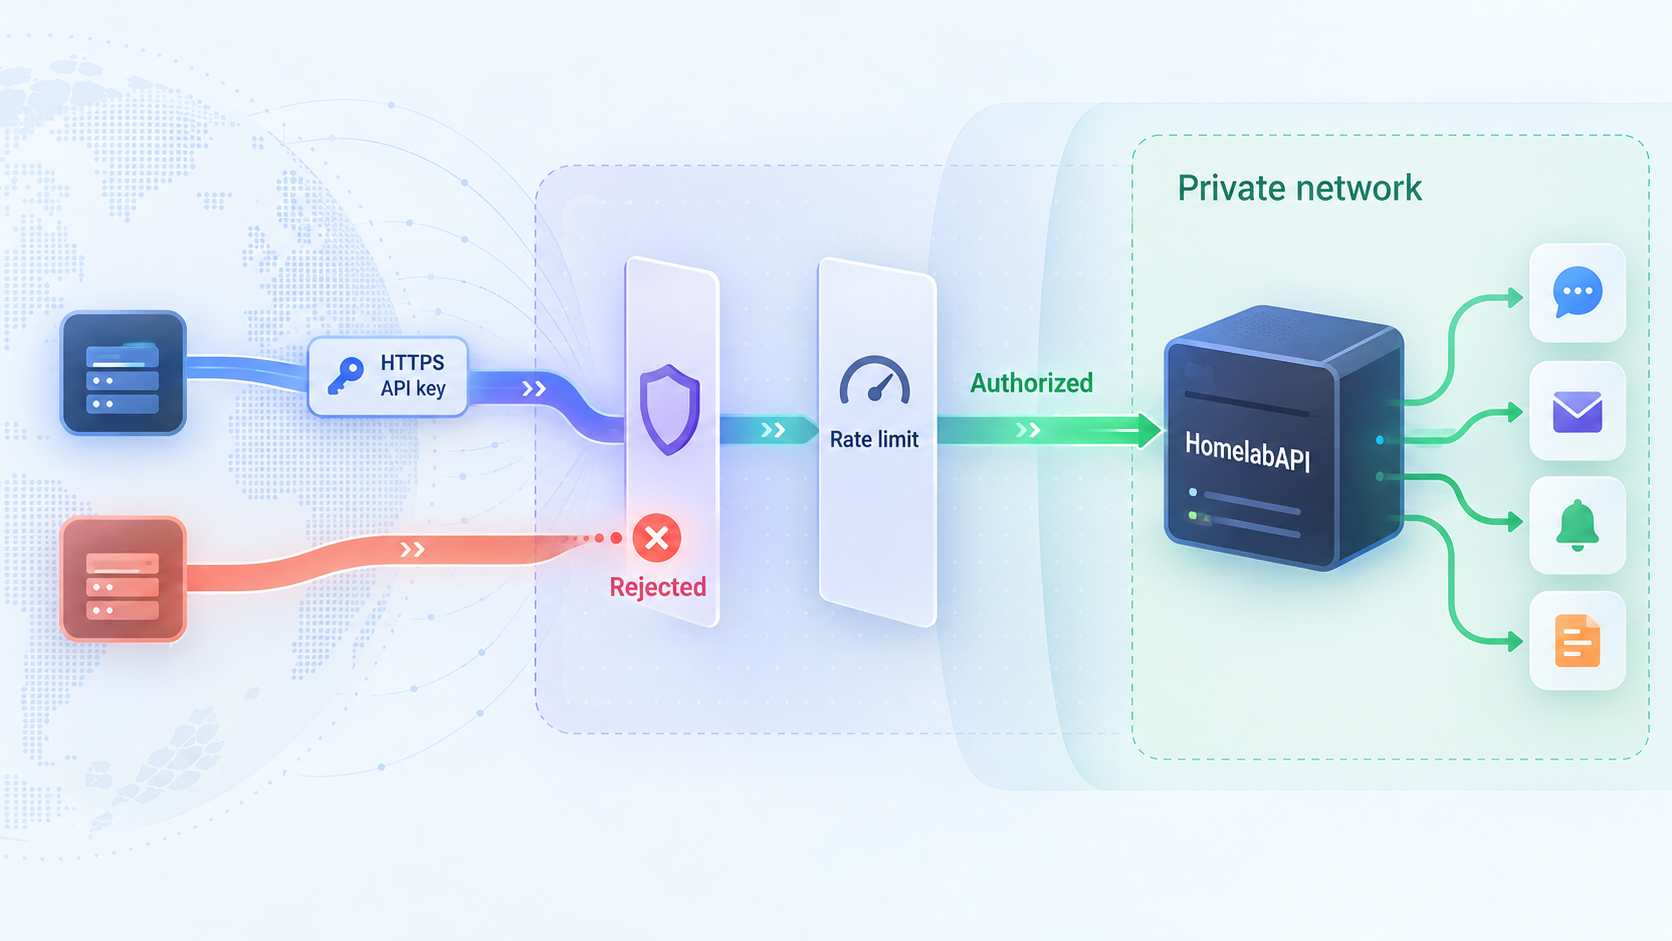
Exposing an API changes its risk profile. A public hostname can receive unwanted traffic even when it is not advertised. The API key must therefore be treated as a real secret, and the endpoint should expose only the application and port required for the webhook workflow.
Protect config.yaml with operating-system permissions appropriate for the account that runs the deployment. That file can contain the HomelabAPI API key and credentials for notification outputs. Avoid placing it in an unencrypted public backup or committing it to source control.
Keep the Localtonet device token separate from the HomelabAPI API key. They serve different purposes. The device token identifies the client device that establishes the tunnel, while the HomelabAPI key is used by callers connecting to the application. Neither should be embedded in this article's examples or shared publicly.
Stop the tunnel when public delivery is no longer needed. Delete obsolete tunnels rather than leaving unused configurations active, and remove old webhook endpoints from sending services after migrations. Where a sending service offers its own access controls or source restrictions, use them according to that service's documented capabilities.
The public hostname is an address, not a secret authorization mechanism. Keep HomelabAPI authentication enabled, protect the API key, use least privilege around configuration and logs, and avoid publishing the endpoint unnecessarily.
Routine operation, changes, and upgrades
Keep the active Compose and configuration files together in a controlled deployment directory. Back them up securely, remembering that config.yaml can contain secrets. Record the published host port and the relationship between the Docker host, Localtonet client device, tunnel, and external webhook senders.
Changing notification destinations
One of the main reasons to centralize notifications is to reduce changes across source systems. Configure and test the replacement output in config.yaml, update current_outputs, and verify delivery before removing the old destination. If the input endpoint and API key remain unchanged, compatible senders should not need to be reconfigured merely because the final notification provider changed.
Adding multiple outputs
Use comma-separated values in current_outputs when notifications should go to selected destinations, or use all to send to every configured output. Test carefully before enabling broad fan-out. An incorrectly configured destination can make troubleshooting confusing even if another destination succeeds.
Restarting after configuration changes
The project evidence establishes docker-compose up as the startup command but does not prescribe a complete production lifecycle procedure. Apply changes using the Docker Compose workflow appropriate to the version installed on your host, then observe startup output and repeat the local notification test. Do not assume that editing a file automatically reloads every setting.
Upgrading an older image reference
Inspect the Compose file before obtaining a newer image. If it still points to gregdotca/homelab-api, change it to gregdotca/homelabapi:latest because the former image no longer receives updates. Back up the deployment configuration, review release notes for the version being adopted, and verify both local and remote notification paths after the upgrade.
Stopping public access without removing HomelabAPI
A Localtonet tunnel can be stopped independently of the local application. This is useful when HomelabAPI should continue serving LAN clients but should temporarily stop accepting internet-originated requests. Stopping and deleting are separate actions. Stop the tunnel for temporary suspension, or delete it when the configuration is no longer required.
Troubleshooting the installation and remote connection
Docker Compose fails before HomelabAPI starts
Confirm that both active files exist with the expected names. YAML is indentation-sensitive, so compare the edited files with their samples and look for malformed indentation, missing separators, or damaged quoting. Also verify that the Compose image uses gregdotca/homelabapi:latest rather than the retired image name.
The local connection is refused
Check whether docker-compose up still shows a running application. Then inspect the active Compose port publication and make sure the request uses the host-side port. Confirm that another application is not already using the selected host port. If testing from another device, verify that the Docker host address is reachable from that device.
The request reaches HomelabAPI but no notification arrives
Recheck the random API key used by the sender, the spelling and contents of current_outputs, and the destination-specific settings in config.yaml. Test one output at a time where possible. A working HTTP route does not prove that the downstream messaging or webhook provider accepted the forwarded notification.
A dedicated input integration does not work
Confirm that the sending service can produce the request format expected by HomelabAPI. For services such as Monit and SmokePing that require an intermediary script, examine the examples in helper_scripts. First direct the integration to the working local endpoint, then switch to the public endpoint only after local formatting and authentication are correct.
The local request works but the public URL fails
Verify that the selected Localtonet client is connected and that the tunnel was explicitly started. Confirm that the tunnel points to the same local IP address and host port used by the successful local test. If the Localtonet client runs in a different machine, 127.0.0.1 refers to that client machine, not the Docker host, so use the Docker host's reachable LAN address instead.
The public URL opens, but /input does not work
Confirm that the external sender uses POST rather than assuming a browser GET request is equivalent. Preserve the /input path, provide the API key using the supported request format, and URL-encode query values when using the fallback query-parameter method.
Notifications stop after a reboot
Check each layer in order: Docker availability, HomelabAPI container state, local endpoint reachability, Localtonet client connectivity, and tunnel running state. The supplied project instructions document interactive startup with docker-compose up, but they do not establish a specific boot-time policy. Configure automatic startup only according to the Docker and operating-system facilities available on your host, then test the complete path after a real reboot.
The API key appeared in logs or shell history
Treat it as disclosed. Generate a new random value, update config.yaml, apply the configuration change, and update every authorized sender. Remove or restrict affected logs according to your retention policy, but do not assume deleting one visible copy eliminates every stored copy.
| Symptom | Likely layer | First check |
|---|---|---|
| Compose does not start | Container configuration | Active filenames, YAML structure, and image name |
| Local connection refused | Docker publication | Container state and host-side port |
| HTTP request arrives but no alert appears | HomelabAPI or output provider | API key, current_outputs, and output credentials |
| Local works but public fails | Localtonet path | Client connection, tunnel state, local target IP and port |
| One sender fails while others work | Sender configuration | POST method, request format, URL encoding, and API key |
| Old deployment does not receive updates | Container image reference | Replace gregdotca/homelab-api with gregdotca/homelabapi:latest |
Frequently asked questions
What port does HomelabAPI use?
The available project evidence does not establish a universal local hostname, container port, or published host port. Read the ports: configuration in your active docker-compose.yml and use its host-side port. This avoids copying a value that does not match your deployment.
Does HomelabAPI require Docker Compose?
Docker and Docker Compose are the project's documented requirements, and the documented installation starts from docker-compose.yml.sample. This guide therefore follows the supported Compose workflow rather than inventing a manual Python or package-manager installation.
Which Docker image should a current deployment use?
Use gregdotca/homelabapi:latest when following the current image naming. The older gregdotca/homelab-api image receives no further updates following the project rename documented in release v0.11.1.
Can HomelabAPI send one notification to multiple outputs?
Yes. Configure the required destinations, then set current_outputs to comma-separated output values. The value all sends to every configured output. Test each destination before relying on multi-output delivery for important alerts.
Can a service send URL parameters instead of a JSON body?
Yes. The default /input endpoint accepts values as URL parameters on a POST request when the service cannot send JSON. URL-encode the values and remember that an API key in the URL can appear in logs, shell history, and monitoring records.
Do I need router port forwarding to expose HomelabAPI with Localtonet?
No. Our client establishes an outbound connection to a Localtonet relay server, so this workflow does not require inbound router port forwarding, firewall changes, VPN setup, or a public IP address. The client must be able to reach the local HomelabAPI target.
Does creating a Localtonet tunnel make it immediately available?
No. Creating the configuration and running it are separate lifecycle actions. Start the tunnel after creating it. The public endpoint remains available only while the selected client is connected and the tunnel is running.
Should the Localtonet client target the container port directly?
For the workflow documented here, target the reachable Docker host address and its published host port. If the Localtonet client runs elsewhere on the LAN, confirm that the client device can reach that address and port before creating the tunnel.
Connect your HomelabAPI endpoint with Localtonet
Install and verify HomelabAPI locally first, then create an HTTP tunnel that points to its actual Docker-published host port. You can provide authorized remote webhook senders with a public HTTPS endpoint without opening an inbound router port.
Get Started Free →

