

Run an engineering wiki on your own server, verify it locally, and provide controlled remote access
Oxynote is an open-source technical workspace that combines documentation, diagrams, collaborative editing, reviewable changes, and live metric charts. In this guide, we install its documented container image, persist its application data in a Docker volume, verify the local web interface, and secure the initial account before any remote exposure. We then connect the working HTTP service to Localtonet so authorized team members can reach it without configuring inbound router port forwarding, a public IP address, or a VPN. Where the available Oxynote documentation does not establish an exact configuration detail, we identify that limitation rather than guessing.
📋 What's in this guide
How this Oxynote deployment works
Oxynote is designed as a self-hosted workspace for engineering documentation. Its pages can bring architecture notes, API references, release checklists, incident instructions, diagrams, code, and operational metrics into one place. The application supports individual use as well as collaborative editing, comments, searchable content, and reviewable document changes.
The documented installation runs Oxynote as one Docker container. Docker publishes the container's HTTP port on port 8080 of the host, while a named volume called oxynote_data stores application data outside the container's writable layer. Once the container is running, the local web interface is available at http://localhost:8080 when opened from the Docker host.
Local access should be established and tested before introducing any public endpoint. This order separates application problems from tunnel problems. If Oxynote does not load locally, adding a tunnel cannot correct the container, storage, login, or host networking issue. If it works locally but not through the public address, troubleshooting can focus on the Localtonet client, tunnel state, and local target.
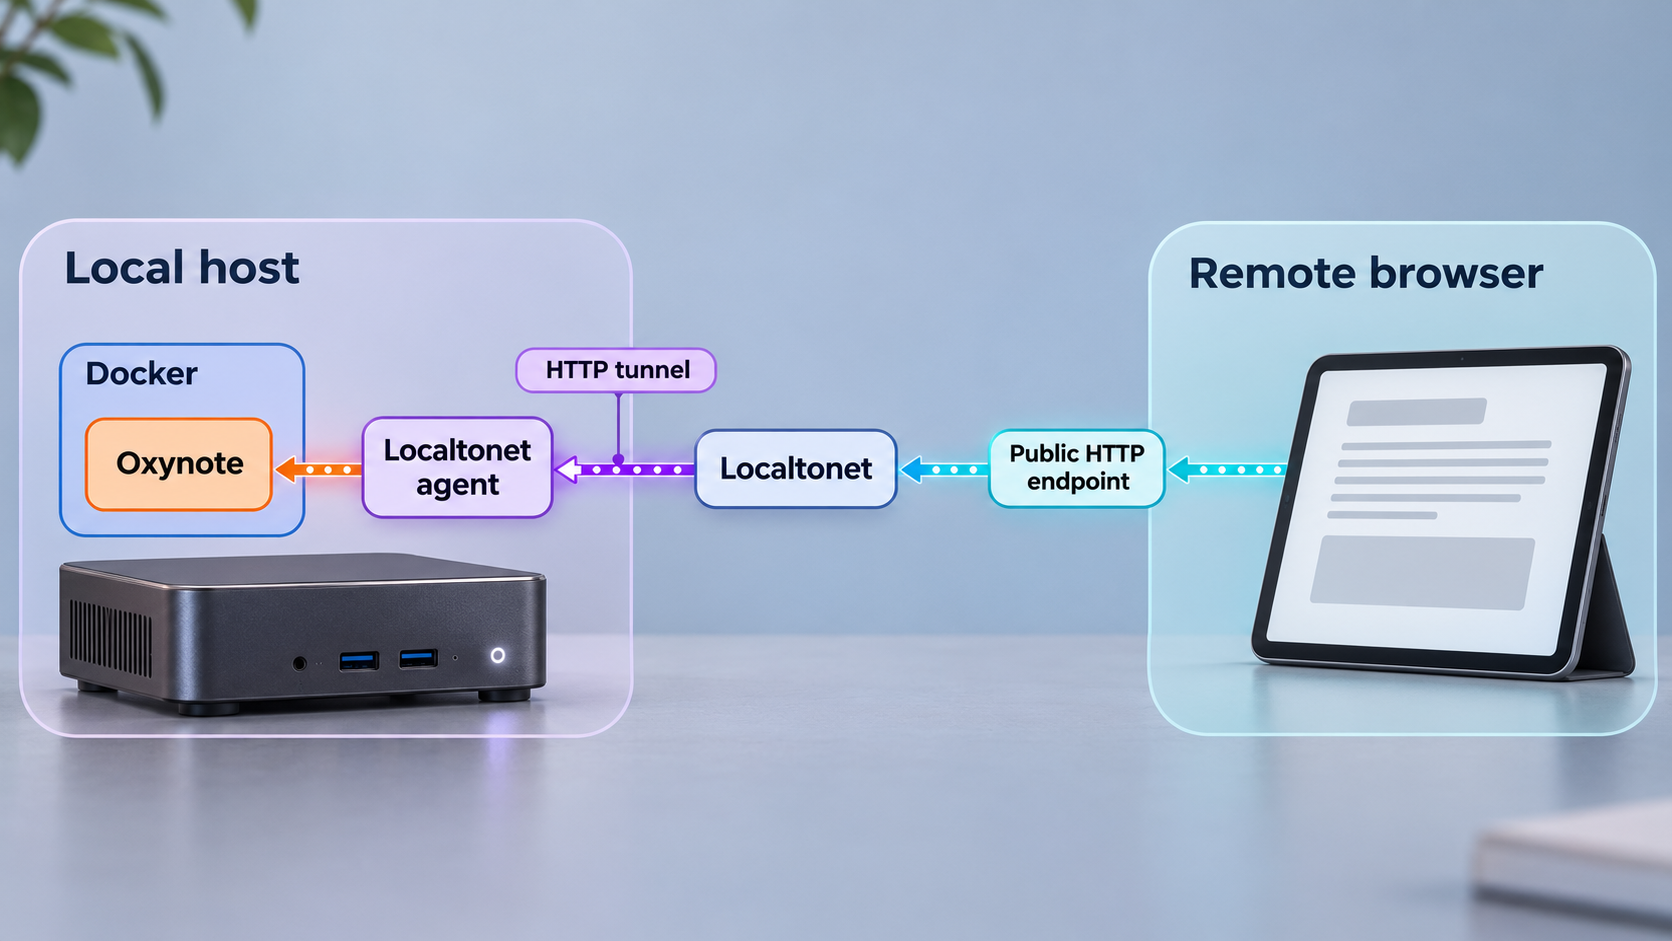
The remote-access component is intentionally a separate stage. The Localtonet client runs on a device that can reach Oxynote and creates an outbound connection to our relay. The HTTP tunnel then points to the local Oxynote IP address and port. This avoids requiring inbound router port forwarding, firewall changes, a public IP address, or VPN setup for this publishing workflow.
Oxynote remains the application and authentication layer. Localtonet supplies network reachability to the selected local HTTP target. A tunnel does not repair an unhealthy container, replace Oxynote account controls, or decide who should be authorized to use the wiki.
Prerequisites and deployment decisions
The documented quick start assumes that Docker is already installed and operational on the host. The supplied Oxynote material does not specify minimum CPU, memory, disk capacity, Docker version, or a complete operating-system compatibility matrix. We therefore cannot provide authoritative minimum hardware figures. Choose a host with enough storage for the wiki content and any files your team intends to place in it, then monitor actual resource use after deployment.
Before running the installation command, confirm the following:
- A working Docker installation is available on the intended host.
- Your current account can run Docker commands using the authorization model configured on that host.
- TCP port
8080is not already assigned to another host service. - The host can retrieve the Oxynote image from GitHub Container Registry.
- You understand where Docker stores named volumes and how your own backup system protects them.
- You can initially open
http://localhost:8080from the Docker host, or reach port8080through a trusted local path for verification. - For later remote access, the Localtonet client will run on this host or another device that can reach the Oxynote host and port.
Check that Docker responds
A simple Docker status command should return information rather than a missing-command or daemon-connection error:
docker infoIf this fails, resolve the Docker installation, daemon, or account-permission issue before proceeding. The exact correction depends on your operating system and how Docker was installed. Oxynote's supplied quick-start evidence does not define those platform-specific installation steps, so this guide does not invent package names or service-management commands.
Check whether port 8080 is already published by Docker
Review running containers before assigning the port:
docker ps
Inspect the PORTS column for an existing host mapping that uses 8080. This check covers running Docker containers, but it does not prove that no non-Docker process uses the port. Port-inspection commands differ by operating system, so use the host's normal networking tools if the Oxynote startup later reports that the address is already in use.
Understand the persistence boundary
The installation maps the named volume oxynote_data to /oxynote/data inside the container. This is important because a container's ordinary writable layer is not an appropriate persistence boundary for application data. The named volume has an independent lifecycle and is not removed merely because a container stops.
Persistent does not mean backed up. A host disk failure, accidental volume removal, or an untested migration can still cause data loss. Establish a backup process appropriate for Docker named volumes before treating the instance as the authoritative home of operational documentation. The supplied Oxynote evidence does not specify an application-consistent backup, restore, export, or migration procedure, so validate those operations against the version you deploy before relying on them in production.
Oxynote points readers to additional production documentation for a real domain and external PostgreSQL configuration, but the relevant configuration file contents, environment variable names, and exact procedures were not supplied for this article. We do not guess them here. The verified workflow below uses the documented single-container command and its named data volume.
Install Oxynote with Docker
The documented quick-start command contains everything required for this installation path. It starts the application in detached mode, publishes the web port, attaches persistent storage, and uses the current image reference supplied by the project.
Open a terminal on the Docker host
Work directly on the machine that will run Oxynote, or use an administrative remote shell approved for that host. Confirm that the Docker daemon is available and that your account can create containers and volumes.
Run the documented Oxynote container command
Execute the command exactly as shown. Docker retrieves the image if it is not already present, creates or reuses the named volume, publishes host port 8080, and starts the container in the background.
docker run -d -p 8080:8080 -v oxynote_data:/oxynote/data ghcr.io/oxynote/oxynoteRecord the returned container identifier
A successful detached start returns a container ID. Keep it available for initial inspection. Because the documented command does not assign a custom container name, Docker also generates a name automatically.
Confirm that the container remains running
Use docker ps and locate the row whose image is ghcr.io/oxynote/oxynote. Confirm that its port mapping includes host port 8080. If no matching running container appears, inspect all containers and then review its logs as described in the troubleshooting section.
Open the local web interface
From a browser on the Docker host, visit http://localhost:8080. Wait for the login interface to load before attempting any Localtonet configuration.
What each Docker argument does
| Argument | Purpose | Operational implication |
|---|---|---|
docker run |
Creates and starts a new container from the selected image. | Running the whole command again creates another container rather than resuming the original one. |
-d |
Runs the container in detached mode. | The application continues in the background and the terminal returns a container ID. |
-p 8080:8080 |
Publishes container port 8080 on host port 8080. | The browser endpoint on the Docker host is http://localhost:8080. |
-v oxynote_data:/oxynote/data |
Mounts a named volume at Oxynote's documented data path. | Application data resides in the Docker volume rather than only in the container layer. |
ghcr.io/oxynote/oxynote |
Selects the Oxynote image from GitHub Container Registry. | Docker downloads the image when it is not available locally. |
Do not assume that this container will automatically return after every host or Docker restart. The documented command contains no restart-policy option. Check the container state after maintenance and start the existing container when needed instead of casually creating duplicate containers.
Secure the initial Oxynote account before exposure
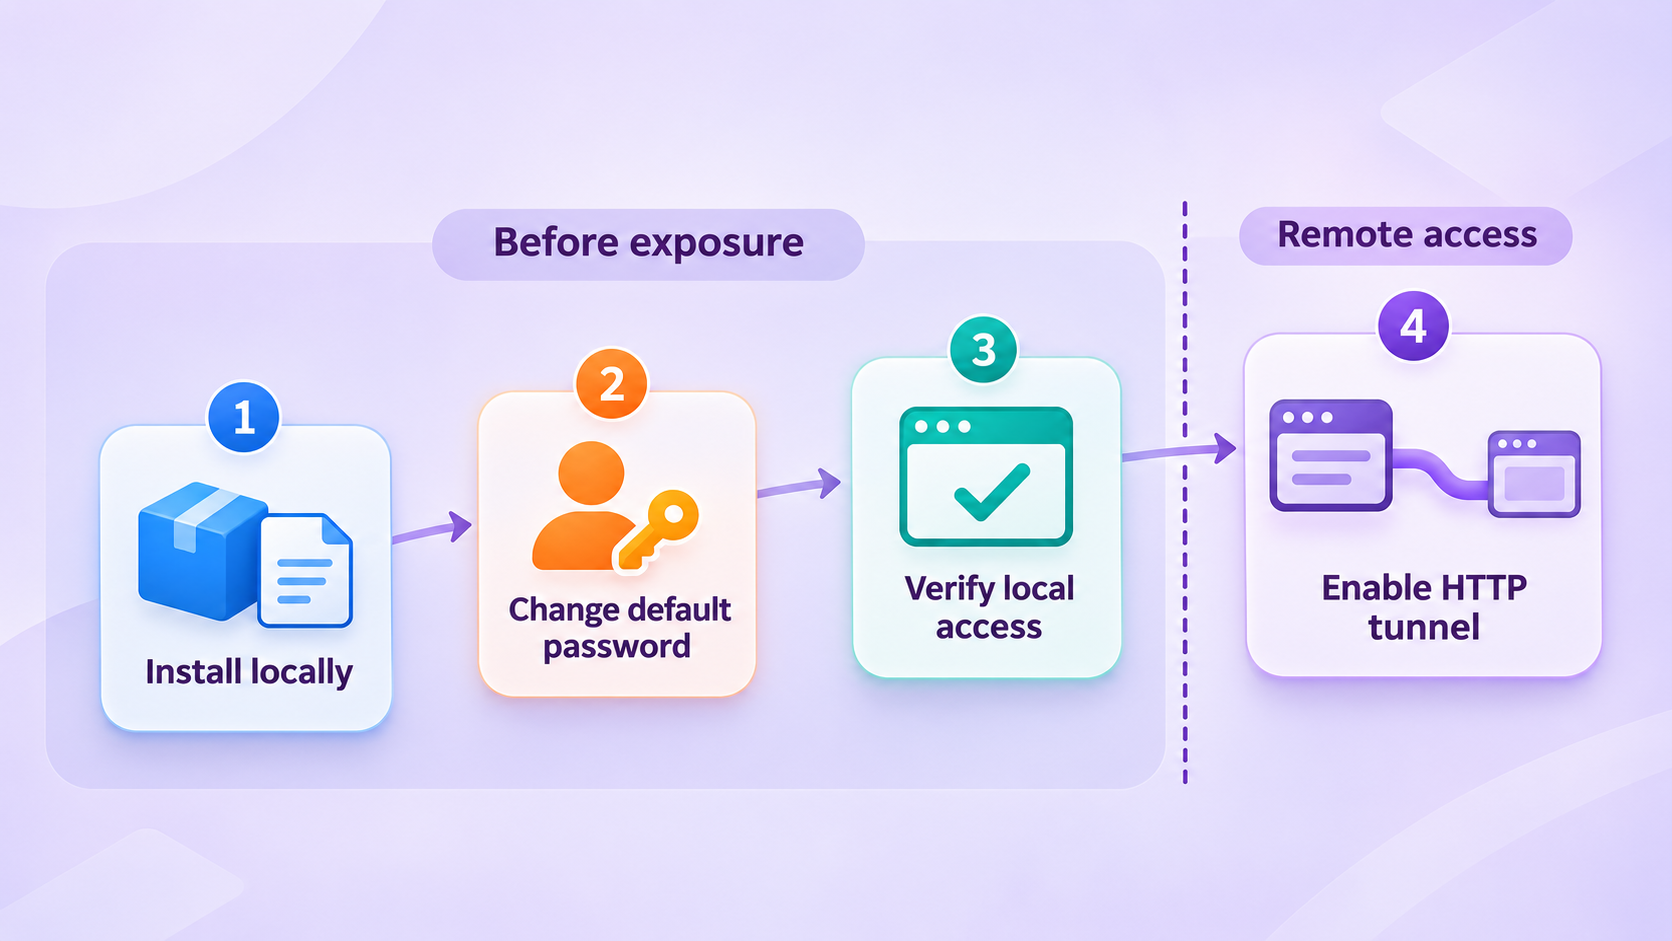
The initial login is the most important security step in this workflow. Oxynote documents a default administrator email of admin@example.com, and its login page displays the default password until that password is changed. That behavior is convenient for a local first run, but it also means an unchanged instance must not be exposed to untrusted networks.
Keep the first login local
Open http://localhost:8080 from the Docker host or use another trusted local access path. Do not create or start the Localtonet HTTP tunnel yet.
Sign in with the initial credentials shown by Oxynote
Use the documented administrator email and the initial password displayed on the login page. This guide intentionally does not reproduce or guess that password.
Change the default password immediately
Replace it with a strong, unique password that is not used for another service. Store it using your organization's approved credential-management process.
Confirm the new credentials
End the current session if the interface permits, then verify that the new password works and that the default password no longer grants access. Complete this check before proceeding to remote access.
A public URL can be discovered or shared beyond its intended audience. Change the default password first, invite only the people who need access, remove access when it is no longer required, and stop the tunnel when remote availability is unnecessary. Treat the tunnel address as a network endpoint, not as a replacement for application authentication.
Oxynote describes workspaces as accessible to invited people, but authorization design still belongs to the deployment owner. Review user access regularly, avoid shared administrator credentials, and provide only the level of access each person needs. If your internal policy requires identity-provider integration, multifactor authentication, an external reverse proxy, or other controls, verify that exact capability and configuration against current Oxynote documentation before deployment. Those details are not established by the evidence supplied for this tutorial.
Verify the local Oxynote service
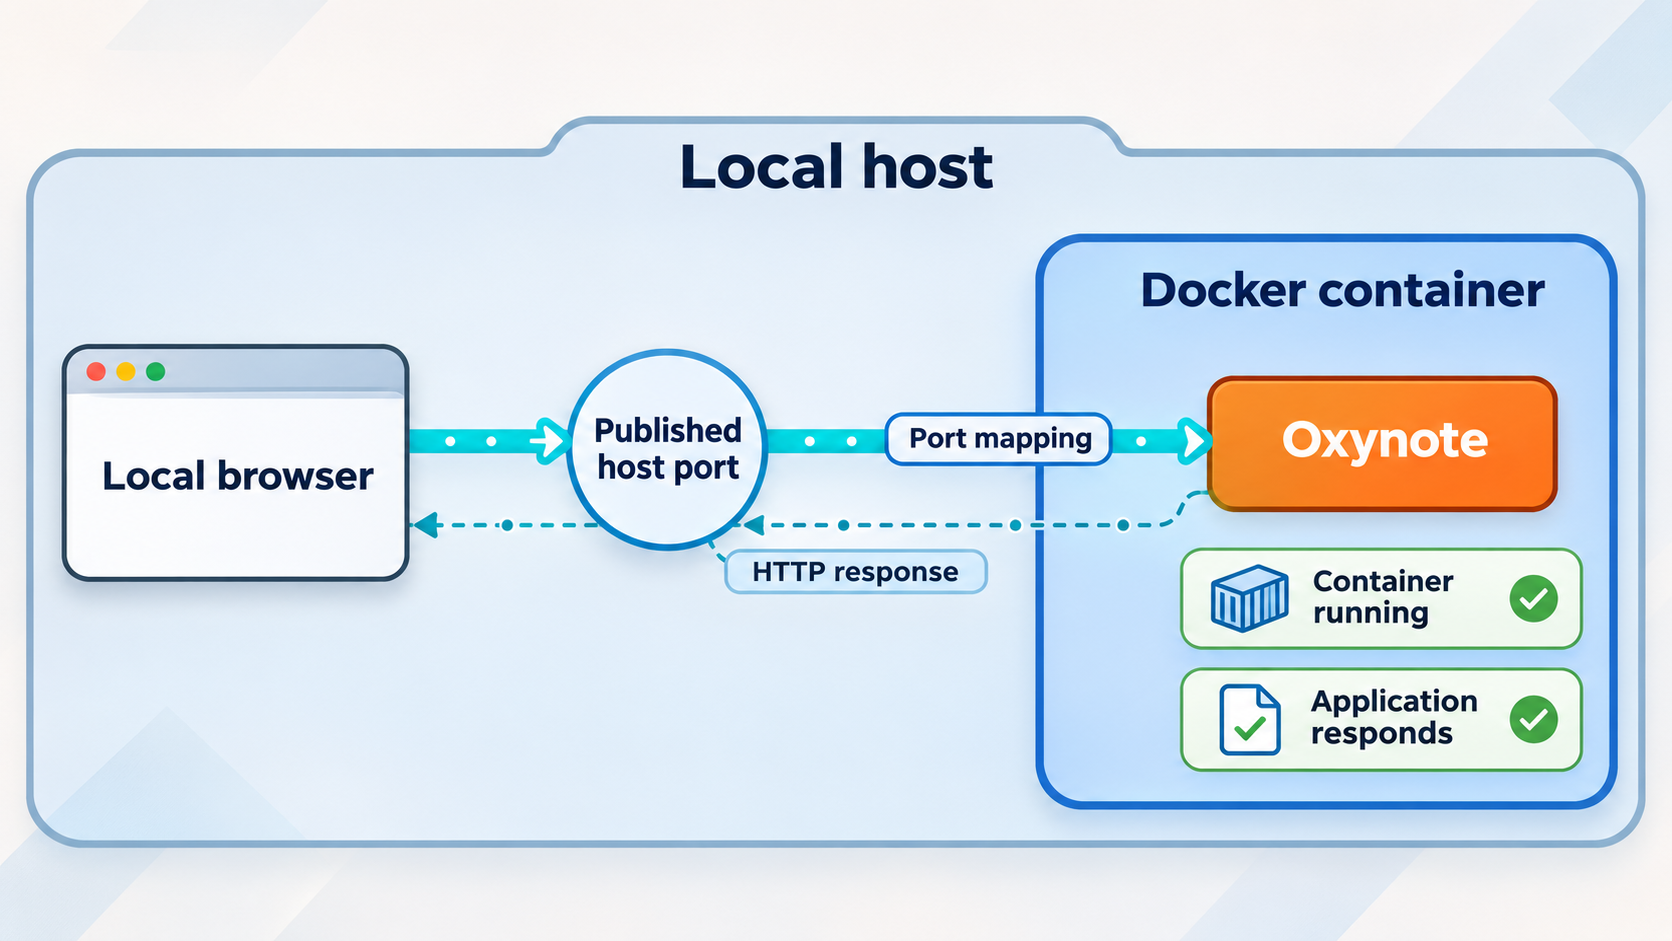
Verification should test more than whether a container appears in Docker. A container can remain in a running state while its application is still starting or unable to complete a request. Use the browser to confirm the actual HTTP interface, authentication, and basic application behavior.
Confirm the container state
docker ps
Find the Oxynote image and note its generated container ID or name. The published-port information should show that host port 8080 maps to the container's port 8080. If the container is missing from this list, display stopped containers:
docker ps -aA stopped Oxynote container indicates that the process exited or was stopped. Do not rerun the installation command immediately. First inspect the existing container's logs and determine why it stopped.
Test the browser endpoint
Open:
http://localhost:8080A successful check should reach Oxynote's web interface rather than a browser connection error or an unrelated service. Sign in with the password you changed during the hardening stage. If the browser loads something unexpected, confirm that you are using HTTP, the correct port, and the intended Docker host.
Perform a small functional test
Create a temporary page or a small piece of test content using the normal interface, then refresh and confirm that the content remains available. This checks more than basic HTTP reachability. It provides an initial indication that the application can write to and read from its data location.
This is not a substitute for a backup and restore test. It also does not prove that every collaboration, data-source, review, AI, or MCP feature is configured. The goal is to establish a clean baseline: the container runs, the page loads, authentication works with the changed password, and a basic write survives a refresh.
Optional HTTP check from a terminal
If curl is already installed on the host, it can confirm that the port returns an HTTP response:
curl -I http://localhost:8080The exact status code can depend on application routing and authentication behavior, so do not assume that only one status code is valid. The important distinction is between receiving an HTTP response and receiving a connection failure. Browser verification remains necessary because it tests the actual interface and login flow.
Operate and maintain the Docker container
The quick-start command does not assign a fixed container name. Docker generates one, and Docker commands can use either that generated name or the container ID displayed by docker ps. The placeholders below must be replaced with the identifier from your own host.
View application output
docker logs <container-id-or-name>For a live stream while reproducing a problem, use:
docker logs -f <container-id-or-name>Exit the live log view using the normal terminal interrupt. Avoid publishing logs without review because application logs can contain hostnames, user identifiers, query text, or other operational context.
Stop the current container
docker stop <container-id-or-name>
Stopping the container makes the Oxynote web service unavailable. A Localtonet tunnel that still targets port 8080 cannot make the stopped application respond, so stop the tunnel as well when the outage is intentional.
Start the same container again
docker start <container-id-or-name>Starting the existing container preserves its original port and volume configuration. This is preferable to repeatedly running the installation command, which creates additional containers and can cause port conflicts.
Restart the container
docker restart <container-id-or-name>A restart is useful after a controlled maintenance action, but it should not be treated as a substitute for diagnosing recurring failures. Review logs if the application repeatedly becomes unavailable.
Plan upgrades cautiously
The available project material identifies version v0.9.3 as the latest release at the evidence check date, but the quick-start image reference does not include an explicit version tag. The supplied evidence does not establish a complete, version-specific upgrade, migration, rollback, or database-backup procedure. For that reason, this article does not prescribe a destructive remove-and-recreate sequence.
Before upgrading, record the version currently in use, read the release notes for all versions in the upgrade path, protect the oxynote_data volume with a tested backup method, and define a rollback plan. If the deployment later uses an external database or other production configuration, protect those components as part of the same change.
The volume oxynote_data is the documented persistent data location for this deployment. Container removal and volume removal are different actions. Confirm the effect of every Docker command before running it, especially if an option would remove attached volumes.
Use live Prometheus and SQL charts responsibly
Oxynote's distinguishing capability is the placement of live operational charts inside technical documentation. A runbook can explain a service and display the metric that indicates whether it is healthy. Architecture notes can sit beside capacity trends. An incident page can combine commands, diagrams, thresholds, and current telemetry without forcing the reader to reconstruct context across separate tools.
The documented data-source families are Prometheus and SQL databases, specifically PostgreSQL, MySQL, and MariaDB. Live Metrics blocks can render query results as time series, bar charts, or gauges. Oxynote also describes support for Grafana-style query macros, including $__rate_interval and $__timeFilter, and workspace variables whose selected values can remain personal to each reader.
| Data source | Typical wiki use | Security consideration |
|---|---|---|
| Prometheus | Place service, latency, error-rate, saturation, or capacity metrics beside operational explanations. | Expose only the metric endpoint and network path required by the Oxynote host. |
| PostgreSQL | Render documented operational or reporting queries as charts. | Use a dedicated read-only database user as required by Oxynote's guidance. |
| MySQL | Display selected SQL-backed operational data within engineering pages. | Use a dedicated read-only user and restrict its accessible schemas and network path. |
| MariaDB | Visualize selected SQL results next to the procedures that interpret them. | Use read-only credentials and grant only the minimum query access needed. |
For SQL sources, the project explicitly calls for a read-only database user so that a page query cannot change data. Apply least privilege beyond the read-only label. Where your database supports it, limit the account to only the schemas, views, or tables required by the documented charts. Do not reuse an application account with write permissions.
The supplied evidence does not include the current data-source setup screens, exact connection fields, secret-storage behavior, environment variables, certificate options, or detailed Prometheus connection procedure. We therefore do not invent a click-by-click configuration. Establish local Oxynote operation first, then use the configuration controls present in the deployed version and test access with a narrowly scoped non-production source before connecting sensitive systems.
Publishing the Oxynote web interface through an HTTP tunnel is separate from database connectivity. Do not create public tunnels for Prometheus or database ports merely to make charts work. Oxynote should reach those data sources through an approved local or private network path whenever possible.
Provide remote Oxynote access with Localtonet
Once the local interface works and the default password has been replaced, Localtonet can expose the HTTP service through a public HTTPS address. Our client establishes an outbound connection to a selected relay, so this workflow does not require inbound router port forwarding, firewall changes, VPN setup, or a public IP address.
Run the Localtonet client on the Docker host when practical. In that layout, the tunnel can target 127.0.0.1 on port 8080. If the client runs on a different machine, 127.0.0.1 would refer to that different machine, not to the Oxynote server. The target must then be the Oxynote host address that is actually reachable from the client device.
Install and run the Localtonet client
Install our client for the operating system of the device that can reach Oxynote. Start it on the Docker host or on another trusted device with a valid network path to the Oxynote HTTP service. Use the current installation instructions available through the Localtonet documentation because client installation details can vary by operating system and version.
Authenticate or select the client device
Use the device-specific authentication token associated with the client that will run this tunnel. Treat the token as a secret. Do not paste it into documentation, screenshots, shell history, source control, or support messages.
Select an available relay server
Choose a currently available server or region from the dashboard. Available values can vary, so obtain them from the current product rather than copying a hardcoded server code from an article.
Create an HTTP tunnel for the local service
Configure an HTTP tunnel whose local target is the Oxynote IP address and port 8080. When the client and Docker run on the same host, use 127.0.0.1 as the local IP. When they run on separate devices, use the reachable Oxynote host address instead.
Choose the appropriate HTTP process type
HTTP tunnels can use Random Sub Domain, Custom Sub Domain, or Custom Domain process types. Each serves the target at a public HTTPS address. Availability can vary, and exact custom-domain DNS requirements must be checked against current Localtonet documentation before configuration.
Start the tunnel
Creating the tunnel does not make it active. Press Start for the configured tunnel and confirm that the selected client device remains connected. The assigned public endpoint works only while the client is connected and the tunnel is running.
Test the public address as a remote user
Open the assigned HTTPS address from a device outside the Oxynote host's local context. Confirm that the login page loads, the default password is no longer accepted, the new credentials work, and normal page navigation behaves correctly.
Select the correct local target
| Client location | Likely local target | Required verification |
|---|---|---|
| Localtonet and Docker on the same host | 127.0.0.1:8080 |
Open http://127.0.0.1:8080 on that host. |
| Localtonet on another LAN device | Reachable Oxynote host address on port 8080 |
Open the HTTP address from the client device before creating the tunnel. |
| Oxynote behind an existing internal proxy | The approved HTTP endpoint reachable from the client | Confirm the proxy route and authentication behavior locally before tunneling it. |
Use the narrowest target that satisfies the deployment. If both applications share a host, loopback access avoids making Oxynote dependent on a LAN address. If the Localtonet client is remote from Docker, ensure the connection is permitted by your network policy and do not weaken unrelated firewall controls merely to make the target reachable.
HTTPS protects the public web connection, but it does not make weak credentials safe or replace application authorization. Keep Oxynote patched, use strong unique credentials, invite only necessary users, review access, and stop the tunnel when it is not needed. Do not expose Prometheus, PostgreSQL, MySQL, or MariaDB ports as part of this HTTP workflow.
Understand the tunnel lifecycle
A saved configuration and a running tunnel are not the same thing. After creating the HTTP tunnel, it must be started. It can later be stopped without deleting its configuration, or deleted when the endpoint is no longer needed. The public URL is available only while the selected client is connected and the tunnel is running.
This behavior supports controlled access windows. For example, a small team can start the endpoint for a remote review session and stop it afterward. If continuous availability is required, monitor both the Oxynote container and the connected Localtonet client because either layer can make the public endpoint unavailable.
Troubleshooting the installation and tunnel
The Docker command reports that port 8080 is already in use
Another process or container has already bound the host port. Run docker ps to look for an existing Docker mapping. Also consider whether an earlier Oxynote container is already running. Do not repeatedly execute the installation command, because each successful execution creates another container.
The supplied quick-start evidence documents the 8080:8080 mapping and does not establish an alternate official host-port example. If you need a different deployment layout, validate it against the current project documentation and make sure the Localtonet target matches the actual host port.
The container starts and immediately exits
Display all containers and inspect the logs:
docker ps -a
docker logs <container-id-or-name>
Look for image retrieval issues, storage errors, permission failures, application startup errors, or a port conflict. Preserve the complete error text for internal diagnosis, but remove credentials and private infrastructure details before sharing it.
The browser cannot open localhost:8080
Confirm that the browser is running on the Docker host. In a browser on another computer, localhost refers to that other computer. Next, verify that the Oxynote container appears in docker ps and that its port mapping includes host port 8080. Use docker logs to see whether the application completed startup.
Also confirm that the URL begins with http:// for the local quick-start endpoint. The public Localtonet HTTP tunnel provides an HTTPS address later, but that does not change the documented local service URL.
The local interface works, but the public URL does not
This usually narrows the issue to the access layer. Check that the correct Localtonet client device is connected, the HTTP tunnel has been started, and the local target is correct. If the client and Oxynote are on the same host, test http://127.0.0.1:8080 there. If they are on separate devices, test the Oxynote host address directly from the client device.
Do not use 127.0.0.1 when the client runs on a different machine from Docker. In that arrangement, loopback points back to the Localtonet client itself.
The public page loads, but login fails
First verify the same credentials against the local Oxynote interface. If login fails both locally and remotely, it is an application credential issue rather than a tunnel issue. Use the account-recovery process supported by the installed Oxynote version. The supplied evidence does not document that recovery workflow, so this article does not invent reset commands or database modifications.
Changes disappear after recreating the container
Verify that the intended container is attached to the named volume oxynote_data at /oxynote/data. If a replacement container was created without that mapping, it may be using a different storage location. Avoid deleting any container or volume while diagnosing the problem. Identify the correct volume and establish a backup before making changes.
Live metric charts cannot reach a data source
Test the network path from the Oxynote host to the data source and verify that the configured account has the intended read permissions. For SQL sources, use a dedicated read-only user. A Localtonet HTTP tunnel to the Oxynote interface does not automatically create database connectivity and should not be used as a reason to publish database ports.
The service does not return after a host restart
The documented Docker command does not include a restart policy. Run docker ps -a, locate the existing Oxynote container, and start it with docker start <container-id-or-name>. Then confirm the local interface before checking the tunnel. If the Localtonet client also stopped, restart it through the supported mechanism for its operating system and verify that the selected device reconnects.
Frequently asked questions
What URL should I use after installing Oxynote?
On the Docker host, use http://localhost:8080. The documented Docker command maps host port 8080 to container port 8080. If you access the host from another trusted local machine, use a reachable address for the Docker host rather than that other machine's localhost.
Must I change the default Oxynote password?
Yes. The default administrator email is admin@example.com, and the initial password is shown on the login page until it is changed. Replace it with a strong, unique password and verify the new login before creating any public tunnel.
Where does the Docker installation store Oxynote data?
The documented command mounts the named Docker volume oxynote_data at /oxynote/data inside the container. The volume provides persistence outside the ordinary container layer, but it still needs an appropriate backup and restore plan.
Does Oxynote support Docker Compose?
A Docker Compose procedure was not established by the evidence supplied for this guide. The verified quick-start path is the single docker run command shown above. We do not invent service definitions, environment variables, health checks, or dependency configuration.
Can Oxynote display live Prometheus metrics?
Yes. Oxynote supports live metric blocks backed by Prometheus queries. It can also query PostgreSQL, MySQL, and MariaDB. Exact connection-screen fields were not provided for this article, and SQL sources should use dedicated read-only database users.
Does Localtonet need to run inside the Oxynote container?
No. Run our client on the Docker host or another device that can reach the Oxynote service. When it runs on the same host, target 127.0.0.1:8080. When it runs elsewhere, target the reachable address of the Oxynote host on port 8080.
Does creating an HTTP tunnel start it automatically?
No. Creating a tunnel and running it are separate lifecycle actions. After configuration, press Start. The endpoint remains available only while the selected Localtonet client is connected and the tunnel is running.
Do I need router port forwarding or a public IP address?
Not for this Localtonet workflow. Our client establishes an outbound connection to a relay and provides the public endpoint without inbound router port forwarding, firewall changes, VPN setup, or a public IP address.
Should I expose the Prometheus or database port through another tunnel?
Not as part of this workflow. The HTTP tunnel publishes the Oxynote web interface. Oxynote should reach Prometheus and SQL data sources over an approved private or local network path. Publicly exposing those backend ports creates a separate security problem and is not required for remote wiki access.
Can I use a custom domain for the public Oxynote address?
HTTP tunnels support Random Sub Domain, Custom Sub Domain, and Custom Domain process types. Availability can vary by current product configuration or plan. Check current Localtonet documentation for the exact custom-domain DNS requirements rather than copying unverified records from a generic tutorial.
Connect your verified Oxynote workspace with Localtonet
Install Oxynote locally, change its default password, confirm the container and web interface are healthy, then create an HTTP tunnel to the verified port 8080 target. Start the tunnel only when the workspace is ready for remote users.
Get Started Free →