

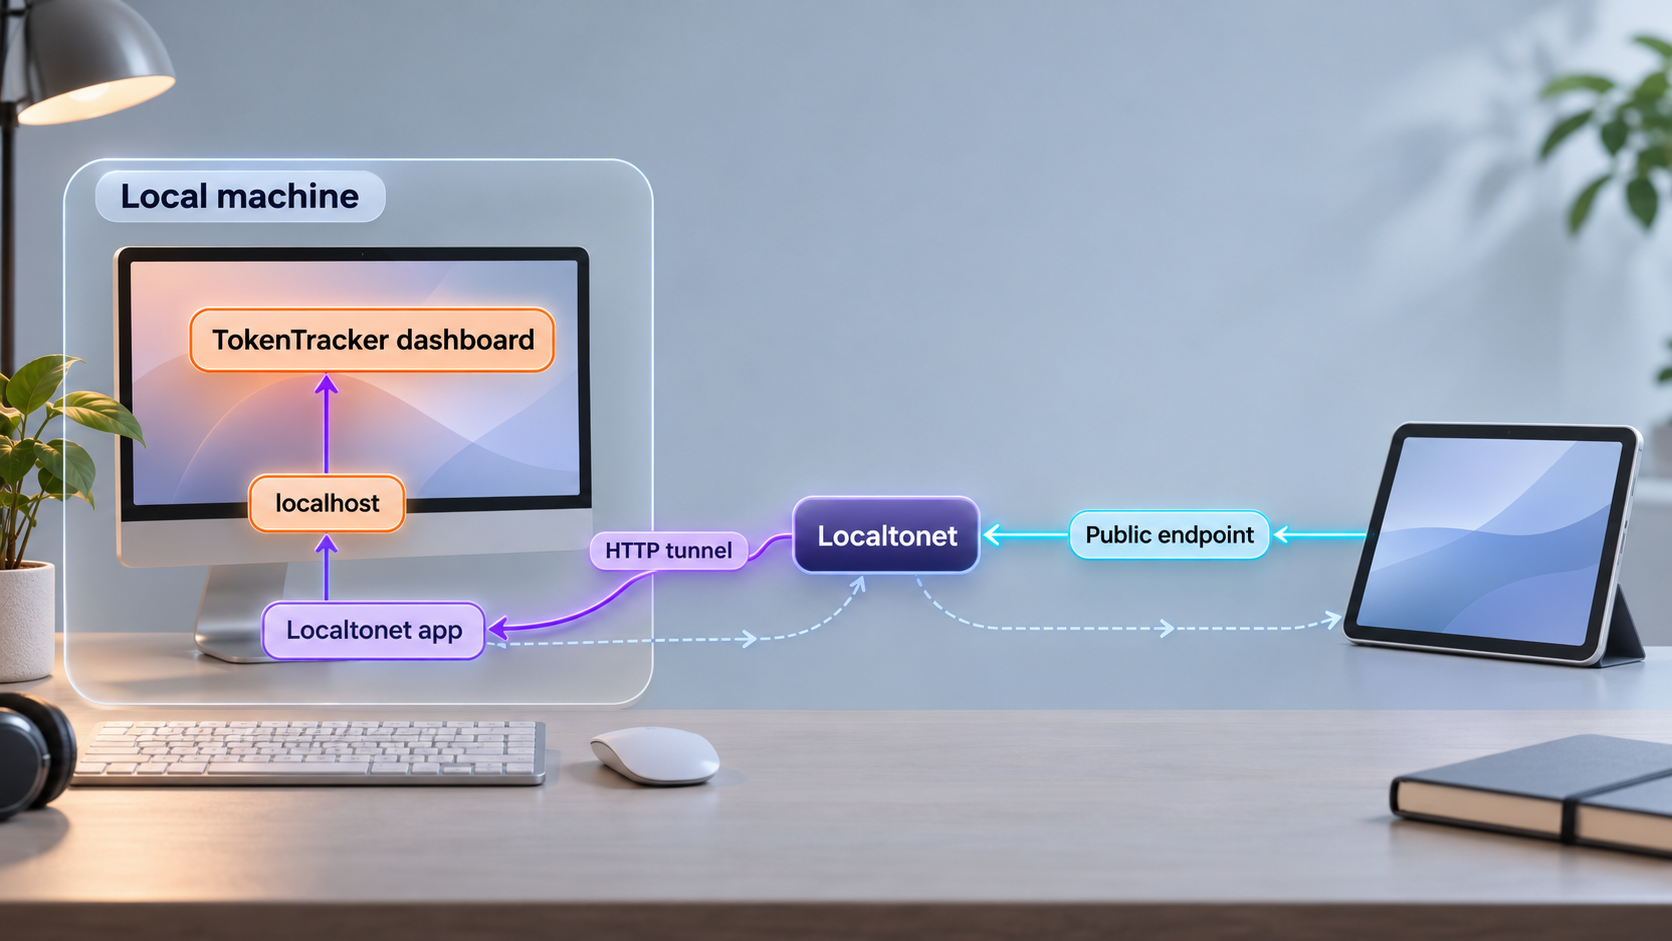
Build a local AI usage dashboard first, verify it on port 7680, then make a deliberate remote-access decision
TokenTracker is a local-first dashboard for monitoring token usage and estimated cost across supported AI coding tools. This guide installs it with npm using the documented Node.js workflow, explains what happens on the first run, and verifies the dashboard at http://localhost:7680. After the local installation works, we show how to connect that HTTP service to Localtonet without configuring inbound router port forwarding, changing firewall rules, setting up a VPN, or requiring a public IP address. Because an AI usage dashboard can reveal project names, model choices, activity patterns, and cost information, the remote-access section also includes a security review that should be completed before starting a public tunnel.
📋 What's in this guide
How the TokenTracker and Localtonet workflow fits together
The safest way to approach this setup is to treat installation and remote access as two separate phases. TokenTracker must first work correctly as a local application. Only after the dashboard loads from the same machine should a tunnel be added. This separation makes troubleshooting easier and prevents a networking layer from hiding an incomplete installation.
TokenTracker runs on the computer that contains or can read the local usage data produced by supported AI coding tools. Its documented npm workflow starts a local dashboard at http://localhost:7680. On its first run, the CLI detects supported tools installed on the machine and configures the relevant integration mechanism. Depending on the tool, that mechanism can be a session-end hook, a notification configuration, a plugin, or a passive local log reader.
TokenTracker describes its data handling as local-first. Its published product information says that it tracks token counts rather than prompts or conversation content, and that an account is not required for the local dashboard. Optional cloud synchronization is a separate choice. Those properties reduce the amount of conversational data handled by the dashboard, but they do not make the dashboard non-sensitive. Usage history, model names, costs, projects, activity periods, limits, and provider status can still be operationally private.
With Localtonet, the client running on the device establishes an outbound connection to one of our relay servers. An HTTP tunnel then points to the local TokenTracker address and port. The resulting public HTTPS address remains available only while the selected Localtonet client is connected and the tunnel is running. This means that creating the tunnel configuration alone does not publish the dashboard. It must also be started.
npx tokentracker-cli, or install tokentracker-cli globally and start it with tokentracker.
What this guide does not assume
We do not assume that TokenTracker provides authentication for every dashboard deployment, because the supplied project evidence does not establish a built-in access-control requirement for the local web interface. We also do not assume a particular Localtonet subscription plan, relay region, custom-domain procedure, or access-control option. Available servers, regions, options, and plan limits can change, so use the values currently shown in your Localtonet dashboard.
A Localtonet tunnel forwards traffic to an existing local service. It does not install, start, repair, or authenticate TokenTracker. Confirm that http://localhost:7680 works on the host before creating the tunnel.
Prerequisites for the npm installation
The documented npm route requires Node.js 20 or newer. npm is normally included with a standard Node.js installation, but it is still important to verify both commands in the same terminal account that will run TokenTracker. This catches common problems such as an older system Node.js taking precedence over a newer installation or npm not being available in the shell path.
Open a terminal on the computer where the supported AI coding tools and their local usage data exist. Run:
node --version
npm --version
The Node.js result must indicate major version 20 or later. The exact npm version is not specified by the available TokenTracker evidence, so this guide does not impose an invented npm version requirement. If node or npm is not recognized, install a supported Node.js release using the standard method for your operating system, then open a new terminal and repeat the checks.
Before continuing, also confirm the following:
- You are running the installation on the machine whose AI coding-tool usage should be tracked.
- The current user account can read and modify the configuration or local data used by the tools you expect TokenTracker to detect.
- Port
7680is not already occupied by another application. - You understand that first-run detection may configure hooks, notification arrays, plugins, or passive readers, depending on the detected tool.
- You can keep the TokenTracker process running for as long as the local dashboard or remote tunnel needs to be available.
| Requirement | Why it matters | How to verify it |
|---|---|---|
| Node.js 20 or newer | The npm installation workflow documents Node.js 20+ as its runtime requirement. | Run node --version and inspect the major version. |
| npm available | npx and global npm installation depend on the Node.js package tooling. |
Run npm --version. |
| Access to local tool data | TokenTracker detects integrations and reads supported local usage sources under the current user context. | Run it as the same operating-system user that normally runs the AI coding tools. |
| Port 7680 available | The documented local dashboard endpoint uses this port. | Start TokenTracker and confirm that the dashboard opens without an address-in-use error. |
| Localtonet client, for remote access only | The client connects the local HTTP service to our relay platform. | Install and run the appropriate Localtonet application before configuring the tunnel. |
Use the normal operating-system account that owns the relevant AI tool configuration and data. Do not add sudo, run an elevated administrator shell, or change package permissions merely to make an error disappear unless the project and your operating-system package setup specifically require that action. This guide does not require elevated execution.
Install and start TokenTracker with npm
TokenTracker documents two npm-based paths. The direct npx route is the shortest way to run the application without first creating a global package installation. The global route installs the CLI command into npm's global package location and is useful when you expect to launch TokenTracker repeatedly by name.
Choose one path. Running both is not normally necessary.
Confirm the Node.js runtime
In the terminal that will run TokenTracker, execute node --version and npm --version. Continue only with Node.js 20 or newer.
Choose the npx or global installation path
Use npx tokentracker-cli for the direct documented launch. Alternatively, install globally with npm i -g tokentracker-cli and then launch it using tokentracker.
Allow first-run detection to complete
On its first run, TokenTracker detects supported AI coding tools and sets up the applicable integration method. Keep the terminal open and review any output or prompts rather than interrupting the process prematurely.
Open the local dashboard
From a browser on the same machine, visit http://localhost:7680. Do not proceed to Localtonet until this local endpoint loads successfully.
Option A: run TokenTracker directly with npx
The simplest documented command is:
npx tokentracker-cliThis asks the npm tooling to run the TokenTracker CLI package. It is a practical choice for a first installation because it avoids a separate global install command. Keep the terminal session visible during the first run so that you can see package, startup, detection, or port-related errors.
Option B: install the CLI globally
To install the command globally, run:
npm i -g tokentracker-cliAfter npm completes the installation, start TokenTracker with:
tokentracker
If npm reports that the global installation succeeded but the tokentracker command is not found, the likely issue is that npm's global executable directory is not present in the current shell path. Open a new terminal first. If that does not help, inspect your Node.js and npm installation rather than repeatedly reinstalling the package with elevated privileges.
What happens on the first run
TokenTracker's first-run behavior is more than simply starting a static web page. It detects supported AI coding tools and installs or activates the suitable collection mechanism for each tool. Published examples include session-end hooks, TOML notification arrays, plugins, and passive log or database readers. The exact set of integrations depends on what is installed and available under the current user account.
This also explains why running TokenTracker as a different user can produce an empty or incomplete dashboard. A service account, administrator account, container, or remote shell may not see the same home directory and application data as the desktop user who runs the AI coding tools.
TokenTracker also publishes native desktop packaging, including a macOS Homebrew cask and release assets for Windows and Linux. Those are valid alternatives, but this article intentionally follows the npm workflow. Do not combine installation methods unless you understand which process and data location you intend to use.
Verify TokenTracker before allowing remote access
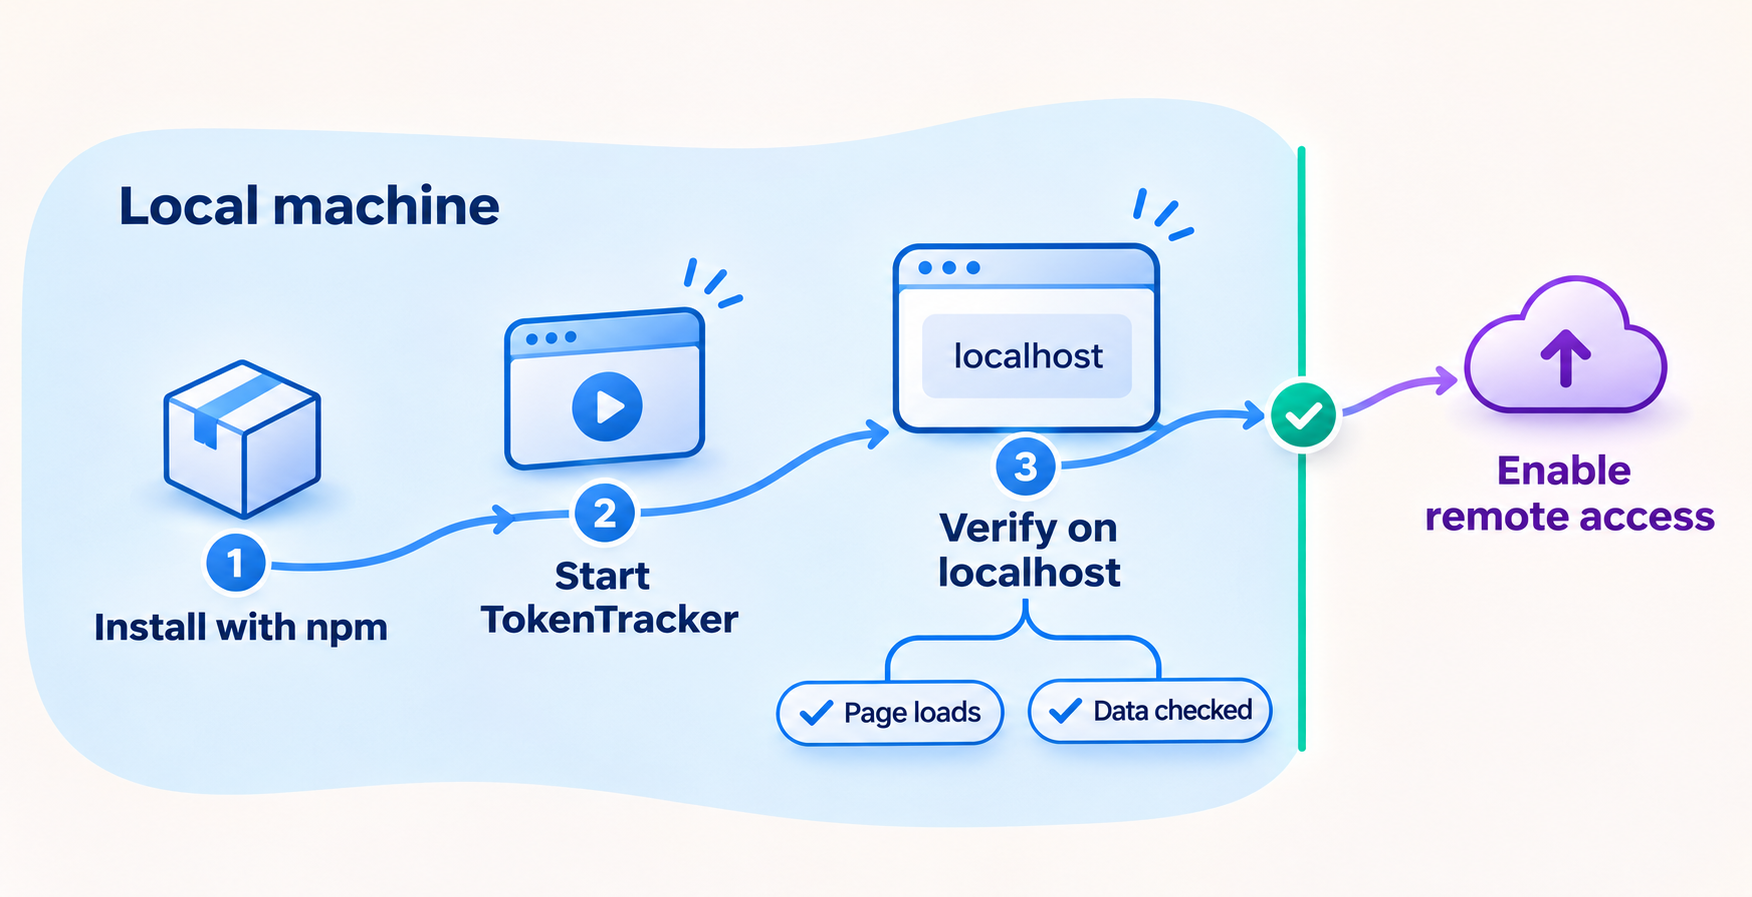
Local verification should answer three questions: is the process running, does the HTTP dashboard respond, and is it showing the expected local data? A successful npm command by itself does not prove that the dashboard is usable.
Open the documented endpoint
On the TokenTracker host, open:
http://localhost:7680
A working page confirms that a browser on the same machine can reach the service. The hostname localhost refers to the machine where the browser is running. If you type this address into a phone or another computer, it refers to that other device, not to the TokenTracker host. Remote access requires an appropriate network path, such as the Localtonet HTTP tunnel configured later in this guide.
Inspect the dashboard content
Check whether the dashboard recognizes the tools and activity you expect. TokenTracker can present unified token usage and cost information, including input, output, cached, and cache-creation token categories where the underlying integration provides them. It also documents views for trends, projects, models, limits, service status, and activity history.
An empty dashboard does not necessarily mean that the HTTP service is broken. It may mean that no supported usage has been found, the expected tool was not detected, the process is running under the wrong user, a configured hook has not yet emitted a completed session, or a passive reader cannot find its local data. First distinguish a web-server problem from a data-collection problem.
Confirm privacy expectations
TokenTracker states that it tracks token counts and does not read prompts or conversation content. It runs locally, and optional cloud sync is not required for the local dashboard. Even so, review the visible dashboard as if another person could see it. Project attribution, model selection, usage volume, costs, working hours, streaks, and provider limits can all disclose information about your development activity.
The fact that a dashboard does not contain prompt text does not make it suitable for unrestricted public access. Before tunneling it, identify what the interface reveals, determine who should be allowed to view it, and decide whether the application or another trusted layer provides adequate authentication and authorization.
Routine operation and installation choices
TokenTracker needs to remain running for its dashboard to respond. If you launched it interactively in a terminal, closing that terminal may end the process depending on your shell and operating-system behavior. The supplied evidence does not establish an official background-service command, startup-service definition, container recipe, or process-manager configuration, so we do not invent one here.
For a persistent deployment, use only a process-management method that you understand and that preserves the correct user environment. TokenTracker's integrations depend on access to user-specific tool configuration and local data. Running the application under a different identity may make the HTTP server available while silently losing access to the data that matters.
Choosing between npx and a global installation
| Method | Command | Best fit | Operational consideration |
|---|---|---|---|
| Direct npx launch | npx tokentracker-cli |
First run, evaluation, or a minimal npm setup | Launch through the package tooling whenever you want to start TokenTracker. |
| Global npm installation | npm i -g tokentracker-cli, then tokentracker |
Repeated command-line use | The npm global executable directory must be available in the shell path. |
| Native package | Varies by operating system | Users who prefer a desktop-oriented installation | This is a separate path from the npm tutorial and should follow the current project release instructions. |
Updating TokenTracker
Package update behavior depends on the installation route and the version currently published to npm. For a global installation, npm can install the package again through the same package name, but this guide does not prescribe an unverified version-pinning or update command. Review the current project release notes before an update, especially on a machine where TokenTracker has configured integrations for several tools.
After any update, repeat the local checks: start the application, open http://localhost:7680, confirm that expected integrations still appear, and only then restart the public tunnel. This order avoids publishing a broken or partially migrated dashboard.
Stopping access when it is not needed
Local application availability and tunnel availability are independent. Stopping TokenTracker makes the local target unavailable. Stopping the Localtonet tunnel removes the public route while leaving TokenTracker available on the host. For temporary remote access, stopping the tunnel is usually the clearer boundary because it deliberately withdraws the public endpoint.
Connect the working dashboard to a Localtonet HTTP tunnel
Complete this section only after the dashboard loads locally. TokenTracker serves an HTTP application, so an HTTP tunnel is the appropriate Localtonet family for browser access. A raw TCP or UDP tunnel is not needed for this documented dashboard workflow.
Our HTTP tunnel points to the local IP address and port reachable from the device running the Localtonet client. If our client runs on the same machine as TokenTracker, the target is the loopback interface and TokenTracker's documented port, 7680. If the client runs on another device, do not assume that localhost will work, because it would refer to the client device itself. In that topology, the Localtonet client must be able to reach TokenTracker through an appropriate local network address, and TokenTracker must be configured to accept that connection. The supplied TokenTracker evidence does not document a network binding option, so the same-device setup is the supported focus of this guide.
Localtonet HTTP tunnels can use Random Sub Domain, Custom Sub Domain, or Custom Domain as their Process Type. All serve the target content through a public HTTPS address. Availability can vary by the current product configuration or plan. Custom-domain DNS details are not included here because they must be checked against current documentation rather than guessed.
Install and run the Localtonet client
Install the Localtonet application for the operating system on the TokenTracker host, then run it. Keeping the client on the same machine avoids ambiguity around loopback addressing and local network binding.
Authenticate or select the client device
Use the device-specific authentication token associated with the client that will run the tunnel. Treat this token as a secret. Do not paste it into documentation, screenshots, shell history, support posts, or shared configuration examples.
Select an available relay server
Choose from the server or region values currently available in the Localtonet dashboard. Do not copy a hardcoded server code from an old tutorial because availability may vary.
Create an HTTP tunnel to TokenTracker
Configure an HTTP tunnel whose local target is the TokenTracker service on the host and port 7680. Select the appropriate Process Type from the options currently available to your account.
Start the tunnel and test the assigned address
Creating a tunnel does not start it. Use the Start action, then open the assigned public HTTPS URL from a separate browser or network and confirm that the TokenTracker dashboard loads.
Stop or delete the tunnel when finished
Stop the tunnel when remote access is no longer required. Delete it if the configuration should not be reused. The endpoint is available only while the selected client is connected and the tunnel is running.
The public address and target details should be tested independently. First verify the local URL on the host. Next start the tunnel and test its assigned HTTPS address. If local access succeeds but public access fails, investigate the Localtonet client, selected device, tunnel state, local target, and relay selection. If local access also fails, return to TokenTracker troubleshooting.
A saved Localtonet tunnel configuration is inactive until it is started. Similarly, a started tunnel cannot deliver the dashboard if TokenTracker is not running on its local target. Both sides of the workflow must be available at the same time.
Security checklist before exposing an AI usage dashboard
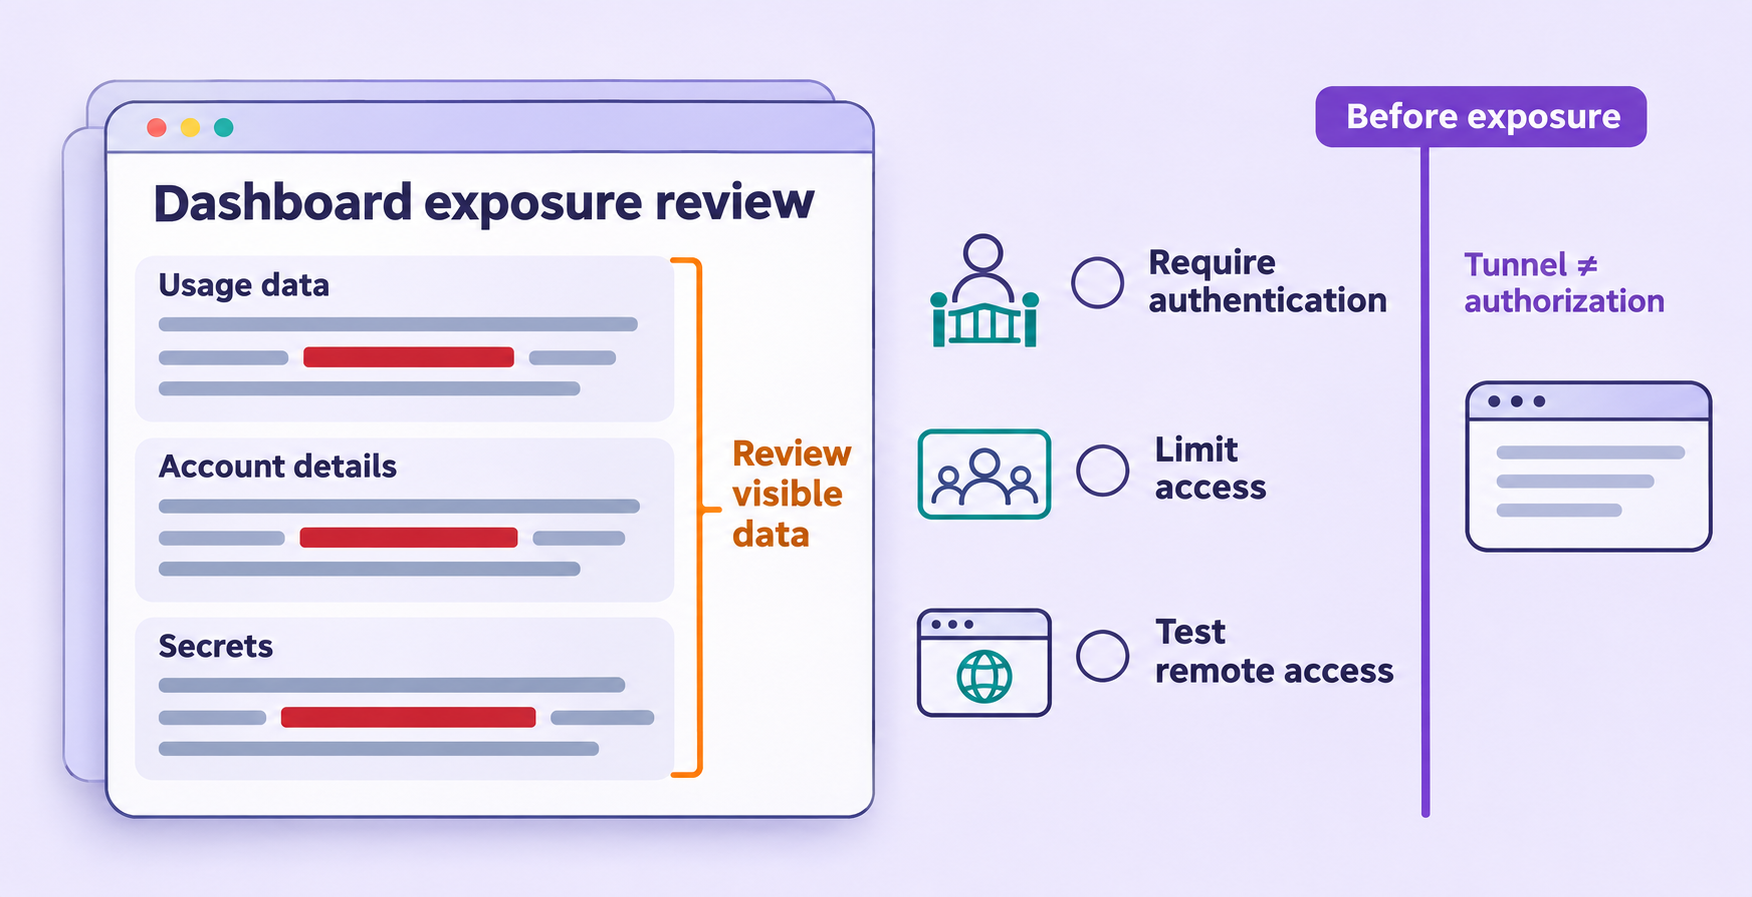
A public URL changes the threat model. The dashboard is no longer reachable only by local software on the host. Anyone who obtains the URL may be able to request it unless an effective access-control layer prevents them. URL obscurity is not a substitute for authentication.
The supplied TokenTracker evidence does not establish that the dashboard requires a login or offers a documented built-in authentication switch. Therefore, do not assume that creating a tunnel automatically limits access to you. Review the actual version you installed and inspect its current interface and documentation for authentication behavior before exposing it.
If you cannot establish who can access the TokenTracker page, keep it local. A generated hostname may be difficult to guess, but it is still a public route and must not be treated as an authorization mechanism. Check the current Localtonet dashboard and TokenTracker release for appropriate access-control options, and test them before sharing the endpoint.
Also consider the security of the host itself. TokenTracker reads local usage information and may configure integrations under the current user account. Keep Node.js, npm, TokenTracker, the operating system, and the Localtonet client updated through their trusted distribution channels. Review package names carefully before installation, and avoid copying commands that include unknown registries, scripts, credentials, or elevated execution.
Troubleshooting TokenTracker and the HTTP tunnel
The Node.js version is too old
If node --version reports a major version below 20, update Node.js before running TokenTracker. After installation, open a new terminal and check again. If the old version still appears, multiple Node.js installations may exist and the shell may be resolving the wrong executable.
The npx command is not found
Confirm that Node.js and npm were installed together and that npm --version works. Restart the terminal after installing Node.js. Do not substitute an unrelated package or download a similarly named executable.
The global command is not found
If npm i -g tokentracker-cli completes but tokentracker is unavailable, start a new terminal. The global npm executable location may not be in the shell path. Resolve that Node.js environment issue rather than assuming TokenTracker itself failed to install.
The browser cannot open localhost:7680
Return to the terminal where TokenTracker was started and review its current output. Confirm that the process is still running and that no port conflict or startup error was reported. Make sure the browser is on the same machine. If another application is using port 7680, the available evidence does not provide a verified TokenTracker port override, so do not invent a command-line flag. Stop the conflicting application if appropriate, or consult the current TokenTracker documentation for a supported configuration.
The dashboard opens but shows no usage
Verify that TokenTracker runs as the same operating-system user that runs the AI coding tools. Complete a normal session in a supported tool if its integration records data at session end. Some integrations use passive local readers while others depend on hooks, plugins, or notification configuration, so data timing varies by source. Review first-run output for detected tools and integration errors.
The local dashboard works but the public URL does not
Check the layers in order:
- Confirm that TokenTracker still opens locally at
http://localhost:7680. - Confirm that the Localtonet client is connected on the selected device.
- Confirm that the tunnel is an HTTP tunnel.
- Confirm that the local target points to the TokenTracker host and port
7680. - Confirm that the tunnel has been started, not merely created.
- Confirm that the selected relay server is currently available in the dashboard.
If the Localtonet client and TokenTracker run on different machines, remember that the client's loopback address does not point to the TokenTracker computer. The available project evidence does not establish a supported TokenTracker network-binding setting, so move the Localtonet client to the TokenTracker host unless current TokenTracker documentation confirms another safe topology.
The public page loads but displays unexpected behavior
Compare the public page with the local page. Browser extensions, cached assets, application updates, or differences in how the application interprets its external origin may affect behavior. The supplied evidence does not establish TokenTracker-specific reverse-proxy headers, base-path settings, WebSocket requirements, or trusted-origin options. Do not invent settings. Record the exact browser error and check the current project documentation or issue tracker for that version.
The endpoint is accessible without a login
Stop the tunnel immediately if that was not intended. Verify whether your TokenTracker version provides authentication, or place it behind a trusted access-control layer supported by your environment. Do not rely on keeping the URL secret. Restart the tunnel only after testing the access restriction from a signed-out browser.
Frequently asked questions
What version of Node.js does TokenTracker require?
The documented npm installation requires Node.js 20 or newer. Verify the active runtime with node --version in the same terminal that will start TokenTracker.
Should I use npx or install TokenTracker globally?
Use npx tokentracker-cli for the shortest direct launch. If you want a reusable global command, run npm i -g tokentracker-cli and then start it with tokentracker. You normally need only one of these installation paths.
What URL does the TokenTracker dashboard use?
The documented local dashboard is http://localhost:7680. Open it on the machine running TokenTracker before configuring remote access.
Does TokenTracker read my prompts or conversations?
TokenTracker states that it tracks token counts and does not read prompts or conversation content. However, its dashboard can still display sensitive operational metadata such as projects, models, costs, limits, and activity patterns.
Does the local TokenTracker dashboard require an account?
The published TokenTracker information says the local dashboard does not require an account and that cloud synchronization is optional. Account-free local use should not be confused with verified remote authentication. Confirm the access-control behavior of your installed version before exposing it.
Which Localtonet tunnel type should I use for TokenTracker?
Use an HTTP tunnel because TokenTracker presents a browser-based HTTP dashboard. Point the local target to the TokenTracker host and port 7680, then start the tunnel and use the assigned public HTTPS address.
Do I need router port forwarding or a public IP address?
No. The Localtonet client establishes an outbound connection to our relay platform. This workflow does not require inbound router port forwarding, firewall changes, VPN setup, or a public IP address.
Does creating a Localtonet tunnel immediately publish the dashboard?
No. Creating the configuration does not mean the tunnel is running. The tunnel must be started, and the selected Localtonet client must remain connected. TokenTracker must also remain available on the configured local target.
Can the Localtonet client run on a different machine?
A Localtonet client can target a service reachable from its device, but localhost always refers to the client device itself. The supplied TokenTracker evidence does not document a network-binding configuration for remote LAN access. For this workflow, run our client on the same machine as TokenTracker unless current TokenTracker documentation confirms a safe alternative.
Is the public HTTPS URL enough to secure the dashboard?
No. HTTPS protects transport to the tunnel edge, but a public URL is not an authorization policy. Use effective authentication and least-privilege controls where available, test them from a signed-out browser, and stop the tunnel when it is not needed.
Make your verified TokenTracker dashboard available with Localtonet
Once http://localhost:7680 works locally and you have completed the access-control review, install our client, create an HTTP tunnel to the dashboard, and start it only for the period when remote access is required.