

Deploy Onyx with Docker Compose, validate every local layer, and publish the web interface only when it is ready
Onyx is an open-source AI platform for LLM chat, agents, retrieval-augmented generation, web search, actions, code execution, and connected knowledge. This tutorial covers host preparation, Lite versus Standard selection, the guided Docker Compose installation, local verification, routine operations, backups, upgrades, and recovery. After Onyx works locally, we map its verified bind address and port to a Localtonet HTTP tunnel. The tunnel provides remote connectivity, while authentication, authorization, credential protection, updates, and application security remain part of the Onyx deployment.
📋 What's in this guide
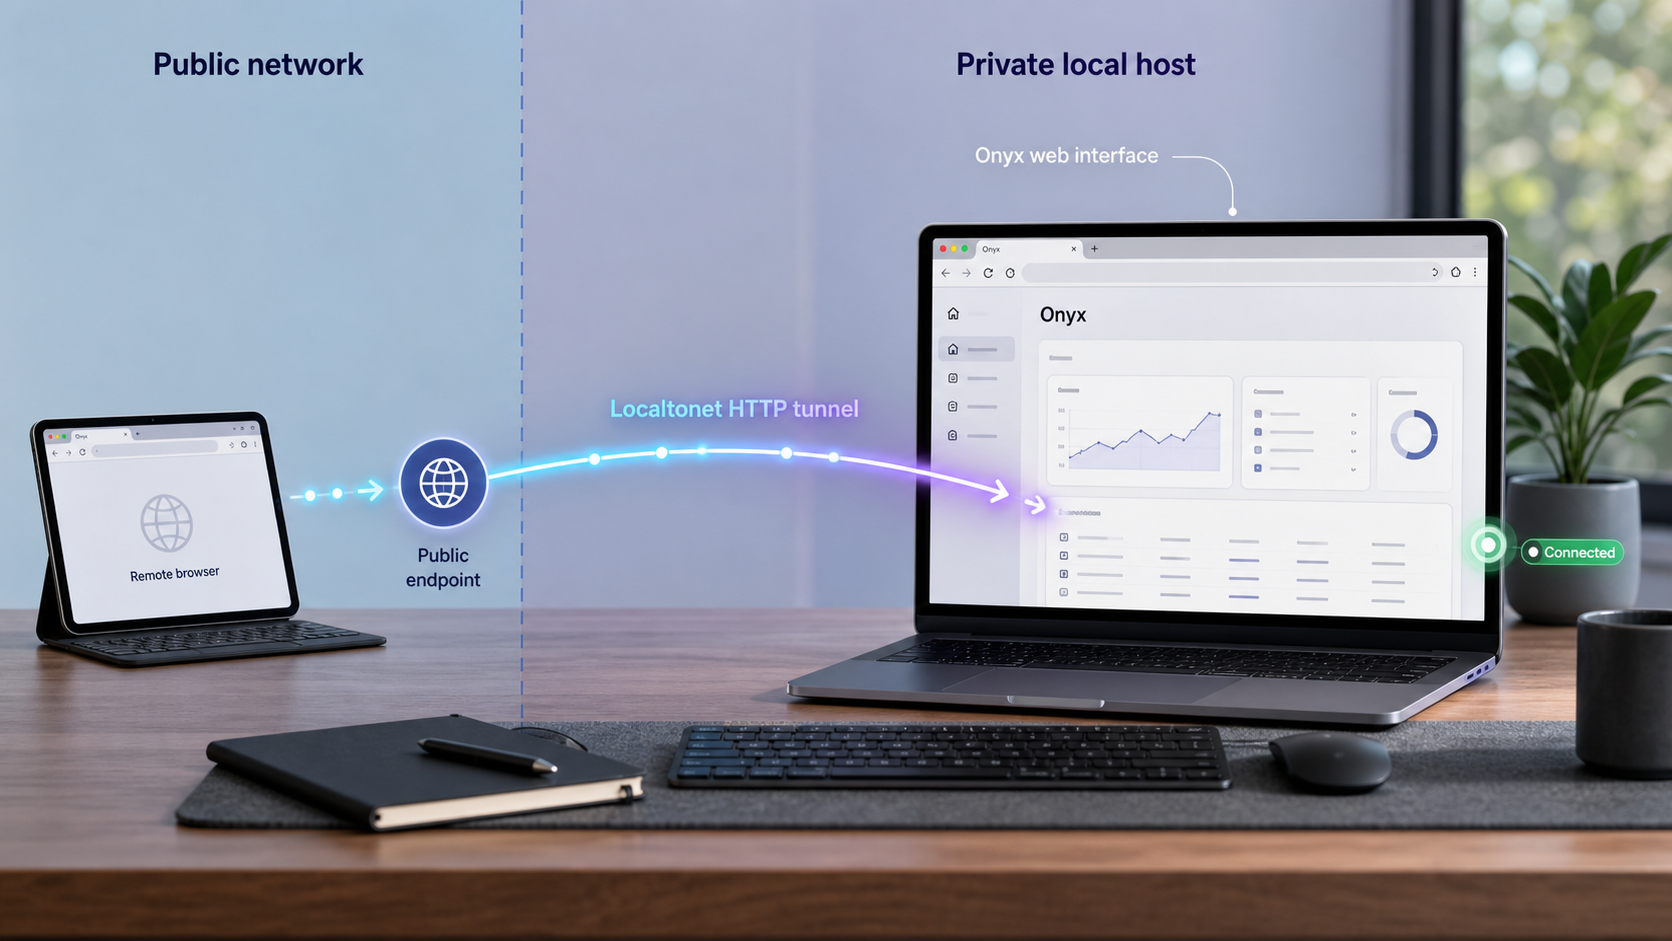
Understand the Onyx and Localtonet architecture
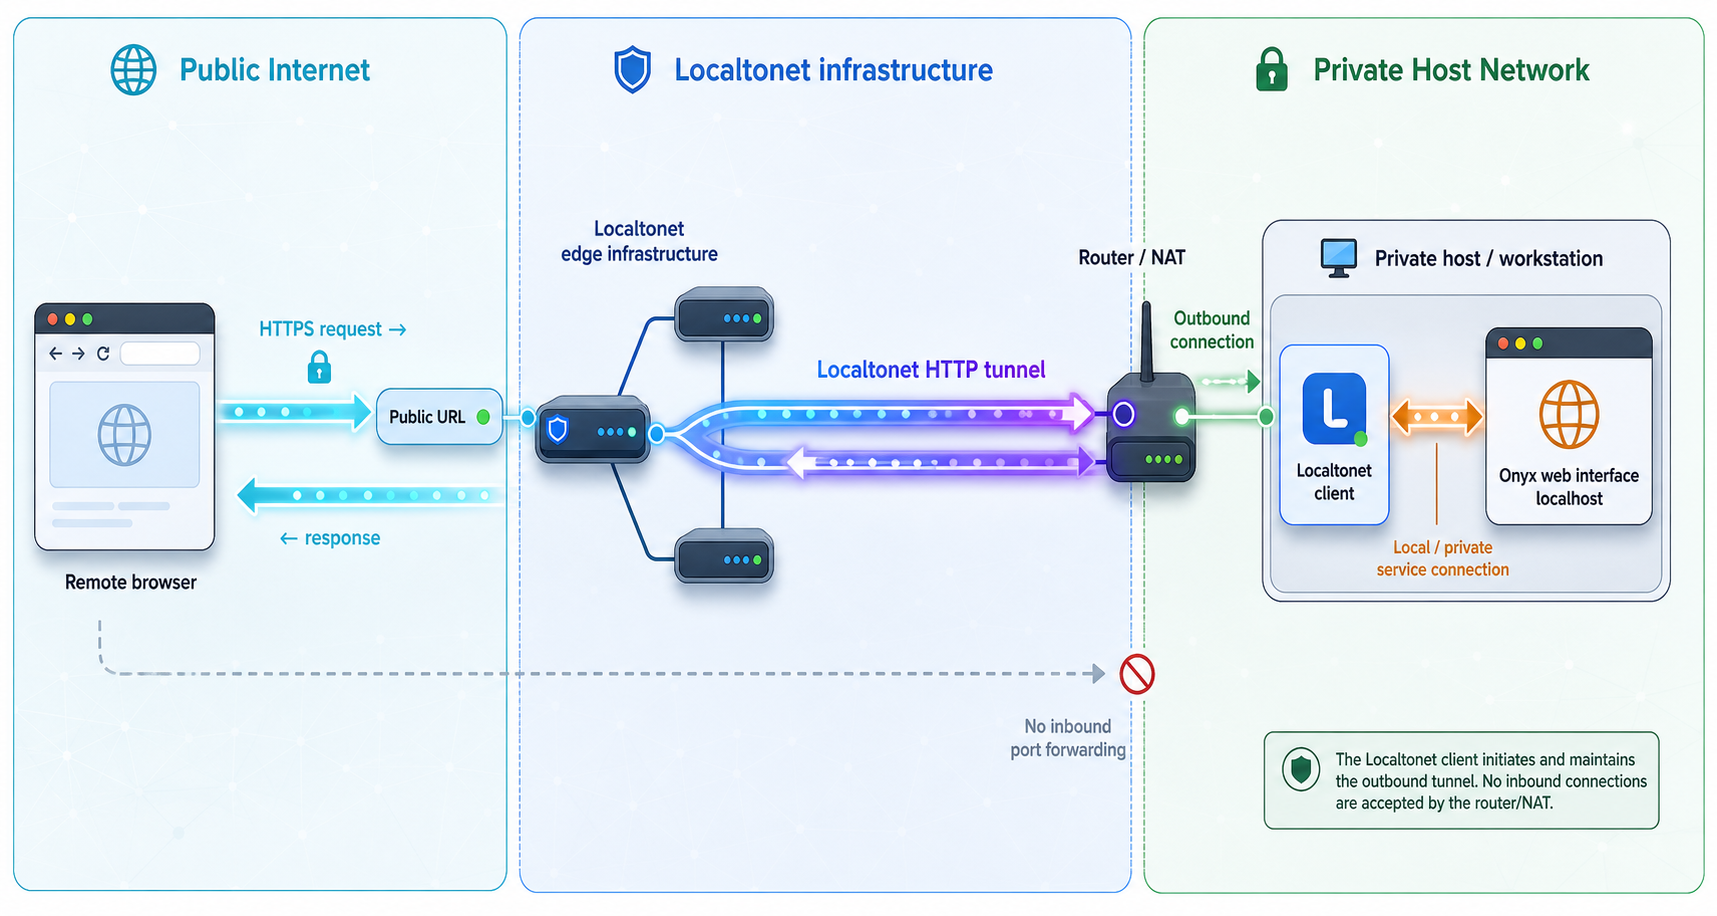
Onyx is the application layer between users, language models, organizational knowledge, and connected applications. Its browser interface supports ordinary LLM conversations and custom agents with their own instructions, knowledge, and actions. Depending on the deployment mode and configuration, Onyx can also provide retrieval-augmented generation, internal search, web search, file handling, code execution, deep research, and integrations through connectors or MCP.
Onyx Community Edition is available under the MIT license and includes the core functionality for chat, RAG, agents, and actions. Onyx also offers an Enterprise Edition with capabilities intended primarily for larger organizations. Enterprise features listed by Onyx include SSO, SCIM-based provisioning and group synchronization, role-based access control for sensitive resources, analytics, query history, custom code controls, and white labeling. Do not assume those Enterprise-only controls are present in a Community Edition installation.
Localtonet has a separate role. We do not install, configure, authenticate, upgrade, or back up Onyx. Our client establishes an outbound connection from a selected device to a Localtonet relay server. An HTTP tunnel then provides a public HTTPS address that forwards requests to the working Onyx IP address and port. This avoids inbound router port forwarding, inbound firewall changes, VPN setup, and the requirement for a public IP address.
Keep these layers separate while deploying. First make the containers healthy. Next verify Onyx directly on the host. If the Localtonet client will run elsewhere, verify Onyx from that device as well. Only then create and start the public tunnel. This sequence prevents an Onyx, database, model-provider, connector, or bind-address problem from being mistaken for a tunneling problem.
Prepare the host and prerequisites
The recommended Onyx quickstart is a guided shell installer that deploys Onyx with Docker Compose and supports both Lite and Standard modes. Use a host where you are authorized to install and operate containers. The host must have enough persistent storage for the application, database, uploaded files, indexes, connector data, and any other state generated by the chosen mode.
Lite is documented as using under 1 GB of memory. That number must not be treated as a Standard production sizing recommendation. Standard adds indexing, connector workers, model inference services, Redis, and MinIO, so its actual CPU, memory, and storage requirements depend on document volume, connector activity, concurrent users, and workload. Review the current Onyx deployment and resourcing guidance before choosing a production host.
Host checklist
- A supported, maintained host on which you can run the official Bash installer.
- A working Docker installation with the Docker Compose command available.
- Sufficient memory for Lite or Standard and enough free disk space for persistent data growth.
- Outbound network access for downloading the installer, container images, updates, and any configured model or connector services.
- Administrative access for installation and a documented account for routine operation.
- A backup destination separate from the active Onyx data.
- A Localtonet-capable device that can reach the final Onyx web endpoint.
- Credentials for the LLM provider or self-hosted model service you intend to use.
Confirm Docker and Compose before running the installer:
docker --version
docker compose version
Both commands should return version information. If either command fails, install or repair Docker using the supported procedure for the host operating system before continuing. The Onyx installer uses Docker Compose, so a functioning Docker daemon and Compose integration are prerequisites rather than optional troubleshooting tools.
Container images are replaceable, but databases, uploaded content, indexes, object data, configuration, and secrets may not be. Keep the Compose project and its persistent volumes under controlled administration. Never use volume-removing commands during ordinary restart or upgrade work unless the current Onyx recovery procedure explicitly requires it and a tested backup exists.
Choose Onyx Lite or Standard
Select the deployment mode according to the features you need, not merely according to the fastest installation path. Lite is a lightweight chat interface for evaluating Onyx or serving teams interested primarily in chat and agents. Standard is the complete platform and is the appropriate choice when the deployment must synchronize connected knowledge and build the indexes used by RAG.
| Capability | Onyx Lite | Onyx Standard |
|---|---|---|
| Primary use | Lightweight chat UI and agents | Complete platform for broader use and larger teams |
| Memory profile | Documented as using under 1 GB of memory | Requires more resources for its additional services |
| LLM chat, tools, uploads, and Projects | Included | Included |
| Vector and keyword index for RAG | Not included | Included |
| Background connector workers | Not included | Included |
| Model inference servers for indexing and inference | Not included | Included |
| Redis and MinIO optimizations | Not part of the reduced Lite stack | Included |
Choose Lite when your immediate goal is to test the user interface, configure an LLM, use tools and uploads, or build agents without deploying the full indexing stack. Choose Standard when you need connected organizational knowledge, vector and keyword retrieval, background connector synchronization, or the other supporting components listed above.
Lite versus Standard describes the deployed stack and its application components. Community Edition versus Enterprise Edition describes licensing and feature availability. A Standard deployment does not automatically include Enterprise-only features such as SSO, SCIM, or RBAC.
Install and configure Onyx
The official quickstart recommends a guided installation command. Run it on the host that will own the Docker Compose deployment. The prompt wording can change as Onyx evolves, but the installer supports selection of Lite or Standard. Read every prompt and record the selected mode, project location, published web endpoint, and any configuration information printed when installation finishes.
Validate the prepared host
Confirm that Docker is running, Docker Compose responds, sufficient disk space is available, and the host can download the required installer and images. Resolve these prerequisites before invoking the Onyx script.
Run the official guided installer
Execute the current command published by Onyx. Run it from an administrative session appropriate for your host and follow your organization's software review and change-control process.
curl -fsSL https://onyx.app/install_onyx.sh | bashSelect Lite or Standard when prompted
Select Lite for the reduced chat and agents stack, or Standard for RAG indexes, connector workers, model inference components, Redis, and MinIO. Do not select Lite if the intended workflow depends on features documented as Standard-only.
Let Docker Compose create the stack
Allow the installer to obtain the required images and start the Compose services. Preserve the final installer output and note the directory containing the generated deployment files. Run later Compose commands from that project directory unless the installer reports a different operating procedure.
Open the default local interface
The Docker Compose quickstart normally publishes the Onyx web interface at http://localhost:3000. Open that address on the Onyx host. If the installer reports a different address or port, its actual output takes precedence and must also be used for the tunnel target.
Complete initial application configuration
Complete the account or administrator setup presented by the installed release, then configure the intended proprietary or self-hosted LLM provider. Onyx supports providers such as OpenAI, Anthropic, Gemini, Ollama, LiteLLM, and vLLM. Use only the providers and credentials authorized for this deployment.
Piping a downloaded script to Bash executes it immediately. The command above is published by Onyx, but administrators should still follow their normal review, approval, package-verification, and change-control requirements. Inspect the current script first if organizational policy does not permit direct remote execution.
Verify Onyx locally before publishing it
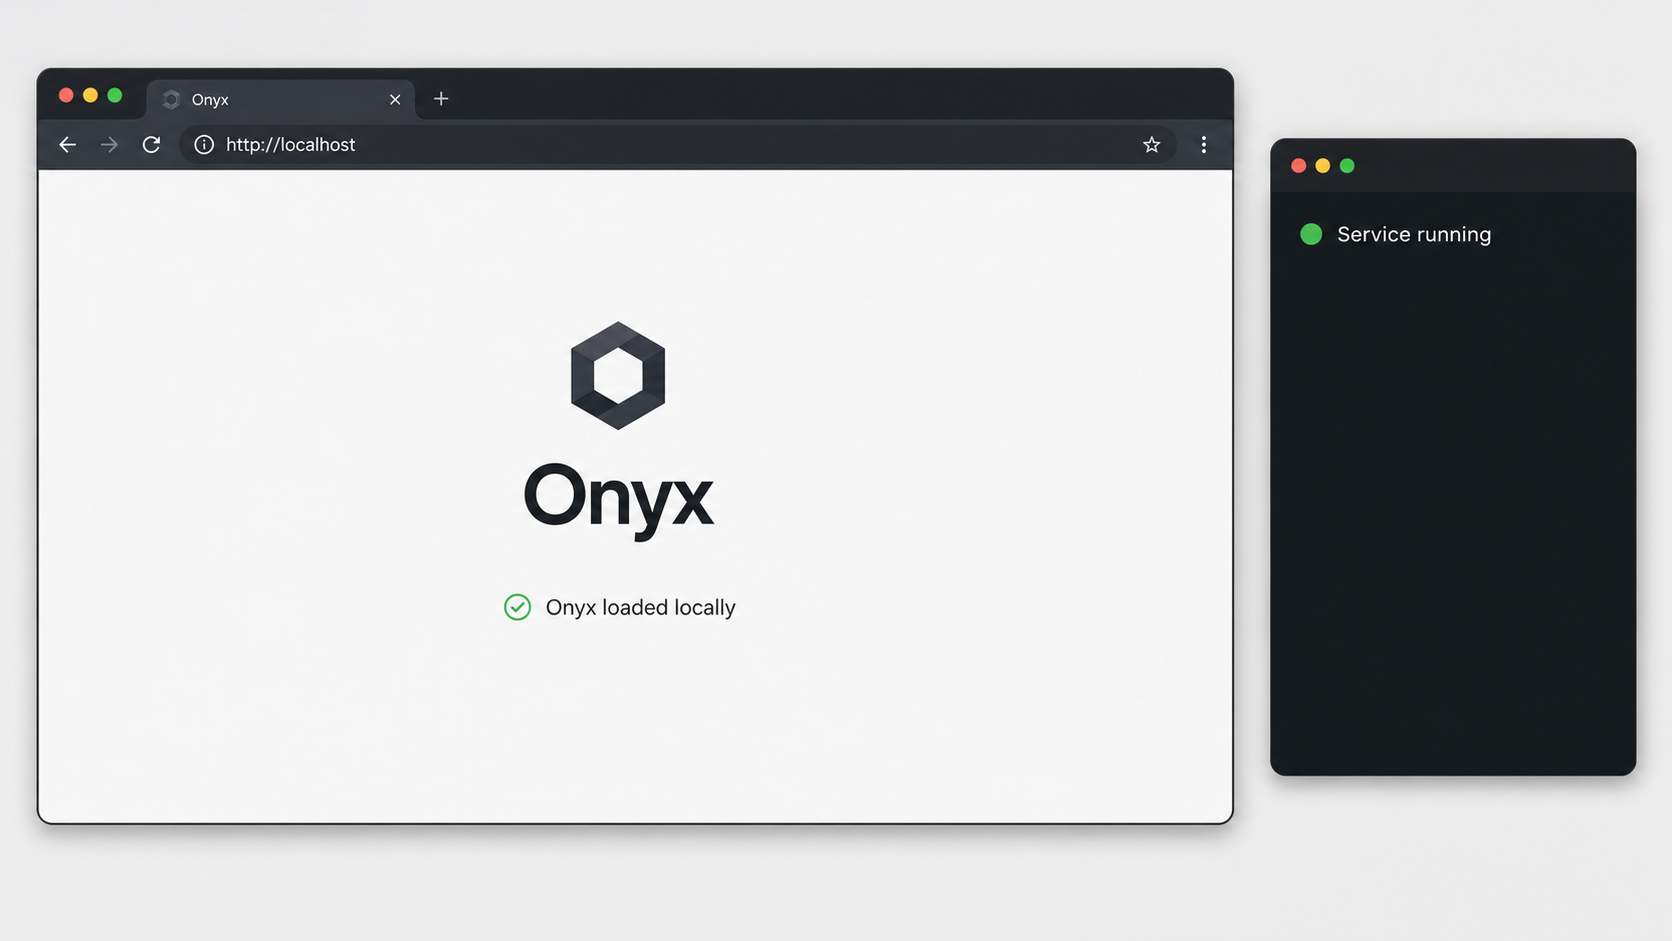
Start verification from the Compose project directory created by the installer. The exact service list differs between Lite and Standard, so discover the deployed service names rather than copying names from another installation.
docker compose config --services
docker compose ps
The first command lists the services defined by the active Compose configuration. The second reports their current state and published ports. Look for containers that are restarting, exited, unhealthy, or missing. Some supporting services may need time to initialize, so review logs before assuming a slow startup has permanently failed.
Test the default local endpoint directly from the Onyx host:
curl -I http://127.0.0.1:3000
An HTTP response confirms that something is listening and responding on the expected local endpoint. A redirect can be normal for a web application, but a connection refusal, timeout, or repeated server error needs to be resolved before tunneling. If the installer published a different port, replace 3000 with that verified port.
Next open http://localhost:3000 in a browser on the host. Complete these practical checks:
- The page loads without a browser connection error.
- The sign-in or initial setup flow behaves as expected.
- A configured user can authenticate.
- The application remains available after a refresh.
- A basic chat request reaches the configured model provider.
- For Standard mode, required knowledge or connector workflows can be configured without a supporting-service error.
A successful login does not prove that the complete application is healthy. Chat failures after login can result from model-provider configuration, unavailable self-hosted models, invalid provider credentials, rate limits, or supporting-service problems. Connector and RAG failures can belong to synchronization workers, indexes, object storage, or external connector authorization. Test the feature locally before involving the public tunnel.
If the Localtonet client will run on a different LAN device, test the Onyx endpoint from that device too. An application bound only to 127.0.0.1 is reachable from the Onyx host but not from another machine. Use the Onyx host's reachable private address and verified published port only when the service is intentionally listening on an appropriate interface and host firewall policy permits that LAN connection.
Use 127.0.0.1 as the tunnel target only when the Localtonet client runs on the same host as Onyx. If the client runs on another device, its own 127.0.0.1 refers to that device, not the Onyx server.
Start, restart, inspect, back up, and upgrade Onyx
Routine operation should use the Compose project produced by the installer. Run commands from its project directory so Docker Compose reads the correct configuration and environment. Record that directory in the system runbook instead of relying on an administrator's shell history.
Inspect status and logs
docker compose ps
docker compose logs --tail=200
Use docker compose ps to see service state and published ports. Use the logs command to inspect recent messages across the stack. To follow new events while reproducing a problem, use:
docker compose logs --followAvoid posting complete logs publicly. They can contain usernames, document names, internal hostnames, request details, connector information, or other sensitive operational data. Redact secrets and private identifiers before sharing a focused excerpt.
Restart without deleting data
Restart the existing containers with:
docker compose restartIf the stack is stopped but still configured, start it in the background with:
docker compose up -d
A normal Compose restart should not remove persistent volumes. Do not append volume-deletion options during ordinary maintenance. After any restart, repeat docker compose ps, inspect logs, and open the local Onyx URL before testing the Localtonet address.
Understand persistence
Use the rendered Compose configuration to identify mounted volumes, bind mounts, environment files, and published ports:
docker compose configTreat the generated configuration, database state, object data, uploaded content, indexes, and credentials as deployment state. Container images alone are not a backup. Recreating containers from images does not recover data that was stored in a removed volume or an unprotected host directory.
Back up before maintenance
A usable backup plan must cover the persistent resources identified by the active Compose configuration and any separately managed secrets or configuration. Use the backup procedure documented for the installed Onyx release and the relevant data service. Store backups outside the active host, restrict access to them, and test restoration on an isolated system.
At minimum, record the installed Onyx version, selected deployment mode, Compose files, environment configuration, volume inventory, configured external services, and restoration sequence. A copied configuration without the corresponding persistent data is incomplete, while copied data without its matching configuration and version may be difficult to restore safely.
Upgrade deliberately
Read the release notes for every version between the installed and target releases before changing images. Do not assume that every version can be skipped safely. Onyx release notes can contain mandatory migration instructions. For example, the v4.6.3 release warns administrators not to upgrade when they need to preserve existing indexed documents unless the required document-index migration has already been run from an eligible v3.x version.
Before an upgrade, verify a restorable backup, record current container health, capture the installed version, and schedule an interruption if required. Follow the exact upgrade and migration procedure for the installed deployment path. Afterward, verify service health, logs, authentication, chat, provider access, connectors, retrieval, and the local URL before reopening or restarting the public tunnel.
A container image may start even when application data still requires migration. Treat release-specific migration warnings as blocking requirements. If an upgrade fails, stop changing the deployment, preserve the current state and logs, and follow the documented rollback or restore procedure for the versions involved.
Publish Onyx with a Localtonet HTTP tunnel
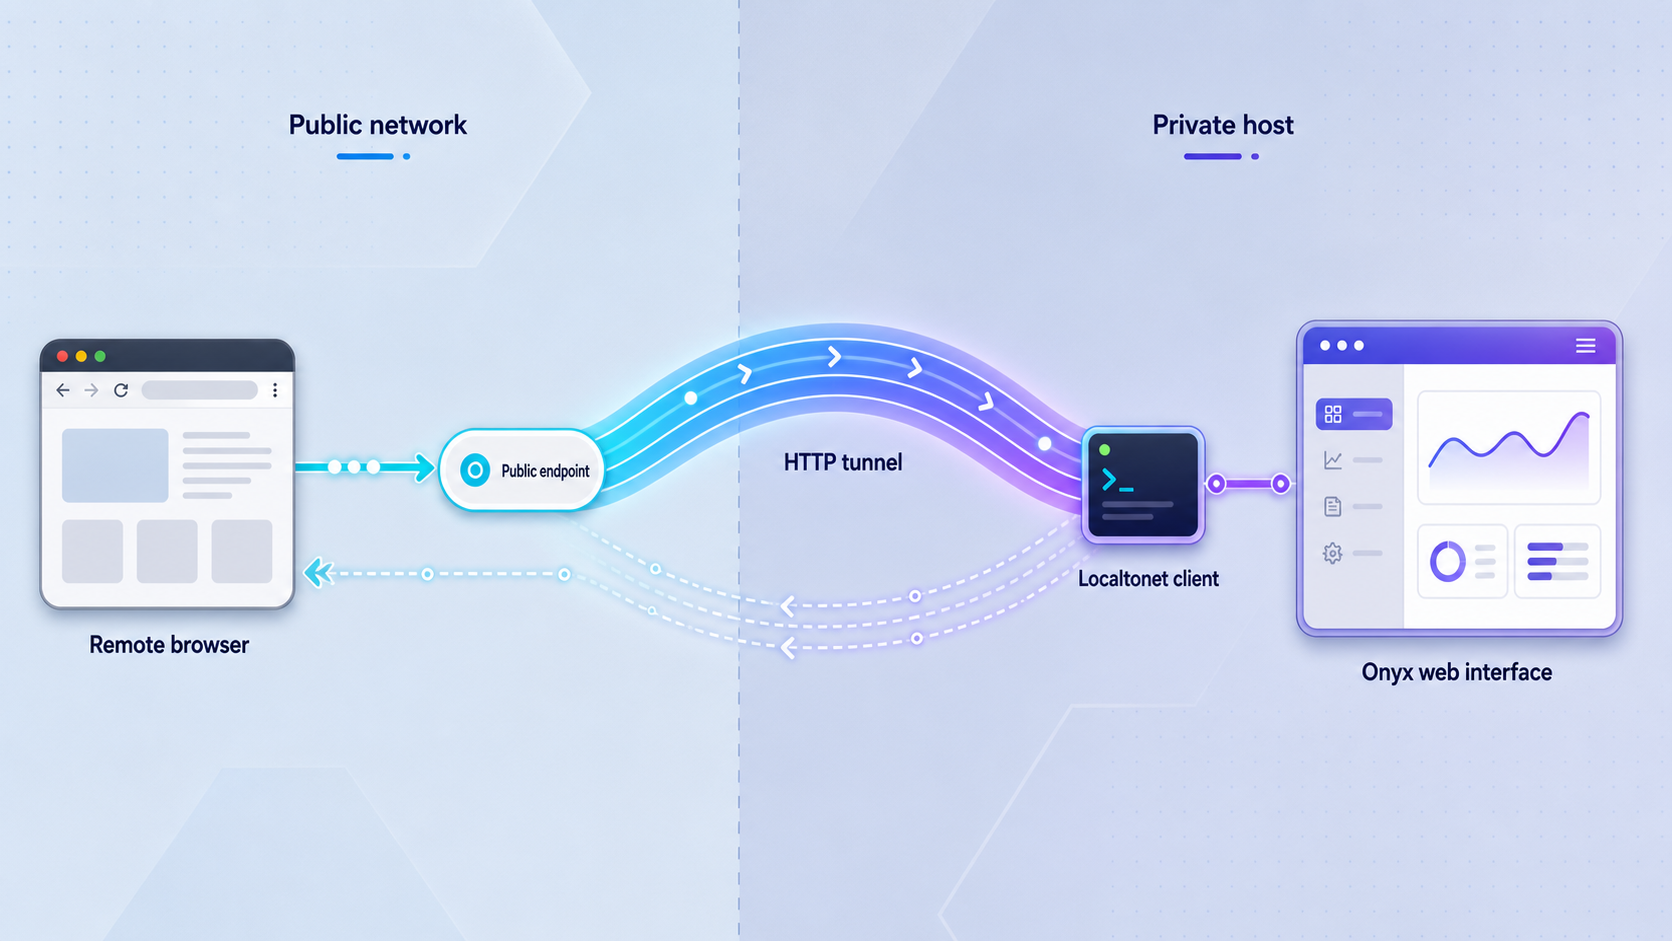
Configure Localtonet only after Onyx passes local verification. Follow the Localtonet HTTP tunnel documentation alongside the sequence below. Current server choices and availability must come from the dashboard rather than from a hardcoded region or server code.
Install and run the Localtonet client
Install our client on the Onyx host or on another device that can reach the verified Onyx endpoint. Start the client so the device establishes its outbound connection to our platform.
Select the device authentication token
In the HTTP tunnel configuration, select the device-specific token for the client that will carry the traffic. Treat the token as a secret. Do not expose it in screenshots, logs, repositories, documentation, or support messages.
Select an available relay server
Choose an available server or region from the current Localtonet dashboard. Available values can vary by product configuration, so do not copy a server code from an older tutorial.
Create the HTTP tunnel and map the local target
Select the required Process Type and enter the Onyx local IP address and port. Use the endpoint already proven from the Localtonet client device. Random Sub Domain, Custom Sub Domain, and Custom Domain all publish HTTP or File Server content at a public HTTPS address, but option availability and custom-domain requirements can vary.
Start the tunnel
Creating the configuration does not make it run. Press Start and confirm that the selected client remains connected. Copy the assigned public URL only after the tunnel reports its running state.
Test remotely and stop access when finished
Open the public URL from a separate network when possible. Confirm that the expected Onyx authentication appears and test an authorized workflow. Stop the tunnel when temporary access ends, or delete it when the configuration is no longer needed.
Map the Onyx endpoint field by field
| Localtonet field or choice | Same-host Onyx example | How to verify it |
|---|---|---|
| Tunnel family | HTTP tunnel | Onyx is a browser-based web application reached through HTTP locally. |
| Local IP address | 127.0.0.1 |
Use this only if Localtonet and Onyx run on the same host and the local URL succeeds there. |
| Local port | 3000 |
Confirm it in installer output, docker compose ps, and a local browser or curl request. |
| Device token | The token for the running client | Select the actual connected device and never copy a token into public material. |
| Relay server | A currently available dashboard selection | Use the dashboard value instead of a hardcoded example. |
| Process Type | Random, custom subdomain, or custom domain | Select the appropriate currently available option and follow current domain requirements. |
If the Localtonet client runs on another LAN device, replace 127.0.0.1 with the reachable private address of the Onyx host. Before saving the tunnel, open that address and port from the client device itself. If the request fails there, changing Localtonet settings cannot make the local service reachable.
A saved tunnel is not necessarily running. The public endpoint is available only while the selected client device is connected and the tunnel has been started. Stop or delete the tunnel when the exposure is no longer required.
Secure Onyx before and after exposure
A public tunnel changes network reachability. It does not replace Onyx authentication, authorization, secure configuration, updates, backups, or monitoring. Configure and test the available authentication flow before starting the tunnel. Do not rely on an unlisted URL as a secret.
Apply least privilege
Create only the users and administrators required for the deployment. Separate routine use from administration where the installed edition supports that separation. Community Edition includes core application functionality, but Enterprise-only SSO, SCIM, and RBAC must not be assumed in a Community deployment. If the available edition cannot express a required access policy, do not compensate by leaving the application broadly accessible.
Protect providers, connectors, and internal knowledge
Model-provider API keys, connector credentials, OAuth tokens, database credentials, Localtonet device tokens, and internal service addresses are secrets. Do not place them in public repositories, screenshots, browser-visible configuration, shell examples, or copied logs. Restrict access to environment and Compose configuration files, rotate exposed credentials, and remove unused integrations.
Validate the public origin
Some web applications need a configured public URL, trusted origin, callback URL, cookie setting, or proxy-aware configuration when placed behind an external HTTPS address. Whether Onyx requires such a setting depends on the installed release and enabled authentication or integration. If login redirects, OAuth callbacks, cookies, generated links, or browser requests use the local address after tunneling, check the current Onyx configuration documentation for the supported public-URL or trusted-origin setting. Do not invent an environment variable or disable origin protections to suppress the error.
Maintain updates and backups
Track Onyx release notes and the container runtime's security updates. Back up persistent application state before upgrades and test restoration. Keep the Localtonet client updated through the current supported installation path. After maintenance, verify locally first and start the public tunnel only after the application is healthy.
Limit the exposure window
If remote access is needed only for a demonstration, support session, or temporary collaboration, stop the tunnel afterward. For ongoing access, monitor application behavior, remove inactive users, review connected services, and maintain a documented shutdown procedure. If compromise is suspected, stop the tunnel, revoke affected credentials, preserve relevant logs, and investigate the local deployment before restoring access.
Complete the initial administrator and authentication configuration locally. Remove test accounts and sample credentials, protect model and connector secrets, and confirm that an unauthenticated remote browser cannot obtain access beyond the intended sign-in flow.
Troubleshoot Onyx and Localtonet in layers
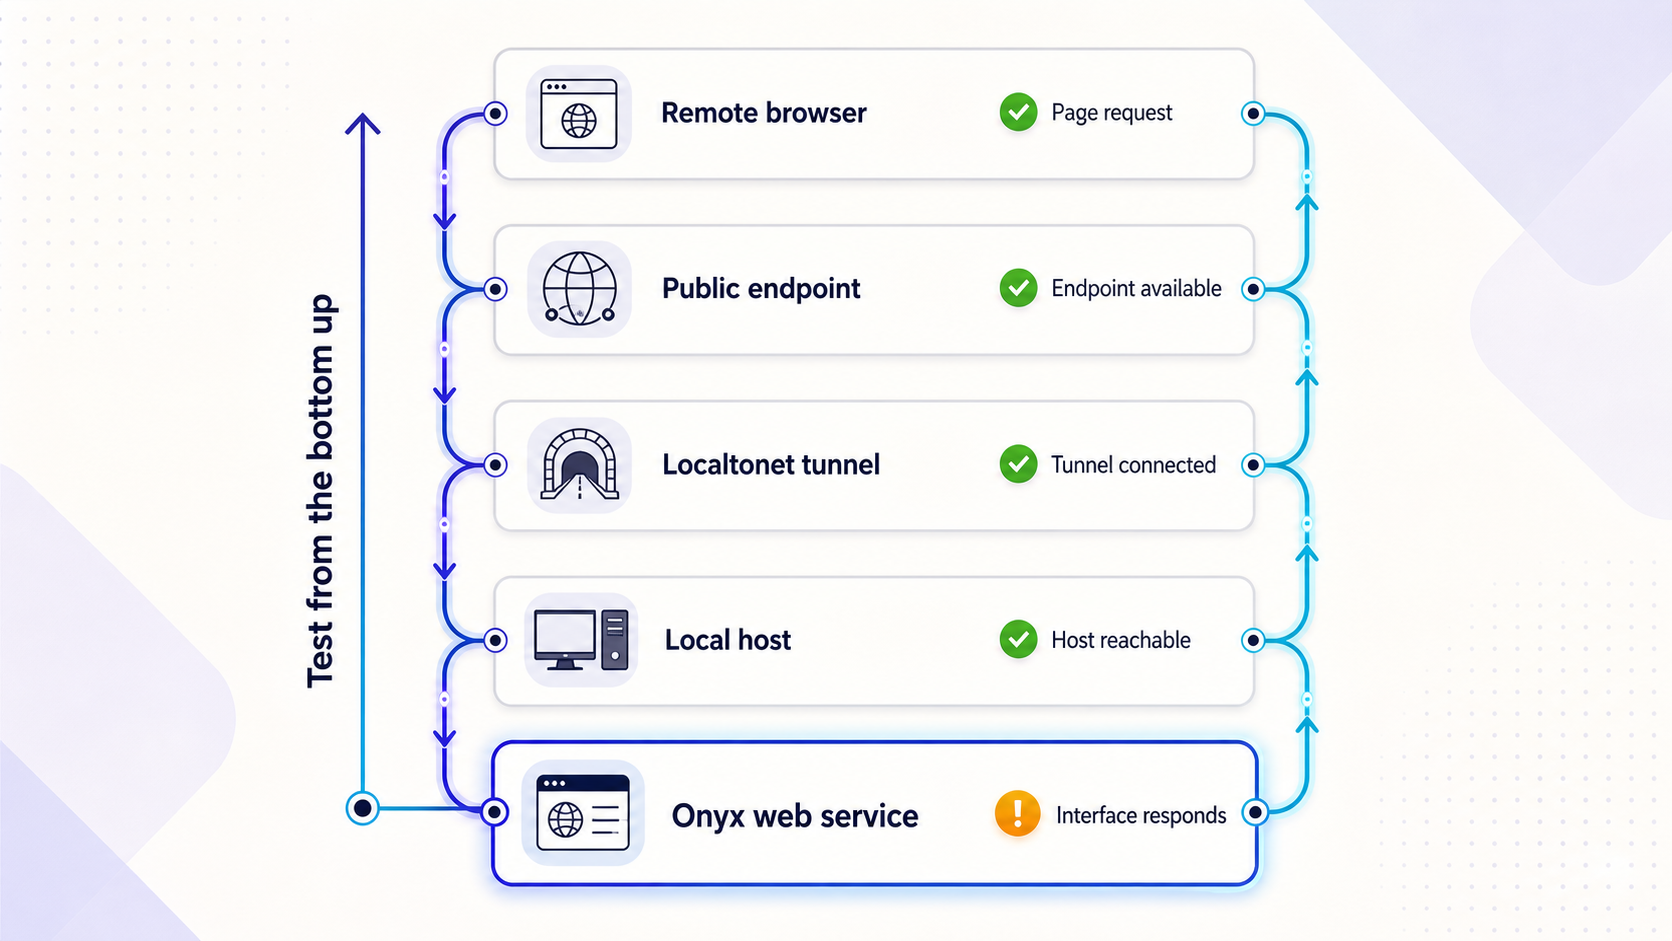
1. Check container state
docker compose ps
docker compose logs --tail=200
Investigate exited, restarting, or unhealthy services. Look for database initialization errors, unavailable dependencies, port conflicts, invalid configuration, storage failures, or migration messages. Use docker compose config --services to obtain valid service names before requesting logs for an individual component.
2. Check the local HTTP endpoint
curl -I http://127.0.0.1:3000
A connection refusal usually means the service is not listening on that address and port, has not finished starting, or has failed. A timeout can indicate a networking or firewall issue. An HTTP server error indicates that the route is reachable but the application needs investigation. Confirm the published port with docker compose ps rather than repeatedly retrying an assumed port.
3. Check port binding and client location
If Onyx works at 127.0.0.1:3000 on its host but Localtonet runs on another device, test the Onyx host's private LAN address from the Localtonet device. A loopback-only listener cannot be reached remotely. Adjust binding and firewall settings only through supported Onyx and host procedures, and expose no broader interface than the design requires.
4. Check the Localtonet client and target
Confirm that the dashboard shows the intended device as connected. Verify that the tunnel uses that device's token, the current relay selection, and the exact IP address and port proven from that client. A target of 127.0.0.1:3000 is correct only for a client running on the Onyx host.
5. Check the tunnel lifecycle
Confirm that the tunnel was started rather than merely created. If it previously worked, verify that the Localtonet client process is still running and that the host still has outbound connectivity. Restarting Onyx alone does not start a stopped Localtonet tunnel, and starting the tunnel does not repair failed Onyx containers.
6. Diagnose failures after login
If the public login page appears but chat fails, repeat the same chat locally. If both fail, inspect Onyx and provider configuration. Check whether the configured LLM service is reachable and whether its credential remains valid. If only the public workflow fails, inspect browser redirects, callback URLs, cookies, public-origin configuration, and requests that still reference a private hostname.
If connectors or RAG fail in Standard mode, inspect the relevant Onyx logs and supporting services. Confirm that the issue also occurs locally, that the connector's authorization remains valid, and that required background services are running. Localtonet forwards web traffic to Onyx; it does not repair connector permissions, rebuild indexes, or supply model-provider access.
7. Recover carefully
Avoid deleting containers, volumes, or deployment directories as a first troubleshooting step. Preserve logs and current configuration, identify the failed layer, and use the documented recovery path for the installed release. If data integrity is uncertain, stop writes, protect the current volumes, and restore into an isolated environment before replacing the active deployment.
| Symptom | Likely layer | First check |
|---|---|---|
| Local URL refuses the connection | Container, published port, or application startup | Run docker compose ps and inspect recent logs. |
| Onyx works on its host but not from the client device | Bind address, LAN routing, or host firewall | Test the Onyx host's private address from the Localtonet device. |
| Dashboard shows the device disconnected | Localtonet client or outbound connectivity | Confirm that the selected client is running and connected. |
| Tunnel exists but the URL is unavailable | Tunnel lifecycle | Confirm that Start was pressed and the tunnel is running. |
| Login works but chat fails everywhere | Onyx or model provider | Test locally and inspect provider configuration and Onyx logs. |
| Login redirects to localhost or cookies fail publicly | Public URL, trusted origin, or authentication callback | Check the installed release's supported public-origin configuration. |
Frequently asked questions
What local URL does the Onyx Docker Compose quickstart use?
The quickstart normally publishes Onyx at http://localhost:3000. Confirm the endpoint in the current installer output and with docker compose ps. If your deployment reports a different port, use that verified value for local testing and the Localtonet target.
Should I install Onyx Lite or Standard?
Choose Lite for a lightweight chat and agents deployment with tools, uploads, and Projects. Choose Standard when you need vector and keyword RAG indexes, connector synchronization workers, model inference components, Redis, and MinIO.
Does Standard include Enterprise SSO and RBAC?
Not automatically. Standard is a deployment mode, while Community and Enterprise are editions. Onyx lists SSO, SCIM, and role-based access control among its Enterprise capabilities. Verify edition requirements before designing an access-control policy around those features.
Can the Localtonet client run on another computer?
Yes, if that computer can reach the Onyx web endpoint. In that layout, use the reachable private address of the Onyx host rather than 127.0.0.1, and test the address directly from the Localtonet device before creating the tunnel.
Do I need router port forwarding or a public IP address?
No. Our client establishes an outbound connection to a Localtonet relay server. The HTTP tunnel can provide a public URL without inbound router port forwarding, inbound firewall changes, VPN setup, or a public IP address.
Does creating a Localtonet tunnel immediately publish Onyx?
No. Creating and starting are separate actions. The selected client must be connected and the tunnel must be running before the public URL forwards requests. The endpoint stops forwarding when the tunnel is stopped or the client disconnects.
Does Localtonet replace Onyx authentication?
No. Localtonet supplies network reachability. Onyx remains responsible for user authentication, application authorization, model and connector credentials, and access to organizational knowledge. Configure and test those controls before starting the tunnel.
What should I back up before upgrading Onyx?
Back up the persistent resources identified by the active Compose configuration, along with the deployment configuration and separately managed secrets required for restoration. Follow the backup and migration procedure for the installed Onyx release, store the backup away from the active host, and test recovery before relying on it.
Publish your verified Onyx interface with Localtonet
Deploy Onyx, confirm its containers and local URL, configure authentication, and then map the verified IP address and port to an HTTP tunnel from a connected Localtonet device. Start the tunnel only when remote access is appropriate, and stop it when the exposure is no longer required.
Get Started Free →

