

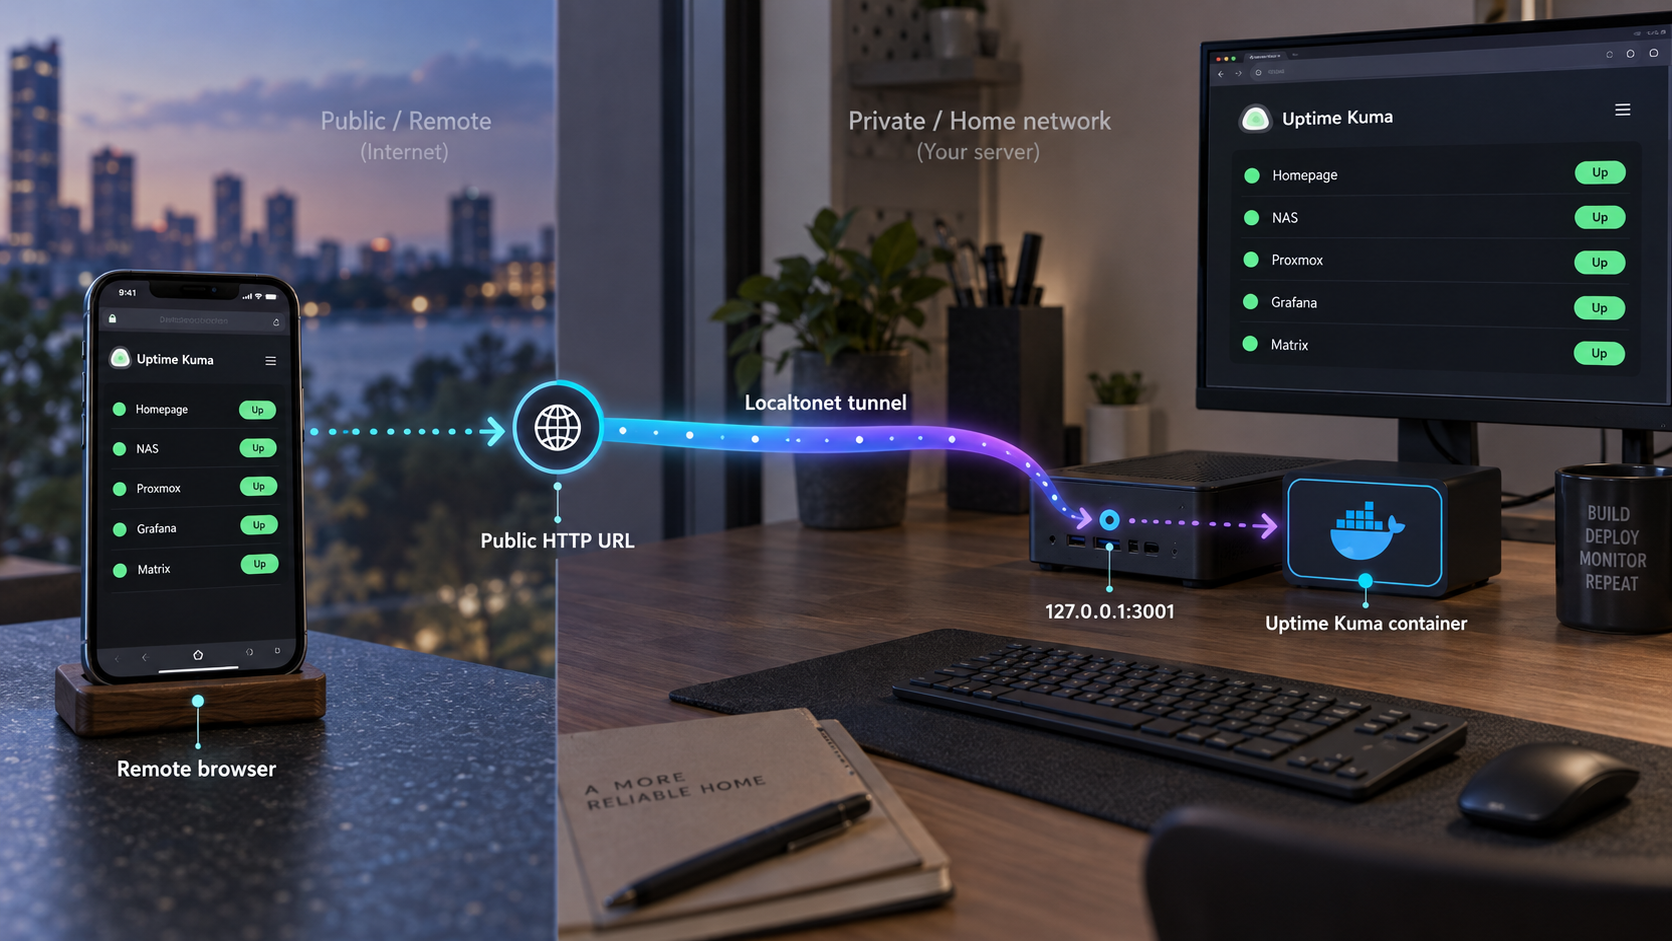
Run your own monitoring dashboard locally, then reach it through a controlled HTTP tunnel
Uptime Kuma is a self-hosted monitoring application with a browser-based dashboard, configurable monitors, notifications, and status pages. In this guide, we install Uptime Kuma 2 with Docker, preserve its application data in a Docker volume, bind the published port to localhost, and verify the dashboard before introducing remote access. Once the local service works, we connect it to an HTTP tunnel with Localtonet so the dashboard can be reached without opening an inbound router port or assigning the host a public IP address.
📋 What's in this guide
How this Uptime Kuma and Localtonet setup works
Uptime Kuma is an open-source, self-hosted monitoring tool. It can monitor HTTP and HTTPS services, raw TCP endpoints, keywords and JSON queries in HTTP responses, WebSocket services, ping targets, DNS records, push monitors, supported game servers, and Docker containers. It also provides notification integrations, multiple status pages, certificate information, proxy support, two-factor authentication, and monitoring intervals as short as 20 seconds.
The application presents its management interface through an HTTP service on port 3001. A standard Docker deployment publishes that container port on the host, which makes the dashboard available at http://localhost:3001. If Docker publishes the port on every network interface, it can also be available through an address such as http://your-ip:3001.
This guide deliberately uses a narrower binding: 127.0.0.1:3001. That tells Docker to publish the service only on the host's IPv4 loopback interface. Other computers cannot connect directly to the host's LAN address on port 3001 when this binding is functioning as intended. A Localtonet client running on the same host can still reach the dashboard through 127.0.0.1:3001 and relay it through an HTTP tunnel.
louislam/uptime-kuma:2 image while a named volume preserves data outside the container's writable layer.
127.0.0.1:3001:3001 limits direct host access to processes running on that machine, which fits a same-host tunnel deployment.
Request path
During local testing, the request path is simply your browser to http://localhost:3001. After the tunnel is running, a remote browser uses the public HTTPS address assigned to the HTTP tunnel. The Localtonet relay passes the connection to the client on your Uptime Kuma host, and the client connects to the local HTTP target at 127.0.0.1:3001.
The Docker container, the Uptime Kuma service, the Localtonet client, and the HTTP tunnel all have independent lifecycles. Creating a tunnel does not start the Uptime Kuma container, and creating the tunnel configuration does not mean that the tunnel itself is running. The container must be operational, the Localtonet client must be connected, and the tunnel must be started.
The target 127.0.0.1:3001 works when the Localtonet client runs directly on the same host where Docker publishes Uptime Kuma. If our client runs on another computer, 127.0.0.1 refers to that other computer, not the Docker host. A separate-host deployment requires Uptime Kuma to listen on an address reachable from the client, along with appropriate host firewall and network controls.
Prerequisites and deployment decisions
Complete the following checks before starting. They prevent the most common problems: using an unavailable port, losing application data, publishing the dashboard more broadly than intended, or pointing the tunnel at the wrong machine.
Docker requirements
Install a current Docker environment appropriate for your operating system. The direct command in this guide needs a functioning Docker Engine and permission to create containers, images, ports, and volumes. If your account does not have permission to communicate with the Docker daemon, run Docker using the privilege model recommended for your operating system rather than changing permissions indiscriminately.
Confirm that Docker is running before continuing:
docker versionThe command should return information for the Docker client and server. If it reports that it cannot connect to the daemon, start Docker and resolve that issue before attempting to launch Uptime Kuma.
Port and storage requirements
This deployment uses host port 3001. That port must not already be occupied on 127.0.0.1. The command also creates a named Docker volume called uptime-kuma and mounts it at /app/data inside the container. Uptime Kuma stores its persistent application data there.
Uptime Kuma's documented Docker guidance warns that NFS file systems are not supported for its application data. Use a local directory or Docker volume backed by supported local storage. Do not move the data path to an NFS share simply because the container starts successfully. Filesystem behavior can affect the application's database and reliability.
Localtonet requirements
For the remote-access stage, install and run the Localtonet client on the Docker host. You also need a device-specific authentication token selected through our platform and an available relay server or region from the current dashboard. Tokens must be kept private. Available relay choices can vary, so this guide does not hardcode a server code or region.
You can create the Uptime Kuma deployment and complete all local verification before setting up Localtonet. That order is intentional. If the application does not work locally, adding a tunnel creates another diagnostic layer without fixing the underlying container or service.
| Installation path | Requirements | When to choose it | Important behavior |
|---|---|---|---|
| Docker command | Docker Engine | A concise deployment with an explicit port binding and named volume | Can publish port 3001 specifically on 127.0.0.1 |
| Docker Compose | Docker with Compose support, plus curl for the documented download command |
A file-based container definition that can be inspected and retained | The documented Compose setup exposes Uptime Kuma on all network interfaces |
| Non-Docker | Node.js 20.4 or newer, Git, npm, and optionally PM2 | Hosts where running the project directly is preferred | The documented startup also listens on all network interfaces |
The project documents all three approaches. This article uses the direct Docker command because it provides a complete, evidence-backed way to specify the localhost-only port mapping without assuming the contents of a Compose file. The Compose and non-Docker alternatives are summarized later for readers who need a different installation model.
Install Uptime Kuma with Docker
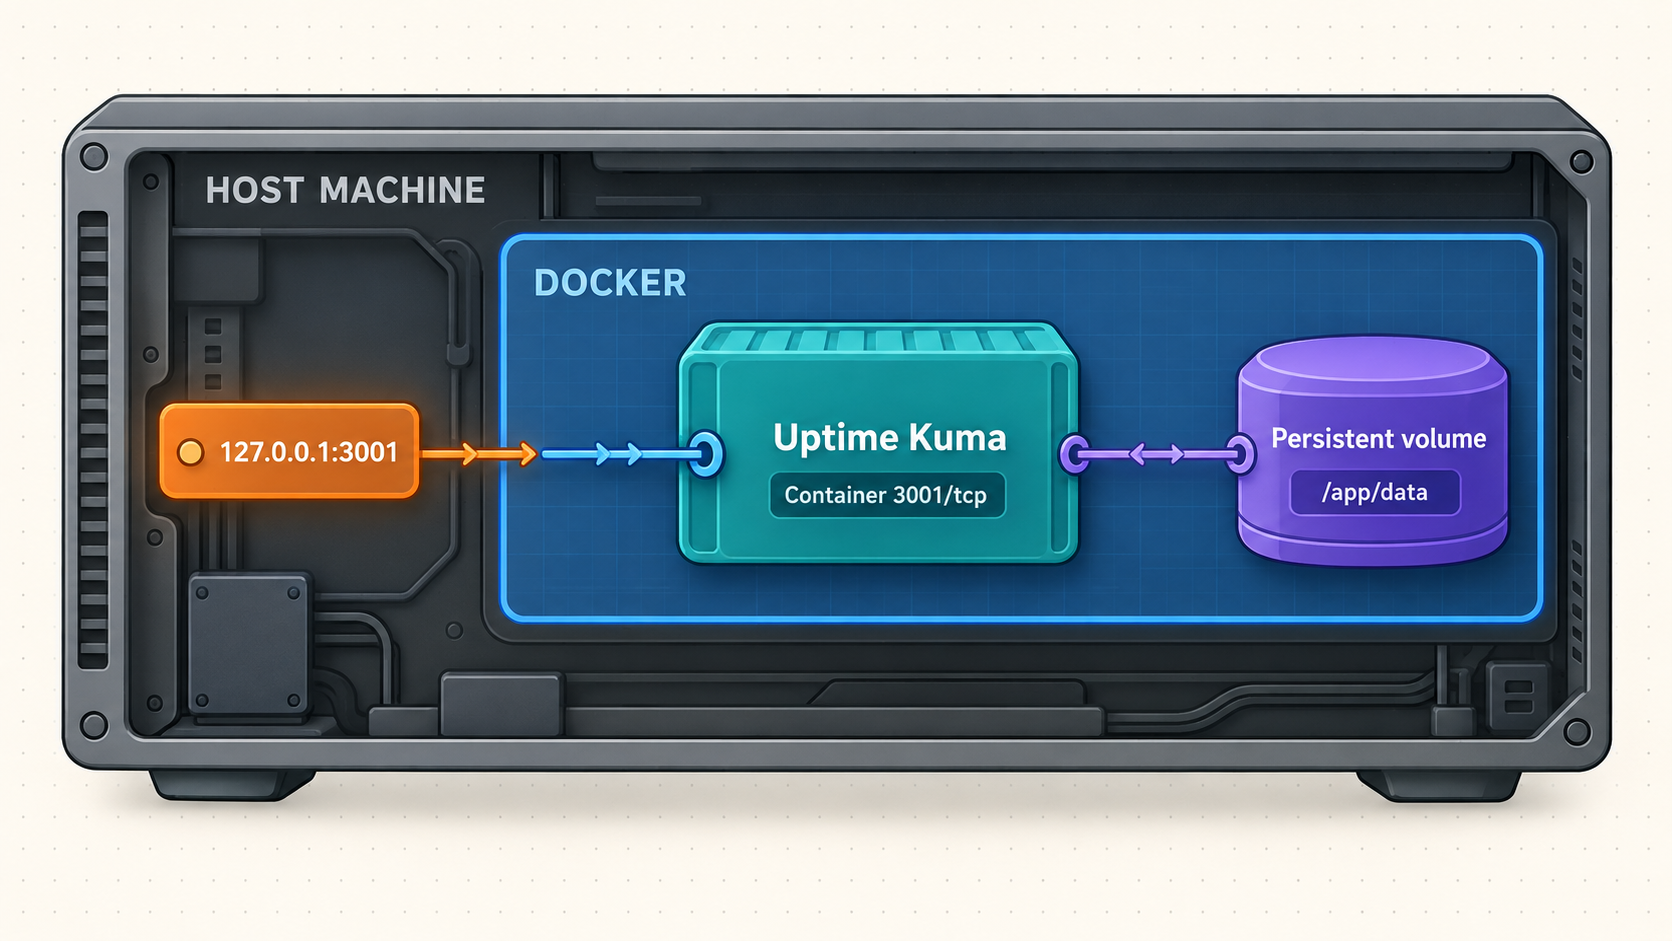
The following installation uses the official major-version image tag, configures automatic container restarts, publishes the dashboard only on IPv4 localhost, and creates persistent storage.
Confirm Docker is available
Run docker version and verify that the command can communicate with the Docker server. Resolve daemon, service, or permission errors before proceeding.
Start the Uptime Kuma container
Run the documented Uptime Kuma 2 image with a named data volume and bind the published port to 127.0.0.1. Docker downloads the image if it is not already present.
Check the container state
Confirm that the container named uptime-kuma is running. If it exits or repeatedly restarts, inspect its logs before trying to configure remote access.
Open the local dashboard
On the Docker host, open http://localhost:3001. Complete the application's on-screen initial setup and keep the management credentials private.
Start the container with this command:
docker run -d --restart=always -p 127.0.0.1:3001:3001 -v uptime-kuma:/app/data --name uptime-kuma louislam/uptime-kuma:2Each option has a specific role:
-dstarts the container in detached mode so it continues running in the background.--restart=alwaysconfigures Docker to restart the container according to Docker's always-restart policy.-p 127.0.0.1:3001:3001maps host loopback port 3001 to container port 3001.-v uptime-kuma:/app/datamounts the named volume at Uptime Kuma's persistent data location.--name uptime-kumaassigns a predictable container name for later operations.louislam/uptime-kuma:2selects the official Uptime Kuma image and its major version 2 tag.
Check whether the container is running:
docker ps --filter name=uptime-kumaIf it is not listed as running, include stopped containers in the output:
docker ps -a --filter name=uptime-kumaReview startup output when the container exits, restarts, or does not serve the dashboard:
docker logs uptime-kuma
The uptime-kuma volume contains persistent application data. Removing and recreating only the container is different from deleting the volume. Before any destructive storage operation, make sure you understand the effect and have a suitable backup. A new container using the same compatible volume can retain data, while deleting the volume removes that persistence layer.
Docker Compose alternative
Uptime Kuma also documents a Compose installation. The documented sequence creates a directory, downloads the project's current compose.yaml, and starts the service:
mkdir uptime-kuma
cd uptime-kuma
curl -o compose.yaml https://raw.githubusercontent.com/louislam/uptime-kuma/master/compose.yaml
docker compose up -d
According to the project documentation, this standard Compose configuration makes Uptime Kuma available on all network interfaces, including http://localhost:3001 and http://your-ip:3001. That is broader than the loopback-only objective in this guide. Inspect the downloaded file and its port publication before using it on an untrusted network. Because the upstream file can change over time, we do not reproduce or guess a modified Compose definition here.
Non-Docker alternative
The project also supports a direct installation on major Linux distributions and on supported 64-bit Windows versions. Its documented prerequisites are Node.js 20.4 or newer, Git, npm, and PM2 when the service should run in the background. FreeBSD, OpenBSD, NetBSD, Replit, and Heroku are listed as unsupported for this installation path.
The documented setup and foreground startup commands are:
git clone https://github.com/louislam/uptime-kuma.git
cd uptime-kuma
npm run setup
node server/server.js
For background operation, the project recommends PM2:
npm install pm2 -g && pm2 install pm2-logrotate
pm2 start server/server.js --name uptime-kuma
PM2 can display current output with pm2 monit. The documented command for adding the process to startup and saving the PM2 process list is:
pm2 startup && pm2 saveThat path is useful when Docker is not appropriate, but the remainder of this guide assumes the Docker container and loopback port mapping shown above.
Complete the initial Uptime Kuma configuration
Open http://localhost:3001 in a browser on the Docker host. On a headless server, use an approved local administration method to access the host without exposing port 3001 prematurely. The exact setup screens can change between Uptime Kuma releases, so follow the labels displayed by the installed version rather than relying on screenshots from another release.
Complete the on-screen initialization and create strong, unique management credentials. Uptime Kuma supports two-factor authentication, and enabling it is advisable before making the dashboard reachable from the public internet. Store recovery information through your normal credential-management process.
Create a first monitor
A monitoring installation is not fully verified merely because its login page opens. Create at least one monitor for a target that the Uptime Kuma container can actually reach. Select a monitor type appropriate for the target, enter its required details, and review the resulting status and response history.
Remember that Docker gives the container its own network context. Inside a typical container, localhost refers to the container itself. It does not automatically refer to another service running on the Docker host or to a different container. If a monitor for a host service fails while the same address works in a host browser, verify that the target address is meaningful and reachable from the Uptime Kuma container.
Start with a simple target whose expected behavior you already know. This separates Uptime Kuma installation problems from target-specific DNS, routing, certificate, authentication, or firewall problems. After that first monitor behaves correctly, add production targets one at a time.
Configure notifications deliberately
Uptime Kuma supports many notification services, including Telegram, Discord, Gotify, Slack, Pushover, and email through SMTP. Notification integrations can contain webhook URLs, account details, or other secrets. Treat those values as credentials, restrict access to the Uptime Kuma administration interface, and avoid placing secret values in screenshots or public status pages.
Test an integration using the controls offered by the installed version before relying on it operationally. A monitor can detect an outage correctly while its notification delivery fails because of an unrelated DNS, authentication, or outbound connectivity issue.
Separate management views from public status pages
Uptime Kuma supports multiple status pages, including mapping status pages to specific domains. A status page and the administrative dashboard have different audiences. Decide whether remote users need administrative access, a read-only public status view, or both. Do not expose the management interface merely to share service health if a status page satisfies the requirement.
A loopback Docker binding prevents direct LAN access to port 3001, but starting an HTTP tunnel intentionally creates a public route to that local service. Finish the Uptime Kuma account setup, use a unique password, enable supported account protections such as two-factor authentication, and review what the interface reveals before sharing the assigned address.
Verify Uptime Kuma locally before tunneling it
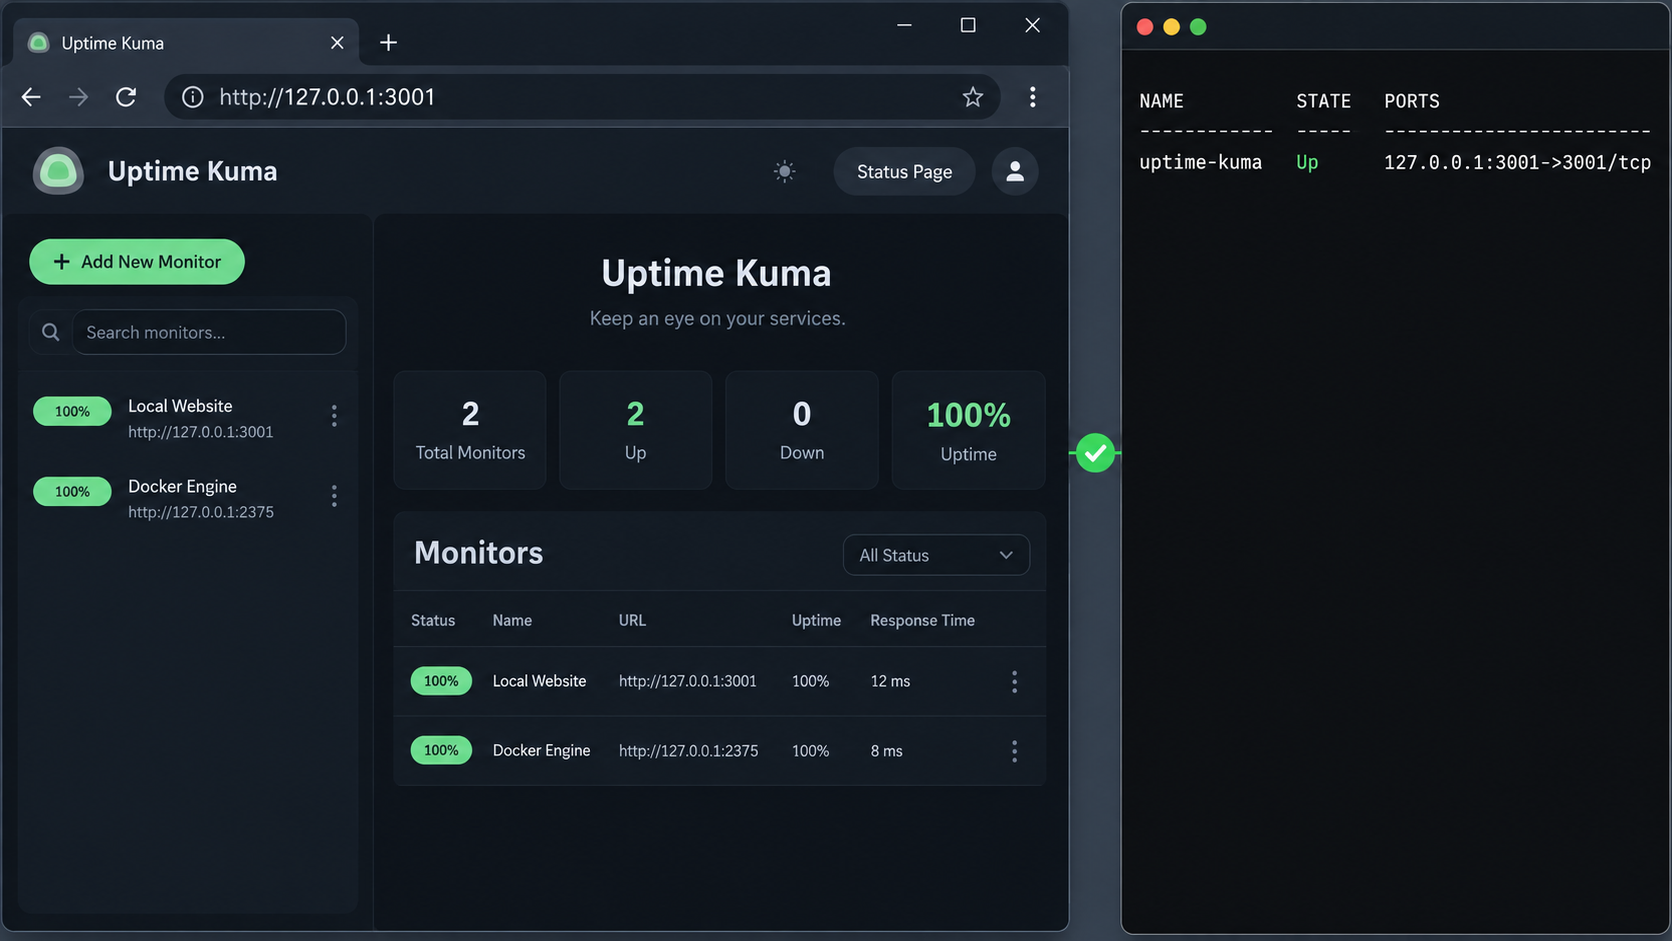
Local verification should cover more than the presence of a container. Confirm the container lifecycle, the host port binding, the application interface, persistent storage, and at least one monitor. This creates a known-good baseline for remote-access troubleshooting.
Verify the browser endpoint
From a browser running on the Docker host, visit:
http://localhost:3001The Uptime Kuma interface should load. Sign in using the account created during initialization and confirm that dashboard navigation works. If the page does not load, do not create a Localtonet tunnel yet. Check the container state and logs first.
Verify the loopback binding
Inspect the running container:
docker ps --filter name=uptime-kuma
Review the port mapping in the output and confirm that the host side is bound to 127.0.0.1:3001, not every interface. The exact formatting of Docker's output can vary, but the address should reflect the explicit mapping in the launch command.
A failed connection from another LAN computer to http://docker-host-ip:3001 is expected for this design. Do not change the binding to all interfaces merely to make that test succeed. The Localtonet client will connect locally on the Docker host.
Verify persistence safely
Confirm that the named volume exists:
docker volume inspect uptime-kumaYou can also restart the existing container and verify that the configured account and monitor remain present:
docker restart uptime-kuma
Wait for the application to become available again, reload http://localhost:3001, and verify the expected configuration. This tests an ordinary container restart, not complete disaster recovery. A proper backup and restore process should be validated separately before the monitoring service becomes operationally important.
Use a verification checklist
- The container appears in
docker psand remains running. docker logs uptime-kumadoes not show a repeating fatal startup failure.- The dashboard loads at
http://localhost:3001on the host. - The host publication is limited to
127.0.0.1:3001. - The initial account configuration is complete.
- At least one known target produces an understandable monitor result.
- The
uptime-kumaDocker volume exists. - The dashboard and saved configuration remain available after a normal container restart.
Provide remote HTTP access with Localtonet
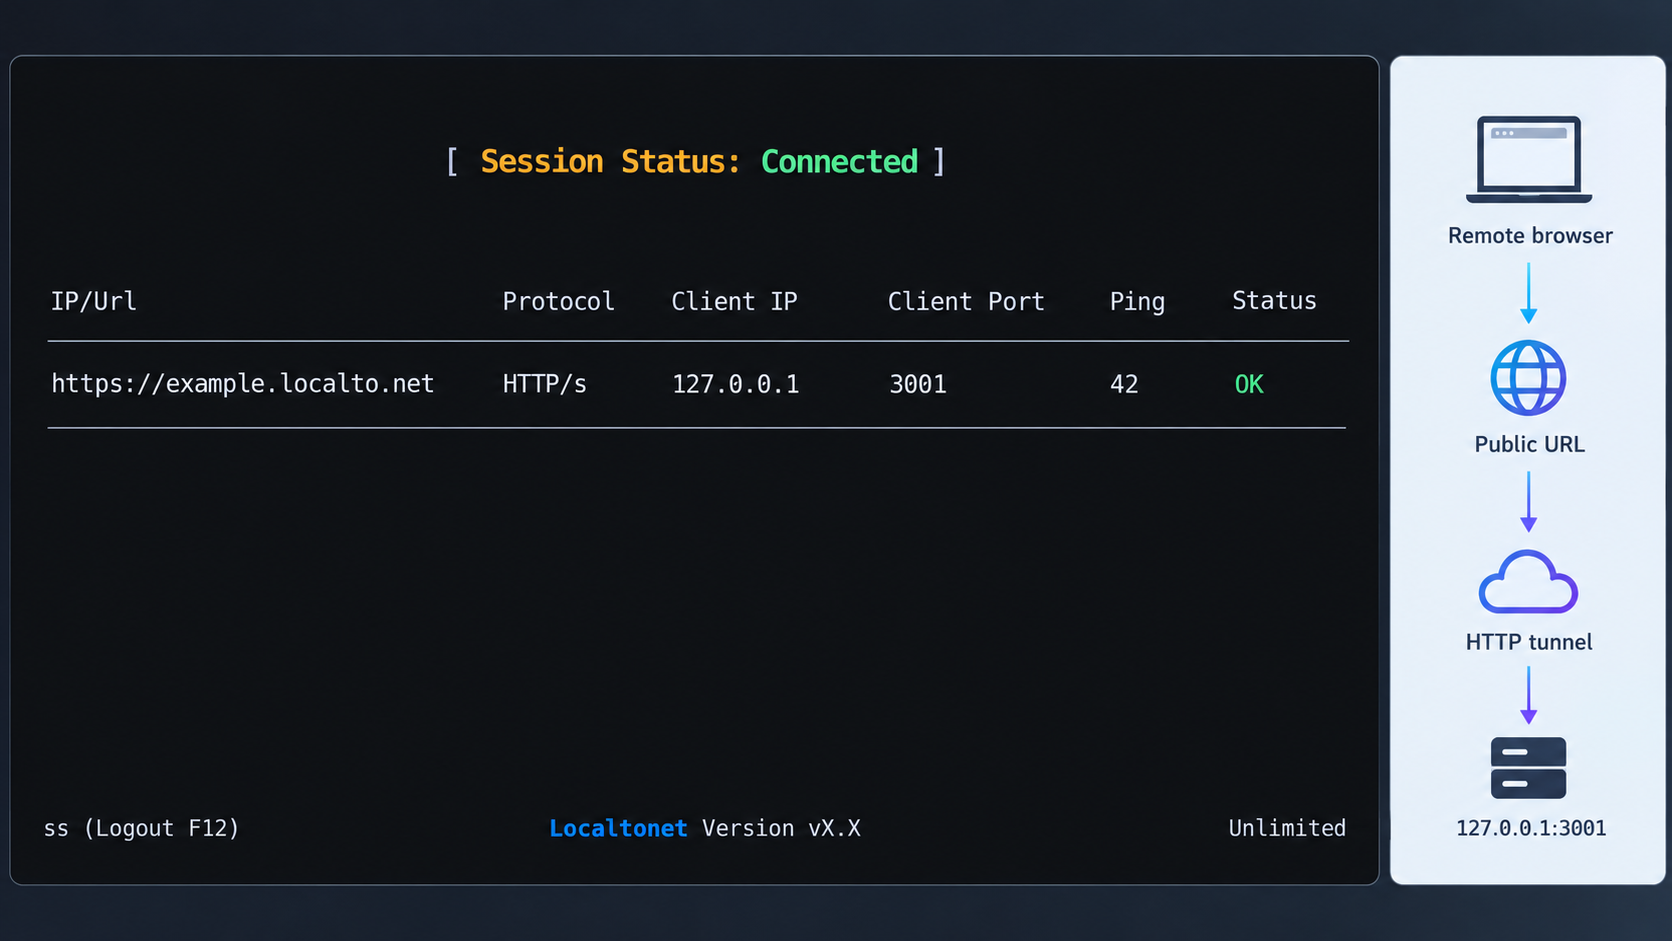
After local verification succeeds, configure an HTTP tunnel to the loopback endpoint. Our client on the host establishes an outbound connection to a Localtonet relay server. You do not need to forward port 3001 on the router, change the inbound firewall to accept internet traffic, configure a VPN, or obtain a public IP address.
HTTP tunnels and File Server tunnels support three process types: Random Sub Domain, Custom Sub Domain, and Custom Domain. All three serve the selected content at a public HTTPS address. Availability and configuration details can vary, so use the choices currently shown in your dashboard. Exact custom-domain DNS instructions should always be checked against current documentation rather than inferred.
Install and run the Localtonet client
Install our client on the same device that runs Docker and can open http://127.0.0.1:3001. Keep the client running for as long as remote access is required.
Authenticate or select the device
Use the device-specific authentication token associated with this client. Do not copy the token into documentation, screenshots, shell history examples, or support messages.
Select an available relay server
Choose an available server or region from the current Localtonet dashboard. Do not rely on a server code copied from an old tutorial because available values can change.
Create an HTTP tunnel
Choose the HTTP tunnel family and select the appropriate process type. For the simplest setup, use an available generated address rather than introducing custom-domain DNS before basic access has been verified.
Set the local target
Point the tunnel to local IP address 127.0.0.1 and local port 3001. These values must describe the endpoint as seen from the device running our client.
Start and test the tunnel
Start the tunnel, then open the assigned public HTTPS address from a separate network or remote device. Confirm that the expected Uptime Kuma interface loads and that authentication remains required.
Creating the configuration alone does not make it active. Use the Start control after checking the selected device, relay, local IP address, and port. The public endpoint remains available only while the selected client is connected and the tunnel is running.
For the current dashboard sequence and available choices, consult our HTTP tunnel documentation. Dashboard labels and availability can change by client version, deployment, or plan, so the current interface remains authoritative for selectable servers and options.
| Layer | Expected value in this guide | What happens if it is unavailable |
|---|---|---|
| Uptime Kuma container | Running as uptime-kuma |
The local dashboard and public route cannot serve the application |
| Local HTTP endpoint | 127.0.0.1:3001 |
Our client has no working service to forward to |
| Localtonet client | Connected on the Docker host | The relay cannot reach the local target |
| HTTP tunnel | Created and started | The public HTTPS address is not active |
| Remote browser | Using the assigned public HTTPS address | Testing localhost remotely will fail because localhost means the remote device |
Test from outside the host
Use a browser on another network, such as a mobile device not connected to the same local network, and open the public address assigned to the tunnel. This verifies the complete route rather than only browser cache or local connectivity.
Sign in, navigate through the dashboard, and confirm that monitor information loads. Uptime Kuma uses a reactive web interface and WebSocket functionality, so testing only a static initial page is not enough. Confirm that the application remains usable after login and that live dashboard behavior works as expected.
Do not substitute the Uptime Kuma host's private address or localhost when testing remotely. A private LAN address is generally not internet-routable, and localhost always points back to the device on which the browser is running.
Routine operation, restarts, backups, and updates
Start, stop, and restart the container
Use the assigned container name for normal lifecycle operations:
docker stop uptime-kuma
docker start uptime-kuma
docker restart uptime-kuma
Stopping Uptime Kuma leaves the HTTP tunnel without a working local target. The Localtonet tunnel may still appear configured, but remote requests cannot produce a functioning dashboard until the container is available again.
The --restart=always option helps Docker restart the container according to that policy, but it does not replace application monitoring, host monitoring, backups, or capacity management. It also cannot recover a host that is powered off, a failed storage device, or an invalid application configuration.
View logs
Display accumulated container output with:
docker logs uptime-kumaFollow new output in real time during a test:
docker logs -f uptime-kumaStop following the output with the terminal's normal interrupt action. Review logs before deleting or recreating anything. An error message about storage, startup, port use, or application initialization is more useful than a generic browser failure.
Back up persistent data
The named volume is the persistence boundary in this deployment. Establish a tested backup method suitable for Docker volumes and your host operating system. A backup process should account for application consistency rather than merely copying active database files at an arbitrary moment.
This article does not prescribe a single backup command because a reliable procedure depends on the host, storage driver, backup product, consistency method, retention requirements, and installed Uptime Kuma version. Whatever method you choose, test restoration into an isolated environment. A backup that has never been restored is not a verified recovery plan.
Keep backup data outside the failure domain of the Docker host. Protect it as operational data because monitoring configuration, notification settings, and integration secrets may be sensitive.
Update conservatively
The :2 image tag follows major version 2 rather than pinning one exact patch release. Pulling an image and replacing a container can therefore introduce a newer version. Review the project's current release and update guidance before changing a working deployment, especially when the monitoring service is operationally important.
Back up the data first, understand the target version, schedule a maintenance window, and verify monitors and notifications afterward. Do not assume that restarting an existing container downloads a newer image. Docker uses the image already present unless a newer image is explicitly obtained through an update workflow.
We intentionally do not provide a guessed one-line update command. The appropriate process may change with Uptime Kuma releases, and application-specific migration guidance should take precedence over generic container replacement advice.
Stop remote access when it is unnecessary
Stop the Localtonet tunnel when remote dashboard access is no longer required. You can later start it again when the selected client is connected. Delete the tunnel only when you no longer need its configuration. Stopping the tunnel and stopping the Uptime Kuma container are separate actions.
If local monitoring should continue while remote administration is disabled, leave Uptime Kuma running and stop only the tunnel. The dashboard will remain locally available at http://localhost:3001, while the public route is inactive.
Troubleshooting the container and remote connection
The container name is already in use
Docker requires container names to be unique. If the launch command reports that uptime-kuma is already in use, inspect the existing container:
docker ps -a --filter name=uptime-kuma
It may be a stopped container from an earlier installation. Do not remove it until you know whether it is attached to the data you intend to retain. If it is the correct deployment, start it with docker start uptime-kuma instead of creating a duplicate.
Port 3001 is already allocated
Another process or container may already be listening on host port 3001. Identify the existing listener using the networking tools appropriate for your operating system. Then decide whether to stop that service or publish Uptime Kuma on another unused localhost port.
If you intentionally change the host-side port, update both the browser URL and the Localtonet target port. The container-side service remains on port 3001 unless Uptime Kuma's documented configuration says otherwise. In a Docker port mapping, the host and container port numbers are separate values.
The container starts and immediately exits
Check its state and logs:
docker ps -a --filter name=uptime-kuma
docker logs uptime-kuma
Address the specific error shown. Avoid repeatedly deleting containers or volumes without understanding the failure. If persistent storage is involved, preserve the volume while diagnosing unless the official recovery procedure explicitly requires a destructive action and you have a verified backup.
The browser cannot open localhost:3001
Confirm that the browser is running on the Docker host. If you enter localhost on your laptop while Docker runs on a separate server, the browser attempts to connect to the laptop itself.
Then confirm that the container is running, review its logs, and inspect the Docker port mapping. Local security software can also affect local connections. Because operating-system firewall and security controls vary, diagnose them with platform-specific tools instead of disabling protection broadly.
Local access works, but the public address does not
This narrows the problem to the remote-access path. Check the following in order:
- Confirm that
http://127.0.0.1:3001still works on the host. - Confirm that the Localtonet client is running and connected.
- Confirm that the selected authentication token belongs to that device.
- Confirm that the HTTP tunnel targets
127.0.0.1and port3001. - Confirm that the tunnel was started after creation.
- Use the assigned public HTTPS address, not the local HTTP address.
If the client runs inside a different container or on a separate machine, revisit the target address. In those environments, its loopback interface is not the Docker host's loopback interface.
The public page loads, but dashboard functions do not behave normally
Verify that local dashboard functions work first. Then test the public endpoint in a clean browser session and review Uptime Kuma's container logs while reproducing the problem. Because the interface uses WebSocket functionality, a successful static page response does not prove that every interactive connection is healthy.
Avoid adding an unrelated reverse proxy until the basic direct HTTP tunnel works. Every additional proxy introduces another place where request headers, connection upgrades, timeouts, and address handling can differ.
A monitor cannot reach a service on the Docker host
The monitor executes from Uptime Kuma's network context, not from your desktop browser. An address such as 127.0.0.1 inside the Uptime Kuma container points back to that container. Use a target address and network design that make the monitored service reachable from the container, while preserving appropriate firewall and authentication controls.
Also separate dashboard connectivity from monitor connectivity. Localtonet makes the Uptime Kuma web interface remotely reachable in this workflow. It does not automatically make every private monitoring target reachable from inside the Uptime Kuma container.
The dashboard disappeared after a host restart
Check that Docker started, then inspect the container:
docker ps -a --filter name=uptime-kumaThe restart policy applies through Docker, so Docker itself must be operational. Next, verify the Localtonet client. The public route also requires that client to be connected and the tunnel to be running.
Security checklist for an internet-reachable dashboard
Tunneling avoids direct inbound router configuration, but it does not make application security optional. The public address is an intentional route from the internet to the selected local service. Treat Uptime Kuma as an administrative application that can reveal infrastructure names, availability patterns, internal URLs, notification configuration, and operational history.
127.0.0.1 publication instead of exposing port 3001 on every LAN interface.
Do not confuse transport exposure with application authorization
The HTTP tunnel carries remote traffic to the local service and provides a public HTTPS address for the supported HTTP process types. Uptime Kuma still controls access to its own dashboard. Keep its authentication enabled and verify that an unauthenticated browser cannot reach administrative information that should remain private.
Likewise, do not assume that an obscure generated address is an access-control mechanism. URLs can be copied, logged, saved in browser history, or shared accidentally. Protect the application as though its address may become known.
Review status-page contents
Public status pages can be useful, but they should disclose only what their intended audience needs. Monitor names, endpoint names, incident details, and grouping can reveal architecture. Review each status page before publishing it and separate public service descriptions from internal operational naming.
Protect integration secrets
Notification settings may contain webhook URLs, SMTP credentials, tokens, or account identifiers. Restrict administrative access, avoid exposing settings in recordings or screenshots, and rotate any credential that is accidentally disclosed. Do not place Localtonet device tokens or notification secrets in monitor descriptions or public status-page content.
Preserve network policy
Deploy the tunnel only where you are authorized to expose the service. Localtonet avoids the need for inbound port forwarding and firewall changes, but it should not be used to evade organizational access rules. Follow your environment's approval, authentication, data handling, and least-privilege requirements.
Frequently asked questions
What URL does Uptime Kuma use after the Docker installation?
Uptime Kuma serves its dashboard on port 3001. With the loopback-only Docker command in this guide, open http://localhost:3001 or http://127.0.0.1:3001 on the Docker host. The service is not directly available through the host's LAN address when it is published only on 127.0.0.1.
Why bind Uptime Kuma to 127.0.0.1 instead of all network interfaces?
A loopback binding prevents direct connections to port 3001 through the host's ordinary LAN interfaces. It is appropriate when the Localtonet client runs on the same host and should be the remote-access path. The public tunnel still makes the selected application internet-reachable, so Uptime Kuma authentication and other security controls remain necessary.
Can the Localtonet client run on a different computer?
Yes, provided that computer can reach the Uptime Kuma service. However, it cannot use 127.0.0.1:3001 to reach another host because loopback always refers to the local device. You would need to publish Uptime Kuma on an appropriately reachable interface and use the Docker host's reachable address, with suitable firewall and network controls.
Does creating a Localtonet tunnel start it automatically?
No. Creating a tunnel and running it are separate lifecycle actions. After creating the HTTP tunnel, use the Start control. The public endpoint is available only while the selected client is connected and the tunnel is running.
Do I need router port forwarding or a public IP address?
No. Our client establishes an outbound connection to a Localtonet relay server. This workflow does not require inbound router port forwarding, firewall changes, VPN setup, or a public IP address.
Where does Uptime Kuma store its data in this deployment?
The Docker command mounts a named volume called uptime-kuma at /app/data inside the container. The volume persists independently of the container's writable layer. Uptime Kuma warns that NFS is not supported for this data, so use a local directory or volume backed by supported local storage.
Can I use Docker Compose instead?
Yes. Uptime Kuma documents a Compose installation using its repository's compose.yaml. The documented default setup exposes the service on all network interfaces, so inspect the port publication before using it. This guide uses the direct Docker command because it explicitly binds the host port to 127.0.0.1.
Does Localtonet monitor my services for Uptime Kuma?
No. Uptime Kuma performs the monitoring from its own container and network context. In this workflow, Localtonet provides remote HTTP access to the Uptime Kuma web interface. Creating the tunnel does not change which targets the container can reach or how Uptime Kuma evaluates them.
Will Uptime Kuma continue monitoring if I stop the tunnel?
Yes, as long as the Uptime Kuma container and its required network connections remain operational. The tunnel controls remote access to the dashboard, not the container's monitoring lifecycle. Stopping the tunnel leaves the local service available at http://localhost:3001.
Access your self-hosted Uptime Kuma dashboard with Localtonet
Verify Uptime Kuma locally, keep port 3001 bound to the Docker host's loopback interface, and then create an HTTP tunnel to 127.0.0.1:3001. Our outbound connection gives you a public HTTPS address without router port forwarding or a public IP.


