

Run a compatible AI API on your own machine, verify every authentication boundary, and provide controlled remote access
WindsurfAPI has evolved into DevinAPI, while the repository and some release artifacts retain the WindsurfAPI name. The current architecture exposes OpenAI-compatible, Anthropic-compatible, and Gemini-compatible HTTP routes, with DEVIN_CONNECT=1 selecting the default direct Devin cloud path. This guide pins the installation examples to release v3.9.29, distinguishes the authentication behavior of host, Docker Compose, and Windows deployments, and verifies the service locally before adding public connectivity. After those checks pass, we use a Localtonet HTTP tunnel to provide an authorized remote client with a public HTTPS endpoint without inbound router port forwarding, firewall changes, VPN setup, or a public IP address.
📋 What's in this guide
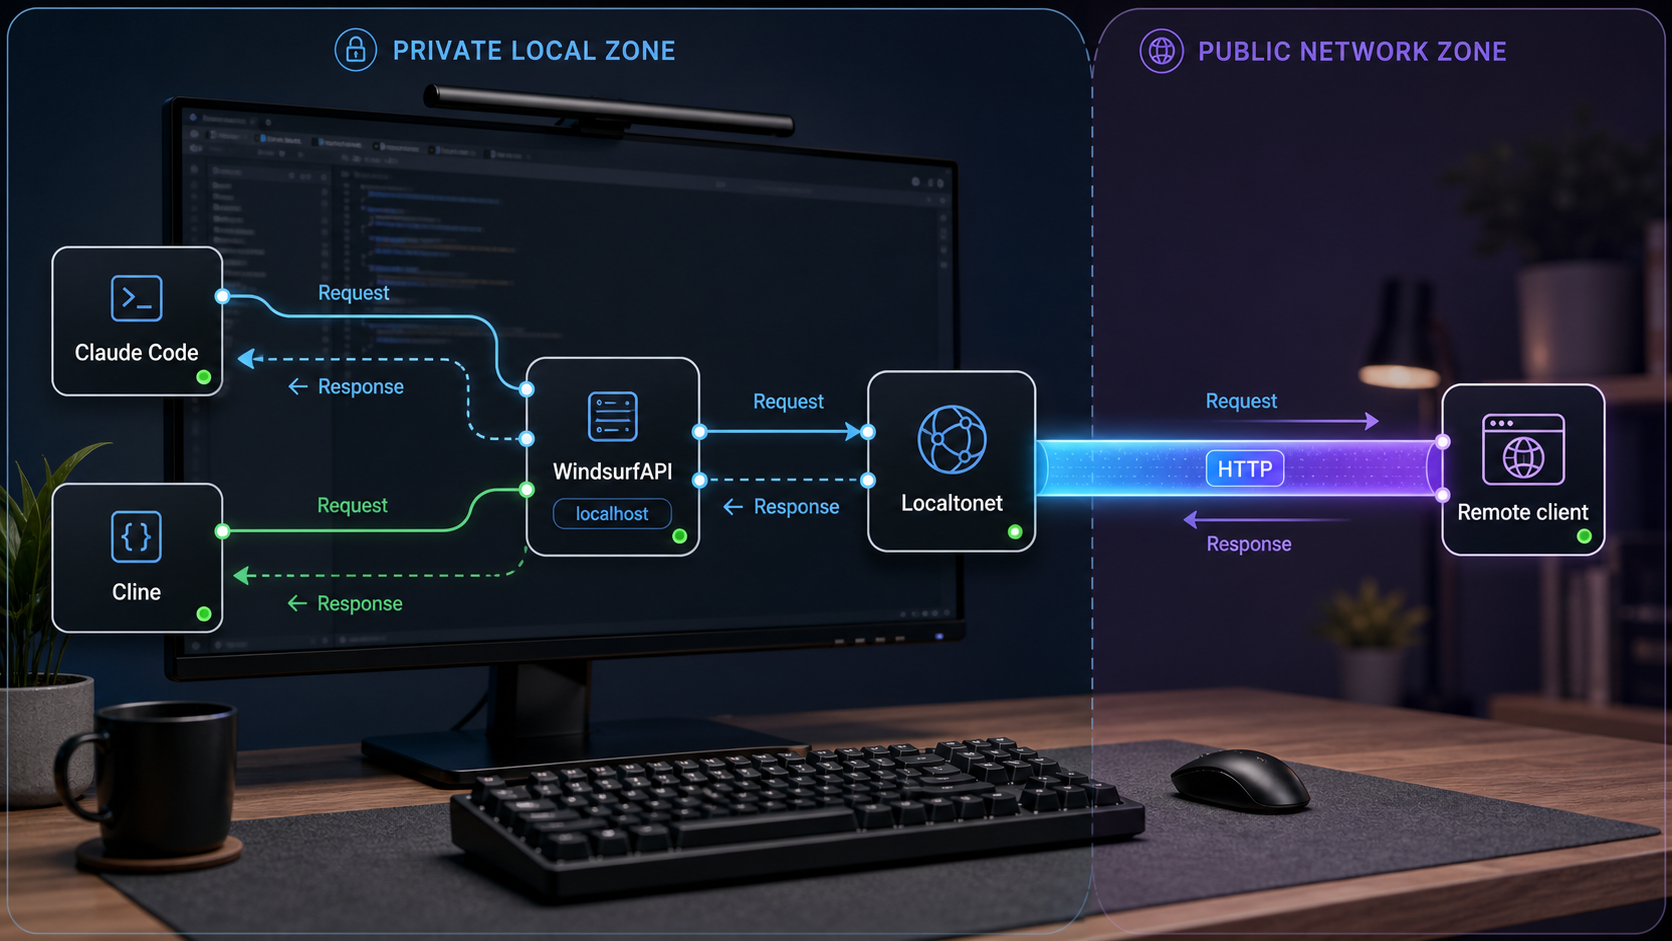
Understand the WindsurfAPI to DevinAPI transition
The project now describes itself as “WindsurfAPI · DevinAPI.” Its current project site says that WindsurfAPI grew into DevinAPI as the default architecture moved toward a direct Devin cloud connection. The GitHub repository remains named WindsurfAPI, and commands, directory names, Windows assets, and older documentation may still use that name. In this tutorial, “the project” means the software in the dwgx/WindsurfAPI repository, while “DevinAPI” describes its current product and architecture direction.
This is more than a naming change. The current default path uses DEVIN_CONNECT=1 to communicate directly with the Devin cloud path over HTTP. It does not require the optional Windsurf Language Server binary. The older Cascade architecture remains available as a second transport path and uses a local Language Server to communicate with the Windsurf cloud. Operators should therefore determine which transport a selected release is using before diagnosing platform, binary, or upstream problems.
Release-sensitive behavior matters throughout this guide. The examples below are pinned to the project’s v3.9.29 release. That release reports no API-breaking change and no required configuration migration from its immediate predecessor, but it is still safer to validate the exact tag you deploy. Consult the project’s English README and release history before substituting a newer tag.
What the HTTP service exposes
The project documents an HTTP service on port 3003 by default. Depending on the selected release and enabled features, its documented API surface includes:
POST /v1/chat/completionsfor OpenAI-compatible chat requests.POST /v1/completionsfor the legacy OpenAI Completions shape.POST /v1/responsesfor the OpenAI Responses format.POST /v1/messagesfor Anthropic-compatible clients.- Routes beneath
/v1beta/models/for Gemini-compatible requests. GET /v1/modelsfor authenticated model discovery.- A management interface beneath
/dashboard.
Protocol compatibility does not guarantee compatibility with every client release, request field, model, or upstream capability. The project controls the translation layer, and upstream behavior may change independently. Test the specific route, client version, account, and model combination you intend to use instead of treating an accepted request format as a universal compatibility promise.
DEVIN_CONNECT=1 and does not require the optional Language Server binary.
The repository contains an MIT license file, but its README also contains an additional author notice discussing commercial use, resale, paid deployment, public backend hosting, and relay services. Determine how the license and notice apply to your planned use, and review the applicable upstream account terms. A technically working installation does not establish permission to operate a shared or commercial service.
Where agent actions actually run
WindsurfAPI or DevinAPI is an HTTP translation and account-access service. It does not itself become the file-editing environment for Claude Code or Cline. When an agent client receives a tool request to read a file, modify source code, or execute a command, that client performs the action where the client is running and under the client process’s local permissions.
This boundary affects security design. An API key controls access to the HTTP service, but it does not constrain the filesystem permissions of an authorized agent client. Protect the API endpoint and separately restrict the client’s workspace, operating-system account, command permissions, repositories, and credentials.
Prerequisites and deployment choices
Choose one deployment method before configuring remote access. Host and Docker deployments require a checkout of the repository. The packaged Windows route uses a release asset instead. This guide uses v3.9.29 so that setup behavior can be evaluated against a specific release rather than the changing master branch.
For a host installation, prepare:
- A machine on which you are authorized to install and run the project.
- Node.js 20 or newer.
- Git for cloning and checking out the selected release.
- Bash if you intend to use
setup.sh,install-ls.sh, orupdate.sh. - Outbound network access required by the selected project transport and authorized account.
- An account that the selected project release accepts and that you are authorized to use.
- Permission to use local port
3003, or a documented alternative set withPORT. - A Localtonet account and client installation for the later tunneling stage.
Docker users need Docker Engine with the Compose plugin. They do not need a host-level Node.js runtime for the application container. Windows users who select a packaged release should verify that the chosen tag actually contains the documented Windows asset and should read that release’s notes before running it.
| Deployment path | Authentication default to verify | Platform and transport notes |
|---|---|---|
setup.sh on a host |
The script generates an environment file, but do not assume that this guarantees strong populated credentials. Inspect the resulting API_KEY and DASHBOARD_PASSWORD. |
Requires Node.js 20 or newer and Bash. The default direct path should use DEVIN_CONNECT=1. |
Direct Node.js with copied .env |
The current project site documents empty host values as no API authentication and no dashboard password. Populate both before any network exposure. | The direct Devin path avoids an optional platform-specific Language Server binary. |
| Docker Compose | The documented Compose configuration fails closed when API_KEY or DASHBOARD_PASSWORD is empty, returning unauthorized responses. |
Compose defaults to DEVIN_CONNECT=1, binds broadly according to project documentation, and does not automatically download the Language Server on that default path. |
| Windows release package | The current project site says first launch generates an API key and dashboard password in a local .env file. |
The documented default binds to 127.0.0.1 and uses the direct Devin path. Confirm these details against the selected release asset. |
| Optional Language Server path | Application authentication still requires separate verification. | Current project sources are inconsistent about macOS support. The repository installer describes Linux and macOS artifacts, while the project site says the optional legacy path is Linux-only. Treat the selected release and binary as authoritative for your test. |
The direct path selected by DEVIN_CONNECT=1 avoids the optional Language Server and its platform-specific binary requirements. If you disable that setting to use the traditional Cascade path, validate the binary source, architecture, permissions, and release compatibility on an isolated host before relying on it.
Install and start the pinned v3.9.29 release
Pinning a release gives you a reproducible starting point. It does not freeze upstream account behavior or guarantee that every documented model will remain available, but it prevents an unreviewed commit on master from entering the initial installation.
Option A: run setup.sh on a Node.js host
Clone the official repository
Clone the repository and enter its directory. Verify the remote URL before executing repository scripts.
git clone https://github.com/dwgx/WindsurfAPI.git
cd WindsurfAPICheck out the selected release
Fetch the release tags and check out v3.9.29. The detached state is intentional for this pinned installation.
git fetch --tags
git checkout v3.9.29Review and run the setup script
Inspect setup.sh before execution. The project describes it as creating directories, setting permissions, and generating .env.
bash setup.shInspect the generated environment file
Confirm DEVIN_CONNECT, PORT, API_KEY, and DASHBOARD_PASSWORD. Do not assume setup-generated credentials are present or strong. Set strong, distinct values before allowing access from another machine.
Start the service in the foreground
Start the documented Node.js entry point and keep the terminal visible during initial testing.
node src/index.jsOption B: direct Node.js startup without setup.sh
The project’s current site also documents a direct zero-runtime-dependency startup path. After cloning and checking out v3.9.29, copy the example configuration and start the service:
cp .env.example .env
node src/index.js
Review .env before starting. For the direct host path, the project site documents an empty API_KEY as no API authentication and an empty DASHBOARD_PASSWORD as an unprotected dashboard. This differs from the documented Docker Compose fail-closed behavior. Populate both fields with strong, unrelated values.
The current architecture describes DEVIN_CONNECT=1 as the direct Devin cloud path and the default direction. If the checked-out release’s example file differs, follow the comments shipped with that tag and investigate the discrepancy before continuing.
Option C: Docker Compose
Use the same pinned checkout, then prepare the environment and start the container:
cp .env.example .env
docker compose up -d --build
docker compose logs -f
The documented Compose defaults use DEVIN_CONNECT=1, so the container does not run or automatically download the optional Language Server on the normal direct path. The project documents the following persistent mounts:
./.docker-data/datafor account, proxy, statistics, runtime, model-access, and log data../.docker-data/opt/windsurffor optional Language Server files and data../.docker-data/tmp/windsurf-workspacefor the temporary workspace.
Docker uses /data as its documented internal data location. The project supports changing the location with DATA_DIR, but storage changes should preserve the intended mounts and backup coverage.
The project documents Compose as returning unauthorized responses when API_KEY or DASHBOARD_PASSWORD is empty. That protection should not be generalized to direct Node.js startup. Set explicit credentials anyway, test valid access, and test invalid access before creating a tunnel.
Option D: Windows release package
For Windows, open the project’s v3.9.29 release page and confirm which Windows assets are attached. The current project site describes both a tray package and a console executable, but packaging can change between releases. Use only an asset published with the tag you reviewed.
The current Windows documentation says first launch generates API_KEY and DASHBOARD_PASSWORD in a local .env, uses DEVIN_CONNECT=1, and binds to 127.0.0.1 by default. Verify the generated values and actual listening address on your selected release. Do not change HOST to 0.0.0.0 merely to use Localtonet when the Localtonet client runs on the same Windows machine. A tunnel can target 127.0.0.1:3003 directly.
Configure authentication and an authorized account
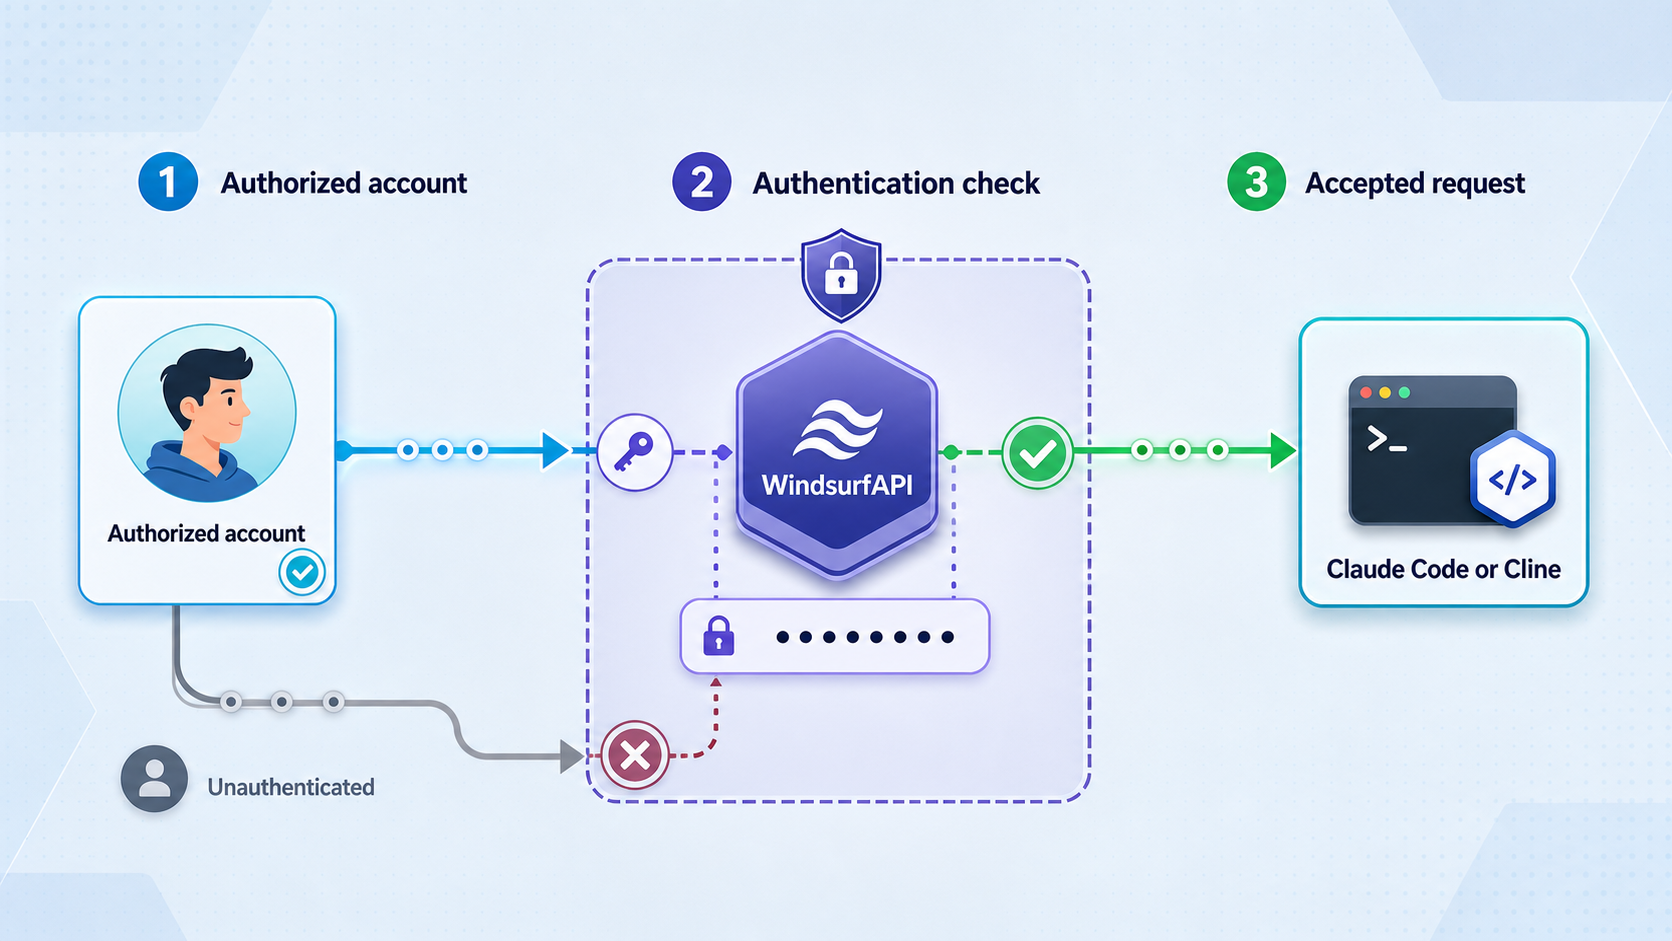
The service has at least three credential boundaries: the client API key, the dashboard password, and the account credential or session token used for the selected upstream path. Never reuse one value across these boundaries.
Set the API key
Configure a strong, unique API_KEY. Anthropic-compatible requests normally submit it using x-api-key. OpenAI-compatible requests normally submit it as a bearer token. Gemini-compatible clients may use the header expected by that project route. Confirm exact header handling against the selected release.
The API key belongs to your self-hosted service. It is not an upstream account token. Do not place an upstream session token in Claude Code, Cline, Cursor, shell examples, public environment files, or client-side browser code.
Set the dashboard password
Configure a separate strong DASHBOARD_PASSWORD. The dashboard is an administrative surface and may expose account state, settings, model controls, logs, or other operational data according to the installed version. Protect it even if you expect to use only API routes.
Add an account you are authorized to use
Open http://localhost:3003/dashboard, authenticate, and use the account workflow provided by the selected release. Current project materials discuss Devin session tokens and dashboard-assisted account functions, but accepted methods can change. Follow the interface and documentation shipped with the tag you deployed.
Account compatibility, model discovery, available tiers, rate limits, and upstream access are controlled by the project and upstream service. Do not assume that every Windsurf or Devin account type will work, that every displayed model is usable, or that an account permits shared access. Use only an account you own or are explicitly authorized to operate.
Keep .env, account files, session tokens, cookies, API keys, dashboard passwords, logs, and Docker persistent data out of Git. Limit filesystem access to the service account and necessary administrators. Review the project’s security policy for its current vulnerability-reporting process. If a credential is exposed, revoke or rotate it at the issuing system and update the deployment before restoring access.
Verify the local API before creating a tunnel
Local verification separates application failures from tunnel failures. A Localtonet HTTP tunnel forwards requests to the configured local target, but it cannot start the Node.js process, correct an invalid account, grant a model entitlement, or repair an incorrect client header.
Confirm that the service remains running
Inspect the foreground terminal for a host deployment. For Docker, run docker compose ps and inspect docker compose logs -f. Resolve restart loops before testing HTTP.
Open the dashboard locally
Visit http://localhost:3003/dashboard, or substitute your configured port. Confirm that the dashboard requires the expected password and that an incorrect password does not grant access.
Query the model catalog with authentication
Store the local API key temporarily in a shell variable and request the documented catalog.
export WINDSURFAPI_KEY='REPLACE_WITH_YOUR_LOCAL_API_KEY'

curl \
  -H "Authorization: Bearer ${WINDSURFAPI_KEY}" \
http://localhost:3003/v1/modelsSend a minimal compatible request
Select a model identifier actually returned for your account. Do not copy a time-sensitive model name from project marketing or an old example.
curl http://localhost:3003/v1/messages \
  -H "content-type: application/json" \
  -H "x-api-key: ${WINDSURFAPI_KEY}" \
  -d '{
    "model": "REPLACE_WITH_AN_AVAILABLE_MODEL",
    "max_tokens": 64,
    "messages": [
      {
        "role": "user",
        "content": "Reply with the word ready."
      }
    ]
}'Test unauthorized requests
Repeat the API request without a key and with an intentionally invalid key. Neither attempt should return an authorized model response. Also verify that dashboard administration fails without the correct password.
Interpret failures by layer. A connection refusal means the service is not reachable at the specified host and port. An HTTP authentication response proves that an application answered, but the supplied credentials were absent or invalid. An account or model error after successful API authentication usually points to account health, entitlement, project compatibility, upstream availability, or rate limits.
Connect Claude Code and Cline locally
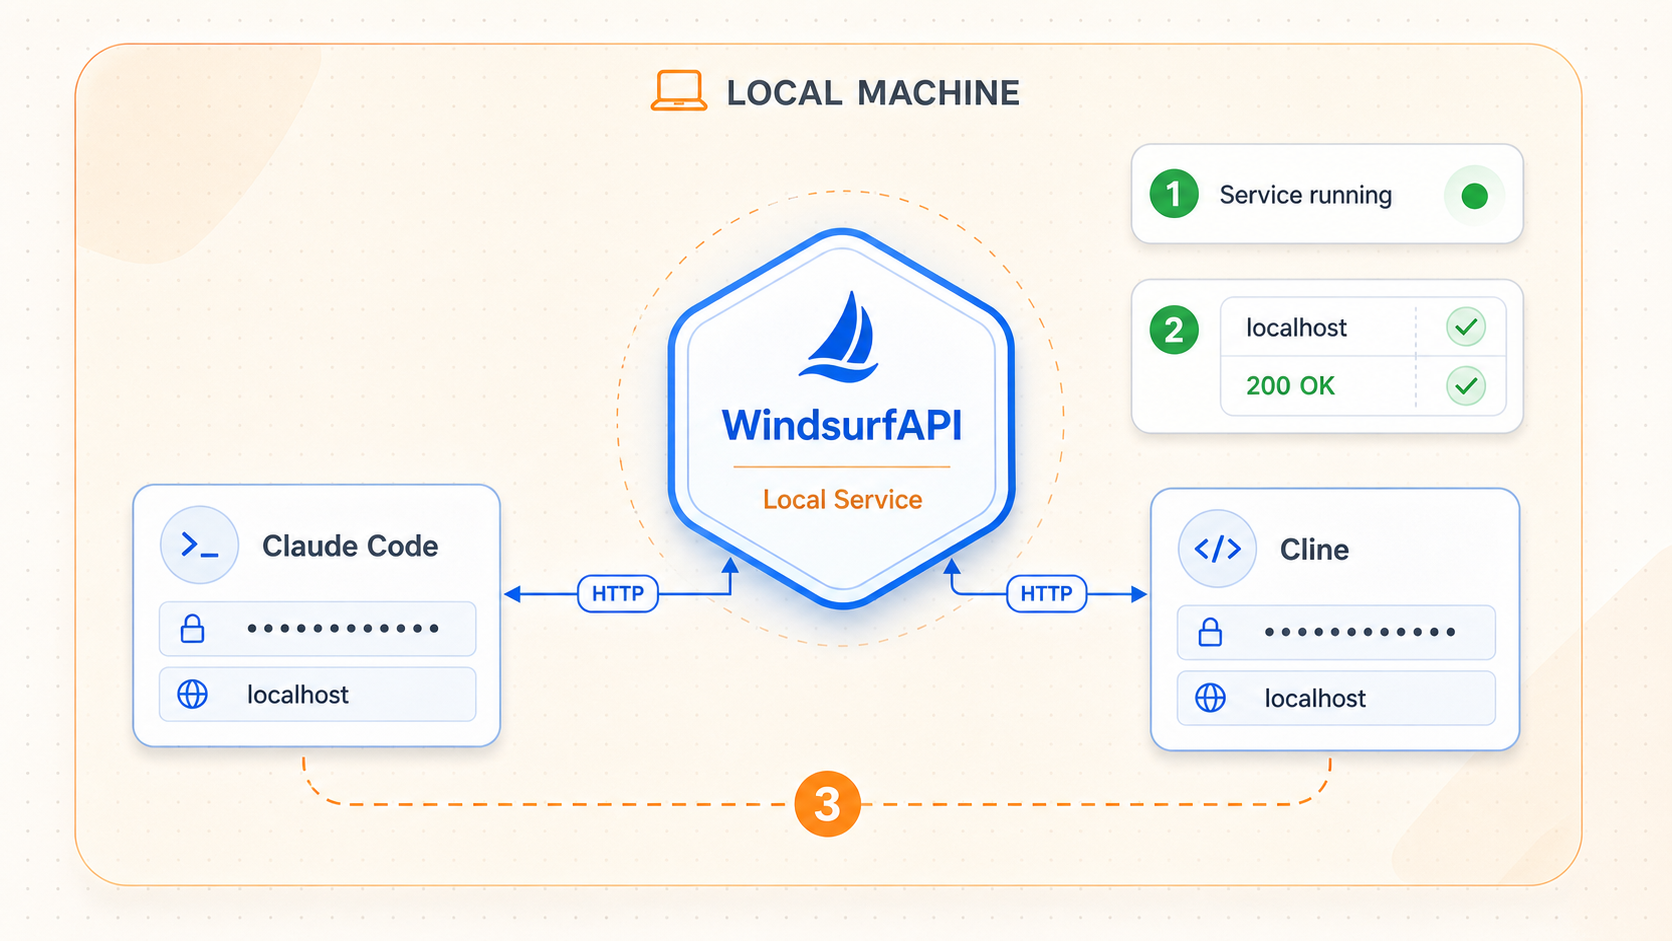
Claude Code
For the project’s Anthropic-compatible route, set Claude Code’s base URL to the server origin. Do not append /v1/messages, because the client constructs its request path.
export ANTHROPIC_BASE_URL="http://localhost:3003"
export ANTHROPIC_API_KEY="REPLACE_WITH_YOUR_LOCAL_API_KEY"
claude
This configures a Claude Code process as a client of an Anthropic-compatible endpoint. It is not the same feature as Anthropic’s Claude Code self-hosted environments. That separate feature concerns where Claude Code cloud sessions execute and has its own organization, runner, plan, and networking requirements.
Cline
For an OpenAI-compatible provider in Cline, use the local base URL:
http://localhost:3003/v1
Supply the self-hosted service’s API key and select a model identifier returned by your authenticated /v1/models request. Cline’s provider labels and interface can change, so use the current OpenAI-compatible configuration rather than depending on an old menu location.
If your Cline release supports an Anthropic-compatible provider, the project also documents /v1/messages. Choose one protocol, follow that provider’s base-URL convention, and verify a minimal request before enabling tools.
Claude Code, Cline, Cursor, and similar agent clients execute approved tools where the client runs. Restrict the workspace, review tool requests, and use an operating-system account with only the permissions needed for the intended repository.
Expose the verified service through Localtonet
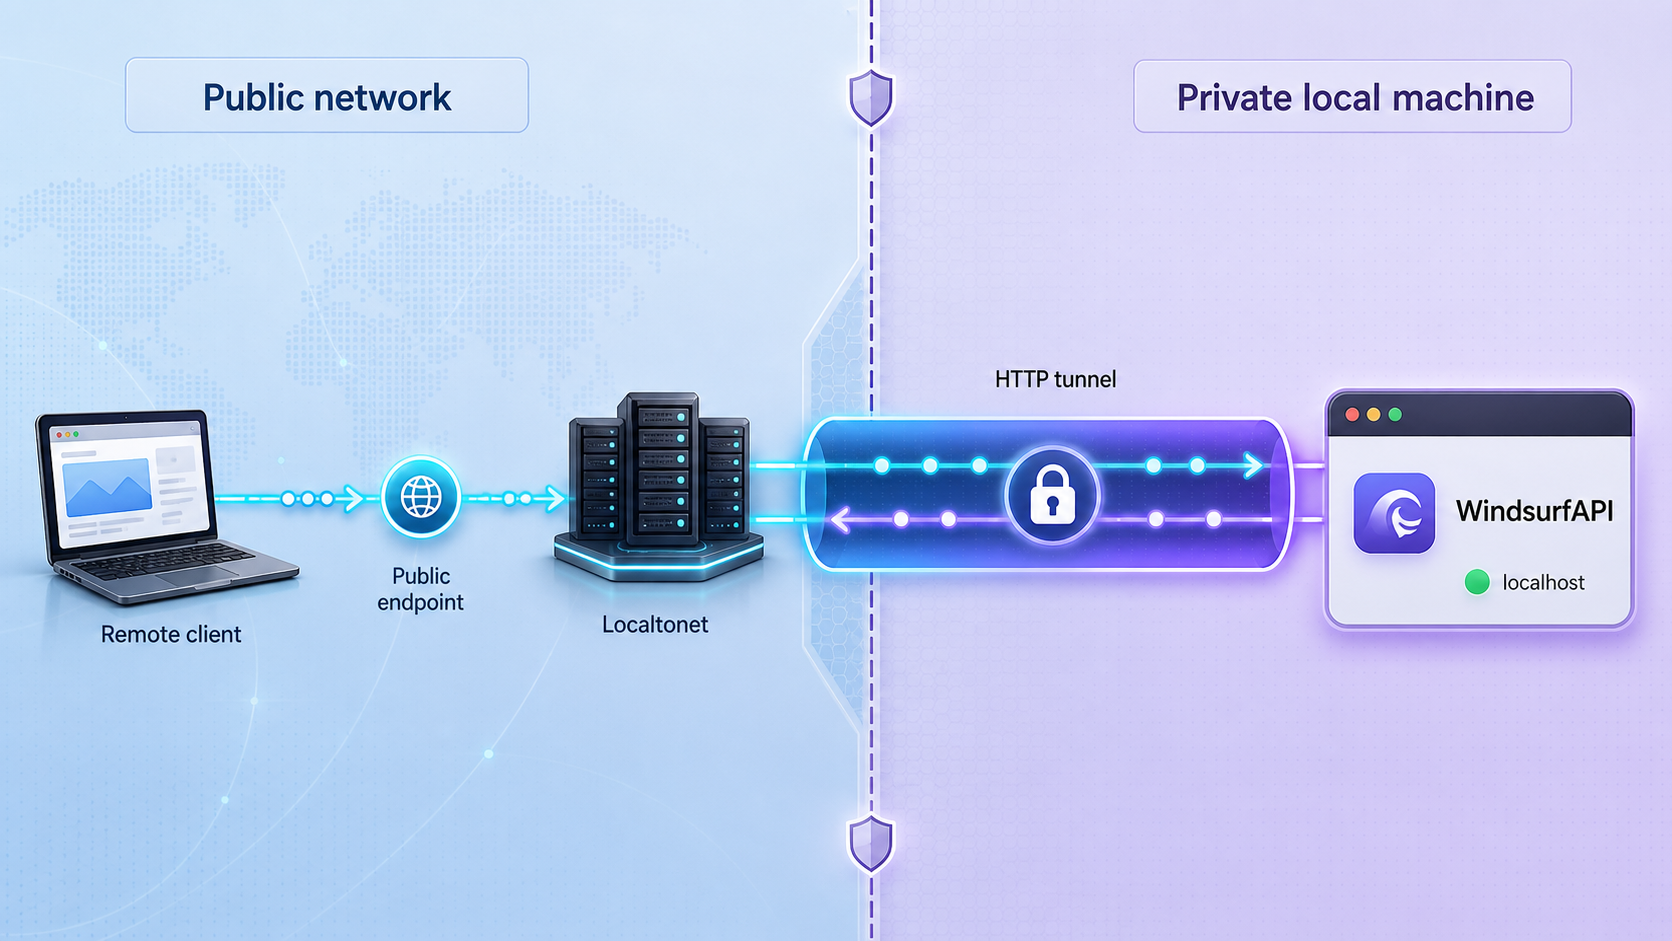
Once the local dashboard, authenticated API request, and unauthorized-request tests all behave correctly, add the connectivity layer. Our Localtonet client establishes an outbound connection to a Localtonet relay server. The resulting HTTP tunnel provides a public HTTPS address without inbound router port forwarding, firewall changes, VPN setup, or a public IP address.
Run the Localtonet client on the same host as the API when practical. That allows the tunnel to target 127.0.0.1:3003 without changing the application to listen on all network interfaces. If the Localtonet client runs on another device, the service must listen on and be reachable through an authorized private network address from that device.
Install and run the Localtonet client
Install our client application on a device that can reach the API service. The tunnel remains available only while the selected client device is connected and the tunnel is running.
Select the correct device token
Authenticate or select the device using its Localtonet auth token. Device tokens are secrets and must not be pasted into articles, source code, tickets, or public screenshots.
Select an available relay server
Choose a currently available server or region from your dashboard. Available values can vary by account, plan, region, and product state, so do not copy a hardcoded server code from an old guide.
Create the HTTP tunnel
When both applications run on the same host, set the local IP address to 127.0.0.1 and the local port to 3003. If you changed PORT, use the same configured value here.
Start the tunnel
Creating a tunnel does not make it run. Use the Start control, wait for the tunnel to enter its running state, and copy the assigned public HTTPS URL.
Repeat authenticated and unauthorized tests
Run the same model and message checks against the assigned HTTPS origin. Confirm that the correct key succeeds and that missing or invalid credentials are rejected. Stop or delete the tunnel when remote access is no longer needed.
For the complete product workflow and current dashboard behavior, consult the Localtonet HTTP tunnel documentation. HTTP process types may provide a random subdomain, a supported custom subdomain, or a custom domain. Check the current dashboard and documentation for option availability and any DNS requirements.
If the assigned origin is represented by the placeholder https://YOUR-ASSIGNED-HOST, Claude Code would use:
export ANTHROPIC_BASE_URL="https://YOUR-ASSIGNED-HOST"
export ANTHROPIC_API_KEY="REPLACE_WITH_YOUR_WINDSURFAPI_KEY"
claude
An OpenAI-compatible Cline configuration would use:
https://YOUR-ASSIGNED-HOST/v1These are placeholders, not real Localtonet addresses. Copy the actual address from the running tunnel.
Anyone who learns the public URL can attempt to contact the application. A Localtonet tunnel supplies connectivity, not WindsurfAPI authorization. Keep the API key and dashboard password enabled, use strong distinct values, share the endpoint only with approved users, and never embed the key in public browser code or a public repository.
Routine operations, controlled updates, and troubleshooting
Keep the service available deliberately
A foreground node src/index.js process is useful during installation because its logs remain visible, but it stops when the terminal exits. The project documents PM2 as an optional process manager. If you use PM2 or another service manager, test startup, shutdown, log retention, and restart behavior locally before depending on unattended remote access.
Docker operators can inspect state with:
docker compose ps
docker compose logs -f
Preserve the documented persistent directories when replacing a container. Backups may contain account data and other secrets, so store and transfer them with the same protections as the live installation.
Treat update.sh as project-controlled and version-sensitive
The project provides update.sh, but it is not a passive package update. The project documents that the script can pull repository changes, invoke install-ls.sh to update the optional Language Server binary, stop PM2, terminate a residual process using port 3003, restart the service, and perform a health check. Those actions can change code, replace an optional binary, interrupt another process, and move a carefully pinned checkout.
Stop the Localtonet tunnel first. Back up .env and all persistent data, review the target release notes and code changes, inspect the current version of update.sh, and confirm that port 3003 is not used by an unrelated process. Run the update only when you have a tested rollback path.
If you intentionally accept the project-controlled update behavior, the documented invocation is:
cd WindsurfAPI
bash update.sh
After updating, do not restore public access based only on the script’s health check. Locally verify the dashboard login, authenticated model discovery, a minimal model request, and rejection of missing and invalid API credentials. Confirm the expected DEVIN_CONNECT mode, data persistence, process manager state, listening address, and port. Only after those regression checks pass should you restart the Localtonet tunnel and repeat the authorized and unauthorized tests through its public URL.
Diagnose failures by layer
| Symptom | Likely layer | What to verify |
|---|---|---|
Connection refused at localhost:3003 |
Local process or port | Confirm that Node.js, the Windows package, or the container is running. Inspect logs and verify PORT. |
| Local response works, but the public URL does not | Localtonet client or tunnel | Confirm that the correct device is connected, the target IP and port are correct, and the tunnel was started after creation. |
| The public endpoint returns an authentication error | Application authentication | Reachability is working. Verify the client header and API key without exposing the credential in logs or screenshots. |
| Direct Node.js accepts a request without a key | Host configuration | Check whether API_KEY is empty. Host defaults must not be confused with Compose fail-closed behavior. |
| Compose returns 401 with an empty key or password | Compose fail-closed protection | Set explicit strong credentials and restart the deployment. Do not disable authentication to make the first request succeed. |
| The dashboard opens but account requests fail | Account or upstream connection | Check account health, authorization, the selected transport, upstream access, and redacted service logs. |
| A model is listed but cannot be used | Entitlement or upstream compatibility | Re-query /v1/models, check the connected account, and test another model known to be available to that account. |
| The optional Language Server fails to start | Binary or platform compatibility | Confirm the release, operating system, architecture, binary source, file permissions, and whether the direct path would avoid the dependency. |
| Claude Code calls an incorrect path | Client base URL | Use the server origin for ANTHROPIC_BASE_URL. Do not append /v1/messages. |
| Cline receives route-not-found responses | Provider or base path | For an OpenAI-compatible provider, use the origin followed by /v1 and select a returned model identifier. |
| The endpoint disappears after a restart | Tunnel lifecycle | Confirm that the Localtonet client reconnected and that the tunnel is running. A saved tunnel is not necessarily a running tunnel. |
Reduce the exposed surface
When the Localtonet client and API run on the same machine, keep the application bound to loopback where the selected deployment supports it. Avoid opening port 3003 directly on the router or host firewall. If remote clients need only API access, do not use the public dashboard routinely, even though both surfaces may share the same application origin.
Run the service under a non-administrative operating-system account where practical. Restrict access to its environment and data files. Separate agent workspaces from unrelated personal or production files. Users with sufficient local process or filesystem access may be able to read service credentials regardless of network controls.
Frequently asked questions
Is WindsurfAPI now called DevinAPI?
The project currently presents both names and says WindsurfAPI evolved into DevinAPI. The GitHub repository and some assets still use WindsurfAPI, while the direct Devin cloud architecture is now the default direction. Always identify the repository tag and configuration mode when asking for support.
Does the default deployment require the Windsurf Language Server?
The current default direct path uses DEVIN_CONNECT=1 and does not require the optional Language Server. The Language Server belongs to the traditional Cascade transport and introduces separate binary and platform compatibility requirements.
Are authentication defaults the same for every deployment method?
No. Direct host documentation describes empty values as no API or dashboard authentication. Docker Compose is documented as failing closed when those values are empty. The current Windows package documentation says it generates both credentials on first launch. Inspect and test the actual configuration for the selected release.
Can the project run on Windows?
The project documents Windows release packages and a platform-independent direct Devin path. Verify that the specific release you select includes the expected Windows asset. Optional Language Server support is documented inconsistently across current project sources, so do not assume that the legacy path supports Windows or every other platform.
Does every connected account have access to every advertised model?
No. Availability depends on the project release, upstream catalog, account type, tier, entitlement, and current upstream behavior. Query /v1/models with authentication and test a returned identifier instead of relying on a static marketing list.
Does Localtonet replace the WindsurfAPI API key?
No. Our HTTP tunnel supplies public connectivity to the local target. The application must still authenticate API clients and protect its dashboard. Test rejection of missing and invalid credentials before and after starting the tunnel.
What Localtonet target should I use on the same machine?
Use an HTTP tunnel targeting 127.0.0.1 and port 3003, unless you deliberately changed the project’s port. This normally avoids changing the application to listen on every network interface.
Is this the same as Claude Code self-hosted environments?
No. This tutorial connects a Claude Code client to an Anthropic-compatible HTTP endpoint. Claude Code self-hosted environments are a separate Anthropic feature for running cloud sessions on organization-controlled runners.
Should I run update.sh while the public tunnel is active?
No. Stop the tunnel, back up configuration and data, review the target release and script, perform the update with a rollback plan, and repeat local authorized and unauthorized regression tests. Restore public access only after those checks pass.
Connect your locally verified API with Localtonet
After the pinned deployment responds locally, protects both the API and dashboard, and rejects unauthorized requests, create a Localtonet HTTP tunnel to the verified local port and provide approved clients with the assigned HTTPS origin.
Get Started Free →

