

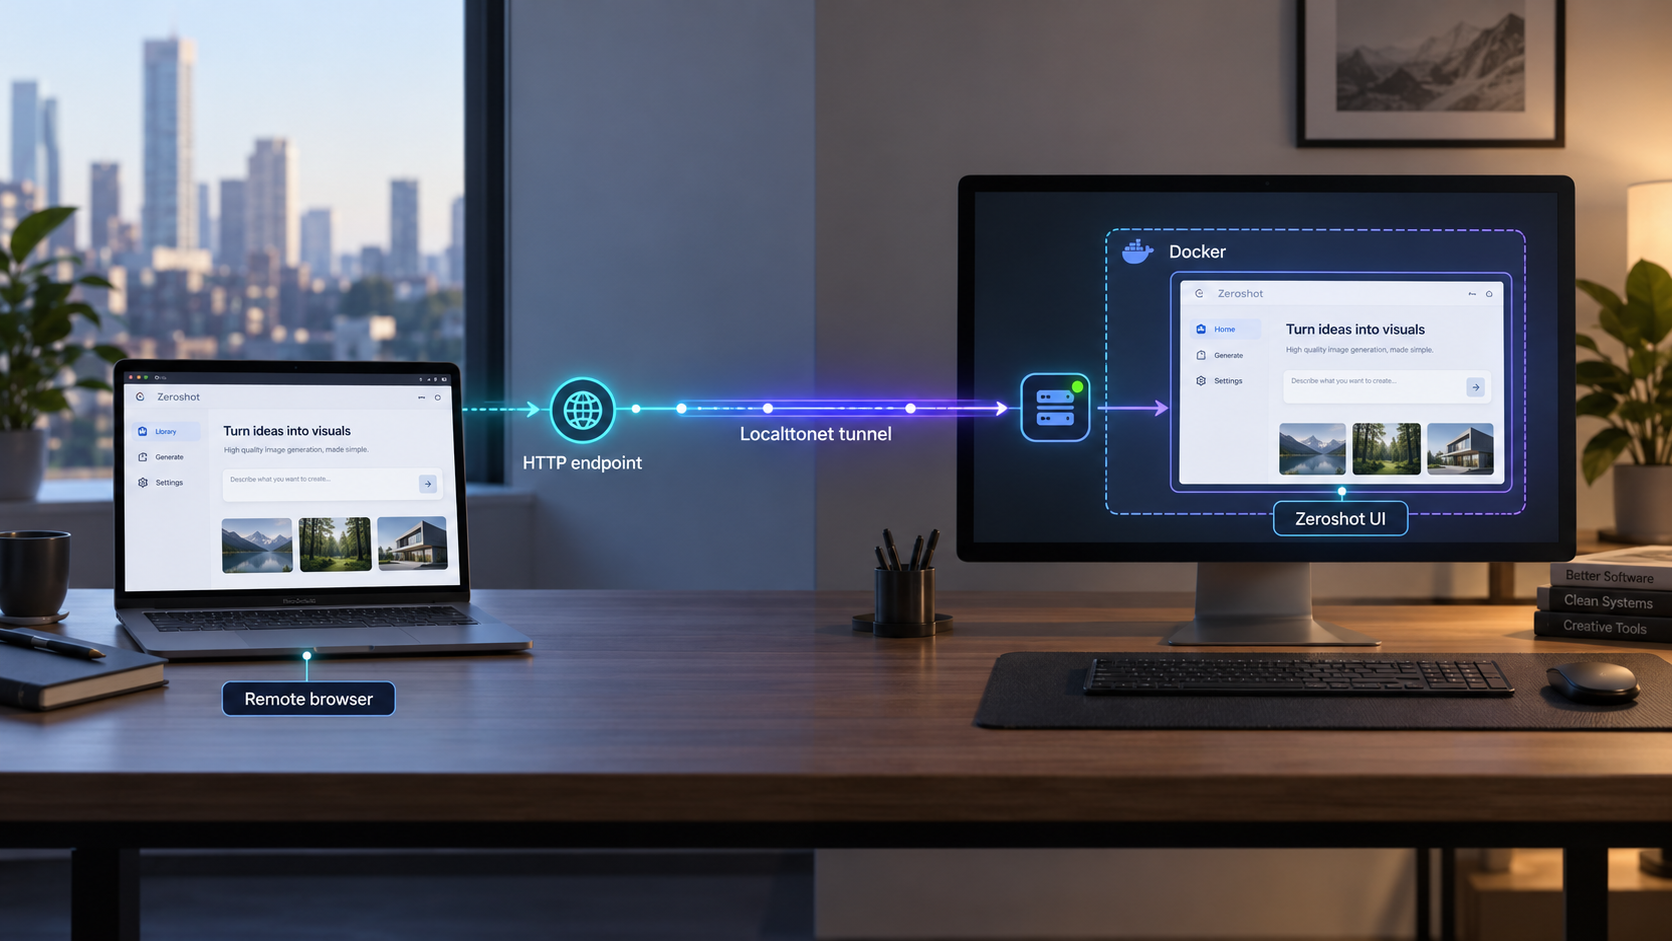
Run Zeroshot on infrastructure you control, verify the Docker target locally, and publish its browser interface only when remote access is needed
Zeroshot coordinates coding agents through an explicit graph in which implementation, review, repair, and delivery can be assigned to separate steps. This guide focuses first on its officially documented self-hosted Docker target, including installation, startup, local verification, container operations, updates, and troubleshooting. After the target works at http://127.0.0.1:8080, we show how to expose that HTTP service through Localtonet without opening an inbound router port or requiring a public IP address. Because built-in authentication for the Zeroshot target UI is not established by the available project documentation, the remote-access section treats public exposure as a deliberate, security-sensitive step.
📋 What's in this guide
What the Zeroshot Docker target does
Zeroshot is designed around a multi-agent graph rather than a single coding agent that implements a change and then judges its own result. A typical graph gives work to an implementation agent, sends the result to independent reviewers, and routes rejected work through a bounded repair loop. The graph defines the sequence, parallel steps, retry paths, and exit conditions before execution starts. A successful run means the checks configured for that graph accepted the result. It does not mean that every possible defect was discovered, because coverage still depends on the requirements, reviewers, tests, models, tools, and environment supplied to the run.
The project offers a command-line workflow and a self-hosted Docker target. They should not be confused. A local CLI installation uses the @the-open-engine-company/zeroshot npm package, requires Node.js 18 or newer, and can start a local inspection interface at http://127.0.0.1:4173/ui/. The Docker target covered here uses the published image ghcr.io/the-open-engine/zeroshot-target:latest and serves its HTTP interface on port 8080, with the UI under /ui/.
/ui/, making an HTTP tunnel the appropriate Localtonet tunnel family for browser access.
Docker target versus local CLI UI
| Deployment | Installation or image | Documented local address | Role in this guide |
|---|---|---|---|
| Self-hosted Docker target | ghcr.io/the-open-engine/zeroshot-target:latest |
http://127.0.0.1:8080 and http://127.0.0.1:8080/ui/ |
The primary deployment and Localtonet target |
| Local Zeroshot CLI UI | npm install -g @the-open-engine-company/zeroshot |
http://127.0.0.1:4173/ui/ |
An optional, separate local workflow |
| Localtonet public endpoint | Localtonet client plus an HTTP tunnel | An assigned public HTTPS address | Remote access after the Docker target passes local verification |
Keeping these endpoints distinct prevents a common configuration error. Port 8080 belongs to the Docker target described in this tutorial. Port 4173 belongs to the UI server started by the local zeroshot ui command. If both are installed, verify which process you intend to publish before creating a tunnel.
Prerequisites and deployment decisions
The shortest reliable path is to run Docker and the Localtonet client on the same machine. That design allows the container to publish port 8080 only on 127.0.0.1. The browser service remains unavailable directly from other LAN devices, while our client can still reach it locally and carry approved traffic through the tunnel.
Before starting, prepare the following:
- A host with Docker installed and the Docker daemon running.
- Permission to pull images from GitHub Container Registry at
ghcr.io. - Available local TCP port
8080. - A browser for testing the root endpoint and
/ui/. - An optional HTTP client such as
curlfor command-line checks. - The Localtonet client installed on the Docker host, or on another device that can reach the target.
- A Localtonet device/auth token selected through the current dashboard. Treat the token as a secret and never place it in public documentation, screenshots, shell history, or source control.
Installing the Zeroshot CLI globally is not required merely to start the documented Docker target. If you also want local CLI runs, install Node.js 18 or newer and then install @the-open-engine-company/zeroshot. Local execution additionally requires a supported coding-agent harness, such as Codex, Claude Code, or GitHub Copilot, to be installed and signed in. The exact model identifiers and provider configuration depend on the harness and account you use, so they must not be guessed.
Plan storage before relying on the service
Zeroshot uses a durable SQLite ledger for run events, but durable application storage and container durability are not the same thing. A writable file can survive a process restart inside the same container and still disappear when that container is removed. A bind mount or Docker volume is normally used to preserve container data across replacement, but the evidence available for this article does not establish the target's supported internal data path or its complete persistence configuration.
Do not invent a mount destination. Start the target for evaluation using the documented image, then consult the version-matched Zeroshot documentation before placing important run history in it. Confirm the supported data directory, ownership requirements, backup procedure, and migration behavior for the exact image version you deploy. Until that is established, treat the disposable command below as a functional test rather than a production persistence design.
Choose an image policy deliberately
The documented image reference uses the latest tag. That is convenient for evaluation, but it can resolve to a different image after a subsequent pull. A fixed image tag or digest is preferable when repeatability matters. The supplied evidence does not establish which version tags are published for the container, so this guide does not manufacture a tag from the CLI release number. Verify an available container tag or digest in the project's registry before pinning it.
Complete the Docker startup and local verification first. A tunnel cannot repair a failed container, an incorrect port mapping, or an application that is still initializing. Separating local deployment from remote access also makes troubleshooting substantially easier.
Install and start the Zeroshot Docker target
The following workflow uses Docker's standard image and port-publishing behavior with the documented Zeroshot target image and HTTP port. It binds the published host port to loopback instead of all network interfaces. This is an intentional safeguard: the service is reachable from the host itself, but it is not directly opened to the whole LAN.
Confirm that Docker is available
Ask Docker for its installed version, then confirm that the daemon can answer container queries. Resolve any daemon, permission, or socket error before continuing.
Pull the official target image
Pull ghcr.io/the-open-engine/zeroshot-target:latest explicitly. This separates registry and download failures from application startup problems.
Start the container with a loopback-only port mapping
Create a container named zeroshot-target and map host address 127.0.0.1, host port 8080, and container port 8080. Keep the first run attached so startup messages remain visible.
Leave the process running for local verification
Do not create a public tunnel yet. Keep the container terminal open and use a second terminal or browser to test the HTTP service locally.
docker --version
docker ps
docker pull ghcr.io/the-open-engine/zeroshot-target:latest
docker run --name zeroshot-target -p 127.0.0.1:8080:8080 ghcr.io/the-open-engine/zeroshot-target:latest
The final command remains attached to the container. Pressing Ctrl+C may stop the process, depending on how the image handles the signal. For the first run, attached mode is useful because it shows startup output immediately. Once the deployment works, you can stop the test container and recreate or start it according to your chosen operating model.
What the port mapping means
Docker's -p 127.0.0.1:8080:8080 argument has three important parts. The first 127.0.0.1 limits the listener to the Docker host's loopback interface. The first 8080 is the port used by browsers and the Localtonet client on that host. The second 8080 is the target port inside the container.
Avoid shortening this to -p 8080:8080 unless direct LAN exposure is an intentional and reviewed requirement. On common Docker configurations, omitting the host address publishes the port on broader host interfaces. A Localtonet HTTP tunnel does not require that broader bind when our client runs on the same host.
Optional local CLI installation
If you also need Zeroshot's local command-line workflow, first verify that Node.js reports version 18 or newer, then install the package globally:
node --version
npm install -g @the-open-engine-company/zeroshot
The installer provides a verified native binary for Linux x64 and arm64, macOS x64 and arm64, and Windows x64. It also installs a Zeroshot skill at user scope for Codex, GitHub Copilot, and Claude Code. Those platform statements describe the documented CLI installer, not every possible Docker host architecture.
A local run requires the selected harness to be installed and authenticated. The project's first-run example uses JSON input and runtime configuration, but model identifiers are harness-specific. Use an identifier supported by your installed harness rather than copying an invented placeholder into a live workflow. The Docker target can be deployed and tested independently of this optional CLI installation.
Verify the target locally before tunneling it
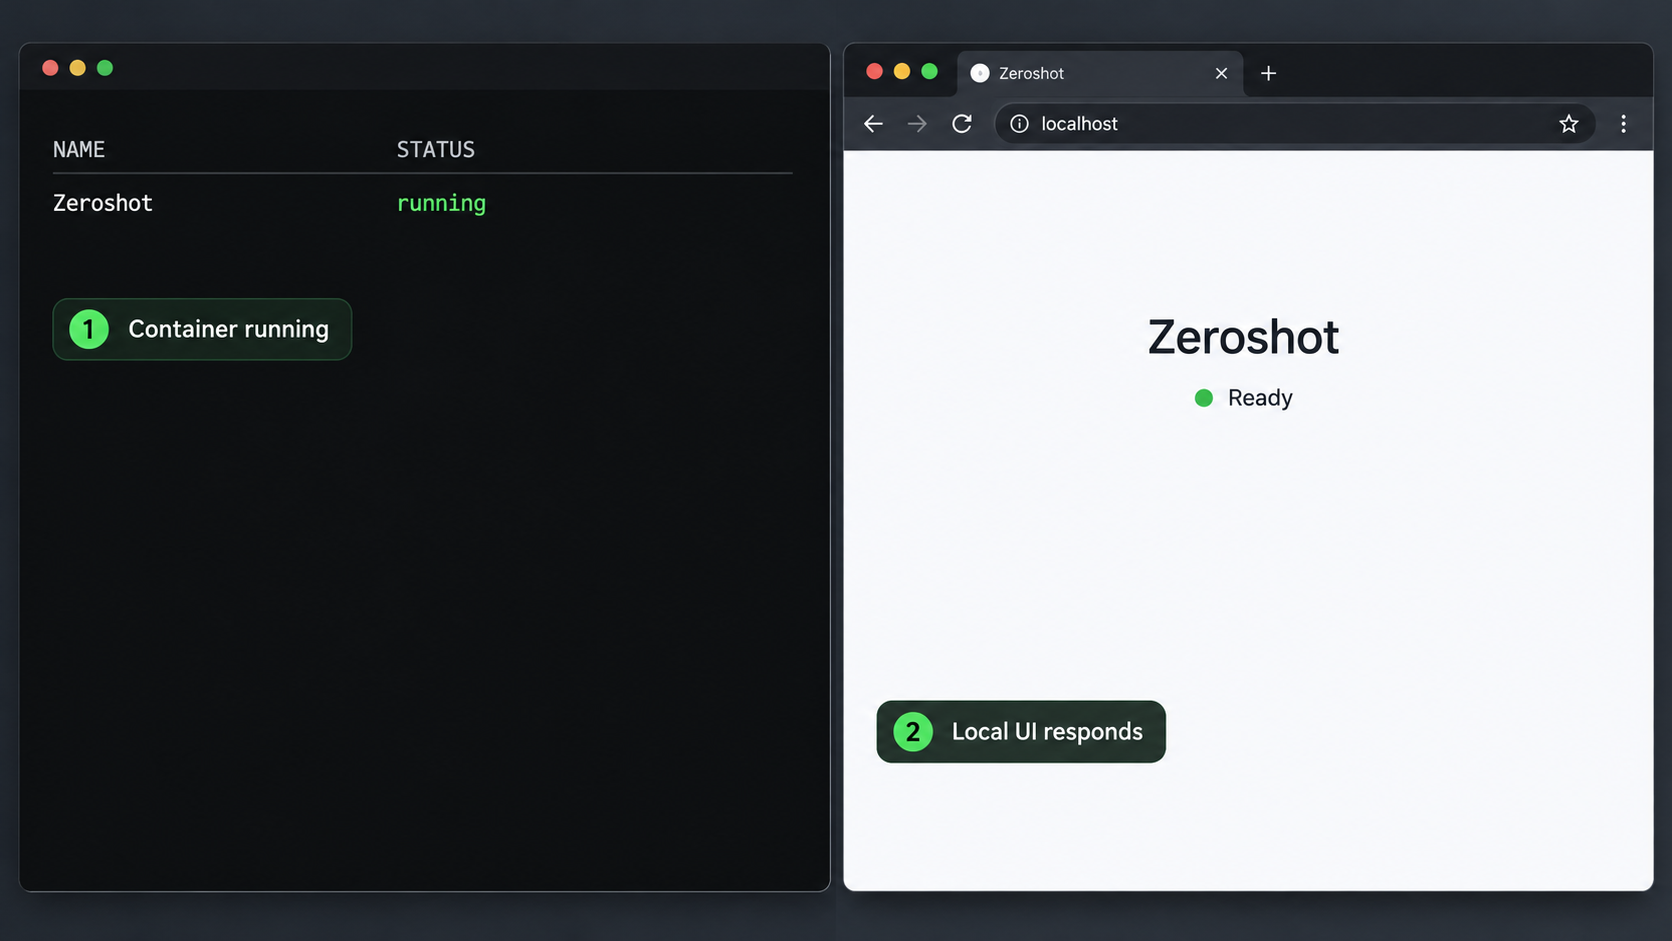
Local verification should answer three separate questions: is the container running, is Docker publishing the expected loopback port, and does the application return an HTTP response? Passing only one of these checks is not enough.
Inspect the running container
Use docker ps and locate the container named zeroshot-target. Check that it is running and that its published port corresponds to loopback port 8080.
Test the HTTP root locally
Request http://127.0.0.1:8080 from the Docker host. Any application-specific response must be interpreted together with the container logs, but a connection refusal means the listener is not reachable.
Open the browser UI
Visit http://127.0.0.1:8080/ui/. Confirm that the page loads rather than relying solely on the root route.
Review logs for hidden startup errors
Inspect the container output even if the page loads. Repeated restarts, storage errors, or failed initialization messages should be resolved before adding remote access.
docker ps
curl -i http://127.0.0.1:8080
curl -i http://127.0.0.1:8080/ui/
docker logs zeroshot-target
An HTTP response confirms network reachability, not full application readiness. Load the UI in a browser and exercise only safe, non-destructive functions needed to confirm that static assets and API requests work through the local origin. If the browser shell appears but data panels fail, inspect its developer tools and the container logs for failed requests.
The documented Docker UI address is http://127.0.0.1:8080/ui/. Using the documented path avoids relying on an undocumented redirect from /ui.
Define a local acceptance checkpoint
Before proceeding, all of the following should be true:
- The
zeroshot-targetcontainer remains running. - Docker shows host port
127.0.0.1:8080mapped to the container's port8080. - The host can connect to
http://127.0.0.1:8080. - The browser can load
http://127.0.0.1:8080/ui/. - The logs do not show an unresolved crash or restart loop.
- You understand that the available evidence does not establish built-in UI authentication.
If any condition fails, remain in the local troubleshooting stage. Creating a tunnel at this point would only add another layer to diagnose.
Operate, stop, restart, and update the container
Routine container operations should be predictable before the service is exposed remotely. The commands below use the container name assigned during installation.
Stop and start the existing container
docker stop zeroshot-target
docker start zeroshot-target
docker logs zeroshot-target
Stopping the container makes the local HTTP target unavailable. If a Localtonet tunnel remains running while the target is stopped, the public endpoint cannot successfully proxy the unavailable application. Stop the tunnel as well when remote access is no longer intended.
Follow logs during an investigation
docker logs --follow zeroshot-target
Exit log-following with Ctrl+C. This ends the log viewer, not normally the already running detached container. If the original container is still attached to the foreground terminal instead, signal handling can differ because that terminal is attached to the application process.
Replace a container that uses the latest image
Pulling a newer image does not rewrite an existing container. Docker containers retain the image selected when they were created. To replace the test deployment, stop and remove the existing container, pull the current image, and create it again:
docker stop zeroshot-target
docker rm zeroshot-target
docker pull ghcr.io/the-open-engine/zeroshot-target:latest
docker run --name zeroshot-target -p 127.0.0.1:8080:8080 ghcr.io/the-open-engine/zeroshot-target:latestDo not run the removal sequence against an important deployment until you have confirmed and tested the project's supported persistence path. The exact volume destination and migration procedure are not established by the supplied evidence, so this article intentionally does not guess them. Back up data using a version-supported method before an upgrade.
Reverify after every replacement
Treat an update as a new deployment. Repeat the local root request, open /ui/, and inspect logs before restarting the public tunnel. If repeatability matters, record the image digest actually deployed, together with the date and the relevant Zeroshot configuration, without recording credentials.
Expose the verified Zeroshot UI with a Localtonet HTTP tunnel
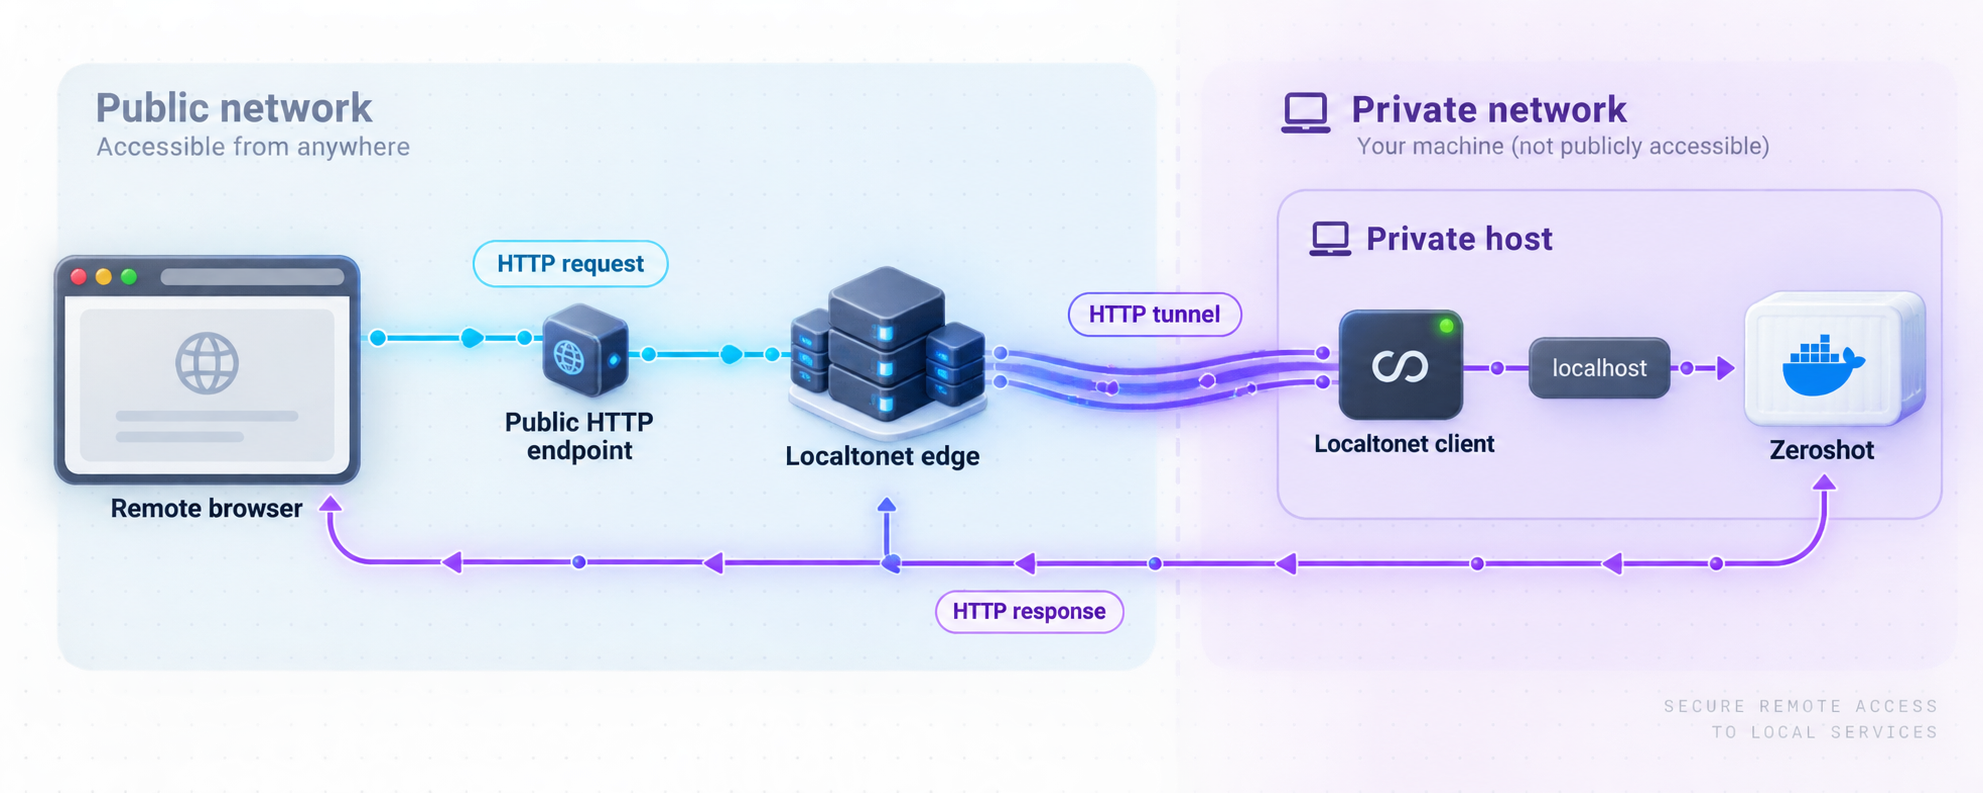
Once the Docker target works locally, an HTTP tunnel is the appropriate Localtonet configuration because Zeroshot presents a browser-accessible HTTP service. Our client connects outbound to a Localtonet relay server. The resulting tunnel provides a public HTTPS address without requiring inbound router port forwarding, firewall changes, VPN setup, or a public IP address.
The cleanest arrangement is to run our client on the Docker host and target 127.0.0.1:8080. If the client runs on another machine, 127.0.0.1 would refer to that other machine, not the Docker host. You would then need a local network address that the client device can reach, and the Docker service would need to listen accordingly. That broadens the network exposure and should be reviewed separately.
Install and run the Localtonet client on the target host
Run our client on the machine that can reach the verified Zeroshot service. Using the Docker host itself allows the tunnel target to remain bound to 127.0.0.1.
Authenticate or select the device
Use the device-specific auth token through the current Localtonet application and dashboard workflow. Never publish, guess, or reuse another device's token.
Select an available relay server
Choose a server or region currently offered in your dashboard. Availability can vary, so this guide does not hardcode a server code or geographic location.
Create an HTTP tunnel to the local target
Configure the local IP address as 127.0.0.1 and the local port as 8080. For the public address, choose an HTTP process type currently available to your account, such as a generated random subdomain. Custom subdomain and custom domain availability and requirements must be confirmed in the current dashboard and documentation.
Start the tunnel
Creating a tunnel does not start it. Use the Start button and confirm that both the selected client device and the tunnel report an active connection.
Test the assigned public address, then stop it when finished
Open the assigned public HTTPS address and append /ui/ to reach the Zeroshot interface. When remote access is no longer required, stop or delete the tunnel. The public endpoint works only while the selected client is connected and the tunnel is running.
For the current dashboard sequence and field names, consult our HTTP tunnel documentation. Exact custom-domain DNS records should always be taken from current Localtonet documentation rather than copied from a generic example.
Verify each layer independently
| Layer | Verification | If it fails |
|---|---|---|
| Zeroshot process | docker ps and container logs |
Resolve startup, configuration, or storage errors |
| Local HTTP service | Open http://127.0.0.1:8080/ui/ on the host |
Check the port mapping and application listener |
| Localtonet client | Confirm the selected device is connected | Check the client process, token selection, and outbound connectivity |
| HTTP tunnel | Confirm the tunnel was created and then started | Start it and verify its local IP and port |
| Public UI route | Open the assigned HTTPS address with /ui/ |
Test the public root, then inspect browser and application errors |
Security safeguards for a remote developer interface
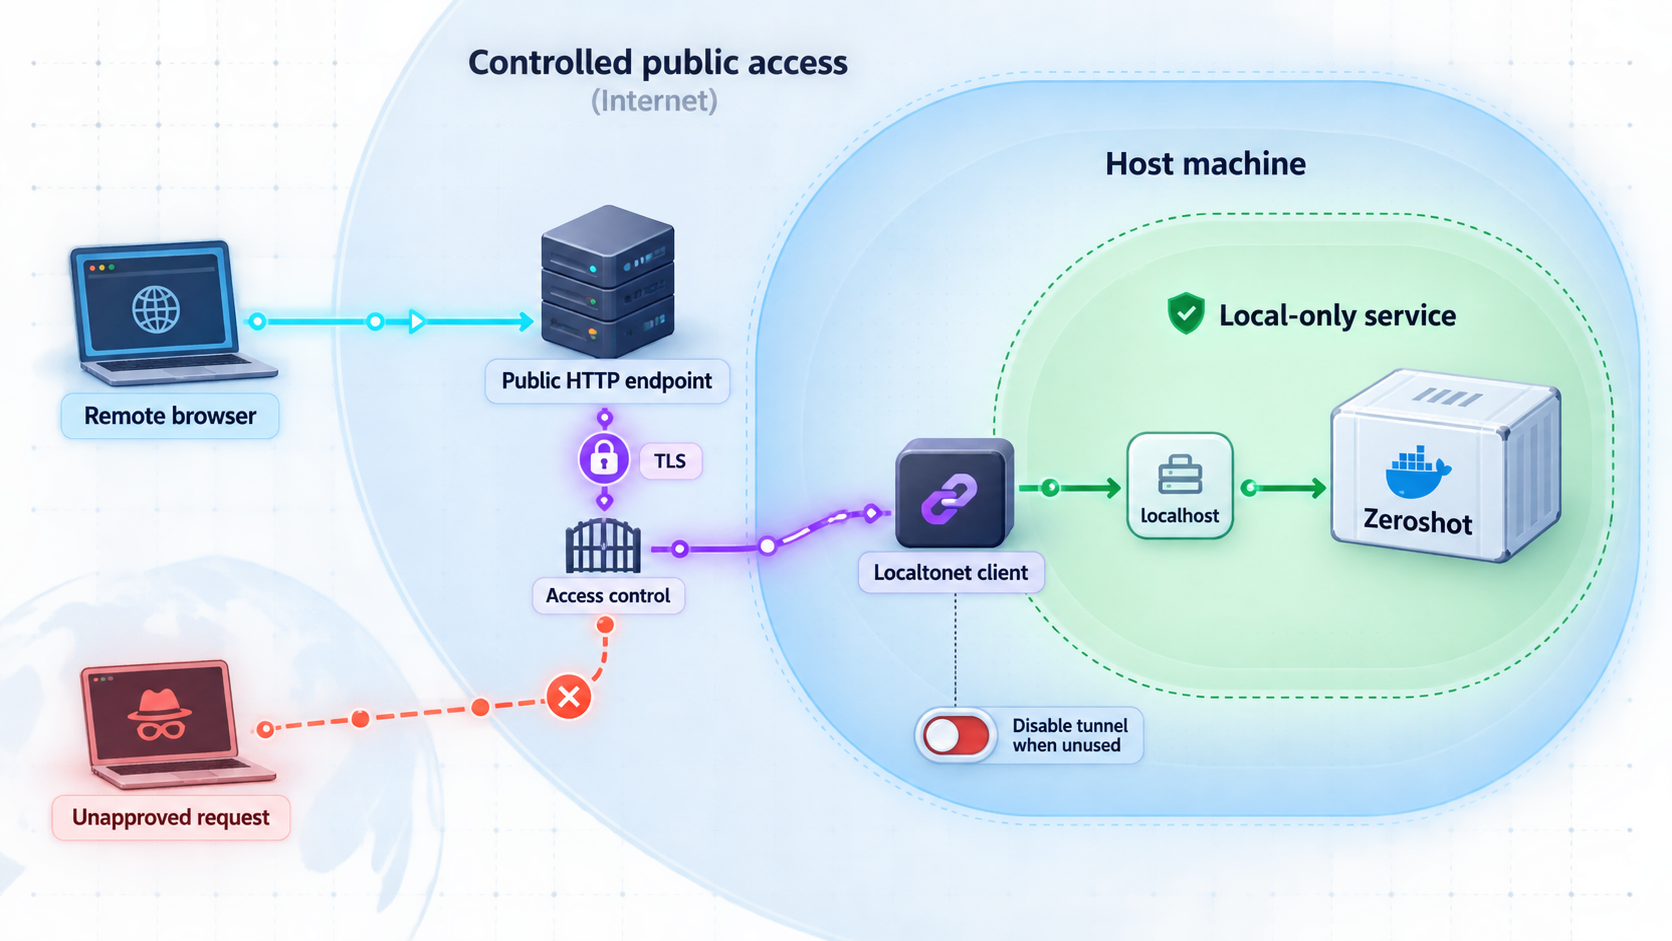
A working tunnel makes a local service reachable through a public endpoint. It does not prove that the application is appropriate for unrestricted public use. The available Zeroshot evidence does not establish built-in authentication or authorization for the Docker target UI, so this guide does not claim that the interface protects itself from unknown visitors.
Do not rely on an unguessable-looking subdomain as the only protection for repositories, prompts, logs, run metadata, model configuration, or developer operations. If the deployed Zeroshot version does not provide documented access controls, restrict exposure to short, supervised sessions or place a properly reviewed authentication layer in front of the service.
Use the narrowest network bind
Keep the Docker mapping on 127.0.0.1 when the Localtonet client runs on the same host. This avoids exposing port 8080 directly on every host interface. The tunnel becomes the intentional remote path, while local firewall and LAN behavior remain simpler.
Expose the service only for as long as needed
A Localtonet tunnel is available only while the selected client is connected and the tunnel is running. Use that lifecycle deliberately. Start the tunnel for a remote session, verify that the intended user can connect, and stop or delete it afterward. Also stop the target container when the service itself is no longer needed.
Protect tokens and coding-agent credentials
A Localtonet auth token identifies the device that runs the tunnel and must remain secret. Zeroshot may also interact with authenticated coding-agent harnesses, provider credentials, repositories, and CI systems depending on your configuration. Do not place any such values in image arguments, public screenshots, copied logs, shell transcripts, or repository files.
The Zeroshot project documents that local runs can reuse an existing harness login, including subscription-backed sessions. That does not establish how every credential behaves inside the Docker target. Follow version-specific Zeroshot guidance for connecting harnesses and providers, and apply least privilege to every account or key.
Treat UI content as sensitive
A run interface may reveal task descriptions, code-related context, review feedback, logs, file paths, branch names, or delivery status. Before remote exposure, inspect what the UI displays with a representative test run. Avoid tunneling a deployment containing confidential project history until access restrictions have been reviewed.
Separate tunnel security from application authorization
Localtonet transports requests to the configured local service and provides the assigned public endpoint. Application authentication, repository permissions, harness permissions, and authorization to launch or inspect runs remain separate concerns. A successful HTTPS connection to the tunnel should never be interpreted as proof that the user is authorized to operate Zeroshot.
Troubleshooting the Docker target and tunnel
The image cannot be pulled
Confirm that the host can resolve and reach ghcr.io. Read the exact Docker error before changing configuration. A name-resolution failure, network timeout, registry denial, unsupported image platform, and local Docker permission error are different problems. The available evidence documents the image reference but does not establish every host architecture supported by that container.
Docker reports that the container name is already in use
A previous zeroshot-target container still exists, even if it is stopped. Inspect all containers:
docker ps --all
If the existing container is the one you want, start it with docker start zeroshot-target. Remove it only after confirming that deleting it will not discard needed data.
Port 8080 is already allocated
Another local process or container is using host port 8080. Stop the conflicting service if appropriate, or choose a different host port while leaving the container target port at 8080. For example, this maps host loopback port 8081 to container port 8080:
docker run --name zeroshot-target -p 127.0.0.1:8081:8080 ghcr.io/the-open-engine/zeroshot-target:latest
If you make that change, local verification must use http://127.0.0.1:8081/ui/, and the Localtonet tunnel's local port must also be 8081. Do not mix the host port with the container port.
The container exits immediately
Inspect its status and logs:
docker ps --all
docker logs zeroshot-target
The logs are the authoritative starting point. Do not hide an initialization failure behind an automatic restart loop. If the error requests configuration not covered by the supplied project evidence, use the documentation matching the deployed image instead of guessing environment variable names or filesystem paths.
The root responds, but the UI does not load
Test the documented /ui/ path with its trailing slash. Then inspect browser developer tools for failed scripts, API requests, or redirects, and compare those failures with the container logs. Test locally before testing through Localtonet. If the local UI fails, the tunnel is not the cause.
The UI works locally but not through Localtonet
Check the layers in order:
- Confirm the container still runs.
- Reload
http://127.0.0.1:8080/ui/on the Docker host. - Confirm the Localtonet client is running and the selected device is connected.
- Confirm the HTTP tunnel targets
127.0.0.1and port8080, or the alternate host port you intentionally selected. - Confirm that the tunnel was started, not merely created.
- Open the assigned public HTTPS address and then its
/ui/path.
If our client runs in another container or on another machine, its 127.0.0.1 does not point to the Zeroshot host. Use a network design in which the client can reach the service, but do not broaden the Docker bind without understanding the resulting LAN exposure.
The public root works, but assets or API calls fail
Record the failing request path and status code from the browser's network panel. Compare the same path through the local endpoint and the public endpoint. A failure on both sides is an application issue. A failure only through the public endpoint may involve generated URLs, origin assumptions, redirects, or proxy behavior. The supplied evidence does not establish Zeroshot settings for external base URLs or trusted proxies, so this article does not invent environment variables for them.
The tunnel stops unexpectedly
The tunnel depends on both the selected Localtonet client connection and the tunnel's running state. Confirm that the host is online, our client process remains active, and the tunnel is started. A running tunnel also requires a healthy target if requests are to succeed. Platform-wide Token/Tunnel webhooks can report Connected or Disconnected changes for a selected Token Group, but they do not monitor Zeroshot application health.
Data disappears after container replacement
This usually indicates that state lived only in the removed container's writable layer. Restore from a valid backup if one exists. Before redeploying, establish the exact persistence directory and backup procedure supported by the Zeroshot target version. Do not select an arbitrary internal path simply because the application uses SQLite.
Frequently asked questions
Do I need the Zeroshot npm CLI to run the Docker target?
Not for the basic Docker-target deployment described here. The target can be pulled from ghcr.io/the-open-engine/zeroshot-target:latest and started with Docker. The npm CLI is a separate workflow for local Zeroshot commands and requires Node.js 18 or newer.
Which Zeroshot port should I use with Localtonet?
Use the Docker host port mapped to the target's container port 8080. With the command in this guide, the Localtonet target is 127.0.0.1:8080. If you intentionally map a different host port, such as 8081, use that host port in the tunnel configuration.
Why is the Docker port bound to 127.0.0.1?
A loopback bind keeps the target from being directly published on broader host network interfaces. When our client runs on the same host, it can reach the service locally and provide the intended remote route through the HTTP tunnel.
Is the public Zeroshot UI protected by built-in authentication?
Built-in authentication or authorization for the Docker target UI is not established by the evidence available for this guide. Do not assume that the UI protects itself. Use short-lived exposure, verify current Zeroshot security documentation, and add a reviewed authentication control where required.
Does creating a Localtonet tunnel make it active immediately?
No. Creating a tunnel does not mean it is running. Start it with the Start button. The public endpoint remains available only while the selected client device is connected and the tunnel is running.
Can the Localtonet client run on a different machine?
Yes, if that device can reach the Zeroshot service. However, 127.0.0.1 always refers to the machine on which the client runs. A separate client host therefore needs a reachable address for the Docker host, and the service must be bound and filtered appropriately. Running both on the same host is simpler and preserves the loopback-only Docker mapping.
Will Zeroshot data survive removing and recreating the container?
Do not assume that it will. Zeroshot records events in a SQLite ledger, but persistence across container removal requires a supported external storage configuration. The exact internal data path is not established by the supplied evidence, so verify the version-specific mount and backup instructions before storing important history.
Should I expose the CLI UI on port 4173 or the Docker target on port 8080?
This guide exposes the self-hosted Docker target on port 8080. Port 4173 belongs to the separate local UI started with zeroshot ui. Verify the exact process you intend to reach and do not publish both accidentally.
Connect your verified Zeroshot target with Localtonet
Start with a loopback-bound Docker service, verify http://127.0.0.1:8080/ui/ locally, and then create an HTTP tunnel for controlled remote access without opening an inbound router port.


