

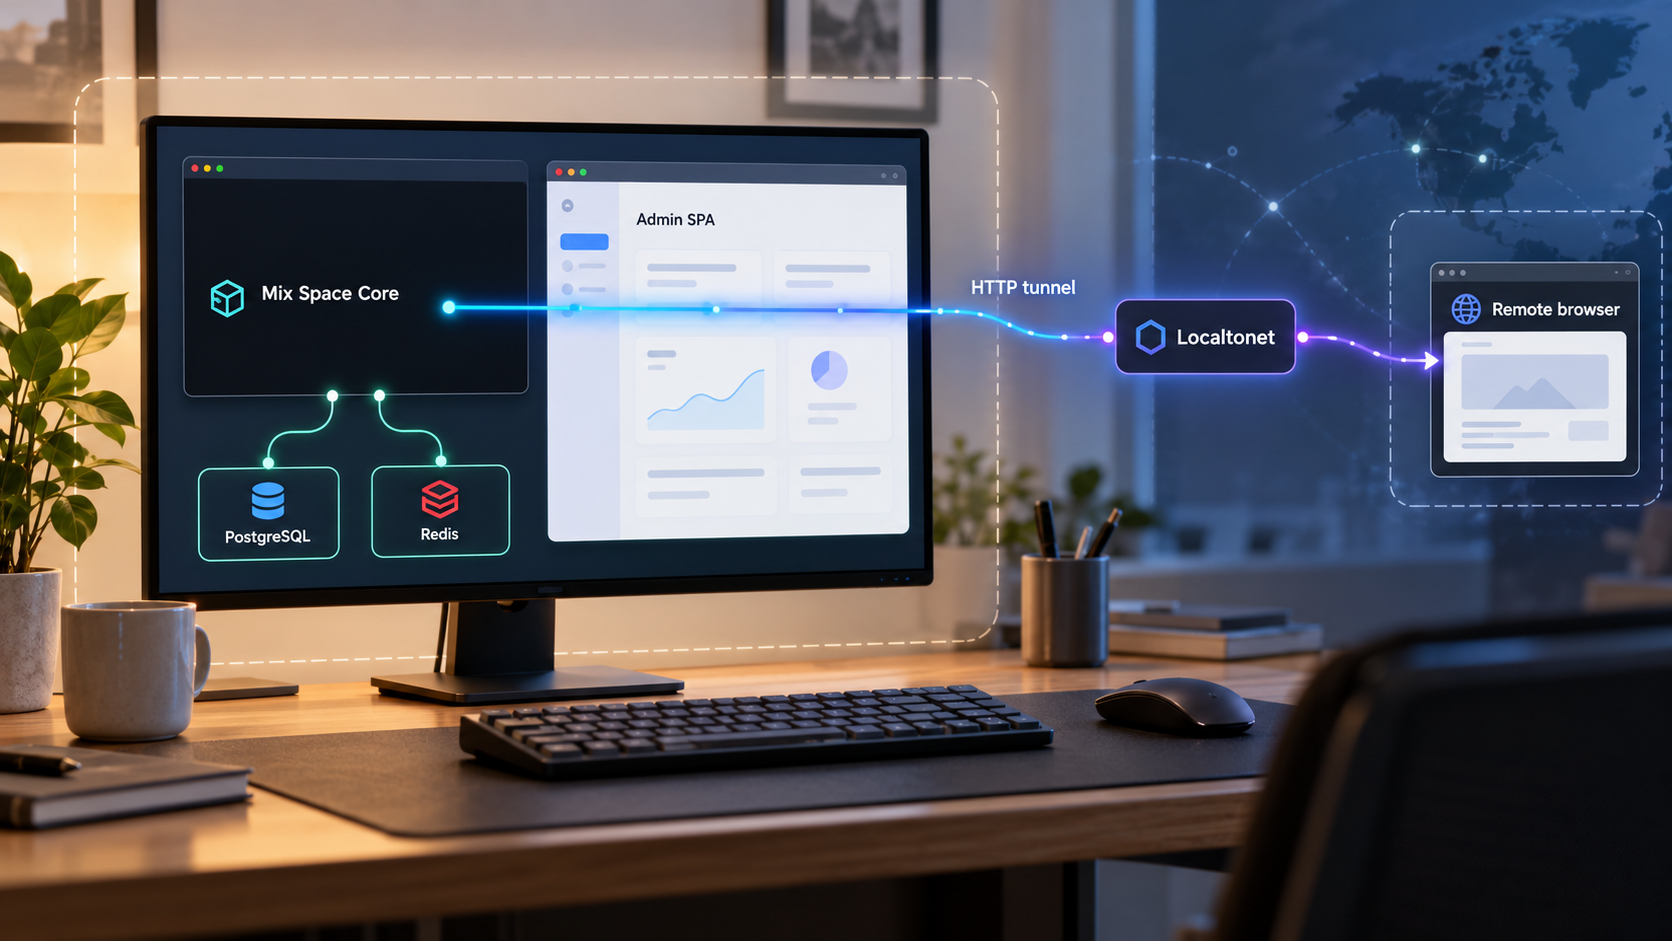
Build a working Mix Space development stack locally, then make the core service reachable when you need remote access
Mix Space combines a NestJS and Fastify core server with PostgreSQL, Redis, and a separate React admin interface. This guide walks through the documented source-based development setup, starts each dependency in the correct order, verifies the core and admin services locally, and explains the routine commands used to operate the stack. Once the local application works, we connect its core HTTP endpoint to Localtonet without requiring inbound router port forwarding, firewall changes, VPN setup, or a public IP address. The documented production files are also discussed, but we do not invent a production deployment procedure where the available project evidence does not establish one.
📋 What's in this guide
Understand the Mix Space development stack
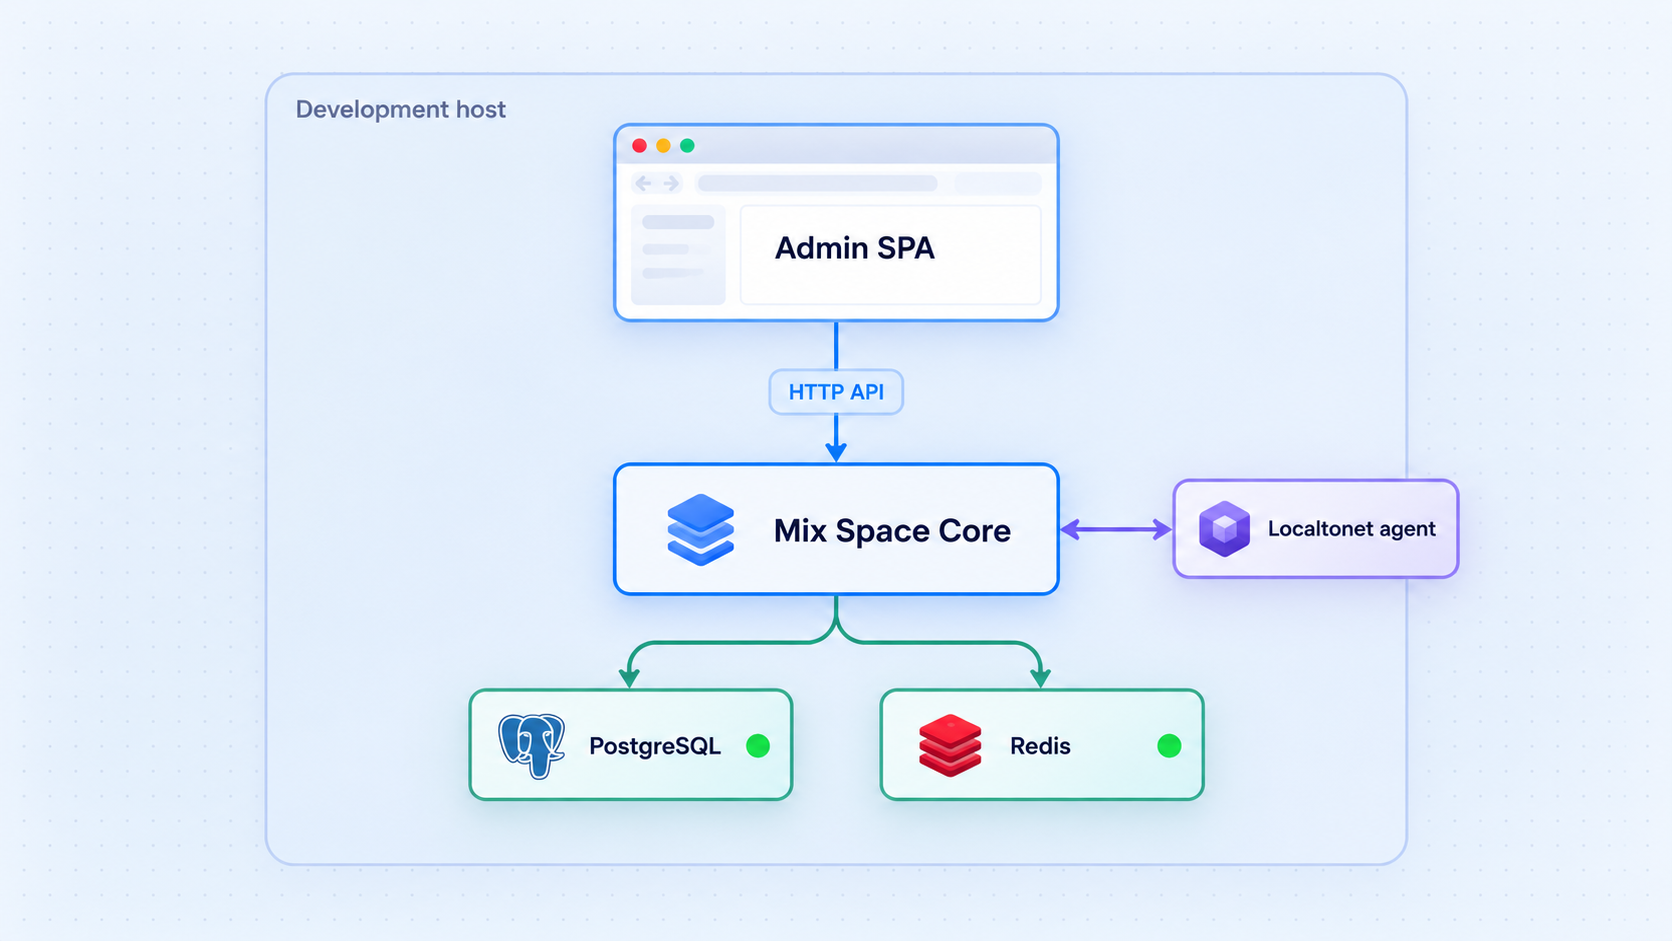
Mix Space is a self-hosted, headless content management system intended for personal blogs, creator homepages, and other content websites. Its monorepo contains more than a single web application. For this tutorial, the most important components are the core server in apps/core and the browser-based admin application in apps/admin.
The core is the backend of the stack. It uses NestJS and Fastify and depends on PostgreSQL and Redis. During the documented development workflow, the core listens at http://localhost:2333. The admin is a React 19 single-page application used to manage the CMS. Its separate development server listens at http://localhost:9528 and is intended to run alongside the core server.
These endpoints serve different purposes. Port 2333 is the core HTTP service consumed by clients and frontends. Port 9528 is the admin development server used while working on the admin SPA. The repository also describes the built admin application as being integrated with the server under /proxy/qaqdmin, but that production-style behavior should not be assumed to replace the separate admin development command covered here.
pnpm dev.
pnpm dev:admin on local port 9528.
2333.
Keeping these roles separate makes troubleshooting much easier. If the database is unavailable, the core may be unable to initialize correctly. If the core is unavailable, the admin page might load while its API operations fail. If the core and admin both work locally but a public address does not, the problem is more likely to be in the tunnel target, tunnel lifecycle, or remote-access configuration.
| Component | Documented startup method | Local address or role |
|---|---|---|
| PostgreSQL | docker compose up -d postgres redis |
Database dependency managed by the development Compose stack |
| Redis | docker compose up -d postgres redis |
Redis dependency managed by the development Compose stack |
| Mix Space core | pnpm dev |
http://localhost:2333 |
| Admin SPA | pnpm dev:admin |
http://localhost:9528 |
| Localtonet HTTP tunnel | Created and started after local verification | Targets the core service on local port 2333 |
Prepare the development host
The source workflow requires a local checkout of the Mix Space repository, a compatible Node.js environment, Corepack, Docker with Docker Compose support, and enough local resources to run PostgreSQL, Redis, the core development process, and optionally the admin development process at the same time.
Git is the normal way to obtain the repository. Node.js provides the JavaScript runtime, while Corepack activates the package-manager integration needed for the repository's pnpm workflow. Docker Compose runs the data services without requiring a separate manual PostgreSQL or Redis installation. The commands in this article must be run from the repository root unless a step explicitly says otherwise.
The supplied project evidence does not establish a universal Node.js, Docker, Docker Compose, or operating-system version for this tutorial. Check the version declarations and current per-application documentation in the repository you actually clone, especially files such as .nvmrc, package.json, and the application README. Use the requirements from the selected commit or release instead of assuming that an arbitrary runtime version is compatible.
Before beginning, confirm that the following tools are installed and callable from your terminal:
- Git, to clone and update the monorepo.
- Node.js, using the version expected by the checked-out project revision.
- Corepack, which is enabled before pnpm dependencies are installed.
- Docker, with the Docker daemon or equivalent engine running.
- Docker Compose, available through the
docker composecommand form. - A web browser, for testing the core and admin endpoints.
- The Localtonet client, but only when you reach the remote-access part of the guide.
Ports 2333 and 9528 must be available on the development machine for the documented defaults. PostgreSQL and Redis also need the resources and networking required by the repository's Compose configuration. If another process already occupies either web port, do not silently substitute a different value and assume the rest of the stack will follow it. First inspect the project's current configuration and supported override mechanism.
The repository contains an .env.example file, but the extracted setup instructions do not establish which environment values are mandatory for this exact quick-start path or which values should be changed. We therefore do not provide invented environment variables, credentials, database URLs, or secrets. If the checked-out revision requires environment configuration, use the names and semantics documented by that revision.
This article follows the repository's source-based quick start. The repository contains docker-compose.server.yml and a multi-stage production Dockerfile, but the available evidence does not provide enough production deployment commands, secret requirements, migration sequencing, or reverse-proxy configuration to document a reliable production installation. Treat the procedure below as a development and evaluation stack.
Install and start Mix Space Core
Work through the installation in sequence. PostgreSQL and Redis should be running before the core development server is launched. Keep the core process attached to its own terminal so that startup errors and runtime logs remain visible.
Obtain the Mix Space repository
Clone the official repository and enter its root directory. If you already have a checkout, enter that directory and make sure you know which branch, tag, or commit you are using. Pinning a known revision is preferable when repeatability matters.
Enable Corepack
Run corepack enable from an environment with permission to activate Corepack. This prepares the package-manager integration expected by the repository.
Install the monorepo dependencies
From the repository root, run pnpm install. Allow the command to finish successfully before starting any application process. Dependency errors should be corrected rather than bypassed.
Start PostgreSQL and Redis
Run docker compose up -d postgres redis from the repository root. The detached mode leaves both services running while returning control of the terminal.
Launch the core development server
Run pnpm dev in a dedicated terminal at the repository root. The documented result is a watch-mode core server available at http://localhost:2333.
A fresh checkout can be prepared with the following command sequence:
git clone https://github.com/mx-space/core.git
cd core
corepack enable
pnpm install
docker compose up -d postgres redis
pnpm dev
Avoid combining all commands into a background script during the first installation. Running them interactively makes it clear which stage failed. In particular, confirm that dependency installation succeeds and that both containers remain healthy enough for the core to connect before interpreting a core startup failure as an application defect.
Inspect the data services
Docker Compose can report the state of the services declared by the project:
docker compose psIf PostgreSQL or Redis exits, inspect its logs from the repository root:
docker compose logs postgres
docker compose logs redis
The exact healthy-state wording and container details can vary with the Docker and Compose versions in use. The practical requirement is that both services remain running and that the core process does not report an unresolved database or Redis connection failure.
Respect the migration model
Mix Space documents forward SQL migrations as a one-shot release-phase operation rather than something that runs automatically on every server boot. That distinction is especially important when moving beyond the quick-start development workflow or upgrading an existing installation. Do not assume that repeatedly restarting the core applies every required schema change.
The repository also includes a separate historical migration utility for moving older MongoDB-backed data to PostgreSQL. That is not part of a clean development installation, and it should not be invoked unless you are performing the specific migration documented by the project. For an existing installation, follow the upgrade and migration instructions associated with the exact version transition.
Verify the core locally before exposing it
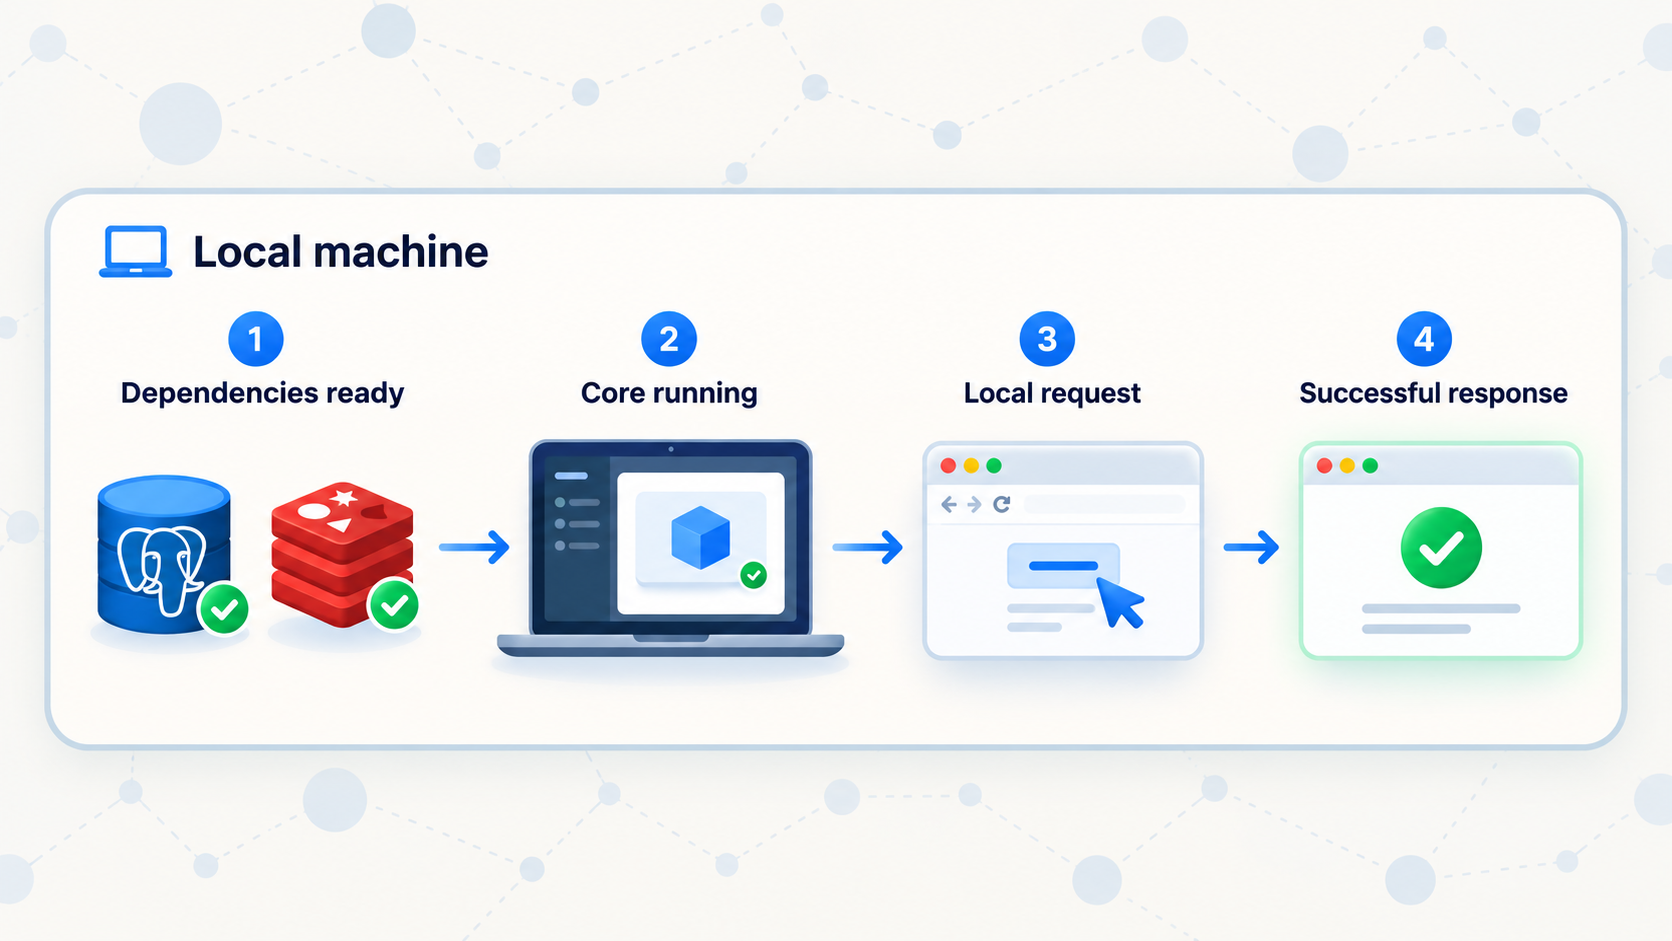
Remote access should be the final integration step, not the first diagnostic step. A tunnel cannot repair a failed application, a stopped database, an occupied port, or a core process that is listening somewhere other than the configured target.
Keep the terminal running pnpm dev open and look for a completed startup rather than an unhandled exception or an endless connection retry. Then open the documented address from a browser on the same machine:
http://localhost:2333You can also test whether the HTTP listener responds from a terminal:
curl -i http://localhost:2333/The exact status code and response body at the root path depend on the application revision and route configuration. A structured application response, redirect, or even an application-level not-found response still proves more about network reachability than a connection-refused error. By contrast, a timeout or connection refusal indicates that the listener is unavailable at that address.
An HTTP listener can be healthy even when a particular path returns an application-level error. First determine whether a TCP connection and HTTP exchange occur. Then diagnose the requested route, authentication requirement, or application configuration. This prevents a valid route error from being mistaken for a tunnel or port failure.
Use a simple verification order
- Confirm the Docker engine is running.
- Confirm PostgreSQL and Redis remain active with
docker compose ps. - Confirm
pnpm devremains running without a fatal startup error. - Open
http://localhost:2333on the same host. - Only after local reachability succeeds, install and configure the Localtonet client.
If another device on the LAN cannot reach the service, that does not necessarily mean the local process is broken. A development server can be bound only to the loopback interface. Localtonet can still target 127.0.0.1 when its client runs on the same device as the core, so LAN exposure is not a prerequisite for the workflow in this article.
Start and verify the Mix Space admin SPA
The admin application is a separate development process. Leave the core terminal running, open a second terminal, return to the repository root, and start the admin development server:
pnpm dev:adminThe documented local address is:
http://localhost:9528Open that address in a browser on the development host. The page loading proves that the admin development server is reachable, but it does not prove that all admin operations can communicate with the core. Test an action that requires backend access and inspect both terminal windows if the interface loads but data requests fail.
The repository describes the admin SPA as communicating with the core through /proxy/qaqdmin. Do not replace this project-defined behavior with an invented API URL or undocumented environment variable. If the current revision requires additional admin configuration, follow the configuration names documented inside that revision.
The main remote-access procedure below exposes the core at port 2333, not the admin development server at port 9528. A development admin interface can provide powerful management capabilities. Keep it local unless remote administration is genuinely required, and apply the application's authentication and authorization controls before making it reachable beyond the host.
If both addresses are working, the local development topology is complete: PostgreSQL and Redis run in containers, the core runs through pnpm dev, and the admin SPA runs through pnpm dev:admin. You can now distinguish frontend, backend, and dependency failures instead of treating the stack as a single opaque service.
Expose the Mix Space core with Localtonet
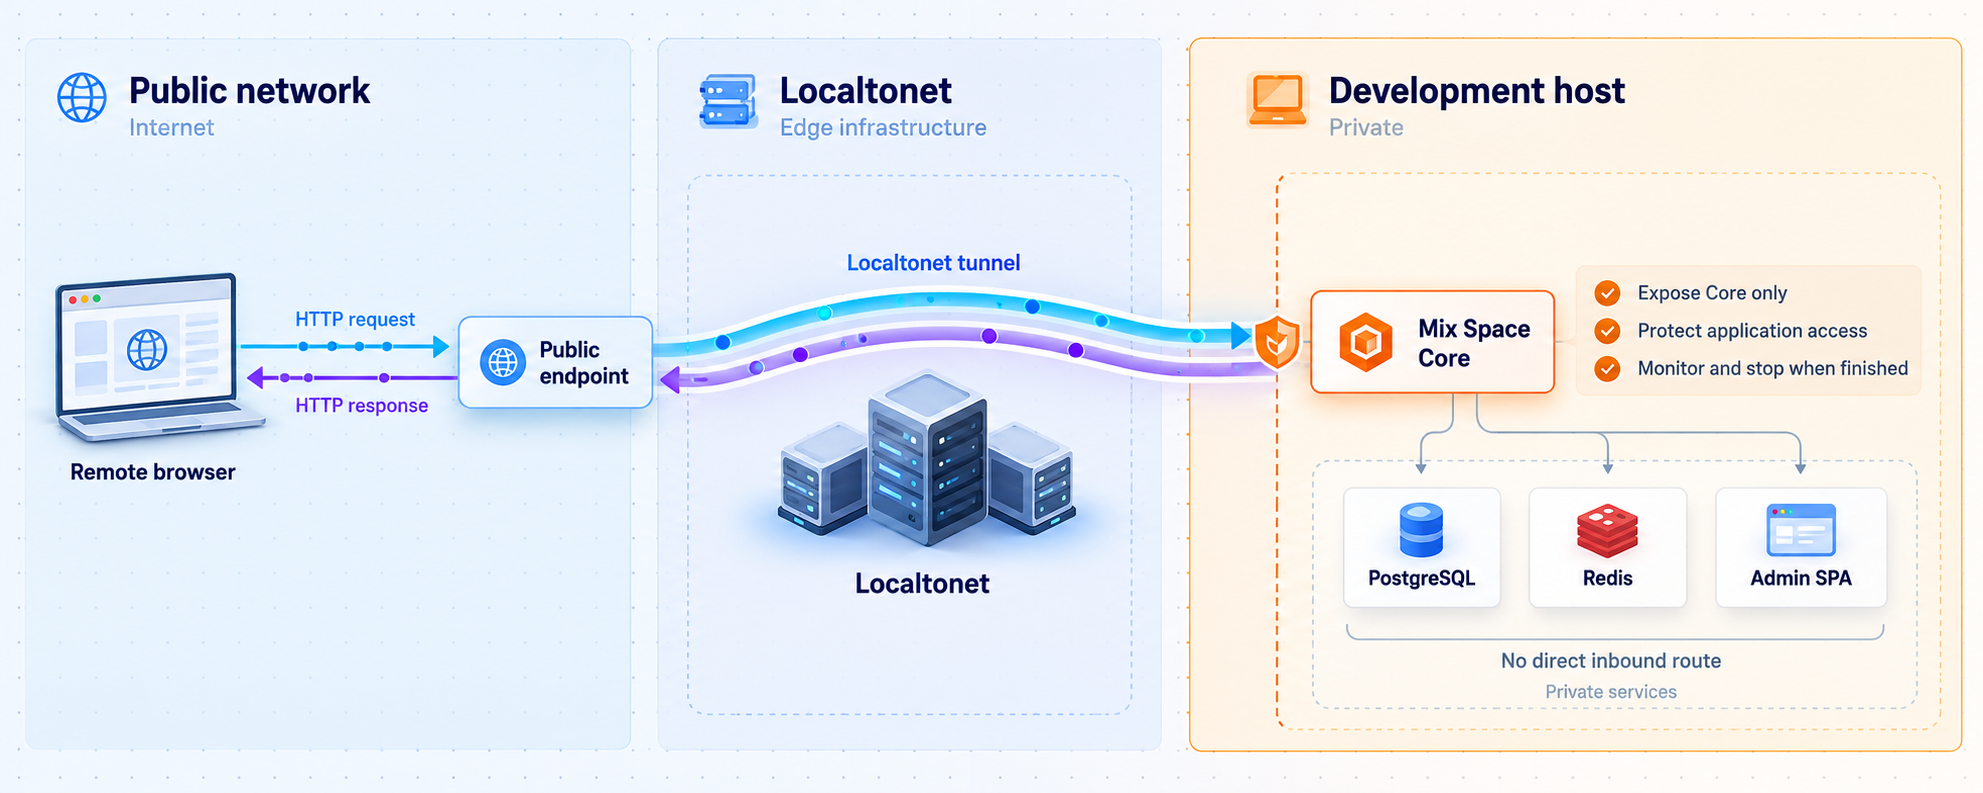
With Localtonet, the client running on the development device establishes an outbound connection to one of our relay servers. The resulting HTTP tunnel provides a public address for the local service without requiring inbound router port forwarding, firewall changes, a VPN, or a public IP address.
For this workflow, the local target is the verified Mix Space core listener on port 2333. Run our client on the same machine as the core and use 127.0.0.1 as the local IP address. If our client runs on another device, that device must already be able to reach the core over the network, and the correct reachable address must be used instead of loopback.
Install and run the Localtonet client
Install our client on the device that can reach http://127.0.0.1:2333. Keep the Mix Space core, PostgreSQL, and Redis running while you configure and test the tunnel.
Authenticate or select the client device
Use the device-specific authentication token associated with the client that will run the tunnel. Treat this token as a secret, never paste it into public documentation, and never substitute a token from another device without intentionally changing the tunnel host.
Select an available relay server
Choose a server or region currently offered in the Localtonet dashboard. Available server codes and regions can vary, so obtain the value from the current product interface instead of copying a hardcoded example.
Create an HTTP tunnel for the core
Create an HTTP tunnel and set its local target to IP address 127.0.0.1 and port 2333 when the Localtonet client and Mix Space run on the same host. Select the supported process type that matches your address requirement, such as a generated subdomain, a selectable subdomain where available, or a custom domain.
Start the tunnel
Creating the tunnel does not start it. Use the Start button and confirm that both the selected client device and the tunnel report a connected state.
Test the assigned public address
Open the public HTTPS address assigned to the HTTP tunnel from a different network or device. Compare the result with the local response from http://localhost:2333. Stop or delete the tunnel when remote access is no longer needed.
For the current dashboard workflow and supported address choices, consult our Localtonet HTTP tunnel documentation. Custom-domain DNS requirements can change, so verify the current documentation before publishing DNS records or assuming a particular record type.
The public address is usable only while the selected Localtonet client is connected, the tunnel is running, and the Mix Space core is listening at the configured local target. A saved tunnel configuration is not proof that the tunnel or application is currently online.
Should the admin development server have its own tunnel?
Not for the core-only workflow documented here. The core and admin use different local ports, so one tunnel targeting port 2333 does not automatically publish port 9528. Keeping the admin local reduces unnecessary exposure and lets remote applications access the core without also presenting the development dashboard publicly.
If there is a justified need to access the admin development server remotely, it requires a separate HTTP tunnel targeting local port 9528. Verify it locally first, evaluate its authentication and authorization behavior, and restrict access using the controls available to your application and current Localtonet configuration. Do not assume that protecting the core endpoint automatically protects a second admin tunnel.
Secure a remotely reachable development service
A tunnel changes reachability. It does not turn an unauthenticated application route into an authenticated one, determine which CMS content should be public, or replace authorization inside Mix Space. Before sharing the public address, review what the core exposes and test access from a browser that is not already signed in.
2333. Do not publish PostgreSQL, Redis, Docker control sockets, or unrelated development services.
The remotely useful service is the Mix Space HTTP core, not its internal data stores. Exposing database or cache ports directly increases risk and is unnecessary for browser, API, or frontend access to the CMS. Keep those dependencies within the development host and Compose network unless you have a separately designed and secured database architecture.
Use least privilege for every credential involved. Development secrets should not be reused as production secrets. If a public URL has been shared more broadly than intended, stopping the tunnel removes its current availability, but you should also rotate any application credential that may have been disclosed or used by an unauthorized party.
Localtonet HTTP and File Server process types can provide a public HTTPS address. That protects the public HTTP transport to the tunnel edge, but it does not remove the need for secure application sessions, correct authorization, safe secret storage, input validation, and timely project updates.
Operate, test, and stop the development stack
Normal operation involves several independent processes. PostgreSQL and Redis run in Docker, while the core and admin run as pnpm development processes. Stopping one part can leave the others running, so use a deliberate shutdown and startup order.
| Command or action | Purpose | Operational note |
|---|---|---|
pnpm dev |
Run the core in watch mode | Keep its terminal open to retain logs and stop it with the terminal interrupt command |
pnpm dev:admin |
Run the admin SPA development server | Use a separate terminal from the core process |
pnpm build |
Build the core application | A successful build is useful validation but is not a complete production deployment |
pnpm bundle |
Create the documented production bundle through Vite | Bundling alone does not define secrets, migrations, hosting, or rollout procedures |
pnpm test |
Run the core Vitest suite | Use when validating code or dependency changes |
pnpm e2e |
Run the end-to-end suite | The repository identifies this as its end-to-end test command |
pnpm typecheck |
Run core type checks and controller or validation guards | Useful before committing or deploying changes |
pnpm lint and pnpm format |
Apply the repository's linting and formatting workflows | Run from the repository root |
Start an existing checkout
When dependencies have already been installed and the configuration has not changed, a typical development restart begins by starting the data services:
docker compose up -d postgres redisThen start the core in one terminal:
pnpm devStart the admin in another terminal only when it is needed:
pnpm dev:adminFinally, start the existing Localtonet tunnel if remote core access is needed. The tunnel should remain stopped when only local development is taking place.
Stop the stack cleanly
Stop the admin and core development processes from their respective terminals. Then stop the two Compose services:
docker compose stop postgres redisStop the Localtonet tunnel separately in our dashboard or client workflow. Do not assume that closing a browser tab stops a server or tunnel. Also avoid deleting Docker volumes as a routine troubleshooting step, because volumes may contain the PostgreSQL data you intend to preserve.
Understand the production boundary
The repository includes a production Compose template and a multi-stage Dockerfile, showing that production-oriented packaging exists. However, the supplied evidence does not establish the complete command sequence, required environment variables, secret management model, migration release step, backup procedure, health checks, upgrade path, or rollback procedure for a production installation.
A reliable production deployment must define all of those details. It should also pin a release, persist and back up PostgreSQL data, account for Redis behavior, run forward migrations in the documented release phase, monitor the application, and establish a tested upgrade and rollback process. This guide intentionally does not convert the development quick start into an unsupported production recipe.
Troubleshoot Mix Space and Localtonet methodically
The core does not start
Return to the first meaningful error in the pnpm dev terminal. Confirm that pnpm install completed, that the active Node.js version matches the checked-out repository's requirements, and that PostgreSQL and Redis are still running. Use docker compose ps and the service logs to distinguish an application failure from a dependency failure.
If the failure mentions missing configuration, inspect the current app documentation and example environment file. Do not compensate by inventing variable names or copying secrets from an unrelated deployment guide.
Port 2333 or 9528 is already in use
Stop the conflicting process or identify the project's documented method for changing the port. A partially started older development process is a common cause. Changing a port affects local verification and the corresponding tunnel target, so update every dependent setting only after confirming that the project supports the new value.
The admin loads but cannot retrieve data
Check the core terminal first. Confirm that http://localhost:2333 is reachable and that PostgreSQL and Redis remain available. Then inspect the admin terminal and browser developer tools for failed requests. A functioning page shell on port 9528 does not prove that the backend path is working.
The public URL reports a gateway or connection error
Test http://127.0.0.1:2333 on the same device as the Localtonet client. If that local request fails, repair Mix Space before changing the tunnel. If it succeeds, confirm that the tunnel target uses the correct IP and port, the selected device is connected, and the tunnel has actually been started.
Remember that 127.0.0.1 refers to the device where the Localtonet client is running. If our client is on a different computer from Mix Space, loopback points to the wrong machine. In that topology, use an address that the client device can reach and verify it from that device before updating the tunnel.
The public URL works locally but not remotely
A public URL should be tested from a separate network or device to avoid confusing cached sessions or local routing with public availability. Confirm the client and tunnel are connected. If using a custom domain, verify the current Localtonet DNS requirements rather than assuming that a previously used DNS record is still correct.
The tunnel exists but is offline
Tunnel creation and tunnel startup are separate lifecycle states. Select the correct client device, ensure it is online, and use the Start action. If the host sleeps, reboots, loses internet connectivity, or stops the client, the tunnel will not remain available until the device and tunnel are running again.
An upgrade introduces database errors
Do not assume that starting the application applies forward SQL migrations. Mix Space documents migrations as a one-shot release-phase operation. Stop and consult the upgrade instructions for the exact source and destination versions before modifying the database. Back up persistent data before any migration or rollback attempt.
Deleting containers, volumes, lockfiles, or database data may hide the original problem while causing permanent loss. Collect logs, confirm versions, review the checked-out configuration, and back up persistent data before using any destructive recovery action.
Frequently asked questions
What ports does the Mix Space development stack use?
The documented core development server is available at http://localhost:2333. The separate admin SPA development server is available at http://localhost:9528. PostgreSQL and Redis are started through the repository's Docker Compose configuration, but this guide does not invent host-port values for those dependencies.
Do I need to run PostgreSQL and Redis before Mix Space Core?
Yes. The documented quick start runs docker compose up -d postgres redis before pnpm dev. If either dependency is stopped or unhealthy, the core can fail during startup or while handling requests.
Does the admin SPA start with the core server?
Not in the development workflow covered here. Run the core with pnpm dev and run the admin development server separately with pnpm dev:admin. Keep both terminals open when developing or testing the complete admin workflow.
Which Mix Space port should the Localtonet HTTP tunnel target?
For remote access to the core, target port 2333. When our client runs on the same host, use 127.0.0.1 as the local IP. Port 9528 belongs to the admin development server and would require a separate tunnel if you deliberately choose to expose it.
Does creating a Localtonet tunnel start it automatically?
No. Creating the configuration does not mean the tunnel is running. The selected client device must be connected, and the tunnel must be started with the Start action. It can later be stopped or deleted.
Does Localtonet require router port forwarding or a public IP address?
No. Our client establishes an outbound connection to a Localtonet relay server. This allows the local HTTP service to receive traffic through its assigned public address without inbound router port forwarding, firewall changes, VPN setup, or a public IP address.
Is this a production deployment guide?
No. This is a source-based development installation using the project's documented quick-start commands. Although the repository contains a production Compose template and a multi-stage Dockerfile, the available evidence does not establish the complete production configuration, migration, secret-management, backup, upgrade, and rollback procedure needed for a safe production guide.
Does the Localtonet tunnel replace Mix Space authentication?
No. The tunnel provides network reachability to the selected local service. Mix Space remains responsible for its application authentication, authorization, sessions, and content-access rules. Review those controls before sharing a public endpoint.
Connect your verified Mix Space core with Localtonet
Once the core responds locally on port 2333, create an HTTP tunnel to reach it remotely without configuring inbound router port forwarding. Keep the admin development server private unless remote administration is specifically required.
Get Started Free →

