

Index a repository locally, verify the Repowise dashboard, and publish only the endpoint you intend to share
Repowise builds reusable codebase intelligence from source structure, dependencies, git history, tests, documentation, engineering decisions, and code-health signals. This guide follows the current public Repowise quick start, separates durable setup steps from version-sensitive behavior, and verifies the dashboard locally before introducing remote access. It then connects the confirmed HTTP endpoint to Localtonet without inbound router port forwarding, firewall changes, VPN setup, or a public IP address. Because repository intelligence can expose sensitive engineering details, the tutorial also explains listener uncertainty, authentication boundaries, lifecycle management, and safe cleanup.
📋 What's in this guide
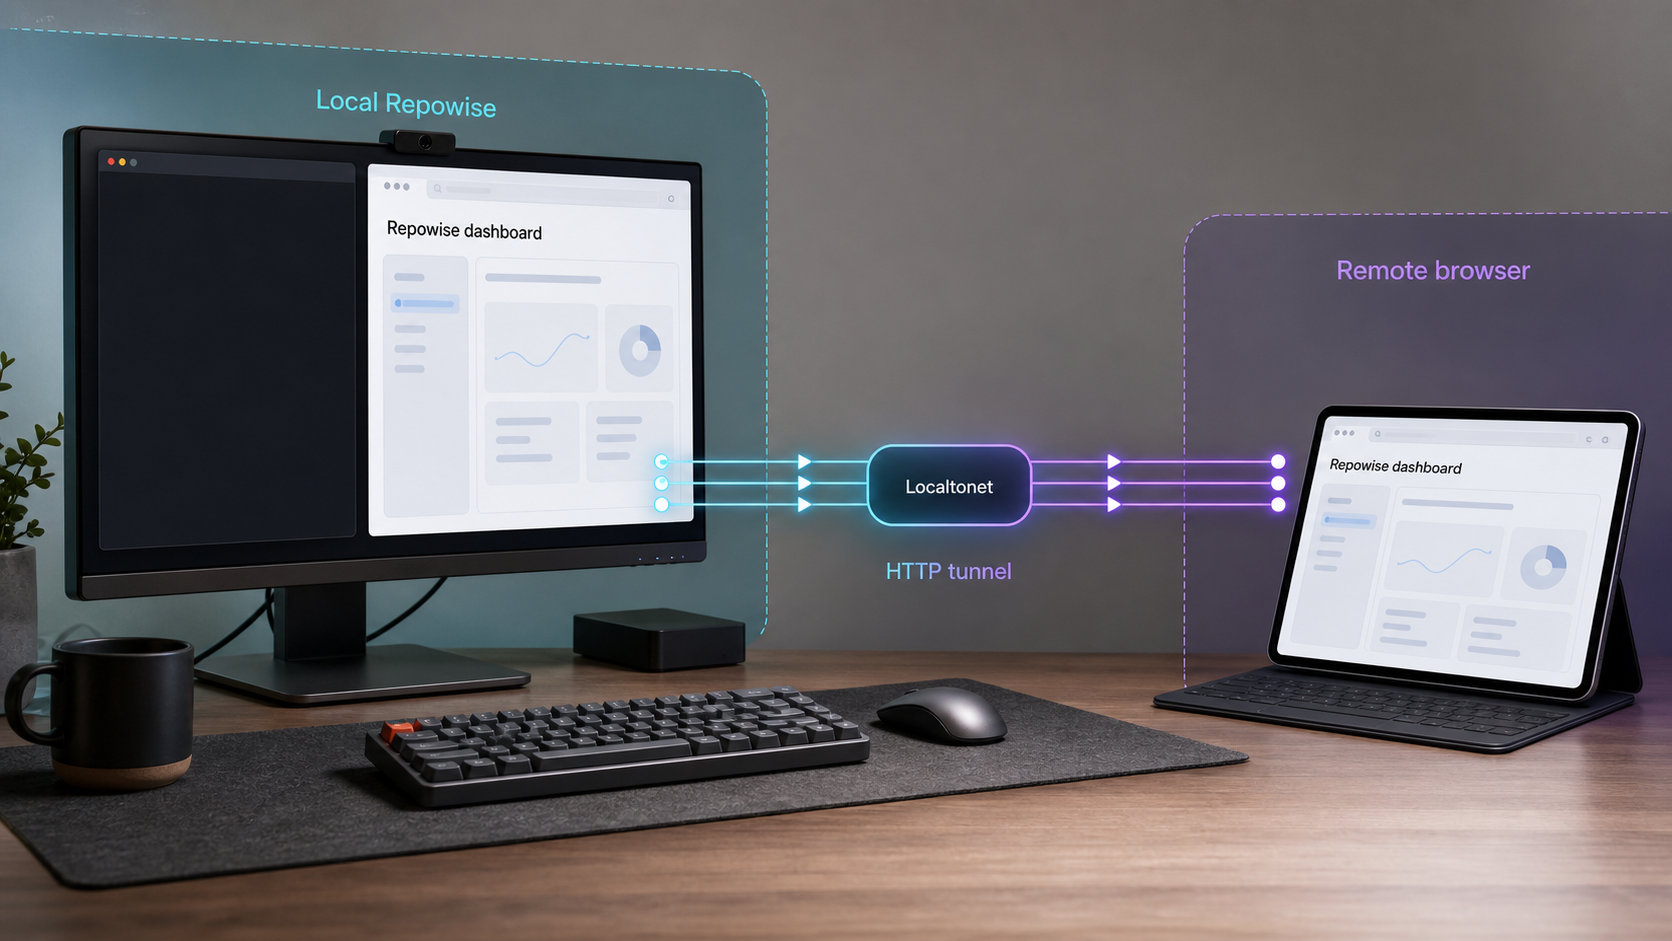
How Repowise and Localtonet fit together
Repowise is a self-hosted codebase-intelligence system. Its current project description says that it indexes code, dependency relationships, git history, tests, documentation, and engineering decisions once, then makes that evidence available to developers and compatible AI tools. The same index supports cited answers, change-impact analysis, code-health findings, generated documentation, MCP tools, editor workflows, pull-request analysis, and a local dashboard.
That architecture creates two separate responsibilities. Repowise owns repository ingestion, indexing, application behavior, and the local dashboard. Localtonet supplies an optional network path to a local service after that service is working. Our HTTP tunnel does not initialize the repository, repair an incomplete index, add Repowise authentication, or configure an MCP client. It forwards requests to a local IP address and port that the Localtonet client can reach.
The sequence matters. First install Repowise in a compatible Python environment. Next initialize the intended repository and let the index finish. Then start Repowise, read its runtime listener information, and verify the dashboard directly. Only after those checks should you create and start a Localtonet HTTP tunnel.
The durable quick-start commands in this article were checked against the public Repowise project materials available in August 2026. The supplied primary evidence also identifies Repowise v0.46.0 as a current release from August 2026. Listener flags, generated paths, configuration formats, update behavior, and integrations can change between releases, so this guide labels those details as version-sensitive instead of presenting inferred behavior as universal.
You can review the official Repowise repository, its current quick-start material, the repository's Python packaging metadata, and the Repowise v0.46.0 release page when checking behavior for a specific installation.
Repowise supports a dashboard and MCP functionality, but that does not prove that every interface shares a path, port, transport, listener, or access-control policy. This tutorial publishes only a browser endpoint that has been verified locally. Do not assume that publishing the dashboard also publishes or secures an MCP endpoint.
Python, platform, repository, and access prerequisites
Start with an authorized repository checkout
Use a working local checkout of the repository you intend to analyze. The published quick start changes into the repository before running initialization, so the working directory is part of the setup. Confirm the repository identity, active branch or commit, and local path before continuing.
Repowise can derive information that is sensitive even when it does not display every source file directly. Structure, symbols, dependencies, callers, ownership patterns, tests, health findings, historical changes, documentation, and architectural decisions can reveal how an application works. Use a repository that you are authorized to index, retain, and make remotely accessible.
Check the current Python packaging requirement
Repowise is distributed as a Python package and the official local quick start uses pip install repowise. The authoritative place for the project's declared Python compatibility is its current pyproject.toml packaging metadata, together with the metadata published for the exact package version selected by pip.
The evidence extract supplied for this revision confirms that the packaging file exists, but it does not include the value of its requires-python field. It also does not provide a supported operating-system matrix. We therefore cannot responsibly publish a numeric Python minimum or claim universal Windows, macOS, or Linux compatibility from that extract. Check the current requires-python declaration before creating the environment. Pip should reject an incompatible interpreter when package metadata is evaluated, but checking first avoids installing into the wrong environment.
Python requirements can change between Repowise releases. Use the packaging metadata for the release you are installing. If your organization pins Python or dependencies, test Repowise in an approved isolated environment before applying it to a sensitive repository.
Use a consistent Python environment
You need a Python installation whose package installer is available and permitted to install Repowise. A dedicated virtual environment is generally helpful because it separates the command-line application and dependencies from the operating system's Python packages. The current quick-start extract does not require one specific environment manager, so use the environment mechanism approved for your workstation or organization.
The environment used for installation must remain active when you run the repowise executable. Multiple Python installations are a common reason for a successful installation followed by a shell reporting that the command cannot be found.
Prepare Localtonet without exposing a token
For the remote-access portion, you need a Localtonet account, a client device, and the device-specific auth token assigned to that client. Install and run our client on the Repowise host when possible. That arrangement is especially useful if Repowise listens only on a loopback address.
Exact Localtonet installation commands and package names vary by operating system and client release. The supplied authoritative product evidence does not include current OS-specific installer commands, so this article does not invent them. Sign in to the Localtonet dashboard, use the download or installation path currently presented for your operating system, install that client on the selected device, and follow its current authentication prompt using the token assigned to that device. Keep the token out of source control, shell scripts, screenshots, logs, and issue reports.
| Requirement | Purpose | Verification |
|---|---|---|
| Authorized repository checkout | Provides the repository context that Repowise initializes and indexes. | Confirm the local path, repository identity, branch, and permission to analyze it. |
| Compatible Python interpreter | Runs the published Repowise package. | Compare your interpreter with the current requires-python value in the packaging metadata. |
| Available pip installation path | Installs Repowise and its declared dependencies. | Use the installer associated with the environment in which you will run Repowise. |
| Local browser access | Allows direct dashboard testing before a tunnel is added. | Open the exact URL reported by the running Repowise process. |
| Localtonet client device | Establishes the outbound connection to our relay server. | Confirm that the selected device is connected and can reach the Repowise endpoint. |
| Approved access policy | Controls who may view repository intelligence remotely. | Confirm authentication and intended users before starting a public tunnel. |
Install Repowise and initialize the intended repository
The current Repowise quick start uses three setup actions before serving: install the package, enter the repository, and initialize its index. Keep the sequence intact. Running initialization from an unintended directory can create state for the wrong project, while starting a service before successful initialization leaves the application without the expected repository model.
Install the published package
Activate the compatible Python environment selected during prerequisite checks, then run the official installation command:
pip install repowiseLet installation complete before continuing. Review any compatibility or dependency error directly. Do not bypass Python-version checks or add unverified installation flags merely to force the package into an unsupported environment.
Enter the target repository
Change into the root directory of the repository to be indexed. Replace the placeholder with its real local path:
cd /path/to/your/repoConfirm the directory before proceeding. If you are evaluating Repowise for the first time, a disposable or non-sensitive test checkout makes it easier to observe generated state and evaluate cleanup safely.
Build the local index without optional generated prose
Run the command published in the current no-API-key quick start:
repowise init --no-prose -y
Repowise states that this builds graph, git, decisions, health, dead-code, and structural-wiki layers locally. The --no-prose option omits optional model-written prose, while -y belongs to the documented non-interactive quick-start invocation.
Allow initialization to finish and read its output. Repository contents, history, language mix, and machine resources can affect indexing work, but the supplied evidence does not establish a universal completion time, memory requirement, disk requirement, or repository-size limit. Do not start several initialization processes because the first one appears slow. Determine whether it is still active or has produced an actionable error.
Current Repowise material says that init wires Claude Code automatically. Treat that as behavior associated with the current published workflow, not as a guarantee for every older or future release. It is not required for browser verification, and it does not establish configuration for Codex, Cursor, VS Code, or every other MCP host.
Repowise describes graph, risk, health, tests, dead-code, and pull-request analysis as local and deterministic, with generated prose as an optional model-backed layer. The published --no-prose initialization path is therefore the appropriate starting point when you want to verify the local index and dashboard without configuring model-provider credentials.
Start Repowise and verify the dashboard locally
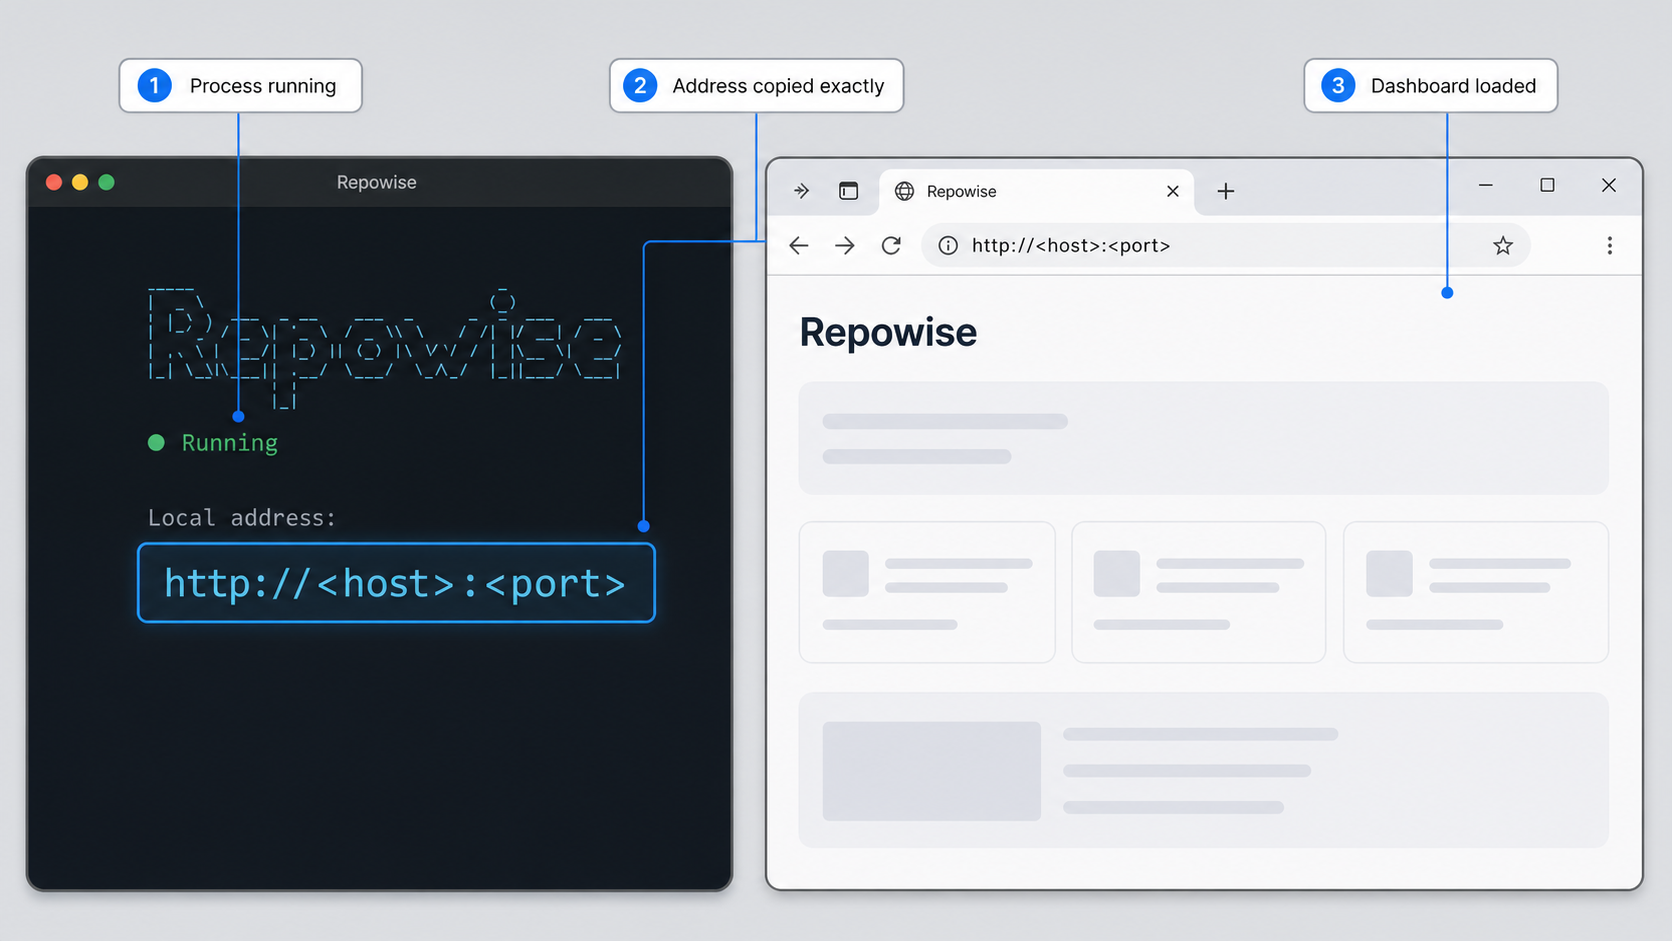
Installation, initialization, and serving are separate checkpoints. A package can install successfully even when repository initialization later fails. An index can complete even when the service cannot bind its listener. A running process can also serve the wrong repository if it was started from an unintended context.
Start the Repowise service
From the initialized repository and the same Python environment, run the documented command:
repowise serveKeep the terminal open. Stopping this process stops the local service unless your deployment uses a separately documented service manager.
Read the runtime listener
Record the scheme, host or bind address, port, and any path printed by Repowise. The current quick-start evidence confirms that users can open a dashboard, but it does not establish one universal dashboard port or bind address.
Open the exact local URL
Use a browser on a device that can reach the listener. If Repowise reports a loopback address, perform the first test on the same host. Do not substitute a common development port or a URL from another installation.
Verify application content
Confirm that the dashboard represents the intended repository and that available overview, documentation, graph, health, or change-intelligence views contain indexed information. A generic HTTP response is not enough to prove that the correct repository is loaded.
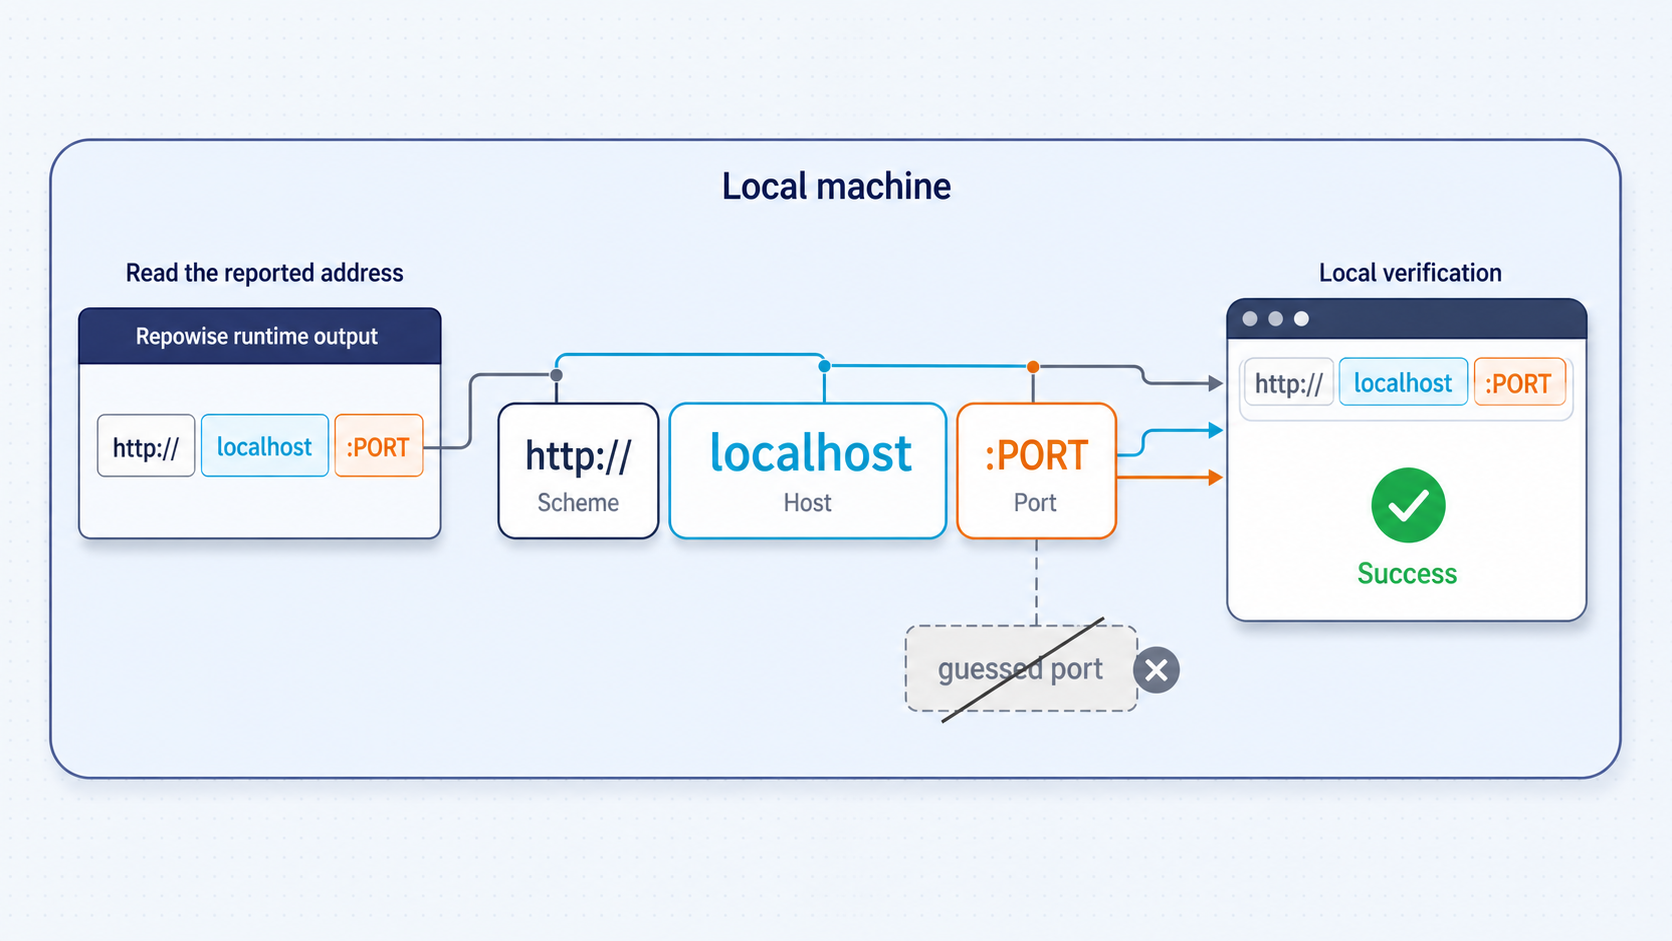
Understand what is known about listener options
The supplied release evidence mentions transport-security behavior associated with a --host option, which indicates that host selection exists in at least the referenced current development line. That release note alone does not define the complete syntax, accepted values, port option, default bind address, or security consequences. It is not sufficient evidence for publishing a universal listener command.
Use the no-argument repowise serve command documented by the project unless you have checked the complete setup material for the exact installed release. If you change the host or port, use only options documented for that version and repeat local verification. Binding to a non-loopback interface can make the dashboard reachable from other devices on the local network, so it is a security decision rather than a routine troubleshooting shortcut.
Version-specific options and defaults can change. A guessed target can expose an unrelated local application or produce misleading gateway errors. Configure Localtonet only with the endpoint your Repowise instance reports and that you have opened successfully.
Generated state, configuration, updates, shutdown, and cleanup
Repository indexing creates operational state that must be considered separately from the installed Python package. Before using Repowise on proprietary or regulated code, determine where your exact release stores its index, generated documentation, decisions, configuration, editor integration, and any cache or metadata.
The supplied primary extracts do not identify canonical state or configuration paths. They also do not provide a complete inventory of files created by repowise init. Publishing a guessed hidden directory or cleanup command would risk deleting repository content or leaving generated data behind. For this reason, the safest first evaluation is in a disposable checkout where you can inspect the before-and-after file tree and compare it with the documentation for the installed release.
| Operation | Established by current evidence | Safe handling |
|---|---|---|
| Initial indexing | repowise init --no-prose -y is the published quick-start command. |
Run it from the intended repository and let it complete before serving. |
| Serving | repowise serve starts the documented local application workflow. |
Keep the process visible and use its reported endpoint. |
| Re-indexing or updating | The supplied release extract refers to an internal update path but does not document a user-facing command or its semantics. | Use only the update or re-index operation documented for the exact installed release. |
| State and configuration paths | No canonical locations are included in the supplied primary extracts. | Inspect the release documentation and generated files before setting backup, ignore, or retention rules. |
| Shutdown | The quick start runs repowise serve as a foreground command. |
Stop the foreground process through the terminal, then verify that its local URL no longer responds. |
| Cleanup | No Repowise state-removal command is established by the supplied evidence. | Stop remote access first, preserve anything needed, and follow release-specific cleanup guidance rather than deleting guessed paths. |
Updating the index after repository changes
A repository index can become stale as source code and history change. The current project emphasizes documentation freshness and ongoing change analysis, and the v0.46.0 release notes refer to an update path. However, the supplied evidence does not define the supported public command, whether updates are incremental, whether serving must stop, or which generated layers are refreshed.
Do not assume that rerunning initialization is equivalent to a supported update. Before refreshing an important repository, check the documentation associated with your installed version and preserve any local configuration or decisions that the documented procedure says to retain. After the update, restart the service if required, verify repository identity and content locally, and only then restart the Localtonet tunnel.
Stopping Repowise safely
For the foreground quick-start workflow, return to the terminal running repowise serve and terminate the process using the normal terminal interrupt for your environment. Confirm shutdown by checking that the local dashboard URL no longer loads. If you later operate Repowise through a process supervisor, container, or organizational deployment, use that system's documented stop operation instead.
Cleaning up an evaluation
Stop the Localtonet tunnel before removing anything. Then stop Repowise and identify all state created by the exact release. If you evaluated it in a disposable repository checkout, removing that entire disposable checkout through your normal file-management process is safer than deleting guessed paths inside a valuable working tree. Package removal and repository-state removal are different tasks, so uninstalling the Python package must not be assumed to erase an index or generated configuration.
First determine which files Repowise expects to be committed, ignored, backed up, or retained for your installed release. Generated indexes and configuration can contain repository-derived information. Apply your organization's retention and source-control policy only after identifying those files accurately.
Configure Localtonet remote access
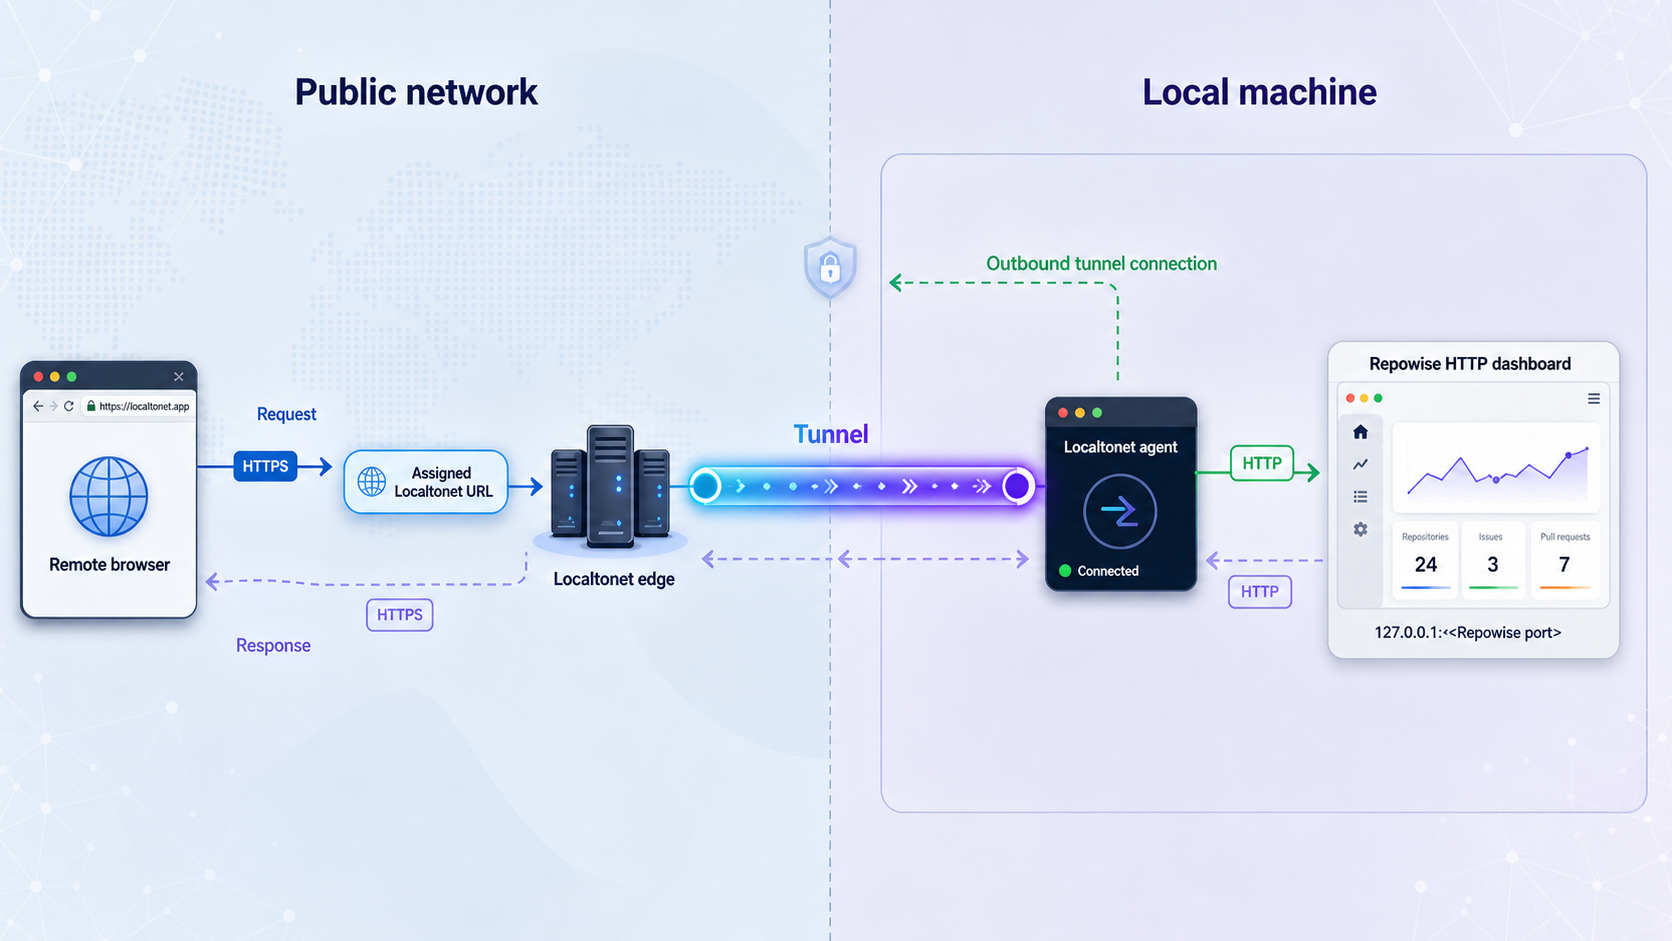
Once Repowise works locally, an HTTP tunnel can provide remote browser access without inbound router port forwarding, firewall changes, VPN setup, or a public IP address. The Localtonet client establishes an outbound connection to a selected relay server. The tunnel provides a public HTTPS address and forwards requests to the local HTTP target.
The current HTTP tunnel workflow contains five operational steps: install and run the client, select or authenticate the device, select an available relay server, create the HTTP tunnel with the local target and process type, and start the tunnel. Creating the configuration alone does not start it.
Install and run the Localtonet client
Sign in to Localtonet and use the current download or installation path presented for the operating system on the device that can reach Repowise. Exact OS-specific commands were not included in the supplied authoritative product evidence, so obtain them from the current dashboard rather than copying an unverified command. Start the client and authenticate it with the device-specific token assigned to that installation.
Select the authenticated device
Select the client device that will run the tunnel. Confirm that it is connected and can open the Repowise URL directly. Running the client on the Repowise host is the straightforward choice when the application listens on loopback.
Select an available relay server
Choose a server or region currently offered in the dashboard. Available values can vary by plan, region, and product state, so do not copy a server code from an article.
Create the HTTP tunnel
Choose the HTTP tunnel family and enter the Repowise local IP address and port you verified. Select the required Process Type from Random Sub Domain, Custom Sub Domain, or Custom Domain. These process types serve the same target content at a public HTTPS address. If you use a custom domain, follow the current dashboard and documentation for DNS requirements rather than guessing records.
Start the tunnel and verify the public address
Use the Start button, then open the assigned public URL from a separate browser session or network. Confirm that it displays the intended Repowise repository and no unrelated service. Stop or delete the tunnel when remote access is no longer required.
See the Localtonet HTTP tunnel documentation for the current interface and field descriptions. The dashboard remains authoritative for available devices, relay selections, process types, domains, and plan-dependent choices.
A Repowise URL that works on the application host might not work from another computer. If the client runs elsewhere, its device must have a route to the Repowise IP address and port. If Repowise is bound only to loopback, run Localtonet on the same host or use a listener configuration explicitly documented by Repowise for your version.
Protect the Repowise exposure boundary
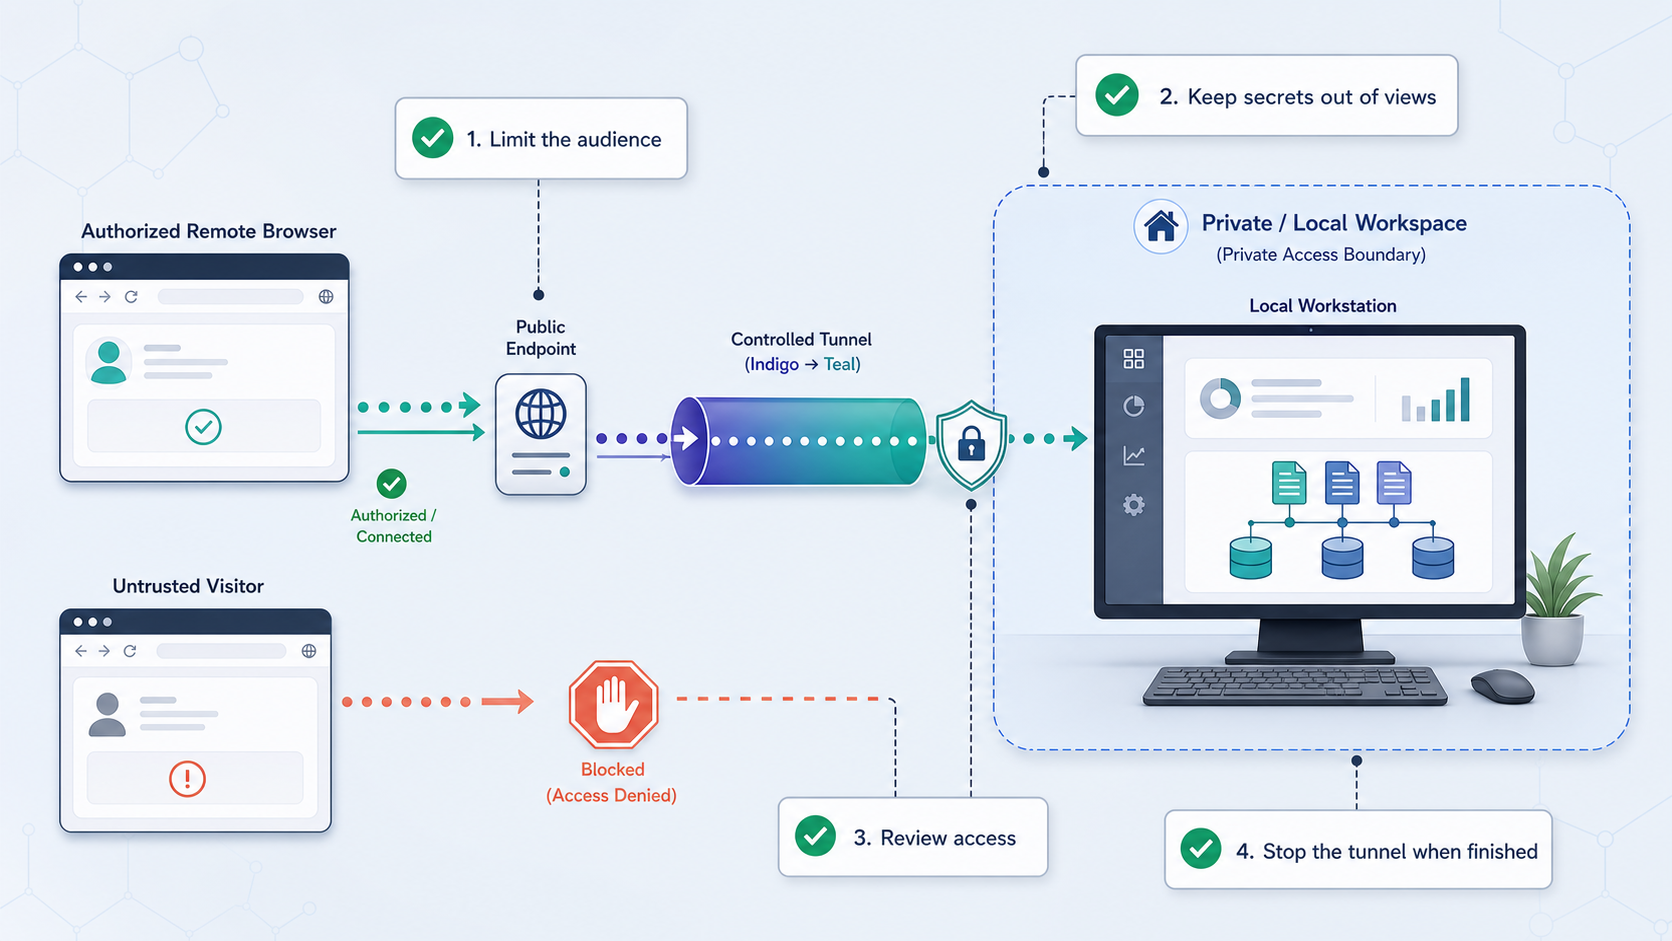
Repository intelligence is not a harmless status page. Depending on the available views, it can disclose file and symbol names, architecture, dependency relationships, callers, tests, ownership patterns, git history, decisions, documentation, code-health findings, and likely areas of change risk.
Localtonet avoids opening an inbound router port, but it does not replace application authorization. A public tunnel URL is publicly routable. The supplied Repowise evidence does not establish a universal dashboard authentication default or prove that one control covers every dashboard and MCP route. Verify the actual behavior of the installed release before exposing proprietary repository data.
Localtonet HTTP process types provide a public HTTPS address, but transport protection does not decide who may view repository intelligence. Do not rely on URL secrecy. Confirm application authentication or an approved protective layer before publishing sensitive content.
Keep the public URL, device token, repository internals, credentials, and private endpoint details out of screenshots and public support requests. When troubleshooting, retain useful status codes and non-sensitive messages while redacting secrets.
Troubleshoot Repowise and Localtonet separately
Use a two-layer test sequence
Always test the application layer before the tunnel layer. If the local URL fails, investigate Repowise. If the local URL works but the public URL fails, investigate Localtonet connectivity and target configuration. Changing both systems simultaneously makes the cause harder to identify.
- If the local URL fails, inspect Repowise initialization, startup output, repository context, and listener behavior.
- If the public URL fails while the local URL works, check the selected client, tunnel status, target IP, target port, and client-side reachability.
- If both URLs load but indexed content is missing, investigate Repowise indexing rather than the tunnel.
- If the wrong application appears, stop the tunnel immediately and correct its target.
The repowise command is not found
Confirm that installation completed in the active Python environment. If several Python installations exist, the package and its command-line entry point may have been installed into a different environment. Make the installation and execution contexts consistent rather than installing repeatedly into several unknown locations.
Initialization ran in the wrong directory
Do not serve or expose the result. Stop and identify what the installed release generated. The supplied evidence does not establish a universal cleanup command or state location, so do not delete a guessed hidden directory. If the work occurred in a disposable checkout, remove that checkout through your normal file-management workflow after preserving anything needed.
The dashboard URL is not obvious
Review the complete startup output for repowise serve. Do not guess a common web-development port. The current release line appears to include host-related listener behavior, but the supplied evidence does not define all supported serve options. Consult the setup material for the installed version before changing listener parameters.
The dashboard works locally but not through Localtonet
Confirm that the tunnel is started rather than merely created. Verify that the selected Localtonet client is connected and can reach the exact Repowise target. If Repowise uses a loopback address and the client runs on another machine, move the client to the Repowise host or use only a listener configuration officially supported by your Repowise release.
The public URL reports a gateway or connection failure
Reopen the local endpoint from the Localtonet client device. Confirm that repowise serve is still running and that its listener did not change after a restart. Compare the current port with the tunnel target. Local endpoint security software or operating-system policy can also prevent the client process from reaching the service.
The wrong repository appears
Stop the tunnel while investigating. Verify the repository context used for initialization and serving. Correct the Repowise instance locally, confirm the expected repository content, and restart remote access only after local verification succeeds.
| Symptom | First check | Avoid |
|---|---|---|
repowise is unavailable |
Check the active Python environment and completed package installation. | Installing into several unrelated environments. |
| Local dashboard does not load | Read the service output and test its exact URL. | Creating a tunnel before local verification. |
| Public URL does not load | Check client connectivity, running status, and target reachability. | Changing Repowise and tunnel settings together. |
| Unexpected application is visible | Stop the tunnel and verify the target port. | Leaving the endpoint online during investigation. |
| Repository data is incomplete | Review initialization or the documented update workflow. | Treating an index problem as a network problem. |
| No authentication is confirmed | Review access policy and add an approved protection layer. | Using an obscure URL as the only control. |
Frequently asked questions
What commands are in the current Repowise quick start?
Install with pip install repowise, enter the target repository, initialize it with repowise init --no-prose -y, and start the application with repowise serve. Run initialization and serving in the intended repository context.
Which Python version does Repowise require?
Check the requires-python declaration in the packaging metadata for the release you intend to install. The primary evidence extract supplied for this article does not include its numeric value, so a fixed minimum cannot be stated responsibly here. Requirements can change between versions.
What is the default Repowise dashboard port?
The supplied current quick-start evidence does not establish a universal port. Start Repowise, record the endpoint reported by that installed release, and verify it directly before configuring Localtonet.
Does the basic setup require an AI provider API key?
No provider key is required for the documented repowise init --no-prose -y quick start. Repowise describes generated prose as optional while its core graph, risk, health, test, dead-code, and review analysis remains local and deterministic.
How do I update or re-index a repository?
Use the update or re-index operation documented for your installed Repowise release. The supplied evidence confirms that an update path exists in the current development line but does not provide a supported user-facing command or define whether updates are incremental. Do not assume that rerunning initialization is equivalent.
Where does Repowise store its generated state?
Canonical state and configuration locations are not included in the supplied primary extracts. Check the documentation for the exact release and inspect a disposable checkout before setting ignore, backup, retention, or cleanup rules.
Should I use an HTTP or TCP tunnel for the dashboard?
Use an HTTP tunnel after confirming that Repowise provides a browser-accessible HTTP endpoint. This matches the dashboard workflow and provides a public HTTPS address through Localtonet. Do not assume that an MCP transport shares the dashboard endpoint.
Does Localtonet require router port forwarding?
No. Our client creates an outbound connection to a Localtonet relay server, so this workflow does not require inbound router port forwarding, firewall changes, VPN setup, or a public IP address.
Is the Localtonet HTTPS address enough to secure Repowise?
No. HTTPS protects transport to the tunnel edge but does not decide who is authorized to view repository intelligence. Confirm Repowise authentication or use an approved protective layer. Do not expose a sensitive dashboard whose access controls have not been verified.
Can the Localtonet client run on another machine?
Yes, if that device can reach the verified Repowise IP address and port. If Repowise listens only on loopback, running Localtonet on the same host is the straightforward option. Change the listener only through options documented for your Repowise version.
Will the public URL work after the client or Repowise stops?
No. The tunnel is available only while the selected Localtonet client is connected and the tunnel is running. Repowise must also remain available at the configured local target.
Connect a verified Repowise dashboard with Localtonet
Install and initialize Repowise in a compatible environment, verify the exact local dashboard endpoint, and confirm an appropriate authentication policy. Then create an HTTP tunnel to provide controlled remote access without opening an inbound router port.
Get Started Free →

