

Run Hunter on Docker, validate the financial AI workspace locally, and publish it through a controlled HTTPS endpoint
Hunter Community Edition is an open-source financial AI agent platform distributed as a Docker Compose deployment. This guide follows the current repository workflow for Linux, macOS, and Windows, including environment configuration, local verification on port 3100, service status, logs, stopping, restarting, and applying configuration changes. After Hunter works locally, we connect it to a Localtonet HTTP tunnel for remote browser access without inbound router port forwarding or a public IP address. Security, data-flow boundaries, troubleshooting, and maintenance limitations are covered throughout.
📋 What's in this guide
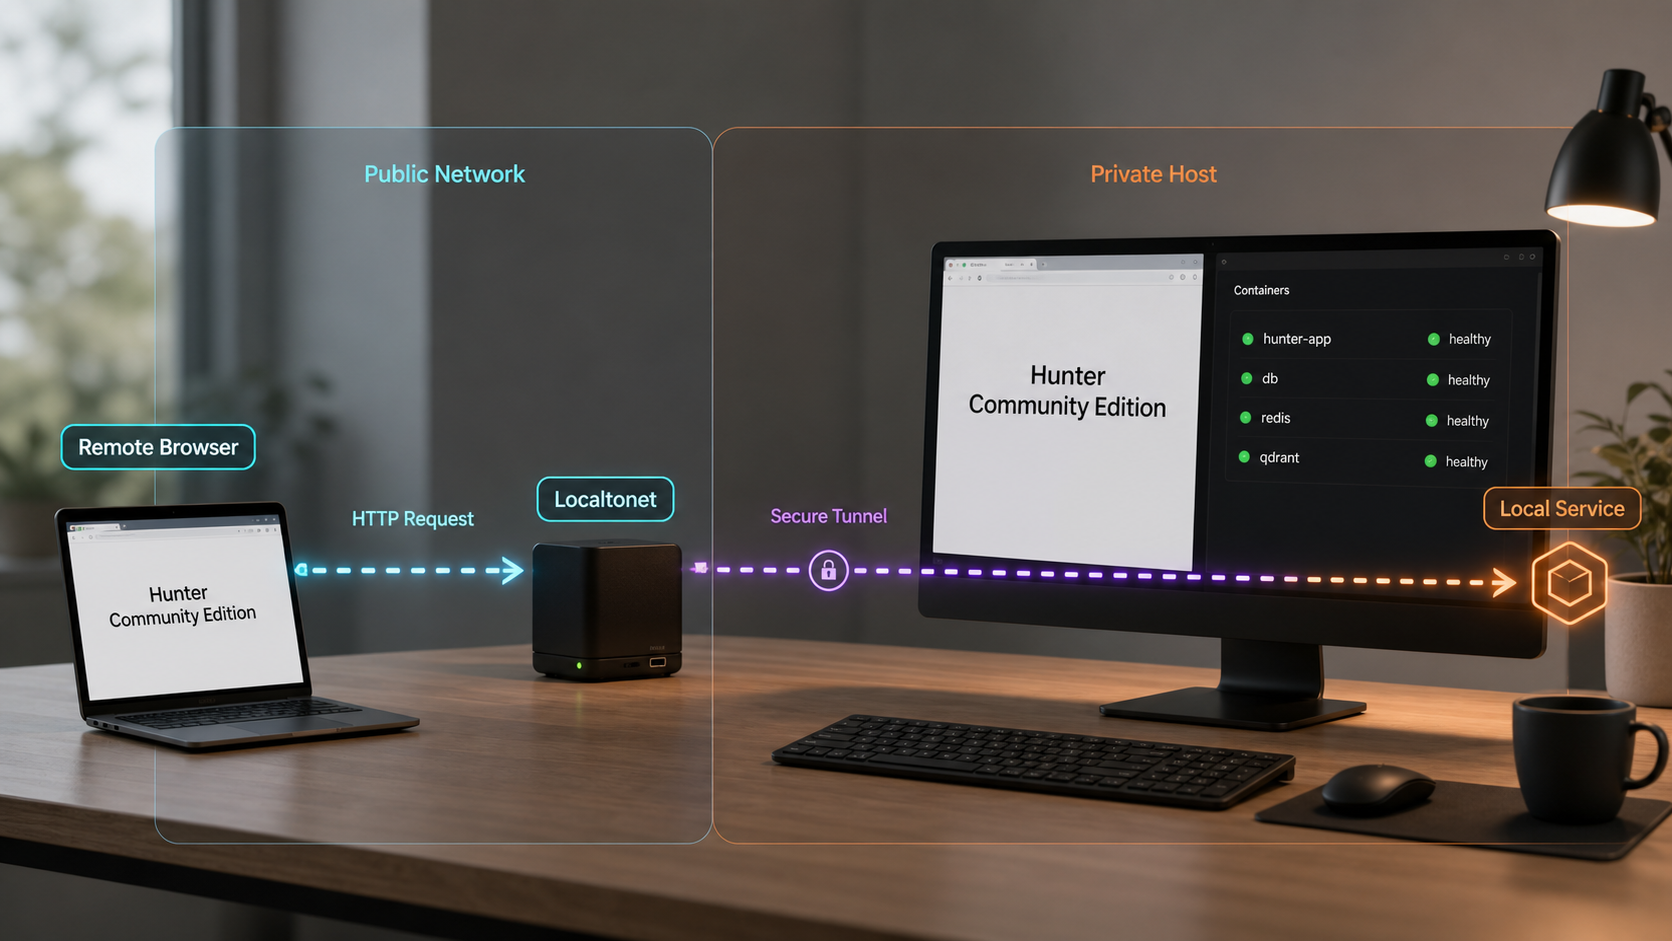
What this deployment includes
Hunter Community Edition is a self-hosted financial AI agent platform for individual investors. Its current repository describes chat, positions, investment memory, watchlists, financial research tools, skill-based analysis, and support for multiple model and data-provider arrangements. The project coordinates its application services with Docker Compose and exposes its browser interface at http://localhost:3100.
This tutorial uses three distinct layers. Hunter is the application layer, Docker Compose is the runtime and service-orchestration layer, and Localtonet is the optional connectivity layer. Keeping those responsibilities separate gives us a reliable troubleshooting boundary. A healthy tunnel cannot repair a failed container, and a healthy Hunter installation does not automatically create a public endpoint.
What self-hosting does and does not mean
Hunter describes conversations, positions, and investment-memory information as residing on the disk used by your deployment. You control the Docker host, checked-out repository, environment file, and local storage attached to the stack. The current README also distinguishes a self-hosted clone from its multi-user demonstration site and states that the self-hosted clone does not require a Hunter cloud account.
Self-hosting does not necessarily mean that every request remains offline. Hunter still needs a language-model endpoint. Prompts, tool results, and other information included in a model request can be transmitted to the provider configured in .env. Financial data may also come from free public sources, the Hunter data pipeline, a broker, a data vendor, or an MCP service. Review the privacy, retention, location, and billing terms of every external service you connect.
Hunter's analyses, predictions, hypothesis checks, scores, and alerts are AI-generated research material. They may be incomplete, delayed, or incorrect and do not constitute investment advice. Independently verify market information and make financial decisions using your own judgment and appropriate professional guidance.
Why local verification must come first
The installation has two milestones. First, start Hunter and prove that its interface and a basic model request work locally. Second, install our client, configure an HTTP tunnel to the verified endpoint, start the tunnel, and test the public address from a separate browser or network.
- Install Hunter and verify
http://localhost:3100on the Docker host. - Inspect service state and logs until the application is healthy.
- Confirm that the configured LLM accepts a harmless request.
- Create and start the Localtonet HTTP tunnel.
- Verify the assigned public HTTPS URL independently.
If the local URL fails, the issue belongs to the repository, environment configuration, Docker runtime, port binding, container state, host resources, or an upstream provider. If local access succeeds but remote access fails, the Localtonet device state, tunnel state, or local target becomes the next investigation layer.
Prerequisites for Hunter Community Edition
The current Hunter README lists Docker Desktop for Windows or macOS, or Docker Engine with Docker Compose v2 on Linux. It also specifies 20 GB of available disk space, 4 GB of memory, access to ghcr.io, and an API key for a supported language-model provider. Git is needed for the repository-based installation used here.
| Requirement | Current project expectation | Why it matters |
|---|---|---|
| Container runtime | Docker Desktop on Windows or macOS, or Docker Engine on Linux | Hunter is distributed as a coordinated container deployment. |
| Compose support | Docker Compose v2 | The documented commands use the docker compose subcommand. |
| Disk capacity | At least 20 GB available | The stack pulls several images and needs room for local application data, logs, and writable layers. |
| Memory | At least 4 GB | Multiple cooperating services run on the Docker host. |
| Registry access | Outbound access to ghcr.io |
Docker must retrieve images used by the current Compose definition. |
| LLM credentials | A key for the selected model provider | The model connection drives Hunter's conversation and AI analysis behavior. |
| Git | A client capable of cloning the public repository | The documented installation begins by cloning hunter-community. |
| Browser | Access to the Docker host's local port 3100 | The application must be verified locally before a tunnel is added. |
Read the current
Hunter Community Edition README
before installation, then keep the
Hunter getting-started guide
available for revision-specific details. The repository's main branch is moving, so commands, images, variables, and provider examples can change after this article is published.
Confirm Docker Compose v2
Run the following command before cloning Hunter:
docker compose version
Compose v2 uses docker compose with a space. If this command is unavailable, install or enable the supported Compose v2 integration. This guide does not replace it with the older docker-compose executable.
On Windows and macOS, start Docker Desktop and wait for its engine to become ready. On Linux, make sure the Docker daemon is running and that your user can execute Docker commands under your organization's administration policy. Do not solve a permission problem by granting unnecessary access to the Docker socket.
Check storage and registry access
The 20 GB requirement means free capacity, not total disk size. Container layers, logs, databases, cached data, and later image downloads can require more room. A host that begins near its storage limit may complete the first pull and fail later as application data grows.
Docker also needs outbound access to ghcr.io. Corporate proxies, DNS filters, registry allowlists, or authenticated egress controls can block image downloads even when websites load normally. Docker daemon proxy settings are separate from browser proxy settings in many environments. Work with the network administrator rather than disabling security controls.
Choose the model and data paths in advance
Hunter needs an LLM base URL, model identifier, and API key. Use values from the provider and model you actually intend to call. A provider can change model names, account eligibility, pricing, quotas, or supported tool-calling behavior independently of Hunter.
The current Hunter README includes a DeepSeek example and requires LLM_SCHEMA_SANITIZE=1 for that path. Treat its model name as a current repository example rather than a permanent identifier. Confirm the available model with the provider before startup.
The .env file can contain JWT_SECRET, LLM_API_KEY, and the optional HUNTER_API_KEY. Do not commit it, publish it, include it in screenshots, or paste it into support messages. The Localtonet device token is another separate secret and must never be placed in Hunter's environment file.
Install and configure Hunter Community Edition
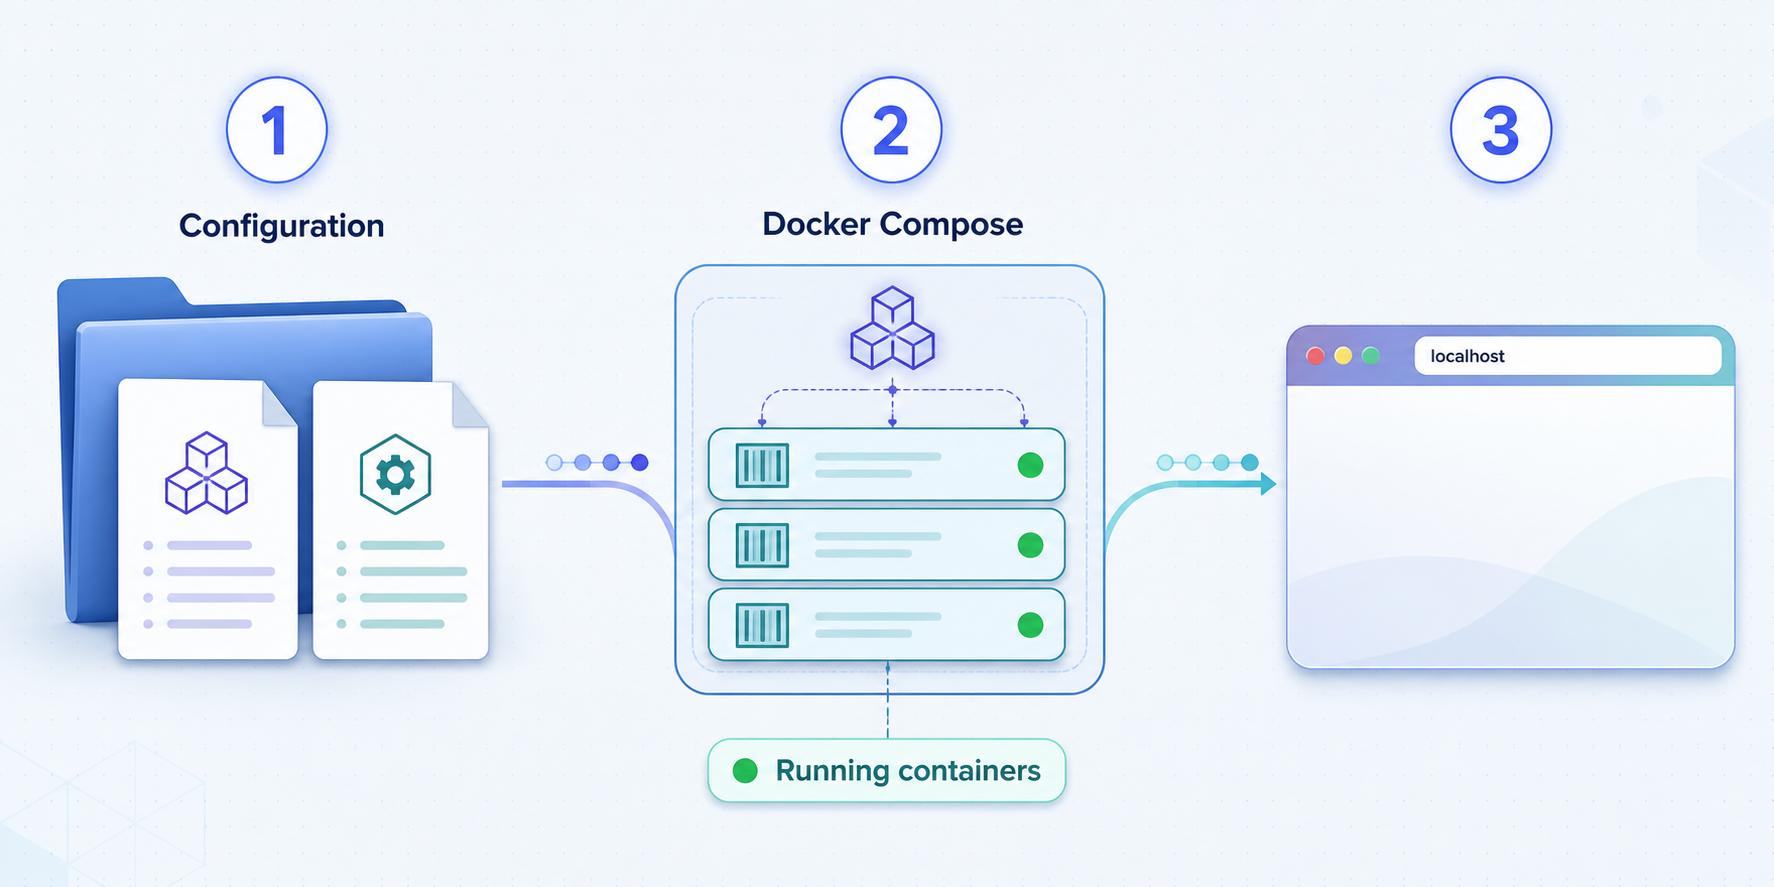
The current quick start has three stages: clone the repository and create .env, edit the required values, and start the Compose stack. The commands below install the current main branch as it exists when you clone it. Record the resulting commit so that you can identify exactly what was deployed.
A normal git clone checks out the repository's current default branch. That is a moving installation source, not a fixed release. If you require repeatability, select a project release or commit that you have reviewed and record it before deployment. Do not combine the current main-branch Compose file with environment instructions or registry assumptions taken from an older release.
Clone Hunter and create the environment file
Clone the public repository, enter it, and copy .env.example to .env. Use the command set for your operating system.
Replace the required environment values
Generate a strong JWT secret, replace the existing JWT_SECRET line, and enter the base URL, model identifier, and API key for the selected LLM. Do not append a second definition of an existing variable.
Start the Compose stack
Save .env, run the documented detached startup command from the repository directory, inspect service state, and then open the local interface.
Linux and macOS repository setup
git clone https://github.com/agentpit-io/hunter-community
cd hunter-community
cp .env.example .env
git rev-parse HEAD
Save the commit printed by git rev-parse HEAD in your deployment record. It identifies the source revision even if the default branch advances later.
Windows PowerShell repository setup
git clone https://github.com/agentpit-io/hunter-community
Set-Location hunter-community
Copy-Item .env.example .env
git rev-parse HEAD
Copy-Item creates the active environment file without relying on Unix shell commands. Make sure the result is named exactly .env, not .env.txt. Windows Explorer may hide known extensions, so verify the name in PowerShell if necessary.
Generate a JWT secret without duplicating the key
First open .env in a text editor. Find the existing JWT_SECRET= line and replace its value. Do not use an append command, because adding a second JWT_SECRET definition makes the effective configuration harder to audit.
On Linux or macOS, generate a Base64 value from 48 random bytes:
openssl rand -base64 48Copy the generated output into the existing line:
JWT_SECRET=replace-this-with-the-generated-valueOn Windows PowerShell, use the operating system's cryptographic random-number generator:
$bytes = New-Object byte[] 48
$rng = [System.Security.Cryptography.RandomNumberGenerator]::Create()
$rng.GetBytes($bytes)
[Convert]::ToBase64String($bytes)
$rng.Dispose()
Copy the resulting Base64 string into the one existing JWT_SECRET= line in .env. Clear the terminal if other people can view its scrollback, and do not include the generated value in documentation or screenshots.
Configure the LLM provider
Replace the corresponding template values in .env:
LLM_BASE_URL=your-provider-base-url
LLM_DEFAULT_MODEL=your-provider-model-id
LLM_API_KEY=your-provider-api-key
The base URL, model, and key must belong to the same provider configuration. Do not assume that every OpenAI-compatible endpoint supports identical models, tools, schemas, or authentication behavior.
The current repository presents this DeepSeek configuration shape:
LLM_BASE_URL=https://api.deepseek.com/v1
LLM_DEFAULT_MODEL=deepseek-v4-pro
LLM_API_KEY=replace-with-your-own-key
LLM_SCHEMA_SANITIZE=1
The provider's model names and account availability are time-sensitive. Verify the current model identifier before using the example. The Hunter-specific requirement established by the current README is that its DeepSeek path enables LLM_SCHEMA_SANITIZE=1.
HUNTER_API_KEY is optional and belongs to the Hunter platform data-pipeline path. It is not a replacement for LLM_API_KEY. Leave optional values unset unless you intend to use the associated service.
Choose a financial-data supply
| Approach | Credentials | Best starting point |
|---|---|---|
| Available free sources | No Hunter platform data key required | Initial evaluation using the available open sources and fallback data. |
| Your tools or MCP services | Depends on the services you operate | Existing broker, vendor, custom API, or MCP integrations. |
| Hunter data pipeline | Optional HUNTER_API_KEY |
Capabilities tied to the project's pipeline and its currently documented data sources. |
Begin with the least complex data route that can prove the base application. Adding multiple vendors, custom tools, MCP services, and public access simultaneously makes failures difficult to isolate.
Start Hunter
docker compose up -dThe first run downloads the required images and may take substantially longer than later starts. The project currently describes roughly ten minutes for an initial pull and about thirty seconds after images are present, but actual timing depends on registry access, bandwidth, host load, storage performance, and image cache state.
A returned prompt only means the detached command has finished. It does not prove that all services are ready. Inspect the Compose state and logs before relying on the browser interface.
Verify Hunter locally before remote access
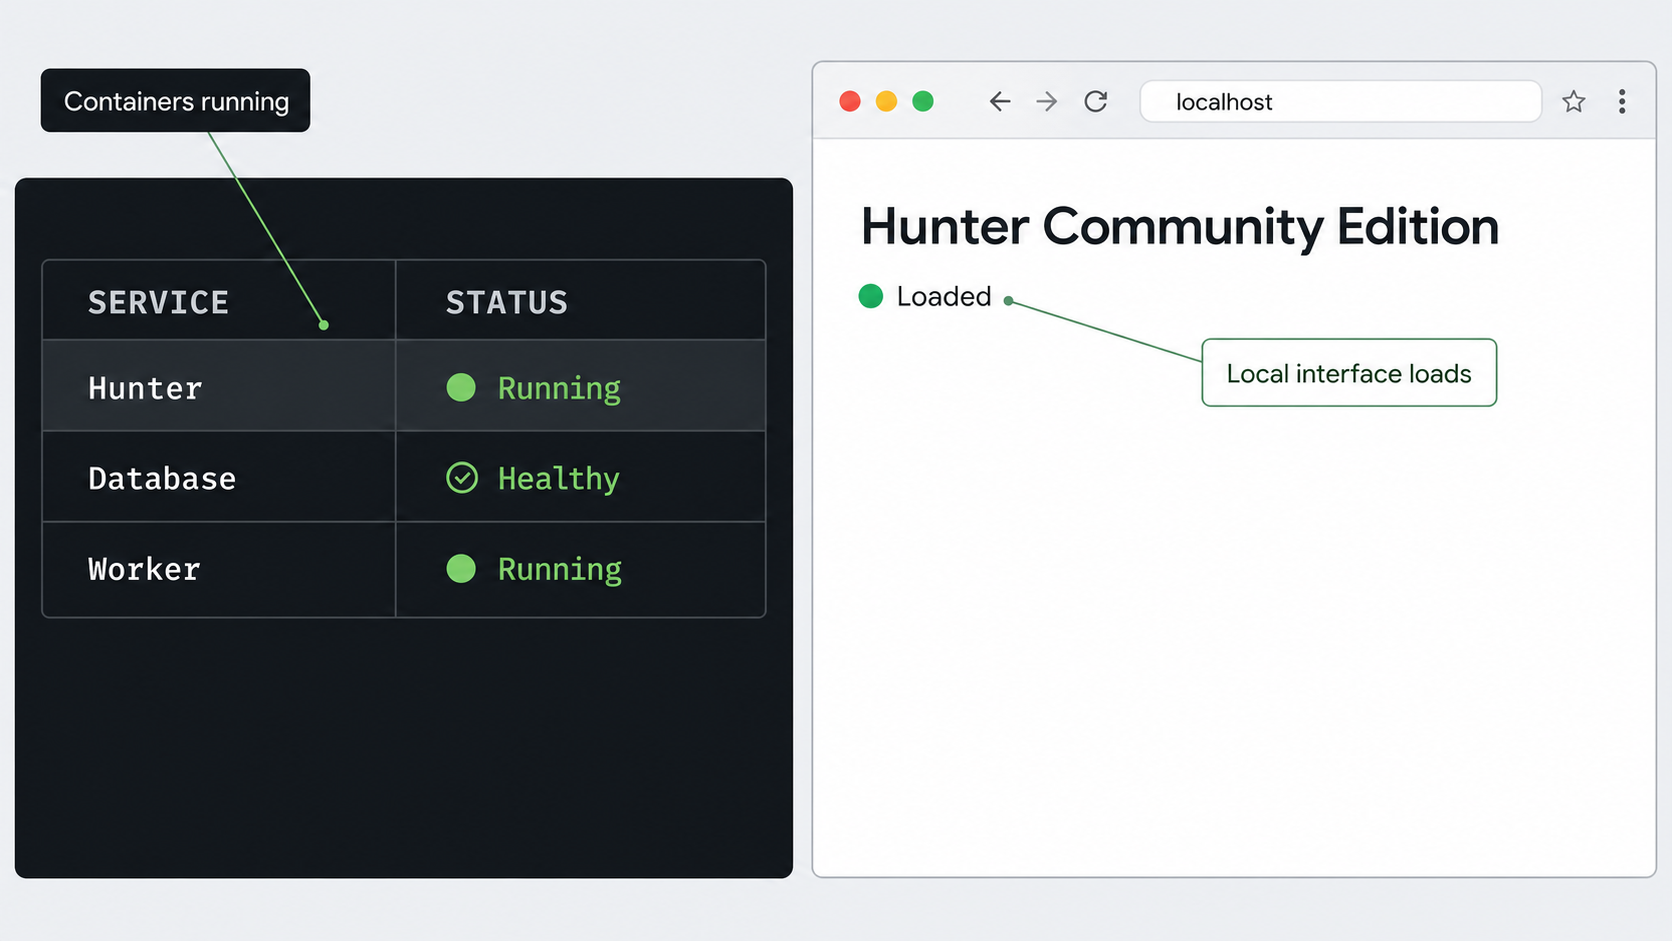
Inspect service state
From the repository directory, run:
docker compose psReview every listed service rather than checking only one container. A container that is restarting, exited, or unhealthy can prevent part of Hunter from working even if another service is running.
View startup logs
docker compose logs --tail=200To follow new messages while the stack initializes, use:
docker compose logs --follow
Press Ctrl+C to stop following the output. This exits the log viewer, not the containers. Before sharing log excerpts, remove API keys, tokens, private URLs, account identifiers, prompts, and financial information.
Open the local interface
http://localhost:3100
Open this address in a browser on the Docker host. localhost always refers to the machine running the browser. If Docker runs on a separate server, opening this URL on your laptop tests the laptop, not the server.
A successful browser check displays Hunter rather than a connection error, an unrelated application, or a persistent gateway failure. The current repository states that a self-hosted clone does not require the account registration used by its public multi-user demonstration site. Follow the interface presented by the checked-out revision and do not expose it publicly until you understand its access behavior.
Test the application in layers
- Confirm that
http://localhost:3100loads consistently. - Verify that the page is Hunter and not another process occupying port 3100.
- Check
docker compose psfor exited, restarting, or unhealthy services. - Submit a harmless prompt containing no private financial or personal data.
- Confirm that the selected LLM returns a response.
- Try a supported market-data request and note which data route handles it.
- Refresh the page and confirm that the interface remains available.
The current README suggests market-price, prediction, and deep-analysis tests. Some workflows depend on the optional data pipeline or another connected data service, and more involved analysis can take longer than a basic conversation. A failed advanced operation does not necessarily mean the web deployment or tunnel is broken.
A Localtonet tunnel forwards requests to the configured local service. It cannot make an unhealthy Compose stack ready or correct an invalid model key. Resolve local service, provider, and data-source problems first.
Operate the Hunter Compose stack
Run lifecycle commands from the same repository directory that contains Hunter's Compose file and .env. This ensures that Docker Compose addresses the intended project.
Check current service status
docker compose psUse this after startup, after a host reboot, and whenever the browser becomes unavailable. It shows whether the project services are running and whether the current Compose definition reports health information.
Read recent logs or follow live output
docker compose logs --tail=200
docker compose logs --follow
Run these as separate commands. Recent logs are useful for startup errors, while live output helps reproduce a failure as you submit a test request.
Stop the stack
docker compose down
This stops and removes the project's containers and Compose network. Do not add --volumes or -v unless the project documentation for your exact revision explicitly requires destructive volume removal and you have a tested recovery plan. Removing volumes can delete persistent data.
Start the stopped stack again
docker compose up -d
Follow it with docker compose ps and a browser check. If the Localtonet client or tunnel was also stopped, restart those separately after Hunter is healthy.
Restart services without changing configuration
docker compose restartThis is suitable for restarting the existing containers when the configuration has not changed. A restart is not a repair for an invalid model name, revoked API key, full disk, blocked registry, or conflicting port.
Apply changes made to .env
A simple container restart does not reliably recreate containers with changed environment values. After editing .env, use the Compose deployment command again:
docker compose up -dThen inspect the resulting state:
docker compose ps
docker compose logs --tail=200
If the current deployment does not pick up the intended change, use a controlled stop and start:
docker compose down
docker compose up -d
This sequence preserves named volumes as long as you do not add the volume-removal option. Changing JWT_SECRET can invalidate existing sessions. Rotate it deliberately, especially after suspected exposure, and expect users to authenticate again if the installed version uses sessions signed with that value.
Record and review the deployed revision
git rev-parse HEAD
git status
Record the commit hash and whether local files have been modified. Do not casually run an update command against a working financial research system. Review the current changelog, migration guidance, environment template, image tags, and Compose definition before moving to another commit or release.
Historical v0.2.0 registry visibility notes do not describe the current main branch and should not be used to diagnose a current installation. If you deliberately pin v0.2.0, use that release's own documentation and image-access requirements. Otherwise, investigate the exact registry response and image reference in the revision you actually deployed.
Backup and update boundaries
Hunter describes local storage for conversations, positions, and investment-memory data, but the evidence available for this tutorial does not establish one universal backup, restore, update, or rollback procedure across every repository revision. Inspect the checked-out Compose file to identify named volumes, bind mounts, and database services. A copy of the Git repository alone may not include data held in Docker volumes.
Do not copy a live database directory and assume that it is recoverable. Before entering information you cannot recreate, establish and test a backup procedure appropriate to the actual storage engine and revision. This guide intentionally does not invent a project-specific backup command.
Expose Hunter with a Localtonet HTTP tunnel
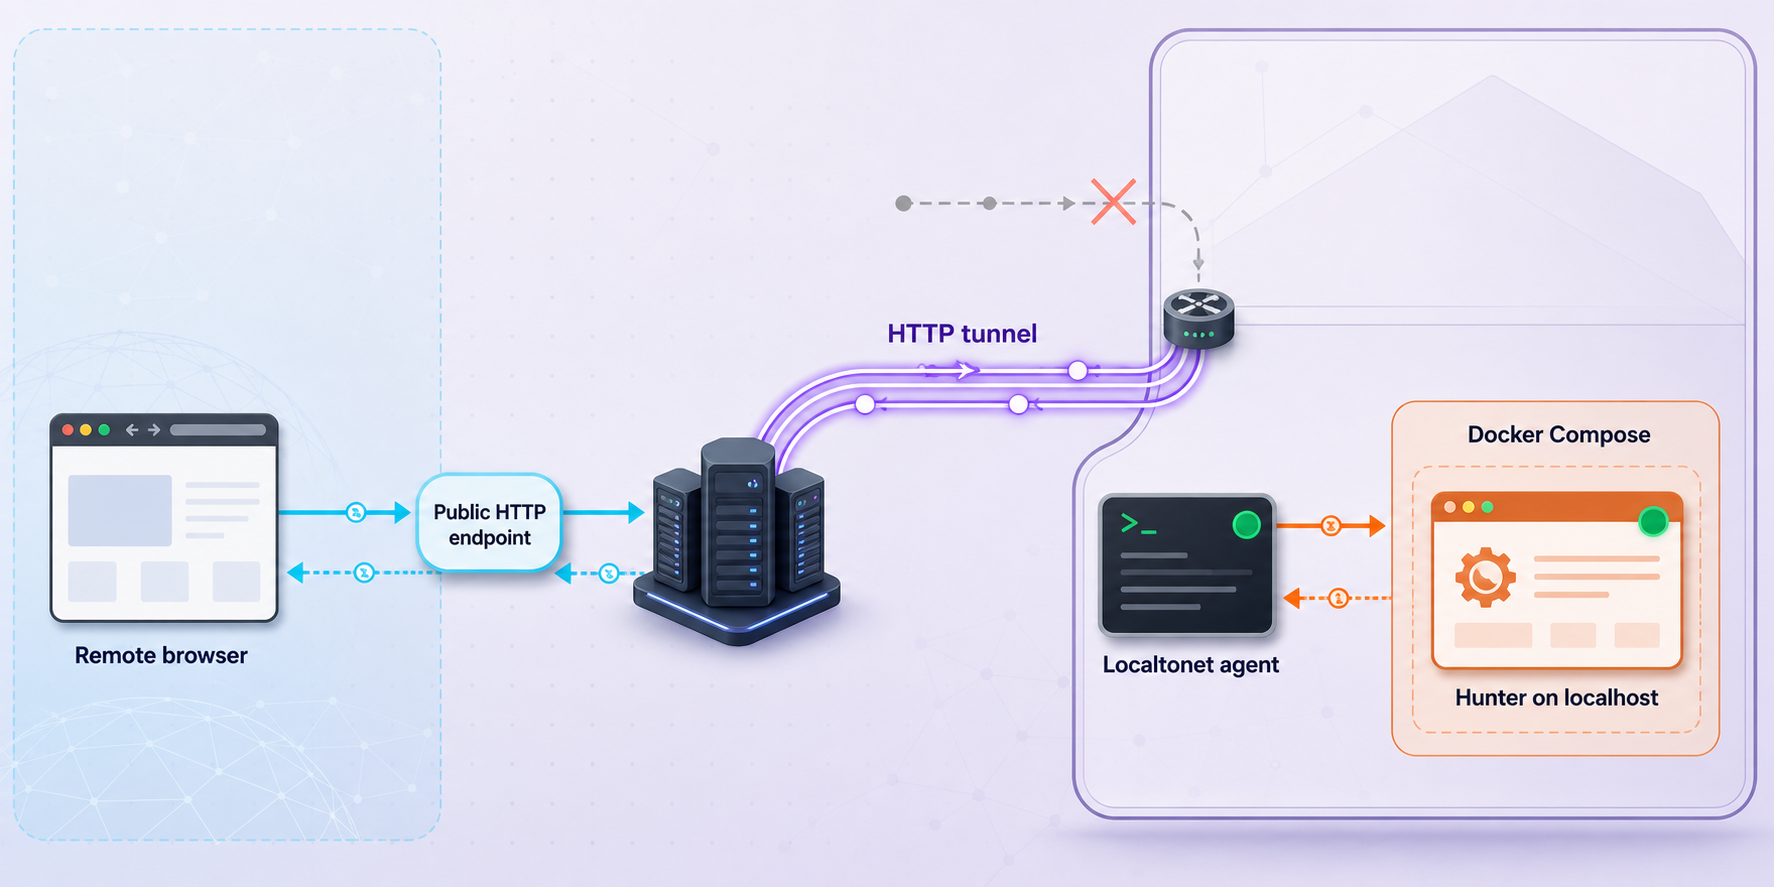
Once Hunter works at http://localhost:3100, our HTTP tunnel can make that interface reachable remotely. The Localtonet client establishes an outbound connection to a relay server, so this workflow does not require inbound router port forwarding, firewall changes, VPN setup, or a public IP address.
The documented HTTP tunnel flow uses the HTTP Tunnel page, a Process Type, an AuthToken, a server selection, and the local IP and port. Creating the configuration does not start it. The public endpoint is available only while the selected client is connected and the tunnel is running.
Install and run the Localtonet client
Install our application on the Hunter host or another device that can reach Hunter. The same host is the simplest choice because 127.0.0.1:3100 has already been verified there.
Open the HTTP Tunnel page
In the Localtonet dashboard, go to the HTTP Tunnel configuration page. Use an HTTP tunnel for Hunter's browser interface rather than exposing unrelated Compose services.
Select the Process Type
Choose Random Sub Domain, Custom Sub Domain, or Custom Domain according to the options currently available for your account. Each process type serves the configured content through a public HTTPS address.
Select the AuthToken and server
Select the device-specific AuthToken for the client that can reach Hunter, then choose an available server from the current dashboard. Do not copy a token or server code from an example.
Enter Hunter's local IP address and port
When the client runs on the Hunter host, use local IP 127.0.0.1 and port 3100. If the client runs on another LAN device, enter a private address that the client device has already verified it can reach.
Start the tunnel
Review the Process Type, AuthToken, server, IP address, and port, then press Start. Creating or saving a tunnel is not the same as starting it.
For the current interface and exact field sequence, use our Localtonet HTTP tunnel documentation. Server availability, process-type availability, and account options can change, so select values from the current dashboard rather than hardcoding them.
Choose the correct target
| Client location | Target | Required verification |
|---|---|---|
| On the Hunter host | 127.0.0.1, port 3100 |
Open http://localhost:3100 on that host before starting the tunnel. |
| On another LAN device | Hunter host's reachable private IP, port 3100 |
Verify from the client device that Hunter listens on a LAN-reachable address. |
| On an unrelated network | No valid target without an existing route to Hunter | The selected Localtonet client must be able to reach the configured local service directly. |
A service bound only to loopback cannot be reached from another LAN device. Do not broaden Hunter's listening address merely to avoid installing our client on the host. If you intentionally enable LAN access, review the host firewall and local network exposure as separate security decisions.
Verify the public endpoint
Open the assigned public HTTPS URL from a private browsing window, another device, or another network. This avoids relying on a local browser session that may already contain application state.
- Confirm that the assigned URL uses HTTPS.
- Confirm that it displays the expected Hunter interface.
- Observe the behavior of a new, unauthenticated browser session.
- Submit a harmless prompt and confirm that the complete request path works.
- Retest
docker compose psand logs if the page loads but an operation fails. - Stop the tunnel when remote access is no longer needed.
If HTML loads through the public URL but a model or financial-data request fails, Localtonet is already forwarding HTTP successfully. Investigate Hunter, the selected LLM, or the configured data service before recreating the tunnel.
Security and privacy considerations
A Localtonet tunnel changes Hunter from a locally reachable service into one with a public address. Treat the assigned URL as discoverable. Its hostname is not a password, and the tunnel should not be used as a substitute for application authentication.
Localtonet carries HTTP requests to Hunter. It does not decide which Hunter users may view conversations, portfolios, investment memories, or connected tools. Review the access behavior of the exact Hunter revision, use strong credentials where supported, apply least privilege, and stop the tunnel if you cannot establish appropriate application access control.
Separate and protect credentials
JWT_SECRET, LLM_API_KEY, an optional HUNTER_API_KEY, external tool credentials, and the Localtonet AuthToken have different purposes. Store and rotate them separately. Never put the Localtonet token in .env, and never enter provider keys into the Localtonet dashboard as tunnel settings.
Model and data-provider keys may authorize billable use. A publicly accessible Hunter deployment can create financial exposure if unauthorized users can submit requests. Use provider-side quotas or usage controls where available and monitor the relevant accounts.
Use low-risk test information
Use public securities and fictional portfolio data during installation. Before entering private portfolio notes, customer records, account identifiers, brokerage exports, or confidential research, determine what is stored locally and what is sent to the LLM, data providers, tools, and MCP services.
Understand the HTTPS boundary
Localtonet's HTTP process types provide a public HTTPS address, with TLS terminated at the tunnel edge. In this workflow, Hunter remains the local HTTP target on port 3100. This statement does not imply encryption for every database field, Docker volume, log file, provider request, or downstream tool connection.
Expose only Hunter's browser endpoint
Do not create public tunnels for databases, Docker control sockets, internal APIs, or other Compose ports merely because they appear in the deployment. Only expose a service when there is a documented need and an appropriate authentication and authorization model.
Use both lifecycle controls deliberately
Hunter and Localtonet have independent lifecycles. docker compose down stops Hunter but does not delete its tunnel configuration. Stopping the tunnel removes the public path but does not stop Hunter. For planned downtime, stop the tunnel first, stop the Compose stack, complete the work, verify Hunter locally after restart, and only then start the tunnel again.
Follow organizational policy
Use outbound tunneling only on systems and networks where you are authorized to expose the service. Do not use Localtonet to bypass workplace policies, application authorization, or network controls. Obtain the necessary approval before publishing employer-owned, customer, regulated, or otherwise sensitive information.
Troubleshoot Hunter and the Localtonet tunnel
Work from the inside out: host resources, Docker, Compose services, Hunter's local interface, model and data providers, Localtonet client state, tunnel state, and finally the remote browser. This prevents unrelated failures from being combined.
| Symptom | Likely layer | What to check |
|---|---|---|
docker compose is unavailable |
Docker installation | Install or enable Docker Compose v2 and verify it with docker compose version. |
| Image pull fails | Registry, network, or storage | Check the exact current image reference, ghcr.io access, DNS, proxy policy, registry response, and free disk space. |
| A service exits or restarts | Compose service | Run docker compose ps and inspect recent logs without publishing secrets. |
| Port 3100 does not load | Hunter, Docker, or port binding | Confirm startup completed, services are healthy, and another process is not using the port. |
| Hunter loads but chat fails | LLM configuration | Check the base URL, model identifier, API key, account status, and provider-specific settings. |
| Chat works but market data fails | Data supply | Review the selected free source, Hunter pipeline key, tool, vendor, or MCP service. |
| Public URL does not load | Localtonet lifecycle or target | Confirm the client is connected, the tunnel is started, and the configured IP and port are reachable from that client. |
| Public page loads but analysis fails | Hunter or an upstream provider | Inspect Hunter logs and provider responses instead of recreating a working HTTP tunnel. |
The environment file is not being used
Confirm that .env is beside the Compose file and named exactly. Check for duplicate keys, spaces accidentally added to variable names, malformed lines, and placeholders that were never replaced. Compare variable names with the .env.example from the same recorded commit, not a template copied from another release.
Do not share the complete file. If you need help, provide a redacted list of variable names and whether each value is present. Remove secrets, private endpoints, account identifiers, and unique hostnames.
Docker cannot pull an image
Run the startup command again and read the exact registry error. Current main-branch installations should be diagnosed against the image references in their checked-out Compose file. Historical v0.2.0 notes about a companion image's release-time visibility are relevant only to deployments intentionally pinned to that release.
If a controlled network uses a proxy, configure the Docker runtime according to the network policy. Do not put a registry personal access token in Hunter's .env. Registry authentication belongs to Docker's credential mechanism, not Hunter's application environment.
Hunter is not available on port 3100
docker compose ps
docker compose logs --tail=200
Look for exited, restarting, or unhealthy services. Confirm that the first image pull completed and that the host has sufficient memory and storage. Check whether another process already occupies port 3100. If you edited the Compose file, compare it with the recorded repository revision before investigating deeper application behavior.
The provider rejects requests
Confirm that LLM_BASE_URL belongs to the service that issued the key and that LLM_DEFAULT_MODEL is available to the account. Check quota, billing authorization, geographic restrictions, and provider status. For the current documented DeepSeek path, verify LLM_SCHEMA_SANITIZE=1.
Configuration changes have no effect
Save .env, then run docker compose up -d and inspect status and logs. If the existing containers still retain the previous values, perform docker compose down followed by docker compose up -d. Do not add a volume-removal flag.
Local Hunter works but the public URL does not
Identify where the Localtonet client is running. A client on the Hunter host can target 127.0.0.1 and port 3100. On another machine, 127.0.0.1 refers to that other machine, not the Hunter host.
Confirm that the selected AuthToken belongs to the intended device, that the client is connected, and that the tunnel was explicitly started. Review the current server selection and test whether the client device can reach the exact IP and port entered in the tunnel.
The public endpoint should no longer be available
Stop the tunnel in our dashboard. Delete obsolete tunnel configurations when they will not be reused. Verify from an unauthenticated browser that the public address no longer serves Hunter. If exposure may have revealed a secret, rotate the affected Hunter, model-provider, data-provider, tool, and Localtonet credentials through their respective systems.
Frequently asked questions
What local URL does Hunter Community Edition use?
The current repository documents http://localhost:3100. Test it on the Docker host after starting the Compose stack and inspecting service state.
Does self-hosted Hunter require a Hunter cloud account?
The current README says the self-hosted clone does not require the account registration used by the project's public multi-user demonstration site. Review the access behavior of your checked-out revision before making it public.
Is an LLM API key optional?
No. Hunter requires an LLM key with a matching base URL and model. The separate HUNTER_API_KEY is optional and belongs to the Hunter data-pipeline path.
How do I view Hunter's service status and logs?
From the repository directory, use docker compose ps for service state and docker compose logs --tail=200 for recent output. Use docker compose logs --follow to watch new messages.
How do I stop and restart Hunter?
Use docker compose down to stop the stack and docker compose up -d to start it again. Use docker compose restart for an ordinary restart when configuration has not changed. Do not add a volume-removal option.
How do I apply changes to Hunter's environment file?
Save .env and run docker compose up -d. If the containers retain previous values, run docker compose down and then docker compose up -d. A simple restart may not recreate containers with changed environment values.
Does self-hosting mean no information leaves my machine?
Not necessarily. Local application data can remain on your deployment, but prompts may be sent to the configured LLM, and financial information may come from external providers, tools, or MCP services.
Should Hunter use a Localtonet HTTP or TCP tunnel?
Use an HTTP tunnel for the documented browser interface on port 3100. It provides a public HTTPS address for Hunter's local HTTP service. A raw TCP tunnel is not required for this browser-access workflow.
Does Localtonet require router port forwarding or a public IP address?
No. Our client creates an outbound connection to a Localtonet relay, so this workflow does not require inbound router port forwarding, firewall changes, VPN setup, or a public IP address.
Is Hunter public as soon as I create a tunnel?
No. Select the Process Type, AuthToken, server, local IP, and port, then press Start. The endpoint works only while the chosen client is connected and the tunnel is running.
Does the public HTTPS URL secure the whole deployment?
No. HTTPS protects the public browser-facing tunnel path to the edge. It does not replace Hunter authentication, authorization, host maintenance, provider-key protection, backups, or the security controls of external services.
Access your verified Hunter deployment with Localtonet
Start by proving that Hunter works at http://localhost:3100. Then install our client on the host, create an HTTP tunnel to 127.0.0.1:3100, press Start, and verify the public HTTPS address from a separate browser. Keep application access controls enabled and stop the tunnel whenever remote access is unnecessary.


