

Reach Your Smart Home Without Opening an Inbound Router Port
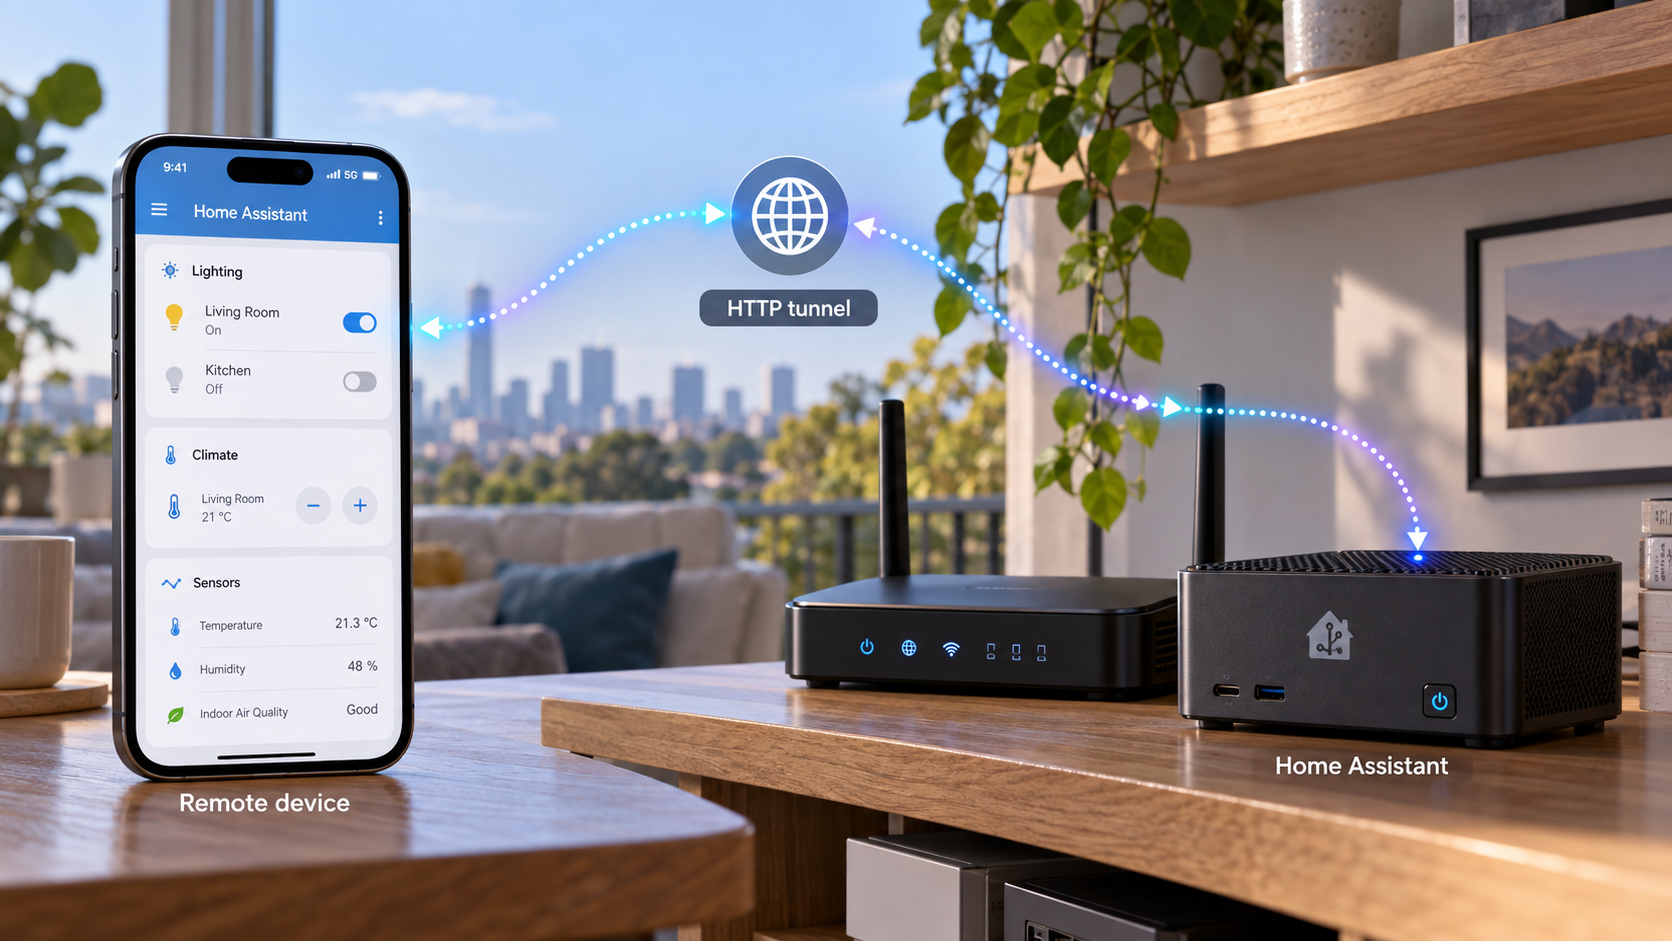
Home Assistant normally serves its dashboard on a private address that cannot be reached from the public internet. A Localtonet HTTP tunnel can publish that service at a public HTTPS address without inbound router port forwarding, firewall changes, a VPN, or a public IP address. This guide covers supported installation choices, local preparation, the Localtonet tunnel workflow, conditional reverse-proxy configuration, external browser and Companion App testing, security, recovery, and troubleshooting.
📋 What's in this guide
How outbound remote access works
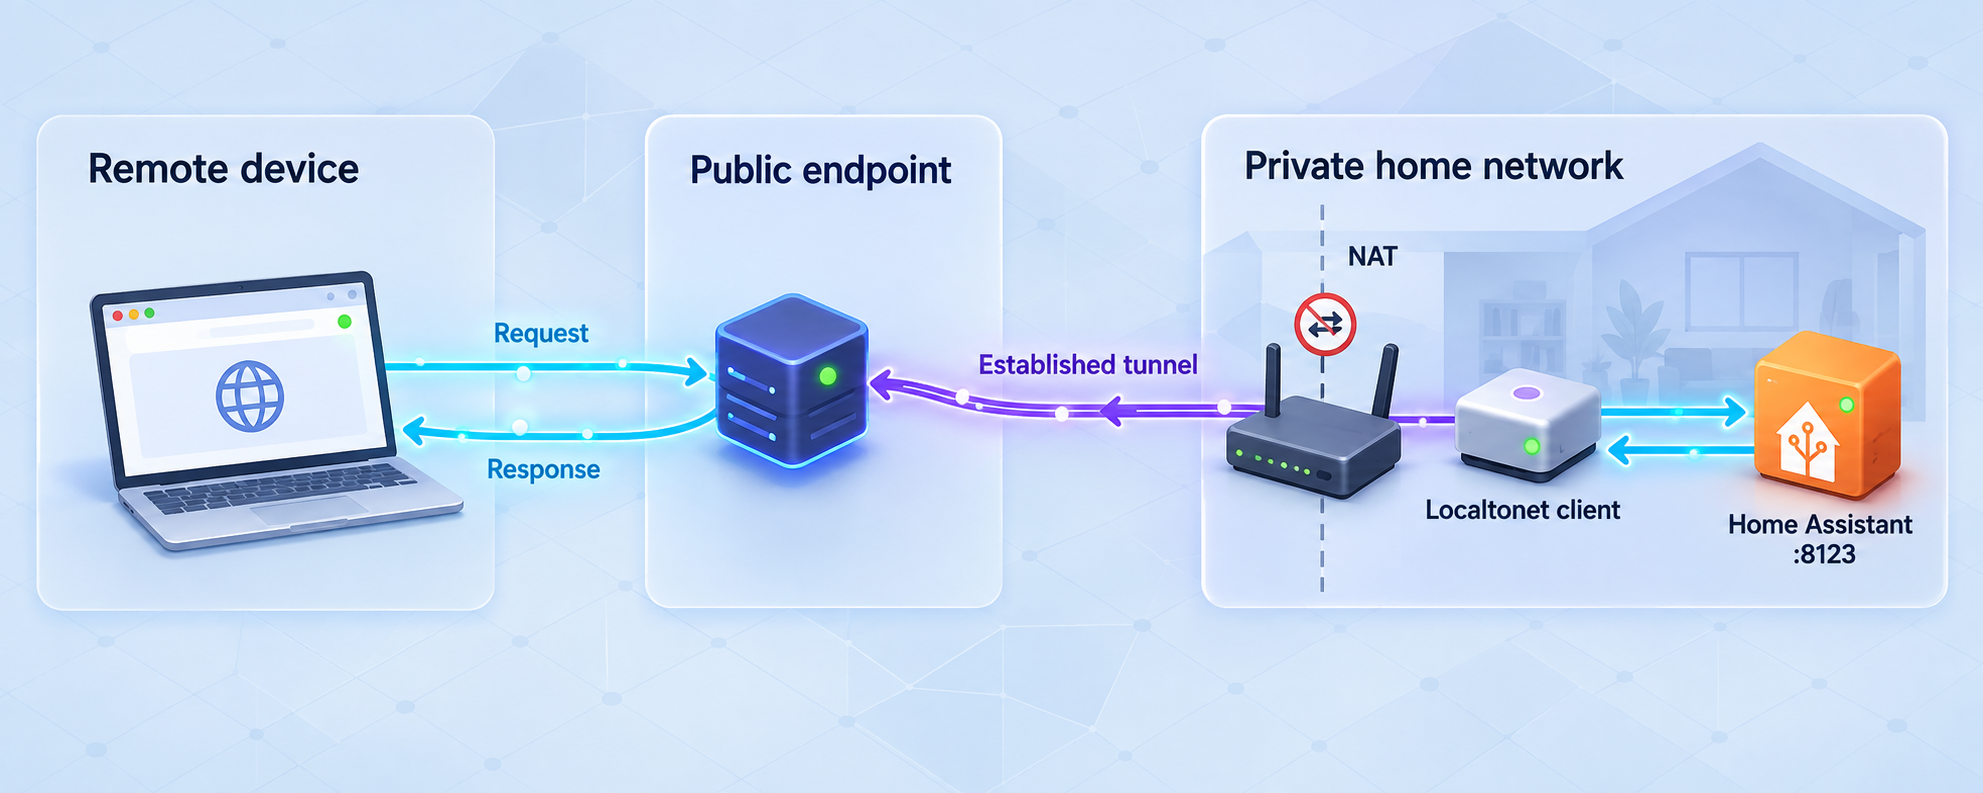
Home Assistant listens on TCP port 8123 by default. A device on the same network can usually reach it through an address such as http://192.168.1.50:8123. That address belongs to a private network and is not directly routable from the public internet.
A traditional remote-access design may combine router port forwarding, dynamic DNS, and a TLS certificate. It also depends on the internet connection accepting inbound traffic. If the connection is behind carrier-grade NAT, an ordinary port-forwarding rule on the home router cannot create a path through the provider's additional NAT layer. A changing public address can introduce another dependency on dynamic DNS.
Localtonet uses an outbound connection instead. The Localtonet client runs on a device that can reach Home Assistant and connects outward to a Localtonet relay. An HTTP tunnel then maps a public HTTPS address to the selected Home Assistant IP address and port. This does not require an inbound router rule or a dedicated public IP address.
A tunnel avoids inbound router configuration, but it still makes the Home Assistant login endpoint internet-reachable. Home Assistant authentication, multi-factor authentication, IP banning, or any one control by itself does not make public exposure risk-free. Keep the full stack updated, limit administrative access, review logs, and stop the tunnel when it is not needed.
Prerequisites and local preflight checks
Complete the local checks before changing Home Assistant or creating a tunnel. Separating local validation from tunnel configuration makes failures much easier to diagnose.
Confirm that Home Assistant works locally
From the device that will run Localtonet, open the exact local Home Assistant target in a browser. Common examples are http://127.0.0.1:8123 for a truly same-host process or http://192.168.1.50:8123 for a separate Home Assistant appliance. Use the actual configured port if Home Assistant does not listen on the default.
The login page should load, sign-in should succeed, and the frontend should remain connected. Navigate between views and confirm that entity states continue updating. A static login page alone proves only that an HTTP response was returned. It does not prove that the persistent connection used by the Home Assistant frontend remains healthy.
Identify the installation types
Record both the Home Assistant installation type and the Localtonet installation type. The important distinction is where the Localtonet process runs relative to Home Assistant:
- On the same operating system and in the same network namespace.
- On another computer or appliance on the same LAN.
- In a Docker container beside or separate from Home Assistant.
- Through the current Localtonet NAS / Home Assistant installation category.
The current Localtonet download page includes a dedicated NAS / Home Assistant category in addition to Windows, macOS, Linux, Docker, OpenWrt, and other platforms. Check that category first for Home Assistant or NAS deployments. It is no longer appropriate to assume that Home Assistant OS always requires a second LAN device.
The exact package or integration offered within that category can change with the supported platform and release. Use the installation path currently presented there for your Home Assistant environment. Do not open an add-on terminal and launch an arbitrary unmanaged host container as a substitute for a listed Home Assistant installation method. If no compatible option is presented for your particular installation, run Localtonet on another supported, always-on device that can reach Home Assistant over the LAN.
Prepare account and network details
- A Localtonet account and a device-specific AuthToken for the client that will run the tunnel.
- The Home Assistant IP address or hostname as seen from that client.
- The Home Assistant port, normally
8123. - Permission to edit and validate Home Assistant configuration if reverse-proxy settings become necessary.
- An external test connection, such as mobile data, that is not using the home Wi-Fi network.
- A recovery path to the Home Assistant host, console, file share, or local management interface before editing YAML.
An AuthToken identifies the Localtonet client device. Do not include it in screenshots, support posts, source control, shared configuration, or article examples. Where possible, prefer an application prompt, protected token file, or supported service configuration over repeatedly entering the token into a shell.
Choose the correct deployment topology
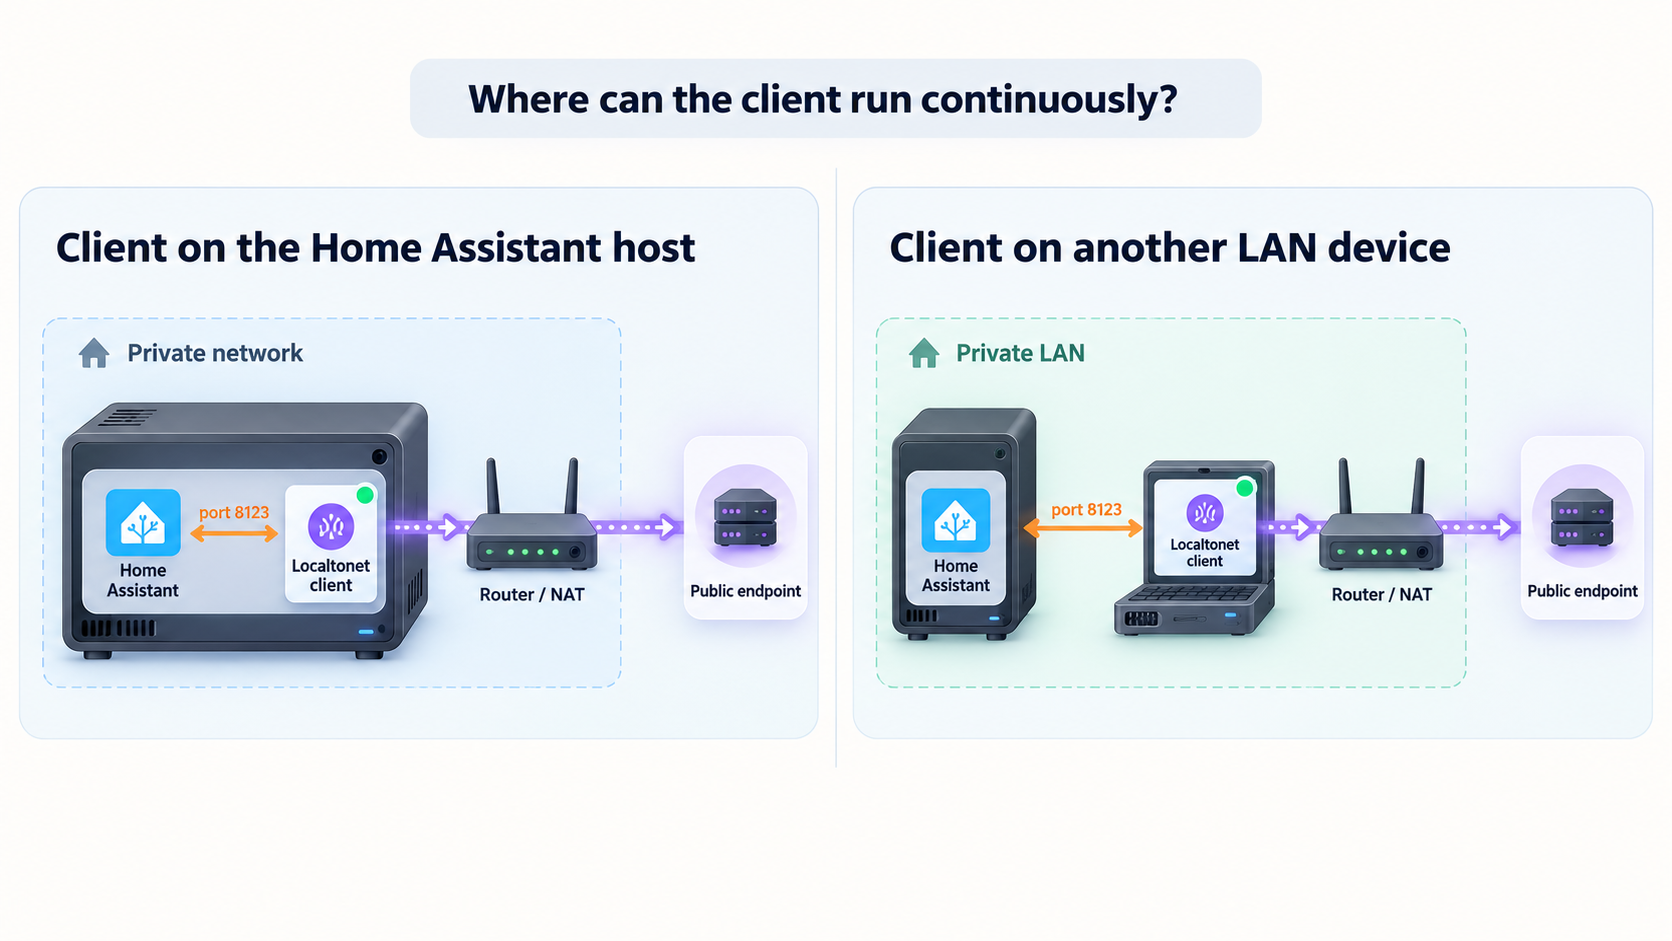
The public traffic path has four conceptual parts: the browser or Companion App connects to the public HTTPS endpoint, a Localtonet relay receives that connection, the Localtonet client carries it through an outbound connection, and the client connects to the configured Home Assistant target.
The target must be interpreted from the Localtonet client's network environment. The address 127.0.0.1 always means the current machine or container namespace. It does not automatically mean the Home Assistant machine.
| Deployment | Typical local target | Address Home Assistant may see | Operational consideration |
|---|---|---|---|
| Same host and same network namespace | 127.0.0.1:8123 or the host's local address |
Potentially loopback, but confirm in Home Assistant logs | Both services depend on the same host |
| Separate device on the LAN | Home Assistant's stable LAN address and port 8123 |
Potentially the Localtonet device's LAN address | Both devices and the LAN path must remain available |
| Separate Docker containers | A resolvable container name, published host port, or another deliberately reachable address | A container, bridge, gateway, or translated address determined by Docker networking | Container addresses can change after recreation |
| Home Assistant OS or NAS path | The target exposed to the supported Localtonet package, app, or add-on environment | An add-on, container, bridge, loopback, or LAN address depending on that installation | Use logs rather than assuming the proxy address |
There is no verified basis in the supplied Localtonet documentation for promising that every Localtonet HTTP tunnel adds a particular set of forwarding headers, or for assigning one fixed immediate source address to every deployment. Network namespaces, container bridges, address translation, and installation packaging can all affect what Home Assistant observes.
For that reason, treat Home Assistant's reverse-proxy configuration as conditional. Do not add use_x_forwarded_for and a guessed trusted_proxies value merely because a tunnel exists. First create the local path, test the public endpoint, and use Home Assistant's logs to determine whether forwarded headers are present and which immediate source address Home Assistant is evaluating.
Never add 0.0.0.0/0, ::/0, an entire home network, or a broad Docker address range without understanding why it is required. A trusted proxy can influence how Home Assistant interprets the apparent client address. Trust only the immediate proxy address or the narrowest controlled network required by a deliberately managed container topology.
Prepare Home Assistant safely
Home Assistant documents reverse-proxy controls in its HTTP integration documentation. When a reverse proxy sends X-Forwarded-For and Home Assistant is configured to use it, the immediate proxy must be included in trusted_proxies. Home Assistant rejects forwarded information from an untrusted source to prevent arbitrary clients from spoofing their apparent address.
Start without guessing the proxy address
Do not add a proxy entry before you know what Home Assistant sees. After the Localtonet HTTP tunnel is running, attempt to open the public URL. If Home Assistant records an untrusted reverse-proxy message, read the source address in that log entry. That source is the candidate immediate proxy address for the current topology.
If no reverse-proxy error appears and the frontend works normally, do not assume that adding use_x_forwarded_for improves the setup. Whether forwarded client information is present and should be trusted must be established from actual behavior and logs.
Back up the configuration before editing
Before changing configuration.yaml:
- Create a Home Assistant backup using the supported backup controls for the installation.
- Make a separate copy of
configuration.yamlor record the exact originalhttp:section. - Confirm that you can restore the file through a local console, supported file editor, network share, container volume, or host filesystem.
- Keep local access available while testing. Do not make remote access the only management path.
Add a narrowly scoped trusted proxy only when required
If the log identifies IPv4 loopback as the immediate proxy, the relevant configuration can look like this:
http:
  use_x_forwarded_for: true
  trusted_proxies:
    - 127.0.0.1
This is an example, not a universal Localtonet value. If the log reports ::1, a stable LAN address, or a controlled container address, use the address actually reported for your installation. Do not list both loopback families or unrelated networks without evidence that they are used.
If configuration.yaml already contains an http: section, merge the new keys into it. YAML does not permit two independent top-level http: mappings to define one combined configuration.
Validate before restarting
Use Home Assistant's current configuration validation control before restarting. Menu labels can vary by release and installation type. Home Assistant OS and supervised environments can also validate from a local terminal with the supported Home Assistant command-line controls. Container and Core installations should run the configuration check using the Home Assistant version and configuration directory used by that installation.
A safe validation and restart sequence is:
- Save the edited YAML without closing the recovery session.
- Run Home Assistant's configuration check.
- If validation fails, do not restart. Correct the reported YAML line or restore the backup copy.
- If validation succeeds, perform a controlled Home Assistant restart.
- Wait for local access to return and sign in locally before testing the public URL.
- Review the Home Assistant log for proxy warnings, configuration errors, and repeated authentication failures.
Rollback after an invalid or incorrect change
If Home Assistant will not start after the edit, use the local recovery path prepared earlier. Restore the original configuration.yaml, or remove the newly added proxy keys from the existing http: section. Validate again and restart Home Assistant. If the service starts but public requests fail, stop the Localtonet tunnel while correcting the configuration so the endpoint is not left in an uncertain state.
If the proxy address was correct initially but changes after a container recreation, inspect the new log entry rather than broadening the trusted range immediately. A user-defined Docker network with controlled addressing or another stable topology is safer than continually trusting unrelated dynamic subnets.
Optional failed-login banning
Home Assistant supports ip_ban_enabled and login_attempts_threshold in the HTTP integration. The threshold is an administrative choice, not a Localtonet requirement. When the correct immediate proxy is confirmed, an example is:
http:
  use_x_forwarded_for: true
  trusted_proxies:
    - 127.0.0.1
  ip_ban_enabled: true
  login_attempts_threshold: 5
If a legitimate client is banned, stop repeated login attempts first. Access Home Assistant locally, inspect ip_bans.yaml, remove the relevant entry according to the Home Assistant recovery procedure, and restart or reload as required by the current Home Assistant version. Also correct stale credentials in browsers and mobile apps so the ban is not immediately recreated.
Install the Localtonet client
Use the current Localtonet download page to select the operating system, architecture, or dedicated NAS / Home Assistant option. Install the client on the device that can reach the Home Assistant target selected during preflight.
NAS and Home Assistant installations
Begin with the dedicated NAS / Home Assistant category on the download page. Use the package or supported integration displayed for your current platform. This is the preferred discovery path for appliance-style environments because it avoids treating a temporary shell command or unmanaged host container as a durable installation.
After installation, connect the client with its device-specific AuthToken and verify that the corresponding device appears connected. If the current category does not present a compatible package for your specific Home Assistant installation or architecture, use another supported always-on Windows, Linux, macOS, Docker, or NAS device on the same LAN.
Linux quick installer
For a supported general-purpose Linux host, the download page provides a quick installer that detects the operating system and CPU architecture and installs the client at /usr/local/bin/localtonet:
curl -fsSL https://localtonet.com/install.sh | shReview downloaded scripts before executing them in a privileged environment. Installation into /usr/local/bin and service management may request administrative access.
The documented Linux service mode requires systemd. It starts the client after reboot and keeps it running after logout. Direct command-line token arguments can be retained in shell history, process records, or administration logs, so consider the package-based protected token file described below when it is compatible with the host.
Linux DEB and RPM service packages
The current download page also provides DEB and RPM packages for x64 and ARM64. These packages require systemd 247 or newer and OpenSSL 3. Examples of compatible platform generations listed by Localtonet include Debian 12, Ubuntu 22.04 or newer, and RHEL 9.
The package route is useful for an always-on Home Assistant companion host because it provides a systemd service and a protected token-file workflow. For a Debian or Ubuntu x64 package downloaded into the current directory, the documented sequence is:
sudo apt install ./localtonet-linux-x64.deb
sudo chmod 600 /etc/localtonet/auth-token
sudo localtonet --headless --authtoken-file /etc/localtonet/auth-token --check-config
sudo systemctl enable --now localtonet.service
sudo journalctl -u localtonet.service
Before running the configuration check, edit /etc/localtonet/auth-token as root and replace the placeholder with the actual token on one line. Do not paste the token into shared command output. ARM64 systems must use the matching ARM64 package. For RPM systems, select the matching RPM architecture and follow the package-specific commands currently shown on the download page rather than substituting Debian package commands.
Compared with the quick installer, the DEB or RPM path has explicit systemd and OpenSSL prerequisites but avoids repeatedly passing the token as a command-line argument. After an upgrade, the package documentation states that the configuration is preserved and the standard client service should be restarted.
Windows and macOS
Windows users can install through the Microsoft Store or use a current standalone build. Windows Service mode starts Localtonet automatically on boot and keeps it running after logout. Service installation and management require an elevated Command Prompt or PowerShell session, and the service can be inspected through services.msc.
On macOS, Localtonet provides Intel and Apple Silicon downloads and an official Homebrew tap:
brew tap localtonet/tap
brew install localtonet
localtonet --version
The current download page also documents launchd service mode. Select a build that matches the Mac architecture and verify service status after a restart.
Docker
The official Localtonet image can be pulled with:
docker pull localtonet/localtonetPlan Docker networking before creating the tunnel. Inside the Localtonet container, 127.0.0.1 points back to that container. If Home Assistant is in another container, use a deliberately configured network path such as a resolvable service name on a shared user-defined network. If Home Assistant publishes port 8123 on the Docker host, use a host address that is actually reachable from the Localtonet container.
Do not assume host networking is portable across every Docker platform. Protect the AuthToken through the supported private configuration mechanism used by the deployment rather than embedding it in a public Compose file or image.
Create and start the Localtonet HTTP tunnel
Local validation and software installation should now be complete. The following sequence keeps the Localtonet product configuration separate from Home Assistant preparation and external testing. For current interface details, consult the Localtonet HTTP tunnel documentation.
Open the HTTP tunnel configuration
Use the Localtonet dashboard to create an HTTP tunnel. HTTP is the appropriate family for the Home Assistant web frontend listening on its local HTTP port.
Select the Process Type
Choose Random Sub Domain, Custom Sub Domain, or Custom Domain according to the options currently available to the account. All three HTTP process types serve the selected content at a public HTTPS address. Check current documentation before applying custom-domain DNS records.
Select the connected AuthToken and relay server
Choose the device-specific AuthToken for the client that passed the local preflight test, then select an available server or region from the current dashboard. Do not copy server codes from an old tutorial because availability can change.
Enter the Home Assistant local target
Enter the IP address or hostname reachable from the Localtonet client and the Home Assistant port, normally 8123. Use loopback only when both processes genuinely share the same network namespace.
Start the tunnel
Creating a tunnel does not make it active. Press Start, confirm that the selected client remains connected, and record the assigned public HTTPS URL without exposing account credentials or the AuthToken.
Remote access requires Home Assistant, the local network path, the Localtonet client, its outbound connection, and the tunnel itself to be operational. A saved tunnel configuration is not proof that the client is connected or that the tunnel has been started.
Verify the browser, frontend connection, and Companion App
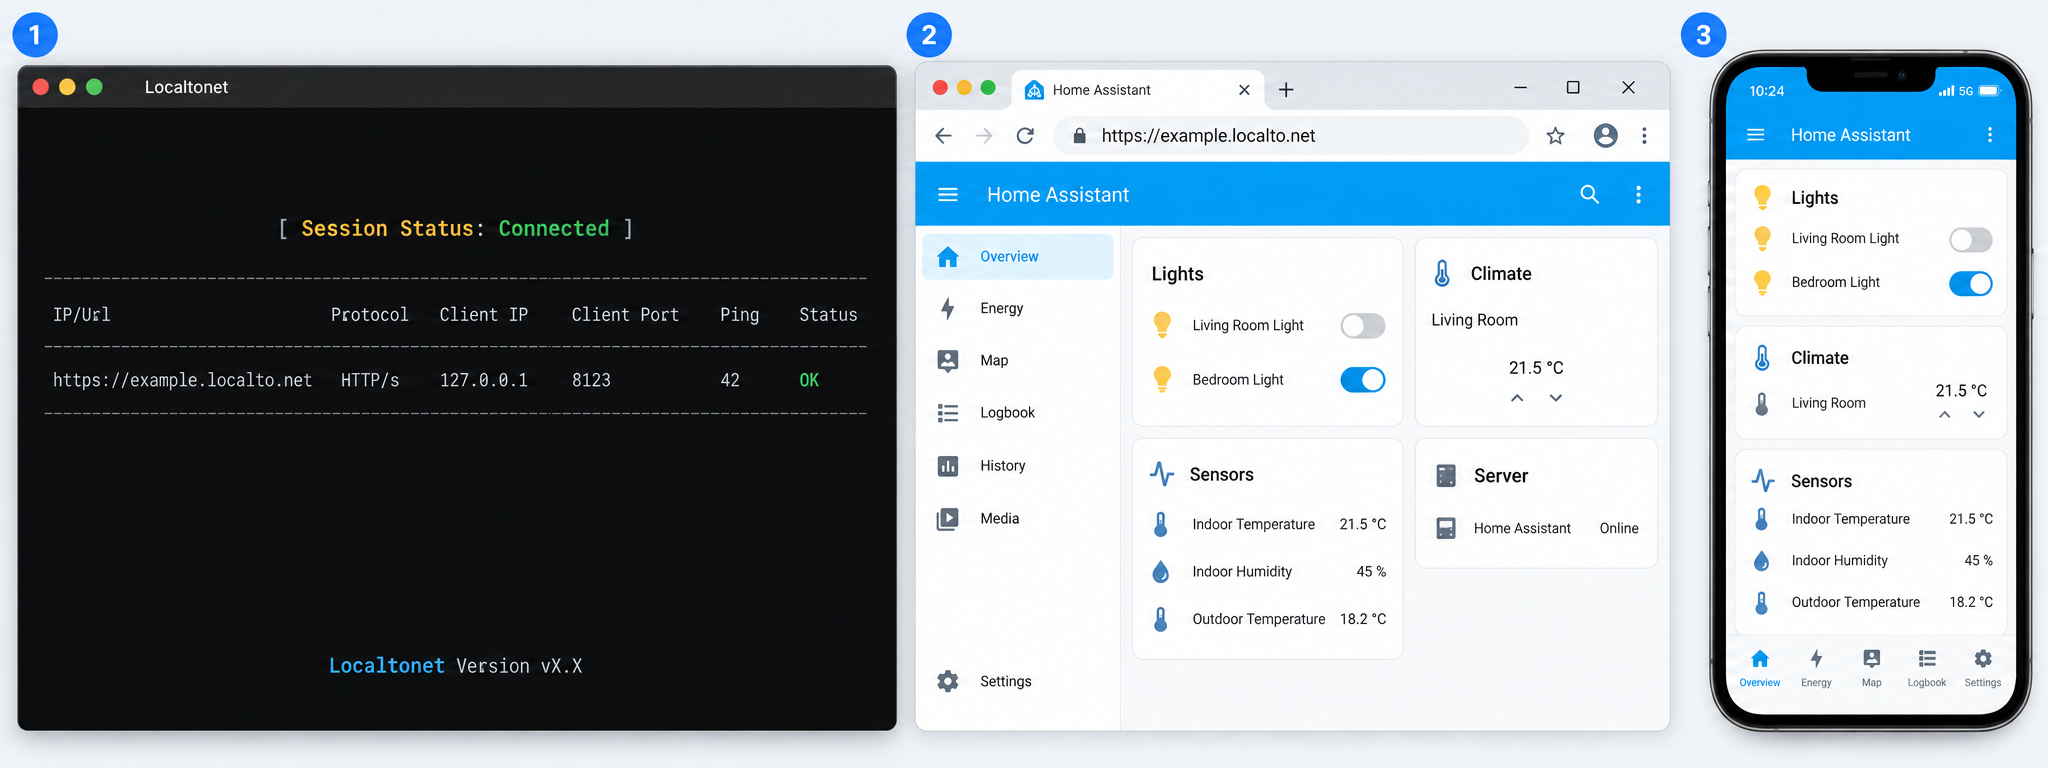
Test in layers so that a successful local request is not confused with successful remote operation.
Test with an external browser
- Keep the local Home Assistant session open for recovery and log review.
- Disconnect the test phone from home Wi-Fi and use mobile data, or use another external network.
- Open the Localtonet public HTTPS URL.
- Confirm that the Home Assistant login page loads without a gateway error.
- Sign in using a normal Home Assistant account.
- Open multiple dashboard views and entity dialogs.
- Trigger or observe a safe state change and verify that the frontend updates without manual reload.
- Leave the page open long enough to confirm that it does not repeatedly disconnect or become stale.
The final checks matter because Home Assistant's frontend uses a persistent connection for ongoing state updates. A login page or one rendered dashboard response does not establish that the full frontend session remains connected.
If Home Assistant reports an untrusted proxy, return to the logs, identify the immediate source address, update the existing http: section narrowly, validate the YAML, and restart safely. Do not guess based solely on whether Localtonet is installed on the same physical computer.
Configure the Home Assistant Companion App
The Companion App can use an external server URL when the phone is away from the home network. Menu names vary by mobile platform and app version. Open the server or connection settings for the Home Assistant server and set the external URL to the Localtonet public HTTPS address. Keep the internal URL set to a reachable local address if local network switching is desired.
Home Assistant can also maintain URL-related settings that integrations use when generating links or callbacks. Follow the current Home Assistant remote-access guidance and the Companion App networking documentation because exact controls and automatic connection behavior can vary by version and platform.
After saving the app configuration:
- Disable Wi-Fi and open the Companion App over mobile data.
- Confirm that login succeeds and dashboards continue updating.
- Test a harmless entity interaction.
- Open a notification link if notifications are part of the intended workflow.
- Check for repeated login attempts caused by stale stored credentials.
A browser working remotely does not guarantee that every integration accepts a new external hostname. Integrations involving OAuth redirects, generated links, webhooks, or callback URLs can have their own documented URL requirements.
Verify operation after reboot
Restart the device running Localtonet during a planned maintenance window. After it returns:
- Confirm that Home Assistant is locally reachable.
- Verify that the Localtonet service, app, container, or supported Home Assistant package started.
- Confirm that the device appears connected in Localtonet.
- Verify that the tunnel is running.
- Repeat the external browser test.
- Confirm that the frontend remains connected and receives live state updates.
Do not assume that operating-system autostart also starts every saved tunnel. Verify both the client connection and tunnel state after maintenance.
Routine operation and change management
Remote access is an operating service, not a one-time configuration. Small changes to LAN addressing, container networking, authentication, or app settings can break a previously working path.
Keep local addresses stable
If Localtonet targets a Home Assistant LAN address, reserve that address through the router or configure it according to the network's normal address-management practice. If Localtonet runs on another LAN device and that address is trusted by Home Assistant, keep its address stable as well.
For Docker, prefer a deliberate user-defined network and stable service discovery rather than copying a temporary container IP. Recreated containers can receive different addresses, and Docker network address translation can change the immediate source Home Assistant logs.
Review the endpoint after upgrades
After upgrading Home Assistant, Localtonet, the host operating system, Docker, a NAS platform, or the Companion App, repeat the local and external checks. Review Home Assistant logs for new proxy warnings and verify service startup after reboot.
Stop access when it is not required
Use the Localtonet dashboard to stop the tunnel when remote access is temporarily unnecessary. Delete obsolete tunnels and revoke a device token if it may have been disclosed. Stopping a tunnel and disconnecting a client are different lifecycle events, so verify the intended state explicitly.
Security checklist for internet-facing Home Assistant
IP banning can reduce repeated login attempts, but it is not a substitute for strong credentials, multi-factor authentication, updates, monitoring, and narrowly configured trusted proxies. Multi-factor authentication also does not protect an unpatched vulnerable component or an already authenticated session.
Maintain a local recovery account and a local management path. If remote access is the only way to administer the system, a stale external URL, accidental ban, invalid YAML file, or disconnected Localtonet client can turn a routine configuration problem into a lockout.
Troubleshoot by failure domain
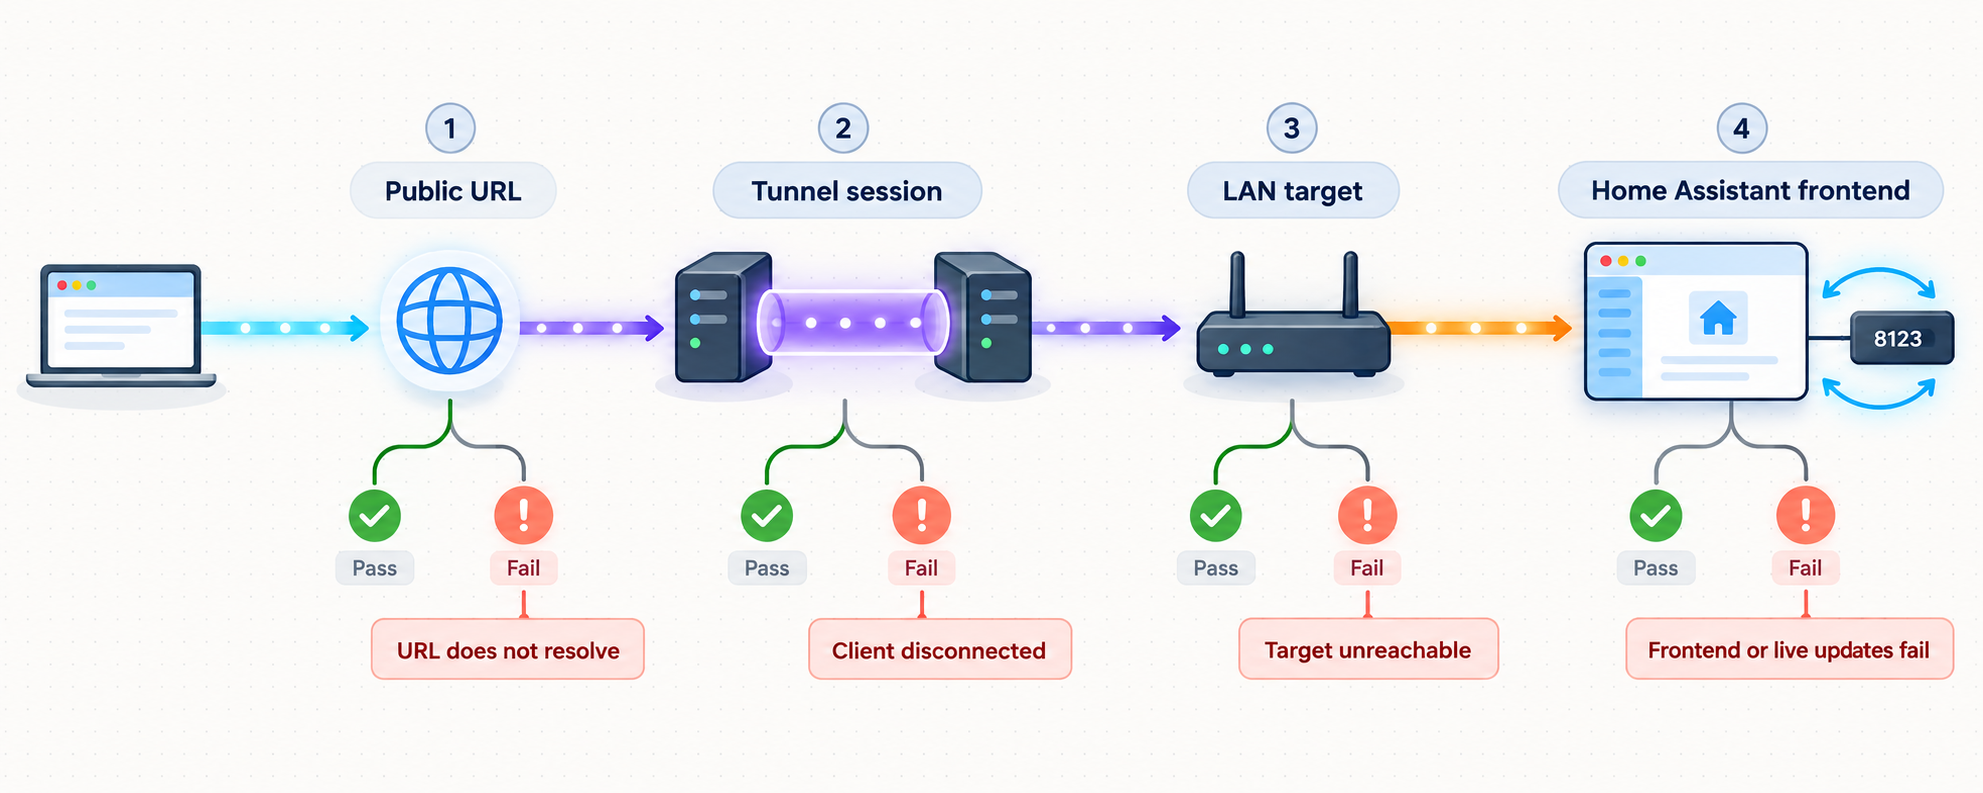
Start by deciding whether the failure belongs to Localtonet, the local Home Assistant target, reverse-proxy handling, DNS or URL configuration, the Companion App, or authentication. Changing several layers at once makes the original cause difficult to identify.
| Symptom | Failure domain | Safe corrective action |
|---|---|---|
| The public URL returns a gateway or connection error | Local target or LAN path | Open the same IP address and port from the Localtonet device. Correct the target, firewall, container network, or Home Assistant listener before changing public settings. |
| The tunnel exists but is unavailable | Localtonet lifecycle | Confirm that the selected client is connected and press Start. A created tunnel is not automatically running. |
| The Localtonet device is disconnected | Client or operating system | Check the Localtonet service, application, container, outbound network connectivity, and system logs. Verify the correct AuthToken without exposing it. |
| Home Assistant reports an untrusted reverse proxy | Home Assistant HTTP configuration | Read the immediate source address from the Home Assistant log, add only that address when forwarded headers are actually in use, validate YAML, and restart safely. |
| Home Assistant does not start after editing YAML | Configuration validation | Use the local recovery path, restore the saved configuration, validate again, and restart. Stop the public tunnel until Home Assistant is healthy. |
| A Docker deployment fails after container recreation | Container networking | Check the target name, network membership, published port, and immediate proxy address. Replace temporary container IP assumptions with a managed network design. |
| A legitimate client receives a ban response | Authentication or IP banning | Stop repeated login attempts, access Home Assistant locally, inspect ip_bans.yaml, remove the relevant ban, and correct stale credentials or proxy interpretation. |
| The page loads but entity states stop updating | Frontend persistent connection | Inspect browser and Home Assistant logs, confirm the tunnel remains running, and test from another external browser. Do not treat the initial page load as a complete success. |
| The browser works but the Companion App fails | App URL or cached session | Verify the external server URL, update stale credentials, test over mobile data, and review current Companion App networking guidance for the installed version. |
| The app continues using an old hostname | Stale external URL | Update the app's external URL and any Home Assistant URL setting required by affected integrations. Review generated notification links and callback configurations. |
| Remote access stops after reboot | Service startup | Verify that the Localtonet app, systemd service, Windows Service, launchd job, container, or Home Assistant package started. Then confirm the tunnel itself is running. |
| A custom domain no longer resolves correctly | DNS or domain configuration | Compare the current DNS setup with current Localtonet custom-domain documentation. Do not reuse records or server values from an older tutorial. |
A practical isolation sequence
- Open Home Assistant locally from the Localtonet device.
- Confirm that login and live frontend updates work locally.
- Confirm that the Localtonet client is connected.
- Confirm that the HTTP tunnel is running.
- Open the public URL in an external browser.
- Inspect Home Assistant logs for proxy, ban, authentication, or configuration messages.
- Only after the browser works, test the Companion App and integration-specific links.
If step one fails, the problem is not the public URL. If steps one through four pass but the public URL fails, investigate the tunnel configuration or relay connection. If the public browser works but the app fails, focus on the app's server URL, cached credentials, network switching, and version-specific settings.
Frequently asked questions
What port should the Localtonet tunnel use for Home Assistant?
Home Assistant listens on TCP port 8123 by default. Use the actual configured port if the HTTP integration uses a different server_port or if a container publishes Home Assistant on another host port.
Does Localtonet require router port forwarding?
No inbound router port forwarding is required. The Localtonet client establishes an outbound connection to a relay and sends the public endpoint's traffic to the selected local service.
Can this work behind carrier-grade NAT?
Yes, provided the network permits the Localtonet client to establish its outbound relay connection. The workflow does not depend on ordinary inbound IPv4 port forwarding or a dedicated public IPv4 address.
Must trusted_proxies contain 127.0.0.1?
No. Use 127.0.0.1 only if Home Assistant actually reports the immediate proxy on IPv4 loopback. A LAN device, Docker container, NAS package, or Home Assistant integration can appear from a different address. Use Home Assistant logs to identify the source rather than guessing.
Do Localtonet HTTP tunnels always add X-Forwarded-For?
The available official evidence does not establish one forwarding-header behavior for every Localtonet HTTP deployment. Treat Home Assistant reverse-proxy settings as conditional. Test the endpoint and use Home Assistant logs to determine whether forwarded headers are present and which immediate proxy address is being evaluated.
Can Localtonet run with Home Assistant OS?
The current Localtonet download page includes a dedicated NAS / Home Assistant category, so check that supported path first. Do not assume that manually launching an unmanaged container from an add-on terminal is a durable installation method. If the current category does not offer a compatible option for the installation, run Localtonet on another supported always-on device that can reach Home Assistant over the LAN.
Why does the login page load while the dashboard later disconnects?
An initial HTTP response does not prove that the frontend's persistent connection remains operational. Test live entity updates, navigation, and a sustained session. Review Home Assistant and browser logs if the page becomes stale or repeatedly reconnects.
Does creating a tunnel make it active?
No. After creating the HTTP tunnel, press Start. The endpoint remains available only while the selected Localtonet client is connected and the tunnel is running.
Can I use a custom domain for Home Assistant?
Localtonet HTTP tunnels support Random Sub Domain, Custom Sub Domain, and Custom Domain process types. Availability can vary, and custom-domain DNS requirements should be checked against the current dashboard and documentation instead of copied from an older guide.
What should I do if a trusted proxy change locks me out?
Stop the tunnel, use the local console or filesystem recovery path, restore the previous configuration.yaml or remove the incorrect proxy entry, validate the configuration, and restart Home Assistant. Confirm local operation before starting the tunnel again.
Set up controlled Home Assistant access
Install Localtonet through the current Home Assistant, NAS, desktop, server, or container path, confirm the local target, create an HTTP tunnel, and verify both the login flow and the live frontend connection from an external network.
Get Started Free →

