

Reach a camera behind NAT or CGNAT without opening an inbound router port
An IP camera is normally reachable only from its local network. With Localtonet, a client device on that network establishes an outbound connection to our relay, allowing a selected camera service to receive a public URL or public host and port without inbound router port forwarding, firewall changes, VPN setup, or a public IP address. This tutorial covers installation on an always-on Linux host, local service identification, tunnel selection, configuration, external verification, security, routine operation, and troubleshooting. Camera protocols and ports vary, so the camera and viewer documentation remain authoritative for device-specific settings.
📋 What's in this guide
Prerequisites and how the connection works
A camera connected to a home, office, or site network usually has a private IP address. A browser, network video recorder, desktop viewer, or mobile application on the same network can contact that address directly. A device on the public internet cannot normally route to it because the gateway uses network address translation and rejects unsolicited inbound traffic unless an administrator creates a suitable rule.
Traditional port forwarding maps an inbound router port to the camera's private address and service port. That requires control of the router and a connection on which inbound access is possible. It can be unavailable behind carrier-grade NAT, on managed building networks, on cellular connections, or where network policy prohibits gateway changes.
Localtonet changes the direction of the initial connection. Our client runs on a computer or supported device that can reach the camera. The client establishes an outbound connection to a Localtonet relay server. Once the corresponding tunnel has been created and started, incoming traffic to the assigned public endpoint travels through that connection to the configured local camera address and port.
The tunnel exposes a selected service, not the entire camera network. It does not recreate the behavior of being connected directly to the local LAN. That distinction matters for discovery, multicast, broadcast, browser security behavior, and applications that expect several related camera services.
What you need before starting
- A camera that you own or are authorized to administer and view.
- A working local connection using the exact browser, viewer, recorder, or application you intend to use remotely.
- The camera's current private IP address and the verified port and transport used by that workflow.
- A Localtonet account and a device-specific AuthToken for the client device.
- A supported computer or device on the camera network that can remain powered on whenever remote access is required.
- Permission to install and operate the Localtonet client on that device.
- A remote viewer that accepts either a public URL or a manually assigned host and port, depending on the tunnel.
- Current camera credentials, preferably for a least-privileged viewing account rather than a full administrator account.
Run the client on a device that can reach the camera directly. It does not have to run on the camera itself. A small computer, server, or other supported system on the same routed network can carry the tunnel. If a VLAN, host firewall, wireless isolation setting, or routing policy prevents that device from reaching the camera, the tunnel cannot repair the local connectivity problem.
A tunnel provides connectivity to the selected camera service. It does not replace camera-side login controls, repair vulnerable firmware, or make an obsolete interface safe. Keep authentication enabled, use unique credentials, expose only necessary services, and stop the tunnel when it is not needed.
Install Localtonet on an always-on client device
The current Localtonet download page provides clients for Windows on 32-bit, 64-bit, ARM, and ARM64 systems; Linux on 64-bit, ARM, ARM64, and corresponding MUSL builds; macOS on 64-bit and ARM64 systems; Docker; and Android. It also provides installable Linux packages for supported x64 and ARM64 environments, a Termux option for ARM64 Android devices, and experimental OpenWrt packages for specified firmware and processor combinations.
Choose a supported platform that can remain awake and connected to the camera network. For an unattended camera site, a service-based Linux installation is useful because the Localtonet client can start during boot. The complete Debian and Ubuntu x64 path below follows the current Localtonet installation documentation.
The current installable DEB and RPM packages require systemd 247 or newer and OpenSSL 3. Examples listed in our documentation include Debian 12, Ubuntu 22.04 or newer, and RHEL 9. Select the package that matches the operating system and processor architecture. The commands below are specifically for the Debian or Ubuntu x64 DEB package.
Debian or Ubuntu x64 installation
Download the x64 DEB package
From the Localtonet documentation page, download the Debian or Ubuntu x64 package named localtonet-linux-x64.deb. Open a terminal in the directory containing that downloaded package.
Install the package
Install the local DEB package with APT. The leading ./ identifies the package in the current directory.
sudo apt install ./localtonet-linux-x64.debPlace the device AuthToken in its protected file
Edit /etc/localtonet/auth-token as root. Replace the placeholder DUMMY_AUTH_TOKEN with the AuthToken assigned to this client device, written on one line. Do not paste a real token into shell history, screenshots, documentation, support messages, or public repositories.
Restrict access and validate the configuration
Limit the AuthToken file to its owner, then run the documented headless configuration check. Continue only after the check succeeds.
sudo chmod 600 /etc/localtonet/auth-token
sudo localtonet --headless --authtoken-file /etc/localtonet/auth-token --check-configEnable and start the Localtonet service
Enable the service for future boots and start it immediately.
sudo systemctl enable --now localtonet.serviceCheck the service log
Read the service journal after startup. This is also the first place to look if the device does not appear connected or stops reconnecting after a host restart.
sudo journalctl -u localtonet.serviceSafe AuthToken handling
The AuthToken identifies the Localtonet client device. Treat it as a credential. The documented file-based workflow avoids placing the token directly in the service command, and the chmod 600 permission limits the file to its owner. Do not reuse the placeholder shown in this article, invent a token, or copy a token assigned to another client without deliberately changing which device identity you intend to use.
If you believe a token has been exposed, do not continue treating it as private. Replace it through the appropriate Localtonet account workflow, update the protected token file on the intended host, rerun the configuration check, and restart the service.
Startup, restarts, and upgrades
The enable --now command performs two separate actions: it starts the service now and enables it for subsequent boots. After restarting the Linux host, check the Localtonet dashboard and service journal before relying on remote camera access. Enabling a service does not prevent outages caused by power loss, failed networking, camera isolation, or a changed local address.
To restart the standard Localtonet service after an intentional configuration or credential change, use:
sudo systemctl restart localtonet.service
sudo journalctl -u localtonet.service
For an upgrade, download the current package for the same platform and architecture, install the new package with APT, and restart the service. The documented package upgrade process preserves the configuration.
sudo apt install ./localtonet-linux-x64.deb
sudo systemctl restart localtonet.service
sudo journalctl -u localtonet.serviceThis camera tutorial uses a standard HTTP, TCP, UDP, or UDP/TCP tunnel. Localtonet VPN Manager is a separate feature with its own service path. Do not switch to the VPN service unless you have deliberately chosen VPN Manager as the remote-access architecture.
Other supported installation paths are available from the same documentation page. Fedora and RHEL use the corresponding RPM package and dnf. ARM64 systems require the matching ARM64 package. Termux can run the console client on an ARM64 Android device. OpenWrt support is experimental and requires a supported firmware release, matching x64 or ARM64 package architecture, and sufficient storage and memory. For an always-on camera site, choose the installation path whose power, update, and service-management behavior you can operate reliably.
Identify the camera service you actually need
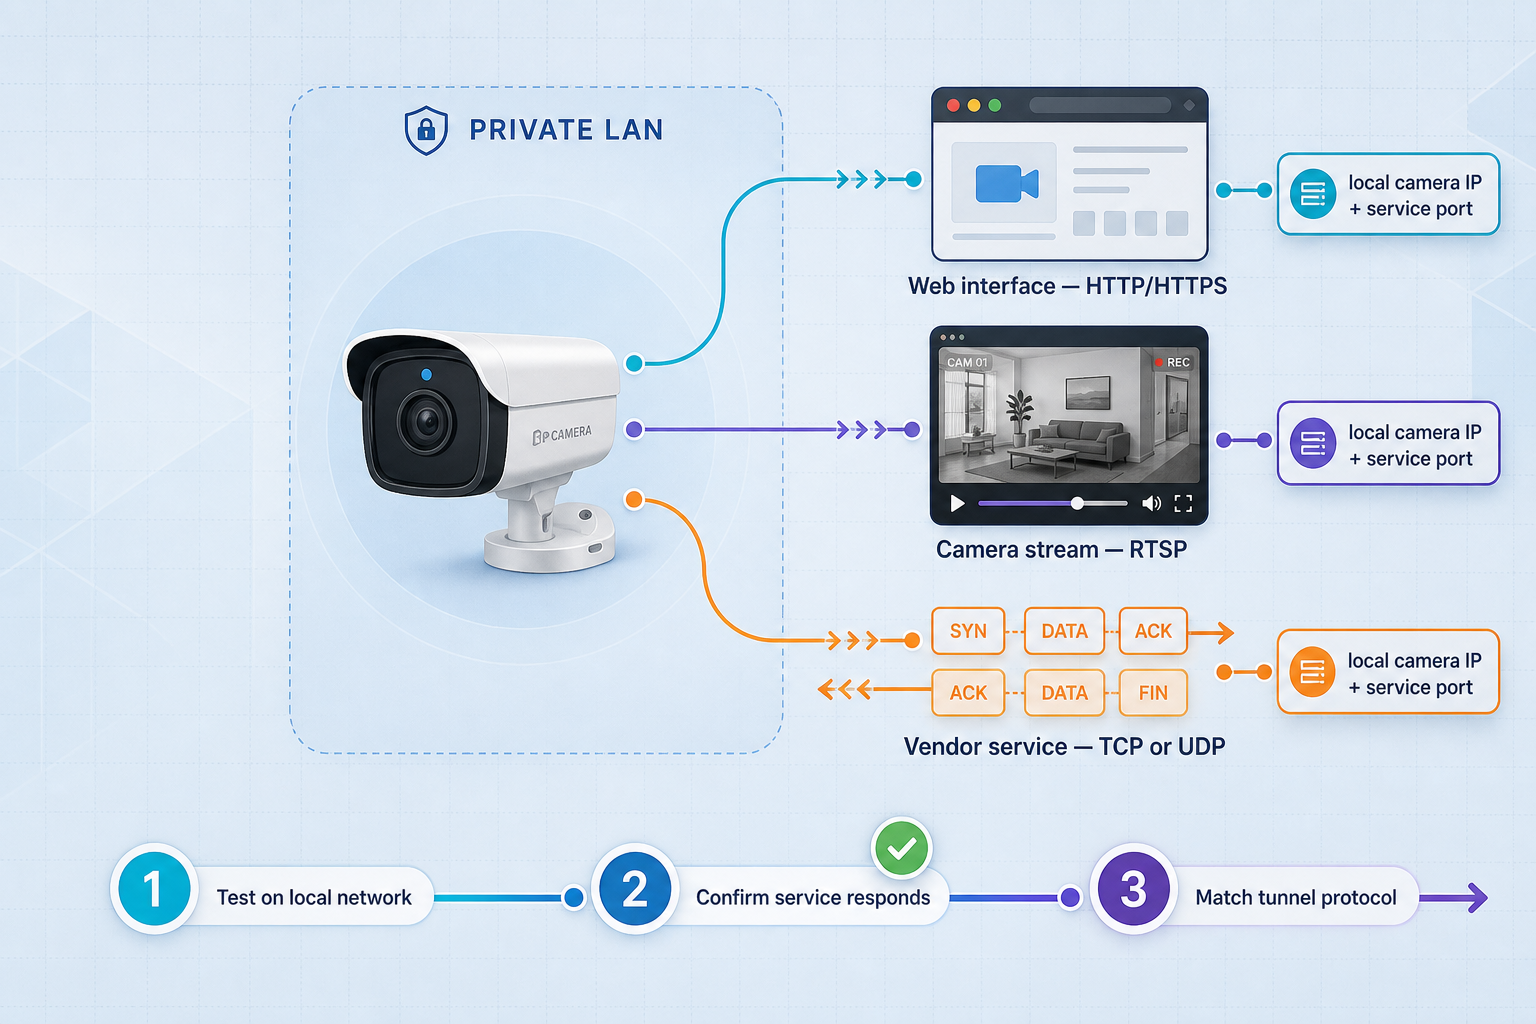
“Access the camera” can mean opening an administration page, watching live video, listening to audio, moving a pan-tilt-zoom camera, retrieving recordings, or connecting a remote recorder. These functions can use different protocols, ports, or connection patterns. A successful login page therefore does not prove that video, audio, playback, or controls will work.
Browser-based administration
A camera may provide a local web interface for settings and viewing. If the required function works through an ordinary browser address, an HTTP tunnel may be suitable. Test the complete page locally before exposing it. Confirm that the browser can log in, render live video, play audio where authorized, and perform any required controls.
Older camera interfaces may depend on obsolete browser plug-ins, proprietary extensions, unsupported codecs, or browser behavior that current systems no longer allow. A tunnel cannot add browser compatibility. Some interfaces also load their main page over one connection while opening a WebSocket, media socket, or HTTP request to another port or to the camera's private IP address.
A page loaded from the public tunnel URL may still contain a private address such as a camera LAN IP, create a secondary WebSocket, or request another local-network resource. Some browsers apply additional permission or security checks when a public origin tries to contact private-network or loopback addresses. Browser behavior can vary, so test the current browser and complete viewing workflow from an external network. A tunnel to the main web port does not automatically rewrite embedded addresses or forward every secondary connection.
RTSP control and media transport
Real-Time Streaming Protocol, or RTSP, establishes and controls media sessions. The protocol is defined by the IETF in RFC 7826. The media itself commonly uses the Real-time Transport Protocol described in RFC 3550. Control messages and media packets do not always follow the same transport path.
A viewer can establish RTSP control over TCP and then negotiate RTP media over separate UDP ports. Other viewers and cameras can carry RTP and RTCP interleaved over the RTSP TCP connection. This is why tunneling a single RTSP control port may work in one viewer but produce no video in another.
If the camera and viewer use interleaved TCP, a TCP tunnel to the verified RTSP service may be sufficient. If they negotiate separate UDP media flows, the workflow may require documented UDP connectivity, a viewer option that selects interleaved TCP, or a different network-access design. The exact result depends on the camera, firmware, viewer, stream profile, and configured transport.
Camera ports are not universal. Confirm the service port, stream path, and media transport in the camera and viewer documentation or from a known working local configuration. Do not expose a range of ports merely because video fails after the RTSP control session connects.
Vendor-specific control channels
A manufacturer's application may use one channel for authentication, another for video, and additional services for audio, events, playback, or movement controls. It may also depend on a vendor-operated cloud service rather than supporting a direct manual connection to the camera.
Check whether the application lets you enter a hostname and port. If it accepts only an automatically discovered device, an account-bound cloud camera, or a fixed vendor connection format, a public tunnel may not be usable with that application. A different standards-compatible viewer may work if the camera documents an appropriate direct service, but compatibility must be confirmed rather than assumed.
ONVIF and local-network discovery
ONVIF-capable software can use WS-Discovery to locate devices. The official ONVIF Core Specification describes the network discovery behavior used by conformant devices. Discovery commonly relies on multicast communication within a local network. Other camera applications may use UDP broadcast or proprietary LAN scans.
A tunnel to one unicast address and port does not reproduce the original multicast or broadcast domain. Add the camera manually in the remote viewer if the application supports a configurable endpoint. If the application requires discovery before allowing a connection, a standard service tunnel may not satisfy the workflow even when the camera's underlying web or media endpoint is reachable.
Create a local service inventory
Record only facts you have verified. For each required function, note the camera's private address, port, TCP or UDP transport, local client, authentication method, and whether the application accepts a manually entered endpoint. If several functions use different documented services, treat them as separate dependencies rather than assuming one tunnel covers all of them.
| Camera function | What to verify locally | Remote compatibility question |
|---|---|---|
| Web administration | Exact local URL, port, login, video, audio, and controls | Does the page embed private addresses, WebSockets, or secondary connections? |
| RTSP viewing | Service address, stream path, credentials, and media transport | Can the viewer use a custom host and port, and can it use interleaved TCP if needed? |
| Recorder connection | Protocol, port, stream profile, and sustained recording | Does the recorder support a manually assigned public endpoint? |
| Audio or device control | Whether it uses the same session or a separate documented service | Are all required transports supported without broadening exposure unnecessarily? |
| ONVIF or vendor discovery | Whether the device can also be entered manually | Will the application function without LAN multicast or broadcast discovery? |
Choose HTTP, TCP, UDP, or combined UDP/TCP
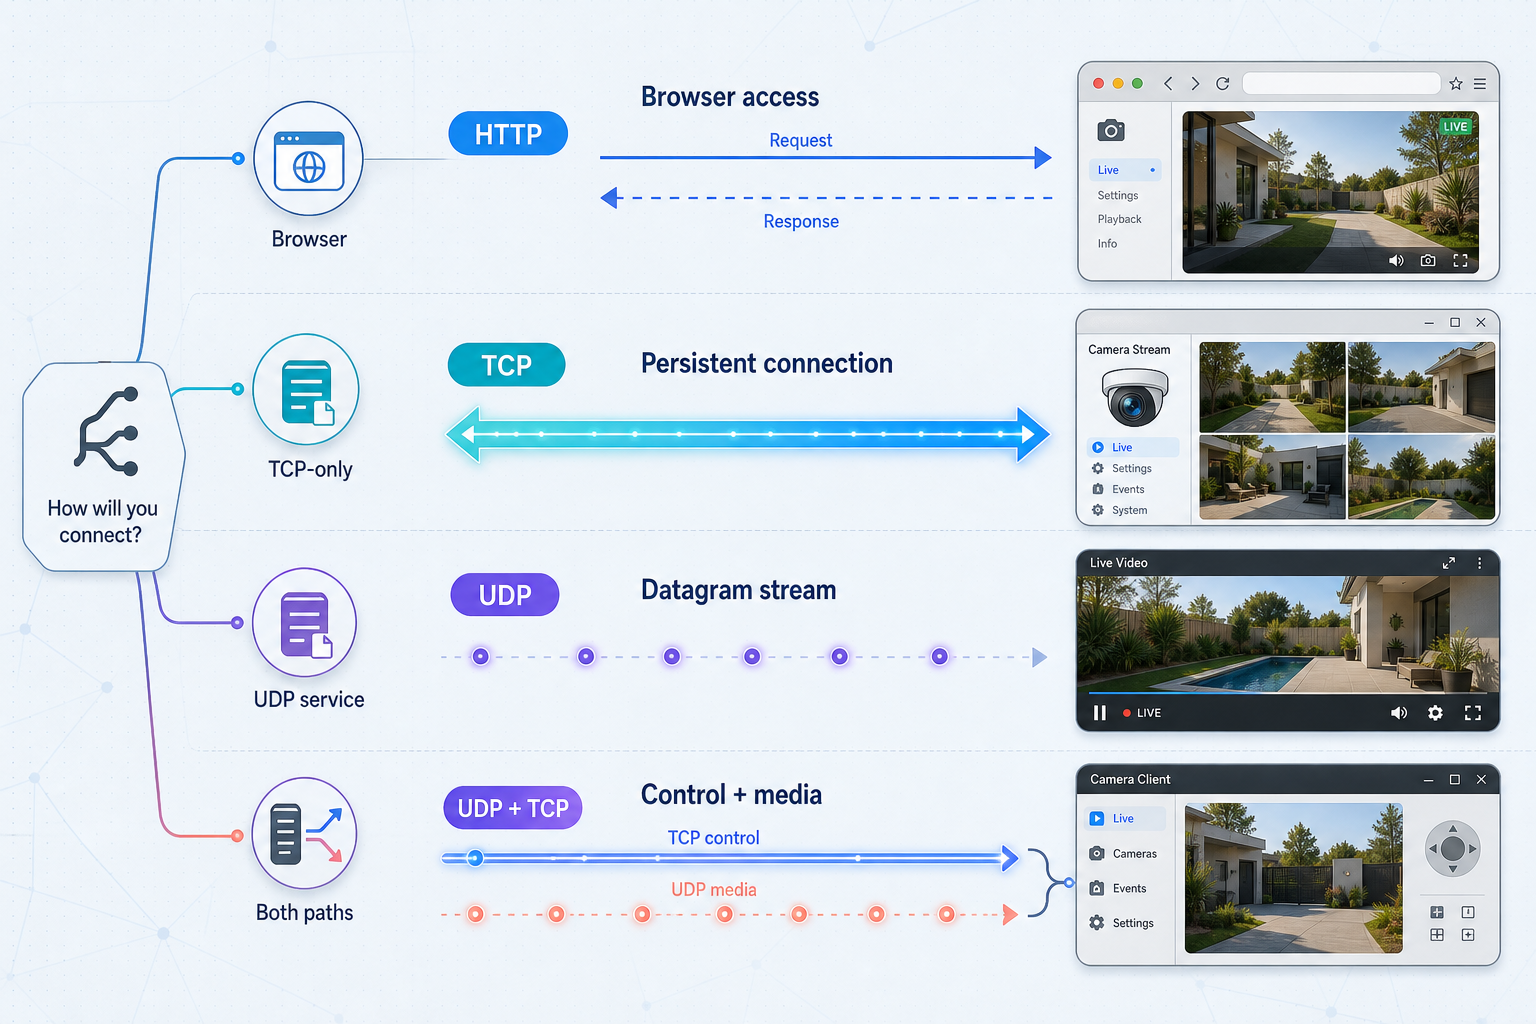
Select the tunnel according to the traffic expected by the actual remote client. Do not choose a broader tunnel merely because the camera has several enabled services. Start with the smallest documented service required for the task.
| Tunnel family | Public endpoint | Suitable starting point | Key limitation to test |
|---|---|---|---|
| HTTP | Public HTTPS address | Browser-based camera interface | The page may rely on secondary media, WebSockets, private URLs, or unsupported browser features |
| TCP | Public host and port | Documented direct TCP service | The viewer must accept a custom endpoint and all required traffic must use the forwarded TCP path |
| UDP | Public host and port | Documented UDP camera or media service | LAN discovery and dynamically negotiated unrelated ports are not reproduced automatically |
| Combined UDP/TCP | Public host and port | One service confirmed to require both transports on the configured port | It does not expose unrelated ports or recreate the local network |
HTTP tunnels support Random Sub Domain, Custom Sub Domain, and Custom Domain Process Types. These choices determine the form of the public HTTPS address while serving the same selected local web content. Availability can vary by current product configuration or plan. Use the Process Types, relay servers, and regions shown in your dashboard, and check current documentation before applying custom-domain DNS settings.
A tunnel forwards the configured target and transport. It does not carry every service on the camera, translate every private address embedded in a web page, or reproduce ONVIF discovery, UDP broadcast, or multicast behavior across the internet.
Create and start the matching Localtonet tunnel
Install and connect the client before creating a tunnel. The client device must be the device that can reach the camera's private address. Creating the tunnel configuration and starting it are separate actions. Stop and delete are later lifecycle operations, not tunnel-creation steps.
The HTTP, TCP, UDP, and combined UDP/TCP workflows share the same core sequence, so the process is consolidated below. The real protocol-specific differences are the tunnel family, whether HTTP Process Type is required, the form of the public endpoint, and the transport behavior the remote camera application must support.
Open the page for the required tunnel family
In the Localtonet dashboard, choose HTTP/s for a compatible browser interface, TCP for a direct TCP service, UDP for a documented UDP service, or UDP/TCP for one verified service that requires both transports. Do not select a protocol solely from a commonly used camera port.
Choose the HTTP Process Type when applicable
For an HTTP tunnel, select Random Sub Domain, Custom Sub Domain, or Custom Domain from the choices currently available to your account. Raw TCP, UDP, and UDP/TCP tunnels use a public host and port rather than the HTTP Process Type workflow.
Select the connected AuthToken and relay server
Select the AuthToken belonging to the client device on the camera network, then select an available relay server or region from the current dashboard. Do not hardcode a server code from an older tutorial, and never disclose the AuthToken.
Enter the camera's local IP address and port
Set the local target to the camera's verified private IP address and the exact port used by the working local service. For HTTP, use the camera web service. For TCP, UDP, or UDP/TCP, use the service and transport established in the local baseline.
Start the tunnel
Press Start. An HTTP tunnel provides a public HTTPS address. TCP, UDP, and UDP/TCP tunnels provide a public host and port. The endpoint is usable only while the selected client is connected and the tunnel is running.
Protocol-specific setup checks
| Selected tunnel | Local target | How to use the public endpoint | What must be verified |
|---|---|---|---|
| HTTP | Camera private IP and web port | Open the assigned public HTTPS address in a browser | Login, video, WebSockets, secondary requests, audio, playback, and controls |
| TCP | Camera private IP and verified TCP port | Enter the assigned public host and port in the viewer or recorder | Stream path, credentials, sustained playback, and RTSP interleaved transport where relevant |
| UDP | Camera private IP and verified UDP port | Configure the remote application with the assigned public host and port | Actual media or control behavior without relying on LAN discovery |
| UDP/TCP | Camera private IP and one service port requiring both transports | Use the assigned public endpoint in an application that supports both transports | Test TCP and UDP functions separately rather than treating a successful login as complete verification |
Consult the current HTTP tunnel documentation, TCP tunnel documentation, UDP tunnel documentation, or UDP/TCP tunnel documentation alongside the dashboard when you need current interface details. The live product remains authoritative for options that vary by plan, client version, region, or deployment.
The local target is the camera address reachable from the Localtonet client, such as its private IP address and service port. The public URL or host and port is assigned for the remote viewer after the tunnel is created and started.
Verify the local baseline and external result
Verification should be repeatable. Do not begin with an external test and then change several settings at once. First prove that the selected client device can reach the exact camera service. Then test the same function through Localtonet from a genuinely separate network.
Establish a repeatable local baseline
- Confirm the camera's current private IP address.
- From the device running Localtonet, open the exact local web URL or connect to the exact host and port used by the viewer.
- Authenticate using the account intended for remote access.
- Confirm that live video starts and remains stable for a meaningful viewing period.
- Test authorized audio, playback, recording, events, and movement controls if they are part of the requirement.
- Close and reopen the client application to prove the result is repeatable.
- Record the transport setting, stream path, camera port, and viewer profile that worked.
If this baseline fails, stop and repair the local route, camera service, credentials, or viewer configuration. A public tunnel cannot make an unreachable local target work.
Run an external-network test
Start the Localtonet tunnel and move the viewing device off the camera network. A mobile connection or another independent internet connection is suitable. Remaining on the same Wi-Fi network does not prove that the public endpoint works.
- Confirm that the Localtonet client appears connected and the intended tunnel is running.
- Use only the assigned public HTTPS URL or public host and port.
- Verify that the camera still requires authentication.
- Confirm live video rather than stopping after the login page or connection dialog succeeds.
- Test authorized audio, playback, controls, events, and recorder behavior separately.
- For a browser interface, check whether failed resources point to a private address, another port, or a WebSocket endpoint.
- Keep the stream open long enough to detect transport negotiation or sustained-playback failures.
- Reconnect after closing the application to confirm that the process is repeatable.
Authentication, video, audio, controls, playback, and events can use different connections. Record which functions pass or fail. A precise result makes it easier to identify a missing service, wrong transport, embedded private URL, browser restriction, or viewer limitation.
Secure a remotely reachable camera
Camera systems can expose live images, microphones, recordings, movement controls, device settings, and information about a physical location. Tunneling avoids inbound router configuration, but it does not remove the need to secure and maintain the camera.
Keep camera-side authentication enabled
Replace default credentials before creating remote access. Use a strong, unique password that is not shared with your router, Localtonet account, email account, or other cameras. If the camera supports separate viewer and administrator roles, use the least-privileged role that can perform the remote task.
Expose the smallest necessary service
Do not create speculative tunnels for every port displayed in the camera settings. If remote users need only a documented viewing service, avoid exposing administration, playback, or device-control services without a specific requirement. Every additional endpoint adds another service that must be authenticated, monitored, and maintained.
Maintain firmware and supported clients
Follow the camera manufacturer's supported update process and review whether the model still receives security maintenance. Disable unused services and remove old accounts where the camera permits it. Tunnel selection cannot repair known vulnerabilities, unsupported browser components, weak authentication, or obsolete firmware.
Protect Localtonet device tokens and management access
A Localtonet AuthToken identifies the client device. Never place it in articles, screenshots, shared scripts, command history, public repositories, support posts, or camera viewer settings. Protect the Localtonet account and the device running the client because access to tunnel management can affect whether the camera service is publicly reachable.
Respect privacy, authorization, and local law
Use remote camera access only for systems and locations you are authorized to monitor. Consider consent, workplace policies, recording restrictions, audio-surveillance rules, retention requirements, and expectations of privacy. Requirements vary by jurisdiction and context. Remote reachability does not grant permission to view, record, or distribute camera content.
If remote access fails, do not disable authentication, expose every listed port, reuse an administrator password, or reactivate obsolete services. Recheck the local target, transport, stream path, viewer capability, client connection, and tunnel state first.
Operate the camera tunnel reliably
Keep the client device available
The public endpoint is available only while the selected Localtonet client is connected and the tunnel is running. Keep the host powered, connected to the camera network, and able to reach the camera. Operating-system sleep, network disconnection, host shutdown, service failure, or camera isolation can end remote access even while the camera remains powered.
On the Debian or Ubuntu service installation, inspect the journal when diagnosing a client-side outage:
sudo journalctl -u localtonet.serviceAfter a host restart, verify both layers: confirm that the Localtonet client reconnects, then confirm that the intended tunnel is running. Client connectivity alone does not prove that a tunnel configuration has been started.
Keep the camera's local address stable
A tunnel targets the configured local IP address and port. If the camera later receives a different private address, the tunnel can remain running while forwarding to the wrong or nonexistent target. Use an appropriate address-reservation method supported by your router or network administration process. Exact reservation steps are router-specific, so follow the gateway documentation.
Stop or delete access intentionally
Stop the tunnel when remote access is not required. Stopping preserves the configuration for later use while ending the active path. Delete obsolete configurations when the endpoint is no longer needed. Creating, starting, stopping, and deleting are distinct lifecycle actions.
Upgrade the client deliberately
Plan client upgrades as an operational change. Install the current package that matches the host architecture, restart the service, check the journal, confirm that the device reconnects, and repeat an external camera test. The Linux package workflow preserves configuration during an upgrade, but camera access should still be verified before the maintenance window is considered complete.
Retest after environmental changes
Repeat the local and external tests after camera firmware updates, viewer upgrades, password changes, router replacements, VLAN changes, Localtonet client updates, or camera address changes. These events can alter ports, transport preferences, authentication, stream paths, browser compatibility, or local reachability.
Review credentials and access scope
Remove accounts that no longer need camera access and rotate credentials if they may have been exposed. Review whether audio, controls, administration, and recordings still need to be remotely accessible. Operational convenience should not turn a temporary viewing requirement into permanent broad exposure.
Troubleshoot by symptom
Work from the camera outward: camera service, local route, Localtonet client service, tunnel state, public endpoint, and remote viewer. Change one variable at a time and repeat the same test.
| Symptom | Likely area | Checks and corrective action |
|---|---|---|
| The client does not appear connected | Installation, AuthToken, or service | Rerun the configuration check without displaying the token, confirm the service was enabled and started, and inspect the Localtonet service journal. |
| The public endpoint does not respond | Client or tunnel lifecycle | Confirm that the selected device is connected, the correct tunnel exists, and Start was pressed. Creation alone does not activate the tunnel. |
| The tunnel runs, but the camera is unreachable | Local target | From the Localtonet client device, test the camera's private IP address and exact port. Check routing, VLAN policy, wireless isolation, and host firewall rules. |
| Access stopped after a router or camera restart | Changed camera IP address | Compare the camera's current address with the tunnel target. Correct the target and use a router-supported address reservation if appropriate. |
| The login page loads, but video is blank | Separate browser connection | Check whether the page opens a WebSocket or secondary stream, embeds a private URL, uses another port, or depends on an unsupported browser component. |
| The browser blocks a private-network request | Public-origin compatibility | Identify the private or loopback destination requested by the page. A tunnel to the main HTTP service does not rewrite embedded addresses or guarantee permission for a secondary local-network connection. |
| RTSP connects, but playback never begins | RTSP media transport | Determine whether the viewer negotiated separate UDP media or interleaved TCP. Use only transport settings and ports documented for the camera and viewer. |
| Video works, but audio or controls fail | Mixed services or permissions | Verify whether those functions use the same connection, a separate documented service, or a different camera permission. Do not expose extra ports without confirming their purpose. |
| The camera is found locally but not remotely | Discovery dependency | LAN broadcast, multicast, and ONVIF discovery are not reproduced by forwarding one service. Enter the public endpoint manually if the viewer supports it. |
| The vendor application has nowhere to enter a host and port | Viewer incompatibility | The application may require local discovery or the vendor's cloud. Use a documented direct-connect mode or compatible viewer if available. |
| Playback starts but stops during a longer session | Transport or availability | Repeat sustained tests, confirm that the client host remains awake and connected, inspect its service log, and compare the viewer's transport with the local baseline. |
| Credentials work locally but not remotely | Wrong service or client formatting | Confirm that the remote application reaches the same camera service and uses the expected username, stream path, and authentication format. |
A practical troubleshooting order
- Verify that the camera is powered and available at its current private address.
- Test the exact service from the device running Localtonet.
- Confirm that the configured target IP address, port, and transport match that baseline.
- Check the Localtonet service journal and confirm that the intended device is connected.
- Confirm that the correct tunnel has been started.
- Test from a separate external network using the assigned endpoint.
- Separate authentication, video, audio, controls, events, and playback results.
- Check whether the remote viewer accepts a custom endpoint and whether discovery is optional.
- Investigate RTSP transport, WebSockets, or secondary web connections only when the observed symptom points there.
When another remote-access model fits better
A service tunnel is a focused way to expose a specific camera endpoint. It is not the only remote-access model, and it is not appropriate for every camera application.
| Approach | Useful when | Important trade-off |
|---|---|---|
| Localtonet HTTP or port tunnel | A known camera service supports a public URL or configurable host and port | Exposes the selected service but does not recreate LAN discovery or automatically combine unrelated camera channels |
| Localtonet VPN Manager | Authorized devices require private network connectivity rather than one public camera endpoint | VPN Manager is a separate private mesh VPN feature with granular firewall rules and LAN bridging |
| Manufacturer remote-access service | The official application requires the vendor's account and cloud workflow | Behavior, privacy, lifecycle, and support depend on the camera manufacturer |
| Router port forwarding | The administrator controls the gateway, has suitable inbound connectivity, and accepts the operational responsibility | Requires router and firewall configuration and may not work behind CGNAT |
| Recorder-mediated access | Cameras are intended to connect through an authorized NVR or managed video platform | Compatibility and remote-access behavior depend on the recorder and camera system |
If the application requires LAN discovery, access to several changing media ports, or broader private-network behavior, a single camera-service tunnel may not be the right architecture. Define the required access scope first, then use the narrowest supported model that preserves camera authentication and organizational policy.
Frequently asked questions
Can I access an IP camera remotely without router port forwarding?
Yes. The Localtonet client establishes an outbound connection to our relay, allowing a selected camera service to receive a public URL or public host and port without an inbound router forwarding rule. The client must remain connected, be able to reach the camera locally, and run the tunnel.
Does Localtonet work behind CGNAT?
Localtonet does not require the camera network to have a public IP address because the client initiates the connection outbound. This makes the model applicable behind CGNAT when the client can establish its outbound connection and reach the camera locally.
Which devices can run the Localtonet client?
Current downloads include Windows, Linux, macOS, Docker, and Android options, with architecture-specific builds. Linux packages are available for supported x64 and ARM64 environments, Termux supports an ARM64 Android console-client path, and specified OpenWrt packages are experimental. Check the current documentation for the package matching your operating system and processor.
Should I use HTTP or TCP for an IP camera?
Use HTTP for a compatible browser-based camera interface. Use TCP when the viewer or recorder expects a direct TCP service at a host and port. Confirm the actual camera and viewer protocol because a web page, RTSP control session, media stream, audio channel, and device controls may not share one connection.
Why does RTSP connect without showing video?
The RTSP control session may have connected while the viewer attempted to receive RTP media over separate UDP flows. Some systems instead interleave media over the RTSP TCP connection. Check the transport used by the known working local configuration and the documented options for the camera and viewer.
Why does the camera page load while the browser blocks video?
The page may open a secondary WebSocket, media connection, different port, private IP address, or loopback address after the main document loads. Browsers may apply additional checks to requests from a public origin into a private network. Test the complete page externally and inspect which destination fails. The main HTTP tunnel does not automatically rewrite those secondary destinations.
Will a tunnel make ONVIF discovery work remotely?
Not by forwarding one camera address and port. ONVIF discovery and other LAN discovery methods can rely on multicast or broadcast behavior that a service tunnel does not reproduce. The viewer needs a supported manual endpoint option, or the workflow needs a network-access model suited to its discovery requirements.
Do all cameras use the same remote-access port?
No. Ports, stream paths, and transports vary by manufacturer, model, firmware, enabled services, and configuration. Use the camera documentation and a verified local connection instead of assuming a universal port.
Does the Localtonet client need to run on the camera?
No. It can run on another supported device that can reach the camera's private IP address and required port. That device must remain powered, connected, and running the Localtonet client while remote access is required.
Is creating a tunnel enough to make the camera available?
No. Creating and running a tunnel are separate lifecycle stages. After creating the configuration, press Start. The public endpoint is available only while the selected client is connected and the tunnel is running.
Is a public camera tunnel automatically secure?
No. The tunnel provides connectivity, not a replacement for camera authorization or maintenance. Keep camera authentication enabled, use unique credentials, maintain supported firmware, expose only required services, protect the Localtonet AuthToken, and stop access when it is not needed.
Connect to an authorized camera without changing the router
Install Localtonet on a device that can reach the camera, verify the exact local service and transport, and create the matching tunnel. Start with the smallest necessary exposure, test from an external network, and keep camera authentication, firmware, privacy, and lifecycle controls in place.
Get Started Free →

