

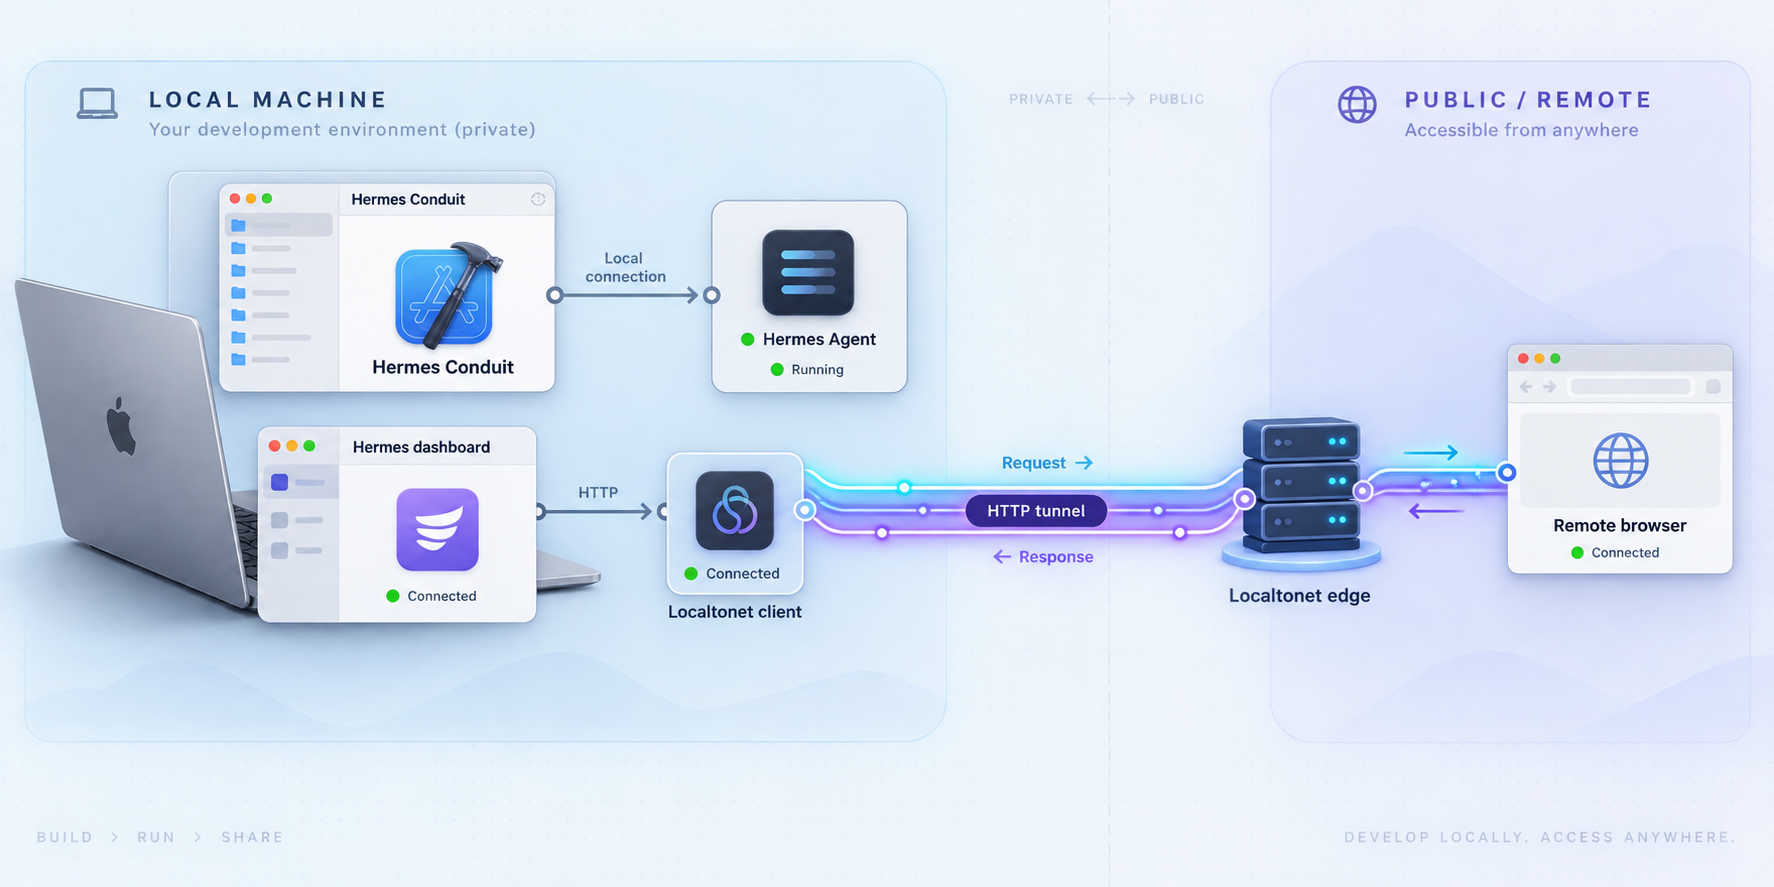
Build the native iOS client, verify your Hermes dashboard, and connect from outside your local network
Hermes Conduit is a native SwiftUI client for a self-hosted Hermes Agent dashboard. In this guide, we build Conduit from source with Xcode, connect it to a working dashboard, verify the local HTTP and WebSocket paths, and then make the dashboard reachable through a Localtonet HTTP tunnel. The Hermes Agent server installation itself is outside this guide because the Conduit documentation treats a running dashboard as a prerequisite. By testing each layer separately, you can distinguish an app build problem from a dashboard, network, authentication, or tunnel problem.
📋 What's in this guide
How Hermes Conduit, Hermes Agent, and Localtonet fit together
Hermes Conduit is an iPhone and iPad client for Hermes Agent. It does not run the Hermes Agent server, replace the Hermes dashboard, or create a dashboard by itself. Instead, Conduit connects directly to the native dashboard exposed by an existing Hermes Agent installation. Sessions, profiles, capabilities, and conversations remain associated with that Hermes environment.
The documented native dashboard normally uses port 9119. A typical local address is http://your-server-ip:9119. Conduit also depends on the dashboard's WebSocket endpoint at /api/ws for connection behavior that cannot be delivered through ordinary one-off HTTP requests alone.
This distinction matters because a browser loading the first dashboard page is not always enough to prove that Conduit will work. The HTTP application, authentication requests, and WebSocket path all need to be reachable from the phone. You should therefore prove the local connection first, before placing any remote-access layer in front of it.
Localtonet becomes relevant after the dashboard is already working. Our client runs on the Hermes host or on another device that can reach it, establishes an outbound connection to a Localtonet relay, and provides a public address for the selected local target. This avoids requiring an inbound router port-forwarding rule, a public IP address, a firewall change, or a separate VPN setup.
/api/ws in addition to the dashboard's HTTP routes. Remote verification must therefore cover more than the initial page response.
Enter the address of the native Hermes dashboard, not an unrelated WebUI address. The documented default port for the native dashboard is 9119, but your deployment may use a different port. Use the address and port configured on your actual Hermes host.
Prerequisites for building and connecting Conduit
A successful setup requires both an Apple development environment and a working Hermes backend. Collect the following prerequisites before cloning the repository.
Apple development requirements
- A Mac capable of running Xcode 16 or later.
- Xcode 16 or later installed and opened at least once so that its required components can be initialized.
- Homebrew, because the documented source-build workflow installs XcodeGen with
brew. - An iPhone or iPad running iOS 17 or later.
- An Apple development team available in Xcode for code signing when installing the source build on a physical device.
- Git for cloning the repository.
The repository also contains targets and code related to features such as Apple Watch, widgets, notifications, and other Apple platform integrations. Those capabilities can introduce signing requirements beyond the basic application target. The available evidence does not define a universal provisioning configuration for every Apple account, bundle identifier, or optional target, so do not copy signing identifiers from another developer. Use your own team and review any signing error reported by Xcode.
Hermes requirements
- A running Hermes Agent instance.
- The native Hermes dashboard enabled.
- The dashboard's actual IP address or hostname and port.
- Valid dashboard credentials.
- Network reachability from the iPhone or iPad for the initial local test.
The usual dashboard address is http://your-server-ip:9119. “Usually” is important here. Port 9119 is the documented default, not a promise that every deployment uses it. If you changed the dashboard binding or placed it behind another local proxy, use the resulting address instead.
The Conduit project documentation does not provide the Hermes Agent installation procedure needed to create a server from scratch. This guide therefore does not invent server installation commands, configuration files, environment variables, or service-manager instructions. Confirm that your existing Hermes Agent dashboard is running before continuing.
Localtonet requirements for the later remote-access stage
- A Localtonet account.
- The Localtonet client installed on the Hermes host or on a device that can reach the Hermes dashboard over the local network.
- A device-specific Localtonet authentication token kept private.
- An available relay server or region selected from the current Localtonet dashboard.
- The local dashboard IP address and port that the Localtonet client can reach.
Relay codes, region availability, plan capabilities, and dashboard choices can change. Obtain those values from the current Localtonet interface rather than copying a hardcoded value from an article.
Choose between the App Store release and a source build
Hermes Conduit provides two practical installation paths. Readers who only want to use the application can install the published App Store release. Developers who want to inspect the code, test repository changes, use a personally signed build, or work with self-hosted push infrastructure can build it from source.
| Installation path | Best for | What you need | Important consideration |
|---|---|---|---|
| App Store release | Using Conduit without maintaining an Xcode project | iPhone or iPad with iOS 17 or later | The application is signed and distributed through the App Store. |
| Source build on a physical device | Development, testing, code review, and personally signed builds | Mac, Xcode 16 or later, XcodeGen, iOS 17 or later, and an Apple development team | You are responsible for signing and resolving provisioning requirements. |
| Source build with a self-hosted push relay | Developers operating their own notification relay | A source build signed with the developer's own Apple account and bundle identifier, plus the separately configured relay | A self-hosted relay cannot deliver notifications to the App Store build using a different developer's APNs credentials. |
This article follows the source-build path. Installing from the App Store does not require the repository, Homebrew, XcodeGen, or Xcode signing, but the dashboard connection and Localtonet sections still apply.
Build Hermes Conduit from source with Xcode
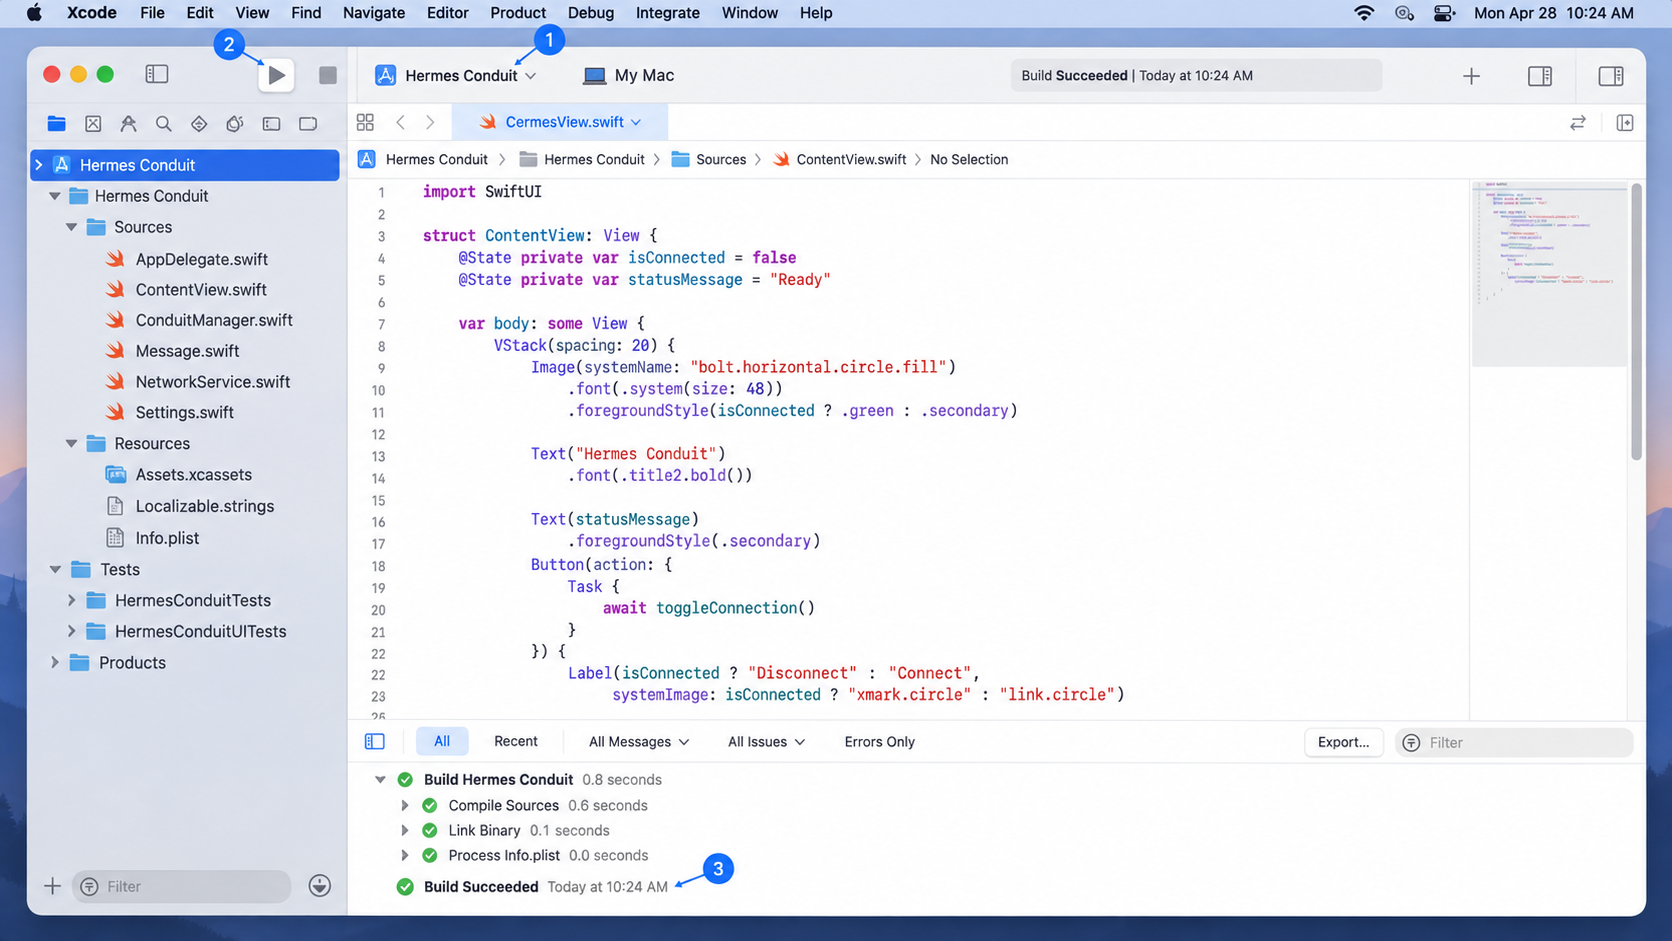
The repository uses XcodeGen to generate Conduit.xcodeproj. Run the documented commands in order. Do not skip project generation and attempt to open a project file that does not exist yet.
Clone the Hermes Conduit repository
Open Terminal, clone the official repository, and change into the new working directory.
git clone https://github.com/kaishi00/hermes-conduit.git
cd hermes-conduitInstall XcodeGen with Homebrew
Install the project generator used by the repository. This command assumes Homebrew is already installed and available in your shell.
brew install xcodegenGenerate the Xcode project
Run XcodeGen from the repository root. It reads the project definition and creates Conduit.xcodeproj.
xcodegen generateOpen the generated project
Open the generated project in Xcode. Use Xcode 16 or later.
open Conduit.xcodeprojSelect your development team
In Xcode, review Signing & Capabilities and select your own development team for the application target. If Xcode reports signing errors for additional targets, inspect each reported target rather than reusing credentials or identifiers from someone else's build.
Build and run on an iOS 17 or later device
Connect or select a compatible iPhone or iPad, choose it as the run destination, and start the build from Xcode. Wait for compilation, signing, installation, and launch to complete. The precise trust or developer-mode prompts can depend on your Apple account and device configuration, so follow the messages presented by Xcode and iOS.
What each command does
git clone downloads the source history and working tree. The cd command places the shell in the repository root, which is important because XcodeGen expects to find the project definition there. brew install xcodegen installs the generator, while xcodegen generate turns the repository's project specification into an Xcode project. Finally, open Conduit.xcodeproj asks macOS to open that generated project in Xcode.
If xcodegen generate reports that it cannot find its project specification, first confirm that the shell is inside the cloned hermes-conduit directory. If the open command says that Conduit.xcodeproj does not exist, return to the XcodeGen output and resolve the generation failure before proceeding.
Use your own Apple development team and keep signing credentials private. Likewise, never place Hermes dashboard passwords, Localtonet authentication tokens, service-token secrets, or private dashboard URLs in the repository.
Connect Conduit to the native Hermes dashboard
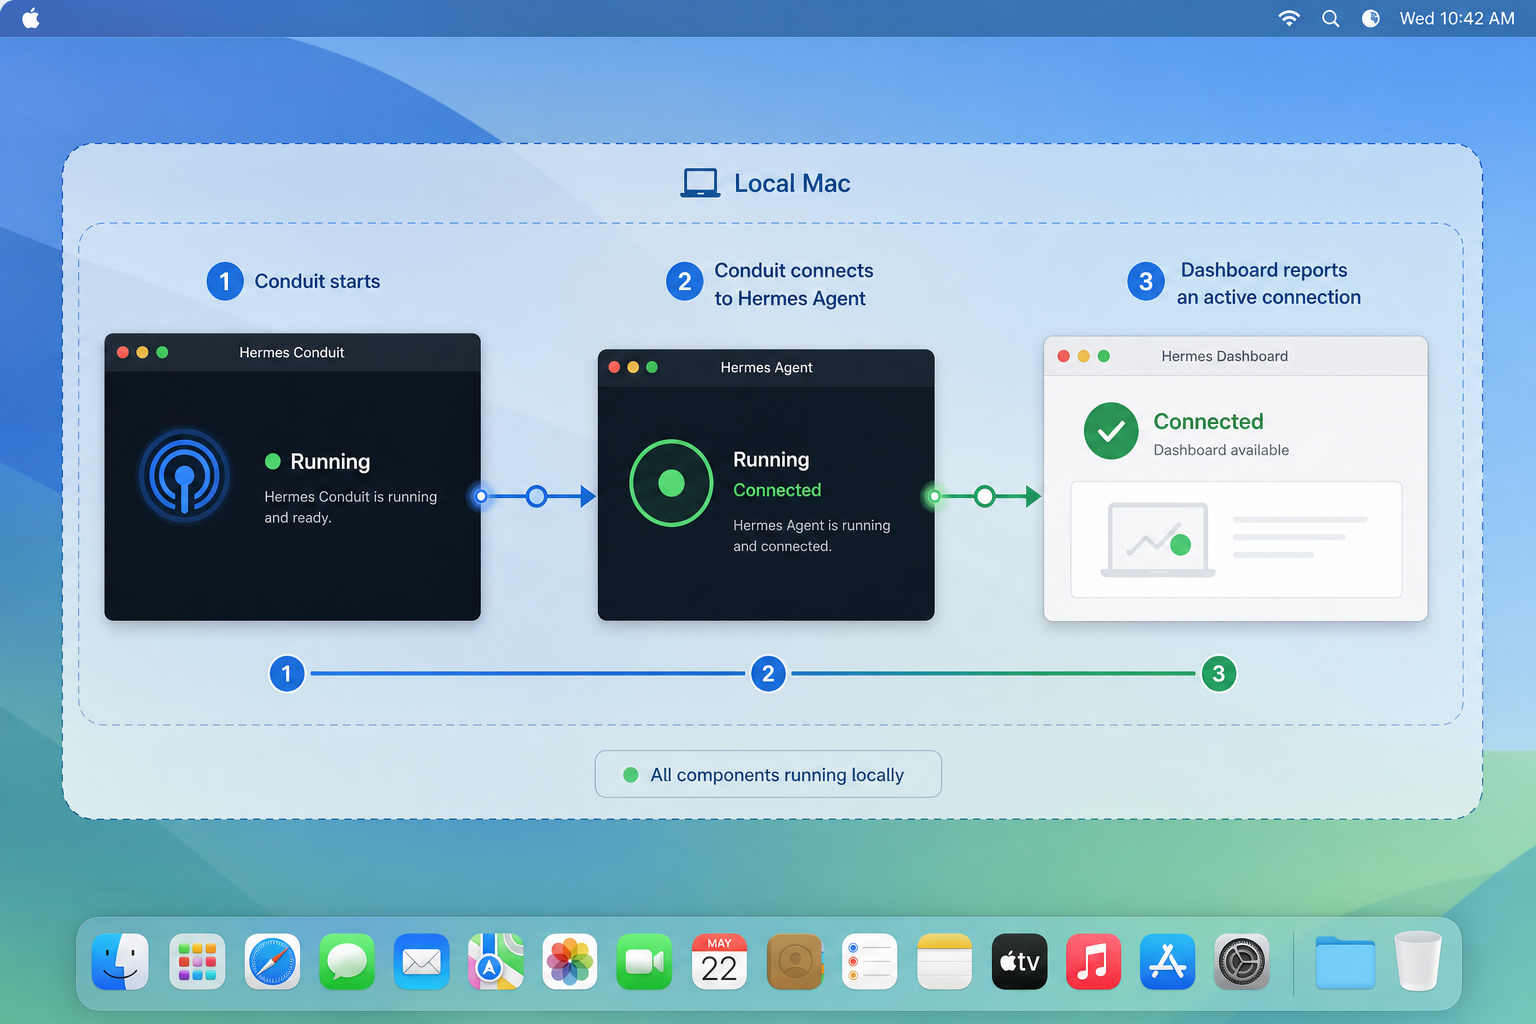
Build success proves that the iOS application compiled and launched. It does not prove that the Hermes dashboard is reachable. Complete the first connection while the phone and Hermes host are on a network where direct local access is expected to work.
Confirm that the native dashboard is running
Check the Hermes host and confirm that the native dashboard is enabled and listening. If your Hermes environment can report its own status, use that status to verify the dashboard before debugging the iOS client.
Determine the dashboard address
Identify the address reachable from the phone. The usual format is http://your-server-ip:9119. Replace the hostname or IP address and port with the values from your installation.
Enter the base address in Conduit
Open Conduit and enter the native dashboard address on the login screen. Enter the dashboard base URL, not the WebSocket path and not an unrelated WebUI URL.
Authenticate with dashboard credentials
Sign in using the credentials configured by the Hermes dashboard. Conduit supports saved credentials protected through native platform facilities, including Keychain storage, and can use Face ID or Touch ID where applicable.
Once authenticated, confirm that Conduit can retrieve the expected data from the same Hermes environment. For example, check that the session and profile information matches what you see on the desktop dashboard. Conduit is designed to use the same underlying Hermes environment rather than maintaining a separate mobile-only session database.
Conduit can save and switch between multiple dashboards with isolated credentials, sessions, and connection state. This is useful if you plan to retain a local address for use at home and add a Localtonet public address for remote use. The exact interface can evolve, so use the current connection controls presented by the installed build rather than relying on an undocumented menu path.
Verify the dashboard before adding remote access
Verification should move from the server outward. Start on the Hermes host, then test from another local device, and only then test Conduit. This sequence narrows the source of a failure.
Test the HTTP dashboard
From a browser on a device that should be able to reach the Hermes host, open the native dashboard address. A default-port example has this form:
http://your-server-ip:9119
You can also make a diagnostic request from a machine with curl. Replace the placeholder with the actual reachable address:
curl -v http://your-server-ip:9119/The exact status code and response body can depend on authentication and dashboard behavior. A redirect or authentication response may still demonstrate network reachability. A connection timeout, connection refusal, or name-resolution failure points to a lower-level networking, listener, or address problem.
Test from the iPhone or iPad
A successful request from the Hermes host itself is not sufficient. A service can listen only on its loopback interface, making it available at 127.0.0.1 on the server but unavailable through the server's LAN address. Test from the actual phone or another device on the same network.
If the phone cannot reach the dashboard locally, do not expect Conduit to repair that condition. Check whether the selected address belongs to the correct host, whether the port matches the running dashboard, whether the dashboard listens on an interface reachable from the network, and whether host or network policy permits the connection.
Verify an actual Conduit session
Sign in, open an existing session, and perform a small non-destructive interaction appropriate for your Hermes environment. The goal is to verify more than a static login page. Streaming responses and live application state commonly depend on the WebSocket endpoint at /api/ws.
A dashboard page can load even when a WebSocket handshake fails. If login works but streaming or live state does not, inspect the network path to /api/ws. When you later add Localtonet, repeat this functional test through the public address.
Expose the working Hermes dashboard with a Localtonet HTTP tunnel
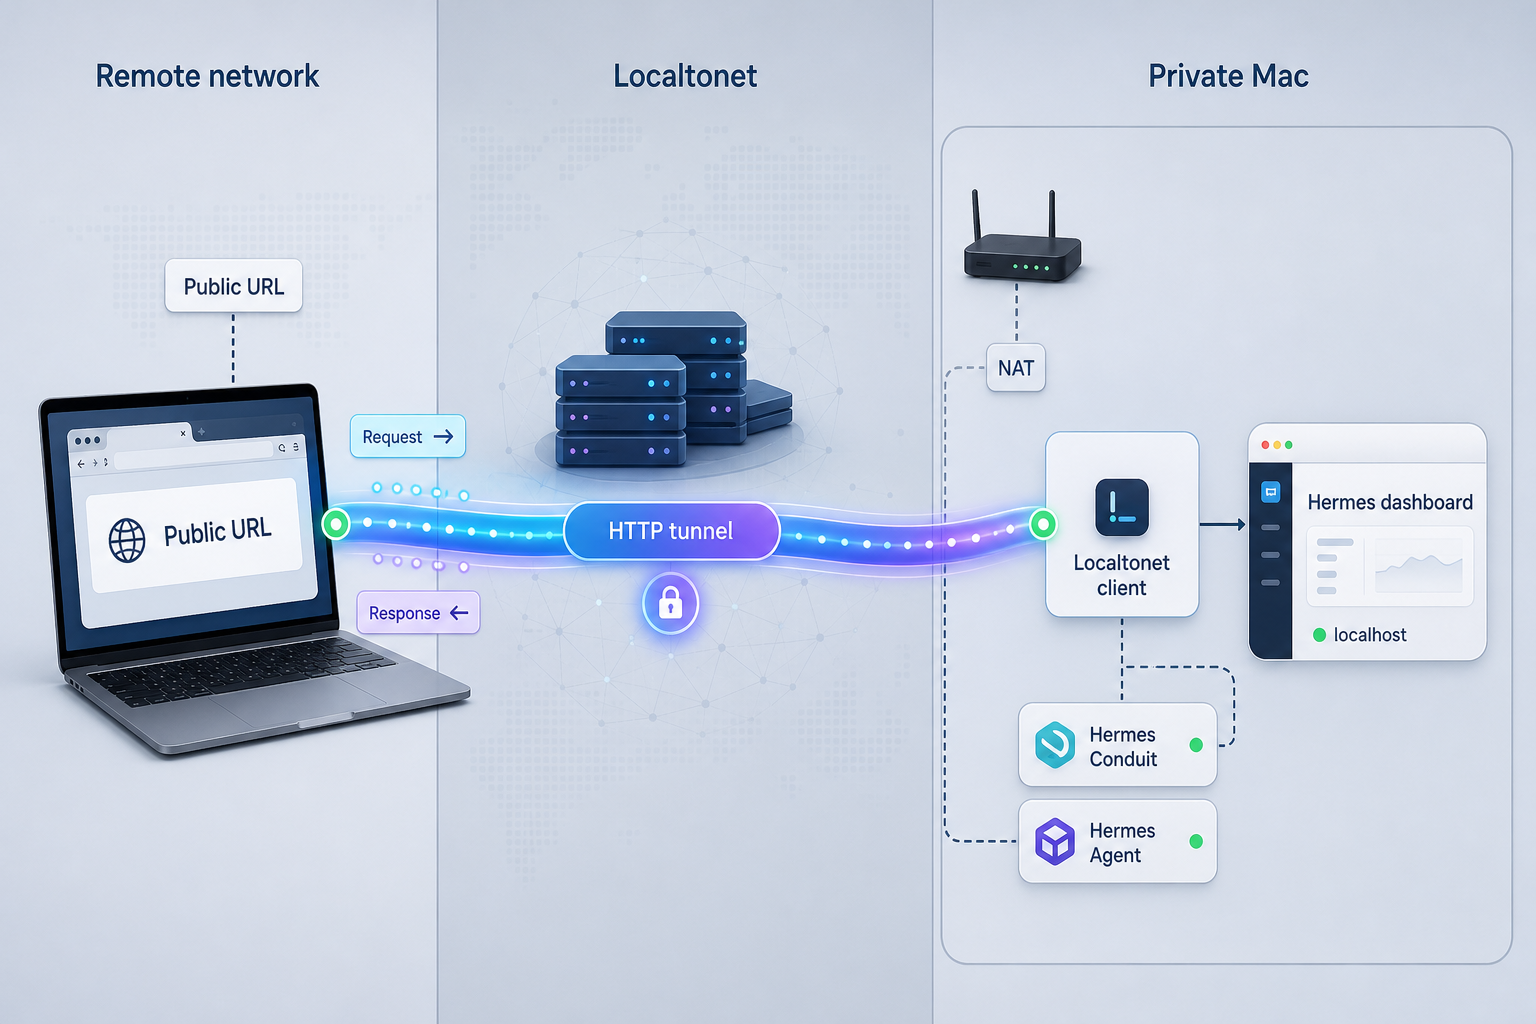
Add Localtonet only after direct local access works. Our HTTP tunnel should point to the native Hermes dashboard, not to the Conduit application. Conduit remains the client on the phone, while the tunnel makes the server-side dashboard reachable from outside the local network.
Install the Localtonet client on the Hermes host when practical. If it runs on another machine, that machine must be able to reach the Hermes dashboard's local IP address and port. A Localtonet tunnel cannot make an incorrect or unreachable local target work.
Install and run the Localtonet client
Install our client for the operating system used by the device that can reach Hermes. Start the client and keep it running. Current installation choices should be taken from the Localtonet download and dashboard experience because commands and packages can vary by operating system and client version.
Authenticate or select the client device
Use the device-specific authentication token issued for that client, or select the authenticated device in the dashboard. Treat the token as a secret. Do not paste it into source code, screenshots, issue reports, or shell history shared with other people.
Select an available relay server or region
Choose from the values currently available in the Localtonet dashboard. Do not hardcode a server code from an old guide because availability can vary by plan, region, and current product configuration.
Create an HTTP tunnel to the Hermes dashboard
Configure the local target as the dashboard IP address and port. If the Localtonet client runs on the same host and Hermes is reachable through loopback, that target may be the loopback address with port 9119. If the client runs elsewhere, use a LAN address that the client device can actually reach. If your Hermes configuration uses another port, enter that port instead of the default.
Start the tunnel
Creating a tunnel does not automatically mean that it is running. Use the Start action and confirm that the selected Localtonet client is connected. The tunnel is available only while both the client connection and the tunnel remain active.
Use the assigned public HTTPS address in Conduit
Copy the public address assigned to the running HTTP tunnel and enter that base address as a Hermes dashboard connection in Conduit. Do not append /api/ws to the login address. Conduit uses the dashboard base URL and reaches the required application paths from there.
HTTP tunnels can use a random subdomain, a custom subdomain, or a custom domain where the selected configuration supports it. These process types serve the same local content at a public HTTPS address. Custom-domain DNS instructions can change, so consult the current Localtonet HTTP tunnel documentation before changing DNS records.
Choose the correct local target
| Localtonet client location | Possible target form | Condition |
|---|---|---|
| Same machine as Hermes | Loopback IP plus the configured dashboard port | The dashboard must be listening on that loopback address. |
| Another machine on the same LAN | Hermes host LAN IP plus the configured dashboard port | The Localtonet client machine must be able to connect to that LAN address. |
| Container or virtual-machine environment | An IP address reachable from the Localtonet client environment | Container, host, and virtual network boundaries must permit the connection. |
Verify the public route before relying on it
Disconnect the phone from the local Wi-Fi network and use a different connection, such as cellular data. Open Conduit through the Localtonet public URL, authenticate, load sessions, and test a live interaction. This confirms that the test is using the remote route rather than silently falling back to local connectivity.
Because Conduit uses /api/ws, verify streaming and live state through the public address. The supplied Localtonet product context confirms HTTP tunneling but does not provide a version-specific WebSocket compatibility matrix. If ordinary HTTP requests work while the Conduit live connection fails, confirm current HTTP tunnel behavior in the active Localtonet documentation and inspect the WebSocket handshake rather than assuming that credentials are wrong.
A tunnel removes the need for inbound router port forwarding, but it still creates a public route to the selected service. Keep Hermes authentication enabled, use strong unique credentials, expose only the required dashboard target, and stop or delete the tunnel when remote access is no longer needed.
Security and operational practices
Remote access should be treated as an explicit publication decision. Localtonet initiates its relay connection outbound, so you do not need to open an inbound router port. That networking convenience does not remove the need for application authentication or careful credential handling.
Understand the HTTPS boundary
The Localtonet public HTTP address is served over HTTPS. The local target may still be an HTTP service such as http://127.0.0.1:9119. Do not describe this arrangement as end-to-end application encryption unless your complete deployment has been configured and verified to provide it. The public HTTPS connection and the local service connection are separate network segments.
Know when the tunnel is available
The public address works only while the selected Localtonet device is connected and the tunnel is running. A reboot, suspended process, lost internet connection, stopped client, or manually stopped tunnel can make the route unavailable. If remote access is operationally important, include the Localtonet client and Hermes dashboard in your normal host health checks.
Treat push notifications as a separate system
A Localtonet HTTP tunnel provides reachability to the Hermes dashboard. It does not replace Conduit's push notification architecture. iOS does not allow applications to maintain unrestricted persistent background connections, so Conduit uses a notification relay for push delivery.
The Conduit documentation provides a shared relay and describes end-to-end encryption for notification content when paired with notifier version 0.5 or later. It also explains that a self-hosted relay requires a Conduit build signed with your own Apple developer account and bundle identifier. This notification flow is separate from the Localtonet tunnel and should be configured only if you need push behavior.
Troubleshooting the build and connection
Diagnose one layer at a time. The most useful dividing line is whether the failure occurs during project generation, Xcode compilation and signing, local dashboard access, or remote tunnel access.
| Symptom | Likely layer | What to check |
|---|---|---|
xcodegen is not found |
Local build tools | Confirm Homebrew completed the XcodeGen installation and that the Homebrew binary directory is available in the current shell. |
Conduit.xcodeproj does not exist |
Project generation | Run xcodegen generate from the repository root and resolve any reported generation error before opening the project. |
| Xcode reports signing or provisioning errors | Apple code signing | Select your own development team and inspect the specific target named in the error. Optional targets may have distinct capability requirements. |
| The application builds but cannot sign in | Dashboard address or authentication | Confirm that you entered the native dashboard base URL, used the correct credentials, and did not enter a different WebUI address. |
| The dashboard works on the server but not on the phone | Local network reachability | Check the server IP, port, listener binding, local firewall policy, Wi-Fi isolation, and whether the phone is on the expected network. |
| The Localtonet URL does not respond | Tunnel lifecycle or target | Confirm that the client device is connected, the tunnel has been started, and the configured local IP address and port are reachable from that client. |
| The public page loads but live responses fail | WebSocket path | Inspect connectivity to /api/ws and verify current WebSocket behavior for the selected HTTP tunnel configuration. |
| The connection works on Wi-Fi but the remote test is inconclusive | Test method | Disable Wi-Fi temporarily and test with cellular data so that the phone cannot use the local dashboard address. |
| A previously working public URL stops working | Client, tunnel, or address state | Check whether the Localtonet client is still connected, whether the tunnel is running, and whether the public address or dashboard target changed. |
Connection refused
A refusal usually means that the destination host was reached but no process accepted the connection on the selected address and port. Verify that Hermes is running, that the native dashboard is enabled, and that the target port matches its actual configuration. Also check whether the dashboard is bound only to a different interface.
Connection timeout
A timeout more often indicates an unreachable address, routing problem, filtering rule, offline host, or incorrect tunnel target. Test the same target directly from the machine running the Localtonet client. If that machine cannot connect locally, changing the public URL in Conduit will not fix the underlying path.
Authentication loops or repeated login prompts
Confirm that the public address maps consistently to the same Hermes dashboard and that you are using credentials for that environment. Conduit isolates credentials by dashboard, which helps prevent one saved connection from silently borrowing credentials assigned to another host.
If your deployment uses an external identity provider or access gateway, verify its complete browser, token, REST, and WebSocket behavior. Conduit supports native OAuth and can work with Cloudflare Access service-token headers, but the system browser navigation used for the native authorization route cannot receive those service-token headers. A service-token-only challenge in front of that authorization route therefore requires a different policy design.
Build behavior changes after pulling repository updates
Read the repository changes and regenerate the Xcode project using the documented XcodeGen command before concluding that Xcode is opening a current project definition. Do not delete signing material or change bundle identifiers blindly. First identify whether the error comes from generation, package resolution, compilation, capabilities, or provisioning.
Frequently asked questions
Does Hermes Conduit install Hermes Agent?
No. Conduit is the native iOS client. It requires an existing Hermes Agent instance with the native dashboard enabled. The Conduit documentation does not provide the server installation procedure, so a running dashboard is a prerequisite for this workflow.
Which Xcode and iOS versions are required?
The documented source-build requirement is Xcode 16 or later. Conduit supports iPhone and iPad devices running iOS 17 or later.
What URL should I enter in Conduit?
Enter the native Hermes dashboard base URL. On a local network, it is usually similar to http://your-server-ip:9119. For remote access through Localtonet, enter the public HTTPS base address assigned to the running HTTP tunnel. Do not append /api/ws to the login address.
Is port 9119 always required?
Port 9119 is the documented default for the native Hermes dashboard. If your installation uses a different port, use that configured value in the local URL and as the Localtonet tunnel target.
Must the Localtonet client run on the Hermes host?
No. It can run on the Hermes host or on another device that can reach the dashboard's local IP address and port. Running it on another device adds a local network hop, so test that connection directly before creating the tunnel.
Does creating a Localtonet tunnel start it automatically?
No. Creating the configuration and running it are separate lifecycle states. Start the tunnel explicitly and confirm that the selected client device is connected. You can later stop or delete the tunnel.
Does the Localtonet HTTP tunnel replace Conduit's notification relay?
No. The HTTP tunnel provides remote reachability to the dashboard. Push notifications use a separate relay architecture because iOS restricts persistent background connections. Configure notification pairing separately if you need push delivery.
Why does the dashboard page load while Conduit still fails to stream?
Loading the page proves only part of the path. Conduit also uses the WebSocket endpoint at /api/ws. Verify the WebSocket handshake, authentication behavior, and current HTTP tunnel compatibility when ordinary requests succeed but live state does not.
Connect your Hermes dashboard with Localtonet
After Conduit works against the native dashboard on your local network, create a focused HTTP tunnel to that dashboard, start it, and verify the assigned public address from an external network.
Get Started Free →

