

Install Airbyte locally with abctl, verify every layer, then add controlled remote access
Airbyte Open Source is a self-hosted data-movement platform for building ELT and ETL workflows across APIs, databases, files, warehouses, lakes, and other systems. This tutorial reproduces the official local quickstart workflow with its current abctl commands, Docker requirements, generated credentials, documented local URL, status checks, lifecycle operations, and uninstall procedure. After Airbyte works at http://localhost:8000, we use that confirmed endpoint to configure a Localtonet HTTP tunnel. Installation and remote access remain separate so that Airbyte, Docker, abctl, connector, and tunnel failures can be diagnosed independently.
📋 What's in this guide

How the Airbyte Open Source quickstart works
Airbyte describes its open-source platform as a data-movement system for ELT and ETL pipelines. A source connector reads from the system that owns the original data, a destination connector writes to the target system, and an Airbyte connection defines how data is synchronized between them. The Airbyte Open Source repository reports a catalog of more than 600 connectors for APIs, databases, data warehouses, data lakes, files, and AI applications.
The official local quickstart uses abctl, Airbyte's command-line deployment tool. abctl creates a local Airbyte deployment on Docker-backed infrastructure and handles the platform components needed by the quickstart. You do not need to assemble those components manually or copy an old Docker Compose tutorial.
This article's commands, local URL, and resource guidance were checked against the official Airbyte Open Source quickstart in August 2026. Airbyte and abctl are actively maintained, so review the current Airbyte Open Source quickstart before running the commands in a long-lived environment. The instructions below are complete for the documented local quickstart, but a future Airbyte release may change a prerequisite or command.
http://localhost:8000 on the host running the deployment.
abctl local credentials instead of guessing or publishing them.
Why local deployment and remote access are separate phases
A tunnel cannot repair an unavailable Docker daemon, an incomplete abctl installation, an unhealthy Airbyte component, or a connector authentication error. If multiple layers are introduced at once, a browser failure provides very little diagnostic information. If the local URL is tested first, every later result has a clearer meaning.
The useful dependency chain is Docker, then abctl, then Airbyte component readiness, then the local web interface, then Airbyte authentication, then connector-specific connectivity. Localtonet sits after those layers. Remote traffic can reach Airbyte only while the Localtonet client is connected, the HTTP tunnel is running, and the client device can still reach the configured local target.
The Airbyte repository also documents an Agent SDK for AI-agent development. Installing that SDK does not deploy the Airbyte Open Source data-movement platform. For this tutorial, use the abctl quickstart rather than an SDK package command.
Prerequisites, supported hosts, and Docker requirements
The abctl quickstart is intended for a local workstation or evaluation host. As verified in August 2026, plan for at least four CPU cores, 8 GB of memory available to the deployment, and 20 GB of free disk space. Connector workloads, logs, downloaded images, and replicated data can require more capacity, so these figures should be treated as a quickstart floor rather than production sizing.
Use a supported macOS or Linux environment, or Windows through WSL2. On Windows, install and run the Linux-side quickstart from WSL2 with Docker integration available to that distribution. If you use an architecture or operating-system release outside the current quickstart's supported combinations, check the current support statement before installation rather than assuming a binary will run.
Docker must be installed and running. Docker Desktop is the usual route on macOS and Windows, while Linux can use a functioning Docker installation supported by the current Airbyte quickstart. The user running abctl must be able to communicate with the Docker daemon and create containers. Merely having the docker executable on the path is not sufficient.
| Requirement | Quickstart expectation | How to check it |
|---|---|---|
| Supported host | macOS, Linux, or Windows through WSL2 | Confirm the operating system and architecture against the current quickstart |
| CPU | At least 4 CPU cores available | Review host capacity and Docker Desktop resource allocation |
| Memory | At least 8 GB available to the deployment | Check host memory and the Docker virtual machine limit |
| Storage | At least 20 GB of free disk space for the quickstart | Check the volume used by Docker, not only an unrelated host volume |
| Docker | Installed, running, and accessible to the current user | Run docker version and docker info |
| Local browser access | The host must be able to open http://localhost:8000 |
Test the URL only after abctl reports a ready deployment |
Verify Docker before installing abctl
Run the following commands in the same shell from which you will run abctl:
docker version
docker info
docker ps
docker version should show both client and server information. If it only reports a client or says it cannot connect to the daemon, start Docker Desktop or the Docker service and retry. docker info should complete without a daemon connection or permission error. An empty result from docker ps is acceptable, but the command itself must succeed.
On Docker Desktop, verify its CPU and memory allocation rather than relying only on the host's total capacity. A machine may have 16 GB of physical memory while Docker is restricted to less than Airbyte needs. Close unrelated high-resource containers before installation if capacity is tight.
Prepare a safe working environment
- Use an account authorized to install command-line tools and run Docker containers.
- Do not paste Airbyte passwords, connector credentials, or Localtonet device tokens into shared terminals or issue reports.
- Ensure the host can download abctl, container images, and connector artifacts over outbound HTTPS.
- Avoid starting the install while another Docker cleanup, operating-system update, or disk-intensive operation is running.
- Decide whether this is a disposable evaluation or a deployment whose configuration and persistent state must be retained.
abctl is the official path for quickly deploying Airbyte locally. Production planning still requires workload sizing, persistent-state protection, access control, monitoring, recovery testing, and a version-specific upgrade plan. Do not infer production capacity from the minimum quickstart resources.
Deploy Airbyte with the official abctl quickstart

The commands in this section are for a fresh local installation. Do not add upgrade flags when creating a new deployment, and do not treat a fresh install as the recovery procedure for an existing environment. Upgrade handling is covered separately.
Install abctl from the official installer
In a supported macOS or Linux shell, or inside WSL2 on Windows, run the official installation command. Let the installer finish, then open a new shell if it reports that your executable path was updated.
curl -LsfS https://get.airbyte.com | bash -Confirm that the command is available before continuing:
command -v abctl
abctl versionInstall Airbyte locally
Keep Docker running and launch the documented local installation. abctl downloads the required artifacts and creates the local deployment. Initial installation can take time because container images and platform components must be prepared.
abctl local installDo not interrupt the command merely because a component is still initializing. If it fails, retain the first meaningful error and use the troubleshooting section rather than repeatedly reinstalling.
Retrieve the generated Airbyte credentials
The local deployment uses generated credentials. Retrieve them directly from abctl and keep the output private.
abctl local credentialsCopy the displayed login values into an approved password manager. Do not include them in screenshots, shell transcripts, source control, public issues, or tunnel configuration.
Open the documented local interface
Visit the standard quickstart URL from the Airbyte host and sign in with the credentials returned by abctl:
http://localhost:8000If the browser does not open automatically, enter this URL manually. Complete local verification before creating connectors or adding remote access.
An Airbyte administrator can configure systems that contain database credentials, API tokens, schemas, and operational data. The generated password is not a placeholder to publish or remove. Store it securely and keep application authentication enabled if the interface is later exposed through Localtonet.
What successful installation means
A successful abctl local install result means the deployment process completed. It does not prove that every component will remain ready under load, that a connector can reach an external system, or that remote browser access is configured. Continue with explicit status, HTTP, login, and connector checks.
Verify the Airbyte deployment locally

Check deployment status with abctl
Ask abctl for the state of the local deployment:
abctl local statusReview the complete output. Required components should be ready rather than repeatedly restarting, pending, or failing. Status labels and component names can evolve between Airbyte releases, so use the command's current output instead of comparing it with an old screenshot.
If status is not ready, do not move to Localtonet. Verify Docker capacity, free disk space, and the first failing component. A browser may occasionally return a partial page while background components remain unhealthy, which is not an acceptable deployment result.
Perform a concrete local HTTP test
From the Airbyte host, request the documented URL and print the HTTP status code:
curl -sS -o /dev/null -w '%{http_code}\n' http://localhost:8000
An HTTP response proves that a process is accepting HTTP requests on the expected endpoint. Depending on the current login flow, you may see a successful response, a redirect, or an authentication-related status. A connection-refused message, timeout, or 000 result means the endpoint was not reached and must be fixed before remote access is attempted.
Then open http://localhost:8000 in a browser. Confirm that the Airbyte login page renders, sign in with the output from abctl local credentials, and verify that the authenticated application loads without a persistent initialization error.
Recheck credentials without reinstalling
If the login page works but the generated login values are unavailable, retrieve them again:
abctl local credentialsThis is a credential-retrieval operation, not a password-reset guess. Verify that you are running the command on the host and under the environment associated with the intended local deployment. Do not solve a login failure by disabling Airbyte authentication.
Create a limited connector acceptance test
Platform readiness and connector readiness are different. Once the interface is stable, configure a small, non-sensitive source and destination appropriate for your environment. Use dedicated test accounts with the minimum permissions required by the selected connectors.
Validate the source, validate the destination, and run a small synchronization. Confirm that Airbyte records the result and that the expected test data arrives at the destination. Connector documentation controls the required permissions, TLS settings, network allowlists, schema behavior, and incremental-sync capabilities.
A useful local acceptance result includes all of the following:
docker infosucceeds and Docker remains available.abctl local statusreports the deployment ready.- The curl request reaches
http://localhost:8000. - The Airbyte login page loads in a local browser.
- The generated credentials allow authorized access.
- A limited connector test validates both endpoints and completes a small sync.
Record the Airbyte version, abctl version, host platform, Docker version, and acceptance-test date in your operational runbook. Those details provide a reliable baseline for later troubleshooting and upgrades.
Lifecycle commands, backups, and version-specific upgrades
Inspect the deployment at any time
These commands are safe first checks when returning to an existing quickstart deployment:
abctl version
abctl local status
abctl local credentials
The first identifies the deployment tool, the second checks the local Airbyte environment, and the third retrieves its generated credentials. Keep credential output out of collected diagnostic logs.
Stop or remove the local deployment
The documented abctl removal command is:
abctl local uninstallUse it when you want abctl to remove the local runtime rather than terminating individual containers manually. If the deployment is later recreated, use the normal local installation workflow and verify status again:
abctl local install
abctl local status
Airbyte also documents a destructive uninstall option that removes persisted data:
abctl local uninstall --persisted
Do not run abctl local uninstall --persisted as a casual troubleshooting step. It is intended to remove the deployment and its persisted local Airbyte data. Verify backups, retention requirements, and the identity of the target deployment before using it.
Stopping Docker Desktop or its daemon also makes the local service unavailable, but that affects every Docker workload on the host and is not a substitute for an Airbyte-aware lifecycle procedure. Use abctl for the deployment itself whenever possible.
Back up before maintenance
The quickstart does not turn a workstation into a complete backup system. Before an upgrade, destructive uninstall, disk migration, or host rebuild, identify the persistent Airbyte state and connector configuration that must survive. Use the backup procedure documented for the installed Airbyte architecture and test restoration away from the only working copy.
Protect backup material as sensitive. Airbyte configurations can describe internal hostnames, schemas, source systems, destinations, and credentials. Encrypt and restrict backup storage according to your organization's policy. A copied screenshot of connection settings is not a tested backup.
Also document connector-specific recovery dependencies. Restoring Airbyte configuration does not restore an external database account, OAuth grant, destination bucket, source-side replication slot, or firewall allowlist that has been deleted elsewhere.
Keep fresh installation and upgrade procedures separate
For a fresh installation, use:
abctl local installFor an existing deployment, review the release notes between your installed and target versions before invoking the upgrade behavior documented for current abctl. The current local upgrade form is:
abctl local install --upgrade
Do not run it until you have checked the target release's prerequisites and protected persistent state. Record the existing output from abctl version and abctl local status first. After upgrading, repeat the same local status, HTTP, login, and limited-sync tests used for initial acceptance.
Version-specific requirements matter. The Airbyte 2.0 release notes, for example, required abctl 0.30.2 before upgrading an abctl deployment to Airbyte 2.0. Those notes also identified Airbyte 2.0 as the last release supporting Helm chart V1 and directed new Helm deployments toward V2. That historical requirement should not be applied blindly to another target version, but it demonstrates why an upgrade command alone is not a complete migration plan.
Operate connectors as independent workloads
A responsive interface does not guarantee successful data movement. Monitor failed jobs, connector errors, storage growth, resource use, external API limits, credential expiration, and schema changes. Record connector versions where the interface exposes them because connector behavior can change separately from the Airbyte platform.
Use dedicated service accounts instead of personal administrator credentials. Grant only the read, write, discovery, metadata, or object-creation permissions required by the connector. Rotate credentials in a controlled window and verify the next synchronization rather than assuming that a saved replacement works.
Review logs before sharing them. Even when passwords are masked, diagnostic output may disclose internal addresses, object names, query context, account identifiers, or data structure. Airbyte asks users not to publish suspected vulnerabilities as GitHub issues or public forum posts. Follow the Airbyte security reporting process and email the address listed there for a suspected security vulnerability.
Expose the verified Airbyte HTTP endpoint with Localtonet
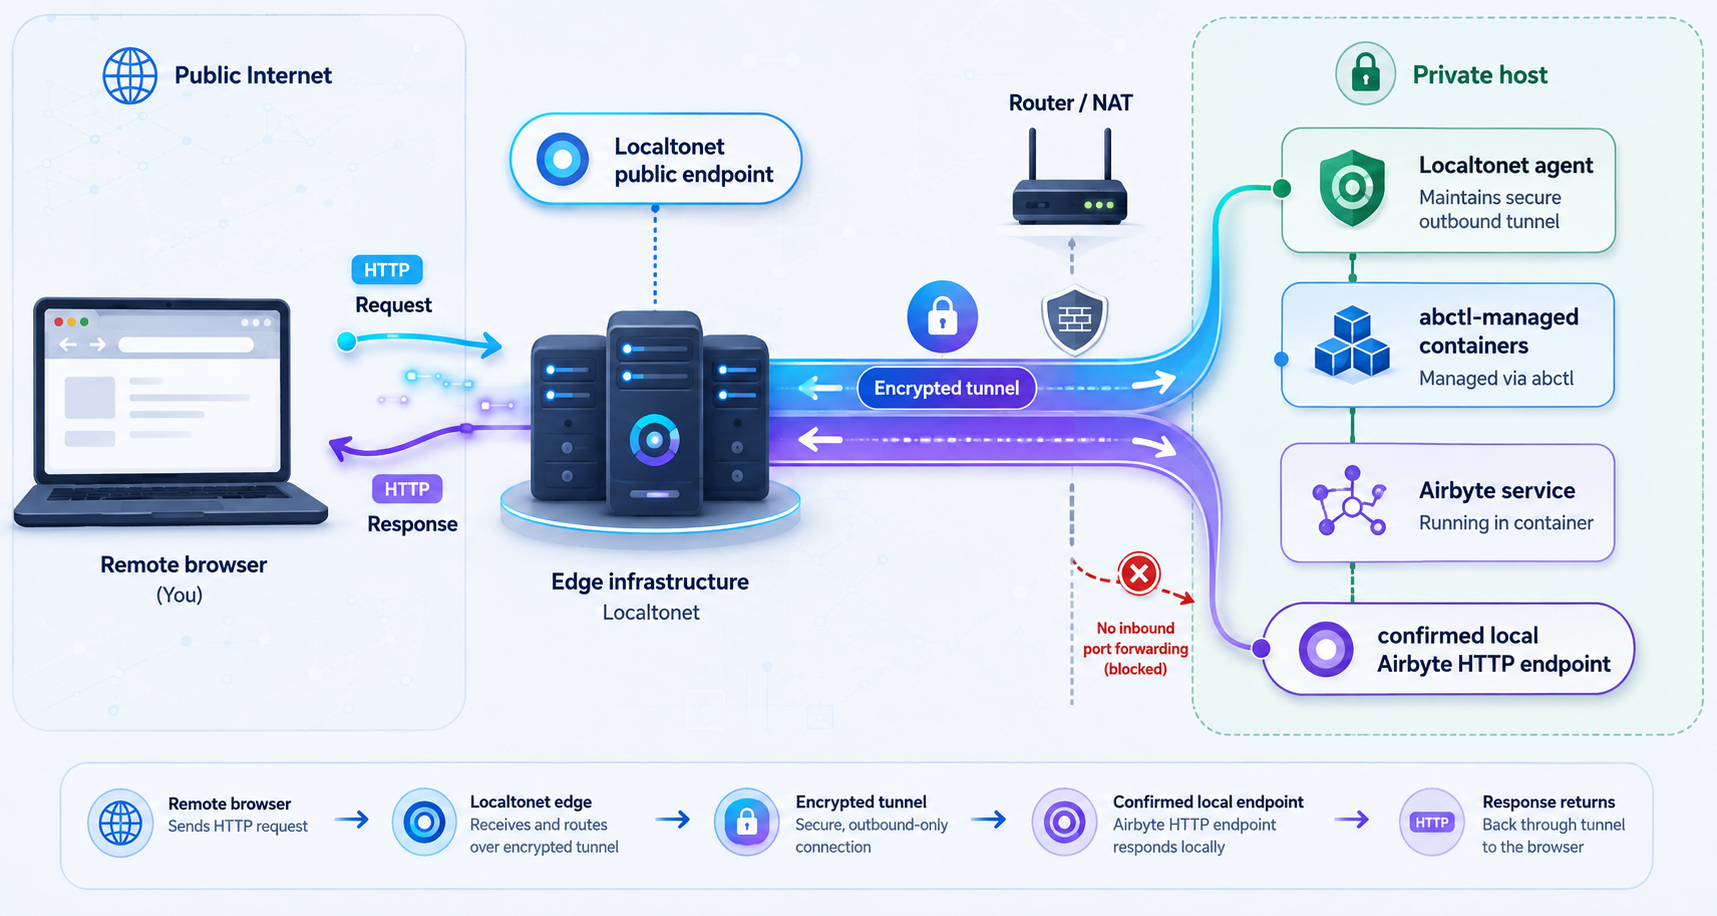

The quickstart gives us a concrete browser target: http://localhost:8000. If the Localtonet client runs on the same host as Airbyte, configure an HTTP tunnel to local IP 127.0.0.1 and local port 8000. This avoids guessing a protocol or port.
Our client establishes an outbound connection to a Localtonet relay server, so this workflow does not require inbound router port forwarding, firewall changes, VPN setup, or a public IP address. The public address remains available only while the selected client device is connected and the tunnel is running.
If you place the Localtonet client on a different device, do not enter 127.0.0.1. On that second device, localhost refers to the second device itself. Airbyte would first need to be intentionally reachable from that client over an authorized private address. For the least ambiguous quickstart, run Localtonet on the Airbyte host and retain 127.0.0.1:8000 as the target.
The following sequence follows the current Localtonet HTTP tunnel documentation.
Install and run the Localtonet client
Install our client on the same host that successfully opens http://localhost:8000. Keep Docker and Airbyte running during configuration so the target can be tested immediately.
Open the HTTP Tunnel page
In the Localtonet dashboard, go to the HTTP Tunnel page to create a browser-accessible tunnel for the confirmed Airbyte HTTP service.
Select the Process Type
Choose Random Sub Domain, Custom Sub Domain, or Custom Domain according to the options currently available for your account and intended address. Each process type serves the target through a public HTTPS address. Custom-domain DNS details should follow the current dashboard and documentation.
Select the AuthToken device
Select the device-specific token for the Localtonet client running on the Airbyte host. Never copy that token into a screenshot, article, public issue, or shared command transcript.
Select an available server
Choose a relay server or region from the values currently shown in the dashboard. Available values can vary, so do not copy a hardcoded server code from another deployment.
Enter Airbyte's verified local IP and port
With both applications on the same host, set the local IP address to 127.0.0.1 and the local port to 8000. These values correspond directly to the locally accepted URL http://localhost:8000.
Start the tunnel
Use the Start button after reviewing the target. Creating the configuration does not make it active. Once started, use the assigned public HTTPS address for the remote test.
Keep Airbyte authentication enabled. Localtonet does not replace Airbyte accounts, connector credential controls, authorization, or least-privilege access. An administrator who can sign in may be able to configure systems containing sensitive credentials and operational data.
Test the public HTTPS address
First repeat the local check on the Airbyte host:
curl -sS -o /dev/null -w '%{http_code}\n' http://localhost:8000Then copy the assigned Localtonet HTTPS URL from the dashboard and test it from a different authorized network. You can set it as a temporary shell variable without saving credentials:
PUBLIC_URL='https://your-assigned-address'
curl -sS -o /dev/null -w '%{http_code}\n' "$PUBLIC_URL"
Replace the sample value with the exact address assigned in your dashboard. An HTTP response indicates that the public request reached the web path. Open the same URL in a browser and confirm that Airbyte presents its login flow. Sign in with an authorized Airbyte account rather than weakening authentication for convenience.
The combination of successful local and public tests provides a useful diagnostic boundary:
- If both tests fail, investigate Docker, abctl, and Airbyte.
- If localhost succeeds but the public URL fails, investigate the Localtonet client, tunnel state, selected device, and target fields.
- If the login page appears publicly but credentials are rejected, the network path works and the remaining issue is Airbyte authentication.
- If the application loads but one sync fails, investigate that connector and its external system rather than the tunnel.
Verify shutdown behavior
Use the Localtonet Stop control when remote access is no longer required. Then repeat the public curl request. It should no longer reach Airbyte through that tunnel, while the local request to http://localhost:8000 should continue to work.
This two-part result proves that you removed public reachability without stopping the application. Delete the tunnel if the configuration will not be reused. If you also uninstall Airbyte, confirm that abctl local status no longer reports the previous running deployment and that the localhost request no longer succeeds.
Troubleshoot Docker, abctl, Airbyte, connectors, and the tunnel
The shell cannot find abctl
Check whether the installer placed the executable on your path:
command -v abctl
abctl version
If the first command returns no path, review the official installer output. Open a new shell if the installer updated your shell configuration. Do not download an unrelated binary from an unofficial location merely to bypass a path problem.
abctl cannot connect to Docker
Run:
docker version
docker info
docker ps
A missing server section, daemon connection failure, or permission error is a Docker-layer problem. Start Docker, enable the correct WSL2 integration where applicable, or correct the current user's Docker access. Retry abctl local install only after all three Docker checks succeed.
The installation stalls or components never become ready
Inspect the deployment:
abctl local statusCheck Docker's allocated CPUs and memory, free space on the volume holding Docker data, and whether container image downloads completed. Resolve the earliest concrete failure. Repeatedly launching another installation can obscure the original problem and consume more disk space.
If a previous disposable attempt must be removed, use the documented uninstall command. Do not use the persisted-data option unless data destruction is intentional:
abctl local uninstallStatus is ready, but localhost does not open
Test the exact documented endpoint:
curl -v http://localhost:8000
A connection refusal differs from an HTTP authentication or redirect response. Confirm that the request is running on the Airbyte host, that no proxy configuration is rewriting localhost traffic, and that you did not substitute a port from an older tutorial. Recheck abctl local status after any Docker restart.
The browser asks for credentials that you do not have
Retrieve the generated values:
abctl local credentials
Use the output only for the intended local deployment and store it in a password manager. If the command itself cannot locate the deployment, return to abctl local status. Do not assume a universal default password.
Airbyte opens, but a connector validation fails
This is usually downstream of the platform web interface. Check the connector's hostname, DNS resolution, outbound network path, TLS requirements, service credentials, OAuth state, database permissions, API scopes, and any source-side allowlist.
Use a small test data set and record the connector version where available. A connector-specific failure should not trigger a destructive abctl uninstall unless platform evidence independently shows that the local deployment is damaged.
The Localtonet public URL does not open
Confirm the layers in order:
abctl local statusreports a ready Airbyte deployment.curl http://localhost:8000reaches the local service.- The Localtonet client on that host is connected.
- The HTTP tunnel is started, not merely created.
- The selected AuthToken identifies the client on the Airbyte host.
- The target is
127.0.0.1and port8000when both applications share the host. - The tested public HTTPS URL exactly matches the address assigned by the dashboard.
If the public page reaches an Airbyte login screen, the tunnel is forwarding traffic to the application. A rejected login after that point is not a tunnel transport failure.
The tunnel stopped working after a host restart
Check both systems independently. Start Docker if necessary, run abctl local status, and verify http://localhost:8000. Then confirm that the Localtonet client is connected and the tunnel is running. The tunnel is unavailable whenever its selected client is disconnected or the tunnel is stopped.
Remote access should no longer be available
Stop the tunnel immediately and test the public URL from a separate network. Delete the tunnel if it will not be reused. Keep the local Airbyte interface available only through intended paths, review relevant operational records, and rotate any application or connector credential that may have been disclosed.
Frequently asked questions
What command installs abctl?
The official macOS, Linux, and WSL2 quickstart installer command verified in August 2026 is curl -LsfS https://get.airbyte.com | bash -. After it completes, confirm the installation with abctl version.
What command installs Airbyte Open Source locally?
With Docker running and the host requirements satisfied, run abctl local install. This is the fresh-install command. Do not add the upgrade option to a new deployment.
What is the local Airbyte quickstart URL?
The standard abctl quickstart interface is available at http://localhost:8000. Verify it from the Airbyte host before configuring any remote-access layer.
How do I retrieve the generated Airbyte password?
Run abctl local credentials on the deployment host. Store the returned login values securely and do not publish the output.
How do I check whether Airbyte is ready?
Run abctl local status, then request http://localhost:8000 and sign in through a browser. A complete acceptance test also validates a limited source, destination, and synchronization.
How do I uninstall the quickstart deployment?
Run abctl local uninstall to remove the local runtime. The command abctl local uninstall --persisted also removes persisted data and should be treated as destructive.
Which Localtonet tunnel type should I use for the abctl quickstart?
Use an HTTP tunnel because the verified Airbyte quickstart target is http://localhost:8000. When the Localtonet client runs on the Airbyte host, enter local IP 127.0.0.1 and local port 8000.
Does Localtonet replace Airbyte authentication?
No. Localtonet provides reachability to the configured target. Airbyte authentication, authorization, connector credential handling, and least-privilege access remain necessary.
Does this setup require router port forwarding?
No. The Localtonet client establishes an outbound connection to our relay server, so inbound router port forwarding, firewall changes, VPN setup, and a public IP address are not required. The selected client and tunnel must remain running.
Should I use the fresh-install command to upgrade Airbyte?
Treat upgrades separately. Protect persistent state, review every applicable release note, confirm the required abctl version, and use the currently documented upgrade form abctl local install --upgrade. Repeat the full local acceptance test afterward.
Connect to your verified Airbyte deployment with Localtonet
Once abctl local status is healthy and http://localhost:8000 works locally, create a Localtonet HTTP tunnel to 127.0.0.1:8000. Test the assigned public HTTPS address, keep Airbyte authentication enabled, and stop the tunnel whenever remote administration is no longer required.


