

Build a Kubernetes-hosted deception service, verify it locally, and publish only the intended HTTP endpoint
Krawl is a cloud-native web honeypot that presents realistic decoy applications, credentials, administrative pages, and crawler traps while recording suspicious activity. In this guide, we deploy Krawl on Kubernetes with its Helm chart, examine the standalone and scalable deployment choices, verify the service through a controlled local port-forward, and cover routine Helm operations. Once the application works locally, we connect that verified endpoint to an HTTP tunnel with Localtonet. We also address dashboard protection, workload isolation, data persistence, and the important uncertainty around source-IP attribution through a tunnel or reverse proxy.
📋 What's in this guide
What Krawl does and how this deployment works
Krawl is a customizable web deception server intended to detect, delay, and analyze malicious scanners, automated crawlers, and attackers. Instead of serving a real business application, it creates a deliberately attractive decoy surface. That surface can include fake login pages, apparent administrative panels, fake configuration files, realistic-looking credentials, paths advertised through robots.txt, canary-token integration, randomized server headers, and spider-trap pages containing continually generated links.
The application also provides a dashboard for reviewing activity. Its documented views include an overview of incoming requests, detected attack types, captured credentials, uploaded or captured files, campaign grouping, IP-focused investigation, tracked addresses, bans, timed-out clients, deception content, and webhooks. Some dashboard panels are protected by a dashboard password. The dashboard itself is placed at a randomly generated secret path at startup unless an operator configures a custom path.
A secret path reduces casual discovery, but it is not a replacement for authentication or network access control. Anyone who learns or observes the path may attempt to reach it. Treat the dashboard as an administrative interface, avoid sharing its URL, use the application's authentication controls, and decide separately whether the dashboard should be reachable through the same public endpoint as the deception pages.
Traffic path used in this guide
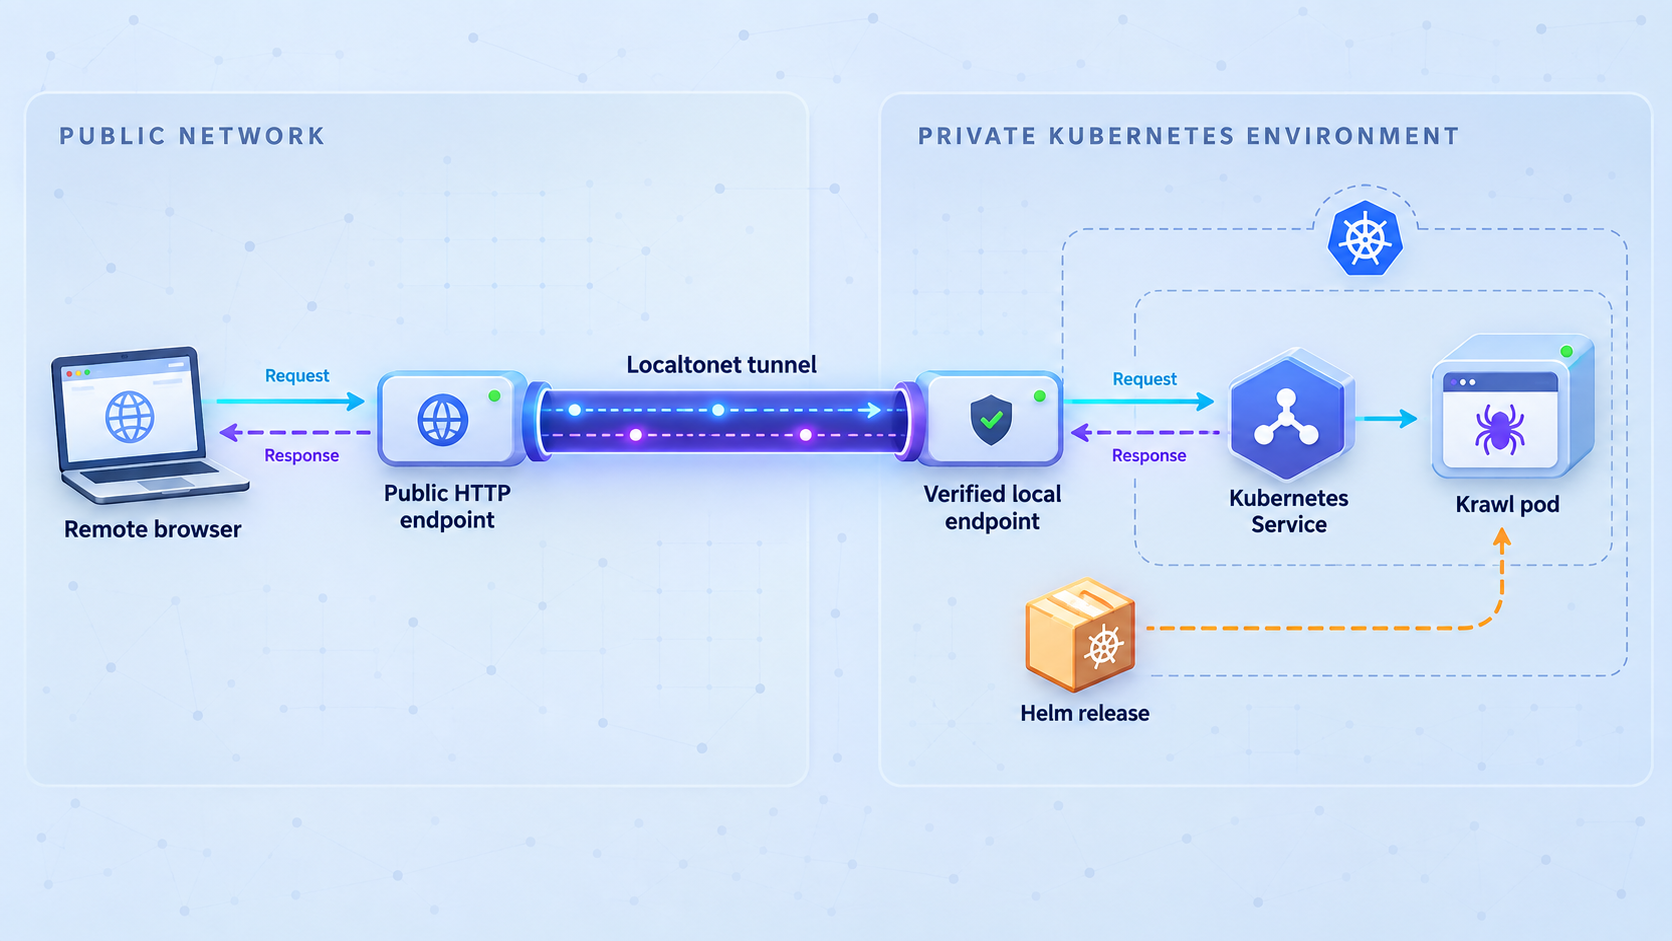
The installation and exposure stages are intentionally separated. Helm first installs Krawl in the Kubernetes cluster. We then use Kubernetes port forwarding to map the Krawl Service to 127.0.0.1:5000 on an administrative workstation. A browser or HTTP client verifies that local endpoint. Only after the local test succeeds do we configure Localtonet on the same workstation and point an HTTP tunnel at the verified address and port.
Public visitor
    |
    v
Localtonet public HTTPS address
    |
    v
Localtonet client on the workstation
    |
    v
127.0.0.1:5000
    |
    v
kubectl port-forward
    |
    v
Kubernetes Service: krawl
    |
    v
Krawl pod
This arrangement is useful for an evaluation or controlled deployment because it does not require the Krawl Service to receive a public load balancer address. It does, however, depend on two long-running processes: the Kubernetes port-forward and the Localtonet client. If either process stops, remote access stops. For a durable production architecture, operators should design an appropriate in-cluster access path and run the Localtonet client on a device that can reliably reach it. The supplied Localtonet product information does not define a Kubernetes-specific client deployment, so this guide does not invent one.
Run Krawl only in an environment you are authorized to expose. Isolate it from production applications, management networks, cloud metadata endpoints, confidential data, and credentials. Do not place genuine secrets in fake configuration files or captured examples. Apply least privilege to the Kubernetes service account, storage, network access, and administrator accounts.
Prerequisites for the Helm deployment
The Krawl chart documents Kubernetes 1.19 or newer and Helm 3.0 or newer as prerequisites. You also need a working kubectl context with permission to create resources in a namespace. This guide uses the namespace krawl-system and Helm release name krawl, matching the documented examples.
The storage requirements depend on the selected deployment mode. Standalone mode stores its database in SQLite and requires a Persistent Volume provisioner if the database is to survive pod replacement. Scalable mode uses PostgreSQL and Redis. The chart can deploy bundled PostgreSQL and Redis instances, or it can connect to external or managed instances when their chart options are configured.
| Requirement | Why it is needed | How to check it |
|---|---|---|
| Kubernetes 1.19+ | Runs the Krawl workload and chart resources | kubectl version |
| Helm 3.0+ | Installs and manages the Krawl chart | helm version |
| Working cluster context | Determines which cluster receives the release | kubectl config current-context |
| Namespace permissions | Allows Helm to create the namespace and release resources | kubectl auth can-i create deployments --namespace krawl-system |
| Persistent Volume provisioner | Provides persistent SQLite storage in standalone mode | kubectl get storageclass |
| PostgreSQL and Redis | Required by scalable mode, either bundled or external | Confirm the chosen chart values before installation |
| Localtonet client | Creates the outbound connection used for remote HTTP access | Install it later on the device that can reach the verified Krawl endpoint |
Confirm the active cluster before making changes
A common Helm mistake is deploying successfully to the wrong Kubernetes context. Run the following checks before installing anything:
kubectl config current-context
kubectl cluster-info
kubectl get nodes
helm version
Review the output rather than assuming that the current context is correct. If the cluster is shared, coordinate the namespace name, resource allocation, retention policy, and exposure plan with its administrators.
Check dynamic storage for standalone mode
List the available storage classes:
kubectl get storageclassAt least one suitable storage class must be available if the chart is expected to provision the standalone database volume dynamically. If no default storage class exists, installation can leave the database claim in a pending state. The exact storage class name and provisioning behavior are cluster-specific, so this guide cannot provide a universal value.
The documented OCI example installs chart version 2.2.0, while newer Krawl application releases also exist. Chart and application versions do not have to share the same release timeline. The reproducible commands below retain the chart version documented by the Helm guide instead of silently substituting an unverified chart version. Before a production rollout, review the currently published chart versions and their image settings, then test the exact version you plan to operate.
Choose between standalone and scalable mode
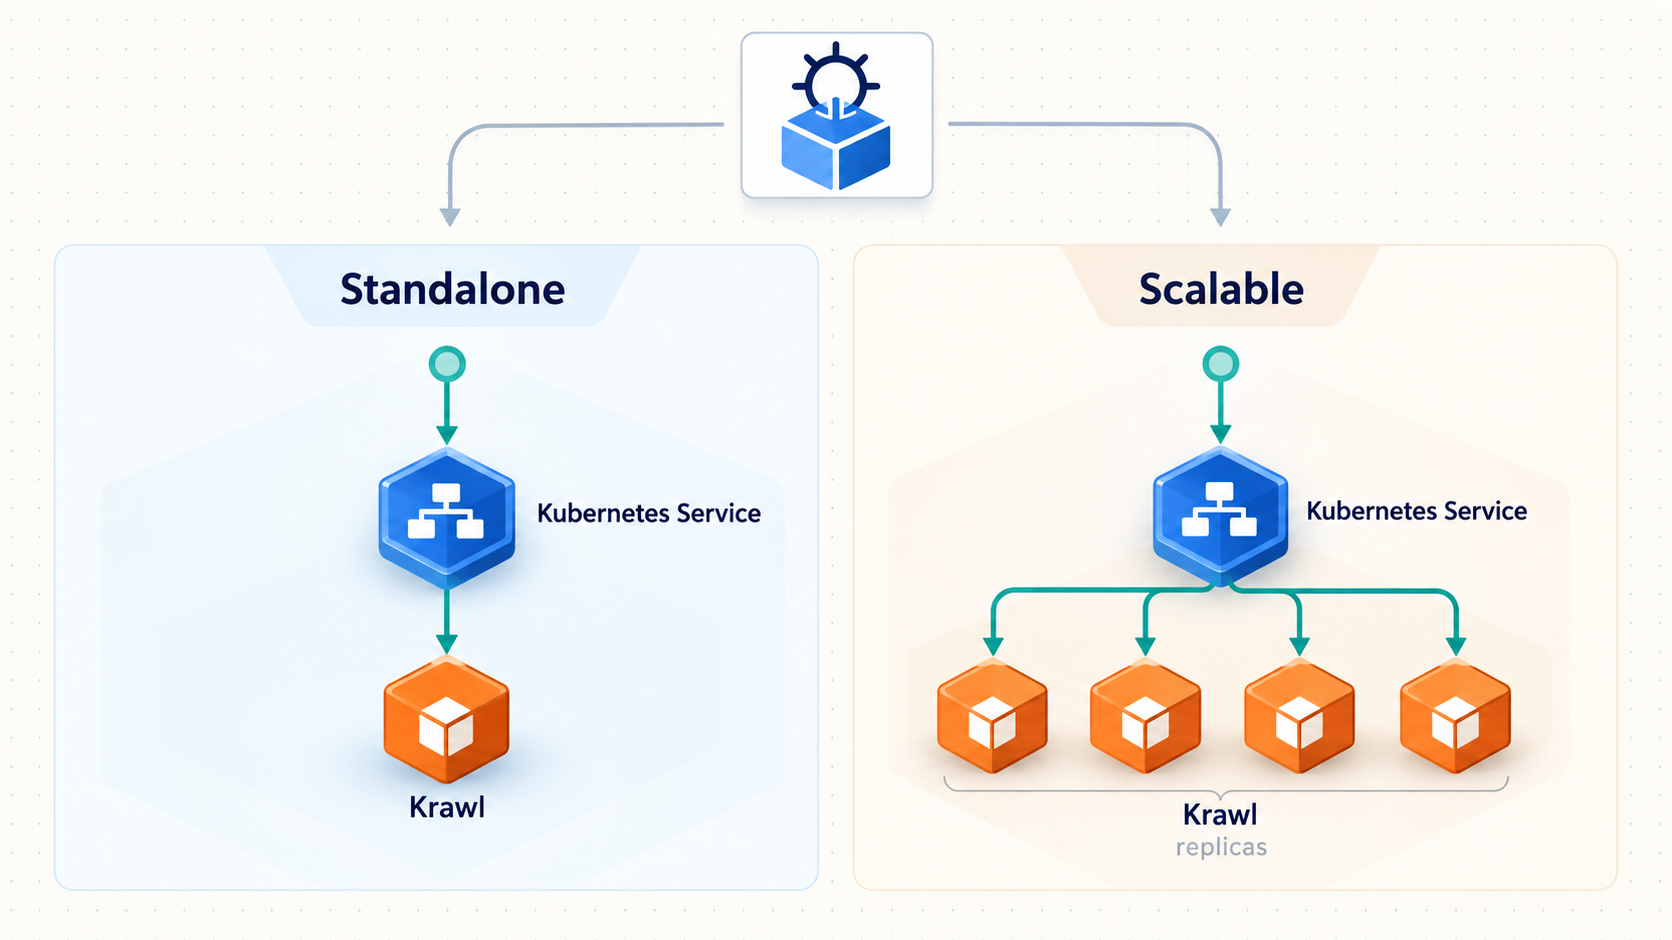
Krawl supports two deployment modes. The choice changes the database, cache, replica count, persistence design, and Kubernetes update strategy. Make this choice before installation because migrating state is a separate operational task, not simply a matter of increasing the replica count.
| Characteristic | Standalone mode | Scalable mode |
|---|---|---|
| Primary database | SQLite in WAL mode | PostgreSQL |
| Cache | In-memory Python dictionary | Redis with multi-tier TTL caching |
| Replica model | One application replica | One or more application replicas |
| External dependencies | No PostgreSQL or Redis dependency | PostgreSQL and Redis, bundled or external |
| Chart update strategy | Recreate | RollingUpdate |
| Best fit stated by Krawl | Development, homelabs, and fewer than 500,000 requests | Production, high availability, and more than 500,000 requests |
| Persistence consideration | Requires a PVC for the SQLite database file | Requires persistent PostgreSQL and appropriate Redis planning |
Standalone mode is the clearest starting point for a lab, evaluation, or lower-volume deployment. It uses fewer components, needs only one Krawl replica, and avoids database and cache credentials. The tradeoff is that it cannot be horizontally scaled safely as if SQLite were a shared multi-writer database.
Scalable mode is the chart default. It uses PostgreSQL for durable application data and Redis for caching and task coordination. Multiple Krawl replicas can run behind a service. Recent Krawl releases coordinate cluster-wide scheduled work with Redis-backed leases so that tasks intended to run once per cluster are not repeated independently by every pod.
Scalable mode introduces more operational responsibility. PostgreSQL and Redis need secure credentials, persistence, resource limits, backup planning, monitoring, and lifecycle management. The chart can deploy both components, but bundled dependencies do not remove those responsibilities. External managed services can be used by disabling the bundled components and supplying the required connection settings.
Krawl's scalable-mode examples intentionally use recognizable placeholders. Replace them with unique secrets before installation. Avoid putting real passwords directly on a command line because commands can be retained in shell history and process records. The supplied evidence does not fully document a Kubernetes Secret integration workflow for every chart field, so inspect the chart version you selected and use its supported secret mechanism rather than inventing unsupported keys.
Install Krawl with Helm
The following walkthrough uses standalone mode so that the initial deployment has no PostgreSQL or Redis dependency. It creates a single Krawl replica, enables persistent SQLite storage, and disables the chart's ingress because remote access will be added only after local verification.
Create a file named krawl-standalone-values.yaml on the administrative workstation:
mode: standalone

replicaCount: 1

ingress:
  enabled: false

postgres:
  enabled: false

redis:
  enabled: false

database:
  persistence:
    enabled: true
    size: 1Gi
    accessMode: ReadWriteOnce
These values use settings documented by the chart. Krawl's standalone example also configures the server port as 5000, but that is already the documented chart default. Leaving the setting out keeps this override focused on the deployment choices that matter here.
Validate the values file
Confirm that standalone mode is selected, only one replica is requested, PostgreSQL and Redis are disabled, ingress is disabled, and database persistence is enabled. Also verify that the cluster can satisfy a 1 GiB ReadWriteOnce claim.
Render the chart before installation
Use Helm's template operation to inspect the resources that chart version 2.2.0 would create. Rendering first catches YAML and value errors without changing the cluster.
Install the OCI chart
Install release krawl into krawl-system, ask Helm to create the namespace, select the documented chart version, and apply the standalone values file.
Wait for the Kubernetes workload
Watch the namespace until the Krawl pod is running and ready. If it remains pending or repeatedly restarts, inspect events and logs before attempting remote access.
Inspect the Service and persistent claim
Confirm that the krawl Service exists and that the standalone database claim is bound. A running pod without durable storage does not satisfy the persistence goal.
Render the Kubernetes resources
helm template krawl oci://ghcr.io/blessedrebus/krawl-chart \
  --version 2.2.0 \
  --namespace krawl-system \
  -f krawl-standalone-values.yaml
Review the generated resource kinds, image reference, service port, volume claim, environment configuration, and security-relevant settings. Helm rendering does not prove that the cluster can schedule the workload, but it gives you a chance to detect unexpected defaults before installation.
Install the chart
helm install krawl oci://ghcr.io/blessedrebus/krawl-chart \
  --version 2.2.0 \
  --namespace krawl-system \
  --create-namespace \
  -f krawl-standalone-values.yaml
Helm should report the release as deployed if Kubernetes accepts the resources. That status means the resources were submitted successfully. It does not necessarily mean the pod is ready, the volume is bound, or the application is responding.
Watch the rollout
kubectl get pods -n krawl-system --watchStop the watch after the Krawl pod reports a running state and its ready container count is complete. Then inspect all primary objects:
kubectl get all -n krawl-system
kubectl get pvc -n krawl-system
kubectl get svc krawl -n krawl-system
helm status krawl -n krawl-system
The persistent claim should show Bound. If it remains Pending, do not continue as if persistence were working. Investigate the storage class, provisioner, requested access mode, capacity, and namespace events.
Review pod output without assuming a pod name
First list the pod:
kubectl get pods -n krawl-systemThen use the actual name shown by Kubernetes:
kubectl logs -n krawl-system <KRAWL_POD_NAME>Krawl generates a random dashboard secret path at startup unless one is configured. The supplied project evidence establishes that behavior but does not establish a stable, version-independent command for retrieving the generated path. Review the startup output and the documentation associated with the exact Krawl version you installed. Do not guess the path or assume that a path used by a public demonstration instance applies to your deployment.
Verify the Krawl service locally
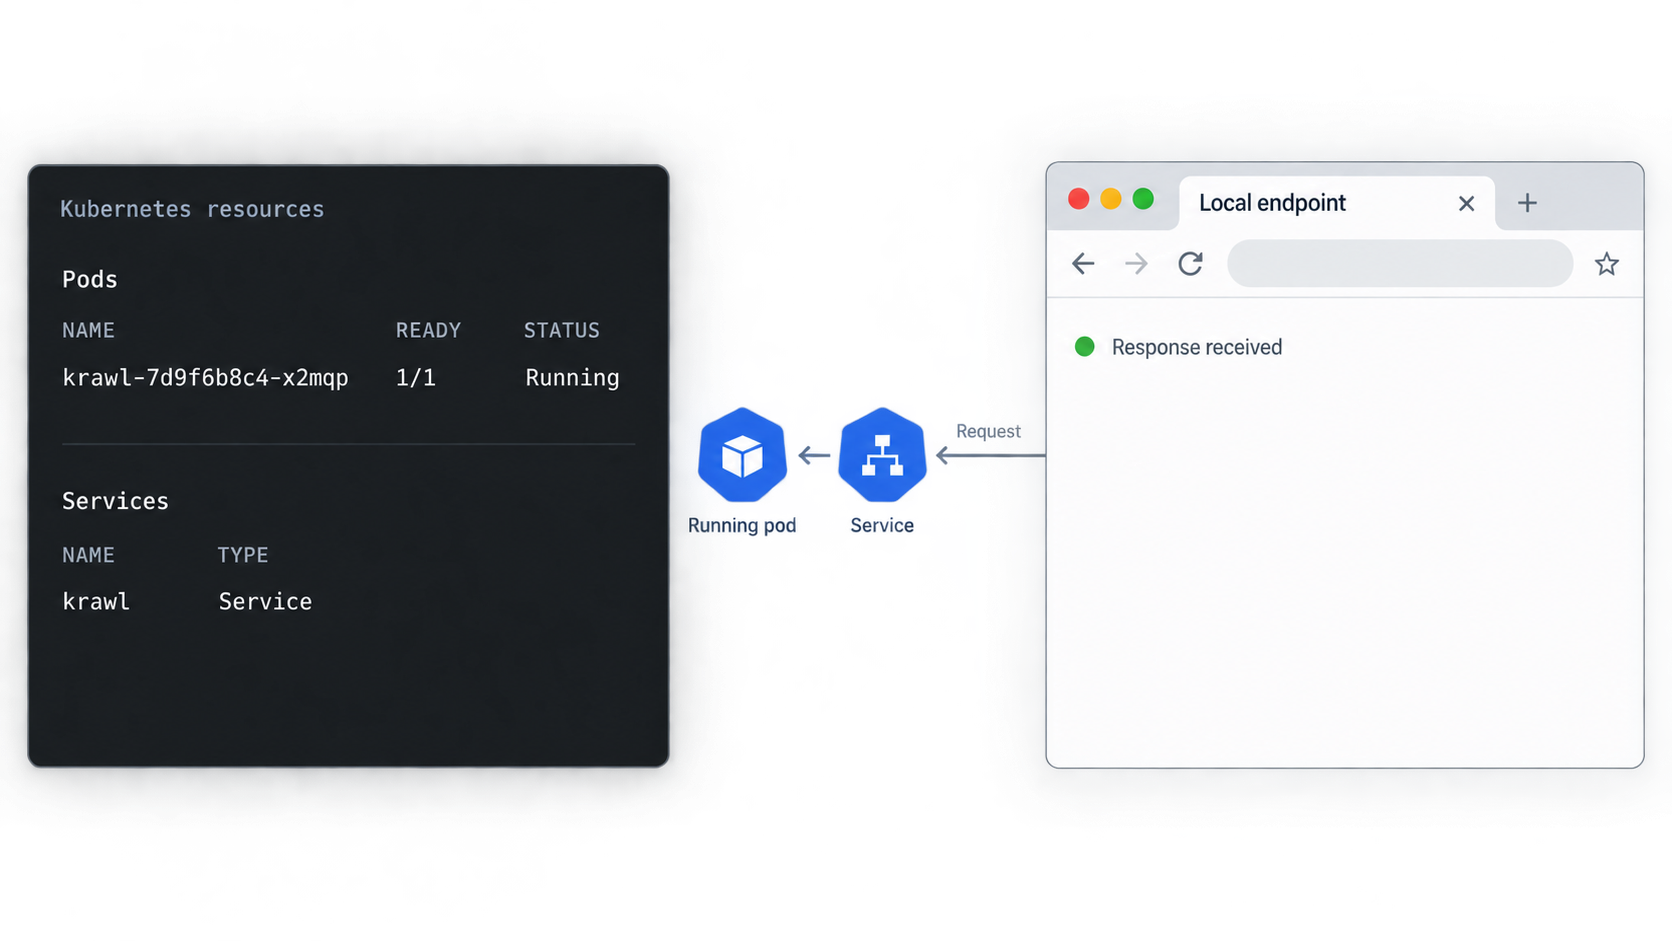
Before exposing anything, test the Krawl Service from a controlled machine. Kubernetes port forwarding creates a temporary listener on the workstation and sends connections through the Kubernetes API to the selected Service.
kubectl -n krawl-system port-forward service/krawl 5000:5000
Keep that terminal open. By default, kubectl port-forward binds locally, making the Krawl service available at:
http://127.0.0.1:5000Open that URL in a browser or request it with an HTTP client:
curl -i http://127.0.0.1:5000/A successful HTTP response confirms that the workstation can reach the Kubernetes API, the Service selects a healthy backend, the pod is accepting traffic, and the port mapping is correct. The response content can vary because Krawl intentionally serves deceptive content and can generate different pages.
Verify through more than one signal
Do not treat a single browser page as the entire acceptance test. Check the pod state, Service endpoints, logs, persistence, and Helm release status:
kubectl get pods -n krawl-system
kubectl get svc krawl -n krawl-system
kubectl get endpoints krawl -n krawl-system
kubectl get pvc -n krawl-system
helm status krawl -n krawl-system
The endpoints output should identify at least one backend for the Service. An empty endpoint set usually means that the Service selector does not match a ready pod or that the pod has not become ready.
Verify the dashboard carefully
Once you have obtained the generated dashboard path from the installed instance, append it to the local base URL. Keep the path private and test protected panels using the dashboard credentials configured for your deployment. Krawl's dashboard may show operational configuration and captured activity, so it should be treated as an administrative surface rather than part of the public bait.
A honeypot depends on accurate request attribution, but every proxy or tunnel can affect the network address seen by the backend. The supplied Localtonet product context does not establish whether the original client address is delivered to Krawl, which forwarding headers are used, or how Krawl should trust those headers for this exact path. Until you test and document that behavior, do not claim that IP addresses recorded through the tunnel are original visitor addresses. They may represent a relay, proxy, or another intermediate hop.
Expose the verified endpoint with Localtonet
Localtonet can expose an HTTP service running on or reachable from a connected device. Our client establishes an outbound connection to a Localtonet relay, so this workflow does not require inbound router port forwarding, firewall changes, VPN setup, or a public IP address. The tunnel supplies a public HTTPS address and remains available only while the selected client is connected and the tunnel is running.
In this guide, the device running the Localtonet client is the same workstation running kubectl port-forward. That detail matters because 127.0.0.1:5000 refers to the machine on which our client is running. If the client runs elsewhere, its loopback interface will not point to the port-forward on your workstation.
Install and run the Localtonet client
Install our client on the workstation that is running the verified Kubernetes port-forward. Keep kubectl port-forward service/krawl 5000:5000 active so that the local target remains reachable.
Authenticate or select the device
Use the device-specific authentication token through the supported client workflow, then select that connected device in the dashboard. Never paste its token into documentation, screenshots, source control, or shared command history.
Select an available relay server
Choose a server or region currently offered in your Localtonet dashboard. Availability can vary, so obtain the value from the live product instead of copying a hardcoded server code from an article.
Create an HTTP tunnel to the local target
Configure an HTTP tunnel with local IP address 127.0.0.1 and local port 5000. Choose the available process type that fits your deployment, such as a generated subdomain. Custom-domain DNS instructions vary and should be checked against the current dashboard documentation.
Start and test the tunnel
Creating a tunnel does not start it. Press Start, copy the assigned public HTTPS address, and test it from a separate network. Stop or delete the tunnel when the exposure is no longer required.
The HTTP tunnel should point to the same endpoint that passed the local test. If http://127.0.0.1:5000 stops working, fix the Kubernetes or port-forward problem first. Recreating the tunnel will not repair an unavailable local target.
Test from outside the cluster network
Use a device on a genuinely separate network, such as a mobile connection, and request the assigned public address. Check all three layers while the request is made:
- The Localtonet dashboard should show the selected device as connected and the tunnel as running.
- The
kubectl port-forwardprocess should still be active without forwarding errors. - Krawl logs or dashboard activity should show that a request reached the application.
Do not publish the dashboard path while testing the public bait page. If dashboard access is needed remotely, first confirm its authentication and decide whether exposing it through the same tunnel is acceptable for your threat model.
Helm can report Krawl as healthy while the public endpoint is offline because the Localtonet client, tunnel, or port-forward has stopped. The reverse can also occur: the tunnel can be running while Krawl is unavailable. Monitor the Kubernetes workload and the remote-access path as separate components.
Understand the source-IP limitation
Krawl documents reverse-proxy configuration because trusted forwarding headers and proxy boundaries affect client-IP interpretation. Its Helm chart also documents externalTrafficPolicy: Local for preserving source addresses at the Kubernetes Service level and additional trusted-IP configuration when Traefik or another reverse proxy is involved.
Those Kubernetes settings do not automatically prove source-IP preservation through Localtonet. The end-to-end chain in this guide includes a public relay, our client, a loopback listener, Kubernetes port forwarding, the Service, and the pod. Because the supplied evidence does not verify the address and header behavior across that complete chain, we cannot state that Krawl will record the original visitor address.
Before using collected addresses for blocking, reputation analysis, incident response, or campaign attribution, generate controlled requests from known external networks and compare the observed Krawl records with the expected addresses. Also inspect the request headers and follow Krawl's current reverse-proxy documentation for the exact application version. Never configure Krawl to trust forwarding headers from arbitrary, untrusted senders.
Operate, update, and remove the deployment
Check release and workload health
These commands provide a concise operational view:
helm list -n krawl-system
helm status krawl -n krawl-system
kubectl get pods,svc,pvc -n krawl-system
kubectl get events -n krawl-system --sort-by=.metadata.creationTimestamp
Review logs using the actual pod name returned by Kubernetes:
kubectl logs -n krawl-system <KRAWL_POD_NAME>For a restarting container, the previous log stream may be useful:
kubectl logs -n krawl-system <KRAWL_POD_NAME> --previousKeep the values file under secure change control
Retain the non-secret Helm values needed to reproduce the release. If a later scalable deployment adds database or Redis credentials, do not commit those secrets into the same unprotected repository. Record the selected chart version, application image version, deployment mode, storage class, retention decision, dashboard configuration, and tunnel architecture.
Preview changes before an upgrade
Render the intended release with the new chart version and values before applying it. The exact target version must be selected from the versions actually published at upgrade time, so it is represented below as a placeholder rather than guessed:
helm template krawl oci://ghcr.io/blessedrebus/krawl-chart \
  --version <TARGET_CHART_VERSION> \
  --namespace krawl-system \
  -f krawl-standalone-values.yaml
When ready, use Helm's upgrade operation:
helm upgrade krawl oci://ghcr.io/blessedrebus/krawl-chart \
  --version <TARGET_CHART_VERSION> \
  --namespace krawl-system \
  -f krawl-standalone-values.yaml
Standalone mode uses a Recreate strategy, so an update can involve downtime while the old pod stops and the replacement starts. Confirm that the persistent claim remains intact and verify both the local endpoint and public tunnel again after every upgrade.
Back up before destructive maintenance
A bound volume is not itself a backup. Snapshot or back up the volume using a method supported by the cluster and storage provider before upgrades, storage migrations, or uninstall operations. The correct snapshot commands are specific to the Kubernetes distribution, CSI driver, and infrastructure, so no universal command can be given safely.
Stop public access without deleting Krawl
To remove remote reachability while leaving the Kubernetes deployment intact, stop the Localtonet tunnel. You can also stop the port-forward process. Because the public route depends on both layers, either action interrupts access. Stopping the tunnel is preferable when you want an explicit access-control action visible in the Localtonet dashboard.
Uninstall Krawl
helm uninstall krawl -n krawl-systemAfter uninstalling, inspect the namespace:
kubectl get all,pvc -n krawl-systemDo not assume that uninstalling the release deletes every persistent volume claim or the underlying data. Helm charts and storage classes vary in their retention behavior. Review remaining claims and backups before deleting anything manually. Stop and delete the associated Localtonet tunnel separately if it is no longer needed.
Troubleshooting Krawl and the HTTP tunnel
The pod remains Pending
Describe the pod and inspect namespace events:
kubectl describe pod -n krawl-system <KRAWL_POD_NAME>
kubectl get events -n krawl-system --sort-by=.metadata.creationTimestamp
kubectl get pvc -n krawl-system
Common categories include an unbound persistent claim, insufficient cluster resources, image-pull failures, scheduling constraints, or missing permissions. Use the event message to identify the actual category rather than repeatedly reinstalling the chart.
The PVC remains Pending
Check the claim and available storage classes:
kubectl describe pvc -n krawl-system <PVC_NAME>
kubectl get storageclass
Verify that a compatible provisioner exists, that a default storage class is available or explicitly selected, and that the requested ReadWriteOnce access mode is supported. Storage configuration is cluster-specific.
The pod enters CrashLoopBackOff
kubectl logs -n krawl-system <KRAWL_POD_NAME>
kubectl logs -n krawl-system <KRAWL_POD_NAME> --previous
kubectl describe pod -n krawl-system <KRAWL_POD_NAME>
Look for database-path errors, permission failures, invalid configuration, failed dependency connections, or resource exhaustion. In scalable mode, verify PostgreSQL and Redis availability and credentials. In standalone mode, verify that the database volume is mounted and writable.
The port-forward reports that the Service has no endpoints
kubectl get svc krawl -n krawl-system
kubectl get endpoints krawl -n krawl-system
kubectl get pods -n krawl-system --show-labels
An empty endpoint list indicates that no ready pod currently matches the Service. Wait for readiness, inspect pod failures, and verify that the installed chart resources have not been modified inconsistently.
Port 5000 is already in use locally
Map a different local port to Krawl's service port:
kubectl -n krawl-system port-forward service/krawl 5500:5000
The local endpoint then becomes http://127.0.0.1:5500. Verify that address and configure the Localtonet HTTP tunnel to target local port 5500. The Kubernetes service still listens on its configured port; only the workstation-side mapping changes.
Krawl works locally but not through Localtonet
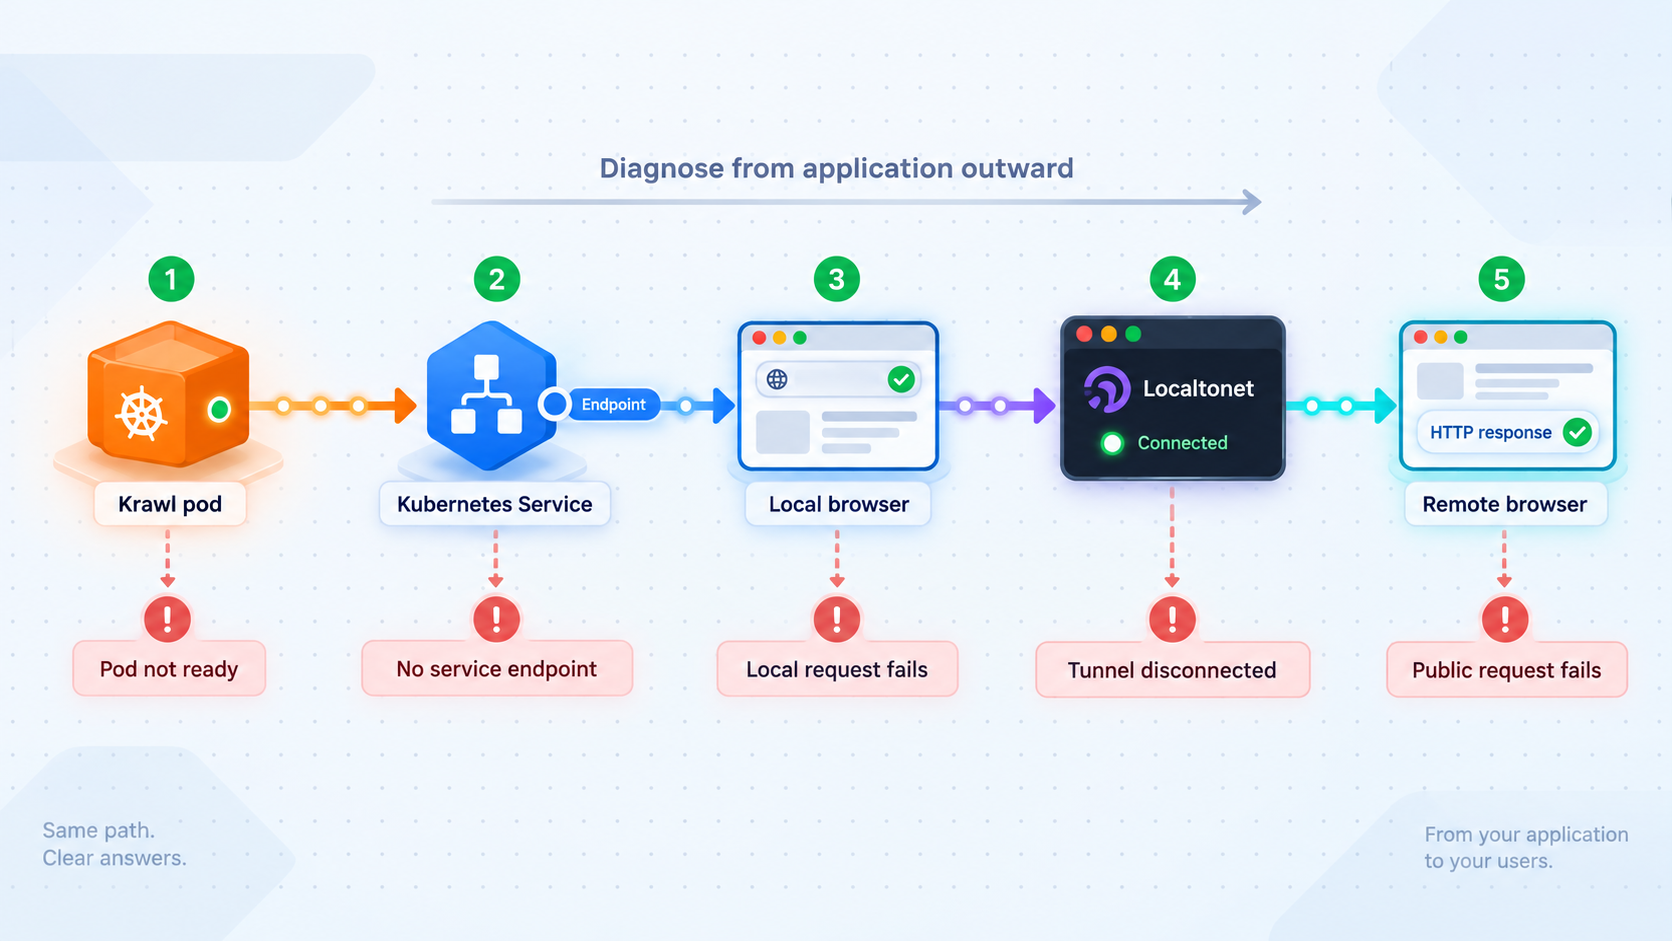
Check the chain in order:
- Confirm that
curl -i http://127.0.0.1:5000/succeeds on the Localtonet client device. - Confirm that the
kubectl port-forwardterminal is still running. - Confirm that the Localtonet client shows the correct device as connected.
- Confirm that the HTTP tunnel targets the same local IP and port used by the successful local test.
- Confirm that the tunnel was started, not merely created.
- Test the assigned public address from a separate network.
If a different local port was selected, update both the local test and tunnel target consistently.
The dashboard path cannot be found
Krawl generates a random secret path at startup unless a custom value is configured. Inspect the startup output for the installed pod and consult the configuration for the exact application version. Do not assume the demonstration dashboard path or a value from another installation. If a custom path is configured later, treat it as sensitive and verify the expected formatting against that chart and application version before upgrading.
Every request appears to come from the same address
This usually indicates that Krawl is observing an intermediate network hop instead of the original visitor. Do not automatically trust a client-supplied forwarding header, since an attacker can forge it unless a trusted proxy overwrites and controls it. Document the complete proxy chain, perform controlled tests, and apply only the trust settings supported by Krawl's current reverse-proxy documentation.
The public endpoint disappears unexpectedly
Verify the independent runtime components: the Krawl pod, Kubernetes Service, port-forward process, Localtonet client connection, and tunnel running state. The tunnel is available only while its selected device remains connected and the tunnel remains active. A workstation sleep event, terminal closure, expired Kubernetes session, pod rollout, or client shutdown can interrupt this evaluation architecture.
Frequently asked questions
Does Krawl require PostgreSQL and Redis?
Not in standalone mode. Standalone mode uses SQLite in WAL mode and an in-memory cache, supports one Krawl replica, and needs persistent storage for the database. Scalable mode uses PostgreSQL and Redis and supports multiple application replicas.
Why does this guide disable Kubernetes ingress?
The goal is to verify Krawl locally before adding one intentional remote-access path. Disabling ingress avoids creating an additional route that may depend on a cluster-specific ingress controller, DNS record, certificate setup, and proxy configuration. An ingress can be designed later if it is part of the intended architecture.
Does Localtonet require router port forwarding?
No. Our client establishes an outbound connection to a Localtonet relay server. This allows the tunnel to provide a public URL without inbound router port forwarding, firewall changes, VPN setup, or a public IP address.
Will Krawl record the original visitor IP through the tunnel?
That behavior is not established by the supplied evidence for this complete forwarding path, so it must not be assumed. Test requests from known external networks, inspect what Krawl records, examine the delivered headers, and follow Krawl's current reverse-proxy guidance before relying on source addresses for attribution or blocking.
Is the random dashboard path enough to protect the dashboard?
No. A random path reduces accidental discovery but should not be treated as complete authorization. Keep the path private, configure and use the dashboard's authentication protections, restrict administrative access where possible, and avoid exposing the dashboard unnecessarily.
Can the Localtonet client run on a different machine?
Yes, provided that machine can reach the Krawl endpoint. However, 127.0.0.1 always refers to the machine running the client. If the Kubernetes port-forward runs on another workstation, a Localtonet client targeting its own loopback address will not reach it. Use a target address that is genuinely reachable from the selected client device and secure that network path appropriately.
Does creating a Localtonet tunnel make it active immediately?
No. Creating a tunnel and running it are separate lifecycle actions. After configuration, press Start. The public endpoint remains available only while the selected client is connected and the tunnel is running.
Can standalone mode be scaled to multiple replicas?
No. Krawl documents standalone mode as a single-instance deployment. Use scalable mode with PostgreSQL and Redis when multiple Krawl replicas are required.
Is the port-forward architecture suitable for unattended production use?
It is most appropriate for evaluation and controlled administration because it depends on a workstation, an active Kubernetes session, and a long-running terminal process. A durable deployment should use a deliberately engineered target reachable from a continuously running Localtonet client. Kubernetes-specific Localtonet deployment instructions are not established in the supplied product context, so they are not invented here.
Connect your verified Krawl endpoint with Localtonet
After Krawl responds locally and its security boundaries are documented, run our client on the device that can reach it, create an HTTP tunnel to the verified address and port, and start the tunnel when you are ready to receive controlled remote traffic.
Get Started Free →

