

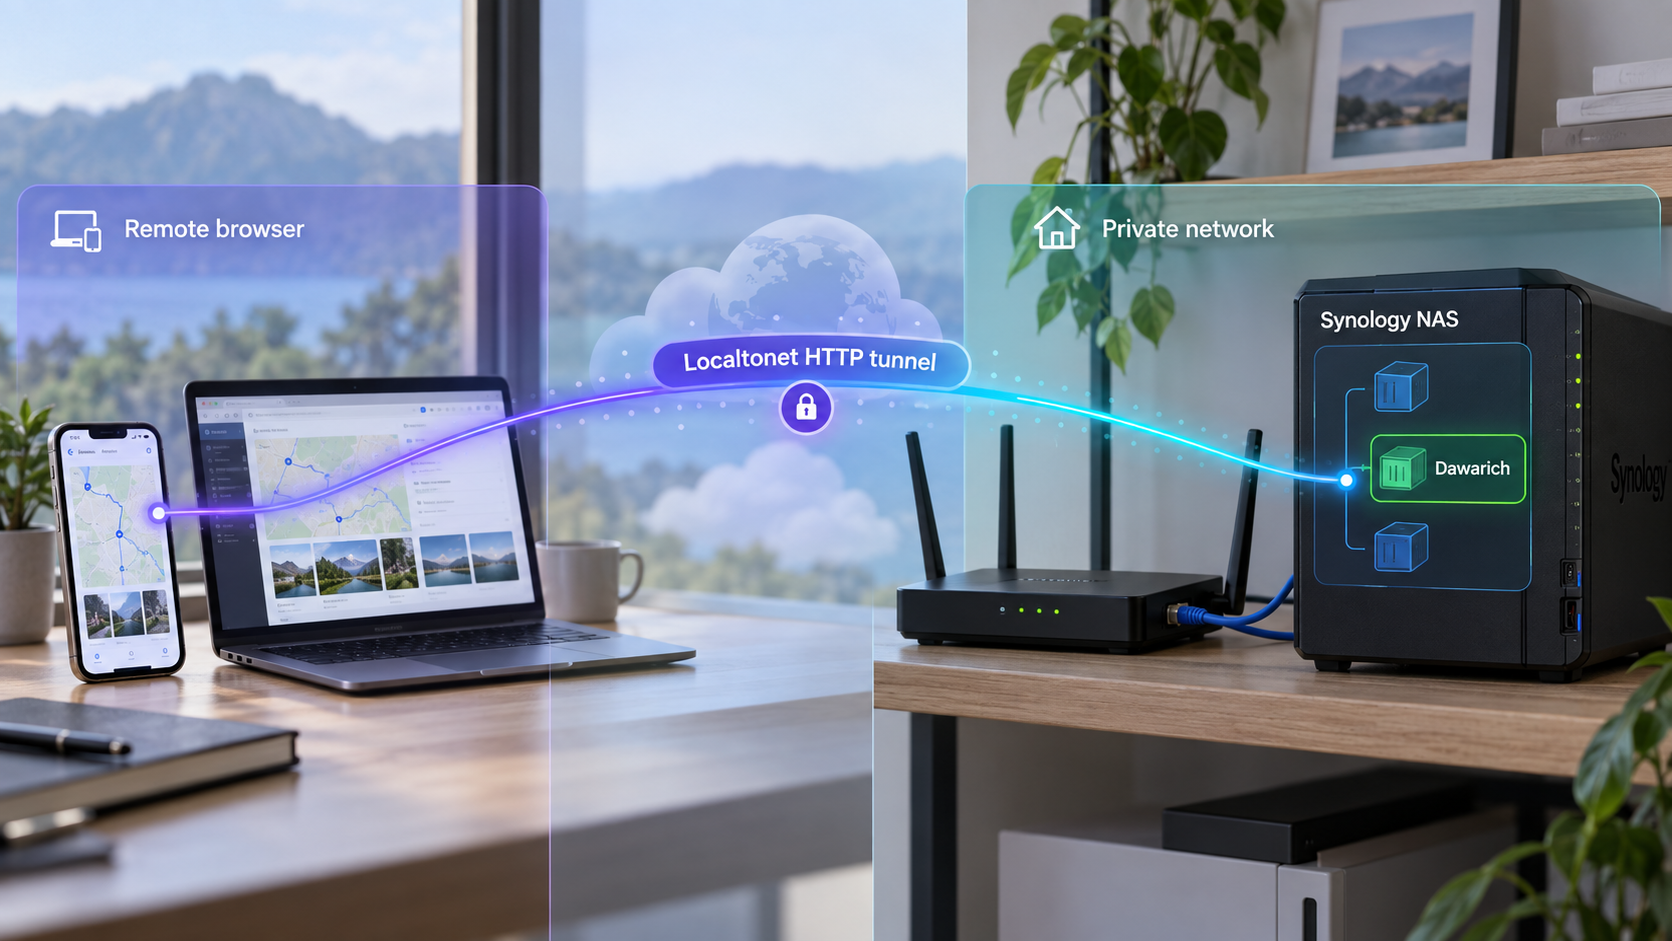
Build a private location-history service on your Synology NAS, verify it locally, then publish only the web endpoint you intend to use.
Dawarich is a self-hostable web application for collecting, importing, visualizing, and exporting location history. This guide walks through the official Synology installation workflow using Container Manager and Web Station, including storage preparation, environment configuration, startup, local verification, updates, backups, and troubleshooting. After Dawarich works correctly inside your network, we explain how to connect that existing HTTP service to a public HTTPS address with Localtonet. The remote-access stage is deliberately separate so that application problems can be resolved before internet exposure is introduced.
📋 What's in this guide
How a Dawarich deployment on Synology works
Dawarich is designed to provide a self-hosted alternative for personal location history. Its web interface can display historical points on an interactive map, connect points with lines, generate heatmaps, show a timeline, create trips, calculate travel statistics, and help organize places and visits. It can import data from sources including Google Maps Timeline, OwnTracks, GPX, GeoJSON, Strava, Immich, and photo EXIF metadata. It can also export data in GeoJSON or GPX formats.
The application is installed with Docker and Docker Compose. On Synology DSM, Container Manager supplies the container runtime and project interface, while Web Station can provide a convenient local portal for the application. The official Synology workflow uses a Compose file, an environment file, and several persistent directories. Those directories keep the database, Redis-related data, shared database files, application storage, and public files outside the disposable container layer.
This separation matters. A container can be replaced during an update, but personal location history must survive that replacement. Keeping the provided volume paths intact and backing them up before changes are essential parts of operating Dawarich, not optional housekeeping.
There are therefore two independent network layers in this guide. First, Synology runs Dawarich and makes it reachable within the local environment. Second, the Localtonet client establishes an outbound connection to one of our relay servers and publishes the selected local HTTP target. Keeping these layers separate makes diagnosis safer and easier.
Do not create the public tunnel as a substitute for local testing. Confirm that the containers are healthy, the expected login page opens locally, and account access works before adding Localtonet. If Dawarich does not work on the LAN, a tunnel will not repair the application or its database.
Prerequisites and deployment decisions
Before creating the project, confirm that the Synology system can install Container Manager and Web Station from Package Center. Dawarich's documented installation method requires Docker and Docker Compose functionality. Hardware eligibility and package availability vary across Synology models and DSM releases, so Package Center on the actual NAS is the authoritative place to confirm availability.
You also need a DSM account that can install packages, create shared folders, edit files, and create Container Manager projects. Plan enough storage for the application, database, imports, and future location points. The supplied evidence does not define a universal CPU, memory, or disk requirement, so we cannot recommend an invented minimum. Actual requirements depend on factors such as import size, number of users, retained history, integrations, and background processing.
Information to decide before installation
- A private folder or shared folder in which the Dawarich project will live.
- The local hostname that Web Station will use, if you choose name-based local access.
- The local time zone for Dawarich.
- A strong database password that will be set before the first start.
- A securely generated
SECRET_KEY_BASEthat will remain stable across restarts and upgrades. - A backup destination for the project configuration and persistent application data.
- The LAN device that will run the Localtonet client if remote access is required.
The documented Synology route uses Web Station and local DNS to make a hostname such as dawarich.my-syno.com resolve to the NAS inside the local network. That hostname is only an example. Use a name appropriate for your environment, and do not assume that creating a Web Station portal automatically creates a public DNS record.
| Component | Purpose | Important consideration |
|---|---|---|
| Container Manager | Creates, builds, starts, and monitors the Compose project | Must be available for the NAS and DSM release |
| Web Station | Provides the documented Synology web portal workflow | The portal hostname must resolve correctly on the local network |
| Compose file | Defines Dawarich and its supporting containers | Use the current template intended for a new Synology installation |
.env file |
Stores host, time zone, database, Redis, and application settings | Keep it private because it contains secrets |
| Persistent folders | Retain application and database data across container replacement | Back them up before updates or configuration changes |
| Localtonet client | Creates the outbound connection used for optional remote access | Run it on a supported device that can reach the Dawarich endpoint |
A location archive can reveal homes, workplaces, routines, travel patterns, and family activity. Limit DSM and shared-folder permissions, protect backups, keep secrets out of screenshots and support posts, and expose the application only after changing its default credentials. A public URL does not replace Dawarich authentication.
Prepare Synology DSM and the project folders
The following sequence follows the documented Synology installation route. Menu names can vary slightly with DSM updates, but the core order should remain the same: install the packages, create restricted storage, create the Dawarich directories, then place the current templates in the project root.
Install Container Manager
Sign in to the Synology DSM web interface, open Package Center, search for Container Manager in the open-source section, and install it. If Container Manager is unavailable, confirm whether the NAS model and installed DSM version support it before continuing.
Install Web Station
In Package Center, locate and install Web Station. The official Synology workflow uses it to create a portal for the Dawarich container project.
Create an optional Docker shared folder
If you do not already have a dedicated share for container projects, open Control Panel, choose Shared Folder, select Create, and create a share such as docker. The documented workflow recommends hiding it from “My Network Places,” granting your administrative user read and write access, and denying unrelated users. If an appropriate project share already exists, reuse it instead of creating another.
Create the Dawarich project root
Open the selected Docker root in File Station, create a folder named dawarich, and open it. This directory will hold the Compose file, environment file, and persistent subdirectories.
Create the persistent subdirectories
Inside the Dawarich root, create folders named redis, db_data, db_shared, app_storage, and public. Preserve these names because the current Synology template expects the corresponding storage paths.
Download the current Synology templates
Download docker-compose.yml and synology.env from the current official Dawarich Synology installation guide and place both files in the Dawarich root. Rename synology.env to .env, retaining the leading dot. If the browser opens a template as text, use its save-link function and preserve the intended filename.
These templates are intended for a new production-mode installation. Do not replace the configuration of an existing deployment with fresh templates. An existing installation should retain its current environment settings, secrets, and storage paths and should follow Dawarich's update procedure instead.
At the end of preparation, the project root should contain the following entries:
dawarich/
├── .env
├── docker-compose.yml
├── redis/
├── db_data/
├── db_shared/
├── app_storage/
└── public/
Treat this as a structural check, not as permission to create alternative Compose content. Use the current upstream templates because container definitions and required settings can change as Dawarich develops.
Configure and install Dawarich in Container Manager
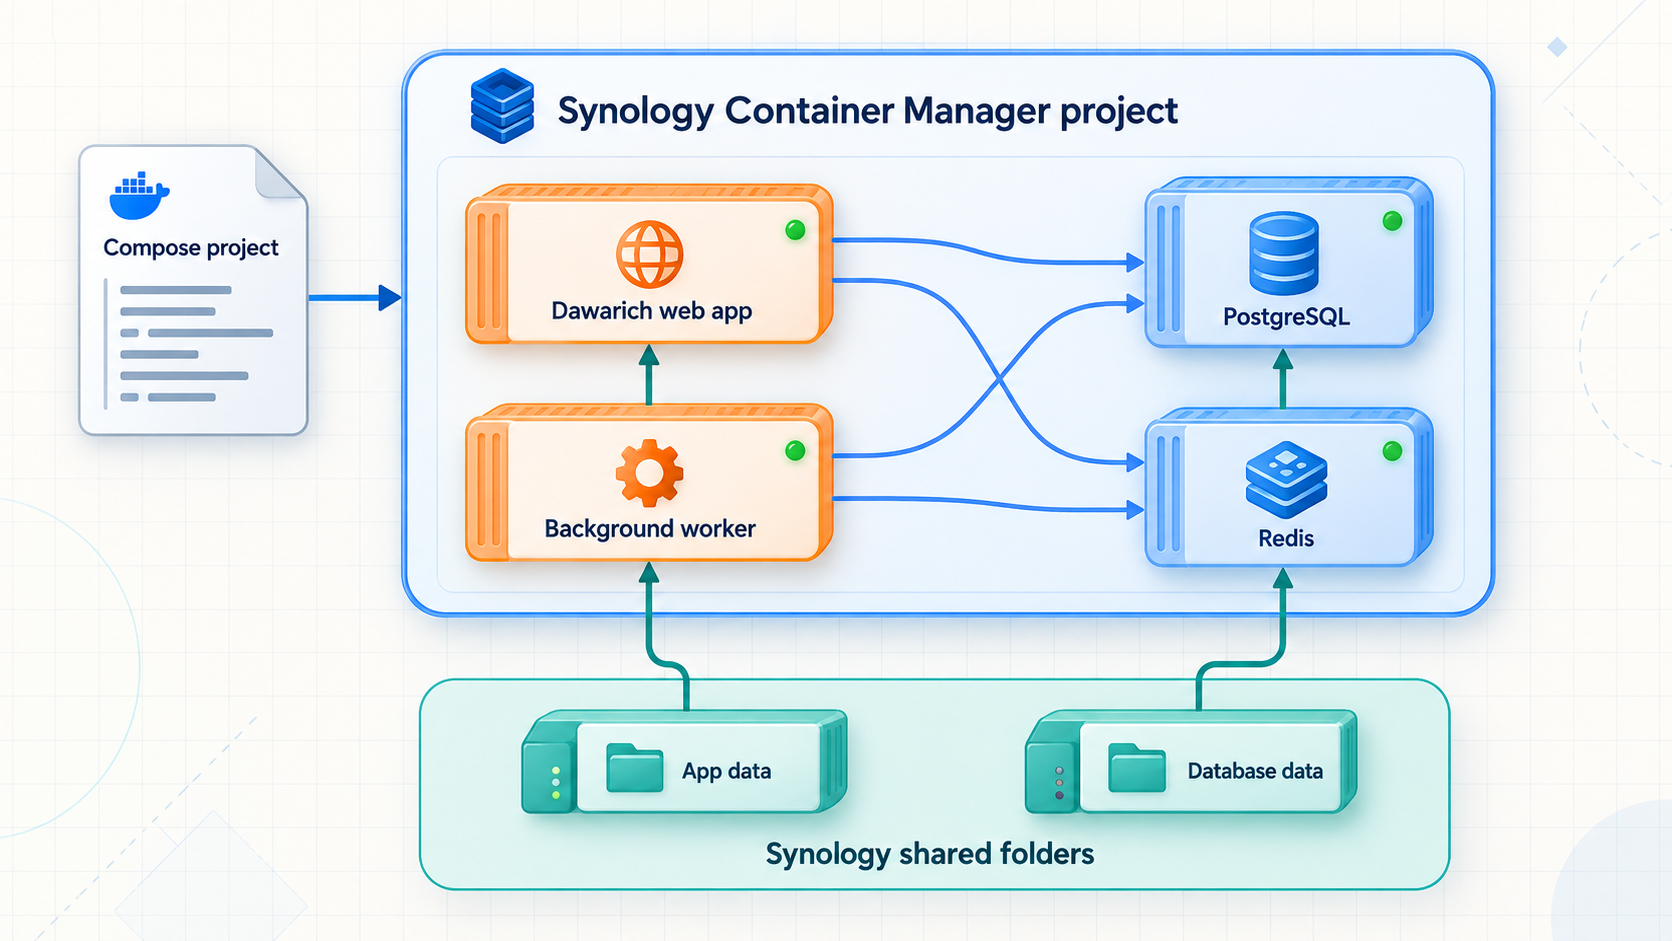
With the files in place, create the project without immediately starting it. This gives you time to finish the Web Station portal and edit the environment values before the first application launch.
Create a Container Manager project
Open Container Manager, go to Projects, and select Create. Enter a project name and set the project path to the Dawarich root folder. When DSM detects the existing Compose file, choose the option to use the existing docker-compose.yml.
Enable the Web Station portal setup
Continue to the next screen and enable “Set up web portal via Web Station.” Select the Dawarich container, its configured web port, and HTTP as the container protocol. The official Synology instructions do not establish one universal DSM portal port for every installation, so use the values presented by the current Compose project rather than guessing.
Create the project without starting it
On the project creation screen, clear “Start the project once it is created,” finish the wizard, and acknowledge the prompt that opens Web Station. Delaying startup prevents Dawarich from initializing with placeholder secrets or an incomplete hostname configuration.
Create the name-based Web Station portal
In the Web Station Portal Creation Wizard, select a name-based portal and enter the local hostname you intend to use. The official example is dawarich.my-syno.com. Configure the portal's HTTPS and HSTS options only in accordance with the certificate and hostname configuration already present in DSM, then create the portal.
Configure local DNS
Add a record on your local DNS server that maps the chosen Dawarich hostname to the Synology LAN IP address. A suitable wildcard record can also work when your network is intentionally configured for it. If Synology DNS is used, ensure that clients receive that DNS server through DHCP or their local network settings. Confirm the NAS address in DSM under Control Panel, Network, Network Interface.
Edit the environment file
Open .env with a trusted text editor. Set APPLICATION_HOSTS to the Web Station hostname. Multiple allowed hosts can be separated with commas. Set TIME_ZONE to your current time zone, and choose a strong DATABASE_PASSWORD. You may also change DATABASE_USERNAME and DATABASE_NAME before the first start.
Generate and preserve the application secret
On a trusted computer with OpenSSL, generate a secret with the documented command below. Paste the generated value after SECRET_KEY_BASE= in .env. Do not publish it, and preserve it for future restarts and upgrades.
Review fixed service settings and save
Leave RAILS_ENV=production, DATABASE_HOST=dawarich_db, and REDIS_URL=redis://dawarich_redis:6379 as provided by the official Synology template. Save the file, return to the project, and review the YAML Configurations tab before building.
Build and start Dawarich
Open Container Manager, Projects, and your Dawarich project. Select Action and then Build. Wait until DSM reports completion, then allow several additional minutes for the database, application, Redis, and background services to initialize.
openssl rand -hex 64
Generate this value once for the installation, store it securely, and keep the same value through routine restarts and upgrades. Do not paste the resulting secret into tickets, screenshots, public repositories, or tunnel configuration. The command belongs on a trusted computer, and only the resulting private value belongs in the protected .env file.
The generic Dawarich Docker workflow can also be started from a cloned repository with the following command:
docker compose -f docker/docker-compose.yml up
That generic workflow documents http://localhost:3000 as the local address and uses Ctrl+C to stop an attached Compose process. For the Synology installation in this guide, use Container Manager and the Web Station portal rather than mixing the repository command into the DSM project. Port 3000 is useful as a known application reference, but the actual endpoint used by another LAN device must match the Synology project's published port and network configuration.
Verify Dawarich locally before remote access
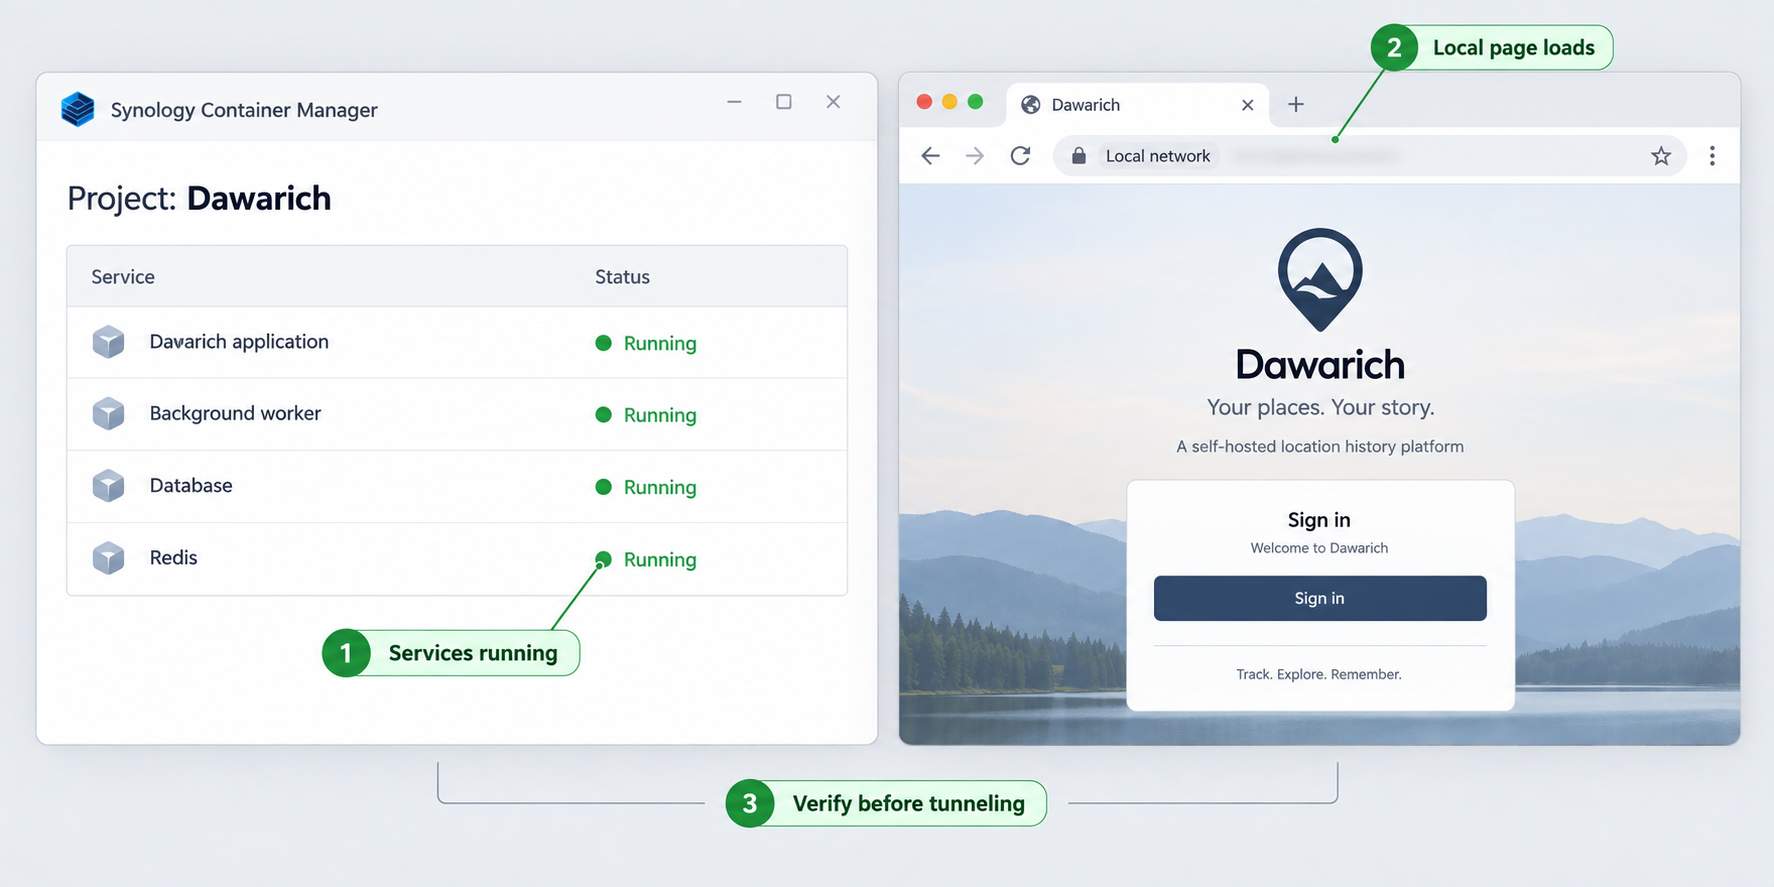
Open the hostname configured in Web Station, such as https://dawarich.my-syno.com. The name must resolve to the NAS from the testing device, the portal must route to the correct container and port, and the application must allow the hostname through APPLICATION_HOSTS.
A successful page load is only the first check. Sign in using the initial account, immediately change its password in account settings, and confirm that the application remains usable after a page refresh. The documented default credentials for a new installation are:
- Username:
demo@dawarich.app - Password:
safepassword
The initial credentials are publicly documented and provide no meaningful protection once an instance is reachable by untrusted users. Change them during local verification. If the application supports additional account or registration controls in your installed version, review those settings before exposure as well.
Local verification checklist
- Container Manager shows the expected project services running rather than repeatedly restarting.
- The selected local hostname resolves to the NAS LAN address.
- The browser reaches the expected Dawarich page through Web Station.
- The hostname appears in
APPLICATION_HOSTSwith no spelling mismatch. - You can sign in and replace the documented default password.
- A browser refresh and a fresh private browsing session still reach the login page.
- The project remains available after a controlled restart from Container Manager.
- The persistent folders remain present and are included in the backup plan.
For a first functional test, use a small, disposable sample rather than immediately importing the only copy of a large location archive. Verify that the expected map or import workflow works, then confirm that the data remains after restarting the project. Keep the original location export even after a successful import. Dawarich's own project guidance warns users not to delete original source data after importing it.
If you intend to send live updates from a mobile application, finish the web installation and account security first. Dawarich documents support for its iOS and Android clients as well as Dawarich Community, Overland, OwnTracks, GPSLogger, PhoneTrack, and Home Assistant. Client-specific endpoint paths, authentication details, and payload settings can vary, so use the instructions for the selected client and installed Dawarich version rather than guessing them from the browser URL.
Backups, updates, imports, and routine operation
Dawarich is under active development. Its project guidance explicitly warns against automatic updates because releases can include breaking changes. Read the release notes before every upgrade and back up the deployment first. A generic container updater that silently replaces images can leave configuration, database, or migration problems undiscovered until the application is needed.
Build a backup around persistent state
At minimum, protect the Compose configuration, private .env file, and all persistent folders used by the project. A backup should be restorable, not merely present. Periodically test recovery in an isolated environment or through another documented method appropriate for your NAS backup tooling.
Be especially careful with database consistency. Copying files while a database is actively writing can produce an unusable snapshot depending on the backup method. The supplied installation evidence does not define one universal live-database backup command for every Dawarich release, so follow the current Dawarich backup guidance and the behavior of your chosen Synology backup tool. Do not invent a database dump command based on assumptions about a template that may have changed.
Use a controlled update process
- Read the release notes for every version between the installed and target versions.
- Confirm that the target version has no new required environment variables or storage changes.
- Back up the database, persistent directories, Compose file, and
.env. - Keep the existing secrets and storage paths rather than replacing them with new-installation templates.
- Apply the current official update procedure.
- Watch project logs and container state during startup.
- Repeat the local login, map, import, and persistence checks before reopening remote access.
Creating a Localtonet tunnel does not make it permanently active. You can stop it while backing up, upgrading, repairing, or validating Dawarich, then start it again after local verification. This reduces unnecessary exposure while the application is in a transitional state.
Understand what can be imported and exported
| Data path | Examples documented by Dawarich | Operational advice |
|---|---|---|
| Historical imports | Google Maps Timeline, GPX, GeoJSON, Strava, OwnTracks | Retain the original archive and test with a small input first |
| Photo integrations | Immich, PhotoPrism, and photo EXIF data | Use dedicated credentials where available and protect integration secrets |
| Live tracking | Dawarich mobile apps, Overland, OwnTracks, GPSLogger, PhoneTrack, Home Assistant | Follow the selected client's current endpoint and authentication instructions |
| Exports | GeoJSON and GPX | Keep periodic independent exports in addition to infrastructure backups |
Connect the working Dawarich service with Localtonet
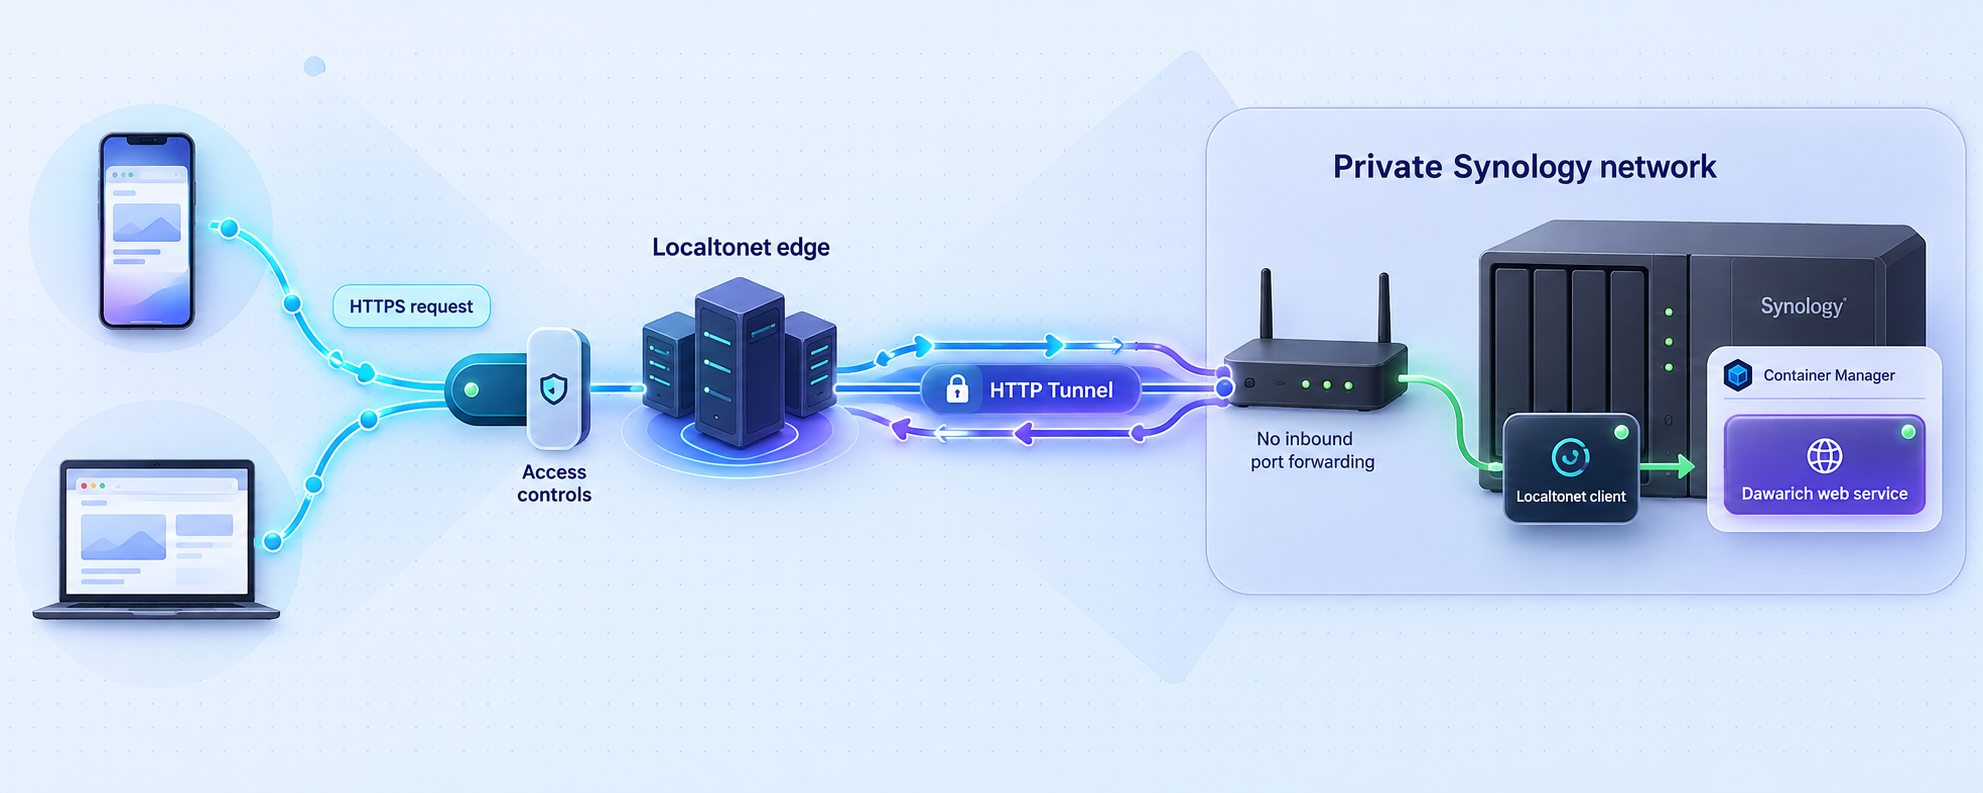
After local verification, Localtonet can expose the Dawarich web service through an HTTP tunnel. Our client creates an outbound connection to a Localtonet relay server, so the workflow does not require inbound router port forwarding, a public IP address, firewall changes, or VPN setup. The resulting tunnel provides a public URL and remains available only while the selected client device is connected and the tunnel is running.
Place the Localtonet client on a supported device that can reach Dawarich over the local network. That might be the service host when a current client build supports the host environment, or another always-on device on the same LAN. We do not claim Synology package availability here because the supplied product context does not establish a native DSM installation path. Check our current download options and use a supported device rather than attempting an undocumented NAS installation.
From the Localtonet client device, test the exact target you plan to enter. If the client runs elsewhere on the LAN, localhost refers to that client device, not to the Synology NAS. In that arrangement, use the NAS LAN IP address and the actual HTTP port reachable from the client. Do not assume port 3000 is exposed to the LAN merely because it is Dawarich's documented generic local port.
Install and run the Localtonet client
Install our current client on a supported device that can reach the verified Dawarich HTTP endpoint. Keep the device online for as long as remote access is needed.
Authenticate or select the client device
Use the device-specific authentication token through the supported client workflow, then select that device in the dashboard. Never copy the token into an article, screenshot, public Compose file, or Dawarich environment file.
Select an available relay server
Choose a currently available Localtonet relay server or region from the dashboard. Availability can vary, so obtain the current value from the product rather than copying a server code from an old tutorial.
Create an HTTP tunnel to Dawarich
Create an HTTP tunnel and set its local target to the IP address and port that the Localtonet client can use to reach Dawarich. Select the required process type, such as a generated random subdomain, a supported selected subdomain, or a custom domain. These process types serve the same application at a public HTTPS address. If using a custom domain, follow the current DNS instructions instead of assuming a record type or destination.
Start and verify the tunnel
Creating the configuration does not start it. Select Start, open the assigned public HTTPS URL, and verify that it displays the expected Dawarich login page. Test with a fresh browser session, sign in using the changed credentials, and stop or delete the tunnel when it is no longer required.
For the current dashboard sequence, consult our Localtonet HTTP tunnel documentation. The dashboard is the authoritative source for current relay choices and fields that may change over time.
Dawarich remote access requires the intended web endpoint. Do not create tunnels to the internal PostgreSQL or Redis services, and do not publish Container Manager or DSM administration merely to reach the application. Expose the smallest necessary surface and keep infrastructure interfaces private.
Which address should be the local target?
| Client location | Potential target host | What to verify |
|---|---|---|
| Same host as the application endpoint | 127.0.0.1 or another locally bound address |
The Dawarich page must open from that host on the chosen port |
| Another device on the Synology LAN | The Synology LAN IP address | The port must be published and reachable from the client device |
| Through a local Web Station hostname | The address resolved by local DNS | The hostname, protocol, port, certificate handling, and application host allowance must all align |
A successful Localtonet connection and a failed public page usually indicate that the tunnel is running but cannot reach its local target, or that Dawarich rejects the requested hostname. Test the target from the client device itself. If only the local Web Station hostname works, check whether the public hostname must be included in Dawarich's allowed host configuration. Exact host-handling requirements can change with Dawarich releases, so inspect the current application documentation and logs rather than disabling host checks broadly.
Security practices for a public Dawarich instance
Remote access changes the threat model. A LAN-only login page becomes reachable from the public internet, and Dawarich contains unusually sensitive information. Use application authentication, unique credentials, current software, least-privilege file permissions, and controlled tunnel lifecycle management together.
Run a release that includes relevant security fixes
Dawarich release 1.14.5 fixed a self-hosted registration bypass affecting versions 1.7.1 through 1.14.4. On affected installations, a person who could reach the instance could create an active account through the mobile registration endpoint even when email and password registration was disabled. The release also corrected family invitation behavior.
Do not interpret version 1.14.5 as a permanent recommendation or assume it remains current. It is the documented version containing that specific fix. Review the latest available release notes and deploy an appropriate maintained version that includes this and subsequent security corrections. If upgrading from an affected installation that was internet-accessible, inspect Settings, Users for unrecognized accounts and remove any that should not exist.
Confirm that every Dawarich account is expected, disable unwanted registration paths where supported, and inspect the user list after upgrades. If an older affected version was ever public, changing the administrator password alone is not enough because an unauthorized account may already have been created.
Apply least privilege throughout the stack
- Grant shared-folder access only to administrators and service identities that require it.
- Keep
.env, database credentials, andSECRET_KEY_BASEprivate. - Do not place Localtonet authentication tokens inside the Dawarich project.
- Expose only the HTTP application endpoint, not DSM, PostgreSQL, Redis, or internal management ports.
- Stop the tunnel when continuous remote access is unnecessary.
- Review application users, family sharing, mobile integrations, and imported data periodically.
- Protect NAS and export backups with access controls appropriate for location data.
- Read release notes before updates and avoid unattended image replacement.
Localtonet provides the public connectivity path, but Dawarich remains responsible for authenticating its users and enforcing its application permissions. Tunneling should not be described as bypassing authorization or network policy. Only expose a service when you administer both the service and the network and are authorized to make it remotely accessible.
Troubleshooting Synology and Localtonet connectivity
The Container Manager build fails
Recheck that docker-compose.yml and .env are in the project root and that the environment file was not accidentally saved as synology.env, .env.txt, or another browser-generated name. Confirm that all five persistent directories exist. Then review the project build output for the first concrete error instead of repeatedly rebuilding without changing anything.
Containers start and then restart repeatedly
Inspect the project logs for database authentication, missing secret, storage permission, or service-name errors. Verify that the configured database password is consistent and that the provided values for DATABASE_HOST and REDIS_URL were not changed. Check folder permissions and confirm that the current template matches a new installation rather than an older project layout.
The local hostname does not resolve
Query or inspect DNS from the same client that is opening Dawarich. The hostname should resolve to the NAS LAN address. If it does not, correct the local DNS record and verify that DHCP supplied the intended DNS server. A portal configuration in Web Station does not automatically update every client's resolver.
Web Station responds, but Dawarich rejects the host
Compare the browser hostname with APPLICATION_HOSTS. Check spelling, punctuation, and comma-separated entries. If you later add a public hostname, determine whether that hostname also needs to be allowed by the installed release. Avoid broad wildcard host settings merely to suppress an error.
The local page works, but the public URL does not
Confirm that the Localtonet tunnel is actually started and that its selected device remains connected. From the Localtonet client device, open or otherwise test the exact local IP address and port entered in the tunnel. If that fails, repair LAN reachability or the Synology port mapping first. Remember that localhost on another computer does not refer to the NAS.
The tunnel opens the wrong site
A name-based Web Station portal may route requests according to the HTTP host. Check the selected local target and how Web Station distinguishes portals. Also confirm that the tunnel is not pointing to a general DSM or Web Station listener that needs a different hostname. Do not expose DSM as a workaround. Use a dedicated reachable application endpoint or a correctly configured host route.
The page loads, but mobile tracking fails
Browser access proves only that the web page is reachable. A tracking client may require a specific API endpoint, account token, payload format, or permission. Follow Dawarich's current instructions for the exact mobile client. Check the application logs and client error without sharing credentials or location payloads publicly.
An update causes startup or data problems
Stop remote access, preserve the current state, and review the release notes for migration or configuration requirements. Do not overwrite .env with a new-installation template and do not delete persistent directories in an attempt to force a clean start. Restore only from a verified backup and follow the current Dawarich recovery guidance for the installed database layout.
Frequently asked questions
Can Dawarich be installed without Docker on Synology?
The current Dawarich installation documentation identifies Docker as the supported self-hosting method. On Synology, the documented workflow uses Container Manager, Docker Compose, and Web Station. This guide does not recommend an undocumented native package installation.
Which port should I use for the Localtonet HTTP tunnel?
Use the actual HTTP port through which the Localtonet client can reach Dawarich. The generic Docker instructions document http://localhost:3000, but a Synology project may publish or route that service through a different Web Station configuration. Test the exact IP address and port from the client device before creating the tunnel.
Does Localtonet require router port forwarding or a public IP address?
No. Our client establishes an outbound connection to a Localtonet relay server. The HTTP tunnel can provide a public URL without inbound router port forwarding, firewall changes, VPN setup, or a public IP address. The tunnel is available only while the selected client is connected and the tunnel is running.
Can the Localtonet client run directly on every Synology NAS?
This guide does not claim universal native DSM support because that is not established by the supplied product information. Use a current supported Localtonet client environment. The client may run on another always-on device that can reach the Synology service over the LAN.
Should I expose PostgreSQL or Redis for Dawarich?
No. Remote browser and supported client access should use the intended Dawarich web application endpoint. Keep PostgreSQL, Redis, Container Manager, and DSM administration private unless a separately documented and secured administrative requirement exists.
Can I leave the default Dawarich credentials in place?
No. The default username and password are publicly documented. Use them only for the first local login, then change the password before making the instance available through Localtonet or any other public access path.
Is it safe to update Dawarich automatically?
Dawarich's project guidance says not to update automatically. It is under active development and releases may contain breaking changes. Read release notes, preserve the existing environment and storage paths, create a verified backup, and perform a controlled update followed by local testing.
Do I still need backups if Dawarich runs in persistent Docker volumes?
Yes. Persistence allows data to survive ordinary container replacement, but it does not protect against disk failure, accidental deletion, database corruption, faulty updates, or lost secrets. Back up the persistent data, Compose file, and private environment configuration, and retain original source archives after imports.
Connect your verified Dawarich service with Localtonet
Once Dawarich works locally, run our client on a supported device that can reach the Synology endpoint, create an HTTP tunnel, and start it when remote access is needed. Keep application authentication enabled, protect your location data, and stop the tunnel during maintenance or whenever public availability is unnecessary.
Get Started Free →

