

Build a private client file portal first, then make the verified web service remotely reachable
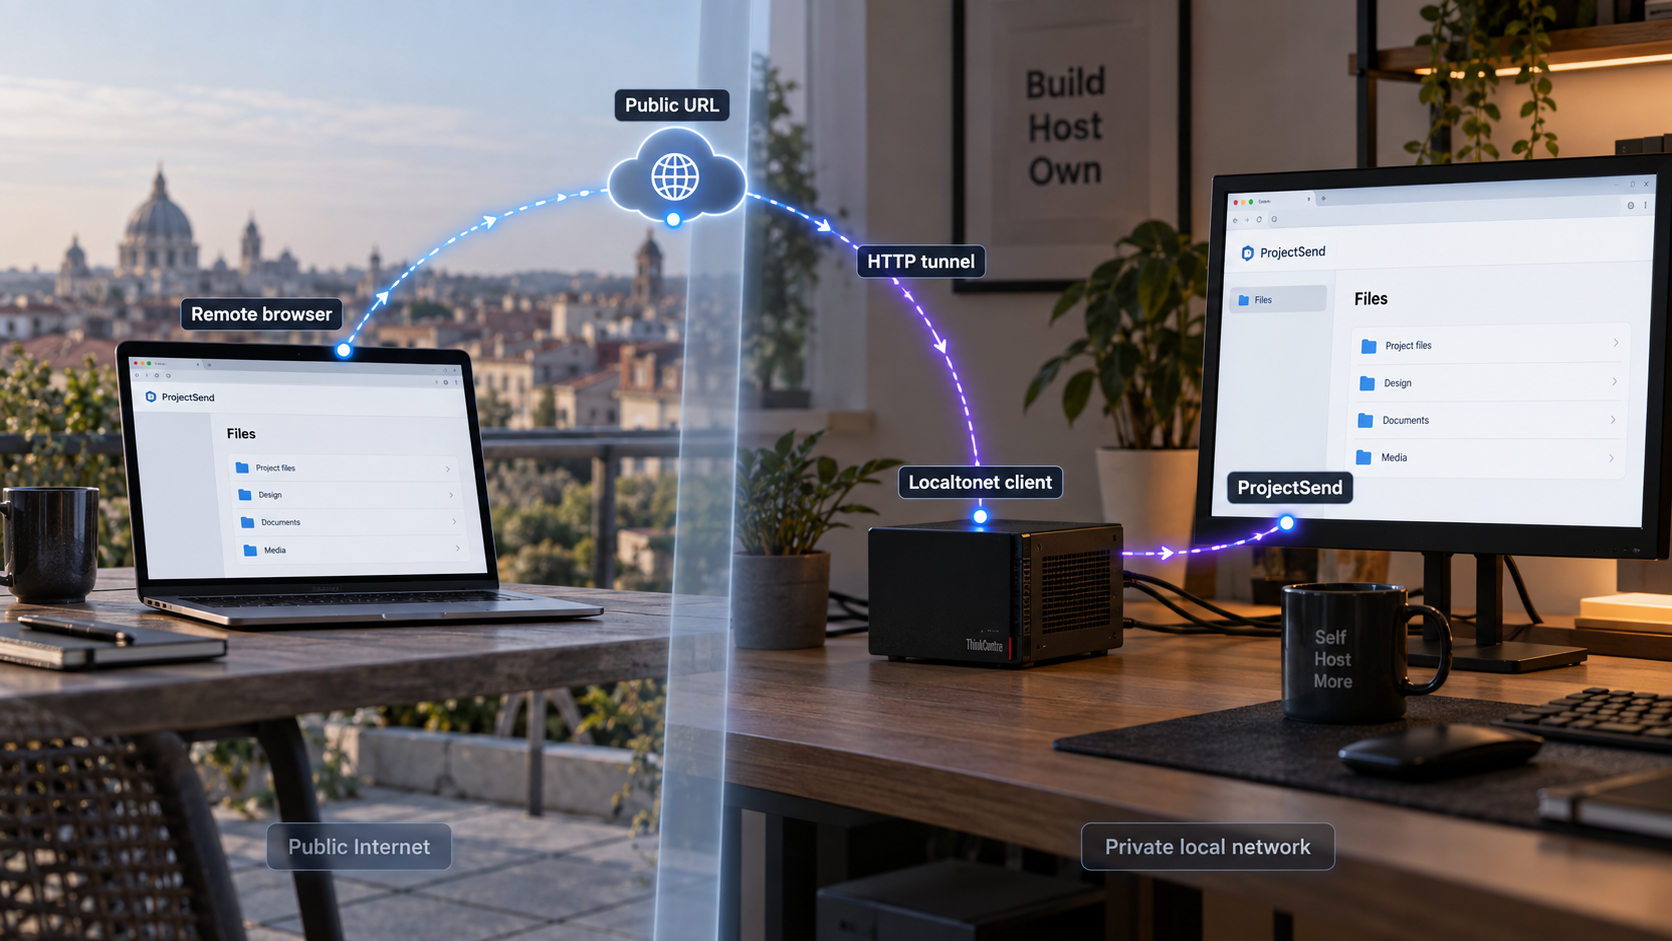
ProjectSend is a self-hosted web application for sharing files with clients through individual accounts and private client pages. This guide focuses on its release ZIP installation path for an nginx server, including prerequisites, environment planning, database preparation, background processing, local verification, updates and troubleshooting. After the portal works locally, we will connect its HTTP endpoint to Localtonet without requiring inbound router port forwarding, firewall changes, a VPN or a public IP address. Exact ports, paths and credentials remain deployment-specific, so the workflow shows how to identify them rather than assuming defaults.
📋 What's in this guide
Understand the ProjectSend deployment before installing it
ProjectSend is designed around a client portal rather than a simple public download directory. Administrators upload and organize files, decide which clients or groups may see them and review activity. Each client signs in to a private area that displays the material assigned to that account. Depending on how the administrator configures the application, ProjectSend can also support client uploads, comments, file expiration, download limits, storage quotas, roles, permissions and two-factor authentication.
A release ZIP installation is the non-Docker path. The published release archive includes the application dependencies and compiled frontend needed to run ProjectSend, so the production server does not need Composer or npm merely to install that archive. This is different from cloning the source repository. A repository clone is a development copy whose dependencies and compiled frontend are deliberately not included, and it therefore requires a development build process.
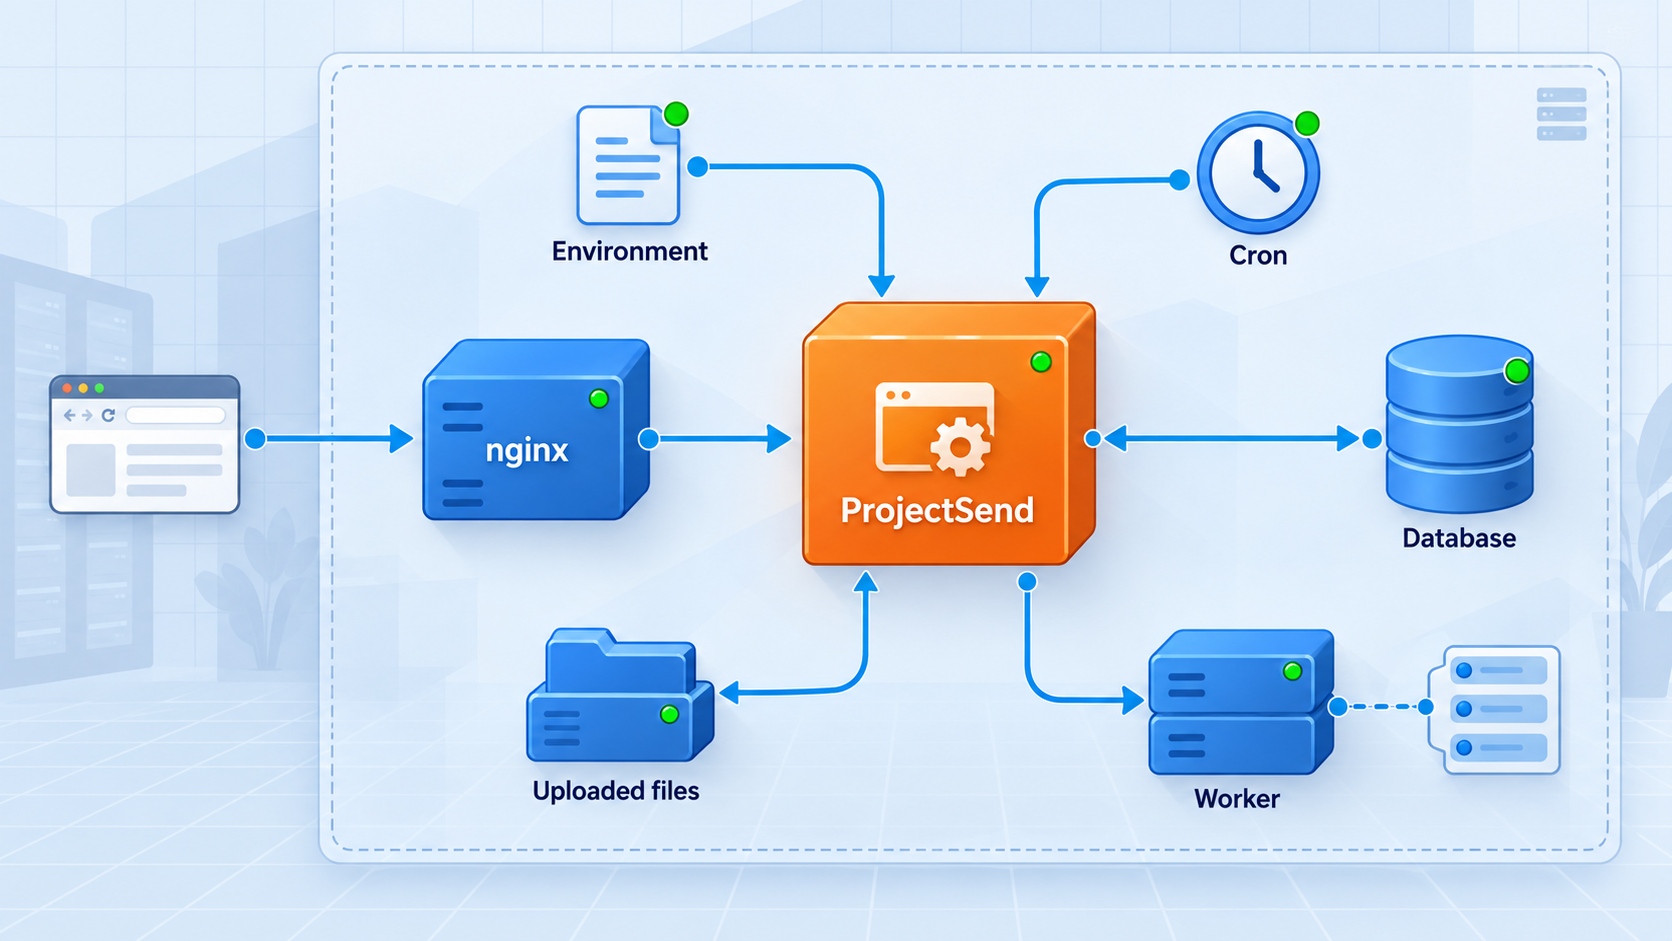
The ZIP path is intended for a server where you have shell access and can configure nginx, PHP-FPM, PHP on the command line, a MySQL database, a background worker and scheduled jobs. It is not an FTP-only installation. You must be able to set permissions, create or edit the application environment, configure the web server, run application commands and supervise recurring processes.
ZIP installation compared with the recommended Docker path
ProjectSend recommends Docker Compose as its quickest installation path because the official image packages the application and its dependencies, while the Compose configuration wires together the supporting services. The release ZIP remains appropriate when Docker is unavailable or when you deliberately want to manage nginx, PHP-FPM, MySQL and process supervision yourself.
| Installation path | Best suited to | What you manage |
|---|---|---|
| Official Docker image | Readers who want the recommended and quickest production path | Compose configuration, passwords, APP_URL, persistent data, backups and container updates |
| Release ZIP | Servers where Docker is unavailable or an existing nginx and PHP stack is preferred | nginx, PHP-FPM, PHP CLI, MySQL, application files, permissions, worker, cron, backups and updates |
| Repository clone | ProjectSend development and contribution work | Development dependencies, Composer installation, npm tooling, frontend compilation and development workflow |
ProjectSend does not establish one universal hostname, port or URL scheme for ZIP installations. Those values come from your nginx and network configuration. Record the actual listener and APP_URL used by your server because the Localtonet target must be based on the working deployment, not on a guessed default.
Check the release ZIP prerequisites
For the current ProjectSend 2 release line described by the approved evidence, the non-Docker server requirements are PHP 8.4 or newer for both CLI and PHP-FPM, MySQL 8.0 or newer, nginx with PHP-FPM and shell access. Redis is optional. Resource requirements, supported operating-system distributions, the complete PHP extension list and exact package names are not established by the supplied evidence, so they should not be guessed. Package names also differ across Linux distributions.
Before downloading anything, confirm that your server can provide each role in the following table. Running a web server alone is not enough. PHP CLI is needed for application commands, while PHP-FPM executes web requests forwarded by nginx. The database must be reachable from the application, and long-running or scheduled work must continue after you close your shell session.
| Requirement | Minimum established by the project | Why it matters |
|---|---|---|
| PHP CLI and PHP-FPM | PHP 8.4 or newer | PHP-FPM handles web requests, while CLI supports application maintenance and background tasks. |
| Database | MySQL 8.0 or newer | Stores application state, accounts and configuration. |
| Web server | nginx connected to PHP-FPM | Serves the public application directory and forwards PHP requests. |
| Shell access | Required for ZIP installation | Needed to extract files, configure the environment, set permissions and manage application processes. |
| Background worker | Must be configured according to the release documentation | Processes queued work outside the request and response cycle. |
| Cron or scheduler integration | Must be configured according to the release documentation | Runs recurring application tasks on schedule. |
| Redis | Optional | May be included when appropriate for the chosen deployment, but is not a mandatory prerequisite. |
Prepare deployment-specific values
Decide these values before editing the environment file:
- The server directory that will contain the extracted release.
- The operating-system user and group that will run nginx and PHP-FPM.
- The MySQL host, database name, application username and a unique password.
- The nginx listening address and port.
- The initial APP_URL that you will use for local or LAN verification.
- The durable location for uploaded files and any other persistent data identified by the release documentation.
- The process-management method for keeping the background worker running.
- The system scheduler account that will execute ProjectSend's recurring task.
- The backup destinations and retention policy for the database, uploads and configuration.
Treat the database password, mail credentials, storage credentials and any application secret as sensitive. Do not paste them into support tickets, screenshots, source-control repositories or tunnel configuration. A Localtonet device authentication token is also sensitive and device-specific.
The supplied evidence confirms that the official INSTALL.md covers requirements, the environment file, nginx, the worker, cron, updates and troubleshooting, but it does not expose the exact directives or commands from that file. Versions may change those details. Follow the INSTALL.md included with the release you downloaded for exact PHP extensions, writable directories, application commands, nginx rules, worker invocation and cron expression. Do not copy commands from another ProjectSend generation or invent framework commands.
Install ProjectSend from an official release ZIP
The safe installation sequence is to choose a stable release, verify the archive, extract it into a controlled server directory and then apply the exact release-specific configuration. Do not use a source-code snapshot as a substitute for the packaged release ZIP. A source snapshot may omit built dependencies and compiled assets that the release archive includes.
Select the stable ProjectSend release
Use the official ProjectSend release or download page and choose the stable release intended for production. Read its release notes before installation. Avoid hardcoding a version from this article because a newer stable release may be available when you deploy.
Download the packaged release ZIP and checksum
Obtain the actual release archive rather than a repository clone or automatically generated source snapshot. Retrieve the checksum published for that same archive. Keep the archive outside the live web directory until verification is complete.
Verify the archive before extracting it
Calculate the ZIP file's SHA-256 digest with a trusted tool available on your operating system and compare the complete value with the checksum published for that release. Stop if any character differs. Do not install an archive whose integrity cannot be confirmed.
Extract the release into its deployment directory
Create a dedicated application directory and extract the archive there. Preserve the packaged directory structure. Do not expose the entire extracted tree blindly through nginx because the correct public document root must come from the release's INSTALL.md.
Review the bundled installation and update instructions
Read the included INSTALL.md before changing files. Also identify UPDATE.md for future upgrades. Confirm the required PHP extensions, environment-file procedure, public document root, writable locations, worker command and scheduler command for this exact version.
Check the extracted ownership and permissions before proceeding. Application code should not be broadly writable merely to avoid permission errors. Only the directories explicitly identified as writable by ProjectSend should receive write access from the relevant runtime account. Because the exact writable paths are version-specific and not present in the supplied evidence, this guide intentionally does not name them.
Keep the unmodified release archive and its verified checksum until the installation has passed local testing. This gives you a known-good reference if a file is accidentally changed during setup. It does not replace a backup after the application begins storing real data.
Configure the database, environment, nginx, worker and cron
Create a dedicated MySQL database identity
Create a database for ProjectSend and a dedicated MySQL account that has the permissions required by the application's installation and runtime process. Do not reuse a database administrator account for normal operation. Record the database host, port if it differs from your environment's standard service configuration, database name, username and password in a secure password manager.
Connectivity must be evaluated from the PHP runtime's point of view. A database reachable from your interactive shell is not necessarily reachable by PHP-FPM if the services run in different namespaces, containers or hosts. For a conventional same-server ZIP deployment, keep the database bound as narrowly as practical instead of exposing it publicly.
Create the application environment
Use the environment template and procedure from the release's INSTALL.md to create the active environment file. Populate the database connection and APP_URL along with every other required value documented for that version. Do not publish the environment file through nginx, commit it to a repository or include it in a downloadable backup stored inside the web root.
APP_URL is important because it describes the address through which ProjectSend expects to be reached. For the first verification pass, use the URL represented by your actual nginx listener and local naming configuration. The supplied evidence does not establish whether a particular ProjectSend version automatically accepts a later Localtonet hostname or requires APP_URL to be changed when the public hostname becomes canonical. Test redirects, generated links, assets, sign-in and download behavior after adding remote access. If the application redirects clients back to the private address, align APP_URL with the intended public address according to that release's documentation.
Generate required secrets using the ProjectSend release's documented mechanism. Do not use example values, placeholder passwords or content copied from another installation. Do not place database credentials, SMTP credentials, storage keys or Localtonet device tokens in nginx files that might be served to visitors.
Configure nginx and PHP-FPM
Configure an nginx server block using the public document root and request-routing rules supplied by the ProjectSend release. Connect PHP requests to the PHP 8.4 or newer PHP-FPM service you installed. The exact FastCGI socket or network address depends on the operating system and PHP packaging, so it cannot safely be specified as a universal value.
The listener may be bound to a loopback address when both the browser tests and Localtonet client run on the same machine. It may instead be bound to a private LAN interface when the Localtonet client runs on another device. Choose deliberately:
- Loopback listener: minimizes local network exposure, but only software on the ProjectSend host can connect to it.
- Private-interface listener: permits access from selected LAN devices, including a separate Localtonet client, but should be protected by host firewall rules and network policy.
- All-interface listener: may expose the portal more broadly than intended and should not be used merely as a troubleshooting shortcut.
Validate nginx configuration with the operating system's supported method before reloading it. Confirm that the configured PHP-FPM service exists and is running. A mismatch between the nginx FastCGI destination and the actual PHP-FPM socket is a common cause of gateway errors.
Install the background worker as a managed service
Use the exact worker command given in the bundled INSTALL.md. Run it under the intended restricted application account and supervise it with the process manager used by your server. A manually started process attached to an SSH session is not a durable production worker because it may stop when the session ends or the server restarts.
Configure restart behavior and logs so that failures are visible. After starting the worker, verify that the process remains active and can access the same environment, database and writable storage as the web application. Do not run it as a privileged user merely to work around ownership problems.
Configure the scheduled task
Add the exact ProjectSend scheduler command and timing documented for the release to the system's scheduling service. Use absolute paths where the project documentation requires them, and run the job under the documented account. Confirm that PHP CLI is version 8.4 or newer. On systems with multiple PHP versions, the PHP executable used by the shell can differ from the one used by PHP-FPM.
Capture scheduler errors somewhere administrators will review. A cron entry can exist while silently failing because of a missing working directory, a limited PATH, the wrong PHP executable, unreadable application files or an inaccessible environment file.
Complete the browser setup
Open the configured APP_URL after nginx, PHP-FPM and MySQL are ready. A new installation should present the first-run setup screen, which creates the administrator account. Use a unique administrator email address and a strong password. Complete this step from a trusted local or private connection before opening remote access.
Do not intentionally leave an uninitialized setup screen available at a public URL. Create the administrator account locally, sign in and confirm the installation state first. Recent ProjectSend releases include protection against two simultaneous first-run requests both becoming administrators, but local initialization is still the safer operational sequence.
Verify the ProjectSend portal locally
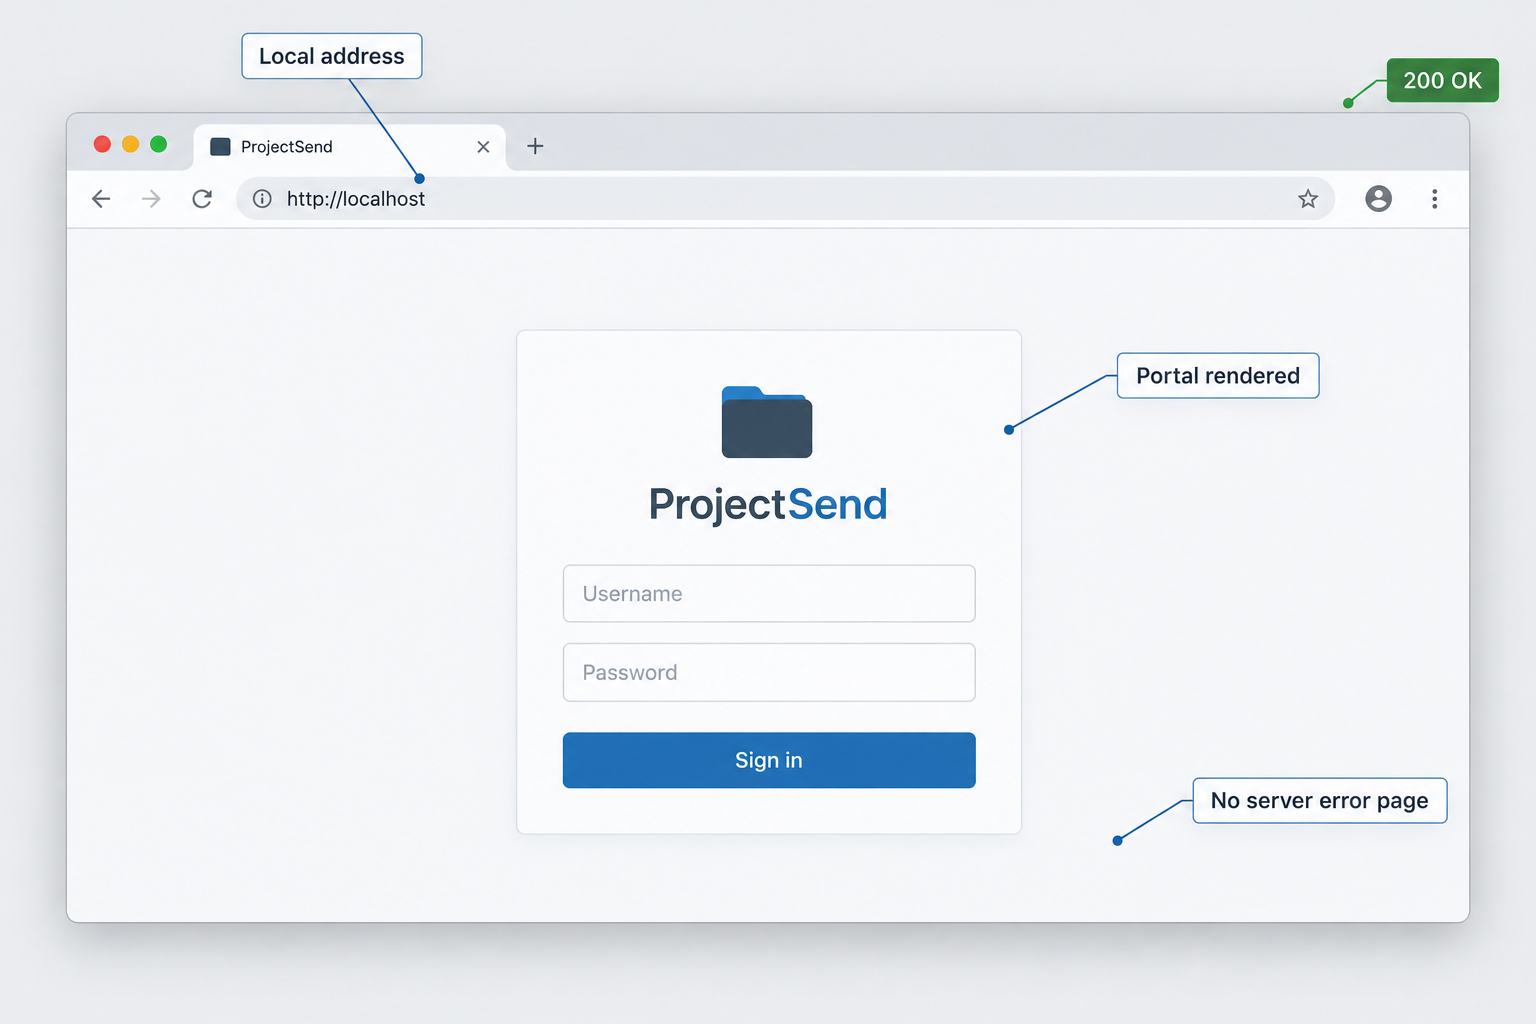
Local verification separates application problems from tunnel problems. If ProjectSend does not work through its nginx listener before Localtonet is introduced, adding a public address will not repair the underlying database, PHP, worker or permission issue.
Open the exact APP_URL
Use a browser from a device that can reach the nginx listener. Confirm that the setup or sign-in page loads without a gateway error, redirect loop, missing stylesheet or mixed hostname.
Sign in as the administrator
Verify that the administrator account created during setup can authenticate and that the management interface loads correctly.
Create a non-administrator test client
Use a dedicated test identity rather than a real customer. This allows you to inspect the client experience and verify access boundaries before storing production material.
Upload and assign a harmless test file
Add a small non-sensitive file and assign it only to the test client. Verify that upload processing finishes and that the file appears in the expected administrative view.
Test the client portal separately
Sign out or use a private browser session, authenticate as the test client and confirm that the assigned file is visible and downloadable. Verify that unrelated administrative areas are not available.
Check worker, scheduler and server logs
Review ProjectSend, nginx, PHP-FPM, worker and scheduler output for errors produced during the test. A page returning successfully does not prove that queued and scheduled work is healthy.
Record the local target for Localtonet
Once the complete test passes, record the local IP address and port that actually serve ProjectSend. If the Localtonet client will run on the same host, a loopback address may be reachable. If it will run on another machine, use a private address that the client device can reach and confirm that intervening firewall policy permits only the required connection.
Test the endpoint from the Localtonet client device itself. This check matters because a browser on the ProjectSend server may reach a loopback listener that another device cannot. The HTTP tunnel's local target must be reachable from the machine running our client.
Plan backups, updates and routine operation
Back up data before accepting real files
A useful backup must cover the MySQL database, uploaded files, environment configuration and any other persistent paths documented by the installed release. Backing up application code alone is not sufficient. Conversely, copying uploads without the matching database can lose the relationships among users, assignments, permissions and files.
Keep backups outside the served application directory and preferably outside the host whose failure they protect against. Restrict access because a backup may contain client information, file contents and credentials. Test restoration to an isolated environment. A backup job that has never been restored is not yet a verified recovery process.
Monitor the whole application stack
Routine checks should cover nginx, PHP-FPM, MySQL, the background worker, scheduled jobs, available disk space and backup completion. ProjectSend can produce a valid sign-in page while a worker or scheduler is unhealthy, so monitoring only the HTTP status misses important failure modes.
Track storage growth in both the upload location and database. Failed or interrupted operations may also consume temporary space. Recent ProjectSend release notes have included protections related to interrupted uploads, which is another reason to keep the application current rather than leaving an old release indefinitely exposed.
Update using the documented release procedure
ProjectSend supplies UPDATE.md for moving an existing installation to a newer version. For a ZIP deployment, follow the update script and post-update checks documented for the installed and destination versions. Do not perform an upgrade by extracting a new archive over live files unless that exact procedure is explicitly documented.
Before updating:
- Read all release notes between the current and destination versions.
- Identify manual actions involving permissions, authentication providers or environment variables.
- Back up the database, uploads and configuration.
- Confirm that the backup can be located and read.
- Plan a maintenance window appropriate to your users.
- Run the documented update process.
- Repeat administrator, client, upload, download, worker and scheduler tests.
ProjectSend Legacy is a previous generation rather than an in-place upgrade path to ProjectSend 2. Moving from Legacy requires a fresh ProjectSend 2 installation and the documented migration process. Do not treat a Legacy directory as though it were an older release ZIP that can simply be overwritten.
Connect the verified ProjectSend endpoint with Localtonet
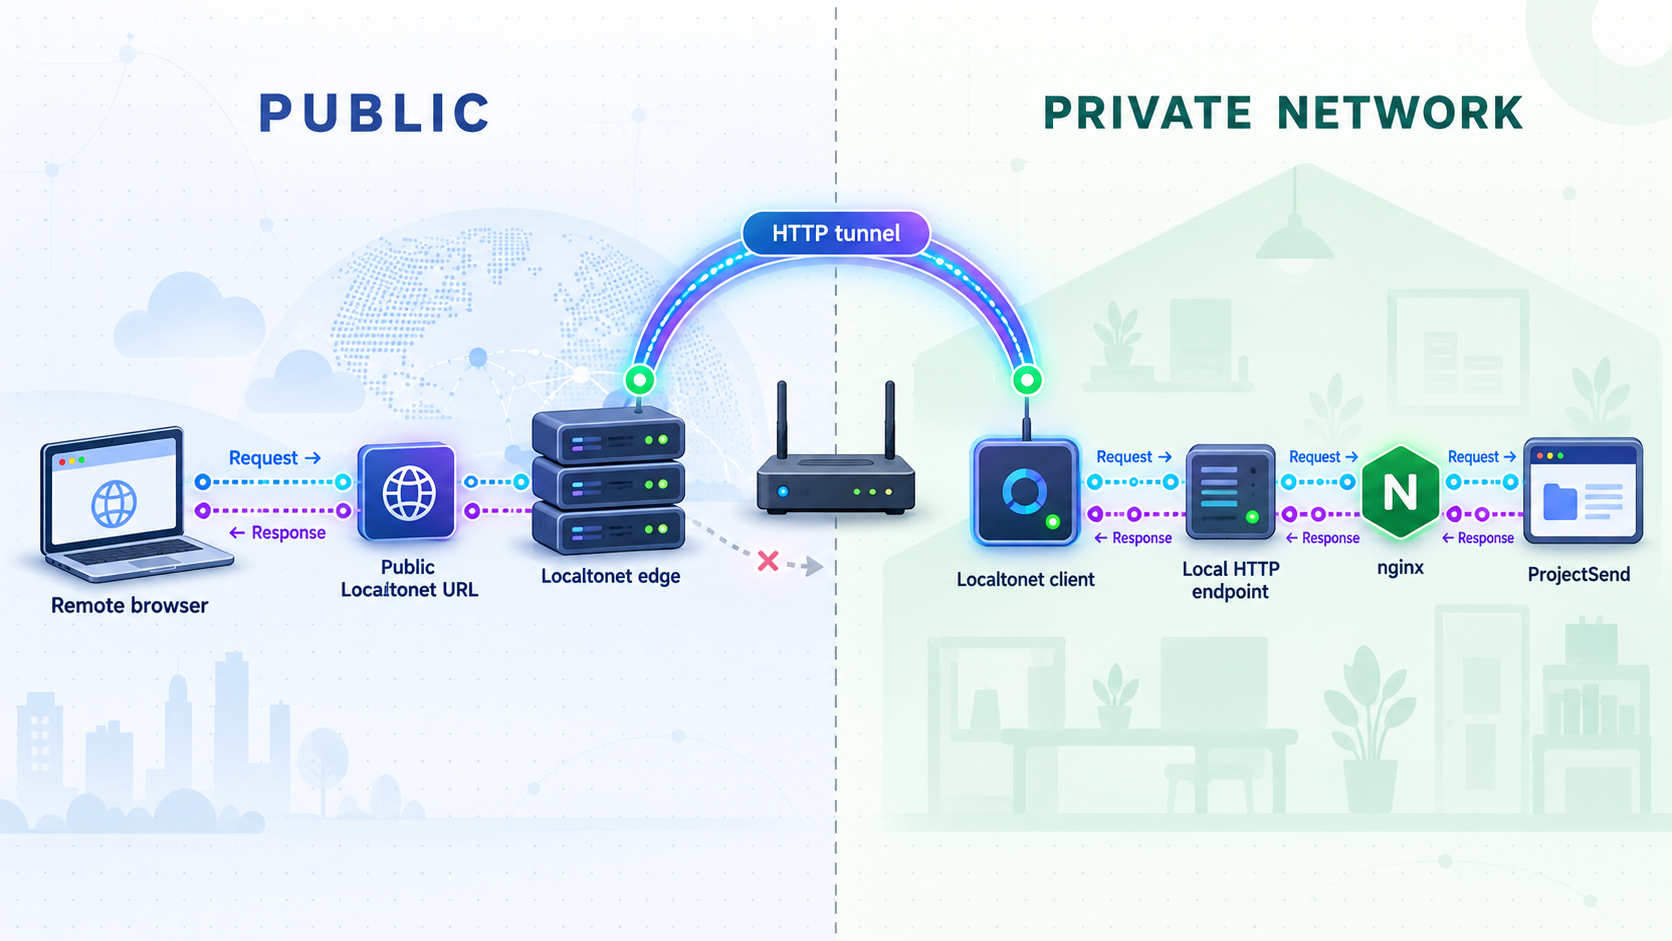
Only begin this stage after the local client workflow succeeds. With Localtonet, the client application on a device that can reach ProjectSend establishes an outbound connection to one of our relay servers. The resulting HTTP tunnel provides a public HTTPS address for the local web endpoint without requiring inbound router port forwarding, firewall changes, VPN setup or a public IP address.
An HTTP tunnel is appropriate because ProjectSend presents a browser-based web application. The target remains the local IP address and port you verified earlier. Do not select a raw TCP tunnel merely because nginx listens on a TCP port. The HTTP tunnel family is intended for local HTTP services and supplies a public web address.
Install and run the Localtonet client
Install our client on the ProjectSend host or on another device that can reach the verified nginx endpoint. Keep the client running whenever remote access is required.
Authenticate or select the client device
Use the device-specific authentication token associated with the client that will run the tunnel. Keep that token secret and never place it in an article, screenshot or shared configuration example.
Select an available relay server
Choose from the relay servers or regions currently offered in the dashboard. Availability can vary, so obtain the current server code from the product instead of copying a hardcoded value.
Create an HTTP tunnel for the local endpoint
Enter the local IP address and port recorded during verification. Choose the required HTTP process type: Random Sub Domain, Custom Sub Domain or Custom Domain. All three process types serve the content at a public HTTPS address, but availability and custom-domain requirements must be checked in the current dashboard and documentation.
Start the tunnel
Creating a tunnel does not start it. Use the Start control and wait for the selected device and tunnel to be connected. The tunnel is available only while the client device remains connected and the tunnel is running.
Test the assigned public address
Open the public HTTPS URL from a separate network and repeat the sign-in, test-client and download checks. Watch for redirects to the private APP_URL, missing assets, session problems and links generated with the wrong hostname.
For the current interface and complete workflow, consult our Localtonet HTTP tunnel documentation. Exact relay choices, plan availability and custom-domain DNS requirements should be taken from the current dashboard rather than inferred from examples.
ProjectSend may continue running locally when the Localtonet tunnel is stopped. Remote access ends when the tunnel stops or its selected client disconnects. You can later stop or delete the tunnel without uninstalling ProjectSend.
Validate ProjectSend at the public hostname
Test with a browser that has no existing administrator session. Begin at the assigned HTTPS address, sign in as the non-administrator test client and download only the harmless test file. Then check whether navigation, generated links and sign-out remain on the intended public hostname.
If ProjectSend redirects to a private hostname or produces links using the local address, inspect APP_URL and the reverse-proxy guidance for the exact ProjectSend release. The supplied evidence does not establish version-specific trusted-proxy settings or forwarded-header configuration, so this article does not invent them. Make only changes supported by the project's documentation, then retest both local administration and remote client access.
Troubleshoot installation and remote-access problems
| Symptom | Likely area to inspect | Safe next check |
|---|---|---|
| nginx returns a gateway error | PHP-FPM service or FastCGI destination | Confirm PHP-FPM is running and nginx points to its actual socket or network address. |
| ProjectSend reports a database failure | Environment values, MySQL availability or grants | Verify the database host, name and dedicated user's permissions without printing the password. |
| Page loads without styling or scripts | Incorrect nginx document root or request routing | Compare the server block with the INSTALL.md bundled with the installed release. |
| Uploads fail or cannot be retained | Writable paths, disk space or PHP limits | Check the documented writable directories, runtime ownership, available space and applicable PHP configuration. |
| Web requests work but queued activity does not | Background worker | Confirm the documented worker process is running under the intended account and inspect its logs. |
| Recurring activity never runs | Cron, PHP CLI version or scheduler environment | Check scheduler logs, command paths and the CLI PHP version. |
| Local portal works but tunnel returns an error | Localtonet target reachability | From the Localtonet client device, connect directly to the configured local IP and port. |
| Public URL redirects to a private address | APP_URL or release-specific proxy behavior | Review ProjectSend's current URL and reverse-proxy instructions before changing configuration. |
| Public URL works intermittently | Client or tunnel lifecycle | Confirm the selected Localtonet device is connected and the HTTP tunnel remains started. |
Separate each layer during diagnosis
Test from the inside out. First confirm MySQL. Next confirm PHP CLI and PHP-FPM. Then test nginx from the ProjectSend host, followed by the endpoint from the Localtonet client device. Only after those checks pass should you test the public URL. This sequence prevents a public-tunnel symptom from hiding a local application failure.
Logs should be reviewed at the same time the failure is reproduced. Preserve timestamps and request context, but remove credentials, client names, private file names, email addresses and authentication tokens before sharing excerpts. For a suspected ProjectSend security issue, use the project's private security reporting channel rather than opening a public issue containing exploit details.
Avoid changing multiple components at once
If the portal was working before a configuration change, revert or isolate that one change before replacing PHP packages, rewriting nginx rules and recreating the tunnel simultaneously. Multiple changes erase the evidence needed to identify the original cause. Keep versioned copies of configuration outside the web root, while ensuring secret-bearing environment files are not committed to an insecure repository.
Secure a remotely accessible client portal
A public HTTPS address makes the application reachable, but it does not replace ProjectSend authentication, authorization or server hardening. The ProjectSend administrator remains responsible for user lifecycle, role design, storage, updates, monitoring and backups. Remote exposure should begin with the narrowest access needed for the client workflow.
Review download limits, expiration and client permissions according to the sensitivity of the files being shared. Do not use public sharing when authenticated client access is the actual requirement. Test each role using a separate account instead of assuming the administrator's view represents what a client can see.
Keep database and administrative services off the public internet. The HTTP tunnel should point only to the intended ProjectSend web endpoint. It should not expose MySQL, PHP-FPM management interfaces, process supervisors, backup locations or server administration tools.
Before sharing the public URL, confirm that first-run setup is complete, ProjectSend is updated, backups work, permissions have been tested and no confidential sample data is present. Use access controls and least privilege. A tunnel should never be treated as a way to bypass organizational authorization or network policy.
Frequently asked questions
Does a ProjectSend release ZIP require Composer or npm on the server?
No. The packaged release ZIP ships ready to run with its dependencies and compiled frontend. A repository clone is different and requires Composer and npm before it can run as a development copy.
What server software does a ZIP installation require?
The established requirements are PHP 8.4 or newer for CLI and PHP-FPM, MySQL 8.0 or newer, nginx with PHP-FPM and shell access. Redis is optional. Use the INSTALL.md bundled with the chosen release for the complete PHP extension list and exact configuration.
Can I install ProjectSend by uploading the ZIP over FTP?
The non-Docker path is not an FTP-only installation. It requires shell access to configure the environment, nginx, permissions, application commands, a persistent background worker and cron.
Which local port should I enter in Localtonet?
Enter the port on which your verified nginx ProjectSend endpoint actually listens. There is no universal ProjectSend ZIP port established by the supplied evidence. Test the IP address and port directly from the device running our client before creating the tunnel.
Should the Localtonet client run on the ProjectSend server?
It can run on the same server or on another device that can reach the local ProjectSend endpoint. A same-host installation may target a loopback listener. A separate device needs a reachable private IP address and port.
Does creating a Localtonet tunnel immediately make it active?
No. The tunnel must be started after creation. It remains available only while the selected Localtonet client is connected and the tunnel is running.
Does Localtonet replace ProjectSend authentication?
No. The HTTP tunnel supplies connectivity to the web endpoint. ProjectSend remains responsible for administrator and client authentication, roles, permissions and file access. Configure and test those controls before providing the public URL to users.
Why does the public address redirect to my private APP_URL?
ProjectSend may be generating redirects or links from its configured APP_URL. Review the URL and reverse-proxy instructions for your exact ProjectSend release. Do not guess trusted-proxy settings or forwarded-header behavior, because those details can vary by version.
Can I stop public access without stopping ProjectSend?
Yes. Stop or delete the Localtonet tunnel to remove its public route. ProjectSend can continue serving its local endpoint independently.
Connect your verified ProjectSend portal with Localtonet
Finish the local installation, test administrator and client access, then create an HTTP tunnel that targets the confirmed nginx IP address and port. Keep your device token private and start the tunnel only when remote access is ready.
Get Started Free →

