

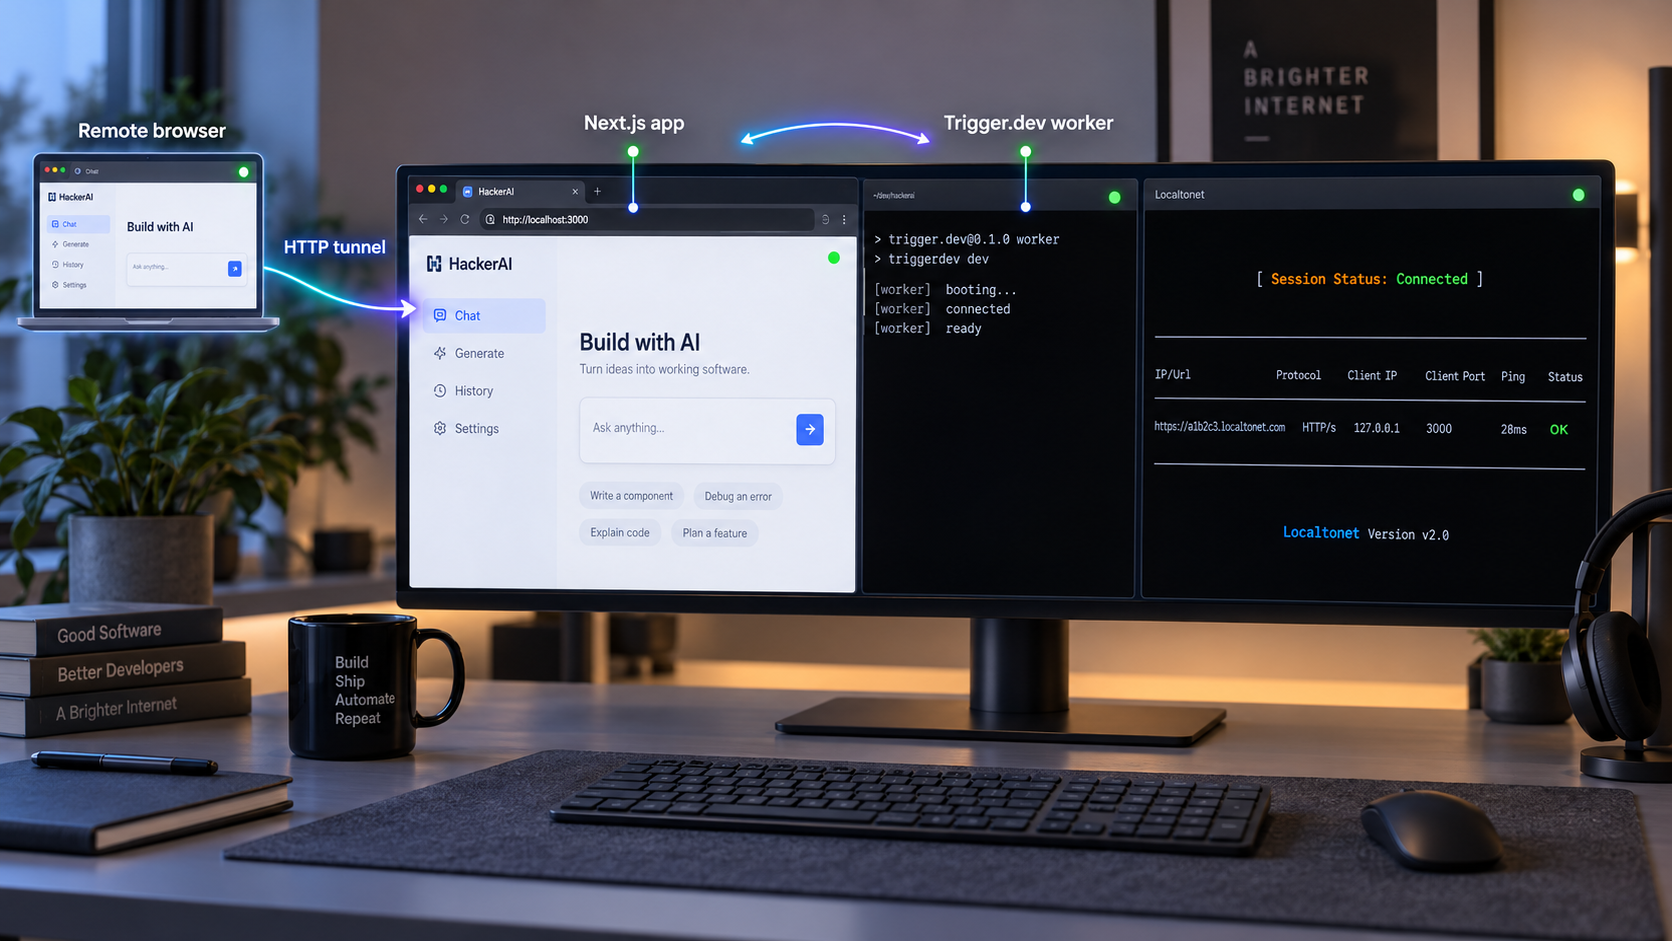
Build the HackerAI development stack, start its Agent worker, and reach the verified web endpoint remotely
HackerAI is an AI-powered penetration testing web application that combines a Next.js interface, a Convex backend, and a Trigger.dev worker for Agent mode. This guide walks through the documented source-based installation, required service accounts, Trigger.dev configuration, startup sequence, local verification, and common failure points. After the application works locally, we show how to expose the detected Next.js endpoint through a Localtonet HTTP tunnel without configuring inbound router port forwarding, a public IP address, or a VPN. The documented HackerAI workflow is a development setup rather than a production deployment, so the security and operational boundaries matter.
📋 What's in this guide
Understand the HackerAI development architecture
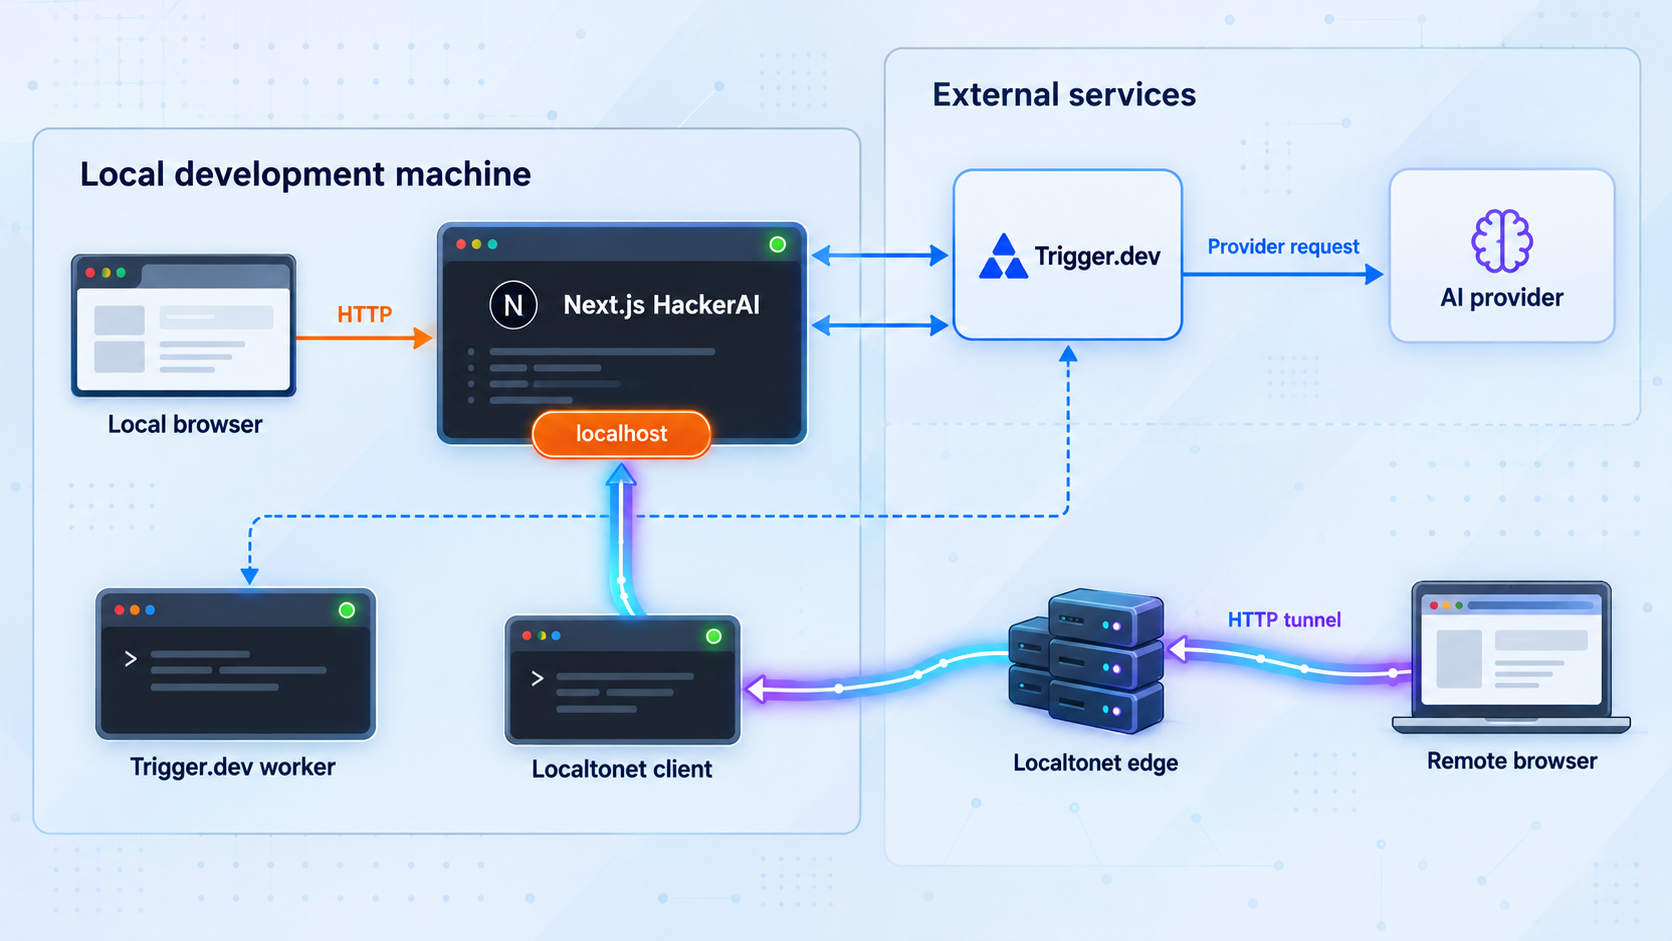
HackerAI describes itself as an AI-powered penetration testing assistant for finding and fixing vulnerabilities by working with AI. Its source-based local workflow is not a single standalone server. The documented development command runs a Next.js development server and a Convex development server, while Agent mode requires an additional Trigger.dev worker. Several external services provide model access, authentication, file storage, isolated execution, and durable task processing.
This distinction is important when deciding what to expose remotely. A browser needs the Next.js web application, so that detected Next.js endpoint is the appropriate target for a Localtonet HTTP tunnel. The Convex development process and Trigger.dev worker support the application internally, but they are not interchangeable with the browser-facing endpoint. Do not point the HTTP tunnel at a backend address merely because it also appears in the startup output.
pnpm run dev command starts both Next.js and Convex development services. They can also be started separately when diagnosing one side of the stack.
Penetration testing can affect the confidentiality, integrity, and availability of systems. Limit testing to assets you own or have written permission to assess. Define the authorized targets, techniques, time window, data-handling rules, and stop conditions before starting an Agent task. A public tunnel does not expand the scope of your authorization.
Localtonet solves the connectivity portion of this workflow. Our platform does not install HackerAI, configure its provider accounts, or turn a development server into a production service. The correct order is to make the complete HackerAI workflow function locally, identify the browser-facing endpoint, and only then add remote access.
Prepare the software and required accounts
Begin with a machine suitable for running a JavaScript development project and keeping multiple terminal processes open. You need Git to clone the repository and pnpm to install packages and run the documented scripts. A compatible Node.js runtime is also necessary for the Next.js and package scripts, but the available installation evidence does not specify an exact Node.js or pnpm version. Do not select a version based on an assumed default. Check the current repository metadata or maintainer guidance if your runtime produces an engine or compatibility error.
Confirm that the following basic commands are available before cloning the project:
git --version
node --version
pnpm --version
These commands report the installed versions. They do not prove that those versions are compatible with the current HackerAI revision, but they quickly identify a missing executable or a shell path problem.
Required service accounts
HackerAI's documented source setup lists all of the following accounts as required. Prepare them before expecting the complete application and Agent workflow to operate:
| Service | Role in the documented setup | Where it matters |
|---|---|---|
| OpenRouter | AI model provider | Application and worker model requests |
| OpenAI | Identifies security requests that should use abliteration.ai models | Application and Trigger.dev worker configuration |
| E2B | Provides isolated cloud execution for Agent mode | Agent execution |
| Convex | Provides the database and backend | Local development stack and worker communication |
| Amazon S3 | Provides file storage | Application and worker storage operations |
| WorkOS | Provides authentication and user management | Web application sign-in and identity flow |
| Trigger.dev | Provides the required durable runtime for agent tasks | Local Agent mode worker |
Optional integrations include abliteration.ai for eligible security requests, Perplexity for web search, Jina AI for web URL content retrieval, Redis for stream resumption, Upstash Redis for rate limiting, PostHog for analytics, and Stripe for payment processing. Optional does not mean that every related feature will work without its provider. It means the base documented setup does not list that provider among the required accounts.
A practical local Agent mode session uses one terminal for the combined Next.js and Convex development command and another for the Trigger.dev worker. Keeping a third terminal free makes it easier to inspect files, check processes, or restart one component without interrupting the others. If you run Next.js and Convex separately, you will need an additional active terminal.
Protect credentials before installation
The setup uses API keys, storage credentials, a Convex service role key, and a Trigger.dev development secret. Treat all of them as secrets. Store values only in the locations required by the project and each provider, keep local environment files out of commits, and never paste real values into support messages, screenshots, browser URLs, tunnel configuration fields, or shell history shared with other people.
The repository includes an example local environment file, but the extracted documentation does not provide a complete authoritative mapping of every main application variable or the exact interactive behavior of the setup script. This guide therefore does not invent missing environment variable names. Run the documented setup process and use the current project prompts or repository example for values not explicitly listed below.
Install HackerAI from the source repository
The documented installation path clones the project, enters its directory, installs dependencies, runs the setup script, and starts the development stack. Run the commands from a terminal under the user account that will operate the application. Avoid running package installation as an elevated administrator unless your environment specifically requires it and you understand the resulting file ownership.
Clone the HackerAI repository
Download the current source repository with Git. This creates a local directory named hackerai.
git clone https://github.com/hackerai-tech/hackerai.gitEnter the project directory
Change the working directory before running package or setup commands.
cd hackeraiInstall project dependencies
Use pnpm with the repository's package and lock files. Let the command finish before continuing, and investigate any package-manager or runtime error instead of moving ahead with a partial installation.
pnpm installRun the setup script
Start the project's documented setup workflow. Follow its current prompts carefully and provide only credentials obtained from your own service accounts.
pnpm run setupStart Next.js and Convex together
Run the combined development command. Keep this terminal open because stopping the process also stops the locally served development stack.
pnpm run devThe final command runs both the Next.js and Convex development servers. Read all startup output rather than looking only for the first URL. You need to distinguish the browser-facing Next.js address from any Convex endpoint or dashboard information.
Run Next.js and Convex separately when needed
The combined command is convenient for ordinary use. HackerAI also documents separate commands, which are helpful when one process exits, logs become difficult to separate, or you want to restart the web interface without restarting the backend.
In the first terminal, run:
pnpm run dev:nextIn the second terminal, run:
pnpm run dev:convexBoth processes must remain healthy for a workflow that depends on both components. A page loading in the browser does not by itself prove that Convex operations, authentication, file storage, model access, or Agent tasks are working.
Configure the application and provider boundaries
Running pnpm run setup is the documented setup action, but this installation has a wider configuration boundary than a typical local web application. The main app, Convex, and Trigger.dev worker may use values from different environments. A value present in a local file is not automatically available to a task executing through Trigger.dev.
Configure each required account using credentials created for this HackerAI development environment. Least-privilege credentials are preferable where a provider supports scoping. For example, storage credentials should not have unrelated account-wide privileges merely because the application requires access to an S3 bucket.
Optional abliteration.ai configuration
HackerAI can use abliteration.ai for eligible security requests that standard models may refuse. To enable that optional integration, create an API key in the provider's console and set ABLITERATION_API_KEY in the environments where HackerAI needs it. The project documentation identifies .env.local, Vercel, and Trigger.dev as relevant locations. For the local workflow in this guide, the local application and Trigger.dev worker environments are the immediately relevant ones.
Without this optional key, HackerAI continues using its standard models. Do not treat the absence of ABLITERATION_API_KEY as the first explanation for every Agent failure, because Agent mode still depends on the required OpenRouter, OpenAI, E2B, Convex, S3, and Trigger.dev configuration.
A Localtonet HTTP tunnel should target the running Next.js service only. It should never point at an environment file, storage directory, development administration endpoint, or ad hoc file server containing credentials. Before remote access, also check that development error pages and logs do not reveal API keys or complete environment values.
Authentication and public URLs
WorkOS provides authentication and user management for HackerAI. Authentication providers commonly distinguish between local and public origins, but the supplied project evidence does not establish HackerAI's exact callback, redirect, or allowed-origin configuration. If sign-in works locally but fails through the public Localtonet address, inspect the current HackerAI and WorkOS configuration rather than guessing a callback path.
Use the exact public URL assigned to the running tunnel wherever the current application and identity-provider instructions require an origin or redirect URL. Do not add an unverified path. If you later receive a different public URL, review any origin-sensitive provider settings again.
Configure and start the Trigger.dev worker for Agent mode
The web development server alone is not the complete local Agent mode setup. HackerAI runs the agent loop as a Trigger.dev task, and the project documents a separate local worker command. Configure this after the main setup so you can distinguish an application startup failure from a worker-specific problem.
Create a Trigger.dev project
Create a project in the Trigger.dev cloud dashboard. Select the project you intend to use for this local HackerAI environment so that its secret and worker variables remain associated with the same project.
Add the development secret locally
Copy your Trigger.dev development secret, which begins with tr_dev_, into .env.local under the variable name TRIGGER_SECRET_KEY. Never publish the real value or reuse an example value.
TRIGGER_SECRET_KEY=your_own_trigger_development_secretAdd the required worker variables
In the Trigger.dev dashboard, open your project and its Environment Variables area. Add the variables required by the task. These values live on the worker and are not supplied merely by configuring Vercel or the local web process.
NEXT_PUBLIC_CONVEX_URL
CONVEX_SERVICE_ROLE_KEY
OPENROUTER_API_KEY
OPENAI_API_KEY
AWS_S3_ACCESS_KEY_ID
AWS_S3_SECRET_ACCESS_KEY
AWS_S3_REGION
AWS_S3_BUCKET_NAME
E2B_API_KEYStart the default local worker
Open another terminal in the HackerAI project directory and start the documented Trigger.dev development worker. Keep it running while sending local Agent requests.
pnpm dev:trigger
Add optional keys to Trigger.dev only for integrations you actually use. Documented examples include ABLITERATION_API_KEY, PERPLEXITY_API_KEY, and JINA_API_KEY. Optional Redis, analytics, or payment integrations can require additional configuration, but this guide does not invent variable names that were not established by the available project instructions.
Use an explicitly routed Trigger.dev branch only when required
The default worker is appropriate for ordinary local Agent requests. HackerAI also documents an explicitly named development branch:
TRIGGER_DEV_BRANCH=my-local-agent pnpm dev:triggerThat inline environment assignment uses syntax supported by POSIX-style shells. Other shells may require a different way to set a temporary environment variable. More importantly, use the override only when the request path is configured to target that same Trigger.dev branch. If the application routes to the default branch while the worker listens on a named branch, the worker can appear healthy without processing the request you submitted.
A common configuration mistake is placing every value in .env.local and assuming the Trigger.dev task can read it. The HackerAI instructions explicitly require the task variables in the Trigger.dev project environment. Conversely, the local development secret belongs in .env.local as TRIGGER_SECRET_KEY.
Verify HackerAI locally before creating a tunnel
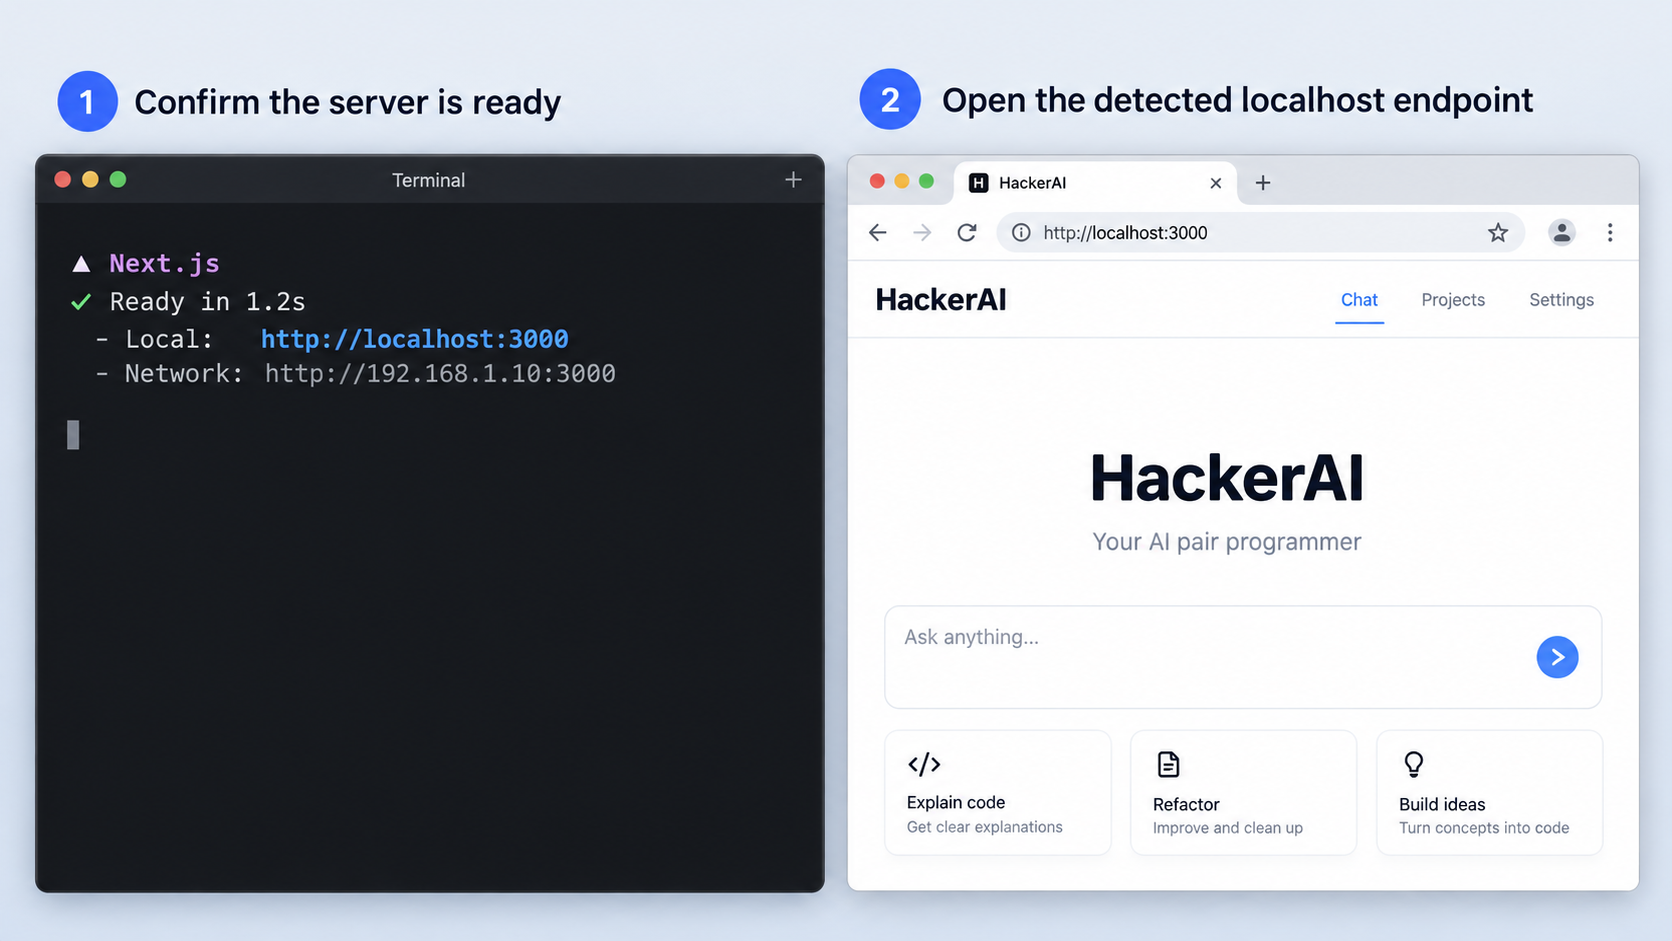
Local verification prevents tunnel troubleshooting from becoming mixed with application troubleshooting. A tunnel can successfully forward traffic to a service that is returning errors, waiting for authentication configuration, or unable to submit Agent work. Verify each layer in order.
1. Identify the Next.js endpoint from terminal output
Watch the terminal running pnpm run dev or pnpm run dev:next. Copy the local browser URL reported by Next.js. The available HackerAI evidence does not specify the hostname or port, so this guide deliberately does not assume a common Next.js default. If the process selects another port because one is occupied, the startup output is the authoritative value for that session.
Record the endpoint as three separate pieces:
- The scheme used locally, normally shown directly in the startup URL.
- The hostname or IP address.
- The port, when one is present.
You will use the local IP address and port as the target of the Localtonet HTTP tunnel. Do not use the public Convex URL or the Trigger.dev dashboard URL as a substitute.
2. Open the application from the host machine
Visit the exact Next.js URL in a browser on the same machine. Confirm that the page renders rather than showing a connection refusal, an endless build state, or a framework error. If the application redirects to authentication, complete the configured authentication flow and return to the application.
A rendered page verifies only the web layer. Watch the Next.js and Convex terminals while navigating. Resolve repeated backend errors, missing configuration messages, or authentication failures before continuing.
3. Confirm that the Trigger.dev worker is connected
The terminal running pnpm dev:trigger should remain active rather than immediately returning to the shell. Review its output for secret, project, configuration, compilation, or connection errors. Check that you started it from the project directory and that TRIGGER_SECRET_KEY belongs to the intended Trigger.dev project.
4. Submit a controlled Agent request
Use a harmless, authorized test task whose expected behavior you can observe. Keep the initial task narrow so failures are easy to attribute. Monitor the web application, Trigger.dev worker, and relevant provider dashboards or logs. A successful page load followed by a permanently queued or unprocessed Agent request usually points toward worker routing, worker environment variables, Trigger.dev project selection, or a downstream provider rather than HTTP connectivity.
5. Recheck the endpoint after any restart
Development server ports can change when a previous process still owns the requested port. After restarting Next.js, read its output again. If the endpoint changed, update the Localtonet target before concluding that the tunnel is broken.
If HackerAI does not work from the host machine, making the endpoint public will not repair it. Stop and resolve local installation, environment, authentication, backend, or worker errors first. This also reduces the chance of exposing an error page containing sensitive diagnostic information.
Expose the verified Next.js endpoint with Localtonet
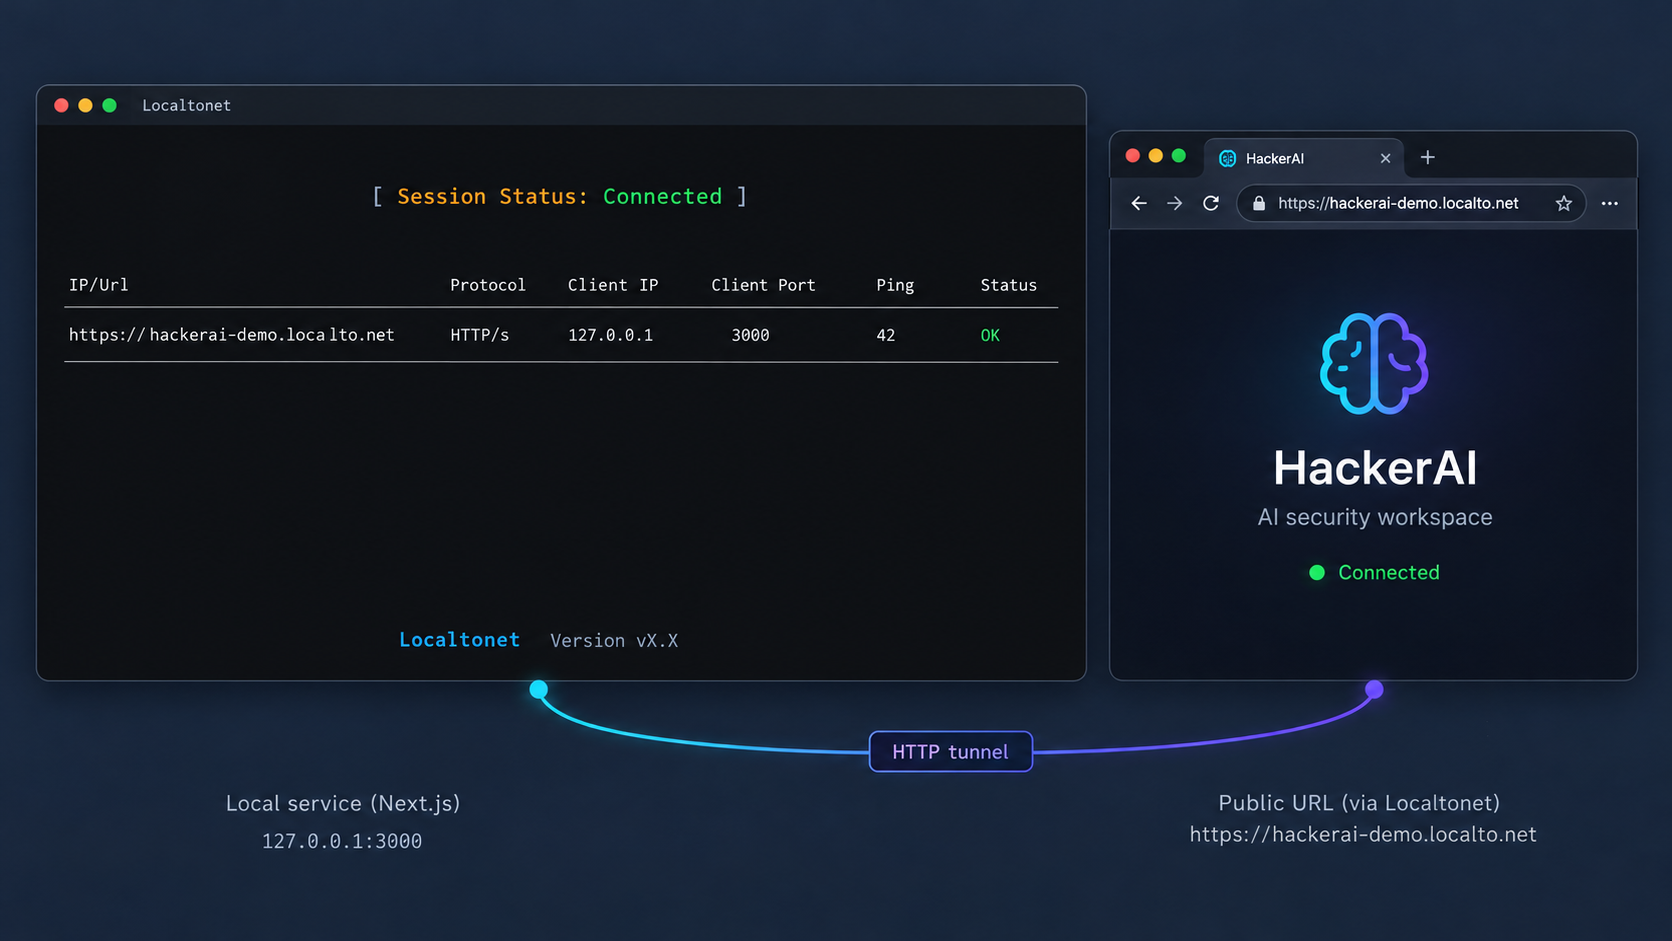
After the application works locally, an HTTP tunnel is the appropriate Localtonet tunnel family for its browser-facing Next.js server. The Localtonet client runs on the machine that can reach the local service and establishes an outbound connection to our relay. This avoids inbound router port forwarding, firewall changes, VPN setup, and the requirement for a public IP address.
HTTP and File Server tunnels support Random Sub Domain, Custom Sub Domain, or Custom Domain process types. All serve content at a public HTTPS address. Availability and exact domain configuration can vary, so obtain current options from the dashboard and do not assume that every process type or domain feature is included in every plan.
For current product screens and configuration details, consult our Localtonet HTTP tunnel documentation while following the workflow below.
Install and run the Localtonet client
Install our client on the machine running HackerAI, or on another device that can reach the detected Next.js endpoint. Start the client and keep it connected. The tunnel will be available only while the selected client is connected and the tunnel is running.
Authenticate and select the correct device
Use the device-specific authentication token associated with the client that can reach HackerAI. Select that device when configuring the tunnel. Never paste its token into the article, a public issue, application source code, or a browser-accessible field.
Select an available relay server
Choose a currently available Localtonet relay server or region from the dashboard. Available server codes and regions can change and may vary by plan, so use the values displayed in the current product rather than copying a hardcoded value from a tutorial.
Create an HTTP tunnel for the Next.js target
Select the HTTP tunnel type and an available process type. Enter the local IP address and port shown by the Next.js startup output. If the Localtonet client runs on the same machine, use an address that the client can reach locally. If it runs on another device, the Next.js service must be listening on a network-reachable interface and local network policy must permit that connection.
Start the tunnel
Use the Start action after creating the configuration. Creating a tunnel does not mean it is running. Wait until the selected client is connected and the tunnel is active, then copy the assigned public URL.
Test the public address
Open the assigned HTTPS URL in a separate browser session. Verify page rendering, authentication, application navigation, and a controlled Agent request. Watch the HackerAI and Trigger.dev terminals during the test so you can distinguish HTTP access from backend or worker failures.
Choose the correct local target
| Observed endpoint | Use as HTTP target? | Reason |
|---|---|---|
| Next.js browser URL from startup output | Yes | This is the web interface intended for browser access. |
| Convex development endpoint | No | It is part of the application's backend rather than a replacement for the Next.js interface. |
| Trigger.dev dashboard or worker connection | No | The worker processes Agent tasks and is not the HackerAI browser interface. |
| Environment file or project directory | No | An HTTP tunnel targets a running service, not files containing configuration or secrets. |
If the public address reaches Localtonet but the target connection fails, test the same local IP address and port from the machine running the Localtonet client. A service listening only on a loopback address may be reachable from the HackerAI host but not from a different client device. Do not broaden the listening interface casually. If you choose to make the service reachable over a local network, protect that network path and limit access according to your environment's security policy.
Operate the development stack and tunnel safely
This workflow has multiple independent lifecycle states. HackerAI's web and backend processes can be running while the Agent worker is stopped. The Localtonet client can be connected while the tunnel is stopped. The tunnel can also be active while Next.js has exited. Check each layer instead of treating the system as one process.
Recommended startup order
- Start the combined HackerAI development process with
pnpm run dev, or start Next.js and Convex separately. - Wait for both development services to initialize and verify the web interface locally.
- Start the Trigger.dev worker with
pnpm dev:trigger. - Submit a controlled local Agent request if configuration changed.
- Run the Localtonet client and confirm that the intended device is connected.
- Start the HTTP tunnel and test its public HTTPS URL.
Recommended shutdown order
- Stop the Localtonet tunnel to remove public reachability.
- Stop the Trigger.dev worker when no Agent tasks should be processed locally.
- Stop the Next.js and Convex development processes.
- Delete the tunnel if it is no longer required, or leave it stopped for later controlled use.
Stopping a tunnel preserves its configuration for later use, while deleting it removes the tunnel configuration. In either case, remote access ends when the tunnel is not running. It also ends if the selected Localtonet client disconnects.
Apply least exposure
A development application can reveal stack traces, internal paths, provider error details, source mappings, or debugging behavior that would be inappropriate for broad public access. Start the tunnel only for the period in which remote access is necessary. Keep HackerAI authentication enabled and restrict access further when your current application or Localtonet configuration supports controls appropriate to your environment.
Do not interpret a hard-to-guess public URL as authentication. Share the URL only with intended users, remove it from tickets and chat logs when access is no longer needed, and rotate any credential that may have appeared in a public response or screenshot.
Keep configuration environments aligned
When rotating a provider credential, update every environment that legitimately uses it. For this workflow, that can include the local application environment and the Trigger.dev project environment. Updating only one side can produce confusing partial behavior, such as a usable web page whose Agent tasks fail after submission.
Do not copy every local variable into Trigger.dev without review. Add the task variables the project documents and optional integration keys actually needed by that worker. This reduces unnecessary secret distribution.
The documented commands start Next.js, Convex, and Trigger.dev development processes. The available evidence does not define a production build command, process supervisor, production hosting architecture, scaling model, backup procedure, availability target, or hardened reverse-proxy configuration. Use this workflow for controlled development and evaluation unless the project's current production documentation establishes additional requirements.
Troubleshoot the installation, worker, and tunnel
The pnpm command is not found
Confirm that pnpm is installed and visible to the shell with pnpm --version. If it works in one terminal but not another, restart the shell and inspect its executable path configuration. The project evidence does not prescribe one pnpm installation method or version, so use an installation method appropriate to your operating system and verify compatibility against the current repository metadata.
Dependency installation fails
Preserve the original error output. Check that you are inside the cloned hackerai directory, that the repository download completed, and that Git, Node.js, and pnpm are available. Runtime engine errors should be resolved by consulting the current project's version requirements rather than randomly changing packages or bypassing checks.
The setup script stops or requests unknown values
Confirm that you prepared the required OpenRouter, OpenAI, E2B, Convex, Amazon S3, WorkOS, and Trigger.dev accounts. Use credentials from your own accounts and follow the current prompts. Because the supplied evidence does not describe every setup-script question, this guide cannot safely supply guessed values for undocumented prompts.
The Next.js page does not load locally
Read the terminal running pnpm run dev or pnpm run dev:next. Use the exact URL it reports and check whether compilation completed. If the combined output is difficult to interpret, start Next.js and Convex separately. A connection refusal usually means no process is listening at that address, while a rendered framework error indicates the HTTP process is reachable but the application failed during build or request handling.
The interface loads, but backend actions fail
Inspect the Convex terminal and application logs. Confirm that the Convex development process is still running and that setup completed. Also check required service credentials relevant to the failing operation. Remote tunneling is not the likely cause when the same action fails through the local Next.js URL.
Agent requests remain queued or never run
Verify that pnpm dev:trigger is running in the project directory. Confirm that TRIGGER_SECRET_KEY in .env.local belongs to the same Trigger.dev project where you added worker environment variables. Check that all nine documented required worker variables are present and correctly named.
If you started an explicitly named branch, make sure the request path targets the same branch. Otherwise, stop that worker and use the default command. Also review E2B, model-provider, Convex, and S3 errors because Trigger.dev can receive a task successfully while a downstream dependency rejects it.
The public URL shows a target or gateway error
First confirm that the Localtonet client is connected and the tunnel is running. Next, compare the tunnel target with the current Next.js startup output. If Next.js restarted on another port, update the target. Test the target from the Localtonet client device, especially when the client and HackerAI run on different machines.
The public URL loads, but sign-in fails
If local authentication works but public authentication does not, investigate origin-sensitive WorkOS or HackerAI configuration. Use the exact assigned public HTTPS URL where the current provider setup requires a redirect or allowed origin. The available evidence does not establish the required callback path, so do not append a guessed route.
The web page works remotely, but Agent mode does not
This usually separates the HTTP layer from the task-processing layer. Localtonet is already forwarding the browser traffic if the page loads. Check the Trigger.dev worker terminal, project environment variables, branch routing, Convex access, E2B configuration, model-provider keys, and S3 credentials. Reproduce the same Agent request through the local URL. If it fails both locally and remotely, focus on HackerAI and its providers rather than the tunnel.
The tunnel stopped unexpectedly
A Localtonet tunnel is available only while the selected client device is connected and the tunnel is running. Check the client process, device connectivity, and tunnel state. Also remember that an active tunnel cannot keep HackerAI available after the Next.js process stops.
Frequently asked questions
What port does HackerAI use locally?
The available HackerAI documentation does not establish a fixed local hostname or port. Start the development server and copy the Next.js browser endpoint from its terminal output. Recheck that output after restarts because a port can change when another process already occupies the previous one.
Which HackerAI endpoint should I expose through Localtonet?
Target the browser-facing Next.js development endpoint reported by the startup output. Do not substitute the Convex endpoint, Trigger.dev dashboard, worker connection, or a project directory. A Localtonet HTTP tunnel forwards web traffic to the local Next.js IP address and port.
Is the Trigger.dev worker required to open the HackerAI web interface?
The web interface is served by Next.js, but HackerAI's Agent mode runs its agent loop through a Trigger.dev task. The page may load while the worker is stopped, yet local Agent requests will not have the documented worker available to process them.
Why must worker variables be added to Trigger.dev if they are already in .env.local?
The task environment is separate from the local web process. HackerAI explicitly documents adding the task's required variables to the Trigger.dev project environment. The local .env.local file also needs TRIGGER_SECRET_KEY so the local worker can connect to the intended Trigger.dev project.
Do I need abliteration.ai to run HackerAI?
No. The integration is optional and is used for eligible security requests that standard models may refuse. Without ABLITERATION_API_KEY, HackerAI continues using its standard models. The required OpenRouter and OpenAI accounts still apply.
Does Localtonet require router port forwarding or a public IP address?
No. Our client establishes an outbound connection to a Localtonet relay server, so this workflow does not require inbound router port forwarding, firewall changes, VPN setup, or a public IP address. The selected client must remain connected and the tunnel must be running.
Does a Localtonet tunnel make this HackerAI setup production-ready?
No. The tunnel provides remote connectivity to the local service. The documented HackerAI commands run development servers and do not establish a production process manager, hardened deployment architecture, backup plan, scaling strategy, or availability guarantee.
Can I run the Localtonet client on a different machine?
Yes, if that device can reach the HackerAI Next.js IP address and port. A Next.js process bound only to the HackerAI host's loopback interface will not normally be reachable from another device. Any change that exposes the development service to a local network should be deliberate and protected by appropriate network policy.
Access your verified HackerAI interface with Localtonet
Once Next.js, Convex, and the Trigger.dev worker operate correctly on your machine, create a Localtonet HTTP tunnel for the detected Next.js endpoint and use the assigned public HTTPS address for controlled remote access.
Get Started Free →

